
eSIM
This tutorial shows how to use eSIM for the test with Amarisoft Callbox. The concept of eSIM has been there long time, but we start seeing the wide scale adoption of it relatively recently. With this wide employment of the technology, Amarisoft evaluated the technology and proved working.
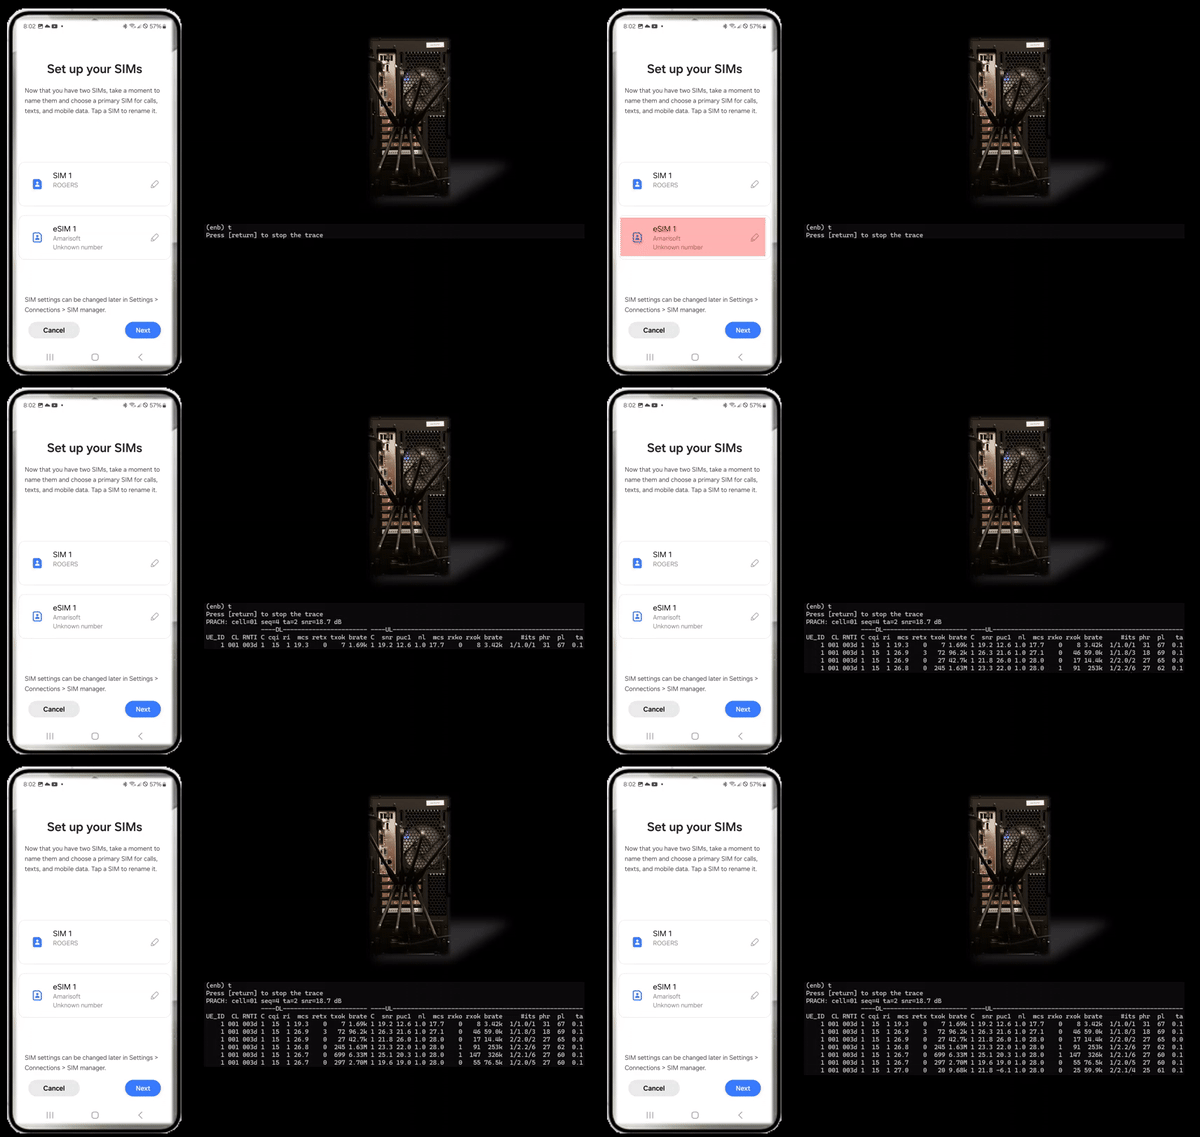
Table of Contents
Introduction
Embedded SIM (eSIM) technology represents a significant evolution in mobile device connectivity, providing a programmable, rewritable alternative to traditional removable SIM cards. eSIMs are hardware components soldered directly onto a device's motherboard, allowing users to download and manage multiple carrier profiles over-the-air without the need for physical card swaps. This advancement facilitates seamless carrier switching, improved device design, and enhanced security, making eSIM an essential component for Internet of Things (IoT) devices, smartphones, wearables, and industrial applications. In the broader telecommunications ecosystem, eSIM adoption streamlines subscriber management, reduces logistical overhead, and enables new business models for network operators and device manufacturers. The Amarisoft Callbox, a comprehensive LTE/5G test platform, enables engineers and researchers to test, evaluate, and validate eSIM workflows in controlled environments. Although eSIM functionality is managed entirely on the User Equipment (UE) at the application level and does not directly interact with 3GPP authentication algorithms or core network processes, understanding how to utilize eSIMs in conjunction with the Amarisoft Callbox is crucial for validating device compliance and ensuring robust interoperability in modern networks.
-
Context of eSIM and Amarisoft Callbox
- eSIM technology provides a digital, embedded alternative to traditional SIM cards, enabling remote provisioning and management of mobile network profiles.
- Amarisoft Callbox is an advanced test platform for LTE and 5G networks, widely used for device validation, protocol analysis, and interoperability testing.
- With the proliferation of eSIM-capable devices, integrating and testing eSIM workflows is increasingly important in network development and device certification processes.
-
Relevance and Importance of This Tutorial
- Demonstrates practical steps to leverage eSIM technology for testing using the Amarisoft Callbox environment.
- Clarifies key distinctions: eSIM is managed on the device (UE) at the application layer and does not require modifications or special handling on the Amarisoft side or within 3GPP authentication workflows.
- Empowers engineers, researchers, and testers to efficiently evaluate eSIM-enabled devices and ensure seamless network integration.
-
What Learners Will Gain
- Understanding of eSIM architecture, provisioning mechanisms, and workflow integration with Amarisoft Callbox.
- Step-by-step guidance for configuring and conducting eSIM-based tests in a controlled lab environment.
- Insight into best practices for troubleshooting and validating eSIM functionality on the UE side.
- Awareness of available resources, application notes, and avenues for acquiring test eSIMs.
-
Prerequisite Knowledge and Skills
- Familiarity with LTE/5G network concepts and architecture.
- Basic understanding of SIM and eSIM technologies, including provisioning and profile management.
- Experience with Amarisoft Callbox or similar cellular test platforms is beneficial.
- General competence in device configuration and network testing procedures.
Summary of the Tutorial
This tutorial details the procedures for performing out-of-the-box eSIM testing on a UE (User Equipment) using Amarisoft Callbox, focusing on both LTE and NR/NSA connectivity. The test process involves the following key steps:
-
Test Setup:
- Use a single cell LTE and single cell NR/NSA configuration as provided by the default installation packages (enb.default.cfg for LTE, gnb-nsa.cfg for NR/NSA).
- eSIM used is the one delivered with the system, without modifications.
- No specific requirements for callbox configuration, except ensuring correct USIM parameter settings for the eSIM profile.
-
eSIM Configuration and Installation:
- Ensure the UE supports eSIM functionality (example device: Samsung Galaxy 24).
- Install the eSIM profile on the UE by navigating to ‘Settings’ > ‘Connection’ > ‘SIM manager’ > ‘Add eSIM’.
- Use the QR code method for eSIM installation (as supported by the test device).
- Select the primary SIM after installation and manage SIM activation as required.
-
APN Setting:
- Configure APN(s) for IP traffic functionality. At minimum, set up the ‘default’ APN; recommended to add 'default', 'internet', and 'ims' for comprehensive IP testing.
-
LTE Test Procedure:
- Use the enb.default.cfg file for basic LTE cell configuration (example: LTE Band 7, 5MHz bandwidth, PLMN 00101).
- Power on the UE with the installed eSIM and confirm successful initial attach and data traffic using the provided logs.
-
NR/NSA Test Procedure:
- Use the gnb-nsa.cfg file for NR/NSA testing (example: LTE band 1, 20MHz; NR n78, 40MHz bandwidth; PLMN 00101).
- Power on the UE with the installed eSIM and confirm initial attach and data traffic for NR/NSA mode.
- Note: In this specific test, NR/SA was not supported by the test device with a test SIM.
-
IP Traffic Test:
- Verify IP traffic capability (e.g., browsing, YouTube, iperf) after APN configuration to ensure data services are operational over eSIM.
-
Log Collection:
- Logs are collected for both LTE and NR/NSA attach procedures to demonstrate successful test execution. Detailed log analysis is outside the scope of this tutorial.
The overall methodology emphasizes using default configurations for both the callbox and eSIM, with primary attention to eSIM profile installation and minimal APN setup to validate network registration and data connectivity for LTE and NR/NSA modes.
Test Setup
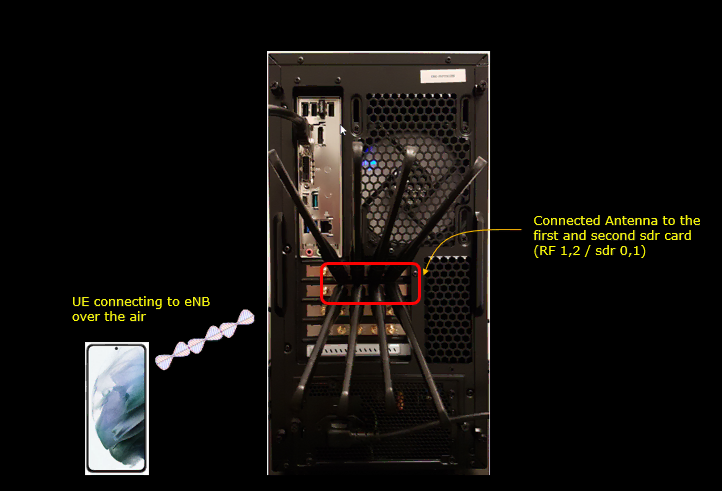
Test setup for this tutorial is as shown below. Since eSIM is just a UE side feature, it doesn't matter much with what type of test setup to be used. In this tutorial, I used the setup shown here because I wanted to test at least about single cell LTE and single cell NR/NSA.
- Since this test is for Out of the box testing, I used the default nsa configuration(gnb-nsa.cfg) file without changing anything in it
- SIM Card used in this tutorial is the one delivered with the system as it is.
- If you want to change the configuration, The tutorial Configuration Guide would help
Configuration
In this application, you don't need to care much about callbox configuration. You can use whatever configuration that you want to use. The only point you need to pay attention to is about SIM parameter setting because eSIM by definition is all about SIM parameter. Most part of the configuration you need to care about is how to install an eSIM profile on your UE(phone).
Callbox
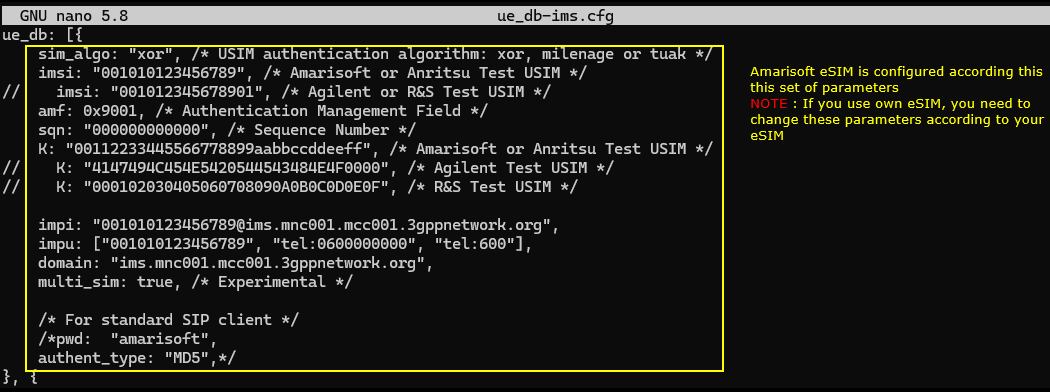
As mentioned above, the only configuration that you need to consider in relation to eSIM is the USIM parameters. The USIM parameter is configured in Callbox by default is ue_db-ims.cfg which are located in /root/mme/config directory.
Filtering the listing with *db* narrows that directory to two entries, lte_ue_ims.db and the 3718 byte ue_db-ims.cfg, and it is the .cfg that carries the parameters and that the next step opens.

If you use Amarisoft eSIM, you don't have to change anything because it is configured to match Amarisoft default configuration. If you are using an eSIM from other sources, you need to know all the SIM parameters and configure those parameters in ue_db configuration file.
The parameters that decide whether authentication succeeds sit at the top of the ue_db entry. sim_algo is "xor", imsi is "001010123456789", amf is 0x9001, sqn is "000000000000" and K is "00112233445566778899aabbccddeeff". Those are the values the Amarisoft eSIM was built against. With an eSIM from anywhere else every one of them has to be replaced with what that eSIM actually holds, and a single wrong digit leaves the UE stuck at authentication.
The commented lines under imsi and under K are alternative test USIM sets, one for the Agilent test USIM and one for the R&S test USIM, kept in the file so that swapping is a matter of moving the comment markers rather than retyping. sim_algo accepts xor, milenage or tuak, and test USIM cards use XOR, which is also why the sqn value here does not really matter, it only comes into play with milenage or tuak.
Below the authentication block come the IMS identities, impi "001010123456789@ims.mnc001.mcc001.3gppnetwork.org", impu holding the same IMSI plus tel:0600000000 and tel:600, and a matching domain. multi_sim is set to true, which lets more than one UE register with the same IMSI and tells them apart by IMEI, and it is only allowed with the XOR algorithm.
UE(Mobile phone)
Installation of eSIM on UE(mobile phone) would vary depending on each specific UE model and some phone (mostly old model) would not support eSIM at all. So the first thing you need to check is to figure out whether your UE support eSIM or not.
eSIM Setting
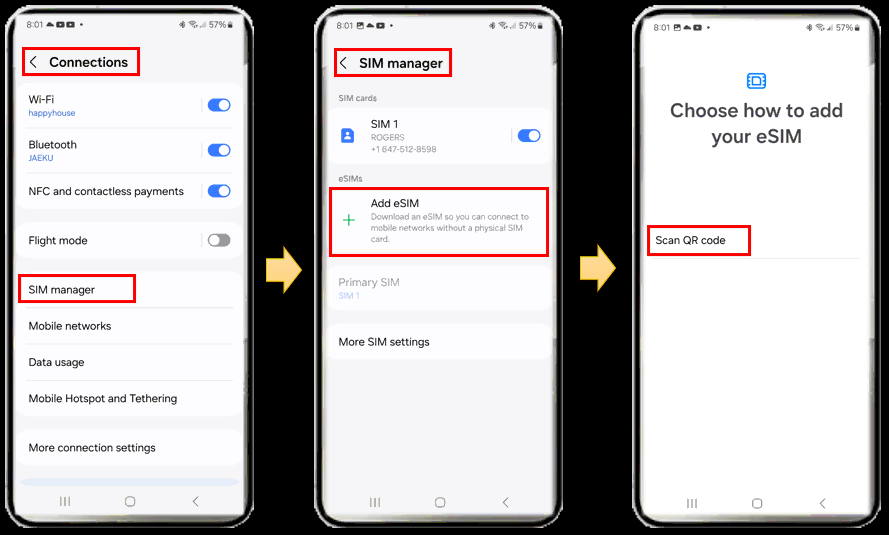
First go to 'Settings' tool and get to 'Connection'. And then select 'SIM manager' and hit 'Add eSIM'. There can be multiple ways of adding eSIM (e.g, QR code, LPA string etc), but SamSung g24 support QR code only. So just hit 'Scan QR code'.
The SIM manager page keeps physical cards and eSIMs in separate groups. The card already in the phone stays listed under SIM cards, on its own carrier and number, and the eSIM is added in the group beneath it, so nothing about this procedure removes or disables the SIM you already have. Primary SIM at the bottom of that page reads SIM 1 at this point, which is what changes later.
On this handset the 'Choose how to add your eSIM' page offers Scan QR code and nothing else. Other phones list an LPA string or a carrier app alongside it, so if what you were given is a text string rather than a code, check this page before assuming you can use it.
If you purchase an eSIM, the eSIM will be delivered in the form of a document with a QR code. Scan the QR code in Camera App and add it to your phone.
The code is read with the ordinary Camera app in PHOTO mode rather than a dedicated scanner, and it only has to sit inside the frame. What comes back names the profile, 'Add Amarisoft eSIM?' with a line about connecting to the Amarisoft network, and getting that page at all is the sign the code was read properly. The wording follows whatever the provider put into the profile, so a different eSIM will name a different network here.
Tapping Add starts the download, which runs for a few minutes and sat at 40 per cent partway through in this run. Wi-Fi is on for the whole of it.
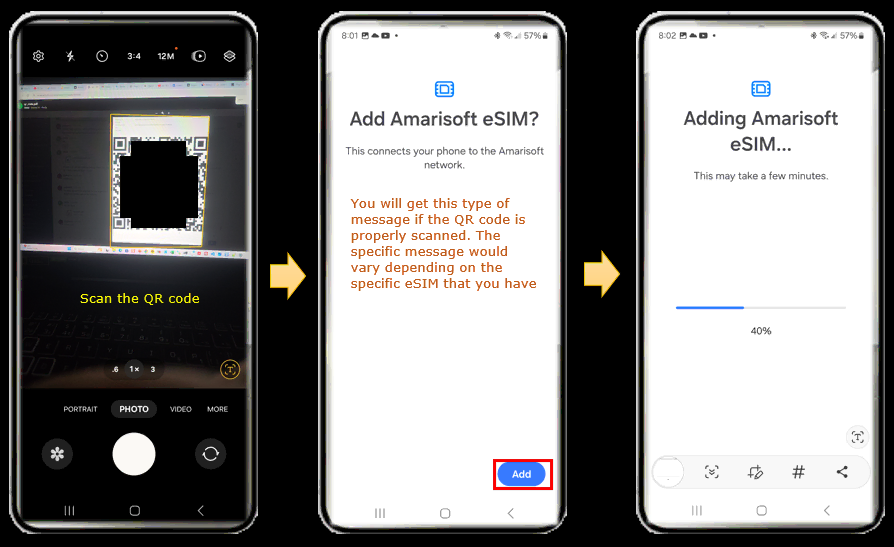
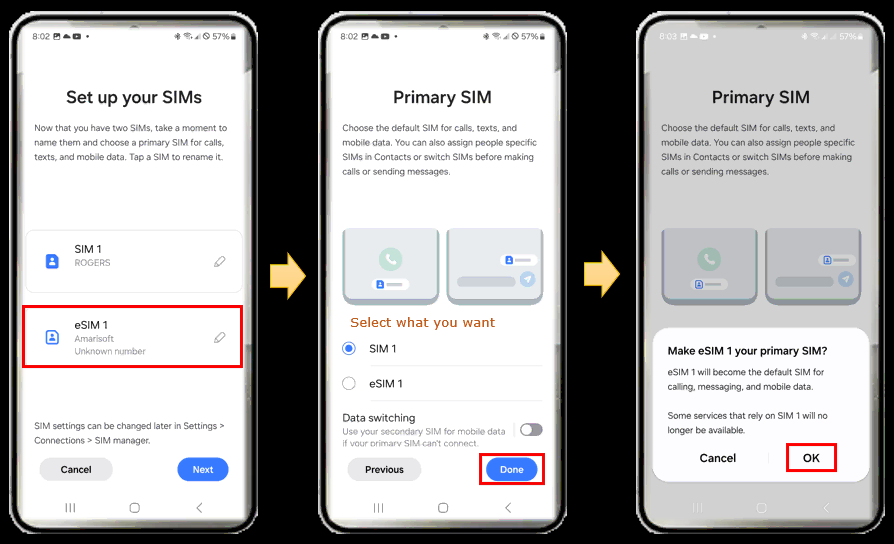
Once the installation is done, select which SIM is used as Primary SIM
The new profile turns up as eSIM 1 named Amarisoft with Unknown number underneath it. That is normal for a test profile, there is no number provisioned against it, and it does not stop the profile working. The physical card stays above it as SIM 1 on its own carrier.
The Primary SIM page is where you choose which of the two carries calls, texts and mobile data, and moving it to eSIM 1 brings up a confirmation warning that some services relying on SIM 1 will no longer be available. On a daily handset that is worth reading rather than dismissing. None of it is final either, the same choice is reachable afterwards under Settings, Connections, SIM manager.
Data switching is left off on that page. Its own description says it uses the secondary SIM for mobile data when the primary cannot connect, which during a test would quietly move the phone onto the other SIM the moment the callbox cell drops, so off is the setting you want here.
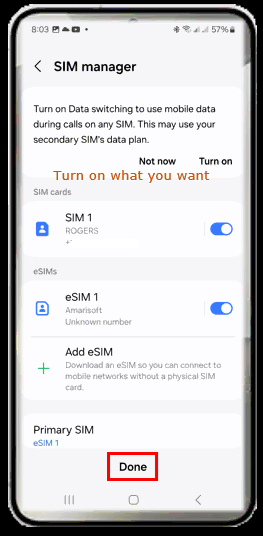
Then you can turn ON or OFF the SIM you want. You can turn on all SIMs or turn off all of them or turn on only specific SIM that you want.
In this run both are on, SIM 1 and eSIM 1 together, and Primary SIM at the bottom of the page now reads eSIM 1 where it read SIM 1 before the profile was added. Leaving the physical card enabled next to the test profile does no harm and keeps the handset usable outside the lab.
The banner across the top offering to turn on Data switching is the same setting that was left off during setup, so answer Not now unless you actually want the phone reaching for the other SIM's data. Done at the bottom is what closes the page out.
APN Setting
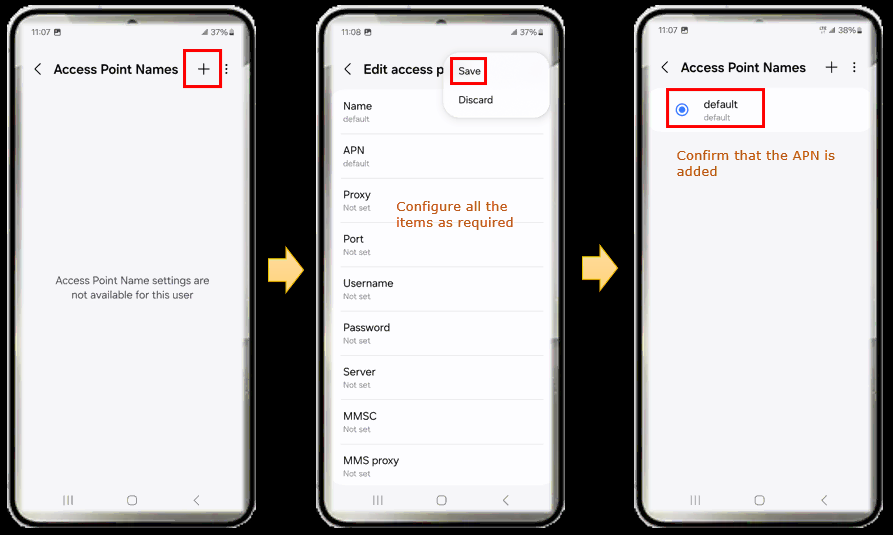
APN setting is not directly associated with eSIM configuration, but proper APN setting would be required to make the UE work with IP traffic (e.g, browsing, YouTube etc). I added 'default' APN to make the Amarisoft eSIM for IP traffic as a minimum setting. But it would be good to have three basic APNs (default, internet,ims) to cover most of the IP related test.
The Access Point Names list starts out empty on this profile, so the entry has to be created with the plus button at the top right. Name and APN are both set to default here, and Proxy, Port, Username, Password, Server, MMSC and MMS proxy are all left unset.
Saving is done from the menu at the top right of the edit page rather than from a button at the bottom, which is easy to walk past, and the entry then has to be selected in the list so that the radio button beside it is filled in. If the list still reads empty after you back out, the APN never got committed.
Perform the test
As I keep saying, eSIM is just about USIM and it get involved only in authentication processes. So you can test it with any test that perform initial registration procedure. In this tutorial, I tested with one basic LTE and one basic NR/NSA.
LTE
For LTE, I just tested with the most basic configuration provided by installation package, which is enb.default.cfg (
The cell configuration is as shown below (LTE Band 7 and 5Mhz channel bandwidth, PLMN 00101)
The rest of the line fills in what that leaves out. Cell 0x001 sits on DL ARFCN 3350 with UL ARFCN 21350, ANT 1 and NL 1 in both directions so this is SISO, SCS 15, and QAM 256 on the downlink against QAM 64 on the uplink, with POW reading -30. The SSB columns are empty because this is LTE.
The cell command underneath adds TAC 0x0001, pci 1, prach_seq 204, dl_gain 0.0 and ul_dis N, under eNB_ID 0x1a2d0. The PLMN on both lines is 00101, which is the same 00101 that starts the imsi in ue_db-ims.cfg, and that pairing is what lets the phone select this cell in the first place.

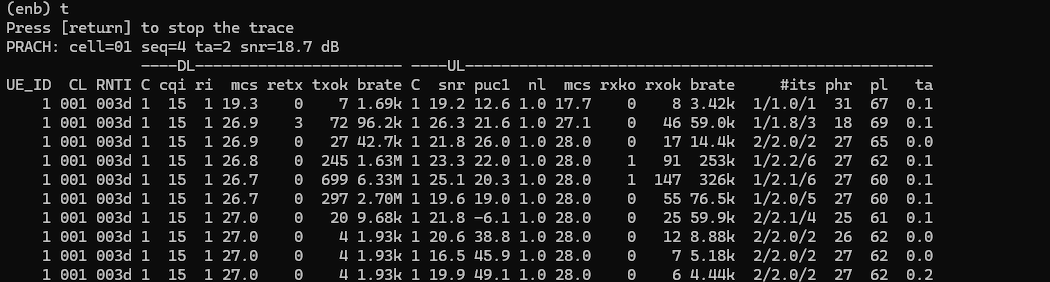
Then I turned on Radio with eSIM that I installed and confirmed the initial attach and data traffic as shown below.
The attach shows up as PRACH: cell=01 seq=4 ta=2 snr=18.7 dB, and the periodic line runs on from there with UE_ID 1 on RNTI 003d. cqi holds at 15 with ri 1, a single layer on this SISO cell, and DL mcs climbs from 19.3 to around 27.0.
DL brate reaches about 6.33M and 2.70M during the busy stretches and falls back to 1.93k when nothing is running, while UL brate stays in the hundreds of kbps. UL snr sits between 16 and 26 dB, phr between 25 and 31 and ta between 0.0 and 0.2, so the phone is close in and not power limited.
NR/NSA
For NR, I used the most basic NR/NSA test configuration that comes with installation package. It is gnb-nsa.cfg (
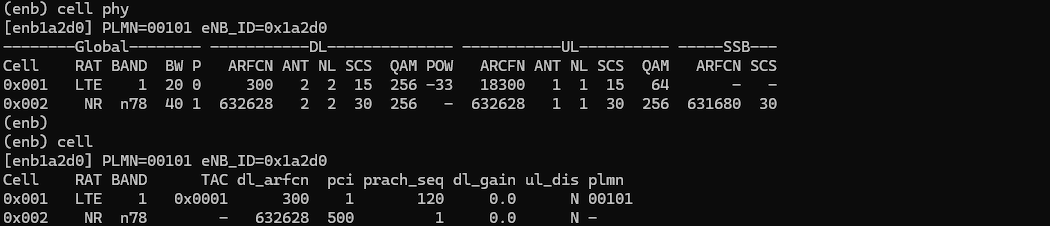
Cell configuration is as shown below (LTE band 1, 20Mhz Bandwidth and PLMN 00101, NR n78 and 40Mhz Bandwidth).
Two cells come up here rather than one. Cell 0x001 is the LTE anchor on DL ARFCN 300 and UL ARFCN 18300 with ANT 2 and NL 2, so 2x2 on the downlink, SCS 15, and QAM 256 down against QAM 64 up at POW -33. Cell 0x002 is the NR cell with DL and UL both on ARFCN 632628, ANT 2 and NL 2, SCS 30 and QAM 256 in both directions, and its SSB on ARFCN 631680 at SCS 30.
On the cell command the LTE cell carries TAC 0x0001, pci 1, prach_seq 120 and plmn 00101, while the NR cell shows pci 500, prach_seq 1 and a dash for both TAC and plmn, since in this NSA setup it is added onto the LTE anchor rather than selected on its own. The PLMN the eSIM has to match is therefore the one on cell 0x001.
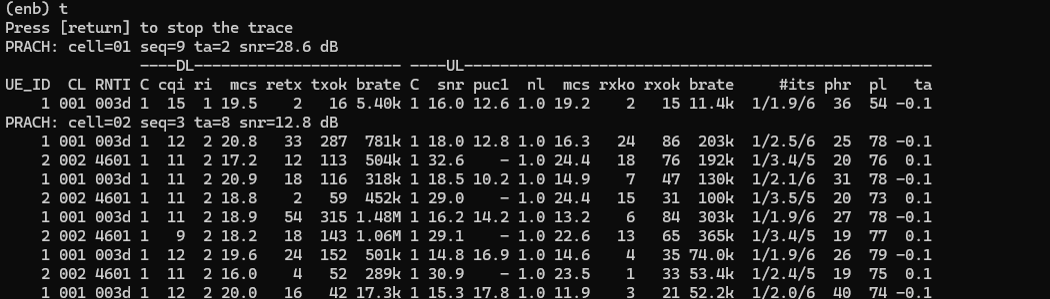
Then I turned on Radio with eSIM that I installed and confirmed the initial attach and data traffic as shown below.
There are two PRACH lines in this run rather than one. The first reads cell=01 seq=9 ta=2 snr=28.6 dB, which is the LTE anchor, and the second reads cell=02 seq=3 ta=8 snr=12.8 dB a few lines later, which is the NR leg being added afterwards. Seeing that second line is how you know the NR side actually came up instead of the phone settling on LTE alone.
From there the periodic lines alternate between UE_ID 1 on CL 001 with RNTI 003d and UE_ID 2 on CL 002 with RNTI 4601, the same phone counted once per leg. ri is 2 on both, DL brate reaches about 1.48M on the LTE side and 1.06M on the NR side, and ta runs -0.1 on cell 001 against 0.1 on cell 002.
IP Traffic
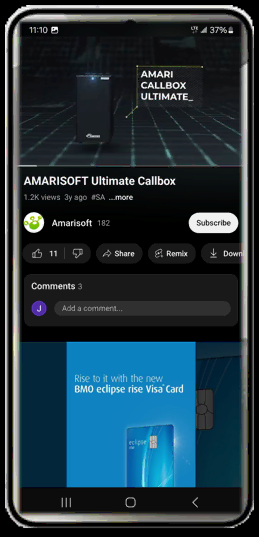
This is not strictly associated with eSIM feature, it is more about APN setting. Try IP traffic (e.g, Browsing/ YouTube or iperf etc). In this tutorial, I tried YouTube (
Streaming is a better check than loading a page, because it keeps the downlink busy for as long as you leave it running instead of finishing in a second. The clip playing here is Amarisoft's own Ultimate Callbox video, and the thumbnails, the comment count and the advert below it all come in alongside the video, so the bearer is carrying more than one flow at once.
Log Analysis
Detailed Log analysis is not the purpose of this tutorial because the log itself is very basic and the analysis was done in other tutorial. I am just providing the log that I collected from the eSIM test just as a proof that eSIM worked as expected.
LTE
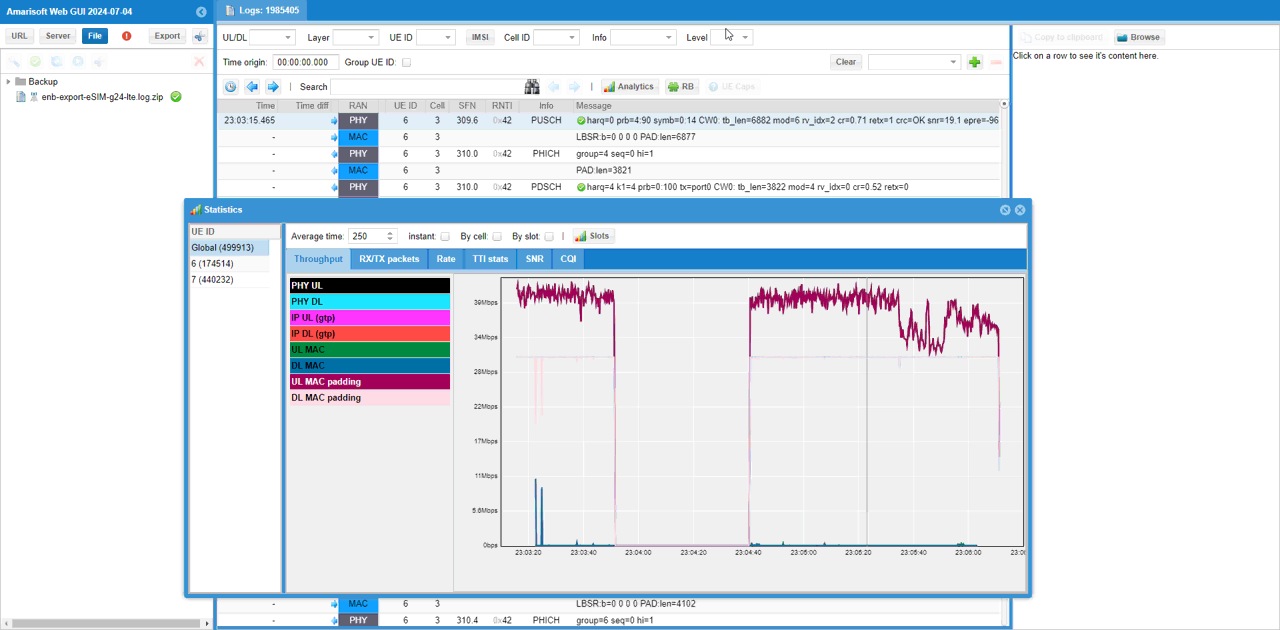
A LTE test log is shared as below. For the analysis, refer to this.
The log loads as enb-export-eSIM-g24-lte.log.zip with a little under two million entries, and the Statistics window over the top of it comes from the Analytics button on the toolbar. It is on the Throughput tab with Average time set to 250.
The list down the left of that window is Global plus one entry per UE seen during the session, so clicking one narrows the plot to that UE alone. The legend separates PHY, IP over GTP, MAC and MAC padding for each direction, which is what lets you tell payload apart from padding when you do come to read one of these properly.
NR/NSA
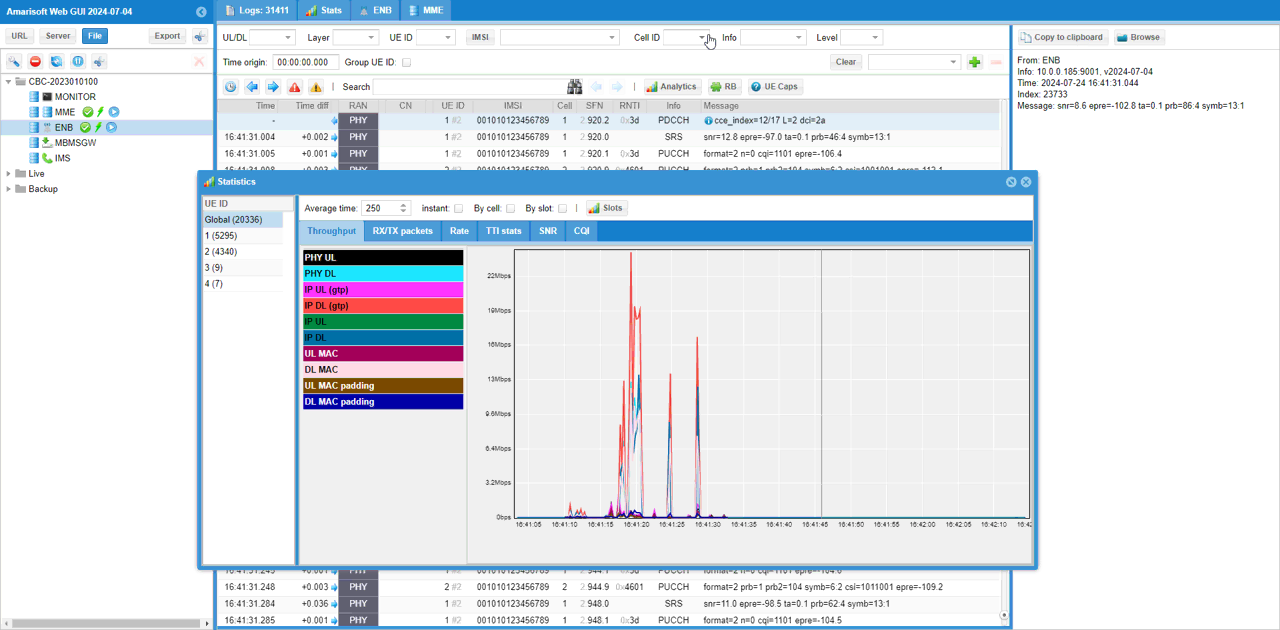
A NR test log is shared as below. For the analysis, refer to this.
The IMSI column is filled in on every row here and reads 001010123456789, the same value that sits in ue_db-ims.cfg. That is the one place in these logs where the eSIM is directly visible, since it is the identity the profile presented and the callbox accepted.
The Cell column carries 1 and 2 on alternating rows with RNTI 0x3d against 0x4601, the two legs of the same phone. The tree on the left holds MONITOR, MME, ENB, MBMSGW and IMS under the callbox, and this log came from ENB at 10.0.0.185:9001 on software v2024-07-04, recorded 2024-07-24. The Statistics window is again on Throughput with Average time 250, and its UE list shows Global with four UEs beneath it, two of which carry almost all of the entries.
FAQ
Q1 : How many different eSIM profile we can purchase from Amarisoft ?
A1 : As of now, Amarisoft sells only one eSIM profile as described here. Currently we don't have any immediate plan to extend this.
Q2 : When we(the end user) wants to change eSIM profile that we purchased, does need to provide new QR code (automatic profile update not possible) ?
A2 : Since Amarisoft seels only one eSIM profile, the exact method for profile change is not investigated yet (Just issuing new QR code would be the simplest way, but automatic update may be possible as well depending on the technical support of eSIM provider)
Q3 : Does Amarisoft run the eSIM server (SM-DP + Server) ?
Q3 : No, the server is not Amarisoft product (i.e, Amarisoft is not running the server), Amarisoft partners with a third party service provider for the server and Amarisoft just provide one specific eSIM profile that is provided by the provider.