Out of the Box Test - UEsim LTE
The purpose of this tutorial is to show you how to do basic LTE connectivity test between a UEsim and Amari Callbox and show you basic operation of Amari UEsim. It is assumed that you don't have any previous experience with Amari callbox. Basically this is same as the tutorial LTE Attach. The only difference is that I uses UE Sim instead of a commercial UE.
UEsim stands for UE simulator and it is the product that can function as UE (User Equipment). It can simulates one or more UEs with a single box (single PC). It can simulator maximum over 1000 UEs in a single box. It supports full radio protocol stack from PHY to RRC/NAS and IP of UE, so that you can test eNB / gNB in full protocol stack from PHY to IP throughput.
UE sim support USIM parameters in purely software way meaning that you don't need any USIM card and you can configure USIM parameters for each and every UEs just by setting USIM parameters in configuration file. Regarding Authentication Algorithm, it support both 3GPP XOR algorithm and Milenage algorithm.
In terms of frequency and bands, Amarisoft UE sim support all the frequencies and bands defined in 3gpp. In terms of MIMO, it can support upto 4x4 MIMO. (
Test Procedure Summary
Step 1 : specify ue.default.cfg as ue configuration (i.e, run 'ln -sf ue.default.cfg ue.cfg' in /root/ue/config). If you want to change the configuration of ue.default.cfg, I would suggest to copy ue.default.cfg to a new file and specify the copied file as ue configuration)
Step 2 : Set TDD/FDD (TDD). number of DL Antenna(N_ANTENNA_DL), and Bandwidth(CELL_BANDWIDTH) as you want
Step 3 : If you want to change the LTE band and frequency, specify dl_earfcn as you want.
Step 4 : Run the test (i.e, run 'service lte restart')
Step 5 : Run Screen (i.e, run 'screen -r')
Step 6 : Power on UE (i.e, power_on) and Verify the result with 't' command and the captured Log. .
Table of Contents
- Out of the Box Test - UEsim LTE
Test Setup
Test setup for this tutorial is as shown below. In this setup, I used Amarisoft Callbox as the network for the UEsim to get connected. But for most UEsim users live network or their own test eNB/gNB would be used for the network.
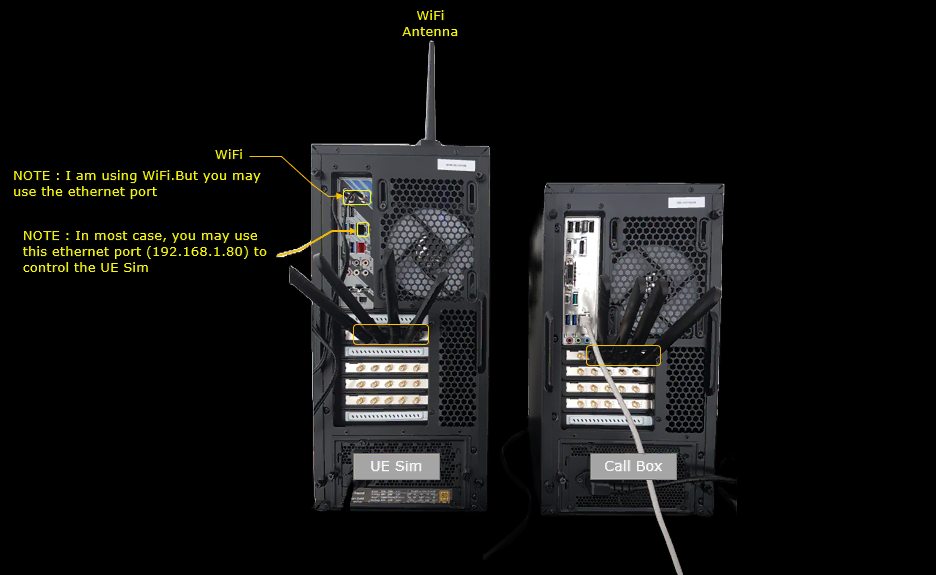
Key Configuration Parameters
Followings are important configuration parameters for this tutorial. You may click on the items for the descriptions from Amarisoft documents.
- cell_groups
- multi_ue
- cells
- band
- dl_arfcn
- bandwidth
- n_antenna_dl
- n_antenna_ul
- ue_list : In this link, you will get the descriptions for all the items listed below
- sim_algo
- imsi
- opc
- amf
- sqn
- K
- as_release
- ue_category
- tun_setup_script
Configuration
An important thing in using UE sim is to do proper matching between UE sim configuration and Call box configuration In this tutorial, I used the ue.default.cfg and and enb.default.cfg without any change
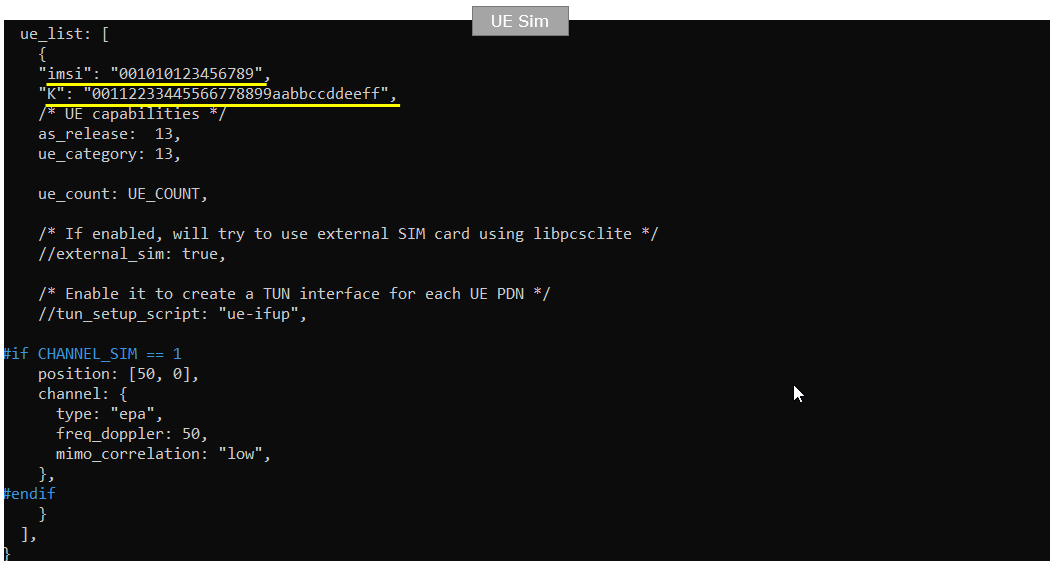
If you use other Network (e.g, other network simulator or real network), you have to make it sure to configure UE sim according to the settings on network side. ue.default.cfg is used as ue configuration (ue.cfg).

On eNB side, enb.default.cfg is used as eNB configuration (enb.cfg).

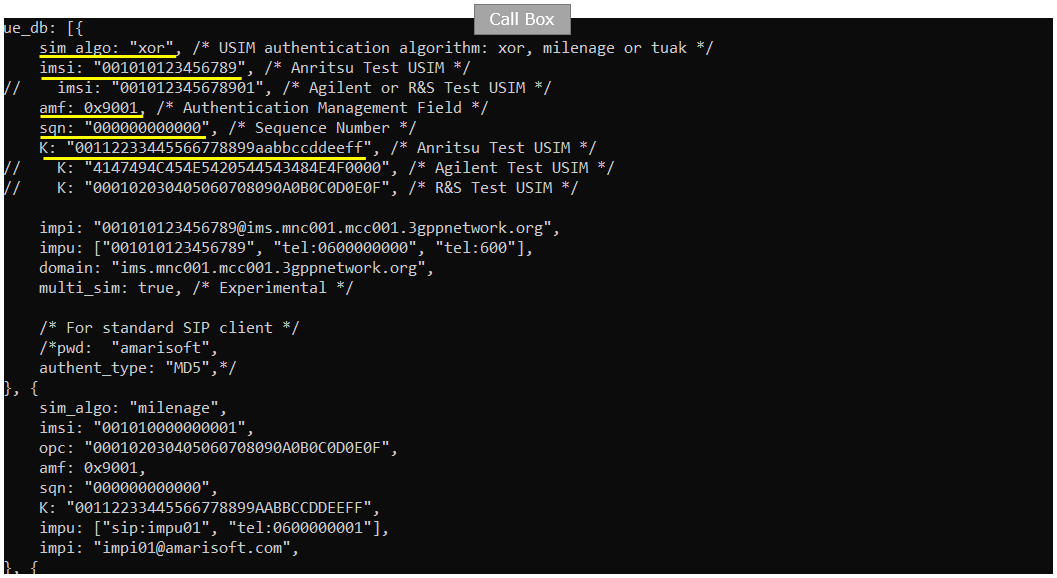
On eNB core network side, mme-ims.cfg is used for core network configuration (mme.cfg) and ims.default.cfg is used for ims configuration (ims.cfg). ue_db-ims.cfg is the file that carries UE database (subscriber information) on network side. This file is usually included within mme.cfg
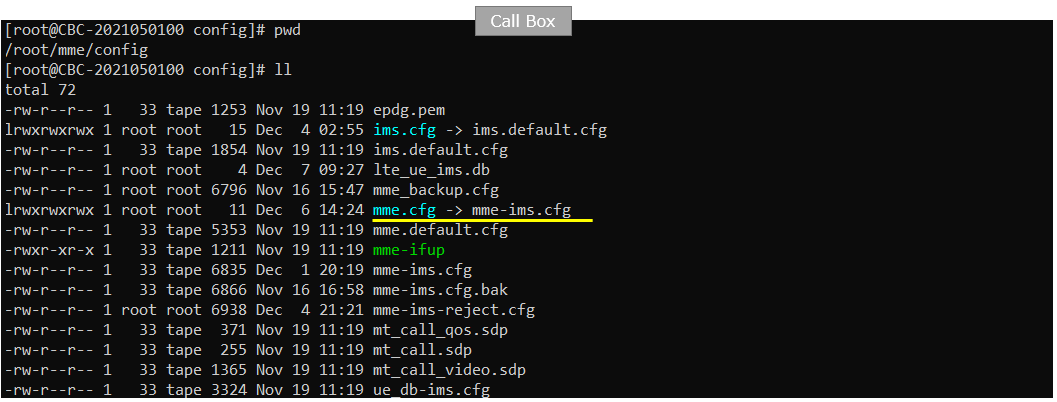
You would see following in /root/mme/config/ims-ims.cfg file on Callbox

In this tutorial, following SIM information will be used. Make it sure to configure the same parameters on UE side as well. (NOTE : this is the contents of ue_db-ims.cfg)
Make it sure that imsi and K value in this file matches the value on enb side shown in previous slide (NOTE : this is the contents of ue.default.cfg)
Following is the configuration on Callbox (enb.default.cfg). In this tutorial, Duplex type of LTE is set to FDD (i.e, TDD 0) and the channel bandwidth ise set to 5 Mhz(i.e, N_RB_DL 25). And antenna configuration is set to be SISO(N_ANTENNA_DL 1).

Following is the configuration on UEsim (ue.default.cfg). Same as eNB, Duplex type of LTE on UEsim is set to FDD (i.e, TDD 0) and the channel bandwidth ise set to 5 Mhz(i.e, CELL_BANDWIDTH 5). And antenna configuration is set to be SISO(N_ANTENNA_DL 1).

Check if LTE service is Running
Whatever you want to test, the first thing you need to do is that call box program (LTE Service) is running. You can check on the execution status of the call box program by running following command and you should get the result as shown below
# service lte status
Make it sure that Active is indicated as acitive (running) on UEsim when you run "service lte status". If you don't get this status, try 'service lte restart' and then check the status again.

Same as in UEsim, make it sure that Active is indicated as acitive (running) on UEsim when you run "service lte status". If you don't get this status, try 'service lte restart' and then check the status again.

# service lte restart
Getting into Screen Mode
If it is confirmed that the lte service is running, go to screen mode by running 'screen -r' and follow through the steps as shown below. The steps shown here is the procedure that you would use for almost every test and it is highly recommended to get familiar with these steps. For further commands you can use in this screen mode, refer to the tutorial : Command Line Command
Run the command "screen -r" on UE sim

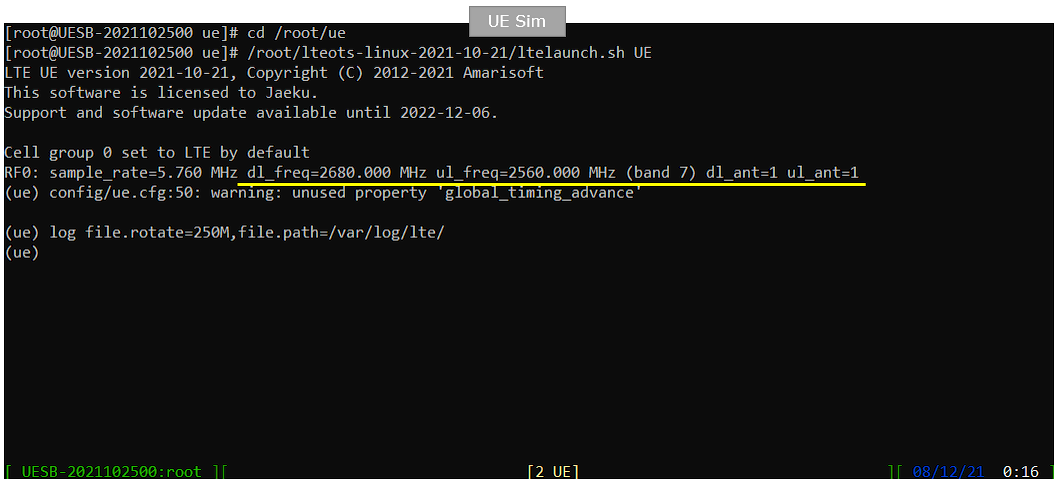
You will get the screen as shown below. there are some important information provided without running any specific command. It provides RF information showing the sample_rate, dl_freq, ul_freq, band, dl_ant, ul_ant that gives you very fundamental RF information. Check out the details of these info and see if the RF is configured as you intended.
Run the command "screen -r" on Callbox

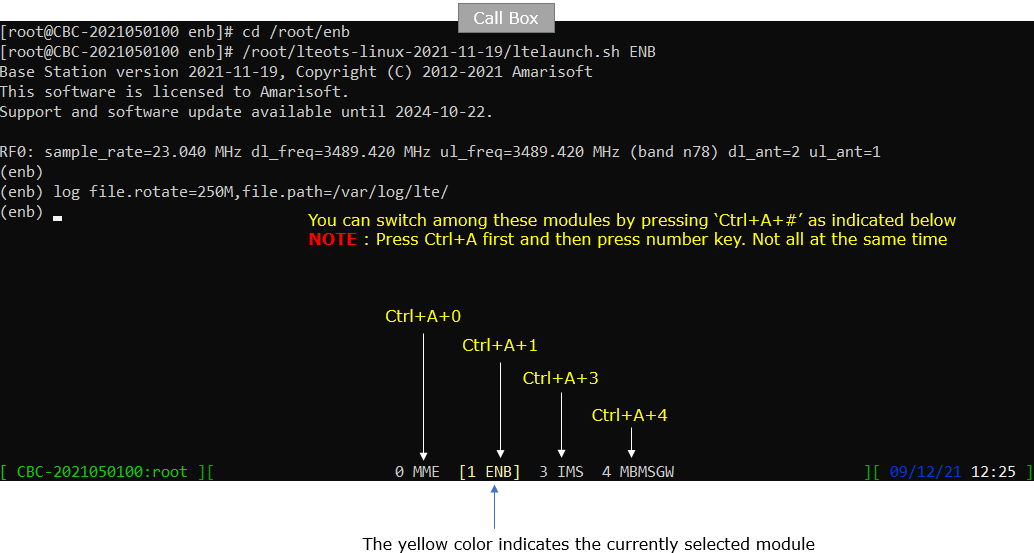
You will get the screen as shown below. This screen shows all the network components installed in the callbox. In this tutorial, it indicates MME, ENB, IMS, MBMSGW are installed in the callbox.
You would see a number before each component name. With Ctrl+A and the number before the component name, you can switch to command line window for the specific component. For example, if you press Ctrl+A+1, the command line window switches to ENB and if you press Ctrl+A+0, the command line window switches to MME and so on.
Attach UE
Now perform UE attach procedure. This would be a little bit busy process since you need to switch back and forth between Callbox screen and UEsim screen.
Start tracing on Callbox

power_on UE on UE sim.

You will see following message once UE detect the cell and decoded SIBs.

Once UE completed SIB decoding and perform initial attach, you will see following trace on Callbox screen. If you started 't' command before you powe on UE, you will get the traces for PRACH attempt. The presence of PRACH trace can be a good troubleshooting indicator for initial attach problem. If PRACH is properly received and the entire RACH process is completed, it is highly likely that the initial attach gets completed and start getting traffic log. Regarding the details on the meaning of each column of this log and how to use the information for troubleshoot, refer to this tutorial.

When the initial attach completed, you can check on the cell information to which the UE sim is registered to with 'cells' command.

Once UE gets registered to network, you can get the ue information that is in connection with gNB on Callbox with 'ue' command in (enb) screen.

You can get the ue information that is in connection with gNB on Callbox with 'ue' command in (mme) screen.

Log Analysis
In this section, you will see how to confirm if UE registration is complete from trace log. You can use the same method to find any issues (e.g, registration failure) for troubleshooting. When UE registration fails, you may use this tutorial to figure out the point of the failure and troubleshoot
Open /tmp/ue0.log on UEsim using any text editor. I am using nano in this tutorial. (NOTE : In the same way, you can check eNB log by opening /tmp/enb0.log on Callbox, but I will not show the UE log in this tutorial. Refer to the tutorial LTE Attach if you are interested in eNB log).
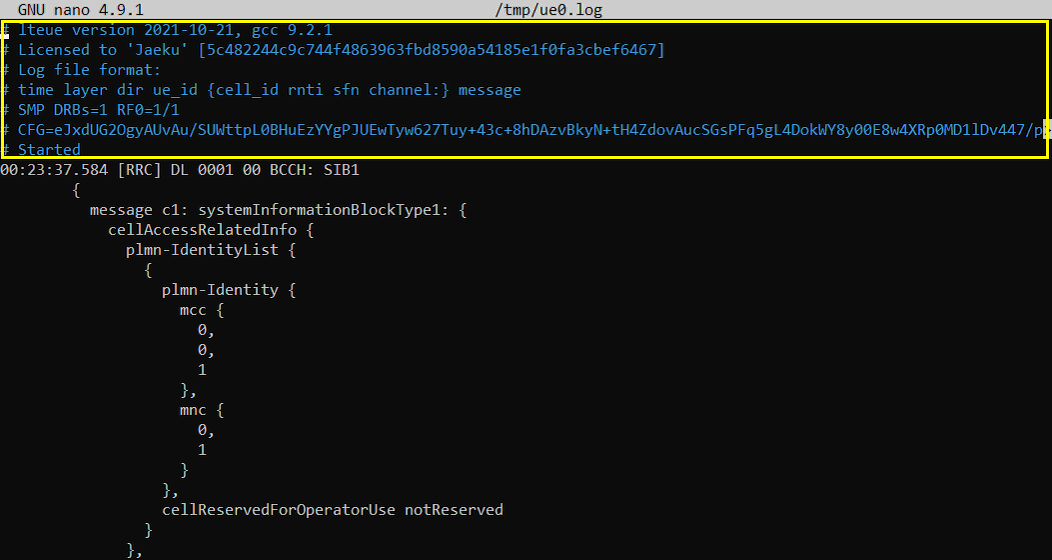
Since this is UE side log, it would be good to check if SIBs are received and decoded properly. In LTE, SIB1 and SIB2 are mandatory to be received otherwise UE would not try attach.
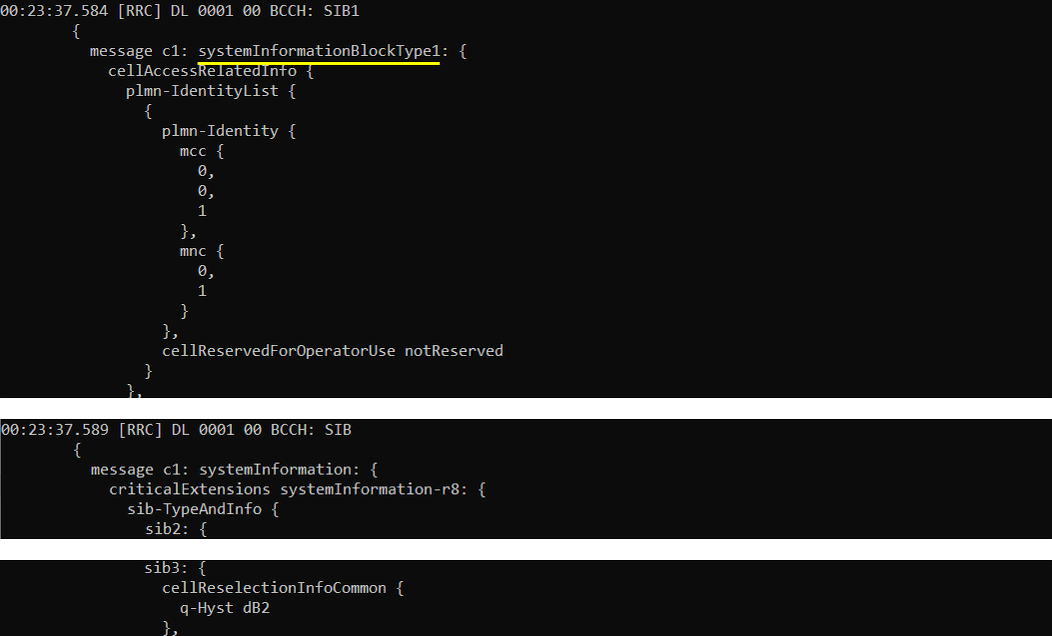
Once SIB is properly received and decoded, UE side attach is started first from NAS layer by triggering EMM:Attach request. If you look into eNB log, this message will be received after RRC setup, but in UE side log you would see this message before RRC process start.
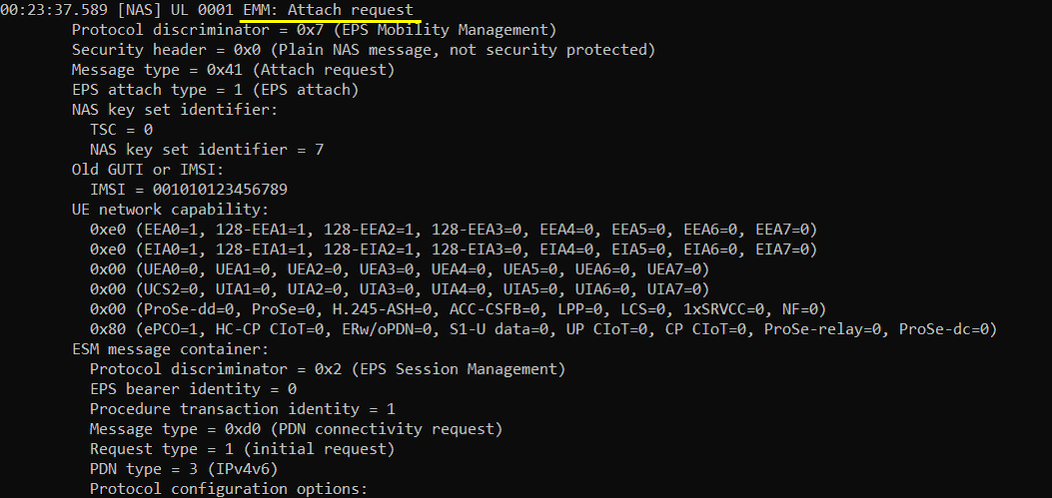
Once triggered by NAS layer, UE triggers RRC Connection Request and network is supposed to send RRC connection setup. Make it sure that UE successfully received RRC Connection Setup.

Next step you need to check is to see whether the UE send RRC Connection Setup Complete or not. If you see this message, it mean that RrcSetup is completed on UE side. If UE fails with RrcSetup, it usually triggers RACH procedure again and send RrcConnectionRequest.

Once RRC Setup Procedure is complete, eNB initiate the Authentication process. If the authentication is confirmed on UE side, UE send Authentication Response message. If you see the Authentication Failure instead of Authentication Response, it usually implies that there is SIM parameter mismatch between USIM and eNB SIM parameter setting. In most case, K value mismatch would be the culprit of the failure. Check ue_db.cfg or ue_db-ims.cfg and make it sure it has authentication parameter that matches DUT's USIM parameter.
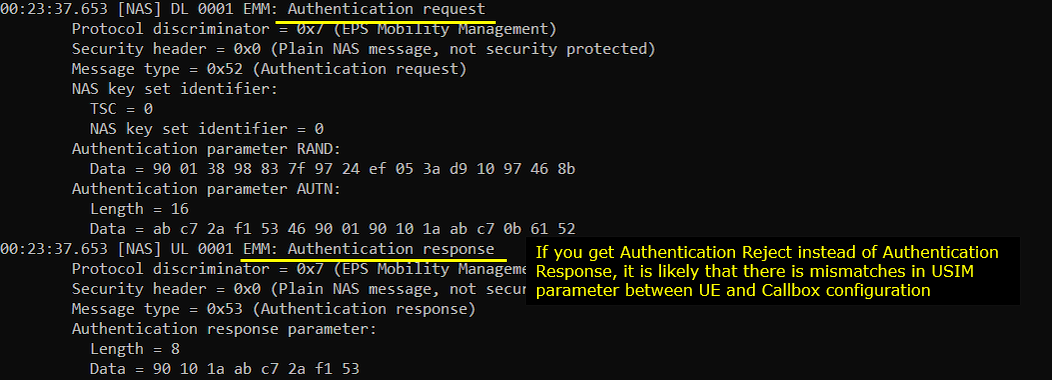
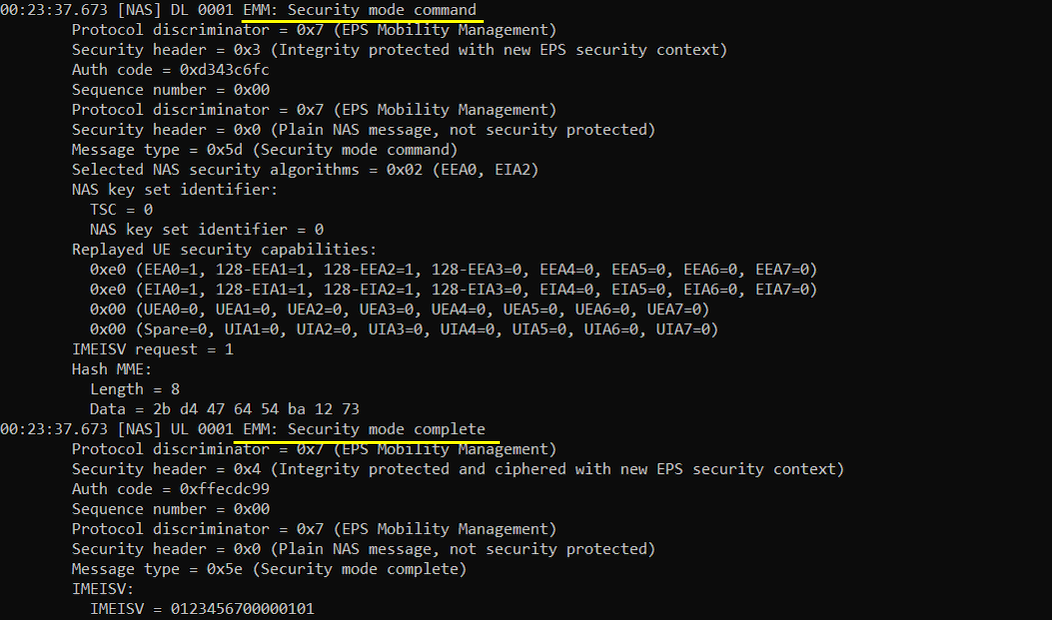
Once Authentication process is complete, eNB/4G Core starts Security checkup. There are two different level of security checkup. The first one is NAS Security and the second one is RRC Security.
If you see EMM:Security mode complete message recieved, it indicates that NAS Security is complete.
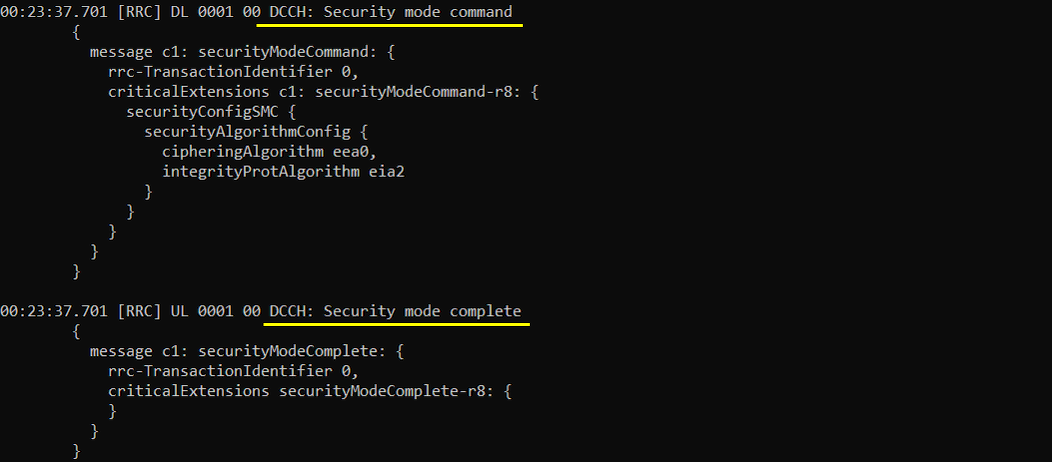
If you see DCCH:Security mode complete message recieved, it indicates that RRC Security is complete.
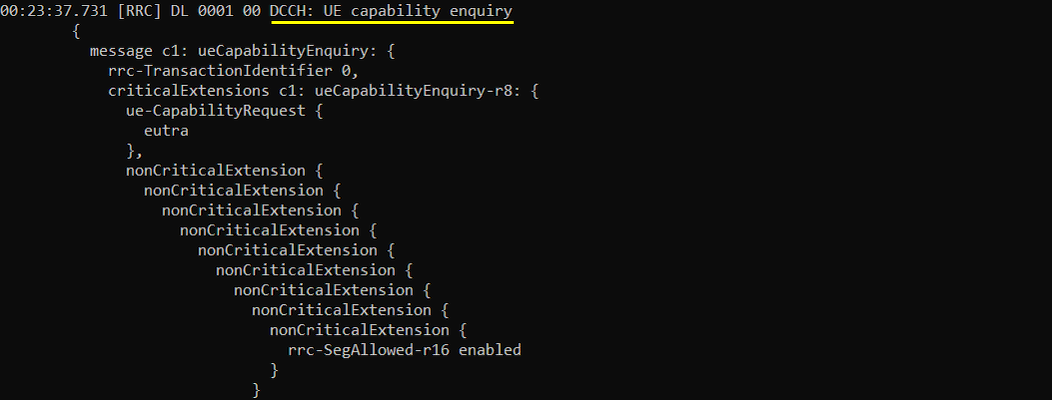
Then Network (eNB) send UE capability enquiry message to check on various features supported by the UE. This is an optional step, but every live network would go through this procedure.
Once UE recieves UE capability information, it is supposed to notify about the featurs it supports via UE capability information message.

Once Authentication and Security checkup is done, eNB initiate RRC Connection Reconfiguration.
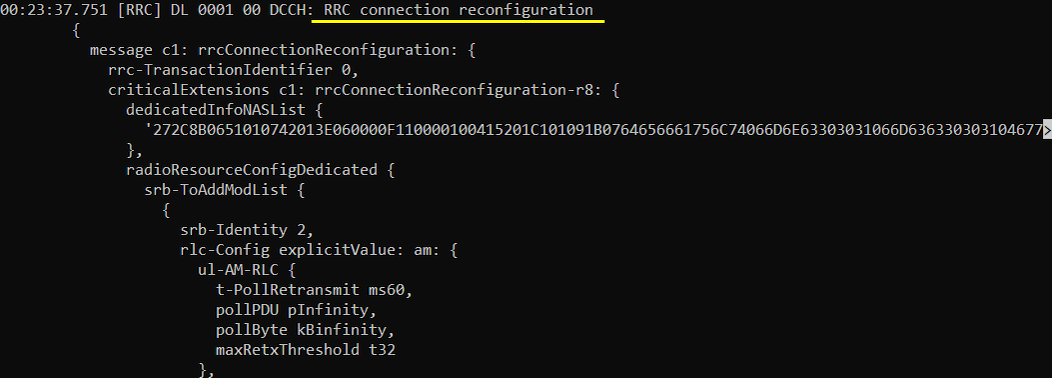
If the Rrc Connection Reconfiguration is properly processed on UE side, UE send RRC Connection Reconfiguration Complete.

RRC / NAS Signaling
: This section is to show you the overall structure of important Rrc messages and Information IE (IE) that are related to this tutorial. It is not intended to describe the details on every RRC/NAS Information elements. With the overall structure and key IEs shown here, it hope it would be easier / clearer to go through the sample log provided in this tutorial or any logs that you captured from your own test setup or live network.
SIB1
: This is the SIB1 message sent by eNB to configure LTE. (
{
message c1: systemInformationBlockType1: {
cellAccessRelatedInfo {
plmn-IdentityList {
{
plmn-Identity {
...
},
cellReservedForOperatorUse notReserved
}
},
trackingAreaCode '0001'H,
cellIdentity '1A2D001'H,
cellBarred notBarred,
intraFreqReselection allowed,
csg-Indication FALSE
},
cellSelectionInfo {
q-RxLevMin -70
},
p-Max 10,
freqBandIndicator 7,
schedulingInfoList {
...
},
si-WindowLength ms40,
systemInfoValueTag 0
}
}
SIB2
: This is the SIB2 message sent by eNB to configure LTE. (
{
message c1: systemInformation: {
criticalExtensions systemInformation-r8: {
sib-TypeAndInfo {
sib2: {
radioResourceConfigCommon {
rach-ConfigCommon {
...
},
bcch-Config {
...
},
pcch-Config {
...
},
prach-Config {
...
},
pdsch-ConfigCommon {
...
},
pusch-ConfigCommon {
...
},
pucch-ConfigCommon {
...
},
soundingRS-UL-ConfigCommon setup: {
...
},
uplinkPowerControlCommon {
...
},
ul-CyclicPrefixLength len1,
pusch-ConfigCommon-v1270 {
...
}
},
ue-TimersAndConstants {
...
},
freqInfo {
...
},
...
},
RrcConnectionSetup
: This is the RrcConnectionSetup message sent by eNB (
{
message c1: rrcConnectionSetup: {
rrc-TransactionIdentifier 0,
criticalExtensions c1: rrcConnectionSetup-r8: {
radioResourceConfigDedicated {
srb-ToAddModList {
...
},
mac-MainConfig explicitValue: {
...
},
physicalConfigDedicated {
pdsch-ConfigDedicated {
...
},
pucch-ConfigDedicated {
...
},
pusch-ConfigDedicated {
...
},
uplinkPowerControlDedicated {
...
},
cqi-ReportConfig {
...
},
soundingRS-UL-ConfigDedicated setup: {
...
},
schedulingRequestConfig setup: {
...
}
AttachRequest
: This is the AttachRequest message sent by UE (
Protocol discriminator = 0x7 (EPS Mobility Management)
Security header = 0x1 (Integrity protected)
Auth code = 0x410496cc
Sequence number = 0x09
Protocol discriminator = 0x7 (EPS Mobility Management)
Security header = 0x0 (Plain NAS message, not security protected)
Message type = 0x41 (Attach request)
EPS attach type = 2 (combined EPS/IMSI attach)
NAS key set identifier:
...
Old GUTI or IMSI:
...
UE network capability:
...
ESM message container:
...
Last visited registered TAI:
...
DRX parameter:
...
MS network capability:
...
Old location area identification:
...
Mobile station classmark 2:
...
Mobile station classmark 3:
...
Supported codecs:
...
Voice domain preference and UE's usage setting = 0x07 (IMS PS voice preferred, CS Voice as secondary, Data centric)
Old GUTI type = 0
MS network feature support = 0x01 (MS supports the extended periodic timer in this domain)
UE additional security capability:
...
AttachAccept
: This is the AttachAccept message sent by Core Network (
Protocol discriminator = 0x7 (EPS Mobility Management)
Security header = 0x2 (Integrity protected and ciphered)
Auth code = 0x6bb083ed
Sequence number = 0x02
Protocol discriminator = 0x7 (EPS Mobility Management)
Security header = 0x0 (Plain NAS message, not security protected)
Message type = 0x42 (Attach accept)
EPS attach result = 2 (combined EPS/IMSI attach)
T3412 value:
...
TAI list:
...
ESM message container:
...
GUTI:
...
Location area identification:
...
MS identity:
...
Emergency number list:
...
EPS network feature support:
...
RrcConnectionReconfiguration
: This is the RrcConnectionReconfiguration message sent by eNB (
{
message c1: rrcConnectionReconfiguration: {
rrc-TransactionIdentifier 0,
criticalExtensions c1: rrcConnectionReconfiguration-r8: {
dedicatedInfoNASList {
',,,
},
radioResourceConfigDedicated {
srb-ToAddModList {
,,,
},
physicalConfigDedicated {
antennaInfo-r10 explicitValue-r10: {
,,,
},
cqi-ReportConfig-r10 {
,,,
},
pucch-ConfigDedicated-v1020 {
,,,
},
cqi-ReportConfigPCell-v1250 {
,,,
}
},
drb-ToAddModList-r15 {
,,,
}
},