Recovery USB
The purpose of this tutorial is to show you how to make a recovery USB and image or reimage the harddisk of your Callbox or UEsim PC. Amarisoft provide special image files for each of the product (e.g, Callbox Classic, Callbox mini, Callbox Ultimate, SIMBOX). You can burn the image file onto a USB memory stick and image / reimage the hard disk of product PC.
Table of Contents
Introduction
The process of creating a recovery USB and performing hard disk imaging or reimaging is a crucial aspect of system maintenance and disaster recovery for specialized hardware such as the Callbox or UEsim PCs provided by Amarisoft. These systems, integral components in telecommunications testing and simulation environments, rely on stable and consistent operating environments to ensure reliable performance. Amarisoft supplies distinct disk image files tailored for each product variant—such as the Callbox Classic, Callbox Mini, Callbox Ultimate, and SIMBOX—enabling users to restore a system to its original factory state or recover from software corruption and hardware failures. The imaging process involves writing the provided disk image to a USB memory stick, which then serves as a bootable medium to overwrite or repair the PC's hard disk. This technique leverages low-level disk operations to ensure the target machine’s software environment matches the tested and supported configuration, minimizing compatibility issues and reducing downtime. Understanding and executing this process correctly is essential for technicians, engineers, and administrators responsible for deploying, maintaining, or recovering Amarisoft-based test infrastructure within broader network development and validation ecosystems.
-
Context of Technology
- Amarisoft's Callbox and UEsim PCs are specialized hardware platforms used for mobile network testing, simulation, and validation.
- System imaging and recovery are vital for maintaining operational reliability and swiftly restoring functionality after system failures or software issues.
- Disk images provided by Amarisoft are custom-tailored for each product line, ensuring compatibility and optimal performance.
-
Relevance and Importance of Topic
- Creating a recovery USB and reimaging the hard disk are essential skills for system administrators and technical users managing Amarisoft products.
- Quick and reliable recovery procedures minimize system downtime and maintain test environment integrity.
- Correct imaging ensures the system is in a supported, predictable state, which is critical for troubleshooting and support.
-
What Learners Will Gain
- An in-depth understanding of the recovery and imaging process for Amarisoft Callbox and UEsim PCs.
- Practical skills to create a bootable recovery USB using Amarisoft-supplied image files.
- Step-by-step guidance to reimage or restore hard disks to their factory default state.
- Knowledge to troubleshoot and resolve common issues related to system recovery and imaging.
-
Prerequisite Knowledge and Skills
- Basic familiarity with USB memory stick usage and file management.
- Understanding of boot device selection in PC BIOS/UEFI settings.
- Experience with disk imaging tools (e.g., balenaEtcher, Rufus, or dd) is helpful but not mandatory.
- General awareness of PC hardware and Amarisoft product models is recommended.
Summary of the Tutorial
This tutorial outlines the procedures for preparing, creating, and using a recovery USB to reimage an Amarisoft Callbox or UEsim PC, as well as post-reimaging steps for software installation and system configuration.
-
Preparation Steps:
- Prepare a USB memory stick with at least 8GB capacity (16GB recommended).
- Back up important files and the /etc/.amarisoft-product directory, including the license file, to a safe location.
- Back up any custom configuration files from the PC to be reimaged.
-
Downloading Required Tools and Image:
- Download FedoraMediaWriter appropriate for your operating system (Windows, Mac, or Linux) from the provided links.
- Download the correct recovery image file for your product from the Amarisoft Extranet.
-
Creating the Recovery USB:
- Launch FedoraMediaWriter on your PC.
- When prompted, select .iso file type (the provided .img file is compatible).
- Choose the downloaded image file and the target USB device.
- Follow on-screen instructions to write the image to the USB stick.
-
Reimaging the Callbox/UEsim PC:
- Insert the prepared recovery USB into the PC to be reimaged.
- Reboot the PC and enter BIOS mode (typically by pressing F2 or F12, depending on the model).
- In the BIOS, navigate to the Boot menu and select UEFI as the boot mode.
- Save and exit BIOS. The system will boot from the USB and display a splash screen.
- Follow on-screen prompts to specify the USB dongle and the hard disk to be reimaged.
- Confirm all prompts (typically by typing 'y').
- Wait for the reimaging process to complete. The PC will power off when finished.
-
Post-Reimaging Software Installation and Configuration:
-
System Identification:
- Check the product name and serial number from the physical label and update the /etc/hostname file accordingly.
- Use text editors like nano, vi, or vim to edit the hostname file.
-
SDR Mapping Configuration:
- List available SDR mapping files in the /etc directory.
- Determine the correct mapping file by running dmidecode -t2 and matching the motherboard product name with available mapping files.
- If no specific mapping file matches, use the default mapping file for your equipment (e.g., sdr-mapping-ultimate for Callbox Ultimate).
- Create a symbolic link between sdr-mapping and the appropriate mapping file using ln -s <your sdr-mapping-file> sdr-mapping.
-
Software and License Installation:
- Install Callbox or UEsim software as required, following the respective installation tutorials.
- Install the necessary license file.
-
System Identification:
The tutorial provides a comprehensive, step-by-step methodology for safely reimaging Amarisoft Callbox or UEsim systems and preparing them for further use.
Before you start
Before you start the process, I would suggest you to prepare followings first.
- Get a USB memory stick ready. It should be at least 8Gb capacity. (I used a USB with the capacity of 16 Gb in this tutorial)
- (If you are going to reimage a PC that you have been using, back up all the files into safe place so that you can recover it later. For example, if you have created your own configuration files, save all of them in safe place).
- Backup licence file. Your license may get invalid once you reimage the PC since host ID get changed with the reimaging. But just in case, I would suggest you to backup the license file.
- Backup the directory /etc/.amarisoft-productand its contents into a safe place (Usually this directory has a file named hostname)
Download Media Writer
First step is to download FedoraMediaWriter program. You can download it from follwong link depending on the operating system for making the recovery USB.
"For Windows":https://getfedora.org/fmw/FedoraMediaWriter-win32-latest.exe
"For Mac":https://getfedora.org/fmw/FedoraMediaWriter-osx-latest.dmg
"For linux":https://flathub.org/apps/details/org.fedoraproject.MediaWriter
In this tutorial, I am working on Windows PC and I downloaded the windows version FedoraMediaWriter as shown below.

Download Recovery Image
Download the image file for your product. You can download it from your downoad account in Amarisoft Extranet as shown below.

Make Recovery USB
Now we have FedoraMediaWriter and image file. We are ready to make the Recovery USB.
Run the FedoraMediaWriter and follow through the instruction by hitting the button highlighed on the screenshot.


I recovery file that we provide is *.img and Media writer does not provide for *.img file. *.img file that we provide is compatible with *.iso file. So select *.iso file at this step.

Select image file that you downloaded at previous step. (NOTE: You would see different name in USB Drive depending on the USB memory stick that you use)


Reimaging Callbox/UEsim PC
Once you have Recovery USB ready, now we are ready to reimage the Hard disk of the product using the USB.
Step 1 : Insert the USB key to the PC.
Step 2 : Reboot the PC and get into BIOS mode as shown below. How to get into BIOS would be a little bit different depending on the product. In this tutorial, I am reimaging Amarisoft Callbox Ultimate. In most case, F2 or F12 key would be the one to get into BIOS mode. Once you get into BIOS mode, go to [Boot] menu and select UEFIas shown below

Step 3 : Then save the configuration and Exit. You will see the splash screen as shown below.

Step 4: While continuing booting, you will get the screen as shown below. Specify the disk name for USB dongle and hard disk you want to reimage as below.

Step 5: Specify the disk name for USB dongle and hard disk you want to reimage as below.

Step 6: As it moves to next step it will get some questions. Just type 'y' for all the questions as shown below.

Step 7 : Now there is nothing you need to do. Just wait until the process complete. Once the process is complete. The PC will turn off.
Install Callbox or UEsim software
Recovery Image itself does not contain any callbox or UEsim software in it, so you need to intall them depending on your needs. Refer to following tutorials to install Callbox or UEsim software.
Step 1 : Check your product name and serial number. You should see a label on the back of the equipement with this information. As an example if you have a Callbox Ultimate, you should see something like CBU-2024031200. Edit the file /etc/hostname and copy the product name inside. You can use nano, vi or vim for this puropose. In our example, you would write CBU-2024031200 in this file and save it as shown in the example below.
![]()
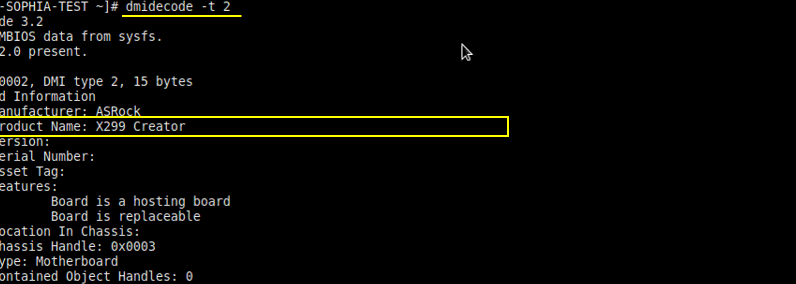
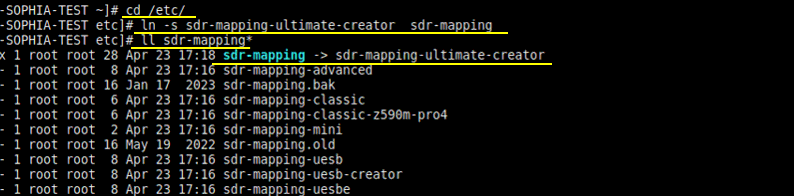
Step 2 : Under /etc directory, there are multiple SDR mapping files. Each file is relevant to a product. Assuming our example in Step 1 with CBU-2024031200, your product is a Callbox Ultimate (You can figure this out from the initial 3 letter 'CBU'). You can see that there are 3 different SDR mapping files for Ultimate Callbox under /etc. In order to check which one of these 3 files to use with your equipment, you should type dmidecode -t2 and check the Product name which is basically the motherboard model. In this example the Product Name is X299 Creator, so the sdr-mapping-ultimate-creator is the one to be used. You need to create a symbolic link to this SDR mapping by typing
ln -s sdr-mapping-ultimate-creator sdr-mapping
Let's follow through this procedurestep by step.
First, check out the list of mapping file locationed in /etc directory.
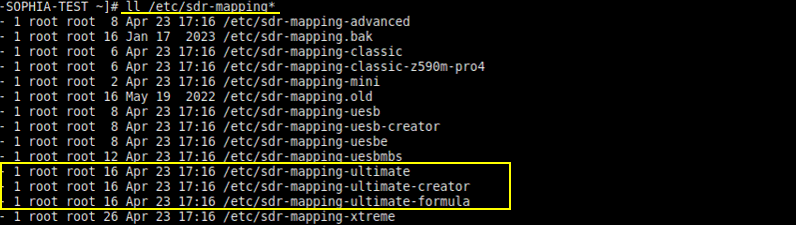
Figure out which mapping file to use from the mother board product name using the command 'dmidecode -t2' (
Make a symbolic link between sdr-mapping and the specific mapping file for your product using the command 'ln -s <your sdr-mapping-file> sdr-mapping'.
Step 3 : Install Callbox or UEsim software as you need according to following tutorials.