Installation - UEsim
The purpose of this tutorial is to show you how to install a new release on the UEsim (UEsim is a system that emulate a User device like a moble phone). Even with sophisticated functionality, the size of the installation package is pretty small (comparing to the package that comes with other equipment) and installation process is simple and reliable.
There are a fewways of the installation that are most commonly used as follows. In terms of the installation software (installation script), there is no differences between them. The differences come from the option parameter used with install.sh
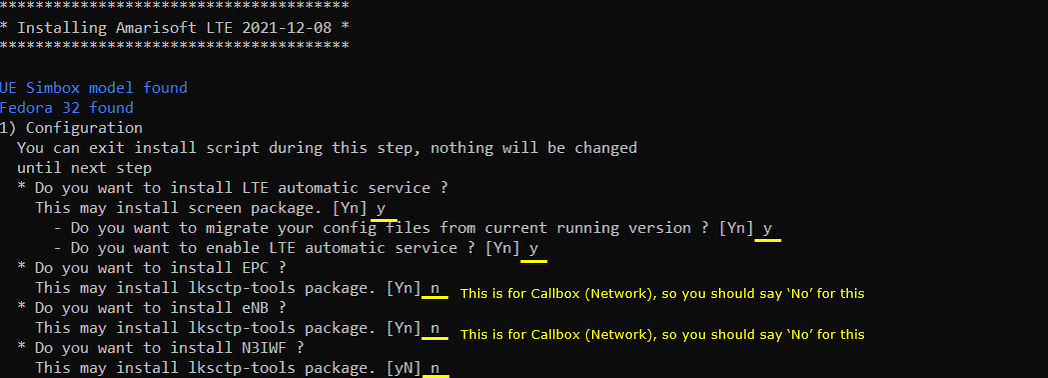
- ./install.sh : Run the installation scrip without any option. If you install in this way, the script would let you to respond to questions for each step of the installation (this is mainly for you to select the which component to install).
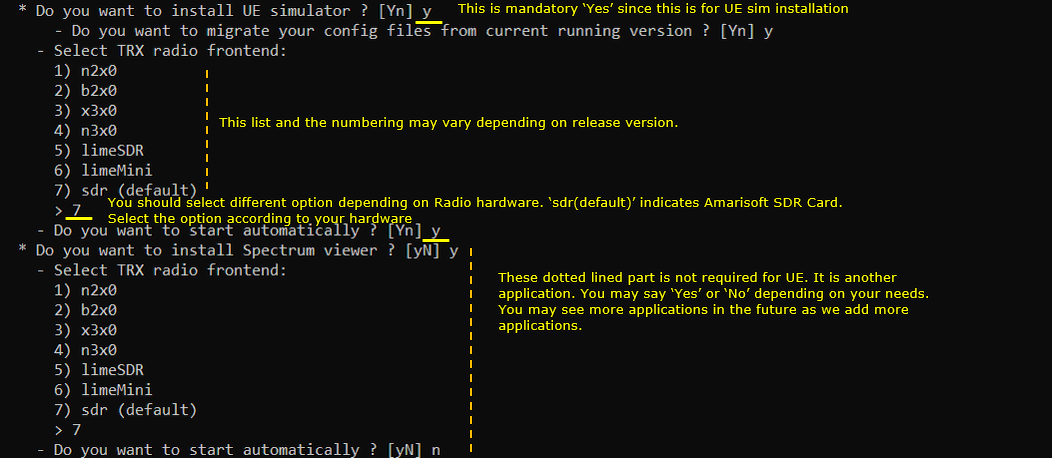
- ./install.sh --default : Run the installation scrip with the option '--default'. With this, the script would install all the components defined in 'default' option and you don't need to manually specify anything during the installation. The installation script will install every components based on default configuration.
Table of Contents
Introduction
UEsim is a sophisticated emulation platform designed to replicate the behavior of user equipment (UE) devices, such as mobile phones, within a controlled testing and development environment. Built to support advanced telecommunications protocols and scenarios, UEsim enables operators, developers, and testers to validate network infrastructure, troubleshoot issues, and optimize service delivery without relying on physical devices. Architecturally, UEsim abstracts hardware dependencies and simulates the complete protocol stack of user devices, allowing for high scalability and flexibility in both standalone and integrated test setups. The platform’s modular design facilitates the emulation of diverse UE profiles, configurations, and network conditions, making it an invaluable tool in the broader ecosystem of mobile network development and validation. The installation process for new UEsim releases is streamlined and efficient; despite the platform’s feature-rich capabilities, the installation package remains lightweight compared to other telecommunications equipment, largely due to optimized packaging and selective component inclusion based on licensing. The installation workflow, governed by an install script, accommodates both interactive and automated installation modes, catering to varied operational preferences while ensuring reliability and consistency across deployments. UEsim’s role in modern telecom environments is pivotal, enabling rapid iteration, comprehensive testing, and robust quality assurance, thereby accelerating the deployment of new network features and services.
-
Context and Background
- UEsim serves as a virtualized user equipment emulator, essential for mobile network operators, equipment vendors, and software developers to rigorously test network behavior, validate interoperability, and diagnose issues without requiring actual mobile devices.
- The system supports emulation of complete protocol stacks (e.g., LTE, 5G) and diverse device configurations, integrating seamlessly into automated test pipelines and lab environments.
- UEsim’s installation package is intentionally lightweight, achieved by packaging only the components aligned with the user’s license entitlements, thus minimizing system resource requirements and deployment complexity.
-
Relevance and Importance of the Tutorial
- Mastering the installation process of new UEsim releases ensures users can swiftly deploy the latest features, performance enhancements, and security updates, maintaining test environment integrity and compatibility.
- The tutorial demystifies the installation options and parameters, enabling both novice and experienced users to optimize their setup according to operational needs and licensing constraints.
- Understanding the nuances of installation modes—interactive versus default—empowers users to tailor their UEsim deployments, ensuring that only required components are installed and configuration consistency is maintained.
-
Learning Outcomes
- Comprehend UEsim installation package structure and the implications of licensing on installation content.
- Execute the installation script in both manual (interactive) and automated (default) modes, understanding the options and expected behaviors.
- Customize default installation options by leveraging the configuration file generated during manual installations.
- Troubleshoot common installation issues and verify successful deployment of the UEsim platform.
-
Prerequisite Knowledge and Skills
- Basic proficiency with Linux command-line interfaces and shell scripting.
- Familiarity with file system navigation and permissions management within a Unix-like environment.
- Understanding of basic mobile network concepts and the role of User Equipment in telecommunications testing (helpful but not strictly required).
- Access to a valid UEsim installation package, appropriate license credentials, and sufficient system privileges to perform installations.
Summary of the Tutorial
This tutorial outlines the procedure for installing a new software release (specifically UEsim) and verifying its installation status. The following summarizes the key test procedures and methodologies described:
-
Directory Structure Verification:
- Check for an existing UEsim installation by inspecting the directory structure under the /root directory.
- Confirm the presence of relevant directories and files from previous installations.
-
Software Download and Preparation:
- Download the installation package (Tarball) from the Amarisoft Extranet account.
- Place the package in a directory of your choice (demonstrated with /tmp in the tutorial).
-
Installation Procedure:
- Extract the tarball using the untar command to produce the installation directory.
- Navigate to the untarred directory and list its contents to verify the presence of the installation shell script and related components.
- Run the installation script (e.g., ./install.sh), optionally using the --default argument to replicate previous installation selections for component choices.
- Monitor the installation progress until the message 'Installation Successful' is displayed.
-
Post-Installation Verification:
- Re-examine the /root directory to ensure the new directories for Amari Callbox are created.
- Check the status of the lte service using the service lte status command to confirm the application layer program is running.
- Note: This status check only verifies the application layer and does not guarantee full operational status of UEsim.
The tutorial provides a step-by-step methodology for installing and validating a UEsim software release, emphasizing both preparatory checks and post-installation verification steps.
Directory Structure of Installed Release
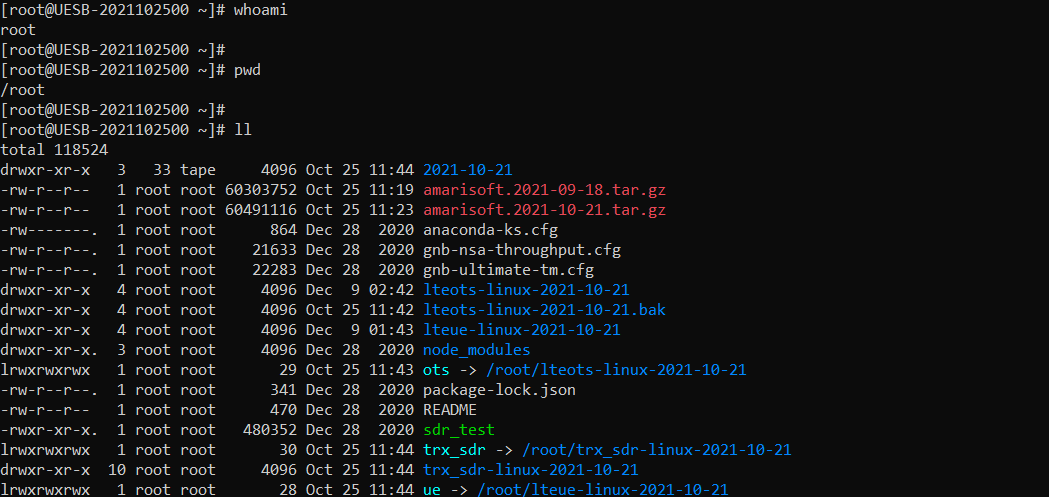
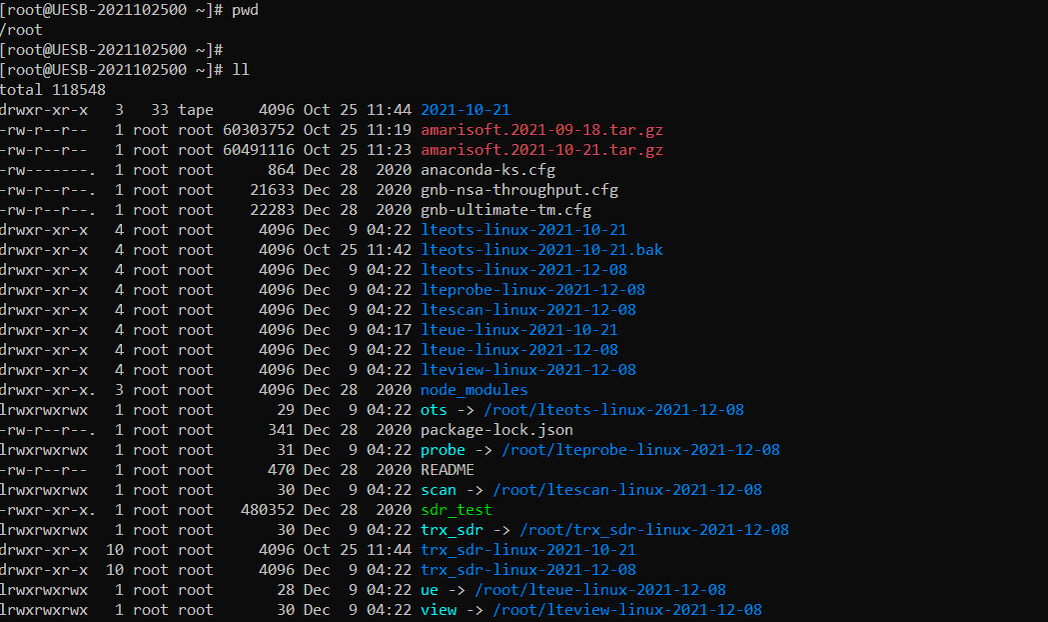
In most cases you may have a software release already installed on your machine (UEsim). If there is an existing installation, you would see the directory struction in /root directory something similar to following.
Download the New Release
You can download the installation package (Tarball) from Amarisoft Extranet account as shown below.

You can place the downloaded package anywhere you like. In this tutorial, I put it in /tmp directory as shown below.

Install
Untar the package as shown below

You will get the untared directory as shown below. You will see all the software packages for installation in this directory

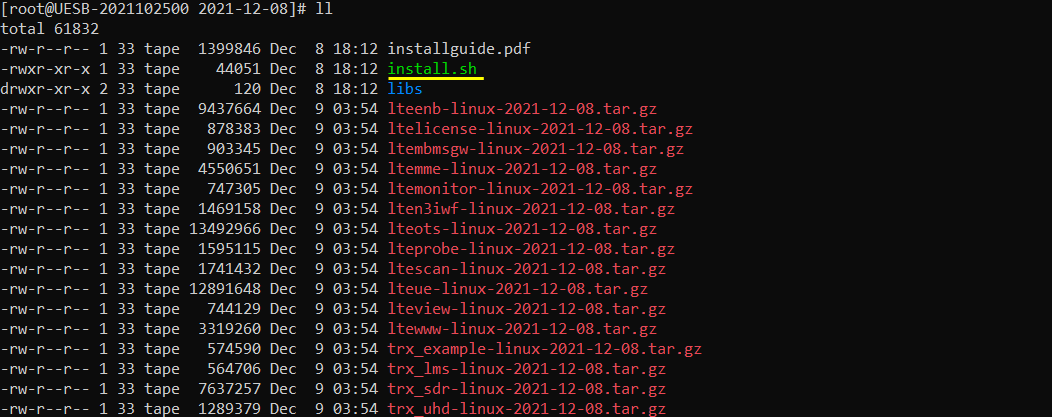
Go to the untarred directory and list the files in it. You will see the installation shell program and other files required for installation
Run the installation shell program as below

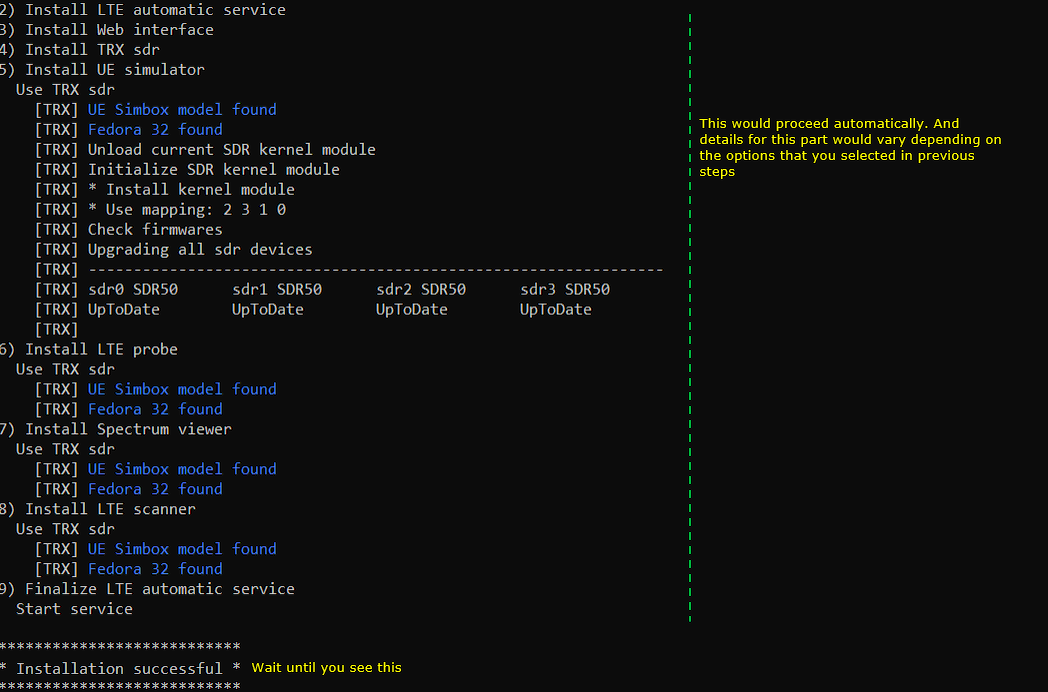
Installation Progress as below
Wait until you see 'Installation Successful' as shown below
Now if you go to /root directory, you will find following directories installed. These are the directories for Amari Callbox
Once installation is done, you can check on the status of lte service and should get the result as follows

NOTE : 'service lte status' just shows the status of the application layer program. Even if you see the same result as shown above, it does not guarantee that UEsimworks properly.