Installation - Callbox
The purpose of this tutorial is to show you how to install a new release on the Callbox. Even with sophisticated functionality, the size of the installation package is pretty small (comparing to the package that comes with other equipment) and installation process is simple and reliable.
There are a fewways of the installation that are most commonly used as follows. In terms of the installation software (installation script), there is no differences between them. The differences come from the option parameter used with install.sh
- ./install.sh : Run the installation scrip without any option. If you install in this way, the script would let you to respond to questions for each step of the installation (this is mainly for you to select the which component to install).
- ./install.sh --default : Run the installation scrip with the option '--default'. With this, the script would install all the components defined in 'default' option and you don't need to manually specify anything during the installation. The installation script will install every components based on default configuration.
Table of Contents
Introduction
The Callbox is a specialized telecommunications testing device that provides a comprehensive platform for simulating network environments and validating the performance of network equipment and devices. Its modular architecture enables users to install, upgrade, and manage a wide array of software components tailored to specific testing needs, making it a vital tool for network engineers and developers. The installation process for new software releases on the Callbox is engineered to be both efficient and robust, featuring a compact installation package despite the system’s advanced functionality. The installation script (install.sh) is designed to accommodate different user preferences—offering both interactive and automated installation modes—by utilizing option parameters that dictate the installation workflow. The flexibility of this process is further enhanced by license-dependent packaging, ensuring that users only receive and install components relevant to their purchased features. This tutorial details the procedures for installing new releases on the Callbox, clarifying the distinctions between installation methods, the role of user input, and mechanisms for customizing installation defaults, all within the context of a secure and reliable deployment environment. Understanding this process is crucial for maintaining system integrity, ensuring feature availability, and optimizing the operational capabilities of the Callbox in diverse laboratory and field settings.
-
Context of the Technology
- The Callbox is a high-performance network test instrument, widely used for simulating various telecommunication scenarios, protocol validation, and device certification.
- Its software-defined functionality is modular, allowing targeted installation and upgrades of specific test suites, protocols, or features via controlled installation packages.
- The installation process is managed through the install.sh script, which supports both manual and automated workflows, improving operational flexibility.
-
Relevance and Importance of the Tutorial
- Efficient installation and upgrade processes are essential for minimizing downtime and ensuring that the Callbox operates with the latest features and security enhancements.
- Understanding the installation mechanisms empowers users to tailor system configurations to their specific licensing and testing requirements.
- The ability to customize default installation parameters streamlines future deployments and supports rapid adaptation to evolving test needs.
-
What Learners Will Gain
- Comprehensive knowledge of the Callbox software installation process, including both interactive and default installation modes.
- Insights into the structure and significance of the installation package relative to licensed features.
- Practical skills for customizing installation defaults and understanding how user selections are persisted for subsequent installations.
- Best practices for maintaining system reliability and managing software upgrades in a controlled test environment.
-
Prerequisite Knowledge and Skills
- Basic familiarity with Linux command-line operations and permissions.
- Understanding of file system navigation and execution of scripts in a Unix-like environment.
- Awareness of Callbox system architecture and licensed feature management is beneficial, but not mandatory.
Summary of the Tutorial
This tutorial outlines the procedures for installing, verifying, and downgrading the Amarisoft Callbox software release. The instructions cover handling both standard installations and situations requiring firmware changes, including step-by-step methodologies for each scenario.
-
Directory Structure Verification:
- Check the /root directory for an existing installation directory structure.
-
Downloading the New Release:
- Obtain the installation package (Tarball) from the Amarisoft Extranet account.
- Place the downloaded package in a desired directory (e.g., /root or /tmp), noting that /tmp is volatile and may be cleared on reboot.
-
Installation Procedure:
- Untar the downloaded package to extract the installation directory and files.
- Navigate to the extracted directory (e.g., 2021-11-19) and list its contents, ensuring the presence of the installation shell script and required files.
- Run the installation shell program using the --default parameter for automatic selection of typical options:
- If --default is omitted, manual selection of all options during installation is required.
- Wait for the installation to complete, confirming success via the "Installation Successful" message.
-
Post-Installation Verification and Actions:
- Verify the creation of installation directories in /root related to Amari Callbox.
- Check the status of the LTE service using service lte status to ensure the application layer program is running.
- Important: A successful status does not guarantee full functionality; a system reboot is recommended to complete component upgrades (e.g., FPGA on SDR card).
- If issues arise (e.g., SDR card errors), first try rebooting the PC. If the problem persists, refer to the SDR checkup tutorial.
-
Downgrade / Switching to a Different Release:
- The process is similar to installation, with additional considerations for firmware compatibility.
-
For releases 2022-09-16 or later:
- Perform installation and firmware switching in a single step with ./install.sh --trx-force-upgrade.
-
For releases older than 2022-09-16:
- Step 1: Install the software using ./install.sh --default.
- Step 2: Reflash the firmware:
- Stop the LTE service: service lte stop.
- Navigate to /root/trx_sdr.
- Upgrade the SDR firmware: ./sdr_util upgrade -force.
Directory Structure of Installed Release
In most cases you may have a software release already installed on your machine (callbox). If there is an existing installation, you would see the directory struction in /root directory something similar to following.
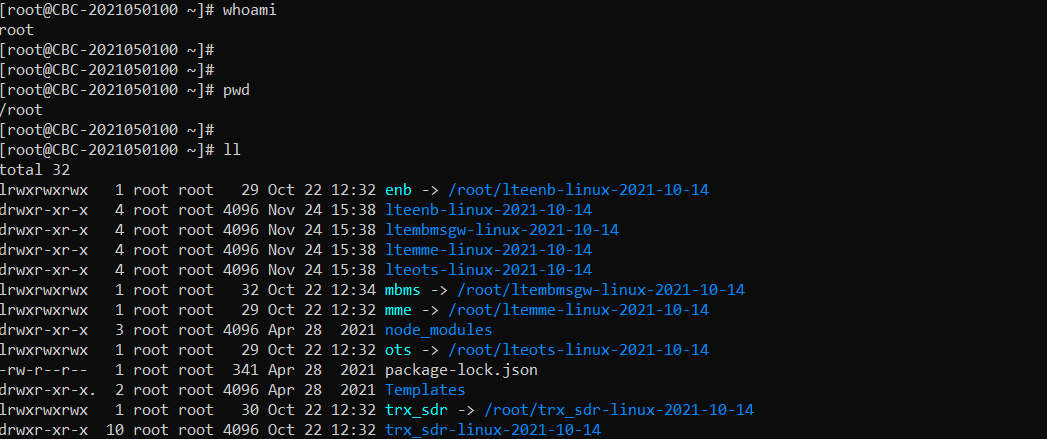
Download the New Release
You can download the installation package (Tarball) from Amarisoft Extranet account as shown below.

You can place the downloaded package anywhere you like. In this tutorial, I put it in /root directory as shown below.

Install
Untar the package as shown below
![]()
You will get the untared directory as shown below. You will see all the software packages for installation in this directory.

Go to the untarred directory and list the files in it. You will see the installation shell program and other files required for installation (In this specific case shown above, go do the directory '2021-11-19' to get the contents as shown below.)
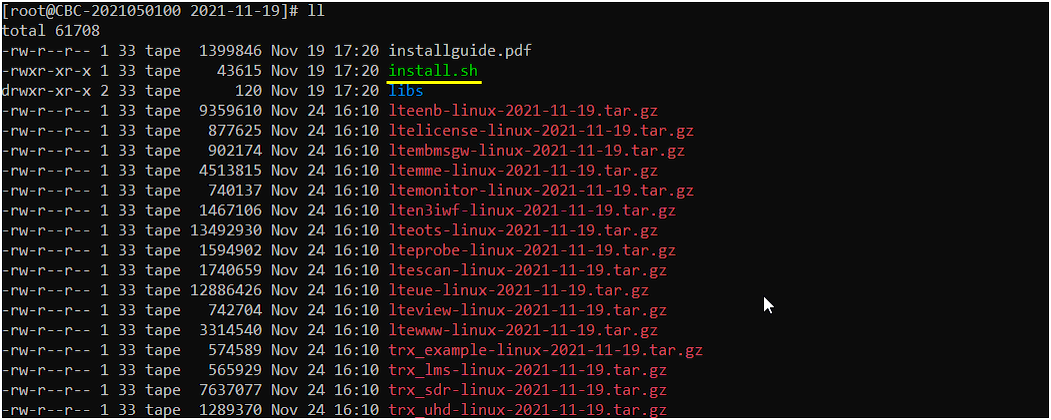
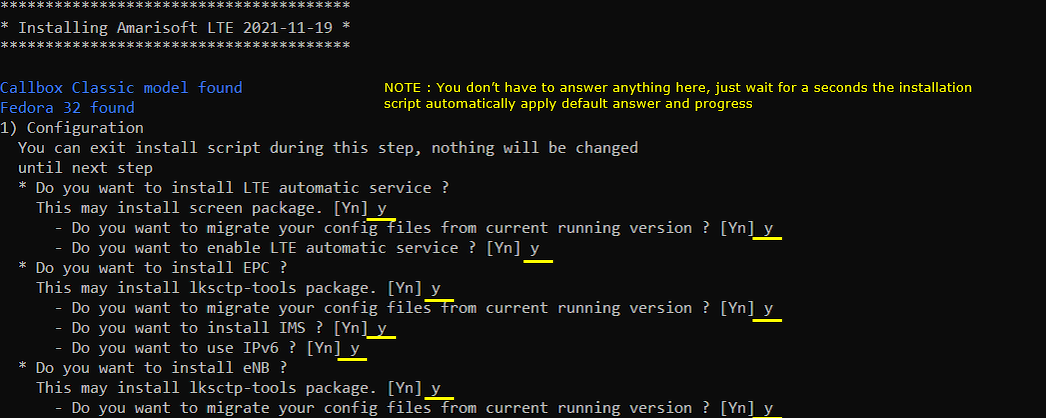
Run the installation shell program as below.

Installation Progress as below
Wait until you see �Installation Successful� as shown below
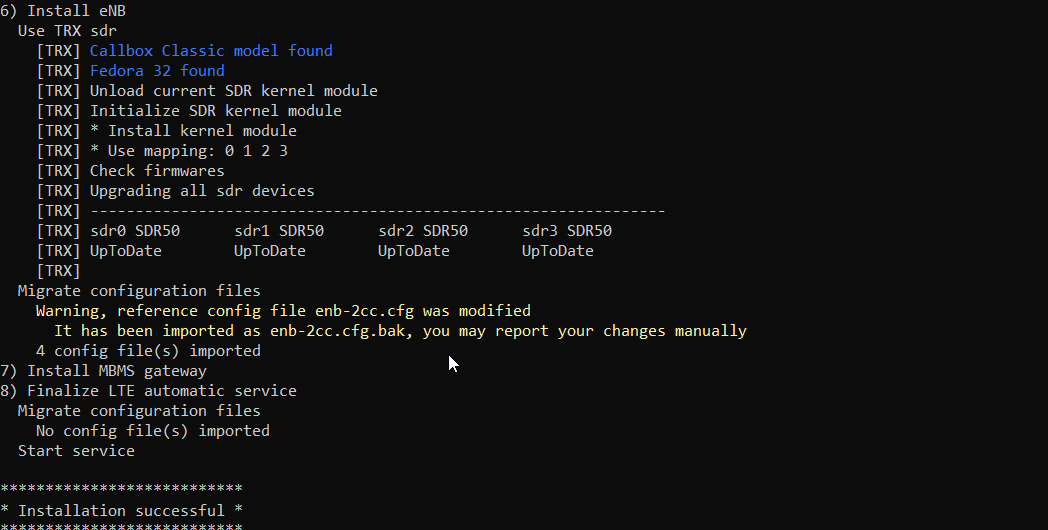
Now if you go to /root directory, you will find following directories installed. These are the directories for Amari Callbox
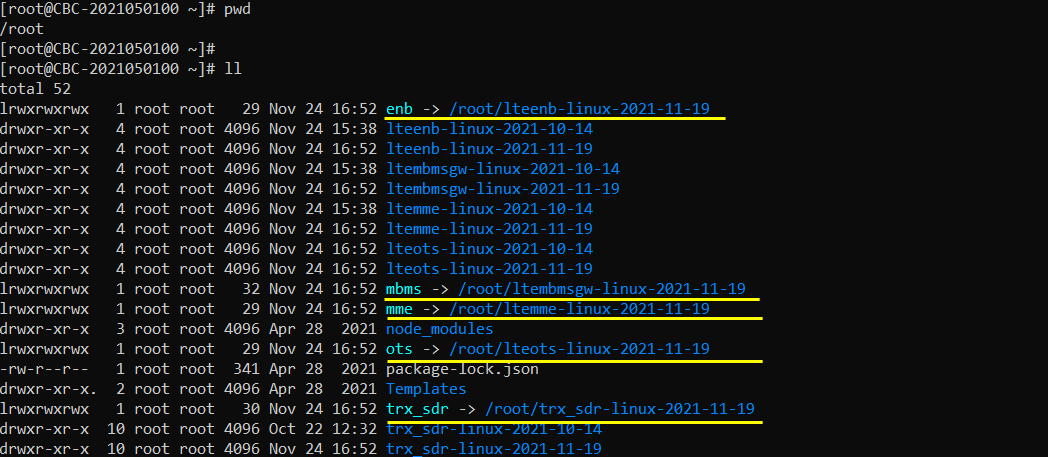
Once installation is done, you can check on the status of lte service and should get the result as follows

Downgrade / Switching to Different Release
Basically Downgrade or switching to other software release is same as Installation procedure explained above. We don't have any separate procedure for downlink or software switching. But there is something you need to keep in mind when you trying downgrade. Depending on situation, downgrade / firmware switching requires firmware switching. You can do it with following two ways.
Downgrading / Switching to 2022-09-16 or later
You can do the installation and firmware switching in a single step as below.
|
./install.sh --trx-force-upgrade |
Downgrading / Switching to older than 2022-09-16
In this case, you have to do it in two steps.
Step 1 : Install the software
|
./install.sh --default |
Step 2: Reflash the firmware
|
service lte stop cd /root/trx_sdr ./sdr_util upgrade -force |