
UEsim NR SA - Carrier Aggregation
The purpose of this tutorial is to show you how to establish NR SA 2CC CA on UEsim. Carrier Aggregation is a mechanism that aggregate the traffic at MAC layer which requires accurate synchronization among all the cell and scheduled by a common MAC scheduler. At high level, it happens in a few steps as follows.
Step 1 : Perform the measurement for all the relavent cells
Step 2 : RRC Connection Reconfiguration to add SCC (Secondary Component Carrier)
Step 3 : MAC CE activating SCCs
In terms of 3GPP, Step 1 is optional but in live network Step 1 is always performed. In Amarisoft Callbox, user case choose whether to perform step 1 or not.
The capability / capacity of Carrier Aggregation of Amarisoft UEsim product series is shown in the table below. Click on the link if you want to get the full datasheet.
|
|
|||
|
Carrier Aggregation |
up to 4 carriers in DL and 2 carriers in UL |
up to 4 carriers in DL and 2 carriers in UL |
Table of Contents
- UEsim NR SA - Carrier Aggregation
- Introduction
- Summary of the Tutorial
- Test Setup
- Key Configuration Parameters
- Test 1 : 2CC CA - TDD and TDD - without Measurement
- Test 2 : 2CC CA - TDD and TDD - with Measurement
- Test 3 : 2CC CA - FDD and TDD - without Measurement
- Test 4 : 2CC CA - TDD and FDD - without Measurement
- RRC / NAS Signaling
Introduction
Carrier Aggregation (CA) is a cornerstone technology in 5G New Radio (NR) that significantly enhances user experience and network throughput by combining multiple frequency carriers into a single logical channel at the Medium Access Control (MAC) layer. This tutorial focuses on the establishment of NR Standalone (SA) 2 Component Carrier (2CC) Carrier Aggregation on Amarisoft UEsim, a widely adopted UE simulation platform for R&D and network testing. Architecturally, CA relies on precise synchronization across all participating cells and is orchestrated by a unified MAC scheduler, ensuring efficient resource allocation and seamless transmission across aggregated carriers. The process typically involves several critical steps, including cell measurements, dynamic reconfiguration of the RRC (Radio Resource Control) layer to integrate Secondary Component Carriers (SCCs), and the activation of these carriers at the MAC level. These operations are aligned with 3GPP specifications to guarantee interoperability and performance across both simulated and commercial User Equipment (UE). In real-world networks, CA is pivotal for achieving peak data rates, optimizing spectrum utilization, and supporting diverse 5G use cases such as enhanced mobile broadband (eMBB). By leveraging Amarisoft UEsim, engineers and researchers can rigorously validate CA capabilities, test multi-carrier scenarios, and ensure compliance with vendor-specific requirements, all within a controlled lab environment. This tutorial provides a structured approach to configuring and validating NR SA 2CC CA, offering insights into best practices, troubleshooting, and adaptation for commercial UEs, thereby bridging the gap between lab testing and live network deployment.
-
Context and Background
- Carrier Aggregation is integral to 5G NR’s ability to deliver high throughput and low latency by enabling simultaneous data transmission over multiple carriers.
- Amarisoft UEsim is a versatile UE emulation solution used by operators and vendors for end-to-end network testing, feature validation, and performance benchmarking.
- The tutorial addresses both simulation-based (UEsim) and commercial UE scenarios, emphasizing flexibility and real-world applicability.
-
Relevance and Importance
- Understanding and configuring CA is essential for network engineers, testers, and researchers working on 5G NR deployments and optimizations.
- The tutorial guides users through the practical steps required for successful NR SA 2CC CA setup, covering critical aspects of measurement, configuration, and activation.
- It highlights key considerations for both simulated and commercial UEs, ensuring the knowledge gained is broadly applicable.
-
Learning Outcomes
- Gain a comprehensive understanding of NR Carrier Aggregation concepts and architecture.
- Acquire hands-on skills in configuring and validating NR SA 2CC CA using Amarisoft UEsim.
- Learn best practices for troubleshooting and adapting CA configurations for commercial UE devices.
- Develop the ability to interpret and apply 3GPP guidelines for carrier aggregation in practical scenarios.
-
Prerequisite Knowledge and Skills
- Basic familiarity with 5G NR architecture, including gNB (gNodeB), UE, and MAC/RRC layers.
- Understanding of cellular network concepts, including frequency bands, component carriers, and scheduling.
- Experience with Amarisoft UEsim or similar UE simulation tools is beneficial but not required.
- Access to relevant network testing environments and documentation, such as the Amarisoft user guides and band combination references, is recommended.
Summary of the Tutorial
This tutorial covers the setup and execution of four different NR SA Carrier Aggregation (CA) test scenarios using Amarisoft Callbox and UE simulator (UEsim). Each test demonstrates specific CA configurations, focusing on TDD/TDD and TDD/FDD combinations, with or without RRC measurements. The procedures involve detailed configuration steps for both network (Callbox) and UE side, as well as the methodology for performing and verifying the tests.
-
Test Setup:
- The test environment consists of Amarisoft Callbox as the gNB and UEsim or a commercial UE as the Device Under Test (DUT).
- Key configuration parameters include scell_list, meas_config_desc (with various event triggers and thresholds), scell_config, and meas_gap_config.
-
Test 1: 2CC CA - TDD and TDD - without Measurement
- Objective: Configure NR SA CA with two TDD cells, without enabling RRC measurement for simplicity.
-
Callbox Configuration:
- Use gnb-2cc-sa-tdd.cfg and set NR_TDD to TDD mode for all cells.
- In nr_cell_list, define scell_list for each cell to allow the addition of the other cell as SCC. Omit rrc_configuration to enable unconditional SCC addition based on UE CA support.
-
UEsim Configuration:
- Use ue-nr-2cc-sa-tdd.cfg. Set N_CELL to 2, configure NR_TDD, antenna numbers and bandwidth to match Callbox.
- Configure cells parameter to define two cells with matching band/frequency settings.
-
Test Execution:
- Verify cell configuration using cell phy and cell commands.
- Power on UE; check registration status (EMM_STATE should be 'registered').
- On Callbox, monitor with the t command for CA establishment (column 'C' shows '2').
- Confirm IP allocation and (optionally) perform UDP data flooding to verify throughput.
-
Log Analysis:
- Check SIB1 transmission, UE capability for band combination, and confirmation of SCC addition/activation via logs and MAC/PHY activity indicators.
- Validate user traffic on both PCC and SCC.
-
Test 2: 2CC CA - TDD and TDD - with Measurement
- Objective: Configure NR SA CA with two TDD cells, using RRC Measurement to trigger SCC addition.
-
Callbox Configuration:
- Use gnb-2cc-sa-meas-tdd.cfg. Set NR_TDD to TDD.
- In nr_cell_list, scell_list includes the other cell with rrc_configuration set to "measurement".
- Configure meas_config_desc with proper event conditions (e.g. a1, a2, a3, a4) and thresholds for triggering SCC addition based on measurement.
-
UEsim Configuration:
- Use ue-nr-2cc-sa-tdd.cfg, matching previous test's settings.
-
Test Execution:
- Similar to Test 1: verify cell config, power on UE, check registration, monitor CA status.
- Ensure measurement reporting is configured and verify that CA is triggered upon appropriate measurement event.
-
Log Analysis:
- Confirm correct transmission of measurement configuration and receipt of measurement report from UE.
- Verify subsequent SCC addition and traffic as in Test 1.
-
Test 3: 2CC CA - FDD and TDD - without Measurement
- Objective: Configure NR SA CA with one FDD (PCC) and one TDD (SCC) cell, without RRC measurement.
-
Callbox Configuration:
- Use gnb-2cc-sa-FDD-TDD.cfg. Set NR_TDD_CC1=0 (FDD), NR_TDD_CC2=1 (TDD).
- In nr_cell_list, configure scell_list for mutual SCC addition, omit rrc_configuration.
- Bandwidth and antenna configuration are set per cell within nr_cell_list for flexibility.
- Parameters such as prach configuration, tdd_ul_dl_config, and ssb_pos_bitmap are also set per cell to accommodate different duplex schemes.
-
UEsim Configuration:
- Use ue-nr-2cc-sa-FDD-TDD.cfg. Set N_CELL to 2, configure NR_TDD_CC1 and NR_TDD_CC2 to match network, set per-cell bandwidth, antennas, and band/frequency.
-
Test Execution:
- Confirm cell configuration, power on UE, check registration, monitor CA establishment, and verify traffic.
-
Log Analysis:
- Perform the same verifications as in previous tests: SIB1, UE capability, SCC addition/activation, and data traffic for both cells.
-
Test 4: 2CC CA - TDD and FDD - without Measurement
- Objective: Configure NR SA CA with one TDD (PCC) and one FDD (SCC) cell, without RRC measurement.
-
Callbox Configuration:
- Use gnb-2cc-sa-TDD-FDD.cfg. Set NR_TDD_CC1=1 (TDD), NR_TDD_CC2=0 (FDD).
- Configure scell_list and per-cell configuration for bandwidth, antennas, prach, tdd_ul_dl_config, and ssb_pos_bitmap.
-
UEsim Configuration:
- scell_list
- meas_config_desc : In this link you would get the descriptions for all the items listed below.
- a1_report_type
- a1_rsrp
- a1_hysteresis
- a2_report_type
- a2_rsrp
- a2_hysteresis
- a2_time_to_trigger
- a3_report_type
- a3_offset
- a3_hysteresis
- scell_config : In this link you would get the descriptions for all the items listed below.
- a2_report_type
- a2_rsrp
- a2_hysteresis
- a2_time_to_trigger
- a4_report_type
- a4_hysteresis
- a4_time_to_trigger
- meas_gap_config
- pattern_id
- Most of UE support only subcarrier spacing 15 Khz only in FDD and support 30 Khz only in TDD.
- Most of UE does not support carrier aggregation between different subcarrier spacing.
- Most of UE support only subcarrier spacing 15 Khz only in FDD and support 30 Khz only in TDD.
- Most of UE does not support carrier aggregation between different subcarrier spacing.
Test Setup
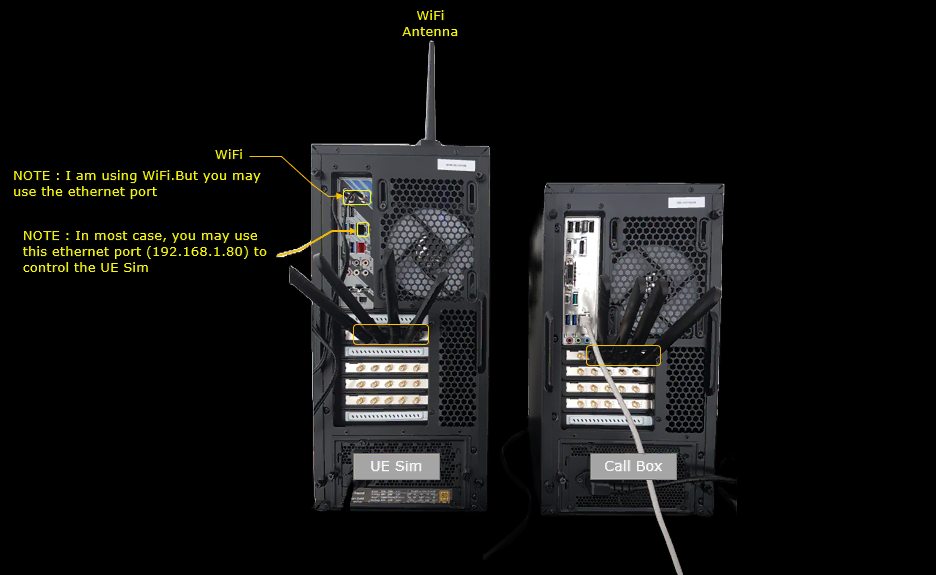
Test setup for this tutorial is as shown below.
Key Configuration Parameters
Followings are important configuration parameters for this tutorial. You may click on the items for the descriptions from Amarisoft documents.
Test 1 : 2CC CA - TDD and TDD - without Measurement
In this test, I will show you how to configure a NR SA carrier aggregation with 2 TDD Cell without RRC Measurement. I didn't enabled measurement just because of the simplicity and you can take this as a base framework (a reference) for configuration of carrier aggregation.
Configuration
An important thing in using UE sim is to do proper matching between UE sim configuration and Call box configuration In this tutorial, I used the ue-nr-2cc-sa-tdd .cfg that is copied and modified from the ue-nr-2cc-sa.cfg and gnb-2cc-sa-tdd.cfg that is copied and modified from gnb-2cc-sa.cfg
Configuration for Callbox
If you use other Network (e.g, other network simulator or real network), you have to make it sure to configure UE sim according to the settings on network side
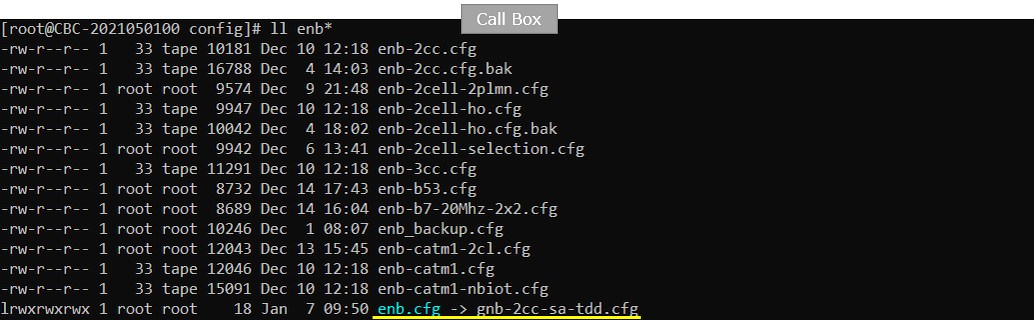
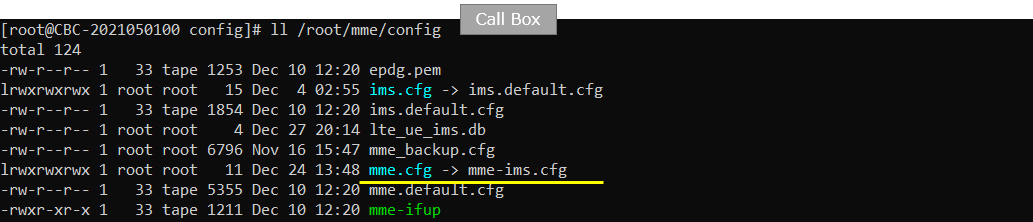
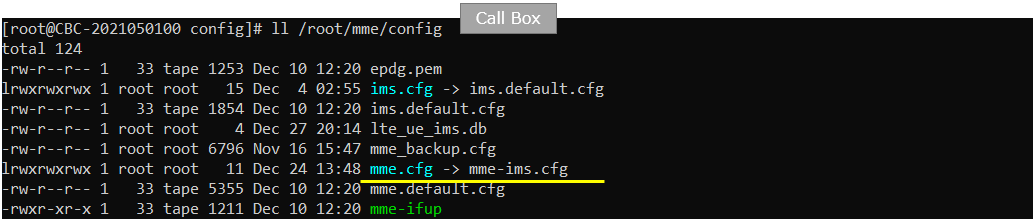
For the core network side, we don't need any specific configuration for carrier aggregation. So I just used the default core network configuration file (mme-ims.cfg)
First, the duplex mode is configured by the NR_TDD parameter. In this test, NR_TDD is set to 1, which means that the cells are operated in TDD mode. Since this parameter is defined as a common configuration value, the same duplex setting is applied to all cells in this setup.
NR_TDD_CONFIG is set to 2, which selects the TDD UL/DL pattern to be used by the cells. This value should be chosen carefully because both component carriers need to follow a compatible TDD timing structure for carrier aggregation operation. NR_ANTENNA_DL is set to 1 and NR_ANTENNA_UL is also set to 1, so this example uses a simple SISO configuration for both downlink and uplink. NR_BANDWIDTH is set to 20, meaning that each NR cell is configured with 20 MHz bandwidth. NR_LONG_PUCCH_FORMAT is set to 2, which selects the long PUCCH format used in this configuration.
At this point, the important thing is that both cells are prepared with the same TDD-based radio framework. This makes the first CA test simpler because the focus can stay on adding and activating the secondary carrier, rather than handling different duplex modes or antenna configurations.

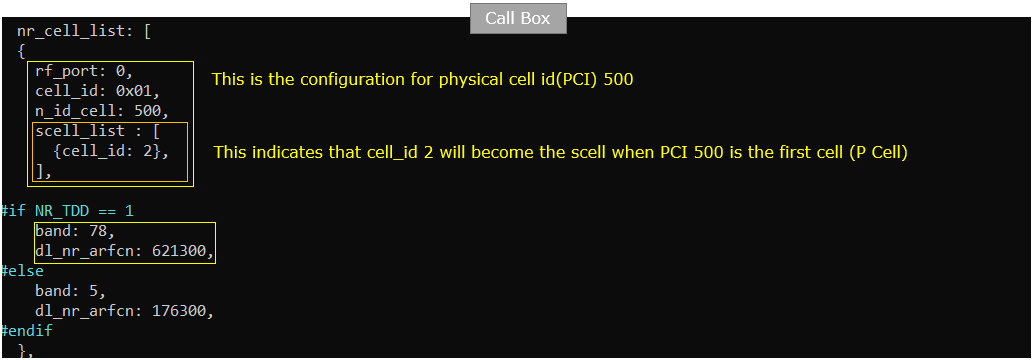
Now configure each cell to support secondary cell addition. This is done by specifying the scell_list parameter inside the cell configuration in nr_cell_list. In this test, the first cell is configured with scell_list containing { cell_id: 2 }, which means that when this cell becomes the primary cell, the cell with cell_id 2 can be added as the secondary cell for carrier aggregation.
In this example, the first cell is configured with n_id_cell: 500, so PCI 500 becomes the PCell when the UE camps on this cell. Under this cell configuration, scell_list points to cell_id 2, which tells the Callbox that cell_id 2 is the candidate SCell to be added for CA operation. Since rrc_configuration is not specified inside scell_list, there is no measurement-based condition for adding the SCell. This means that the SCell can be added directly by RRC Reconfiguration without waiting for a UE measurement report, as long as the UE supports carrier aggregation for the configured band combination.
For this TDD test, the cell is configured with band 78 and dl_nr_arfcn 621300. This defines the operating band and downlink NR-ARFCN for the cell. The important point in this part is not only the frequency configuration itself, but also the relationship between the PCell and SCell. The PCell configuration explicitly lists which secondary cell can be added, and this becomes the basis for the later RRC Reconfiguration message that adds the SCell to the UE.
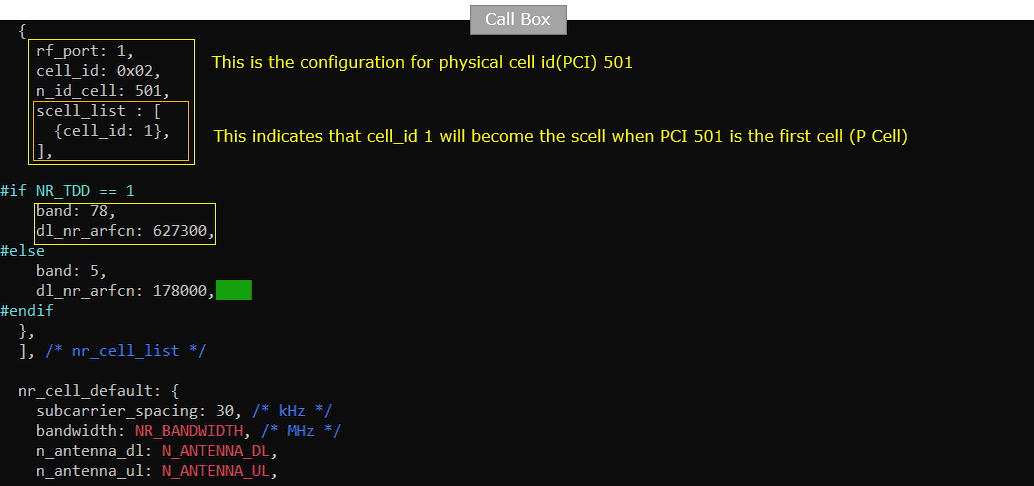
Then configure the second cell in the same way so that carrier aggregation can work in either cell direction. In this cell configuration, rf_port is set to 1, cell_id is set to 0x02, and n_id_cell is set to 501, so this part defines the second physical cell with PCI 501. Under this cell, scell_list contains { cell_id: 1 }, which means that when PCI 501 becomes the primary cell, the cell with cell_id 1 can be added as the secondary cell.
This configuration is the reverse relationship of the previous cell configuration. In the previous example, cell_id 1 can add cell_id 2 as the SCell. In this example, cell_id 2 can add cell_id 1 as the SCell. This makes the setup more flexible because the UE can camp on either cell first, and the other cell can still be added later as the secondary component carrier.
As in the first cell configuration, rrc_configuration is not specified inside scell_list. This means that the SCell addition is not controlled by an RRC measurement condition. The Callbox can add the secondary cell directly by RRC Reconfiguration as long as the UE supports the required carrier aggregation band combination.
For this TDD test, the second cell is also configured on band 78, but with a different downlink NR-ARFCN, dl_nr_arfcn 627300. So the two cells are both TDD cells in the same band, but they operate on different carrier frequencies. This creates the basic 2CC intra-band CA structure, where one carrier works as the PCell and the other carrier is added as the SCell.
Configuration for UEsim
I used the ue-nr-2cc-sa-tdd .cfg for this test (
NOTE : You can skip this configuration if you use commerical UE as DUT)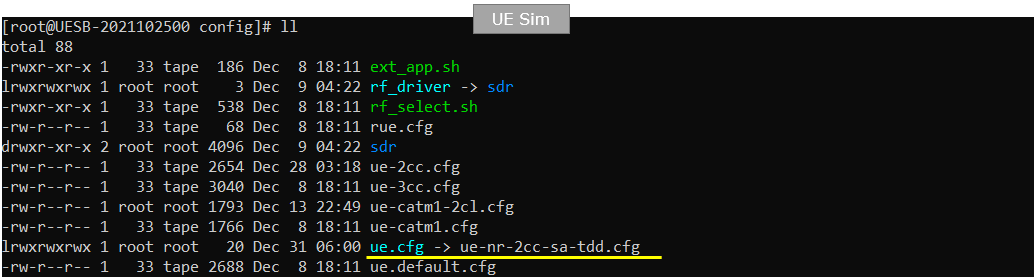
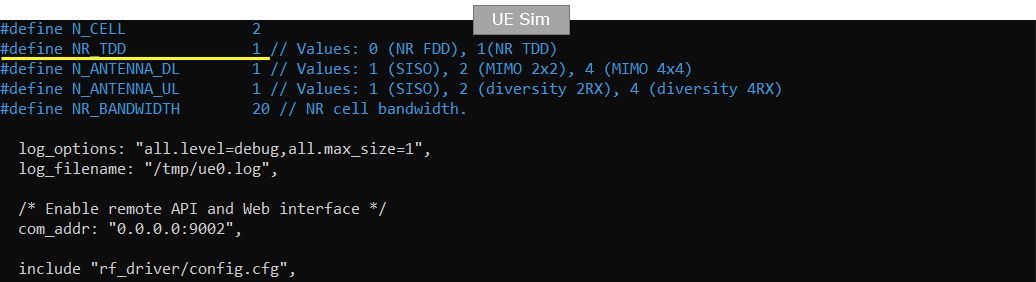
Since this test uses two cells for carrier aggregation, set N_CELL to 2 in the UEsim configuration. This tells UEsim to create and handle two NR cells so that one cell can work as the PCell and the other cell can be added later as the SCell.
NR_TDD is set to 1 to match the Callbox configuration, meaning that the UE side is also configured for NR TDD operation. This value should be aligned between Callbox and UEsim because the UE needs to follow the same duplex mode and TDD timing structure as the network.
N_ANTENNA_DL is set to 1 and N_ANTENNA_UL is also set to 1, so the UE is configured with a simple SISO antenna setup for both downlink and uplink. NR_BANDWIDTH is set to 20, which matches the 20 MHz cell bandwidth configured on the Callbox side. Keeping these basic radio parameters aligned between Callbox and UEsim is important before testing carrier aggregation, because any mismatch in duplex mode, antenna configuration, or bandwidth can prevent the UE from properly synchronizing with the configured cells.
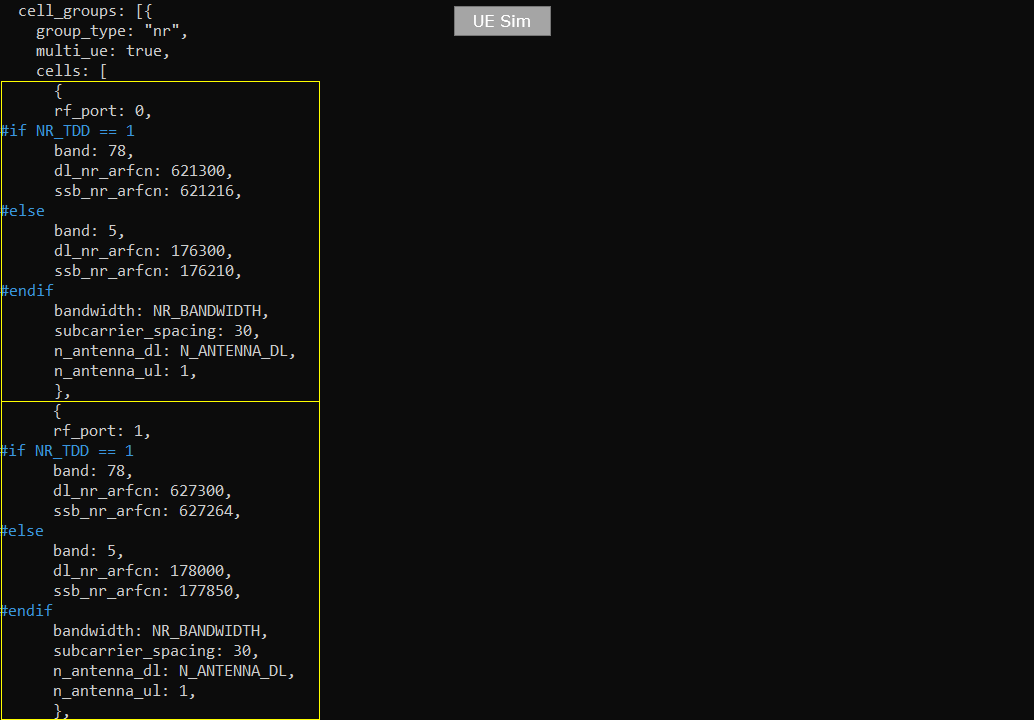
Since this is a 2CC CA test, two cells are configured in the cells list on the UEsim side. Each cell configuration should match the corresponding Callbox cell configuration so that UEsim can detect both carriers correctly and use them for carrier aggregation.
The first cell uses rf_port 0 and is configured with band 78, dl_nr_arfcn 621300, and ssb_nr_arfcn 621216 when NR_TDD is set to 1. This matches the first TDD cell configured on the Callbox side. The second cell uses rf_port 1 and is configured with band 78, dl_nr_arfcn 627300, and ssb_nr_arfcn 627264, which matches the second TDD cell on the Callbox side. Since both cells are in band 78 but use different carrier frequencies, this creates the two-carrier structure required for NR SA 2CC CA.
For each cell, bandwidth is set to NR_BANDWIDTH, subcarrier_spacing is set to 30 kHz, and n_antenna_dl is set to N_ANTENNA_DL. These values should be kept consistent with the common UEsim configuration and with the Callbox configuration. The important point here is that UEsim must be aware of both component carriers from the beginning. Then, after the UE connects to one cell as the PCell, the other configured cell can be added later as the SCell through RRC Reconfiguration and activated by MAC CE.
Perform the Test
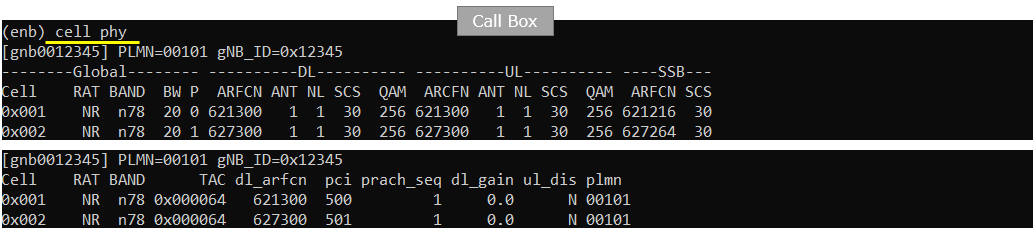
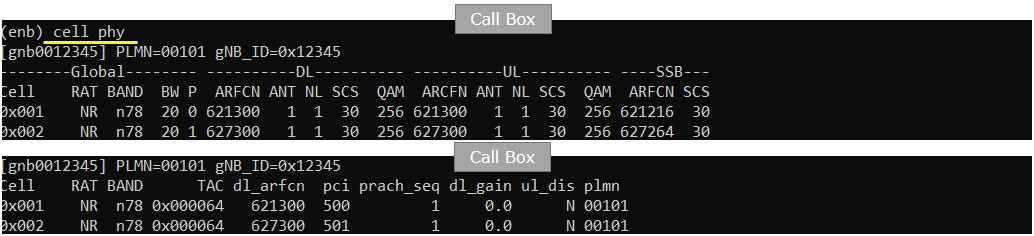
First, check the basic cell configuration on the Callbox side using the cell phy and cell commands. These commands do not directly tell you whether the setup is specifically for carrier aggregation, handover, or cell reselection, but they are useful for confirming that multiple cells are configured and running as expected.
In the cell phy result, two NR cells are shown. Cell 0x001 is configured on band n78 with 20 MHz bandwidth, DL ARFCN 621300, UL ARFCN 621300, and SSB ARFCN 621216. Cell 0x002 is also configured on band n78 with 20 MHz bandwidth, DL ARFCN 627300, UL ARFCN 627300, and SSB ARFCN 627264. Since both cells are configured on n78, this confirms that the test is using two TDD cells. You can also refer to an NR band table, such as sqimway.com/nr_band.php, to check whether a specific NR band is defined as TDD or FDD.
The cell command gives another view of the same cells. It shows that cell 0x001 has PCI 500 and cell 0x002 has PCI 501. The DL ARFCN values also match the earlier configuration, where the first cell uses 621300 and the second cell uses 627300. At this stage, the purpose is simply to confirm that both cells are active with the expected band, frequency, bandwidth, and PCI before starting the UE attach and carrier aggregation procedure. You may refer to this site : https://www.sqimway.com/nr_band.php to check duplex type of each band.
If all cells are configured as intended, power on the UE from UEsim. If you are using a commercial UE instead of UEsim, this is the point where you can power on the device.
After the power_on command is executed, UEsim starts the cell search and initial synchronization procedure. In this example, the log shows Cell 0: SIB found and Cell 1: SIB found, which means that UEsim successfully detected both configured cells and decoded the system information from each cell. This is an important checkpoint before checking carrier aggregation, because the UE first needs to recognize the available cells correctly before one of them can be used as the PCell and the other can be added later as the SCell.
At this stage, the UE is not yet confirmed to be using carrier aggregation. The purpose of this step is to confirm that the UE can see both cells and that the basic radio configuration between Callbox and UEsim is aligned. Once both SIBs are found, you can proceed to the attach procedure and then check whether the secondary cell is added and activated properly.

With the ue command on UEsim, you can check the UE registration status after powering on the UE. In this result, EMM_STATE is shown as registered, which means the UE has successfully completed the registration procedure with the network. The output also shows one E-RAB and an assigned IP address of 192.168.2.2, so the UE has obtained user-plane connectivity.
At this point, the UE is attached to the network, but this command still does not confirm carrier aggregation by itself. It only confirms that the UE is registered and has at least one IP address. If you are using a commercial mobile phone instead of UEsim, the equivalent basic check would be that the phone shows the 5G icon and a valid signal indication on the display. After this registration check is successful, you can continue with CA-specific checks such as whether the SCell is added by RRC Reconfiguration and whether it is activated by MAC CE.

On the Callbox side, check the real-time trace log with the t command. It is better to start this trace before powering on the UE, because then you can capture the full procedure from initial access to registration and SCell activation.
In this trace, the C column indicates the number of component carriers currently used by the UE. If you see 2 under the C column, it means that 2CC carrier aggregation has been established. In this example, the UE is shown with C = 2, so the UE is not only registered on the PCell but also has the second component carrier added and activated.
Other columns such as cqi, ri, mcs, snr, and bitrate show the radio condition and scheduling status while the UE is connected. However, for this specific checkpoint, the most important field is the C column. Once this value becomes 2, you can confirm from the Callbox trace that the UE is operating with two component carriers.s (
NOTE : I would suggest you to run 't' command before you power on UE on UEsim)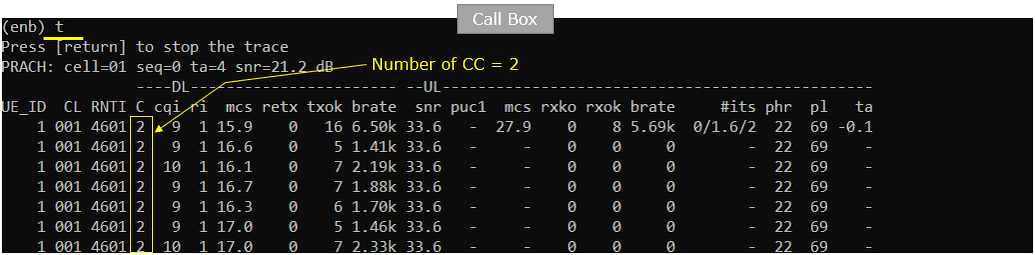
On the Callbox MME screen, you can also check the registration and IP allocation status with the ue command. This gives the core-network side view of the UE status.
In this output, REG is set to Y, which means the UE is registered in the core network. The SUPI is shown as 001010123456789, and the UE is connected through the 5GC path. The IP_ADDR field shows 192.168.2.2, which means that an IP address has been successfully allocated to the UE. The #BEARER value is 1, indicating that one user-plane bearer is established.
This check does not directly prove carrier aggregation, but it confirms that the UE is properly registered and has a valid data connection from the core-network point of view. Together with the previous Callbox t trace showing C = 2, this confirms both parts of the test: the UE is registered with IP connectivity, and 2CC carrier aggregation is active on the radio side.

This step is not mandatory, but it is useful for checking whether the user-plane data path is working properly. After confirming that the UE is registered and that an IP address is allocated, you can generate downlink UDP traffic from the Callbox side using ltesim_server.
In this example, ltesim_server is started on the Callbox, and the cbr_send command is used to send constant bit rate UDP traffic to the UE IP address 192.168.2.2. The value 200M indicates the target data rate, and 60 indicates the traffic duration in seconds. This means the Callbox sends UDP packets toward the UE for 60 seconds with a target throughput of 200 Mbps.
This test helps confirm that the IP data pipe is properly established after registration. It is also useful for observing scheduling and throughput behavior in the Callbox trace. If carrier aggregation is working, you can keep the t trace running and check whether the UE continues to show C = 2 while data traffic is being scheduled.

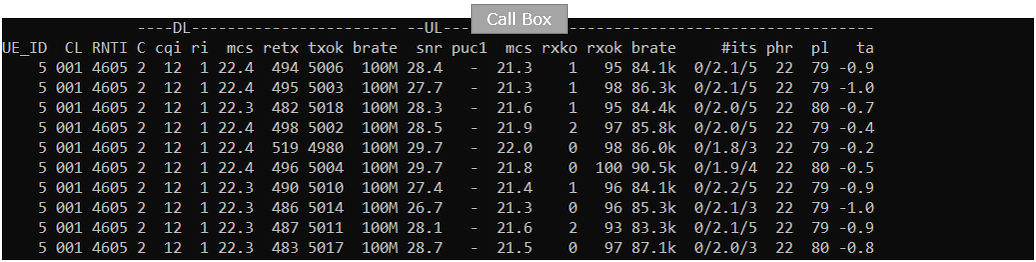
Check the downlink throughput with the t command on the Callbox side while the UDP traffic is running. In this example, the C column still shows 2, which means that the UE is operating with two component carriers during the traffic test. This is the important CA confirmation point because it shows that carrier aggregation is still active while downlink data is being scheduled.
The brate column under DL shows around 100M, which means the Callbox is sending downlink traffic to the UE at about 100 Mbps in this trace. The mcs value is around 22, cqi is 12, and the downlink snr is around 27 to 29 dB, indicating that the radio condition is good enough for stable downlink scheduling. The txok value is continuously increasing, which means downlink packets are being transmitted successfully.
At this point, you can confirm that the UE is registered, IP connectivity is established, the SCell is active, and downlink traffic is flowing while 2CC CA is maintained. So this trace is a practical final check that the 2CC CA setup is working not only at the configuration level, but also during real data transfer.
Log Analysis
Sample Log In this section, you will see how to confirm if UE registration is complete from trace log. You can use the same method to find any issues (e.g, registration failure) for troubleshooting. When UE registration fails, you may use this tutorial to figure out the point of the failure and troubleshoot
NOTE : This section is just to check quickly some important points in the log, but it may be a little bit tricky to do the detailed log analysis (especially for lower layer log analysis). In that case, I strongly recommend you to use WebGUI for the log analysis. You may refer to WebGUI Tutorial
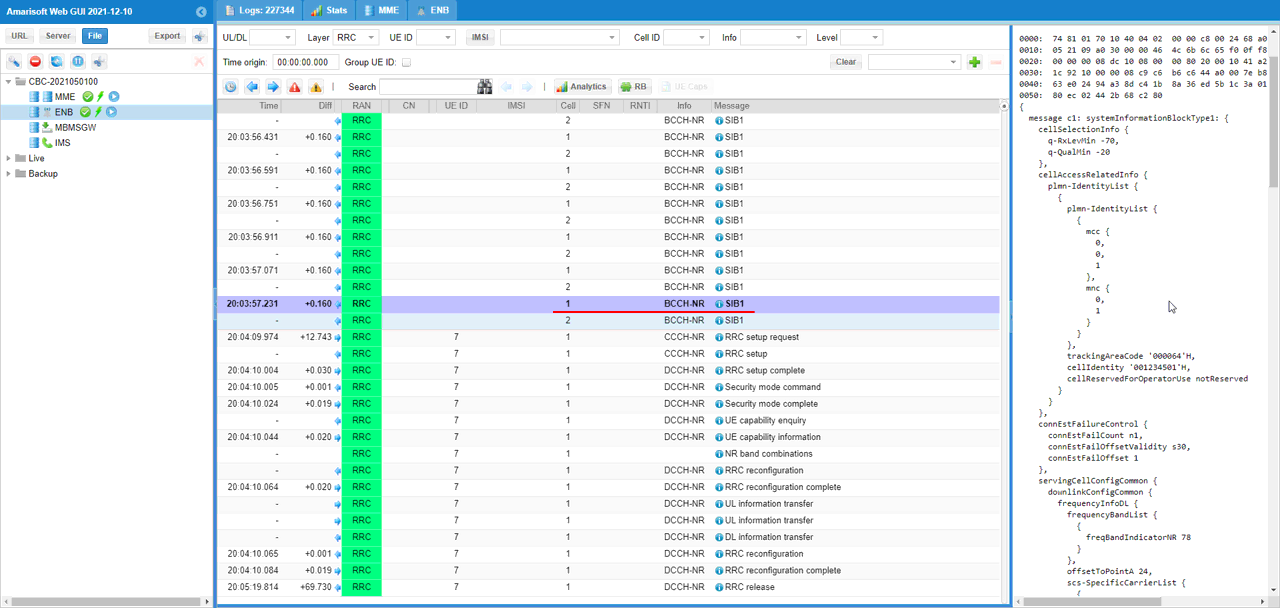
First, check the basic SIB1 transmission from cell 1. There is no specific CA-related parameter that needs to be checked in this SIB1 at this point. The purpose of this step is simply to confirm that cell 1 is running properly and broadcasting SIB1 as expected.
In the log, SIB1 is repeatedly transmitted on BCCH-NR, and the selected message is decoded as systemInformationBlockType1. This confirms that the cell is already active at the RRC broadcast level. From the decoded SIB1 contents, you can also see basic cell information such as PLMN identity, tracking area code, cell identity, and servingCellConfigCommon. These are common system information parameters required for UE cell selection and initial access, not a direct indication of carrier aggregation.
For this CA test, this step should be treated as a basic sanity check. Before checking RRC Reconfiguration or SCell activation, it is important to confirm that the serving cell is broadcasting SIB1 correctly. If SIB1 is not transmitted or cannot be decoded properly, the UE may not be able to camp on the cell, and the later carrier aggregation procedure cannot proceed normally.
Likewise, check the basic SIB1 transmission from cell 2. As with cell 1, there is no specific CA-related parameter that needs to be highlighted in this SIB1 for this test. The main purpose is to confirm that cell 2 is also running properly and broadcasting SIB1.
In the log, SIB1 is transmitted on BCCH-NR for cell 2, and the selected message is decoded as systemInformationBlockType1. This confirms that the second cell is active and can broadcast the basic system information required for UE detection and initial access. The decoded SIB1 includes common information such as PLMN identity, tracking area code, cell identity, and servingCellConfigCommon, but these are general cell broadcast parameters rather than a direct indication of carrier aggregation.
This step is another sanity check before moving into the CA-specific signaling. Since this test uses two cells, both cells should be verified individually. If cell 2 does not transmit SIB1 properly, the UE may not be able to detect it as a valid cell, and it may not be possible to add it later as an SCell. Once SIB1 transmission is confirmed for both cell 1 and cell 2, you can continue to check the RRC procedure where the secondary cell is actually configured.
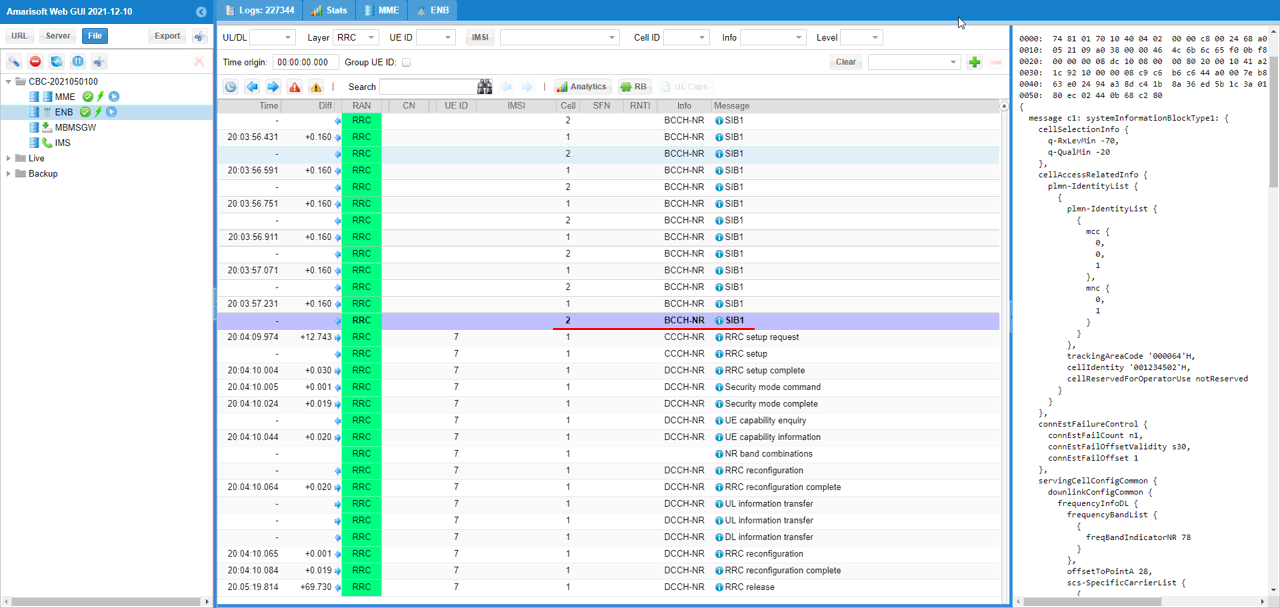
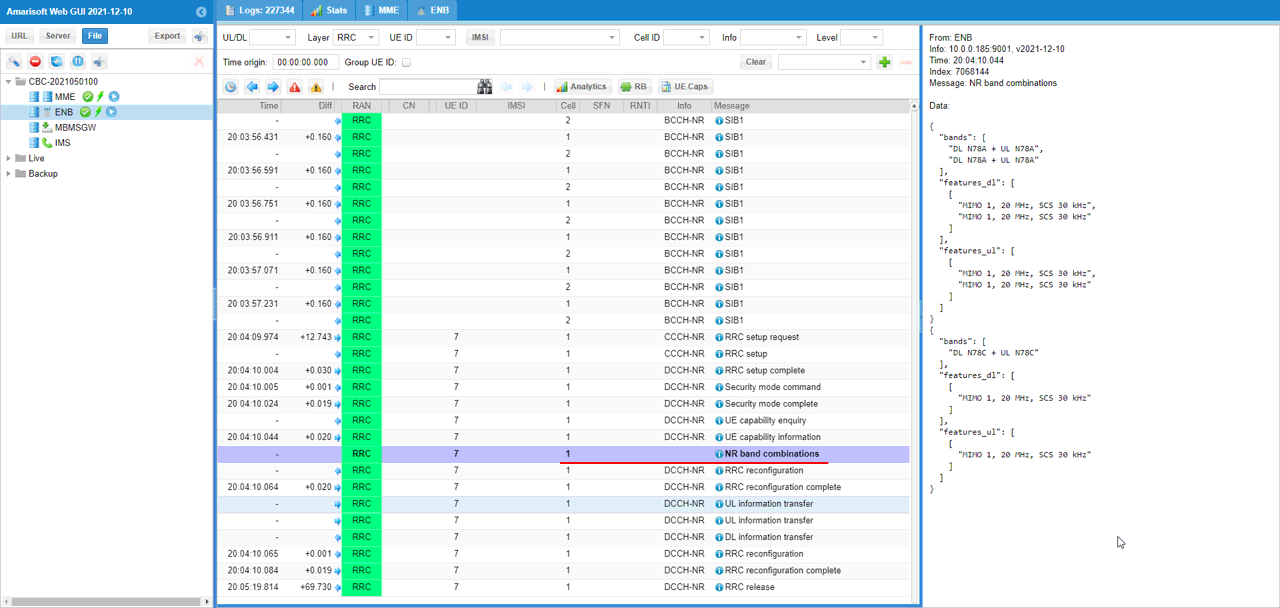
Confirm that the UE supports the CA band combination that matches the band configuration used in the test. This is an important checkpoint because the gNB will not add the secondary component carrier if the UE does not report support for the required band combination, even if both cells are configured correctly and all other conditions are satisfied.
In this example, the selected message is NR band combinations, which is derived from the UE capability information. The decoded capability shows supported combinations such as DL NR78 + UL NR78 and DL NR78A + UL NR78A. This matches the test configuration where both component carriers are configured in band n78. It also shows the supported feature set, including MIMO 1, 20 MHz, and 30 kHz SCS, which is consistent with the simple SISO 20 MHz configuration used in this test.
This step explains why UE capability checking is important in CA testing. The Callbox may have two cells configured properly, and the UE may be able to detect both cells, but CA will still not be established unless the UE reports the required CA band combination. Once the matching band combination is confirmed here, the next step is to check the RRC Reconfiguration message where the SCell is actually added to the UE configuration.
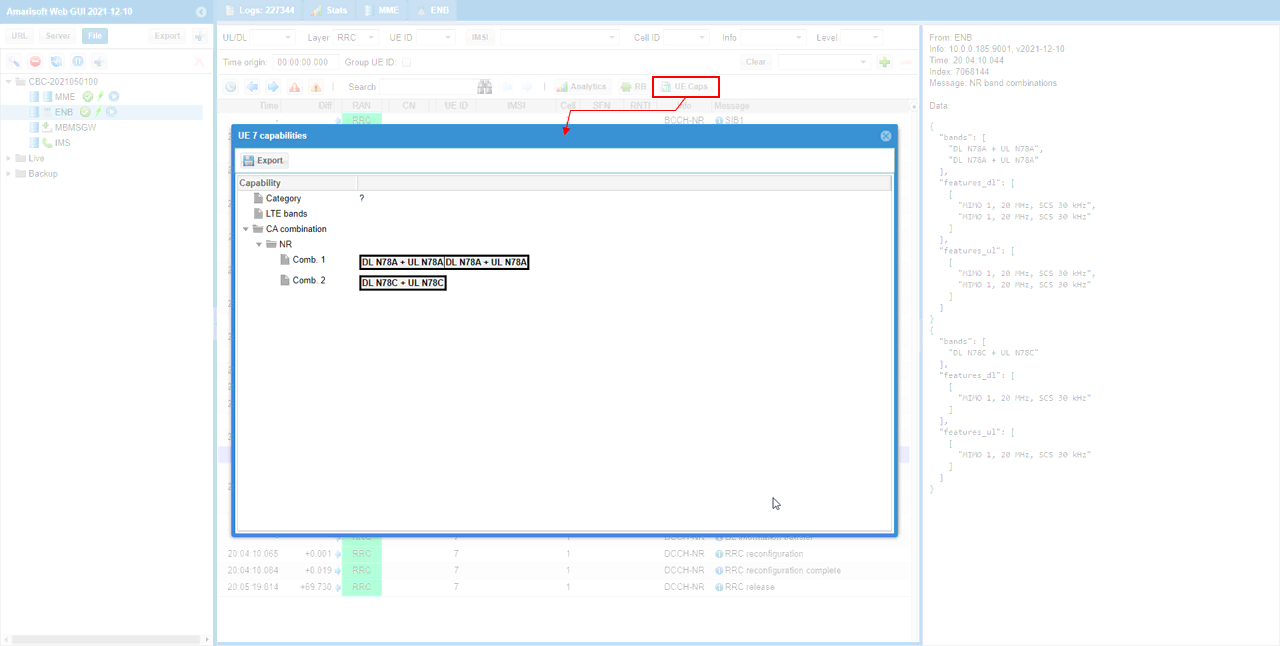
In many cases, UE capability information contains a long list of supported features and band combinations, so it can be difficult to read directly from the decoded RRC text. To make the CA band combination easier to check, you can use the UE Caps function in Amarisoft Web GUI.
When you click UE Caps, the UE capability information is displayed in a more organized tree format. In this example, under CA combination, the NR section shows the supported carrier aggregation combinations. Comb. 1 shows DL NR78A + UL NR78A and DL NR78A + UL NR78A, which matches this test case because both component carriers are configured in band n78. Comb. 2 shows another supported combination, DL NR78C + UL NR78C.
This view is useful because you can quickly confirm whether the UE supports the same CA band combination as the one configured on the Callbox. If the required band combination is not listed here, the gNB may not add the SCell, even though the two cells are running and the UE is registered normally. So before debugging the RRC Reconfiguration or MAC CE activation step, it is always a good idea to confirm the UE capability first in this table-based view.
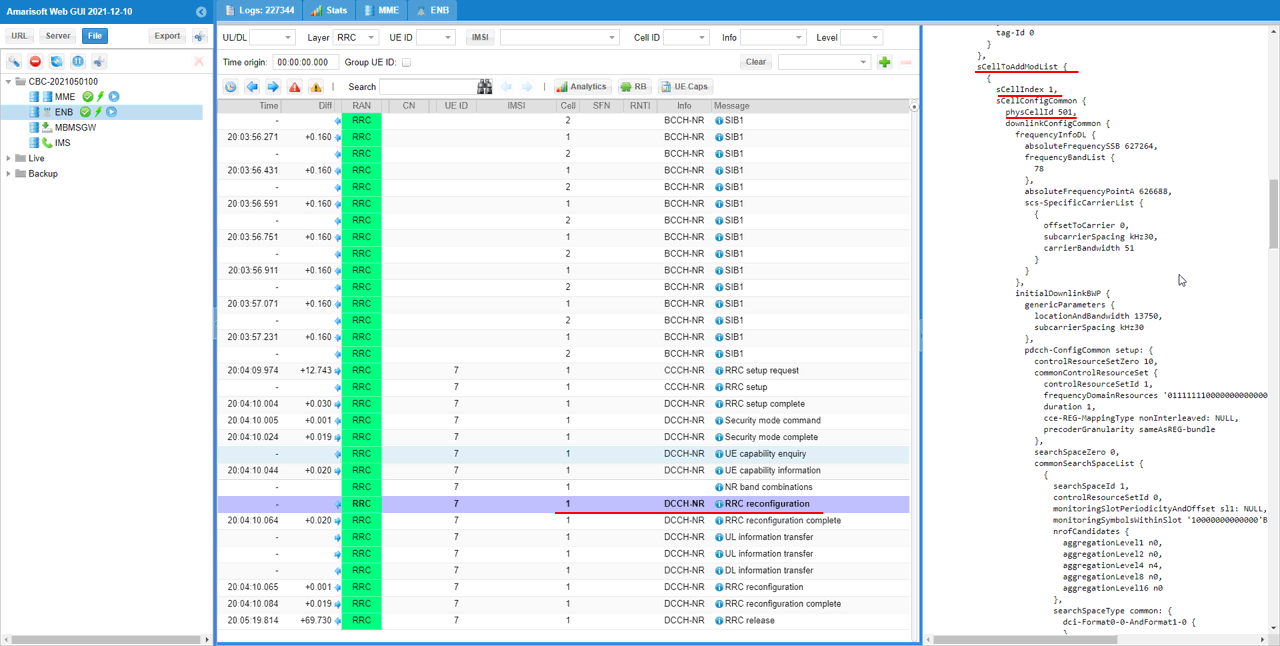
If the UE supports the band combination specified in the configuration file, the gNB sends an RRC Reconfiguration message to add the SCell. This is the first clear CA-specific RRC signaling step, because the secondary cell is now being configured for the UE.
In this example, the selected message is RRC reconfiguration on DCCH-NR. Inside the message, scellToAddModList is included, which means that the network is adding or modifying an SCell configuration. The scellIndex identifies the configured SCell entry, and physCellId is set to 501, which corresponds to the second cell configured earlier. The downlink configuration includes frequencyInfoDL with absoluteFrequencySSB 627264 and frequencyBandList containing band 78, so this SCell configuration matches the second TDD n78 carrier used in the test.
This message is important because it shows that the Callbox has decided to add the secondary component carrier and has provided the UE with the required SCell configuration. At this point, the SCell is configured by RRC, but it does not necessarily mean that the SCell is already active for data scheduling. After the UE receives this configuration, the next important step is to check RRC Reconfiguration Complete from the UE and then confirm SCell activation by MAC CE.
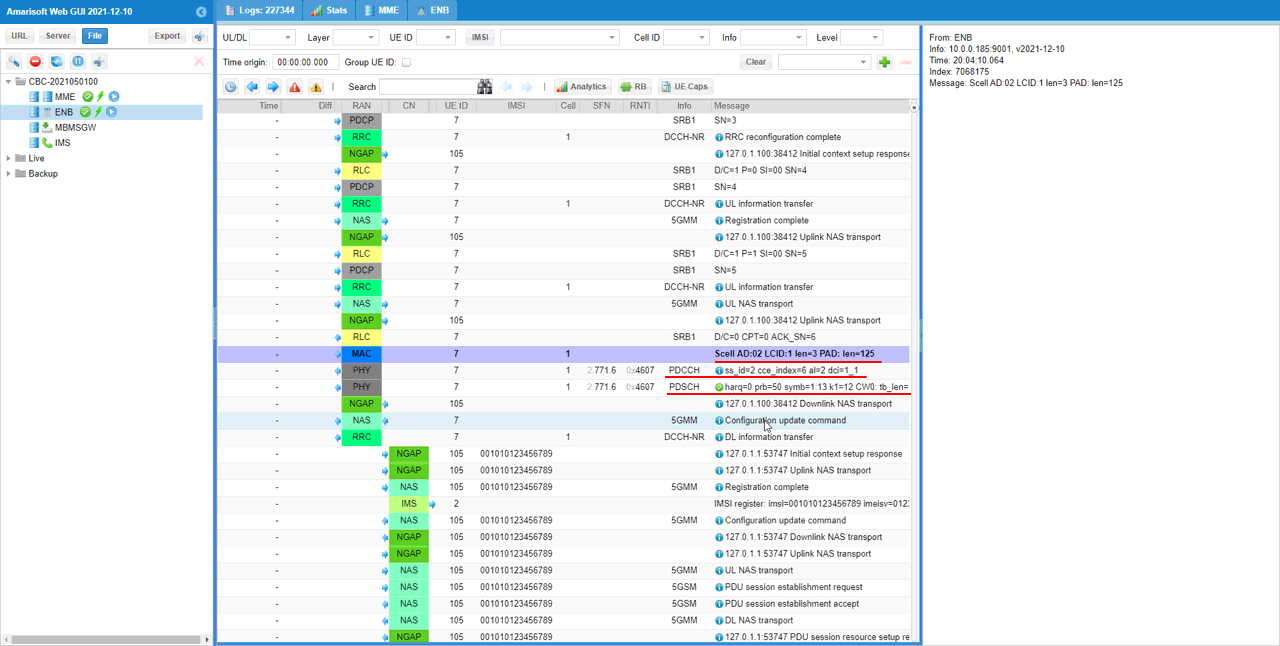
You can also check the MAC log to confirm the SCell addition. Look for the SCell AD message in the MAC layer. This indicates that the secondary cell has been added at the MAC level after the RRC Reconfiguration procedure.
In this example, the MAC log shows SCell AD:02, which indicates that the SCell corresponding to logical cell ID 2 is being added. This matches the earlier RRC Reconfiguration where the secondary cell was configured with PCI 501. The same log line also shows PAD, which means padding is included in the MAC PDU.
Right after the MAC message, you can see the corresponding PHY entries. The PDCCH line shows the downlink control information used to schedule the transmission, and the PDSCH line shows that the MAC PDU is actually transmitted through the physical downlink shared channel. This is an important confirmation because it shows not only that the MAC layer generated the SCell addition message, but also that the message was scheduled and sent over the air interface through PDCCH/PDSCH.
At this point, the SCell has been configured by RRC and the MAC layer has sent the SCell addition message. The next checkpoint is to confirm that the UE receives and accepts the configuration, and then to verify that the SCell becomes active during scheduling.
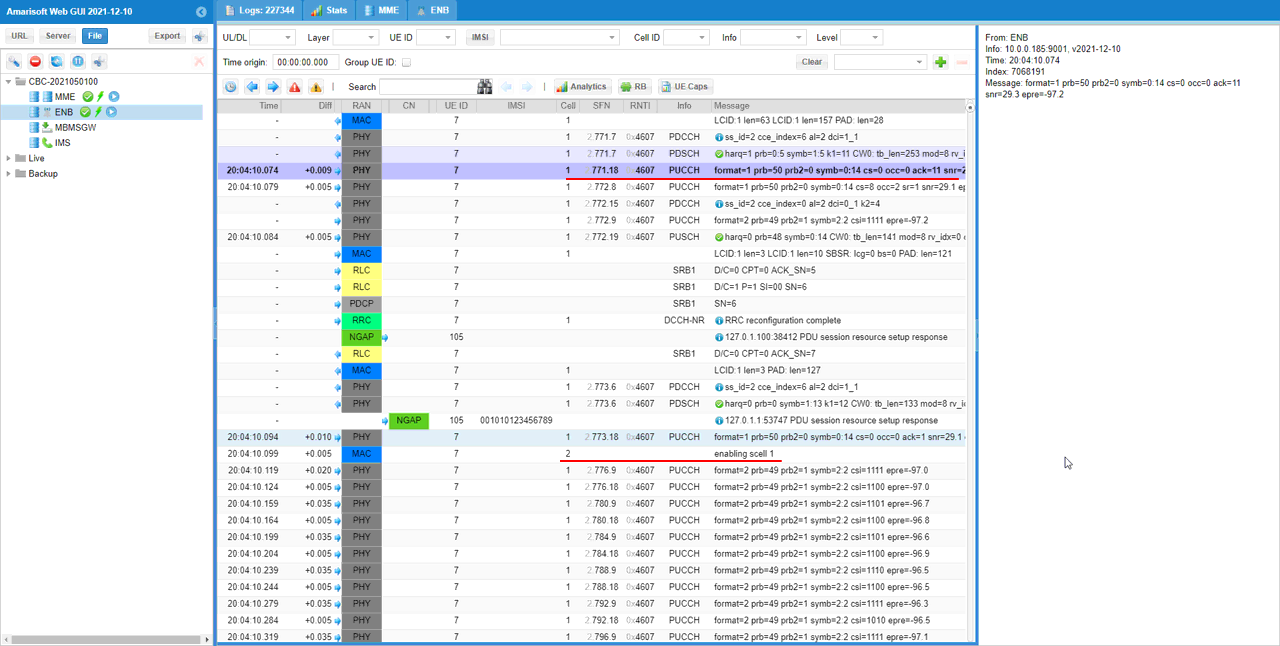
Now confirm that the added SCell is activated by checking the enabling scell log print. This is the point where the SCell is no longer just configured by RRC, but becomes active for CA operation.
In this example, the MAC log shows enabling scell 1. This indicates that the configured secondary cell is being activated. After this point, the UE can start using the SCell as part of the carrier aggregation operation, depending on scheduling and traffic condition.
You can also see PHY activity around this timing, including PUCCH, PDCCH, and PDSCH entries. These logs show that the lower layer procedure is continuing after the SCell activation. The important checkpoint here is the enabling scell message, because it confirms the activation step after the earlier RRC Reconfiguration and SCell addition message.
So the CA procedure can be understood in sequence as follows: first the UE capability confirms that the required band combination is supported, then RRC Reconfiguration adds the SCell configuration, then the MAC log shows SCell addition, and finally the enabling scell log confirms that the configured SCell is activated. Once this activation is done, you can check the t trace and confirm that the C column becomes 2 during connected operation or data traffic.
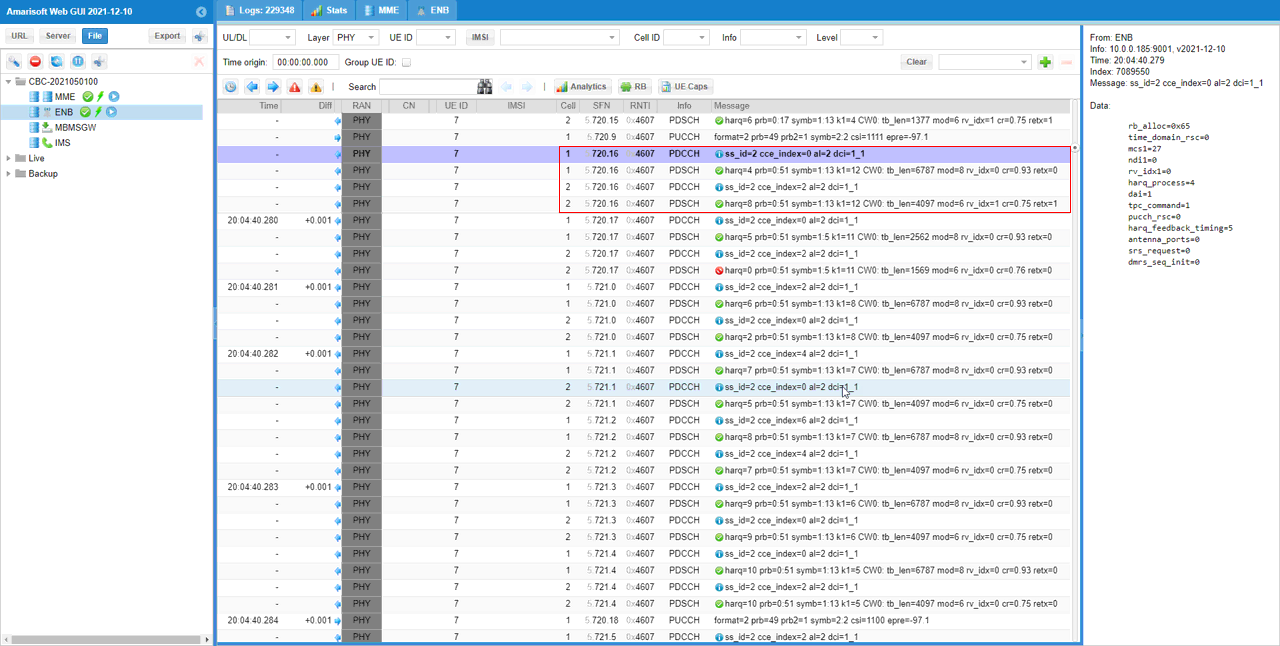
After the SCell is activated, check the PHY log to confirm that user traffic is scheduled on both the PCC and SCC. In this test, cell 1 and cell 2 correspond to the two component carriers used for 2CC CA, so you should see PHY scheduling activity for both cells.
In the log, the Cell column shows entries for both cell 1 and cell 2. You can see PDCCH and PDSCH messages appearing for cell 1, and also PDCCH and PDSCH messages appearing for cell 2. This indicates that downlink scheduling is not limited to only the primary cell. The scheduler is using both component carriers, which is the expected behavior after CA is established and the SCell is activated.
The PDCCH entries show the downlink control information used to schedule the transmission, and the PDSCH entries show the actual downlink shared channel transmission carrying the user data. Seeing these PDCCH/PDSCH pairs on both cells is a strong confirmation that the PCC and SCC are both participating in data transmission.
This is a more detailed lower-layer confirmation than simply checking C = 2 in the t command. The t command gives a compact summary that two component carriers are active, while the PHY log shows the actual scheduling activity on each component carrier. When both checks are consistent, you can confirm that the UE is operating in 2CC CA and that traffic is being carried over both cells.
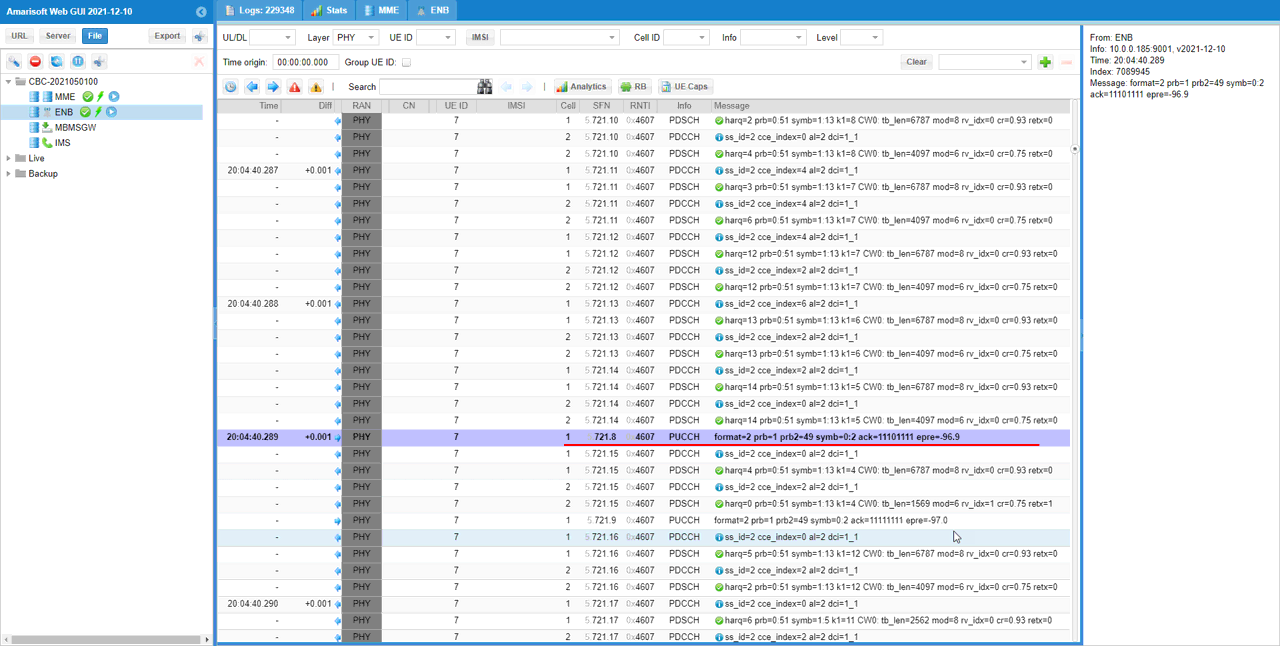
Now check whether PUCCH is reported with ACK/NACK values for the transmitted PDSCH. This is another important confirmation point because it shows that the UE is not only receiving scheduled PDSCH data, but also sending HARQ feedback back to the gNB.
In the PHY log, you can see repeated PDSCH transmissions on both cells, and then a PUCCH entry with ack values. The ack field indicates the HARQ feedback for the corresponding downlink PDSCH transmissions. When ACK/NACK feedback is observed, it means that the downlink scheduling, PDSCH reception, HARQ feedback generation, and uplink control transmission are all working together.
This is a stronger end-to-end radio stack confirmation than only checking that the SCell was configured. RRC Reconfiguration confirms that the SCell was added, the MAC log confirms that the SCell was activated, the PHY log confirms that PDCCH/PDSCH scheduling happens on both component carriers, and the PUCCH ACK/NACK confirms that the UE is properly responding to the downlink transmissions. If all these checkpoints are observed, you can conclude that 2CC carrier aggregation is properly established across the whole radio protocol stack.
Test 2 : 2CC CA - TDD and TDD - with Measurement
In this test, I will show you how to configure a NR SA carrier aggregation with 2 TDD Cell withRRC Measurement. In terms of the configuration for carrier aggregation, this is same as the previous test. The difference between this test and previous test is what triggers the carrier aggregation.
Configuration
An important thing in using UE sim is to do proper matching between UE sim configuration and Call box configuration In this tutorial, I used the ue-nr-2cc-sa-tdd .cfg that is copied and modified from the ue-nr-2cc-sa.cfg and gnb-2cc-sa-meas-tdd.cfg that is copied and modified from gnb-2cc-sa.cfg
Configuration for Callbox
If you use other Network (e.g, other network simulator or real network), you have to make it sure to configure UE sim according to the settings on network side
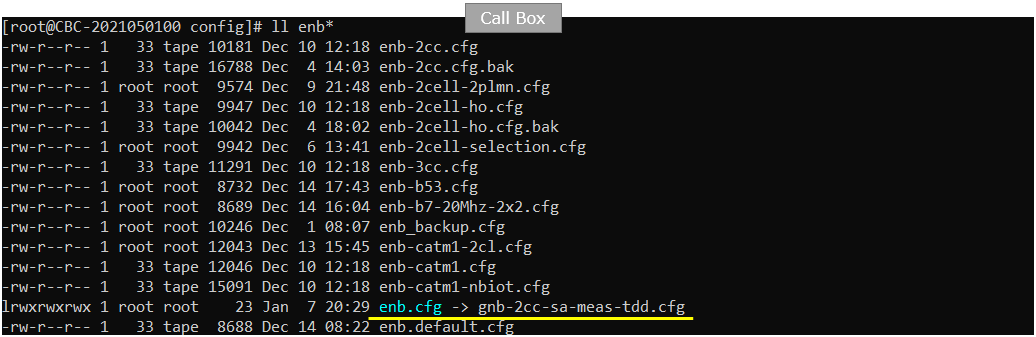
For the core network side, we don't need any specific configuration for carrier aggregation. So I just used the default core network configuration file (mme-ims.cfg)
First, configure the duplex mode with the NR_TDD parameter. In this test, NR_TDD is set to 1, which means that the cells are operated in NR TDD mode. Since this value is defined as a common configuration parameter, the same duplex mode is applied to all cells in this setup.
NR_TDD_CONFIG is set to 2, which selects the TDD UL/DL pattern used by the cells. Because this test uses TDD and TDD carrier aggregation, both component carriers should use a compatible TDD configuration so that the UE and gNB can maintain proper timing across the PCell and SCell. NR_ANTENNA_DL is set to 1 and NR_ANTENNA_UL is also set to 1, so this example uses a simple SISO configuration for both downlink and uplink. NR_BANDWIDTH is set to 20, meaning that each NR cell is configured with 20 MHz bandwidth. NR_LONG_PUCCH_FORMAT is set to 2, which selects the long PUCCH format used in this configuration.
This part is the same basic radio setup as the previous test. The main difference of this test is not in these common duplex, antenna, or bandwidth parameters, but in how the SCell addition is triggered later. In this test, the SCell will be added after the UE performs RRC measurement and reports the measured cell condition to the gNB.

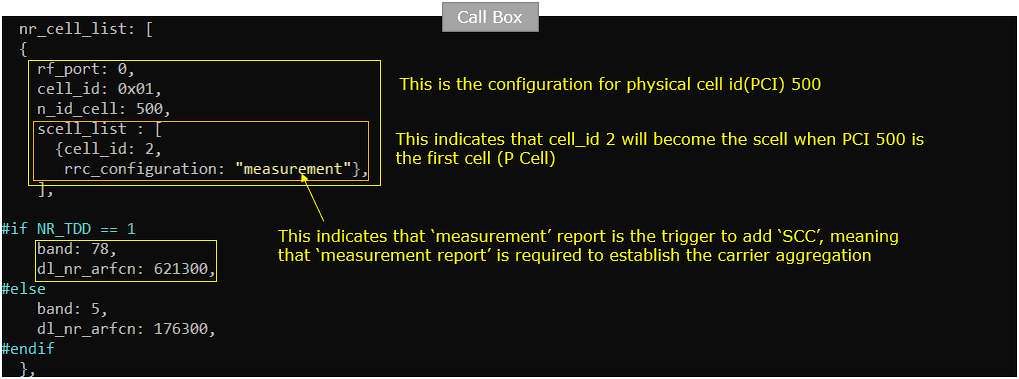
Now configure each cell to support secondary cell addition. This is done by specifying the scell_list parameter inside the cell configuration in nr_cell_list. In this test, the first cell is configured with scell_list containing { cell_id: 2 }, which means that when this cell becomes the PCell, the cell with cell_id 2 can be added as the SCell for carrier aggregation.
The important difference from the previous test is that rrc_configuration is specified as measurement inside scell_list. This means that the SCell is not added immediately just because it is listed as a candidate secondary cell. Instead, the gNB configures RRC measurement, waits for the UE measurement report, and then uses that report as the trigger condition to add the SCell.
In this example, the first cell is configured with n_id_cell: 500, so PCI 500 becomes the PCell when the UE camps on this cell. The scell_list points to cell_id 2, meaning that PCI 501 can become the secondary cell when PCI 500 is the serving PCell. Since rrc_configuration: "measurement" is used, the CA procedure becomes measurement-based. This makes the test closer to a real network scenario, where the gNB normally adds an SCell only after confirming through UE measurement that the secondary carrier is suitable.
For this TDD test, the cell is configured with band 78 and dl_nr_arfcn 621300. This defines the first carrier used as the possible PCell. The key point here is that the relationship between the PCell and SCell is still defined by scell_list, but the actual SCell addition is controlled by the RRC measurement procedure.
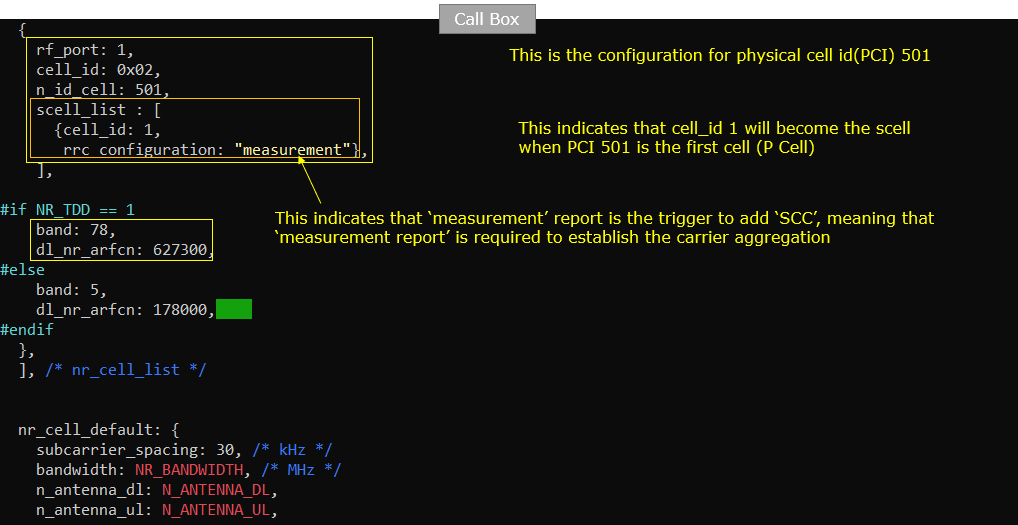
Then configure the second cell in the same way so that it can also support secondary cell addition. In this configuration, rf_port is set to 1, cell_id is set to 0x02, and n_id_cell is set to 501, so this part defines the second physical cell with PCI 501.
The scell_list contains { cell_id: 1 }, which means that when this cell becomes the PCell, the cell with cell_id 1 can be added as the SCell for carrier aggregation. This is the reverse direction of the previous configuration. In the previous cell configuration, PCI 500 can add cell_id 2 as the SCell. In this configuration, PCI 501 can add cell_id 1 as the SCell. This allows CA to work regardless of which of the two cells becomes the initial serving cell.
As in the previous cell configuration, rrc_configuration is set to measurement. This means that the SCell addition is controlled by RRC measurement. The gNB first configures the UE to measure the candidate secondary cell, and the UE sends a measurement report when the configured measurement condition is satisfied. After receiving the measurement report, the gNB can proceed with the RRC Reconfiguration to add the SCell.
For this TDD test, the second cell is configured with band 78 and dl_nr_arfcn 627300. So both component carriers are in band n78, but they use different carrier frequencies. The key point of this configuration is that scell_list defines the possible PCell and SCell relationship, while rrc_configuration: "measurement" defines that the actual SCell addition should be triggered by the UE measurement result.
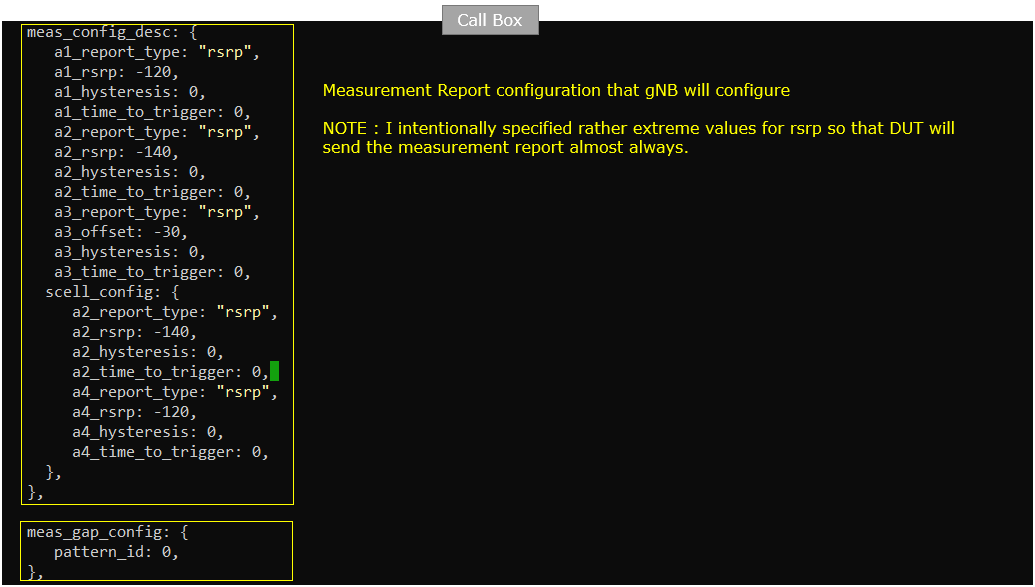
Since this test requires a measurement report as a precondition for SCell addition, configure the measurement details with meas_config_desc. This parameter defines what kind of measurement the gNB will configure in the UE, and what condition should trigger the UE to send a measurement report.
In this example, the measurement report type is set to rsrp, so the UE evaluates the measurement condition based on RSRP. The a1, a2, and a3 related parameters define general measurement event conditions, and the scell_config section defines the measurement condition used for SCell addition. Inside scell_config, a2_report_type and a4_report_type are set to rsrp, and the corresponding threshold values are configured with a2_rsrp and a4_rsrp. The hysteresis and time_to_trigger values are set to 0, so the measurement event can be triggered immediately when the condition is met.
For this tutorial, the RSRP threshold values are intentionally configured with rather extreme values so that the UE sends the measurement report almost always. This makes the test easier to reproduce because the purpose here is not to optimize a real deployment threshold, but to verify the measurement-based CA procedure. In a real test or field-like scenario, you can adjust rsrp, hysteresis, and time_to_trigger values according to your test requirement.
The important point is that scell_config provides the measurement condition used to trigger SCell addition. Once the UE receives this measurement configuration and reports that the candidate SCell satisfies the condition, the gNB can proceed with RRC Reconfiguration to add the SCell. The meas_gap_config section is also included, and pattern_id is set to 0, which provides the measurement gap configuration if measurement gap is needed for the configured measurement scenario.
Configuration for UEsim
I used the ue-nr-2cc-sa-tdd .cfg for this test (
NOTE : You can skip this configuration if you use commerical UE as DUT)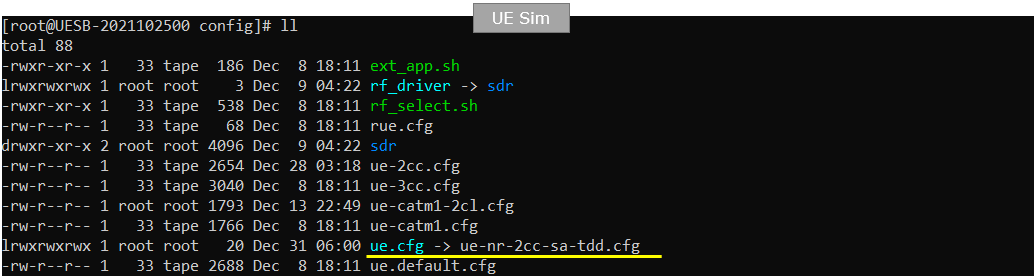
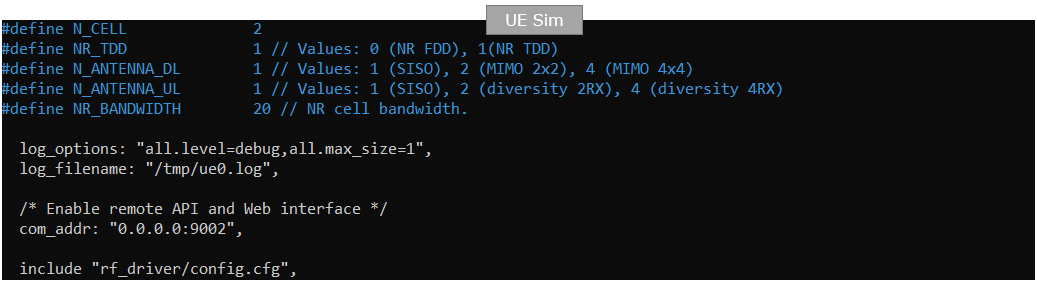
Since this test uses two cells for carrier aggregation, set N_CELL to 2 in the UEsim configuration. This allows UEsim to configure two NR cells so that one cell can be used as the PCell and the other cell can be measured and added later as the SCell.
NR_TDD is set to 1 to match the Callbox configuration, so the UE side is also configured for NR TDD operation. N_ANTENNA_DL is set to 1 and N_ANTENNA_UL is set to 1, which means the UE is configured with a simple SISO setup for both downlink and uplink. NR_BANDWIDTH is set to 20, so the UE expects 20 MHz NR cell bandwidth, matching the Callbox cell configuration.
These basic radio parameters should be aligned between the Callbox and UEsim before testing measurement-based CA. If the number of cells, duplex mode, antenna configuration, or bandwidth does not match, the UE may fail to detect the cells correctly, and the later measurement report and SCell addition procedure may not work as expected.
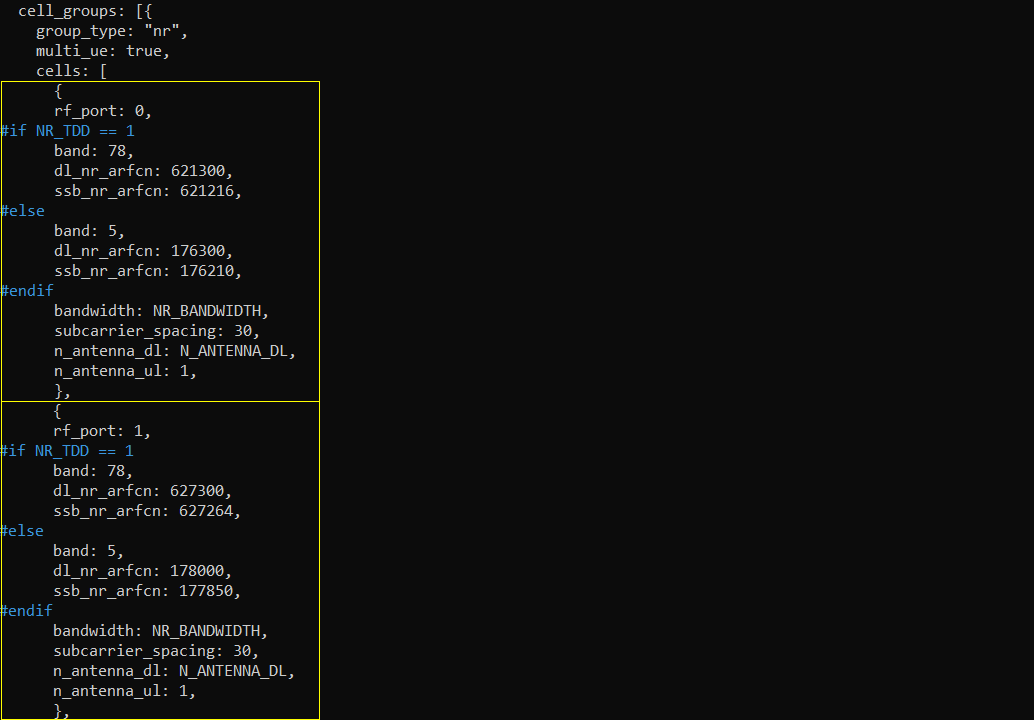
Since this is a 2CC CA test, two cells are configured in the cells parameter on the UEsim side. The UE side cell configuration should match the Callbox cell configuration so that UEsim can detect both carriers correctly before the measurement-based SCell addition procedure starts.
The first cell uses rf_port 0 and is configured with band 78, dl_nr_arfcn 621300, and ssb_nr_arfcn 621216 when NR_TDD is set to 1. This corresponds to the first TDD cell configured on the Callbox side. The second cell uses rf_port 1 and is configured with band 78, dl_nr_arfcn 627300, and ssb_nr_arfcn 627264, which corresponds to the second TDD cell on the Callbox side. Both cells are in band n78, but they use different carrier frequencies, so they can be used as two component carriers for NR SA 2CC CA.
For each cell, bandwidth is set to NR_BANDWIDTH, subcarrier_spacing is set to 30 kHz, and n_antenna_dl is set to N_ANTENNA_DL. These values should be consistent with the common UEsim parameters and the Callbox configuration. In this measurement-based test, the UE still needs to know both cells, but the SCell is not added immediately. The UE first connects to one cell as the PCell, measures the other configured cell according to the RRC measurement configuration, reports the measurement result, and then the gNB adds the measured cell as the SCell if the configured condition is satisfied.
Perform the Test
First, check the basic cell configuration on the Callbox side using the cell phy and cell commands. These commands do not directly indicate whether the current multi-cell configuration is used for carrier aggregation, handover, cell selection, or reselection, but they are useful as the first sanity check because they confirm that the expected number of cells are configured and running.
In the cell phy output, two NR cells are shown. Cell 0x001 is configured on band n78 with 20 MHz bandwidth, DL ARFCN 621300, UL ARFCN 621300, and SSB ARFCN 621216. Cell 0x002 is also configured on band n78 with 20 MHz bandwidth, DL ARFCN 627300, UL ARFCN 627300, and SSB ARFCN 627264. Since both cells are configured on band n78, this confirms that both cells are TDD cells. You can also refer to an NR band table, such as sqimway.com/nr_band.php, to check whether a specific NR band is defined as TDD or FDD.
The cell command gives another view of the same configuration. It shows that cell 0x001 has PCI 500 and cell 0x002 has PCI 501, and the DL ARFCN values match the configured carrier frequencies. At this stage, the purpose is simply to confirm that both cells are active with the expected band, frequency, bandwidth, and PCI before powering on the UE and checking the measurement-based carrier aggregation procedure.. You may refer to this site : https://www.sqimway.com/nr_band.php to check duplex type of each band.
If all cells are configured as intended, power on the UE from UEsim. If you are using a commercial UE instead of UEsim, this is the point where you can power on the device.
After the power_on command is executed, UEsim starts searching for the configured cells and tries to decode their system information. In this example, the log shows Cell 0: SIB found and Cell 1: SIB found, which means that UEsim successfully detected both cells and decoded SIB from each of them.
This is an important checkpoint for this measurement-based CA test. Before the UE can report measurement for the candidate SCell, both cells should be visible to the UE. At this stage, carrier aggregation is not established yet. This step only confirms that the UE can detect both configured cells, so the later RRC measurement, measurement report, SCell addition, and SCell activation procedure can proceed normally.

With the ue command on UEsim, you can check the UE registration status after powering on the UE. In this example, EMM_STATE is shown as registered, which means the UE has successfully completed the registration procedure with the network.
The output also shows that one E-RAB is established and the UE has received the IP address 192.168.2.2. This confirms that the UE is not only synchronized with the radio cell, but also registered and assigned user-plane connectivity.
At this point, carrier aggregation is not confirmed yet. This command only confirms the basic registration and IP allocation status. For the measurement-based CA test, the next important checkpoints are to confirm that the UE receives the RRC measurement configuration, sends the measurement report, and then receives the RRC Reconfiguration for SCell addition.

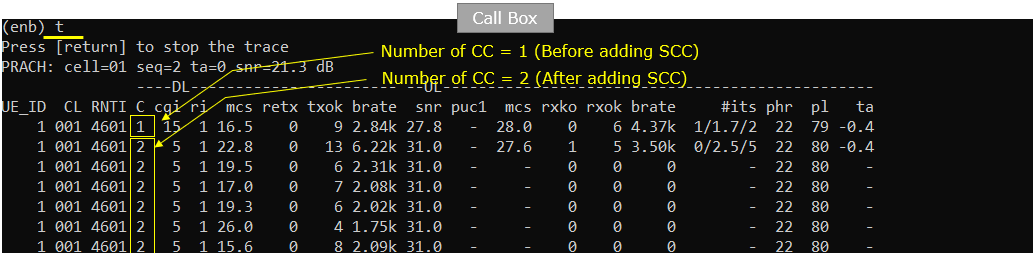
On the Callbox side, check the trace log with the t command. It is recommended to start this trace before powering on the UE, because then you can see the transition from the initial single-carrier state to the final carrier aggregation state.
In the trace output, the C column indicates the number of component carriers currently used by the UE. At the beginning, C is shown as 1, which means only one component carrier is active. This is the expected initial state before the secondary cell is added. After the measurement-based SCell addition procedure is completed, the C column changes to 2, which means that 2CC carrier aggregation has been established.
This trace is useful because it shows the actual CA transition clearly. In this measurement-based test, the UE first registers on the PCell, receives the measurement configuration, reports the measured SCell condition, and then the gNB adds and activates the SCell. Once that procedure is completed, the t command shows C = 2. So this is a quick runtime confirmation that the measurement-triggered SCell addition has worked successfully.
On the Callbox MME screen, check the UE status with the ue command and make sure that the UE is registered from the core-network point of view.
In this output, REG is set to Y, which means the UE is successfully registered. The IP_ADDR field shows 192.168.2.2, so the UE has also received an IP address. The #BEARER value is 1, indicating that one user-plane bearer is established.
This check does not directly indicate carrier aggregation, but it confirms that the UE registration and IP allocation are working properly. Together with the t command showing that the C column changes from 1 to 2, this confirms both sides of the test: the UE is registered with IP connectivity, and the radio side has successfully moved into 2CC CA after the measurement-based SCell addition procedure.

This step is not mandatory, but it is useful for checking whether the IP data path is working properly after registration and CA activation. Once the UE has an IP address, you can generate downlink UDP traffic from the Callbox side using ltesim_server.
In this example, ltesim_server is started on the Callbox, and the cbr_send command is used to send UDP traffic to the UE IP address 192.168.2.2. The value 200M indicates the target traffic rate, and 60 indicates the duration in seconds. This means that the Callbox sends constant bit rate UDP traffic toward the UE for 60 seconds with a target rate of 200 Mbps.
This traffic test is useful because it allows you to check the real scheduling behavior after the measurement-based SCell addition. While the traffic is running, you can keep the t trace open and verify that the C column stays at 2 and that downlink bitrate is observed. This confirms that the data path is established and that 2CC CA is maintained during actual user-plane traffic.

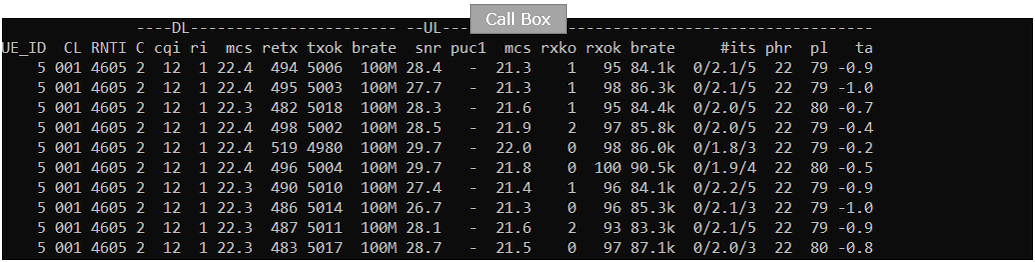
Check the downlink throughput with the t command while the UDP traffic is running. In this output, the C column shows 2, which confirms that the UE is still operating with two component carriers during the traffic test.
The DL brate column shows around 100M, meaning that downlink traffic is being transmitted to the UE at about 100 Mbps. The cqi value is 12, ri is 1, and the DL mcs value is around 22, so the UE is reporting a reasonable radio condition and the scheduler is assigning a relatively high modulation and coding level. The snr value is around 27 to 29 dB, which also indicates stable downlink radio quality.
This check confirms that the measurement-based CA procedure is not only completed at the signaling level, but also maintained during actual user-plane traffic. Since the UE is registered, has an IP address, the C column is 2, and downlink bitrate is observed while traffic is running, you can confirm that 2CC CA is working properly in this test.
Log Analysis
Sample Log In this section, you will see how to confirm if UE registration is complete from trace log. You can use the same method to find any issues (e.g, registration failure) for troubleshooting. When UE registration fails, you may use this tutorial to figure out the point of the failure and troubleshoot
NOTE : This section is just to check quickly some important points in the log, but it may be a little bit tricky to do the detailed log analysis (especially for lower layer log analysis). In that case, I strongly recommend you to use WebGUI for the log analysis. You may refer to WebGUI Tutorial
The description on initial check up (i.e, SIB1 , UE capability information etc) is not shown here because it is same as in Test 1 Log Analysis.
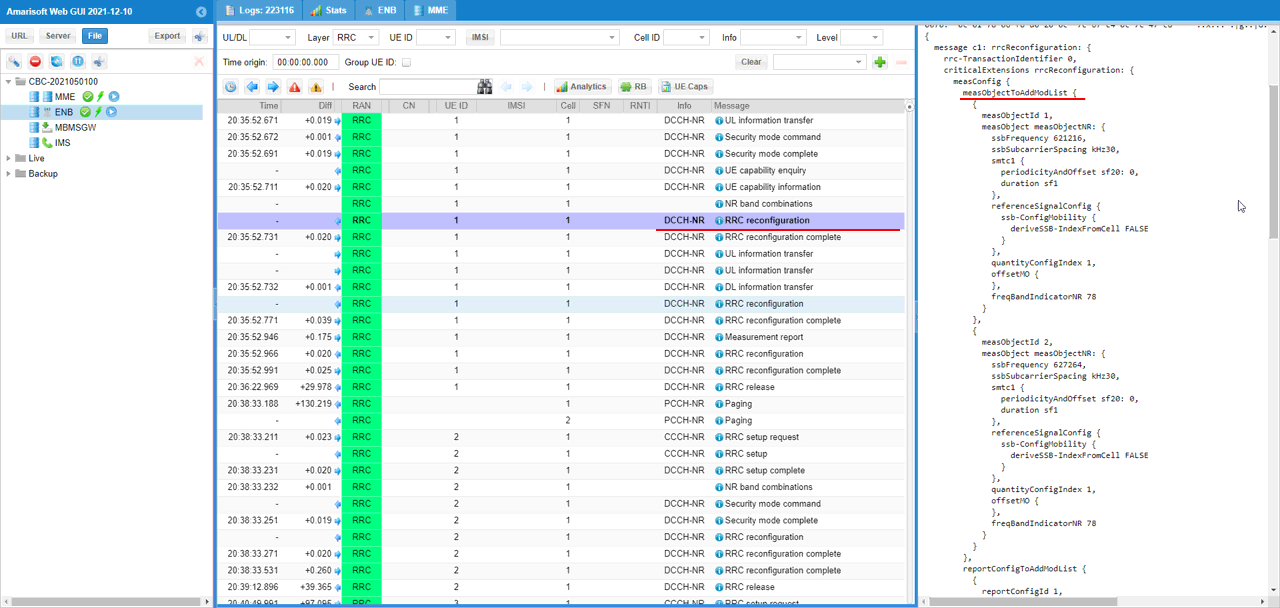
Since this test is configured to trigger SCell addition based on a measurement report, first check whether the RRC Reconfiguration message for measurement configuration is sent as intended. This message is sent before the actual SCell addition, and its purpose is to configure the UE with the measurement objects, report configuration, and measurement ID mapping required for the later measurement report.
In this example, the selected RRC Reconfiguration includes measConfig. Inside measConfig, measObjectToAddModList is configured, which defines the cells or frequencies that the UE should measure. You can see measurement objects with ssbFrequency, ssbSubcarrierSpacing, referenceSignalConfig, and freqBandIndicatorNR 78. This means the UE is being instructed to measure NR cells in band n78 using the configured SSB-based measurement information.
The message also includes reportConfigToAddModList, which defines the event-based reporting condition. This part is related to the measurement event configuration that was defined in meas_config_desc. In other words, the configuration file defines the measurement trigger condition, and this RRC Reconfiguration is where the gNB delivers that condition to the UE.
This step is important because the SCell cannot be added by measurement trigger unless the UE first receives a valid measurement configuration. If this RRC Reconfiguration does not contain the expected measConfig, the UE may register normally, but it will not send the intended measurement report for SCell addition. So before checking the later RRC Reconfiguration for SCell addition, confirm that this earlier measurement configuration message is present and that the measurement object and report configuration match your intended CA measurement setup.
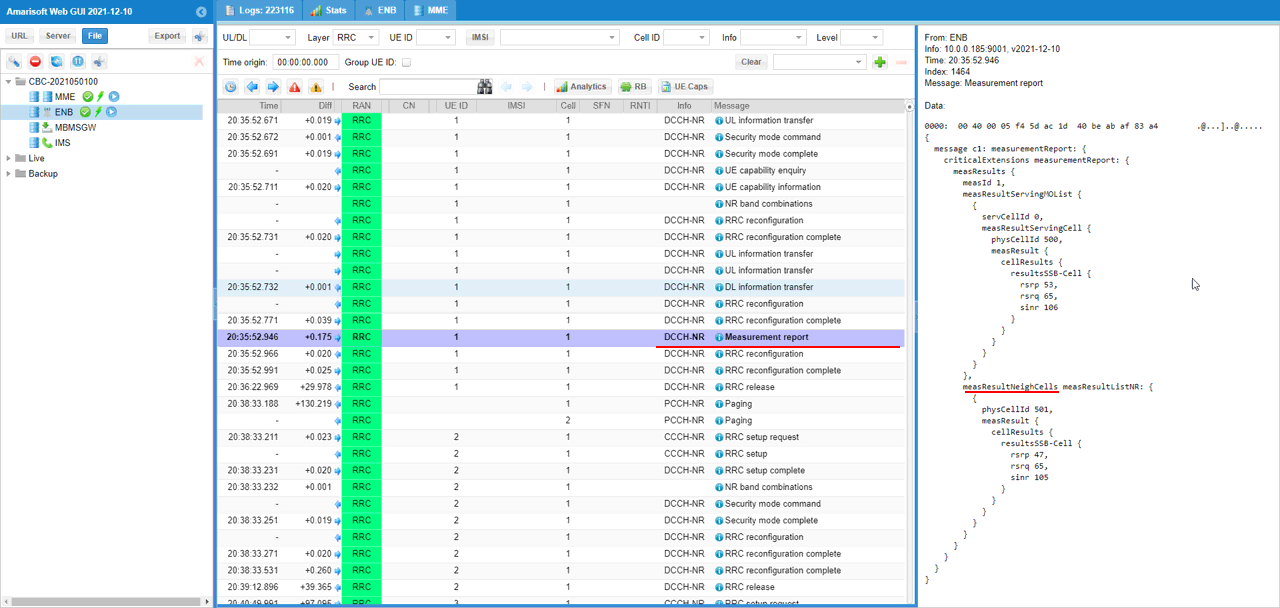
Confirm that the Callbox, or gNB side, receives the measurement report from the UE with the expected measurement result. This is the key checkpoint for this test because SCell addition is configured to be triggered by UE measurement.
In this example, the selected message is Measurement report on DCCH-NR. Inside the decoded message, measId is reported, which links this report to the measurement configuration that was previously sent by RRC Reconfiguration. The report includes the serving cell measurement result and the neighbor cell measurement result. The serving cell is shown with physCellId 500, and the neighbor cell is shown with physCellId 501. This matches the two cells configured earlier in the test.
The neighbor cell measurement result includes RSRP, RSRQ, and SINR values, which means the UE successfully measured the candidate SCell and reported it to the gNB. Since physCellId 501 is the cell intended to be added as the SCell when PCI 500 is the PCell, this measurement report provides the required trigger for the gNB to proceed with SCell addition.
This step confirms that the measurement-based part of the CA procedure is working. The UE received the measurement configuration, measured the target cell, and sent the measurement report back to the gNB. After this point, you can check the following RRC Reconfiguration message to confirm that the gNB actually uses this report to add the SCell.
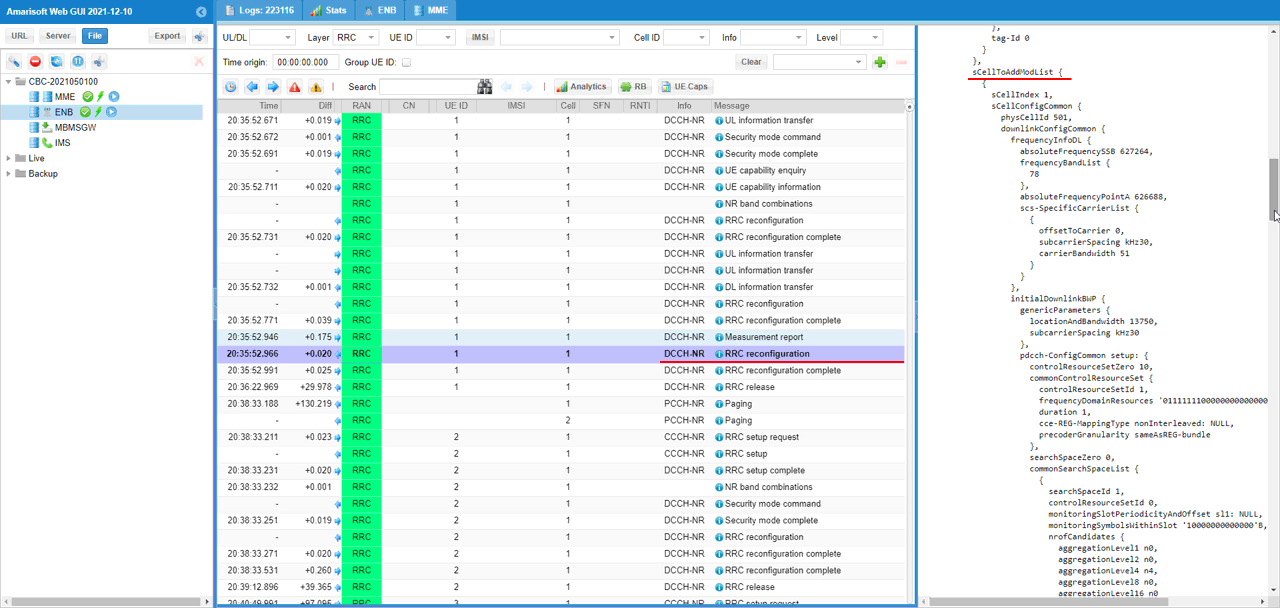
If the UE supports the configured CA band combination and the expected measurement report is received by the gNB, the Callbox sends an RRC Reconfiguration message to add the SCell. This is the point where the measurement result is used as the trigger for actual SCell configuration.
In this example, the selected RRC Reconfiguration includes scellToAddModList, which means that the gNB is adding or modifying an SCell for the UE. Inside this configuration, scellIndex is set to 1 and physCellId is set to 501, so the added SCell corresponds to the second cell configured earlier. The downlink configuration includes absoluteFrequencySSB 627264 and frequencyBandList with band 78, which matches the second TDD n78 carrier used in this test.
This message confirms that the gNB has moved from the measurement phase to the SCell addition phase. In the previous step, the UE reported the neighbor cell measurement result for PCI 501. In this step, the gNB uses that result and sends the UE the required SCell configuration for PCI 501. After this message, the next checkpoint is to confirm that the UE sends RRC Reconfiguration Complete and then to check the MAC and PHY logs to verify that the added SCell is activated and used for scheduling.
Test 3 : 2CC CA - FDD and TDD - without Measurement
In this test, I will show you how to configure a NR SA carrier aggregation with 1 TDD Cell and 1 FDD cell without RRC Measurement. In this test, a FDD cell will be used as PCC (Primary Component Carrier) and a TDD cell will be used as SCC(Secondary Component Carrier).
I didn't enabled the RRC measurement for simplicity, but still the configuration would be a little bit more complicated comparing to Test 1 (TDD + TDD case) because different duplex method should be configured for each cell.
NOTE : FDD and TDD Carrier Aggregation has some practical difficulties / restriction if you want to try with commercial UEs. It is not due to Amarisoft Implementation, it is due to UE side restriction as of now (Apr 2022) which is listed as below. So when you are trying with FDD + TDD Carrier Aggregation, check on UE side feature / capability first.Configuration
An important thing in using UE sim is to do proper matching between UE sim configuration and Call box configuration In this tutorial, I used the ue-nr-2cc-sa-FDD-TDD.cfg that is copied and modified from the ue-nr-2cc-sa.cfg and gnb-2cc-sa-FDD-TDD.cfg that is copied and modified from gnb-2cc-sa.cfg
Configuration for Callbox
If you use other Network (e.g, other network simulator or real network), you have to make it sure to configure UE sim according to the settings on network side
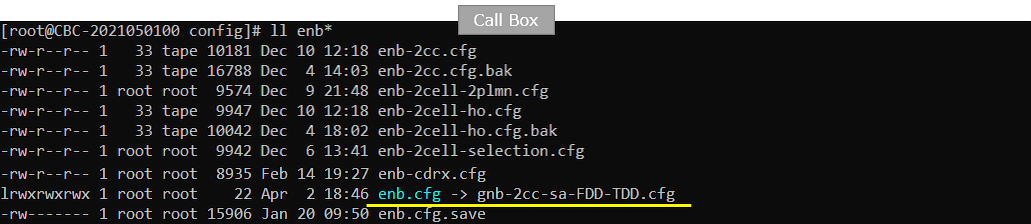
On Callbox (gNB), I used gnb-2cc-sa-FDD-TDD.cfg that is copied and modified from gnb-2cc-sa.cfg
For the core network side, we don't need any specific configuration for carrier aggregation. So I just used the default core network configuration file (mme-ims.cfg)
gnb-2cc-sa-FDD-TDD.cfg is configured as follows.
First, configure the duplex mode separately for each component carrier. In the previous TDD and TDD tests, a single NR_TDD parameter was enough because both cells used the same duplex mode. In this test, however, the PCC and SCC use different duplex modes, so two separate parameters are used: NR_TDD_CC1 for the first cell and NR_TDD_CC2 for the second cell.
NR_TDD_CC1 is set to 0, which means the first cell is configured as NR FDD. This cell will be used as the PCC, or Primary Component Carrier. NR_TDD_CC2 is set to 1, which means the second cell is configured as NR TDD. This cell will be used as the SCC, or Secondary Component Carrier. NR_TDD_CONFIG is still configured for the TDD cell and defines the TDD UL/DL pattern used by the second component carrier.
In this example, separate bandwidth parameters are also used. NR_BANDWIDTH_CC1 is set to 20 for the FDD PCC, and NR_BANDWIDTH_CC2 is set to 20 for the TDD SCC. Separating the bandwidth parameters is useful because FDD and TDD carriers may use different bandwidths in other test cases. For example, an NR FDD carrier may use a narrower bandwidth while an NR TDD carrier may use a wider bandwidth. In this test, both are set to 20 MHz, but the configuration structure allows them to be changed independently later.

Now configure the first cell to support secondary cell addition. This is done by specifying the scell_list parameter inside the cell configuration in nr_cell_list. In this test, the first cell is configured with scell_list containing { cell_id: 2 }, which means that when this cell becomes the PCC, the cell with cell_id 2 can be added as the SCC for carrier aggregation.
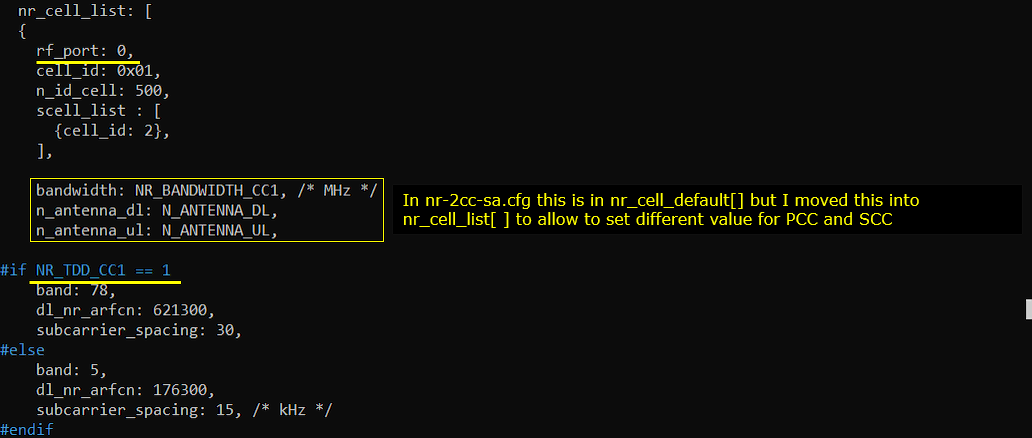
In this example, the first cell uses rf_port 0, cell_id 0x01, and n_id_cell 500, so this cell corresponds to PCI 500. Since NR_TDD_CC1 is set to 0, this first cell is configured as an FDD cell. For the FDD case, band 5 is used with dl_nr_arfcn 176300 and subcarrier_spacing 15 kHz. This cell becomes the primary component carrier in this test.
The scell_list does not include rrc_configuration, so SCell addition is not controlled by an RRC measurement condition. This means the gNB can add the SCC directly by RRC Reconfiguration as long as the UE supports the configured FDD + TDD CA band combination.
Another important point is that bandwidth, n_antenna_dl, and n_antenna_ul are configured inside each cell entry in nr_cell_list instead of being configured only in nr_cell_default. This is useful for this mixed FDD and TDD test because the PCC and SCC may need different bandwidth or antenna settings. In this example, the first cell uses NR_BANDWIDTH_CC1 for its bandwidth, while the second cell can use a separate bandwidth parameter later. This makes the configuration more flexible than the previous TDD and TDD case, where both cells used the same common bandwidth setting.
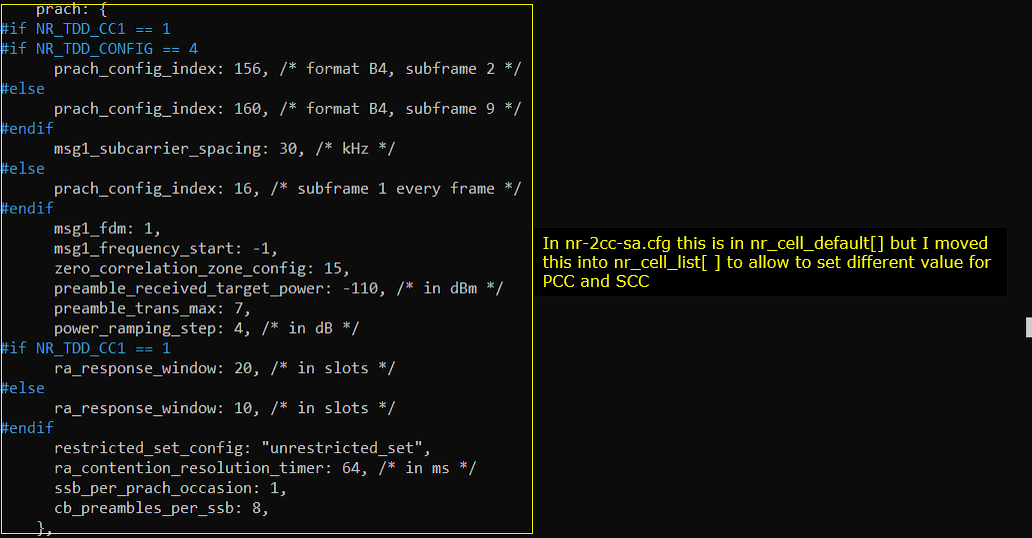
Now configure the PRACH parameters according to your test requirement. In the previous same-duplex CA cases, such as TDD-TDD or FDD-FDD, the PRACH configuration could be placed in nr_cell_default because both cells could share the same default PRACH setting. In this mixed FDD and TDD test, however, the two component carriers use different duplex schemes, so the PRACH configuration is moved into each cell configuration inside nr_cell_list.
This makes it possible to apply a different PRACH configuration for each cell. For example, when NR_TDD_CC1 is set to 1, the configuration uses the TDD-specific PRACH settings, and the prach_config_index is selected depending on the TDD configuration. If NR_TDD_CONFIG is 4, prach_config_index is set to 156, and otherwise it is set to 160. In this case, msg1_subcarrier_spacing is set to 30 kHz, which matches the TDD-style configuration.
If NR_TDD_CC1 is not set to 1, the cell is configured as FDD, and prach_config_index is set to 16. This corresponds to the FDD case where PRACH occasion timing is different from the TDD case. The ra_response_window is also selected differently depending on the duplex mode. For TDD, it is set to 20 slots, while for FDD it is set to 10 slots.
Other PRACH-related parameters are configured in the same block, including msg1_fdm, msg1_frequency_start, zero_correlation_zone_config, preamble_received_target_power, preamble_trans_max, power_ramping_step, ra_contention_resolution_timer, ssb_per_prach_occasion, and cb_preambles_per_ssb. These parameters define how the UE sends Msg1 and how the gNB handles the random access procedure.
The main reason for moving this PRACH block from nr_cell_default into nr_cell_list is flexibility. In this FDD and TDD CA test, the PCC and SCC may require different PRACH timing and random access settings. By configuring PRACH separately per cell, each component carrier can use the proper PRACH configuration for its own duplex mode.
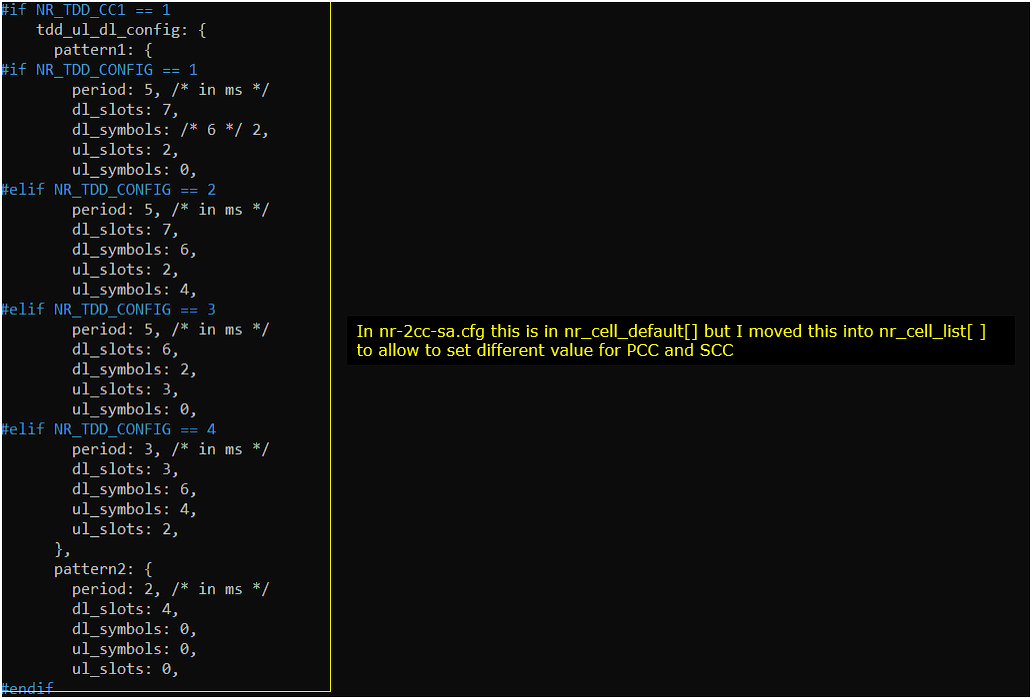
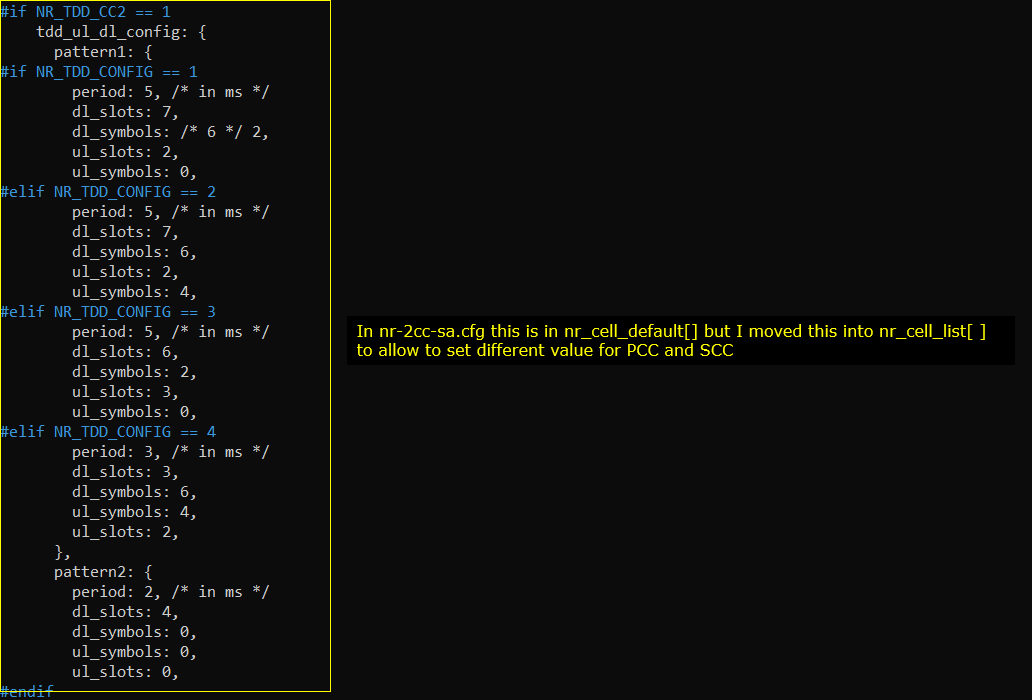
I moved tdd_ul_dl_config from nr_cell_default into the individual cell configuration inside nr_cell_list. This is done so that each cell can apply its own TDD UL/DL pattern independently, instead of forcing all cells to use the same default TDD configuration.
This is especially useful in this FDD and TDD CA test because the first cell is FDD and does not need a TDD UL/DL configuration, while the second cell is TDD and does need one. By placing tdd_ul_dl_config inside each cell configuration, the TDD pattern is applied only to the TDD cell, and each component carrier can be configured according to its own duplex mode.
In this example, the tdd_ul_dl_config block is enabled only when NR_TDD_CC1 is set to 1. Different patterns are selected depending on NR_TDD_CONFIG. For example, when NR_TDD_CONFIG is 2, the pattern uses a 2 ms period with 2 DL slots, 6 DL symbols, 1 UL slot, and 4 UL symbols. This pattern was slightly adjusted to avoid a scheduling warning where some SCell DL slots could not be scheduled due to a limited number of k1 values in dl-DataToUL-Ack.
The main point is that in mixed-duplex CA, it is better to keep duplex-dependent parameters such as PRACH and TDD UL/DL configuration inside each cell configuration. This gives more flexibility and prevents one common default configuration from being incorrectly applied to both PCC and SCC.
I also moved ssb_pos_bitmap from nr_cell_default into each cell configuration inside nr_cell_list. This allows each cell to apply a different SSB position bitmap instead of forcing the same SSB burst configuration to all cells.
This is useful in this FDD and TDD CA test because the PCC and SCC may use different duplex modes, different subcarrier spacing, or different SSB transmission patterns. By configuring ssb_pos_bitmap per cell, the FDD cell and TDD cell can each use the SSB position setting that matches its own radio configuration.
In this example, one case uses ssb_pos_bitmap: "10000000", while the other case uses ssb_pos_bitmap: "1000". This means the SSB transmission position can be selected differently depending on the cell configuration. The important point is not only the specific bitmap value itself, but the configuration structure. Moving this parameter into nr_cell_list gives more flexibility when PCC and SCC do not share exactly the same radio characteristics.
Together with the previous changes, this shows the general approach for mixed FDD and TDD CA configuration. Parameters that may be different between PCC and SCC, such as bandwidth, antenna configuration, PRACH, TDD UL/DL pattern, and SSB position bitmap, are better configured inside each cell entry rather than being placed only in nr_cell_default.

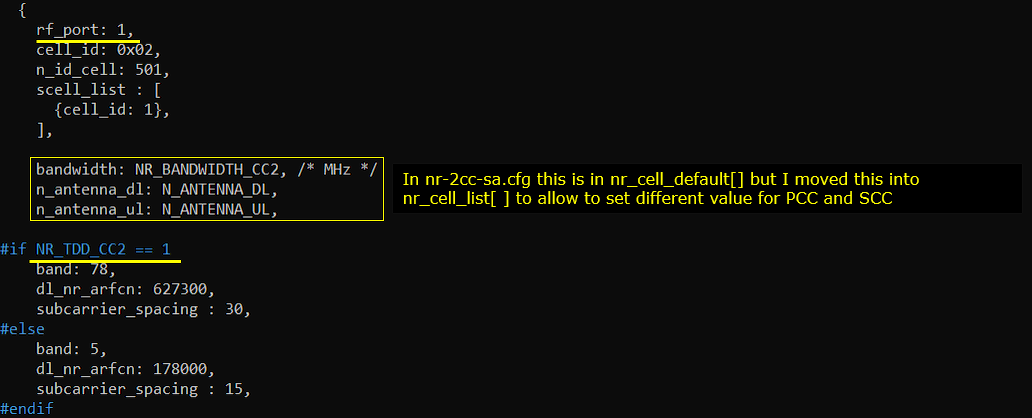
Then configure the second cell to support secondary cell addition. This is done by specifying scell_list inside the second cell configuration in nr_cell_list. In this test, the second cell is configured with scell_list containing { cell_id: 1 }, which means that when this cell becomes the primary cell, the cell with cell_id 1 can be added as the secondary cell for carrier aggregation.
In this example, the second cell uses rf_port 1, cell_id 0x02, and n_id_cell 501, so this cell corresponds to PCI 501. Since NR_TDD_CC2 is set to 1, this second cell is configured as a TDD cell. For the TDD case, band 78 is used with dl_nr_arfcn 627300 and subcarrier_spacing 30 kHz. This cell is intended to work as the SCC in this FDD and TDD CA test.
As in the first cell configuration, rrc_configuration is not specified inside scell_list. This means that the SCC addition is not controlled by RRC measurement. The gNB can add the secondary cell directly by RRC Reconfiguration as long as the UE supports the required CA band combination for the configured FDD and TDD carriers.
Also note that bandwidth, n_antenna_dl, and n_antenna_ul are configured inside this cell entry instead of only using nr_cell_default. The second cell uses NR_BANDWIDTH_CC2, so its bandwidth can be controlled independently from the first cell. This is useful in mixed-duplex CA because the PCC and SCC may use different bandwidth, antenna configuration, duplex mode, subcarrier spacing, PRACH configuration, and SSB position. By configuring these parameters per cell, each component carrier can be adjusted separately while still being used together for carrier aggregation.
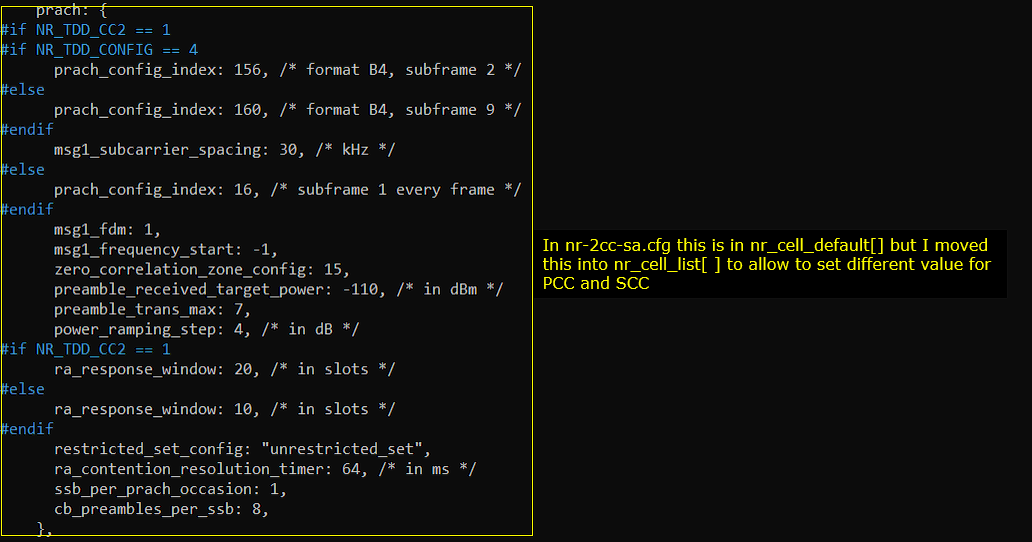
Like the first cell case, configure the PRACH parameters for the second cell according to your test requirement. In same-duplex CA cases such as TDD-TDD or FDD-FDD, the PRACH configuration can often be placed in nr_cell_default because both cells can share the same random access configuration. In this mixed FDD and TDD test, however, the PRACH configuration is placed inside each cell entry in nr_cell_list so that the PCC and SCC can use different PRACH settings when needed.
For the second cell, the PRACH configuration is selected based on NR_TDD_CC2. Since NR_TDD_CC2 is set to 1 in this test, this cell is treated as a TDD cell. In that case, the configuration uses the TDD PRACH branch. If NR_TDD_CONFIG is 4, prach_config_index is set to 156, and otherwise it is set to 160. The msg1_subcarrier_spacing is set to 30 kHz, which matches the TDD cell configuration.
If NR_TDD_CC2 were set to 0, the FDD branch would be used instead, where prach_config_index is set to 16. The ra_response_window is also selected depending on the duplex mode. For the TDD case, it is set to 20 slots, while for the FDD case it is set to 10 slots.
The remaining PRACH parameters, such as msg1_fdm, msg1_frequency_start, zero_correlation_zone_config, preamble_received_target_power, preamble_trans_max, power_ramping_step, ra_contention_resolution_timer, ssb_per_prach_occasion, and cb_preambles_per_ssb, define the detailed random access behavior for this cell. The key point is that this PRACH block is configured per cell, so the FDD PCC and TDD SCC can each use the proper random access configuration for their own duplex mode.
I moved tdd_ul_dl_config from nr_cell_default into each cell configuration inside nr_cell_list. This allows each cell to apply a different TDD UL/DL pattern instead of forcing all component carriers to use the same common TDD configuration.
This is useful for this FDD and TDD CA test because only the TDD cell needs tdd_ul_dl_config. The FDD cell does not use a TDD UL/DL pattern, while the TDD SCC needs its own DL/UL slot structure. By placing this block inside the cell configuration, the TDD pattern can be applied only to the cell where NR_TDD_CC1 or NR_TDD_CC2 is set to 1.
In this example, several TDD patterns are selected depending on NR_TDD_CONFIG. For NR_TDD_CONFIG 2, the pattern is adjusted slightly with period 2 ms, 2 DL slots, 6 DL symbols, 1 UL slot, and 4 UL symbols. This adjustment is made to avoid the warning that some SCell DL slots may not be scheduled due to a limited number of k1 values in dl-DataToUL-Ack. This kind of warning is related to the timing relationship between downlink data scheduling and uplink HARQ ACK feedback.
The main point is that in mixed FDD and TDD CA, duplex-dependent parameters should be configured per cell whenever the PCC and SCC may require different behavior. Together with the per-cell PRACH and SSB bitmap configuration, moving tdd_ul_dl_config into nr_cell_list makes the setup more flexible and avoids applying an inappropriate default configuration to both component carriers.
I also moved ssb_pos_bitmap from nr_cell_default into each cell configuration inside nr_cell_list. This allows each cell to apply its own SSB position bitmap instead of using one common default value for all cells.
This is useful in this FDD and TDD CA test because the PCC and SCC may have different radio configurations. The FDD cell and TDD cell may use different duplex mode, subcarrier spacing, or SSB transmission pattern, so it is better to configure ssb_pos_bitmap separately per cell.
In this example, one case uses ssb_pos_bitmap: "10000000", and the other case uses ssb_pos_bitmap: "1000". The exact bitmap value depends on the duplex mode and cell configuration, but the important point is that the SSB position can now be controlled independently for each component carrier.
Together with the previous changes, this follows the same configuration principle used in this mixed FDD and TDD CA test. Parameters that may be different between PCC and SCC, such as bandwidth, PRACH, TDD UL/DL pattern, and SSB position bitmap, are moved from nr_cell_default into each cell entry in nr_cell_list so that each cell can be configured separately.

Configuration for UEsim
On UEsim, I used the ue-nr-2cc-sa-FDD-TDD.cfg that is copied and modified from the ue-nr-2cc-sa.cfg (
NOTE : You can skip this configuration if you use commerical UE as DUT)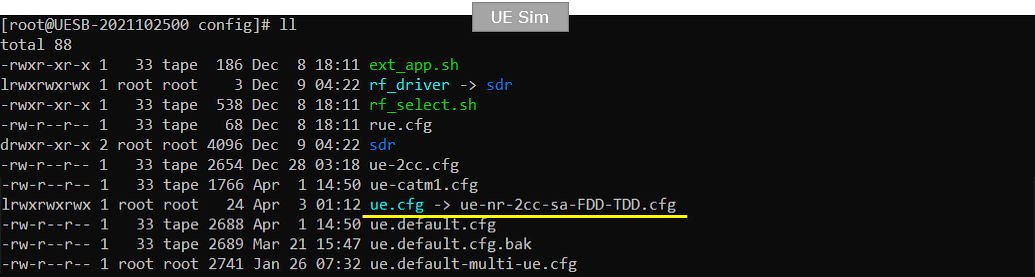
ue-nr-2cc-sa-FDD-TDD.cfg is configured as follows.
Since this test uses two component carriers, set N_CELL to 2 and configure the duplex mode of each cell separately using NR_TDD_CC1 and NR_TDD_CC2 so that they match the corresponding Callbox cell configuration. In addition, configure the downlink antenna count (N_ANTENNA_DL), uplink antenna count (N_ANTENNA_UL), and bandwidth of each carrier (NR_BANDWIDTH_CC1 and NR_BANDWIDTH_CC2) to match the Callbox configuration.
Unlike the previous TDD-TDD and FDD-FDD examples, this mixed-duplex test defines separate duplex mode parameters for each component carrier. NR_TDD_CC1 controls the duplex mode of the PCC, while NR_TDD_CC2 controls the duplex mode of the SCC. This allows one carrier to operate in FDD mode while the other operates in TDD mode.
Separate bandwidth parameters, NR_BANDWIDTH_CC1 and NR_BANDWIDTH_CC2, are also introduced so that each carrier can use a different channel bandwidth. This is useful because FDD deployments often use narrower bandwidths, while TDD deployments typically use wider bandwidths. Configuring the bandwidth independently for each carrier makes it possible to emulate a wider range of real deployment scenarios while keeping the PCC and SCC configurations independent.

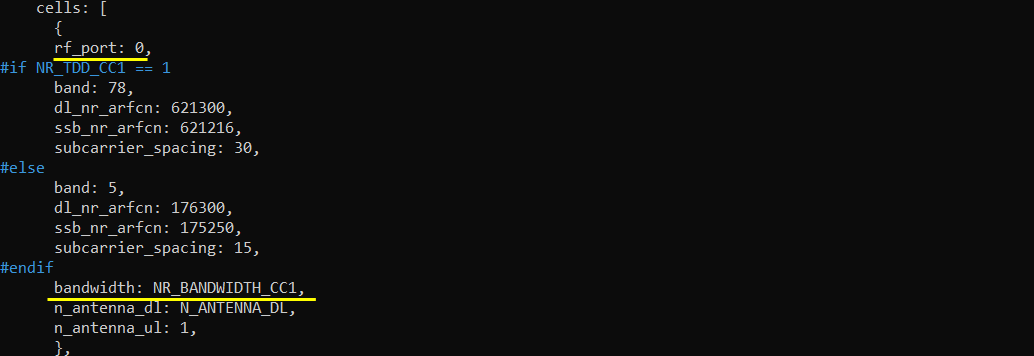
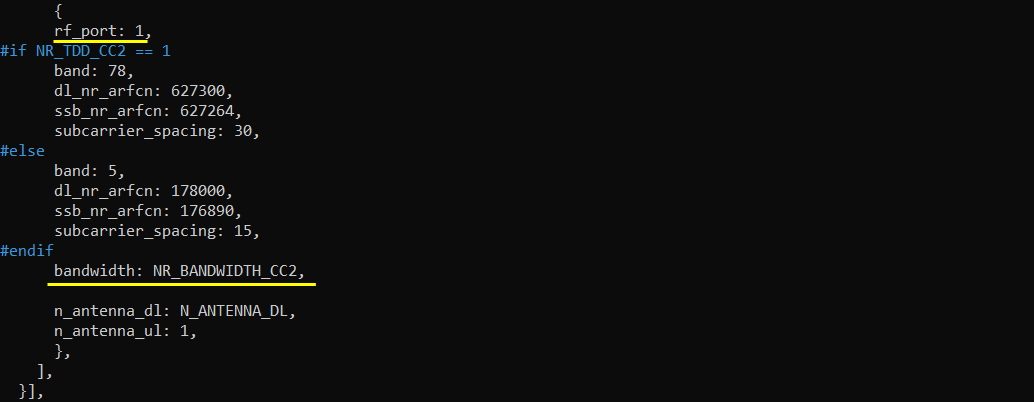
Since this is a 2CC CA test, configure two cells in the cells parameter on the UEsim side. The duplex mode, band, frequency, SSB frequency, subcarrier spacing, and bandwidth of each cell should match the corresponding Callbox configuration. In this test, the two cells are not configured identically because the first cell is used as the FDD PCC and the second cell is used as the TDD SCC.
For the first cell, rf_port is set to 0. Since NR_TDD_CC1 is set to 0, the FDD branch is used, so the cell is configured with band 5, dl_nr_arfcn 176300, ssb_nr_arfcn 175250, and subcarrier_spacing 15 kHz. The bandwidth is set to NR_BANDWIDTH_CC1, so the first carrier bandwidth can be controlled independently from the second carrier. This first cell matches the FDD PCC configuration on the Callbox side.
For the second cell, rf_port is set to 1. Since NR_TDD_CC2 is set to 1, the TDD branch is used, so the cell is configured with band 78, dl_nr_arfcn 627300, ssb_nr_arfcn 627264, and subcarrier_spacing 30 kHz. The bandwidth is set to NR_BANDWIDTH_CC2, so the second carrier bandwidth can also be controlled independently. This second cell matches the TDD SCC configuration on the Callbox side.
The important point in this configuration is that UEsim must know both component carriers, but each carrier can have its own duplex mode and radio parameters. This is why NR_TDD_CC1, NR_TDD_CC2, NR_BANDWIDTH_CC1, and NR_BANDWIDTH_CC2 are used separately. With this structure, the UE can first register on the FDD PCC and then add the TDD SCC later through the carrier aggregation procedure.
Perform the Test
First, check the basic cell configuration on the Callbox side using the cell phy and cell commands. These commands do not directly tell you whether the multi-cell setup is being used for carrier aggregation, handover, cell selection, or reselection, but they are useful as the first sanity check because they confirm that the expected cells are configured and running.
In the cell phy output, two NR cells are shown. Cell 0x001 is configured on band n5 with 20 MHz bandwidth, DL ARFCN 176300, UL ARFCN 167300, and SSB ARFCN 175250. This is the FDD cell used as the PCC in this test. Cell 0x002 is configured on band n78 with 20 MHz bandwidth, DL ARFCN 627300, UL ARFCN 627300, and SSB ARFCN 627264. This is the TDD cell used as the SCC. You can also confirm the duplex type from the band information. Band n5 is FDD, while band n78 is TDD.
The cell command gives another view of the same configuration. It shows that cell 0x001 has PCI 500 and cell 0x002 has PCI 501. The DL ARFCN values also match the configured carrier frequencies. At this point, the purpose is simply to confirm that both cells are active with the expected band, duplex type, frequency, bandwidth, and PCI before powering on the UE and checking whether the TDD SCC is added to the FDD PCC for 2CC CA operation.. You may refer to this site : https://www.sqimway.com/nr_band.php to check duplex type of each band.
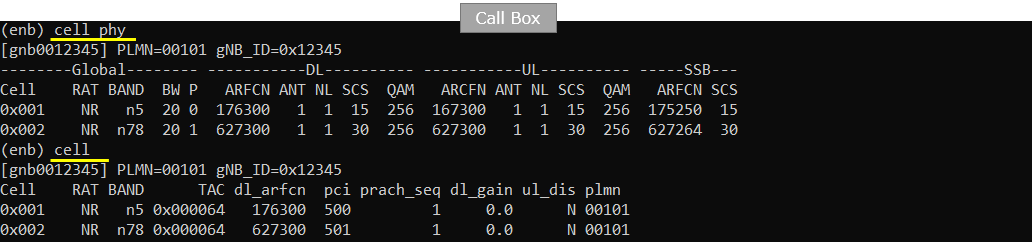
If all cells are configured as intended, power on the UE from UEsim. If you are using a commercial UE instead of UEsim, this is the point where you can power on the device.
After the power_on command is executed, UEsim starts searching for the configured cells and tries to decode the system information. In this example, the log shows Cell 0: SIB found and Cell 1: SIB found, which means that UEsim successfully detected both configured cells. In this test, Cell 0 corresponds to the FDD PCC candidate, and Cell 1 corresponds to the TDD SCC candidate.
This is the first basic checkpoint before checking carrier aggregation. At this stage, CA is not confirmed yet. This step only confirms that the UE can see both cells and decode their SIB information. Once both cells are detected properly, the UE can continue with registration on the FDD PCC, and then the gNB can add the TDD cell as the SCC if the UE supports the required FDD + TDD CA band combination.
With the ue command on UEsim, check the UE registration status after powering on the UE. In this example, EMM_STATE is shown as registered, which means that the UE has successfully completed registration with the network.
The output also shows that one E-RAB is established and the UE has received the IP address 192.168.2.2. This confirms that the UE has basic user-plane connectivity through the primary cell. In this test, the UE first registers through the FDD PCC, and the TDD cell is expected to be added later as the SCC.
At this point, carrier aggregation is not confirmed yet. This command only verifies that the UE is registered and has an IP address. The next step is to check the Callbox trace or RRC/MAC logs to confirm whether the TDD SCC is added and activated for 2CC CA operation.
On the Callbox side, check the real-time trace with the t command. It is recommended to start this trace before powering on the UE, because this allows you to observe the procedure from initial access through SCell addition and CA activation.
In this output, the C column indicates the number of component carriers currently used by the UE. If this value is 2, it means that 2CC carrier aggregation has been established. In this example, C is shown as 2, so the UE is operating with two component carriers.
This is especially important in this FDD and TDD test because the two component carriers are using different duplex modes. The UE is connected with the FDD cell as the PCC and the TDD cell as the SCC. Once the C column becomes 2, you can confirm that the mixed FDD + TDD CA configuration has been accepted and activated from the Callbox scheduling point of view.
Other fields such as cqi, ri, mcs, snr, and brate show the current radio condition and scheduling status. However, for this checkpoint, the most important field is the C column. It gives a quick confirmation that the UE is no longer operating with only the primary carrier, but with both PCC and SCC as a 2CC CA connection. (
NOTE : I would suggest you to run 't' command before you power on UE on UEsim)On the Callbox MME screen, check the UE registration and IP allocation status with the ue command. This gives the core-network side view of the UE after registration.
In this output, REG is set to Y, which means the UE is registered successfully. The IP_ADDR field shows 192.168.2.2, so the UE has received an IP address. The #BEARER value is 1, which means one user-plane bearer is established.
This check does not directly confirm carrier aggregation, but it confirms that the UE is properly registered and has valid IP connectivity. Together with the Callbox t trace showing C = 2, this verifies both important parts of the test: the UE is registered and reachable from the core-network side, and the radio side is operating with 2CC CA using the FDD PCC and TDD SCC.
This step is not mandatory, but it is useful for checking whether the IP data path is working properly after the mixed FDD and TDD CA setup is established. Once the UE is registered and an IP address is allocated, you can generate downlink UDP traffic from the Callbox side using ltesim_server.
In this example, ltesim_server is started on the Callbox, and the cbr_send command is used to send UDP traffic to the UE IP address 192.168.2.2. The value 200M indicates the target traffic rate, and 60 indicates the duration in seconds. This means the Callbox sends constant bit rate UDP packets toward the UE for 60 seconds with a target rate of 200 Mbps.
This traffic test is useful because it allows you to verify the user-plane data path and observe how the scheduler behaves while 2CC CA is active. While the traffic is running, you can keep the t trace open and check whether the C column remains 2 and whether downlink bitrate is shown. If C stays at 2 during traffic, it confirms that the UE is maintaining carrier aggregation with the FDD PCC and TDD SCC while actual user data is being transmitted.
Check the downlink throughput with the t command while the UDP traffic is running. In this output, the C column shows 2, which confirms that the UE is still operating with two component carriers during the traffic test.
The DL brate column shows around 100M, meaning that downlink traffic is being transmitted to the UE at about 100 Mbps. The cqi value is 12, ri is 1, and the DL mcs value is around 22, so the radio condition is good enough for stable downlink scheduling. The DL snr value is around 27 to 29 dB, which also indicates a stable downlink channel condition.
This result confirms that the mixed FDD and TDD CA setup is working during actual user-plane traffic. The UE is registered, an IP address is allocated, the C column remains 2, and downlink throughput is observed while traffic is running. This means the UE is not only configured for 2CC CA, but is also maintaining the FDD PCC and TDD SCC combination during data transfer.
Log Analysis
In this section, you will see how to confirm if UE registration is complete from trace log. You can use the same method to find any issues (e.g, registration failure) for troubleshooting. When UE registration fails, you may use this tutorial to figure out the point of the failure and troubleshoot
NOTE : This section is just to check quickly some important points in the log, but it may be a little bit tricky to do the detailed log analysis (especially for lower layer log analysis). In that case, I strongly recommend you to use WebGUI for the log analysis. You may refer to WebGUI Tutorial
First, check the basic SIB1 transmission from cell 1. There is no specific CA-related parameter that needs to be highlighted in this SIB1 at this point. The purpose of this step is to confirm that cell 1 is running properly and broadcasting SIB1 as expected.
In this log, SIB1 is repeatedly transmitted on BCCH-NR for cell 1, and the selected message is decoded as systemInformationBlockType1. This confirms that the cell is active at the RRC broadcast level. From the decoded SIB1 contents, you can also see basic cell information such as PLMN identity, tracking area code, cell identity, frequency band information, SSB configuration, and servingCellConfigCommon. In this mixed FDD and TDD test, cell 1 is configured as the FDD cell, and the decoded SIB1 shows freqBandIndicatorNR 5, which matches the intended FDD PCC configuration.
This step should be treated as a basic sanity check before looking at CA-specific signaling. If SIB1 is not transmitted correctly from cell 1, the UE may not be able to camp on the PCC, and the later procedure for registration and SCell addition cannot proceed normally. Once SIB1 from cell 1 is confirmed, you can continue to check SIB1 from cell 2 and then verify the RRC Reconfiguration and MAC activation steps for the TDD SCC.
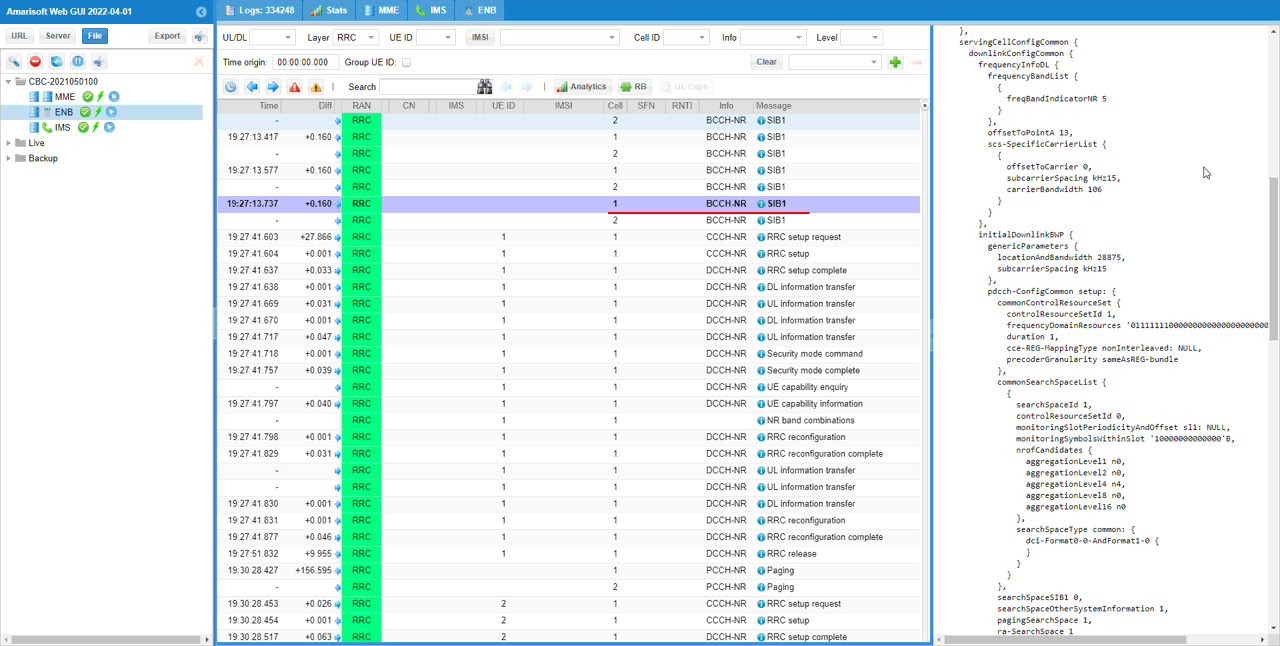
Likewise, check the basic SIB1 transmission from cell 2. As with cell 1, there is no specific CA-related parameter that needs to be highlighted in this SIB1 for this step. The purpose is simply to confirm that cell 2 is also running properly and broadcasting SIB1 as expected.
In this log, SIB1 is repeatedly transmitted on BCCH-NR for cell 2, and the selected message is decoded as systemInformationBlockType1. This confirms that the second cell is active at the RRC broadcast level. From the decoded SIB1 contents, you can also check common cell information such as PLMN identity, tracking area code, cell identity, frequency band information, SSB configuration, and servingCellConfigCommon. In this mixed FDD and TDD test, cell 2 is configured as the TDD cell, and the decoded SIB1 shows freqBandIndicatorNR 78, which matches the intended TDD SCC configuration.
This step is another sanity check before looking at the CA-specific signaling. Since this test uses an FDD PCC and a TDD SCC, it is important to confirm that both cells are broadcasting their own SIB1 properly with the expected band and radio configuration. Once SIB1 transmission is confirmed for both cell 1 and cell 2, you can continue to check whether the UE capability includes the required FDD + TDD CA band combination and whether the gNB sends RRC Reconfiguration to add the TDD cell as the SCell.
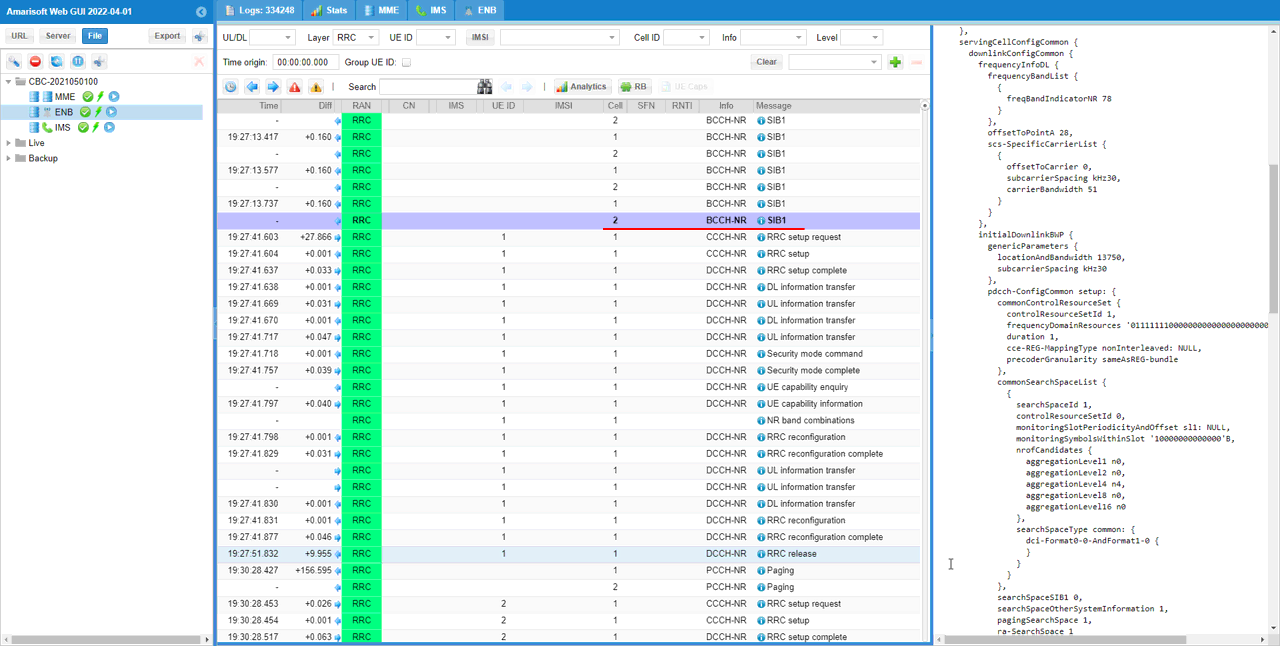
Confirm that the TDD pattern is populated properly in SIB1 for the TDD cell. This is especially important in this mixed FDD and TDD CA test because only the TDD cell should have a TDD UL/DL configuration, while the FDD cell does not use this kind of DL/UL slot pattern.
In this example, the selected SIB1 for cell 2 includes tdd-UL-DL-ConfigurationCommon. The configuration shows referenceSubcarrierSpacing kHz30, dl-UL-TransmissionPeriodicity ms2, nrofDownlinkSlots 2, nrofDownlinkSymbols 6, nrofUplinkSlots 1, and nrofUplinkSymbols 4. This matches the TDD pattern configured earlier for the TDD component carrier.
This check confirms that the per-cell tdd_ul_dl_config was applied correctly and that the TDD SCC is broadcasting the intended TDD structure through SIB1. This is an important sanity check before checking CA-specific signaling, because if the TDD pattern is not populated correctly, the UE may still detect the cell, but later scheduling, HARQ feedback timing, or SCell operation may not work as expected. Once this TDD pattern is confirmed in SIB1, you can continue to check UE capability and then verify that the TDD cell is added as the SCC by RRC Reconfiguration.
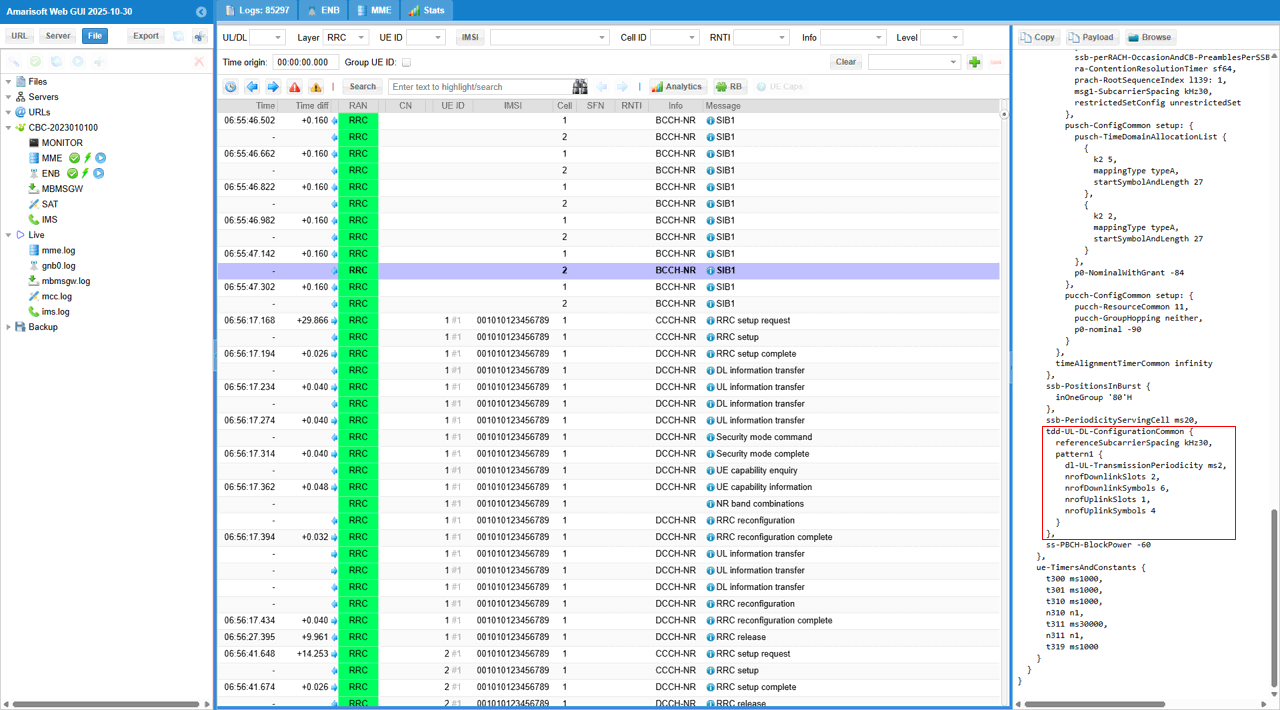
Confirm that the UE supports the CA band combination that matches the band configuration used in this test. This is an important checkpoint because the gNB will not add the SCC if the UE does not report support for the required band combination, even when both cells are configured correctly and all other conditions are satisfied.
In this example, the selected message is NR band combinations, which is derived from the UE capability information. The decoded capability shows a combination including DL NR5A + UL NR5A and DL NR78A + UL NR78A. This matches this mixed FDD and TDD CA test, where the first carrier is configured on band n5 as the FDD PCC and the second carrier is configured on band n78 as the TDD SCC. The feature set also shows the supported bandwidth and subcarrier spacing for each carrier, such as 20 MHz with 15 kHz SCS for n5 and 20 MHz with 30 kHz SCS for n78.
This step is important because mixed FDD and TDD CA depends strongly on UE capability. The Callbox may have both cells running correctly, and the UE may be able to detect both cells, but the gNB will not proceed with SCC addition unless the UE capability includes the required n5 + n78 CA combination. Once the matching band combination is confirmed here, you can continue to check the RRC Reconfiguration message where the TDD cell is added as the SCell.
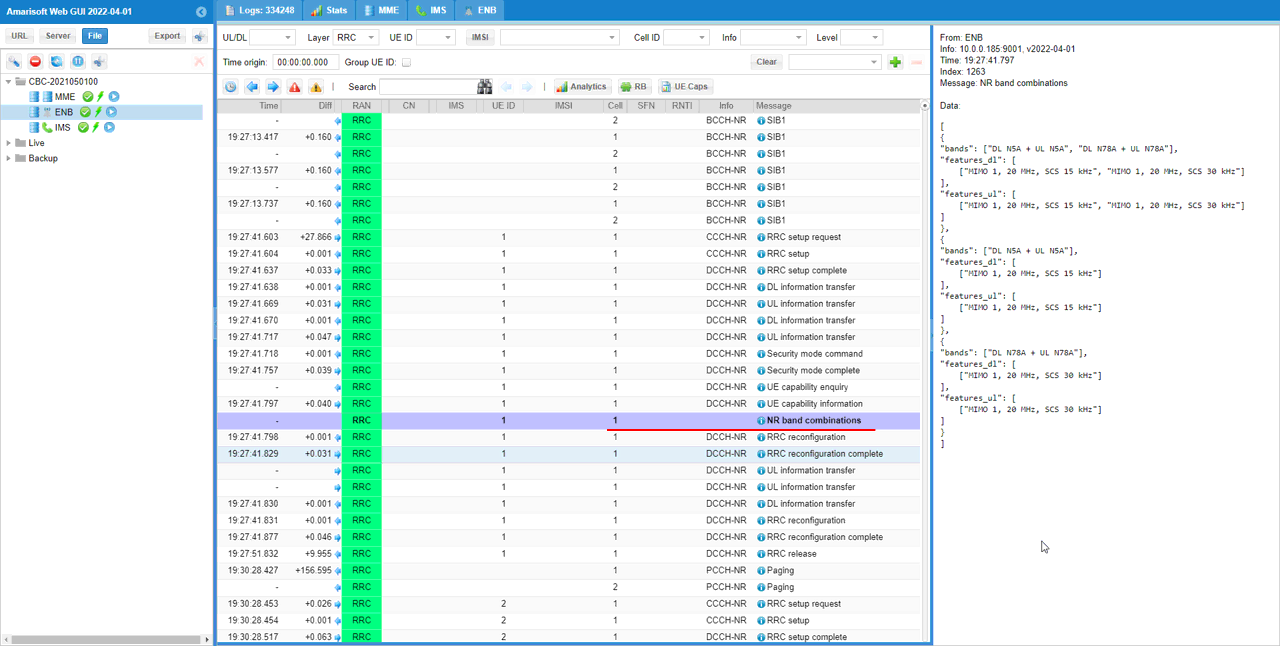
In many cases, UE capability information contains a long list of supported features and band combinations, so it can be difficult to follow directly from the decoded RRC text. To make the CA band combination easier to check, you can use the UE Caps function in Amarisoft Web GUI.
When you click UE Caps, the UE capability information is displayed in a more organized tree format. In this example, under CA combination, the NR section shows the supported carrier aggregation combinations. Comb. 1 shows DL NR5A + UL NR5A together with DL NR78A + UL NR78A, which matches this test case because the PCC is configured on band n5 and the SCC is configured on band n78. This confirms that the UE supports the mixed FDD and TDD CA band combination required for this setup.
The same view also shows other supported combinations, such as DL NR5A + UL NR5A only and DL NR78A + UL NR78A only. These indicate that the UE can also operate with each band individually, but for this test the important one is the combined n5 + n78 CA entry. If the required mixed-band combination is not listed here, the gNB may not add the TDD SCC even though both cells are running and the UE is registered normally. So before debugging RRC Reconfiguration or MAC activation, it is always useful to confirm the required CA combination in this table-based UE Caps view.
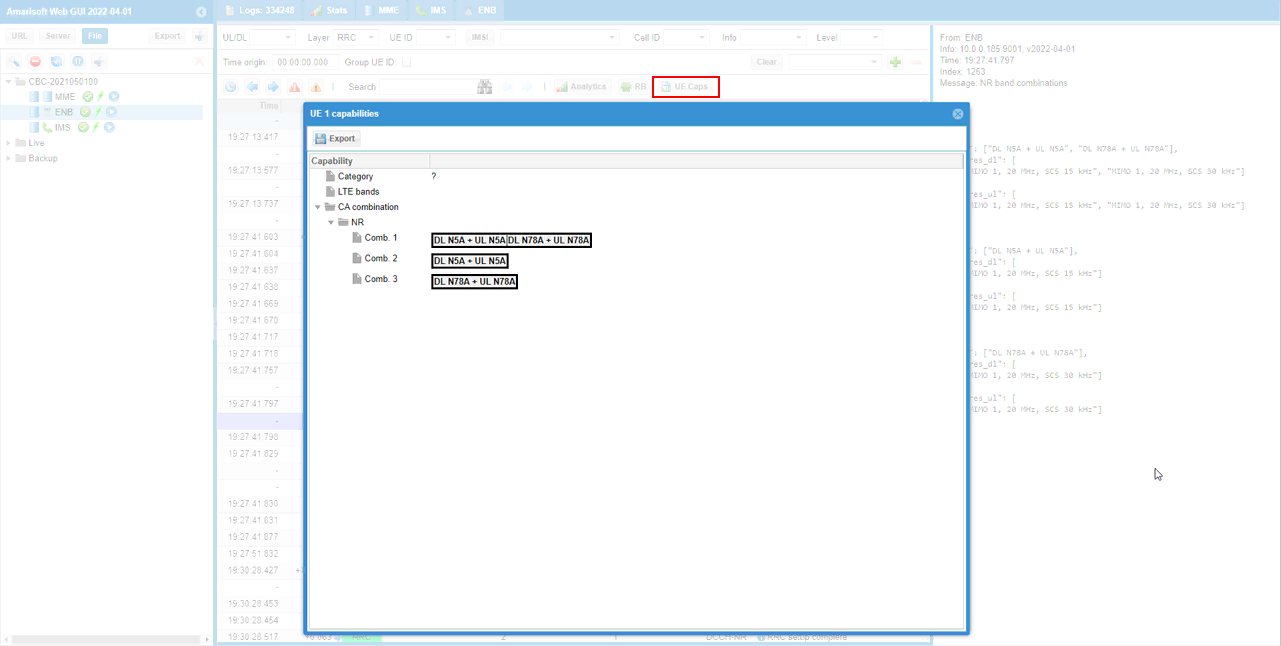
If the UE supports the band combination specified in the configuration file, the gNB sends an RRC Reconfiguration message to add the SCell. In this mixed FDD and TDD test, this is the key RRC signaling step where the TDD cell is added as the SCC while the UE is already connected through the FDD PCC.
In this example, the selected message is RRC Reconfiguration on DCCH-NR. Inside the message, scellToAddModList is included, which means that the gNB is adding or modifying an SCell configuration. The scellIndex identifies the SCell entry, and physCellId is set to 501, which matches the second cell configured earlier. The downlink configuration also shows absoluteFrequencySSB 627264 and frequencyBandList with band 78, confirming that the added SCell is the TDD n78 carrier.
This message confirms that the Callbox has accepted the UE capability and decided to add the configured TDD cell as the SCC. At this point, the SCC is configured by RRC, but it is not necessarily active for scheduling yet. After this message, you should check that the UE sends RRC Reconfiguration Complete, then check the MAC log for SCell addition or activation, and finally confirm from the t command or PHY log that the UE is actually operating with two component carriers.
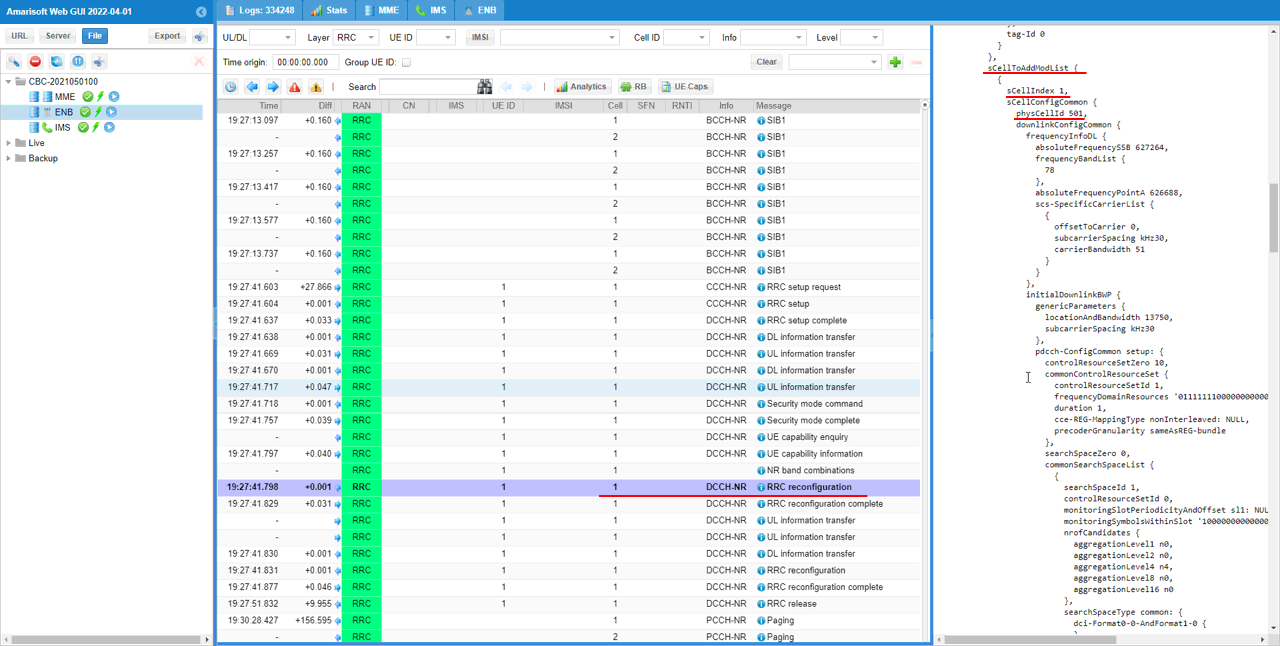
You can check the MAC log to confirm the SCell addition. Look for the SCell AD print in the MAC layer. This indicates that the secondary cell has been added after the RRC Reconfiguration message.
In this example, the MAC log shows SCell AD:02. This means that the SCell corresponding to logical cell ID 2 is being added. This matches the earlier RRC Reconfiguration where the SCell was configured with physCellId 501, which is the TDD n78 cell used as the SCC in this mixed FDD and TDD CA test.
You can also check the following PHY log lines to confirm that the MAC packet is actually transmitted through the physical layer. The PDCCH line shows the downlink control information used to schedule the transmission, and the PDSCH line shows that the corresponding MAC PDU is sent through the downlink shared channel. This confirms that the SCell addition message is not only generated at the MAC layer, but also scheduled and transmitted over the air interface.
At this point, the TDD SCC has been added to the UE configuration. The next checkpoint is to confirm that the added SCell is activated, and then verify from the t command or PHY log that the UE is operating with two component carriers during actual scheduling.
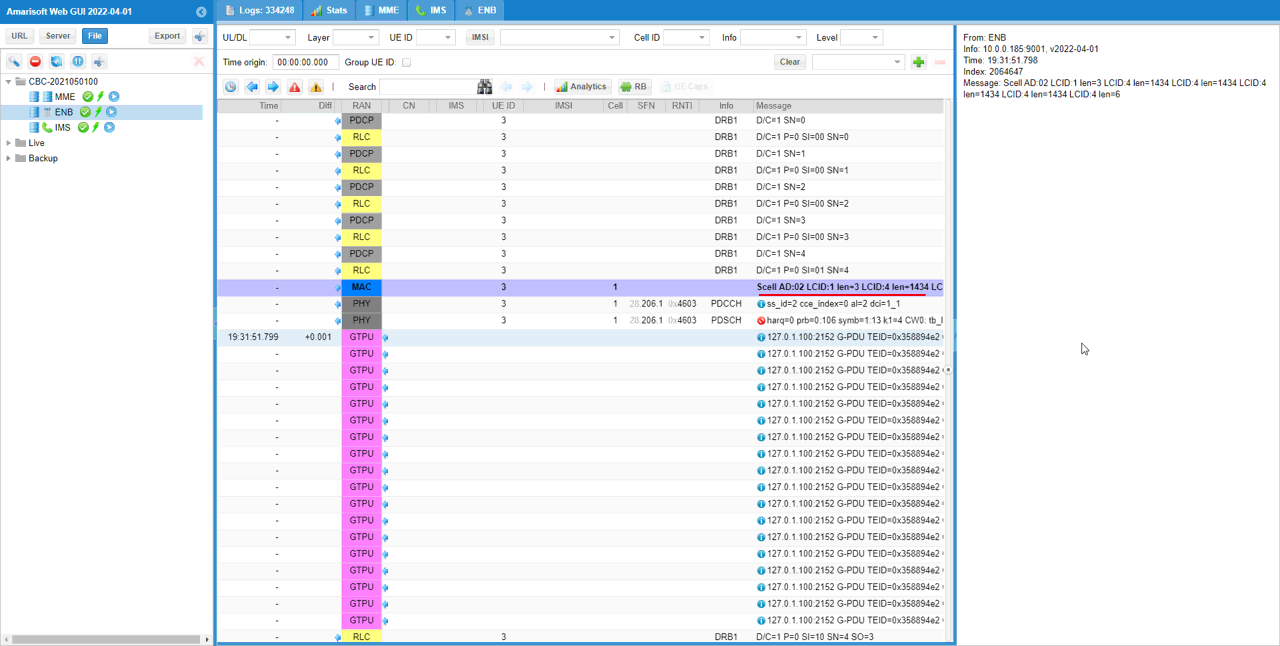
Now confirm that the added SCell is activated by checking the enabling scell log print. This is the point where the SCell moves from being only configured by RRC to being activated for CA scheduling.
In this example, the MAC log shows enabling scell 1. This indicates that the previously added SCell is now activated. In this mixed FDD and TDD CA test, this means the TDD n78 cell has been activated as the SCC while the UE remains connected through the FDD n5 cell as the PCC.
Around this timing, you can also see PHY activity such as PDCCH, PDSCH, and PUCCH. These entries show that lower-layer scheduling and feedback procedures are running while the SCell activation takes place. The important checkpoint in this step is the enabling scell message, because it confirms that the SCC activation step has completed after the earlier RRC Reconfiguration and SCell addition procedure.
At this point, the basic CA signaling sequence is complete. The UE capability confirmed support for the n5 + n78 CA band combination, RRC Reconfiguration added the TDD SCC, the MAC log showed SCell addition, and the enabling scell log confirms that the added SCell is activated. After this, you can check the t command or PHY log to verify that the UE is actually scheduled with two component carriers during traffic.
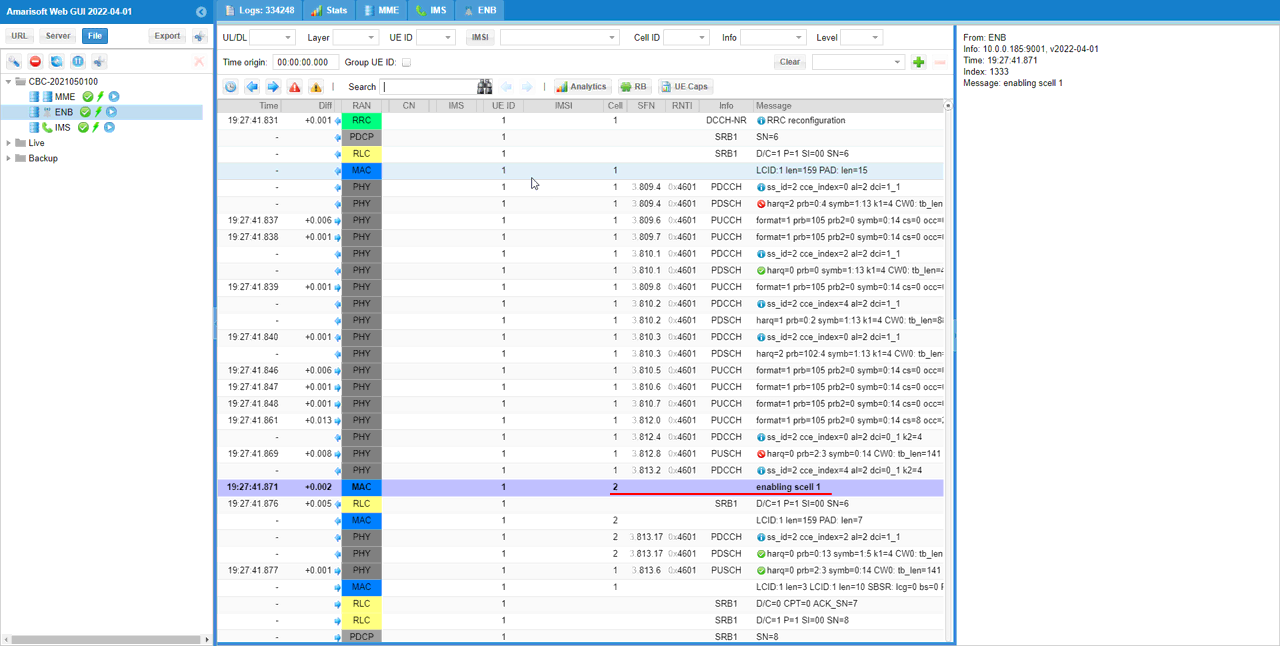
Check the PHY log to confirm that user traffic is scheduled on both the PCC and SCC. In this test, cell 1 is the FDD PCC and cell 2 is the TDD SCC, so you should see PHY scheduling activity on both cells after the SCell is added and activated.
In this log, the Cell column shows entries for both cell 1 and cell 2. You can see PDCCH and PDSCH entries for cell 1, and also PDCCH and PDSCH entries for cell 2. This means downlink scheduling is not limited to the FDD PCC only. The scheduler is also using the TDD SCC for data transmission, which confirms that the mixed FDD and TDD CA operation is active at the PHY scheduling level.
The PDCCH entries show the downlink control information used to schedule the transmission, and the PDSCH entries show the actual downlink shared channel transmission carrying the user data. Seeing these PDCCH/PDSCH pairs on both cells is an important confirmation because it proves that both component carriers are participating in the user-plane traffic.
This is a more detailed confirmation than the t command. The t command gives a compact summary by showing C = 2, while the PHY log shows the actual scheduling activity on each component carrier. When both checks are consistent, you can confirm that the UE is operating with the FDD cell as PCC and the TDD cell as SCC in 2CC CA mode.
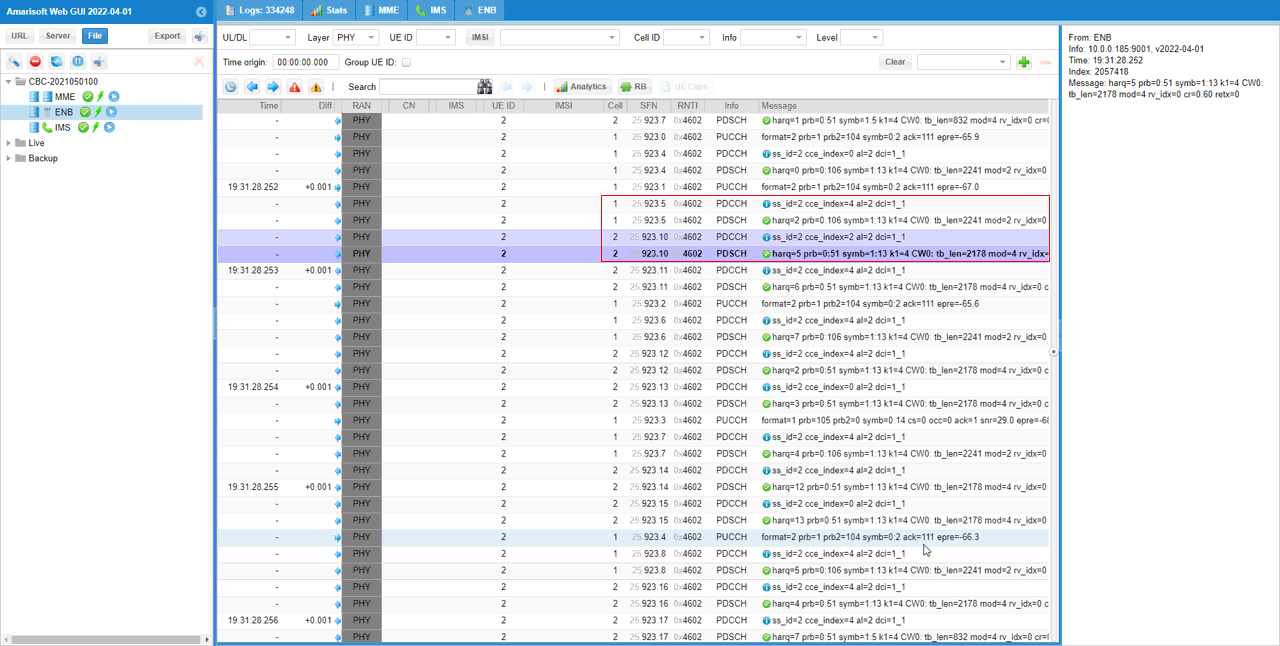
You can also check the PHY layer traffic for both cells more easily by using the RB map plot. This gives a visual view of resource block allocation, so it is easier to see whether traffic is being scheduled on both the PCC and SCC.
In this example, the RB map shows multiple panes for the configured cells. The blue blocks indicate PDSCH allocation, so they show where downlink user traffic is being scheduled. You can see PDSCH allocation on the first cell and also on the second cell, which confirms that both component carriers are being used for downlink transmission. In this mixed FDD and TDD CA test, this means the FDD PCC and the TDD SCC are both carrying traffic.
The RB map is useful because it gives a more intuitive confirmation than reading many PHY log lines one by one. The PHY log shows the detailed PDCCH and PDSCH entries, while the RB map shows the same scheduling activity graphically across time and frequency resources. If you see PDSCH allocation on both cells while the t command shows C = 2, it is a clear indication that 2CC CA is active and that traffic is being distributed across both PCC and SCC.
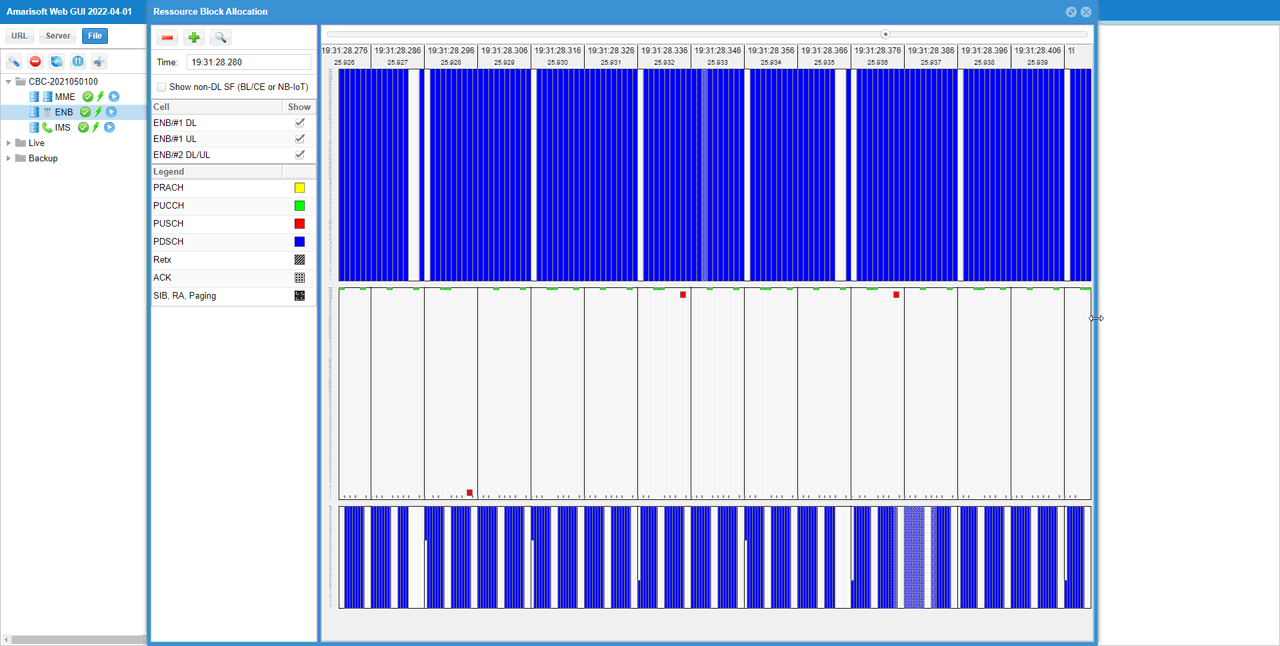
Test 4 : 2CC CA - TDD and FDD - without Measurement
In this test, I will show you how to configure a NR SA carrier aggregation with 1 TDD Cell and 1 FDD cell without RRC Measurement. In this test, a TDD cell will be used as PCC (Primary Component Carrier) and a FDD cell will be used as SCC(Secondary Component Carrier).
I didn't enabled the RRC measurement for simplicity, but still the configuration would be a little bit more complicated comparing to Test 1 (TDD + TDD case) because different duplex method should be configured for each cell.
NOTE : FDD and TDD Carrier Aggregation has some practical difficulties / restriction if you want to try with commercial UEs. It is not due to Amarisoft Implementation, it is due to UE side restriction as of now (Apr 2022) which is listed as below. So when you are trying with FDD + TDD Carrier Aggregation, check on UE side feature / capability first.Configuration
An important thing in using UE sim is to do proper matching between UE sim configuration and Call box configuration In this tutorial, I used the ue-nr-2cc-sa-TDD-FDD.cfg that is copied and modified from the ue-nr-2cc-sa.cfg and gnb-2cc-sa-TDD-FDD.cfg that is copied and modified from gnb-2cc-sa.cfg
Configuration for Callbox
If you use other Network (e.g, other network simulator or real network), you have to make it sure to configure UE sim according to the settings on network side
On Callbox (gNB), I used gnb-2cc-sa-TDD-FDD.cfg that is copied and modified from gnb-2cc-sa.cfg
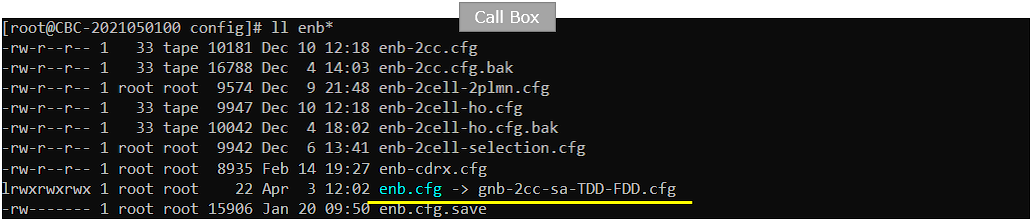
For the core network side, we don't need any specific configuration for carrier aggregation. So I just used the default core network configuration file (mme-ims.cfg)
gnb-2cc-sa-TDD-FDD.cfg is configured as follows.
First, configure the duplex mode separately for each component carrier. In this test, two parameters are used: NR_TDD_CC1 and NR_TDD_CC2. This allows the first cell and the second cell to use different duplex modes, which is required because this test uses one TDD cell and one FDD cell.
NR_TDD_CC1 is set to 1, which means the first cell is configured as NR TDD. This first cell will be used as the PCC, or Primary Component Carrier. NR_TDD_CC2 is set to 0, which means the second cell is configured as NR FDD. This second cell will be used as the SCC, or Secondary Component Carrier. NR_TDD_CONFIG is set to 2 and is used for the TDD carrier to define the TDD UL/DL pattern.
Separate bandwidth parameters are also used for each component carrier. NR_BANDWIDTH_CC1 is set to 20 for the TDD PCC, and NR_BANDWIDTH_CC2 is set to 20 for the FDD SCC. In this example, both carriers use the same 20 MHz bandwidth, but defining separate bandwidth parameters makes the configuration more flexible. In other test cases, the TDD carrier and FDD carrier may use different bandwidths, so separating these values makes it easier to configure each cell independently.

Now configure the first cell to support secondary cell addition. This is done by specifying scell_list inside the cell configuration in nr_cell_list. In this test, the first cell is configured with scell_list containing { cell_id: 2 }, which means that when this cell becomes the PCC, the cell with cell_id 2 can be added as the SCC for carrier aggregation.
In this example, the first cell uses rf_port 0, cell_id 0x01, and n_id_cell 500, so this cell corresponds to PCI 500. Since NR_TDD_CC1 is set to 1, this first cell is configured as a TDD cell. For the TDD case, band 78 is used with dl_nr_arfcn 621300 and subcarrier_spacing 30 kHz. This cell is intended to work as the PCC in this TDD and FDD CA test.
The scell_list does not include rrc_configuration, so SCC addition is not controlled by an RRC measurement condition. This means the gNB can add the secondary cell directly by RRC Reconfiguration as long as the UE supports the configured TDD + FDD CA band combination.
Another important point is that bandwidth, n_antenna_dl, and n_antenna_ul are configured inside each cell entry in nr_cell_list instead of being configured only in nr_cell_default. This is useful for this mixed-duplex CA test because the PCC and SCC may require different bandwidth or antenna settings. In this example, the first cell uses NR_BANDWIDTH_CC1, while the second cell can use NR_BANDWIDTH_CC2 later. This allows each component carrier to be configured independently while still being used together for carrier aggregation.
Now configure the PRACH parameters according to your test requirement. In same-duplex CA cases such as TDD-TDD or FDD-FDD, the PRACH configuration can often be placed in nr_cell_default because both cells may share the same random access setting. In this mixed TDD and FDD test, however, the PRACH configuration is moved into each cell entry inside nr_cell_list so that each component carrier can use a PRACH configuration that matches its own duplex mode.
For the first cell, the PRACH configuration is selected based on NR_TDD_CC1. Since NR_TDD_CC1 is set to 1 in this test, this cell is treated as a TDD cell. In that case, the TDD PRACH branch is used. If NR_TDD_CONFIG is 4, prach_config_index is set to 156, and otherwise prach_config_index is set to 160. The msg1_subcarrier_spacing is set to 30 kHz, which matches the TDD cell configuration.
If NR_TDD_CC1 were set to 0, the FDD branch would be used instead, where prach_config_index is set to 16. The ra_response_window is also selected according to the duplex mode. For the TDD case, it is set to 20 slots, while for the FDD case it is set to 10 slots.
The remaining parameters, including msg1_fdm, msg1_frequency_start, zero_correlation_zone_config, preamble_received_target_power, preamble_trans_max, power_ramping_step, ra_contention_resolution_timer, ssb_per_prach_occasion, and cb_preambles_per_ssb, define the detailed random access behavior for this cell.
The main point of this configuration is that PRACH is now controlled per cell rather than only by nr_cell_default. This is useful for the TDD PCC and FDD SCC case because the PCC and SCC may require different PRACH timing and random access settings. By configuring PRACH inside each cell entry, each component carrier can use the proper PRACH configuration for its own duplex mode.
I moved tdd_ul_dl_config from nr_cell_default into each cell configuration inside nr_cell_list. This allows each cell to apply a different TDD UL/DL configuration instead of using one common default setting for all cells.
This is especially important in this test because the PCC is a TDD cell and the SCC is an FDD cell. The TDD PCC needs a valid TDD UL/DL pattern, while the FDD SCC does not use a TDD slot pattern. By placing tdd_ul_dl_config inside the per-cell configuration, the TDD pattern can be applied only to the TDD cell, and the FDD cell can keep its own FDD-based configuration.
In the case where the TDD cell is used as the PCC, the TDD pattern also affects how scheduling and HARQ feedback timing are handled for the whole CA operation. Therefore, the TDD pattern may need to be adjusted so that the gNB can schedule as many usable slots as possible across both the PCC and SCC. In this example, the NR_TDD_CONFIG 2 pattern was adjusted to avoid the warning that some SCell DL slots may not be scheduled due to the limited number of k1 values in dl-DataToUL-Ack. This warning is related to the timing relationship between downlink data transmission and uplink HARQ ACK feedback.
The main point is that when the PCC is TDD, the TDD UL/DL pattern is not just a local configuration for one cell. It can affect whether the scheduler can properly use both component carriers. So for mixed TDD and FDD CA, it is better to configure tdd_ul_dl_config per cell and tune the TDD pattern carefully according to the CA scheduling requirement.
I also moved ssb_pos_bitmap from nr_cell_default into each cell configuration inside nr_cell_list. This allows each cell to apply a different SSB position bitmap instead of using one common default value for all component carriers.
This is useful in this TDD and FDD CA test because the PCC and SCC use different duplex modes. The TDD PCC and FDD SCC may require different SSB transmission positions depending on their band, subcarrier spacing, and duplex configuration. By configuring ssb_pos_bitmap inside each cell entry, each component carrier can use the SSB bitmap that matches its own radio configuration.
In this example, one case uses ssb_pos_bitmap: "10000000", and the other case uses ssb_pos_bitmap: "1000". The exact value depends on the cell configuration, but the important point is that the SSB position is now controlled per cell. This follows the same configuration approach used for bandwidth, PRACH, and TDD UL/DL pattern. Any parameter that may be different between the TDD PCC and FDD SCC is moved from nr_cell_default into nr_cell_list so that each cell can be configured independently.
Then configure the second cell to support secondary cell addition. This is done by specifying scell_list inside the second cell configuration in nr_cell_list. In this test, the second cell is configured with scell_list containing { cell_id: 1 }, which means that when this cell becomes the primary cell, the cell with cell_id 1 can be added as the secondary cell for carrier aggregation.
In this example, the second cell uses rf_port 1, cell_id 0x02, and n_id_cell 501, so this cell corresponds to PCI 501. Since NR_TDD_CC2 is set to 0 in this test, this second cell is configured as an FDD cell. In the FDD branch, band 5 is used with dl_nr_arfcn 176300 and subcarrier_spacing 15 kHz. This cell is intended to work as the SCC in this TDD and FDD CA test.
As in the first cell configuration, rrc_configuration is not specified inside scell_list. This means that SCC addition is not controlled by RRC measurement. The gNB can add the secondary cell directly by RRC Reconfiguration as long as the UE supports the required CA band combination for the configured TDD and FDD carriers.
Also note that bandwidth, n_antenna_dl, and n_antenna_ul are configured inside this cell entry instead of only using nr_cell_default. The second cell uses NR_BANDWIDTH_CC2, so its bandwidth can be controlled independently from the first cell. This is useful in mixed-duplex CA because the TDD PCC and FDD SCC may use different bandwidth, antenna configuration, duplex mode, subcarrier spacing, PRACH configuration, and SSB position. By configuring these parameters per cell, each component carrier can be adjusted separately while still being used together for carrier aggregation.
Like the first cell case, configure the PRACH parameters for the second cell according to your test requirement. In same-duplex CA cases such as TDD-TDD or FDD-FDD, the PRACH configuration can often be placed in nr_cell_default because both cells can share the same random access configuration. In this mixed TDD and FDD test, however, the PRACH configuration is placed inside each cell entry in nr_cell_list so that each component carrier can use a PRACH configuration that matches its own duplex mode.
For the second cell, the PRACH configuration is selected based on NR_TDD_CC2. Since NR_TDD_CC2 is set to 0 in this test, this second cell is treated as an FDD cell. In that case, the FDD PRACH branch is used, and prach_config_index is set to 16, which corresponds to subframe 1 every frame. The ra_response_window is also set according to the FDD case, so it uses 10 slots instead of the TDD value.
If NR_TDD_CC2 were set to 1, the TDD PRACH branch would be used instead. In that case, prach_config_index is selected based on NR_TDD_CONFIG. If NR_TDD_CONFIG is 4, prach_config_index is set to 156, otherwise it is set to 160, and msg1_subcarrier_spacing is set to 30 kHz.
The other PRACH parameters such as msg1_fdm, msg1_frequency_start, zero_correlation_zone_config, preamble_received_target_power, preamble_trans_max, power_ramping_step, ra_contention_resolution_timer, ssb_per_prach_occasion, and cb_preambles_per_ssb define the detailed random access behavior for this cell. The main point is that this PRACH block is configured per cell, so the TDD PCC and FDD SCC can each use the proper PRACH timing and random access parameters for their own duplex mode.
I moved tdd_ul_dl_config from nr_cell_default into each cell configuration inside nr_cell_list. This allows each cell to apply a different TDD UL/DL configuration instead of sharing one common default setting.
In this TDD and FDD CA test, this is useful because only the TDD cell needs the TDD UL/DL pattern. The FDD cell does not use this configuration, so keeping tdd_ul_dl_config inside the cell configuration makes it possible to apply the TDD pattern only to the TDD PCC.
In this example, tdd_ul_dl_config is enabled only when NR_TDD_CC1 is set to 1. Different TDD patterns are selected depending on NR_TDD_CONFIG. For NR_TDD_CONFIG 2, the pattern uses a 2 ms period with 2 downlink slots, 6 downlink symbols, 1 uplink slot, and 4 uplink symbols. This pattern was adjusted to avoid the warning that some SCell downlink slots may not be scheduled due to the limited number of k1 values in dl-DataToUL-Ack.
This warning is related to HARQ ACK timing. Even though the SCC is FDD, the UE still needs to send HARQ feedback according to the scheduling and uplink timing available through the configured serving cell structure. When the PCC is TDD, the available uplink timing depends on the TDD pattern, so the TDD UL/DL configuration can affect whether the scheduler can fully use the SCell downlink opportunities.
The main point is that when TDD is used as PCC, the TDD pattern should be checked carefully because it can affect CA scheduling behavior across both PCC and SCC. Moving this configuration into nr_cell_list gives more flexibility and allows each cell to keep the proper duplex-specific configuration.
I also moved ssb_pos_bitmap from nr_cell_default into each cell configuration inside nr_cell_list. This allows each cell to use a different SSB position bitmap instead of applying one common default value to all cells.
This is useful in this TDD and FDD CA test because the PCC and SCC use different duplex modes and may require different SSB transmission patterns. The TDD PCC may use one SSB bitmap, while the FDD SCC may use another bitmap depending on its band, subcarrier spacing, and synchronization signal configuration.
In this example, one branch uses ssb_pos_bitmap: "10000000", and the other branch uses ssb_pos_bitmap: "1000". The exact value depends on the selected duplex mode and cell configuration, but the main point is that the SSB position can now be controlled independently for each component carrier.
This follows the same configuration approach used for the other per-cell parameters in this test. Since the TDD PCC and FDD SCC may not share the same radio configuration, parameters such as bandwidth, PRACH, TDD UL/DL pattern, and SSB position bitmap are placed inside nr_cell_list so that each cell can be configured separately.
Configuration for UEsim
On UEsim, I used the ue-nr-2cc-sa-TDD-FDD.cfg that is copied and modified from the ue-nr-2cc-sa.cfg (
NOTE : You can skip this configuration if you use commerical UE as DUT)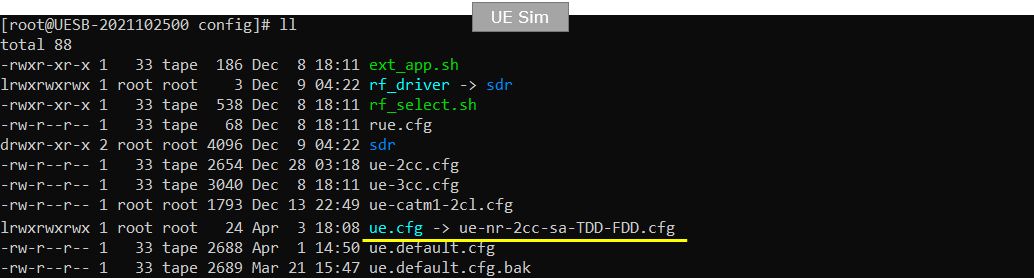
ue-nr-2cc-sa-TDD-FDD.cfg is configured as follows.
Since this test uses two component carriers, set N_CELL to 2 on the UEsim side. Then configure the duplex mode of each cell separately using NR_TDD_CC1 and NR_TDD_CC2 so that the UE side matches the Callbox configuration.
In this test, NR_TDD_CC1 is set to 1, which means the first cell is configured as NR TDD. This cell is used as the PCC. NR_TDD_CC2 is set to 0, which means the second cell is configured as NR FDD. This cell is used as the SCC. This is why separate NR_TDD flags are created for CC1 and CC2 instead of using one common NR_TDD parameter.
N_ANTENNA_DL and N_ANTENNA_UL are both set to 1, so the UE is configured with a simple SISO setup for both downlink and uplink. NR_BANDWIDTH_CC1 and NR_BANDWIDTH_CC2 are also configured separately. In this example, both are set to 20 MHz, but the separate parameters allow the PCC and SCC to use different bandwidths if needed. This is useful for mixed TDD and FDD CA because TDD and FDD carriers may use different bandwidths in real deployment or in other test scenarios.
The important point is that the UEsim cell count, duplex mode, antenna configuration, and bandwidth should match the Callbox configuration. Once these basic parameters are aligned, UEsim can detect both cells correctly and proceed with registration on the TDD PCC before the FDD SCC is added through the carrier aggregation procedure.

Since this is a 2CC CA test, configure two cells in the cells parameter on the UEsim side. The band, frequency, SSB frequency, subcarrier spacing, duplex type, and bandwidth should match the corresponding Callbox cell configuration. In this test, the two cells are configured differently because the first cell is the TDD PCC and the second cell is the FDD SCC.
For the first cell, rf_port is set to 0. Since NR_TDD_CC1 is set to 1, the TDD branch is used, so the cell is configured with band 78, dl_nr_arfcn 621300, ssb_nr_arfcn 621216, and subcarrier_spacing 30 kHz. The bandwidth is set to NR_BANDWIDTH_CC1, allowing the first component carrier bandwidth to be controlled independently. This first cell matches the TDD PCC configuration on the Callbox side.
For the second cell, rf_port is set to 1. Since NR_TDD_CC2 is set to 0, the FDD branch is used, so the cell is configured with band 5, dl_nr_arfcn 176300, ssb_nr_arfcn 175250, and subcarrier_spacing 15 kHz. The bandwidth is set to NR_BANDWIDTH_CC2, allowing the second component carrier bandwidth to be configured independently from the first one. This second cell matches the FDD SCC configuration on the Callbox side.
The important point is that UEsim must know both component carriers, but each carrier can have its own duplex mode and radio parameters. With this configuration, the UE first registers on the TDD PCC and then the FDD cell can be added later as the SCC through the carrier aggregation procedure.
Perform the Test
First, check the basic cell configuration on the Callbox side using the cell phy and cell commands. These commands do not directly tell you whether the multi-cell setup is being used for carrier aggregation, handover, cell selection, or reselection, but they are useful as the first sanity check because they confirm that the expected cells are configured and running.
In the cell phy output, two NR cells are shown. Cell 0x001 is configured on band n78 with 20 MHz bandwidth, DL ARFCN 621300, UL ARFCN 621300, and SSB ARFCN 621216. This is the TDD cell used as the PCC in this test. Cell 0x002 is configured on band n5 with 20 MHz bandwidth, DL ARFCN 176300, UL ARFCN 167300, and SSB ARFCN 175250. This is the FDD cell used as the SCC. You can also confirm the duplex type from the band information. Band n78 is TDD, while band n5 is FDD.
The cell command gives another view of the same configuration. It shows that cell 0x001 has PCI 500 and cell 0x002 has PCI 501. The DL ARFCN values also match the configured carrier frequencies. At this stage, the purpose is simply to confirm that both cells are active with the expected band, duplex type, frequency, bandwidth, and PCI before powering on the UE and checking whether the FDD SCC is added to the TDD PCC for 2CC CA operation. You may refer to this site : https://www.sqimway.com/nr_band.php to check duplex type of each band.
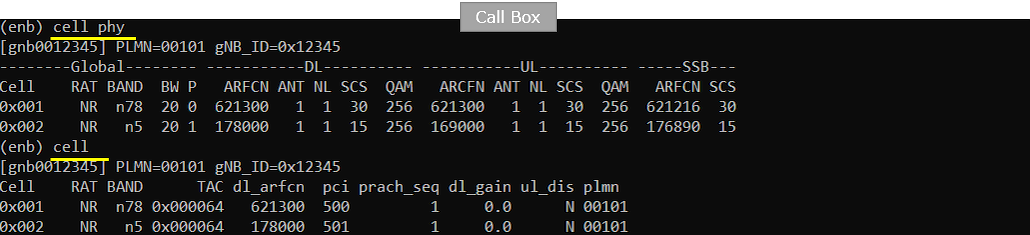
If all cells are configured as intended, power on the UE from UEsim. If you are using a commercial UE instead of UEsim, this is the point where you can power on the device.
After the power_on command is executed, UEsim starts searching for the configured cells and tries to decode the system information. In this example, the log shows Cell 0: SIB found and Cell 1: SIB found, which means that UEsim successfully detected both configured cells. In this test, Cell 0 corresponds to the TDD PCC candidate, and Cell 1 corresponds to the FDD SCC candidate.
This is the first basic checkpoint before checking carrier aggregation. At this stage, CA is not confirmed yet. This step only confirms that the UE can see both cells and decode their SIB information. Once both cells are detected properly, the UE can continue with registration on the TDD PCC, and then the gNB can add the FDD cell as the SCC if the UE supports the required TDD + FDD CA band combination.
With the ue command on UEsim, check the UE registration status after powering on the UE. In this example, EMM_STATE is shown as registered, which means that the UE has successfully completed registration with the network.
The output also shows that one E-RAB is established and the UE has received the IP address 192.168.2.2. This confirms that the UE has basic user-plane connectivity through the primary cell. In this test, the UE first registers through the TDD PCC, and the FDD cell is expected to be added later as the SCC.
At this point, carrier aggregation is not confirmed yet. This command only verifies that the UE is registered and has an IP address. The next step is to check the Callbox trace or RRC/MAC logs to confirm whether the FDD SCC is added and activated for 2CC CA operation.
On the Callbox side, check the real-time trace with the t command. It is recommended to start this trace before powering on the UE, because this allows you to capture the full sequence from initial access to SCell addition and CA activation.
In this output, the C column indicates the number of component carriers currently used by the UE. If this value is 2, it means that 2CC carrier aggregation has been established. In this example, C is shown as 2, so the UE is operating with two component carriers.
This is the quick runtime confirmation for this TDD and FDD CA test. The UE first registers through the TDD PCC, and then the FDD cell is added as the SCC. Once the C column becomes 2, you can confirm that the mixed TDD + FDD CA configuration has been accepted and activated from the Callbox scheduling point of view.
Other fields such as cqi, ri, mcs, snr, and brate show the current radio condition and scheduling status. However, for this checkpoint, the most important field is the C column. It confirms that the UE is no longer operating only with the primary carrier, but with both PCC and SCC as a 2CC CA connection.
On the Callbox MME screen, check the UE registration and IP allocation status with the ue command. This gives the core-network side view of the UE after registration.
In this output, REG is set to Y, which means the UE is successfully registered. The IP_ADDR field shows 192.168.2.2, so the UE has received an IP address. The #BEARER value is 1, which means one user-plane bearer is established.
This check does not directly confirm carrier aggregation, but it confirms that the UE is properly registered and has valid IP connectivity. Together with the Callbox t trace showing C = 2, this verifies both important parts of the test: the UE is registered and reachable from the core-network side, and the radio side is operating with 2CC CA using the TDD PCC and FDD SCC.
This step is not mandatory, but it is useful for checking whether the IP data path is working properly after the TDD and FDD CA setup is established. Once the UE is registered and an IP address is allocated, you can generate downlink UDP traffic from the Callbox side using ltesim_server.
In this example, ltesim_server is started on the Callbox, and the cbr_send command is used to send UDP traffic to the UE IP address 192.168.2.2. The value 200M indicates the target traffic rate, and 60 indicates the duration in seconds. This means that the Callbox sends constant bit rate UDP packets toward the UE for 60 seconds with a target rate of 200 Mbps.
This traffic test is useful because it allows you to verify the user-plane data path and observe CA scheduling behavior during actual traffic. While the traffic is running, keep the t trace open and check whether the C column remains 2 and whether downlink bitrate is shown. If C stays at 2 during traffic, it confirms that the UE is maintaining carrier aggregation with the TDD PCC and FDD SCC while user data is being transmitted.
Check the downlink throughput with the t command while the UDP traffic is running. In this output, the C column shows 2, which confirms that the UE is still operating with two component carriers during the traffic test.
The DL brate column shows around 100M, meaning that downlink traffic is being transmitted to the UE at about 100 Mbps. The cqi value is 12, ri is 1, and the DL mcs value is around 22, so the radio condition is good enough for stable downlink scheduling. The DL snr value is around 27 to 29 dB, which also indicates a stable downlink channel condition.
This result confirms that the TDD and FDD CA setup is working during actual user-plane traffic. The UE is registered, an IP address is allocated, the C column remains 2, and downlink throughput is observed while traffic is running. This means the UE is not only configured for 2CC CA, but is also maintaining the TDD PCC and FDD SCC combination during data transfer.
Log Analysis
In this section, you will see how to confirm if UE registration is complete from trace log. You can use the same method to find any issues (e.g, registration failure) for troubleshooting. When UE registration fails, you may use this tutorial to figure out the point of the failure and troubleshoot
NOTE : This section is just to check quickly some important points in the log, but it may be a little bit tricky to do the detailed log analysis (especially for lower layer log analysis). In that case, I strongly recommend you to use WebGUI for the log analysis. You may refer to WebGUI Tutorial
First, check the basic SIB1 transmission from cell 1. There is no specific CA-related parameter that needs to be highlighted in this SIB1 at this point. The purpose of this step is simply to confirm that cell 1 is running properly and broadcasting SIB1 as expected.
In this log, SIB1 is repeatedly transmitted on BCCH-NR for cell 1, and the selected message is decoded as systemInformationBlockType1. This confirms that the cell is active at the RRC broadcast level. From the decoded SIB1 contents, you can also see basic cell information such as PLMN identity, tracking area code, cell identity, frequency band information, SSB configuration, and servingCellConfigCommon. In this test, cell 1 is configured as the TDD PCC, and the decoded SIB1 shows freqBandIndicatorNR 78, which matches the intended n78 TDD primary cell configuration.
This step should be treated as a basic sanity check before checking CA-specific signaling. If SIB1 is not transmitted correctly from cell 1, the UE may not be able to camp on the PCC, and the later registration and SCell addition procedure cannot proceed normally. Once SIB1 from cell 1 is confirmed, you can continue to check SIB1 from cell 2 and then verify whether the FDD cell is added as the SCC through RRC Reconfiguration and activated at MAC level.
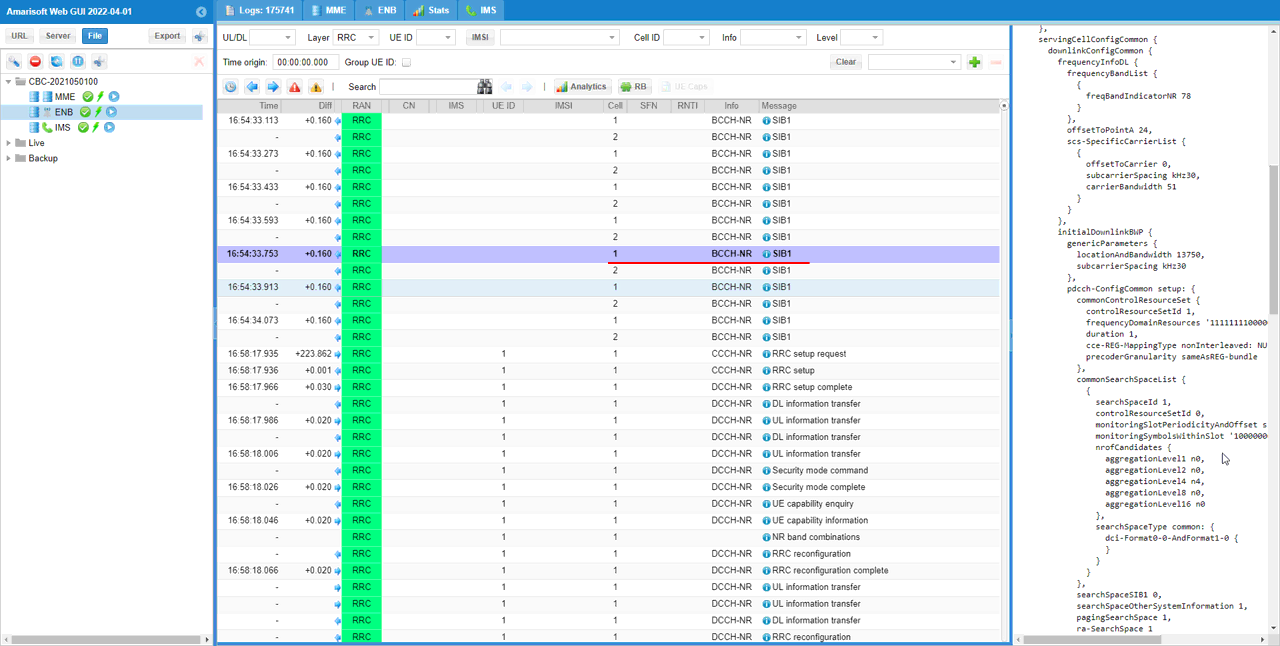
Then confirm that the TDD UL/DL pattern in SIB1 of the TDD cell is populated properly according to the configuration file. This is an important check in this test because cell 1 is used as the TDD PCC, and the TDD pattern affects the DL/UL slot structure used by the UE after it camps on this cell.
In this example, the decoded SIB1 includes tdd-UL-DL-ConfigurationCommon. The configuration shows referenceSubcarrierSpacing kHz30, dl-UL-TransmissionPeriodicity ms2, nrofDownlinkSlots 2, nrofDownlinkSymbols 6, nrofUplinkSlots 1, and nrofUplinkSymbols 4. This matches the TDD pattern configured earlier for NR_TDD_CONFIG 2.
This check confirms that the per-cell tdd_ul_dl_config was applied correctly to the TDD cell and that the intended TDD structure is broadcast through SIB1. This is especially important when the TDD cell is used as PCC, because the PCC timing is the main timing reference for the UE connection, and the available UL timing can also affect HARQ ACK feedback scheduling for CA operation. If this TDD pattern is not configured properly, the UE may still detect the cell, but later CA scheduling or ACK/NACK feedback timing may not work as expected.
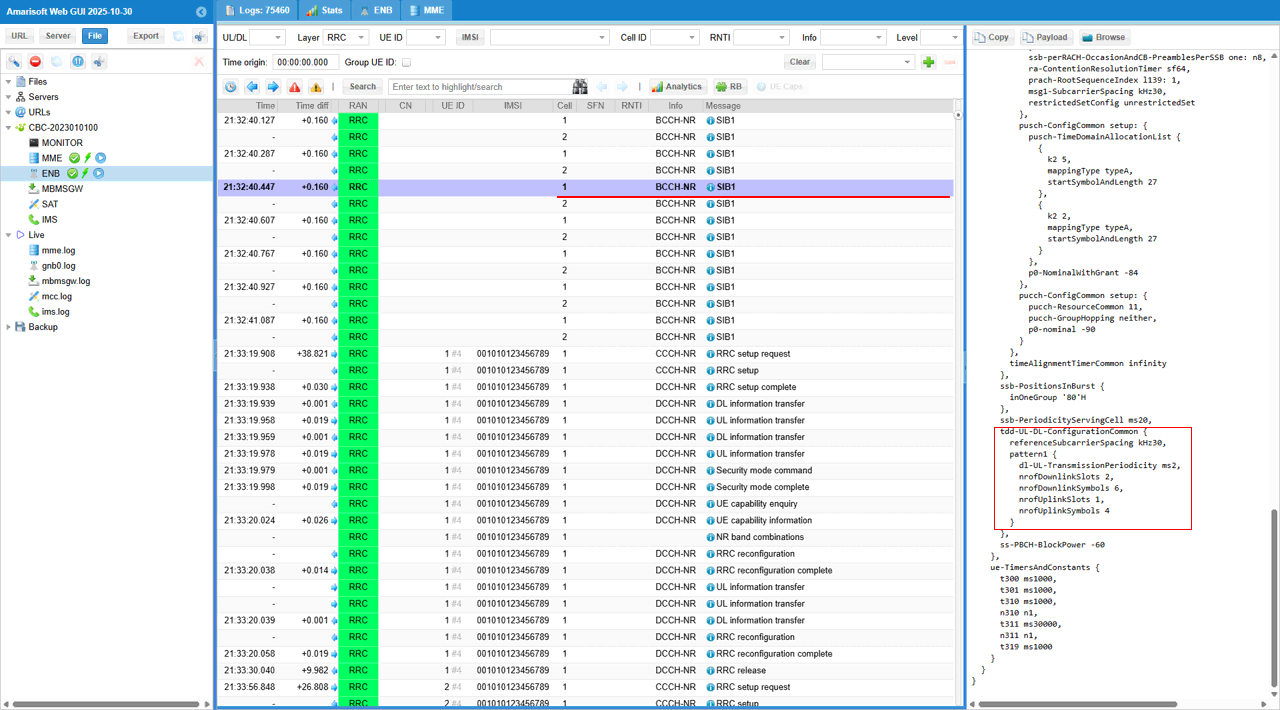
Likewise, check the basic SIB1 transmission from cell 2. As with cell 1, there is no specific CA-related parameter that needs to be highlighted in this SIB1 for this step. The purpose is simply to confirm that cell 2 is also running properly and broadcasting SIB1 as expected.
In this log, SIB1 is repeatedly transmitted on BCCH-NR for cell 2, and the selected message is decoded as systemInformationBlockType1. This confirms that the second cell is active at the RRC broadcast level. From the decoded SIB1 contents, you can also check common cell information such as PLMN identity, tracking area code, cell identity, frequency band information, SSB configuration, and servingCellConfigCommon. In this test, cell 2 is configured as the FDD SCC, and the decoded SIB1 shows freqBandIndicatorNR 5, which matches the intended n5 FDD secondary cell configuration.
This step is another sanity check before moving to CA-specific signaling. Since this test uses a TDD PCC and an FDD SCC, both cells should be confirmed individually. Cell 1 should broadcast the expected TDD configuration, and cell 2 should broadcast the expected FDD configuration. Once SIB1 transmission is confirmed for both cells, you can continue to check whether the UE capability includes the required n78 + n5 CA band combination and whether the gNB sends RRC Reconfiguration to add the FDD cell as the SCell.
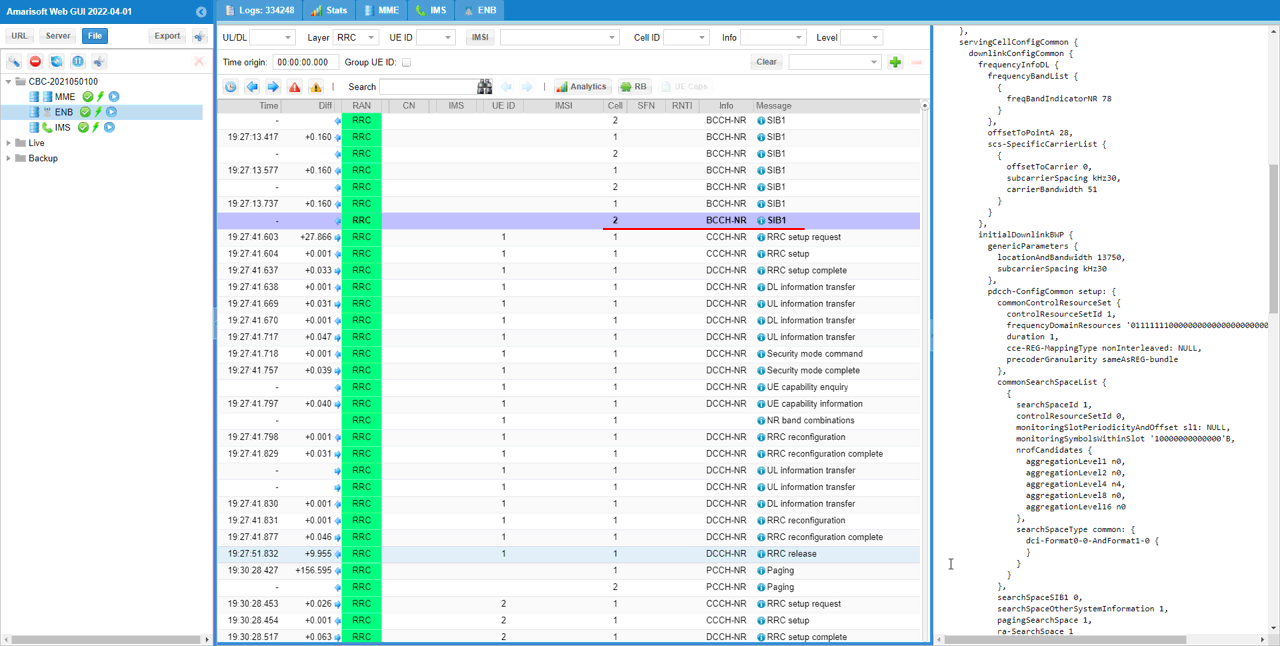
Confirm that the UE supports the carrier aggregation band combination that matches the band configuration used in this test. This is an important checkpoint because the gNB will not add the SCC if the UE does not report support for the required band combination, even if both cells are configured correctly and all other conditions are satisfied.
In this example, the selected message is NR band combinations, which is derived from the UE capability information. The decoded capability shows a combination including DL NR5A + UL NR5A and DL NR78A + UL NR78A. This matches this test case, where the PCC is configured on band n78 as the TDD cell and the SCC is configured on band n5 as the FDD cell. The feature set also shows the supported bandwidth and subcarrier spacing for each carrier, such as 20 MHz with 30 kHz SCS for n78 and 20 MHz with 15 kHz SCS for n5.
This step is important because mixed TDD and FDD CA depends on UE capability. The Callbox may have both cells running correctly, and the UE may be able to detect both cells, but the gNB will not proceed with SCC addition unless the UE capability includes the required n78 + n5 CA combination. Once the matching band combination is confirmed here, you can continue to check the RRC Reconfiguration message where the FDD cell is added as the SCell.
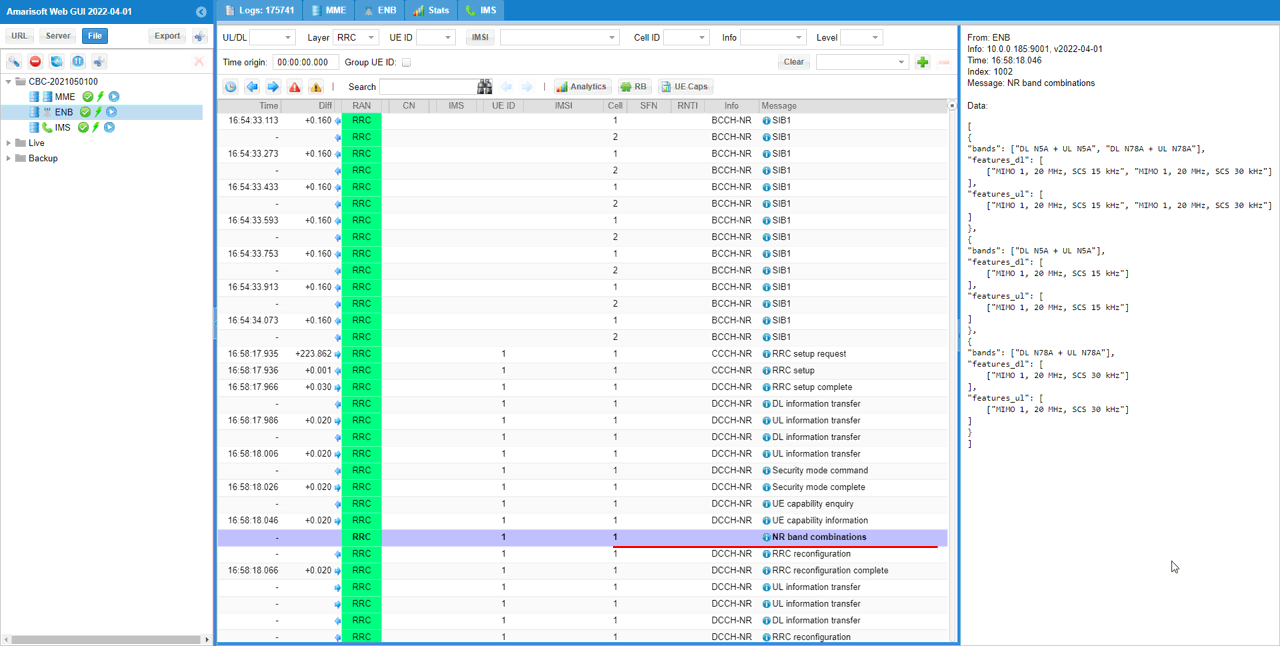
In many cases, UE capability information contains a long list of supported features and band combinations, so it can be difficult to follow directly from the decoded RRC text. To make the CA band combination easier to check, you can use the UE Caps function in Amarisoft Web GUI.
When you click UE Caps, the UE capability information is displayed in a more organized tree format. In this example, under CA combination, the NR section shows the supported carrier aggregation combinations. Comb. 1 shows DL NR5A + UL NR5A together with DL NR78A + UL NR78A, which matches this test case because the PCC is configured on band n78 and the SCC is configured on band n5. This confirms that the UE supports the mixed TDD and FDD CA band combination required for this setup.
The same view also shows other supported combinations, such as DL NR5A + UL NR5A only and DL NR78A + UL NR78A only. These indicate that the UE can operate on each band individually, but for this test the important one is the combined n78 + n5 CA entry. If the required mixed-band combination is not listed here, the gNB may not add the FDD SCC even though both cells are running and the UE is registered normally. So before debugging RRC Reconfiguration or MAC activation, it is useful to confirm the required CA combination in this table-based UE Caps view.
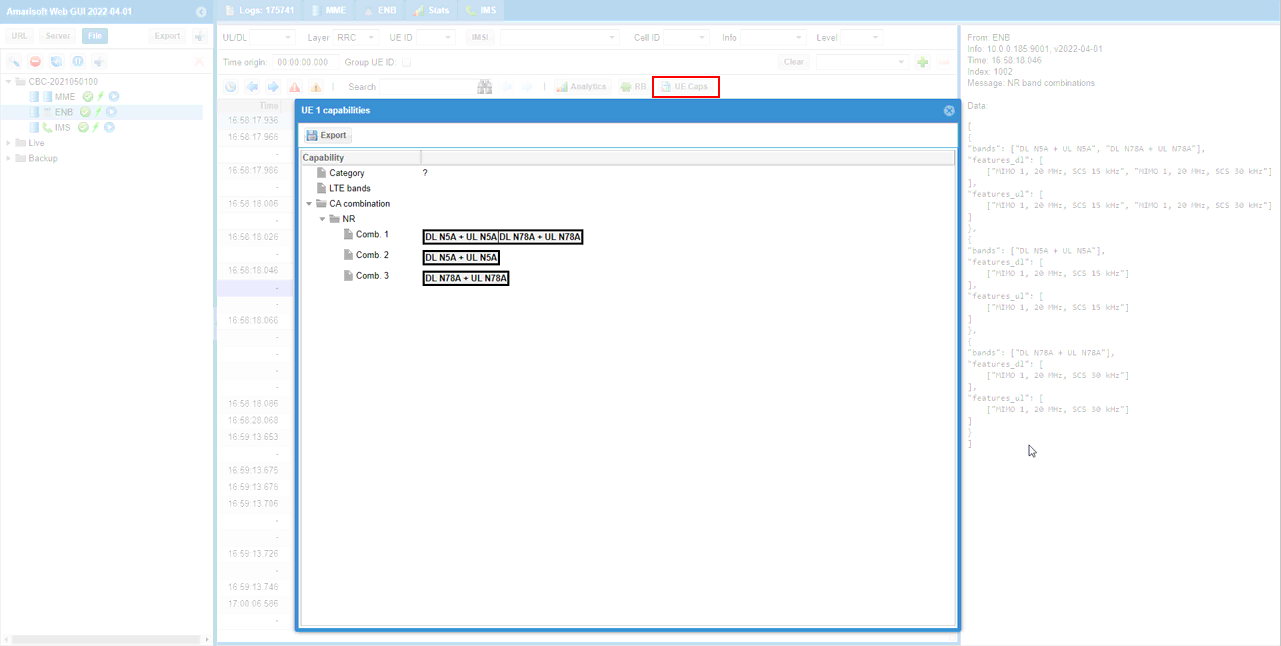
If the UE supports the band combination specified in the configuration file, the gNB sends an RRC Reconfiguration message to add the SCell. In this TDD and FDD test, this is the key RRC signaling step where the FDD cell is added as the SCC while the UE is already connected through the TDD PCC.
In this example, the selected message is RRC Reconfiguration on DCCH-NR. Inside the message, scellToAddModList is included, which means that the gNB is adding or modifying an SCell configuration. The scellIndex identifies the SCell entry, and physCellId is set to 501, which matches the second cell configured earlier. The downlink configuration also shows absoluteFrequencySSB 175250 and frequencyBandList with band 5, confirming that the added SCell is the FDD n5 carrier.
This message confirms that the Callbox has accepted the UE capability and decided to add the configured FDD cell as the SCC. At this point, the SCC is configured by RRC, but it is not necessarily active for scheduling yet. After this message, you should check that the UE sends RRC Reconfiguration Complete, then check the MAC log for SCell addition and activation, and finally confirm from the t command or PHY log that the UE is actually operating with two component carriers.
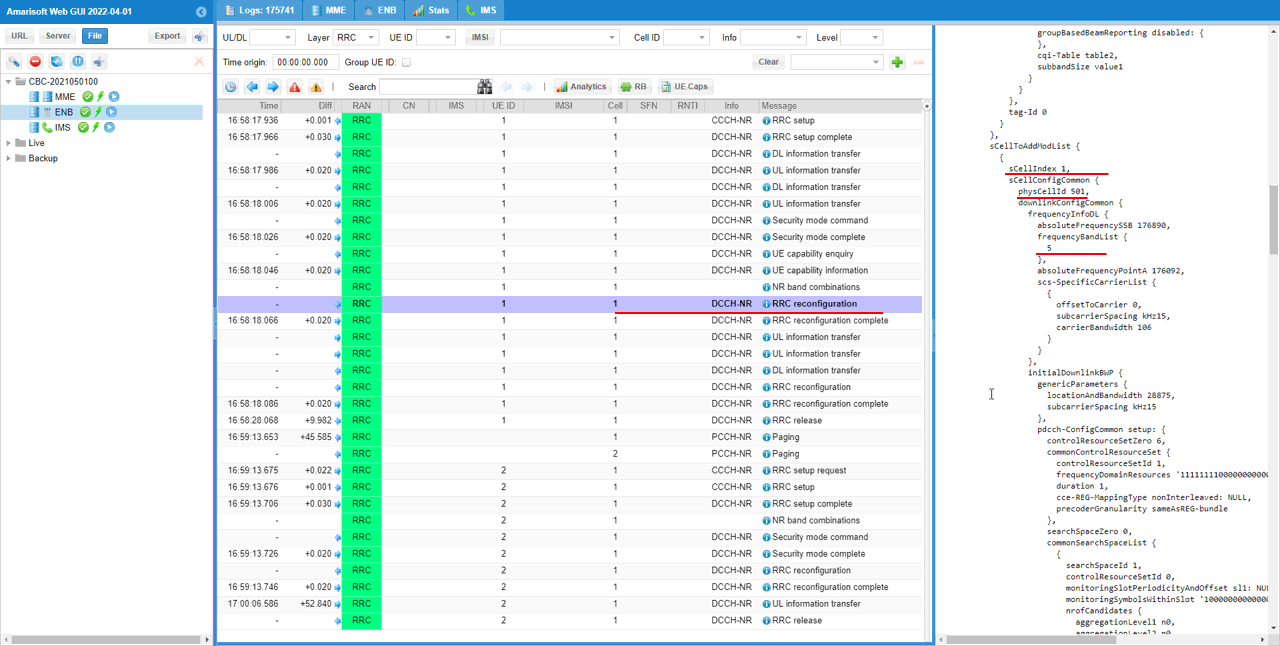
You can check the MAC log to confirm the SCell addition. Look for the SCell AD print in the MAC layer. This indicates that the secondary cell has been added after the RRC Reconfiguration message.
In this example, the MAC log shows SCell AD:02. This means that the SCell corresponding to logical cell ID 2 is being added. This matches the earlier RRC Reconfiguration where the SCell was configured with physCellId 501, which is the FDD n5 cell used as the SCC in this TDD and FDD CA test.
You can also check the following PHY log lines to confirm that the MAC packet is actually transmitted through the physical layer. The PDCCH line shows the downlink control information used to schedule the transmission, and the PDSCH line shows that the corresponding MAC PDU is sent through the downlink shared channel. This confirms that the SCell addition message is not only generated at the MAC layer, but also scheduled and transmitted over the air interface.
At this point, the FDD SCC has been added to the UE configuration. The next checkpoint is to confirm that the added SCell is activated, and then verify from the t command, PHY log, or RB map that the UE is operating with two component carriers during actual scheduling.
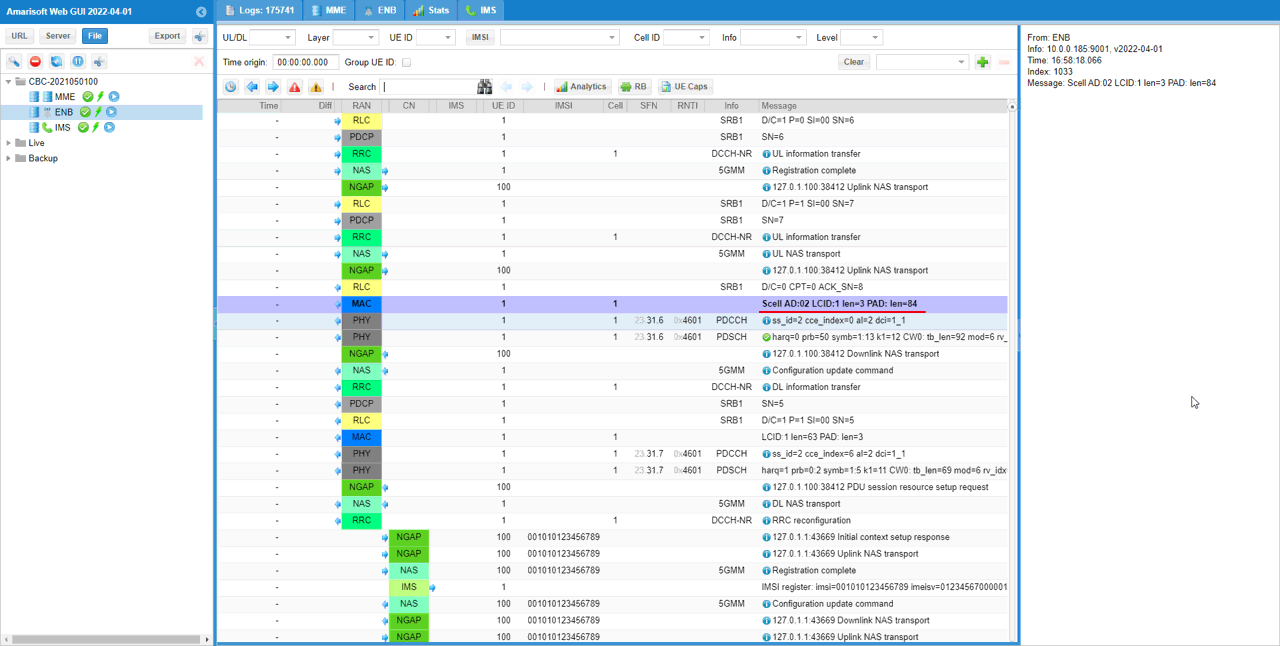
Now confirm that the added SCell is activated by checking the enabling scell log print. This is the point where the SCell changes from configured state to activated state, meaning it can be used for carrier aggregation scheduling.
In this example, the MAC log shows enabling scell 1. This indicates that the previously added SCell is now activated. In this TDD and FDD CA test, the UE is connected through the TDD PCC, and the FDD n5 cell has been added and activated as the SCC.
Around the same timing, you can also see PHY activity such as PDCCH, PDSCH, and PUCCH. These logs show that lower-layer scheduling and HARQ feedback procedures are running while the SCell activation takes place. The important checkpoint here is the enabling scell message, because it confirms that the SCell activation step has completed after the earlier RRC Reconfiguration and SCell addition procedure.
At this point, the main CA signaling sequence is complete. The UE capability confirmed support for the n78 + n5 CA band combination, RRC Reconfiguration added the FDD SCC, the MAC log showed SCell addition, and the enabling scell log confirms that the added SCell is activated. After this, you can check the t command, PHY log, or RB map to verify that the UE is actually scheduled with two component carriers during traffic.
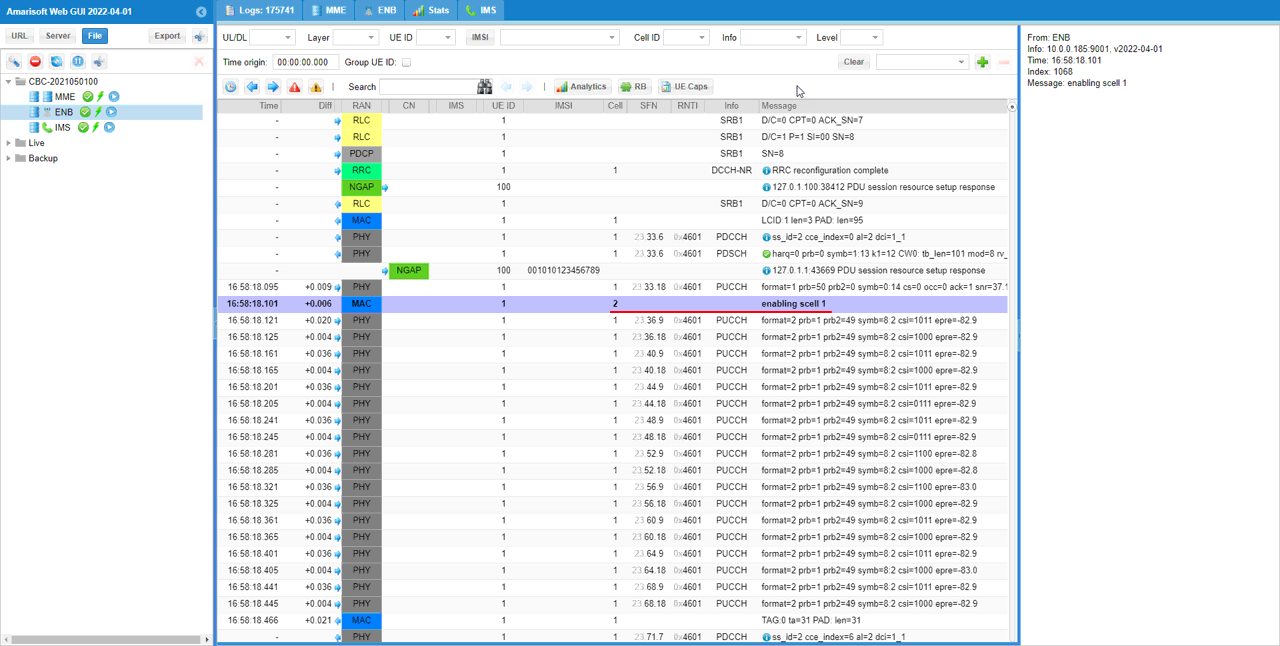
Check the PHY log to confirm that user traffic is scheduled on both the PCC and SCC. In this test, cell 1 is the TDD PCC and cell 2 is the FDD SCC, so you should see PHY scheduling activity on both cells after the SCell is added and activated.
In this log, the Cell column shows entries for both cell 1 and cell 2. You can see PDCCH and PDSCH entries for cell 1, and also PDCCH and PDSCH entries for cell 2. This confirms that downlink scheduling is not limited to the TDD PCC only. The scheduler is also using the FDD SCC for downlink data transmission.
The PDCCH entries show the scheduling control information, and the PDSCH entries show the actual downlink data transmission. Seeing these PDCCH/PDSCH pairs on both cells is a strong confirmation that both component carriers are participating in user-plane traffic.
This is a more detailed confirmation than the t command. The t command gives a compact indication by showing C = 2, while the PHY log shows the actual per-cell scheduling activity. When both checks are consistent, you can confirm that the UE is operating with the TDD cell as PCC and the FDD cell as SCC in 2CC CA mode.
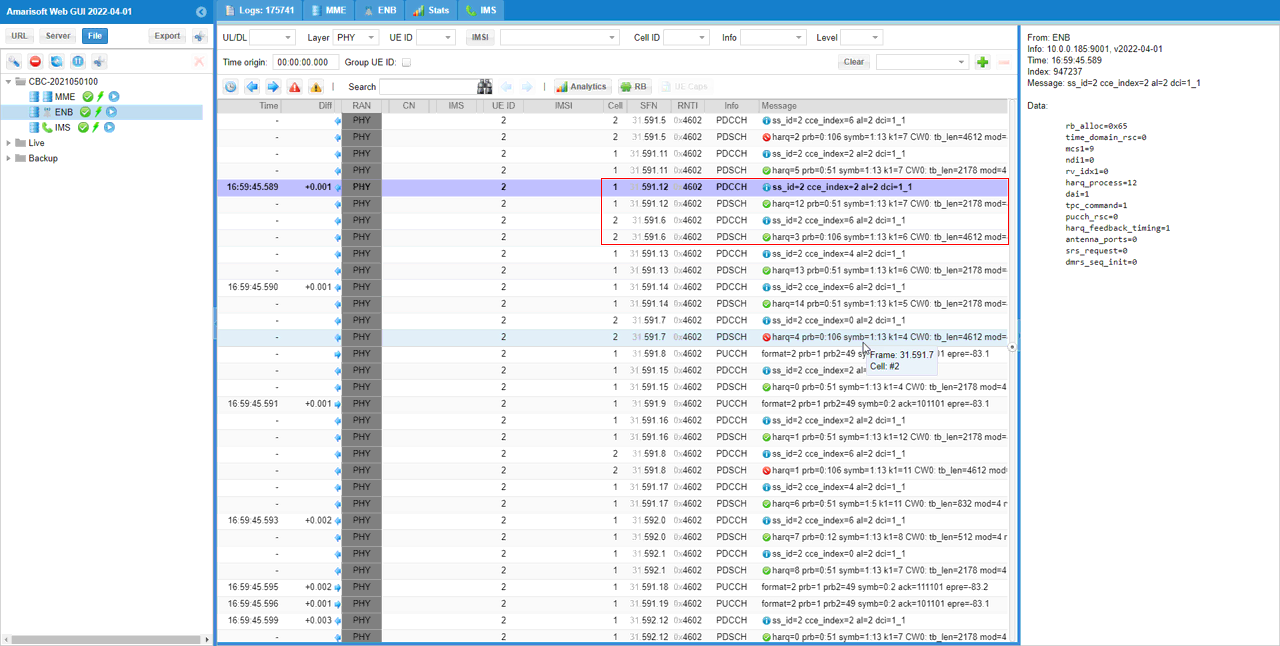
You can check the PHY layer traffic for both cells more easily using the RB map plot. This gives a graphical view of resource block allocation, so it is easier to confirm whether both the PCC and SCC are being used without checking every PHY log line one by one.
In this example, the RB map shows the resource allocation for both cells. The blue blocks indicate PDSCH allocation, which means downlink user traffic is being scheduled. You can see PDSCH activity on the TDD PCC and also on the FDD SCC. This confirms that both component carriers are participating in downlink transmission after the SCell is added and activated.
The RB map is especially useful in mixed TDD and FDD CA because the two cells may show different time-domain behavior. The TDD cell follows the configured TDD UL/DL pattern, so downlink allocation appears only in the available downlink slots. The FDD cell can have a different scheduling pattern because it does not follow the same TDD DL/UL slot structure. Seeing traffic allocation on both cells in this view confirms that the scheduler is using both carriers according to their own duplex configuration.
So this RB map provides an intuitive final confirmation of the test. Together with the t command showing C = 2 and the PHY log showing PDCCH/PDSCH activity on both cells, this confirms that the UE is operating with the TDD cell as PCC and the FDD cell as SCC in 2CC CA mode.
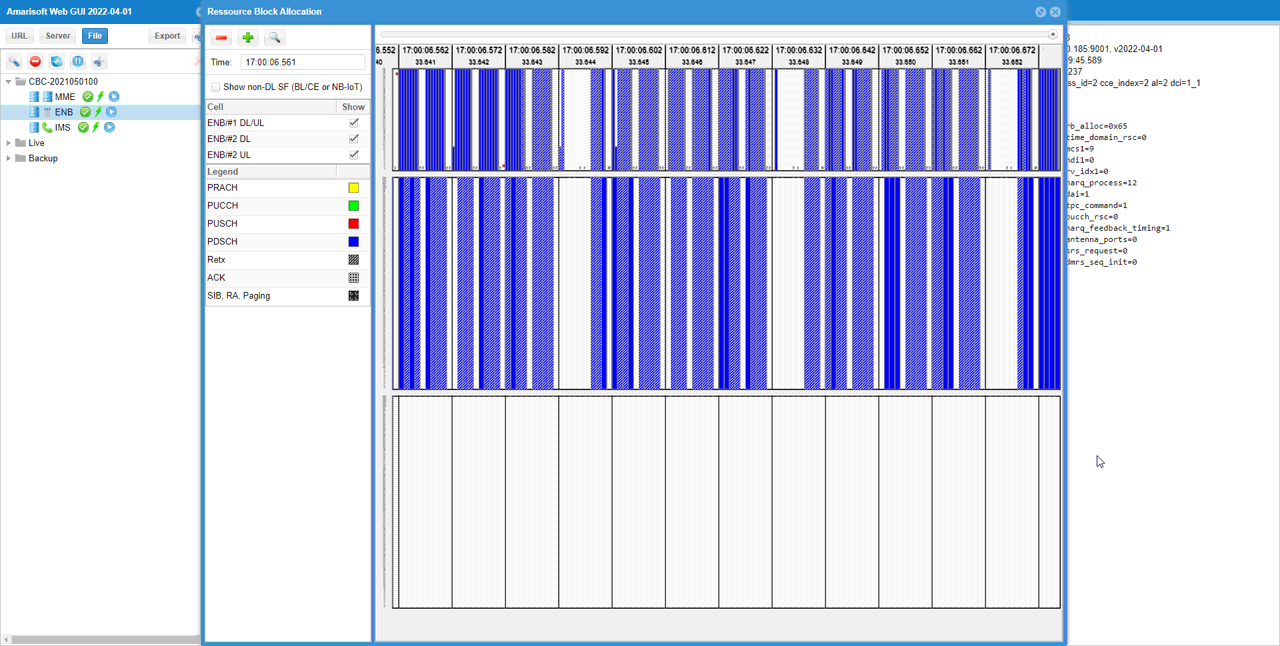
RRC / NAS Signaling
RrcReconfiguration (SA)
: This is the RrcSetup message sent by gNB to add NR SCC. (
NOTE : You would see some IEs that has a specific assigned vale here, but consider it as just an example value. Those values should vary depending on test requirement){
message c1: rrcReconfiguration: {
rrc-TransactionIdentifier 0,
criticalExtensions rrcReconfiguration: {
nonCriticalExtension {
masterCellGroup {
cellGroupId 0,
mac-CellGroupConfig {
phr-Config setup: {
...
},
skipUplinkTxDynamic FALSE
},
spCellConfig {
spCellConfigDedicated {
initialDownlinkBWP {
pdsch-Config setup: {
...
}
}
},
uplinkConfig {
initialUplinkBWP {
pucch-Config setup: {
...
},
pusch-Config setup: {
...
}
}
},
csi-MeasConfig setup: {
csi-ReportConfigToAddModList {
...
}
},
tag-Id 0
}
},
sCellToAddModList {
{
sCellIndex 1,
sCellConfigCommon {
physCellId 501,
downlinkConfigCommon {
frequencyInfoDL {
absoluteFrequencySSB 627264,
frequencyBandList {
78
},
absoluteFrequencyPointA 626688,
scs-SpecificCarrierList {
{
offsetToCarrier 0,
subcarrierSpacing kHz30,
carrierBandwidth 51
}
}
},
initialDownlinkBWP {
genericParameters {
locationAndBandwidth 13750,
subcarrierSpacing kHz30
},
pdcch-ConfigCommon setup: {
...
},
pdsch-ConfigCommon setup: {
...
}
}
},
ssb-PositionsInBurst mediumBitmap: '80'H,
ssb-periodicityServingCell ms20,
dmrs-TypeA-Position pos2,
ssbSubcarrierSpacing kHz30,
tdd-UL-DL-ConfigurationCommon {
...
}
},
ss-PBCH-BlockPower -28
},
sCellConfigDedicated {
initialDownlinkBWP {
pdcch-Config setup: {
...
},
pdsch-Config setup: {
...
},
firstActiveDownlinkBWP-Id 0,
pdcch-ServingCellConfig setup: {
},
pdsch-ServingCellConfig setup: {
nrofHARQ-ProcessesForPDSCH n16
},
csi-MeasConfig setup: {
...
}
}
}
},
dedicatedNAS-MessageList {
'...'
}
}
}
}
}