
LTE - Carrier Aggregation
The purpose of this tutorial is to show you how to perform LTE Carrier Aggregation. Carrier Aggregation is a mechanism that aggregate the traffic at MAC layer which requires accurate synchronization among all the cell and scheduled by a common MAC scheduler. At high level, it happens in a few steps as follows.
Step 1 : Perform the measurement for all the relavent cells
Step 2 : RRC Connection Reconfiguration to add SCC (Secondary Component Carrier)
Step 3 : MAC CE activating SCCs
In terms of 3GPP, Step 1 is optional but in live network Step 1 is always performed. In Amarisoft Callbox, user case choose whether to perform step 1 or not.
Regarding the total number of CC (PCC + SCCs) and the number of Layers for each cell, the capacity varies with the product type. Refer to the following table summarized from the datasheet (Click on the link to check out the full datasheet)
|
Product |
|||||
|
Max Number of LTE Cell |
1 |
3 |
4 |
8 |
12 |
|
Max Number of NR Cell |
1 |
3 |
4 |
8 |
12 |
|
Max Total Number of Cell |
1 |
3 |
4 |
8 |
12 |
|
Σ(Bi*Li) |
40 |
120 |
800 |
1600 |
2400 |
Bi : Bandwidth of Cell [i], Li : Number of Layers of Cell[i]
Table of Contents
- LTE - Carrier Aggregation
- Introduction
- Summary of the Tutorial
- Test Setup
- Key Configuration Parameters
- Test 1 : 2CC CA (FDD-FDD) - Inter band without Measurement
- Test 2: 2CC CA (FDD-FDD)- with Measurement
- Test 3: 2CC CA (FDD-FDD) - DL+ULwithout Measurement
- Test 4: 2CC CA (FDD-FDD) + NR NSA/FDD
- Test 5: 2CC CA (TDD-TDD)- with Measurement
- RRC / NAS Signaling
- FAQ
Introduction
Long Term Evolution (LTE) Carrier Aggregation (CA) is a pivotal technology within the LTE-Advanced framework, introduced to meet the ever-increasing demand for higher data rates and improved spectral efficiency in modern wireless networks. Carrier Aggregation enables mobile operators to combine multiple frequency bands, referred to as Component Carriers (CCs), at the Medium Access Control (MAC) layer, effectively expanding the available bandwidth for end-users and supporting high-throughput applications. This mechanism relies on precise synchronization across all participating cells and is orchestrated by a centralized MAC scheduler, ensuring efficient traffic aggregation and resource allocation. The process typically involves several coordinated steps: measuring all relevant cells, executing Radio Resource Control (RRC) connection reconfiguration to introduce Secondary Component Carriers (SCCs), and activating SCCs via MAC Control Elements (CEs). While the initial measurement phase is optional according to 3GPP standards, it is generally conducted in live network environments for optimal performance. In test environments like the Amarisoft Callbox, users have flexibility over whether to include this step. The scalability of Carrier Aggregation, including the total number of aggregated carriers and supported MIMO layers per cell, varies based on the test platform and product capabilities. Understanding and implementing LTE Carrier Aggregation is crucial for engineers and researchers aiming to optimize network capacity, enhance user experience, and support advanced mobile broadband services within the evolving landscape of wireless communications.
-
Technology Context
- LTE Carrier Aggregation is a core feature of LTE-Advanced, allowing the combination of multiple frequency blocks to increase data throughput and network capacity.
- Operates at the MAC layer, requiring precise synchronization and centralized scheduling for seamless aggregation across Primary and Secondary Component Carriers (PCC and SCCs).
- Supported and evaluated through advanced network simulators and testbeds such as the Amarisoft Callbox, which offers flexible configuration for research and validation.
-
Relevance and Importance
- Carrier Aggregation addresses spectrum scarcity by enabling operators to utilize fragmented spectrum resources efficiently.
- It is fundamental for delivering high-speed mobile broadband, supporting next-generation applications and a superior user experience.
- Understanding CA is essential for professionals working in wireless network design, optimization, and testing.
-
Tutorial Outcomes
- Gain a comprehensive understanding of the LTE Carrier Aggregation process and its key steps: measurement, RRC reconfiguration, and MAC CE activation.
- Learn to configure and evaluate Carrier Aggregation scenarios using platforms like Amarisoft Callbox.
- Acquire knowledge to analyze capacity and performance metrics based on different product capabilities and configurations.
-
Prerequisite Knowledge
- Familiarity with LTE network architecture and 3GPP standards.
- Understanding of MAC and RRC layers in mobile networks.
- Basic experience with radio network measurement and test equipment is advantageous.
Summary of the Tutorial
This tutorial provides detailed procedures for configuring and verifying various LTE and NR carrier aggregation (CA) scenarios using SDR cards, Amarisoft configurations, and UE simulators or commercial UEs. Each test is described with step-by-step instructions, configuration highlights, and log analysis methods. Below is a summary of the test procedures for each scenario presented.
-
Test 1: 2CC CA (FDD-FDD) - Inter band without Measurement
- Objective: Configure carrier aggregation between two LTE FDD cells in different bands, with CA triggered without UE measurement reports.
- Procedure:
- Connect two SDR cards, each to an antenna, corresponding to two LTE FDD cells.
- Edit enb-2cc.cfg to set N_CELL to 2 and configure scell_list for the secondary component cell (SCC).
- Optionally, extend RRC release timers to prevent premature release before SCC addition.
- Start the network and UE, perform initial attach, and establish 2CC CA.
- Verify configuration with the "cell phy" command (check for correct cell parameters and number of carriers).
- Run lteSim_server to generate IP traffic and confirm both carriers are active (column 'C' shows 2).
- Log Analysis: Confirm UE registration, SCC addition via RRC messages, and proper scheduling of both cells. Check Resource Block Allocation plots for CA activity.
-
Test 2: 2CC CA (FDD-FDD) - with Measurement
- Objective: Configure carrier aggregation between two LTE FDD cells, triggered by UE measurement reports.
- Procedure:
- Configure enb-2cc-meas.cfg (copy from enb-2cc.cfg), set N_CELL to 2, and use scell_list for SCC.
- Add rrc_configuration: "measurement" to require CA triggering via measurement report.
- Configure meas_config_desc as needed for the test, focusing on scell_config.
- Optionally, extend the RRC release timer.
- Start the network and UE, perform initial attach, and initiate measurements for SCC detection.
- Verify configuration and connection as in Test 1.
- Log Analysis: Ensure UE sends the expected measurement report (with measResultNeighCells IE), triggering SCC addition. Confirm proper configuration of measurement and SCC addition in RRC messages.
-
Test 3: 2CC CA (FDD-FDD) - DL+UL without Measurement
- Objective: Configure 2CC carrier aggregation for both Downlink and Uplink without requiring UE measurement reports.
- Procedure:
- Edit enb-2cc-ul.cfg (from enb-2cc.cfg) and set N_CELL to 2.
- Configure scell_list and add ul_allowed to enable UL CA if supported by the UE.
- Optionally, specify ul_earfcn if needed.
- On UEsim, set N_CELL to 2 and configure necessary parameters for band, frequency, as_release, and ue_category.
- Start the network and UE, perform initial attach, and establish CA with both DL and UL.
- Verify connections and carrier status as in previous tests.
- Log Analysis: Check UE capability for the required band combination and verify RRC signaling for both DL and UL SCC addition. Inspect Resource Block Allocation plots for DL and UL traffic aggregation.
-
Test 4: 2CC CA (FDD-FDD) + NR NSA/FDD
- Objective: Demonstrate inter-RAT carrier aggregation between two LTE FDD cells and one NR FDD cell, with NR added as NSA SCG cell.
- Procedure:
- Edit gnb-nsa-2LTE-1NR.cfg to configure both LTE and NR parameters, ensuring N_CELL and MIMO settings (NR: 4x4, LTE: 2x2).
- Configure scell_list for LTE SCC and en_dc_scg_cell_list for NR cell as SCG.
- Configure meas_config_desc for measurement-based triggering.
- Start the network and UE, perform initial LTE attach, establish 2CC CA, perform NR neighbor measurement, and add NR as NSA SCG cell.
- Verify connection status by monitoring carrier count and cell IDs.
- Log Analysis: Confirm UE capability for LTE-NR CA, check measurement configuration and triggering, verify proper signaling for NR addition in NSA mode, and analyze corresponding IEs in RRC messages.
-
Test 5: 2CC CA (TDD-TDD) - with Measurement
- Objective: Configure TDD carrier aggregation between two LTE cells, triggered by UE measurement reports.
- Procedure:
- Edit enb-48A-48A-20-20-NonContiguous.cfg (from enb-2cc.cfg), set N_CELL to 2, and enable TDD mode.
- Configure scell_list for SCC and add rrc_configuration: "measurement".
- Set TDD-specific parameters: uldl_config, sp_config, tdd_ack_nack_feedback_mode.
- Set up meas_config_desc and extend RRC release timers as needed.
- On UEsim, match band, frequency, and set TDD mode; configure UE-specific settings as needed.
- Start the network and UE, perform initial attach, and manipulate cell power to guide attachment and trigger measurement-based SCC addition.
- Confirm CA establishment by monitoring carrier count.
- Log Analysis: Check UE capability for TDD bands, verify measurement configuration and triggering (Events A2/A4), confirm SCC addition via RRC messages, and ensure CA activation in both eNB and UEsim logs.
General Recommendations and Notes:
- Always verify the UE supports required band combinations for each test scenario.
- Use the "cell phy" command and log analysis tools (including WebGUI) to confirm configuration and troubleshoot issues.
- For measurement-triggered CA, ensure proper configuration of measurement events, objects, and reporting IEs in RRC signaling.
- Pay attention to uplink and downlink configurations, especially in scenarios involving both directions or inter-RAT CA.
- Refer to Amarisoft documentation for detailed parameter descriptions as needed.
Test Setup
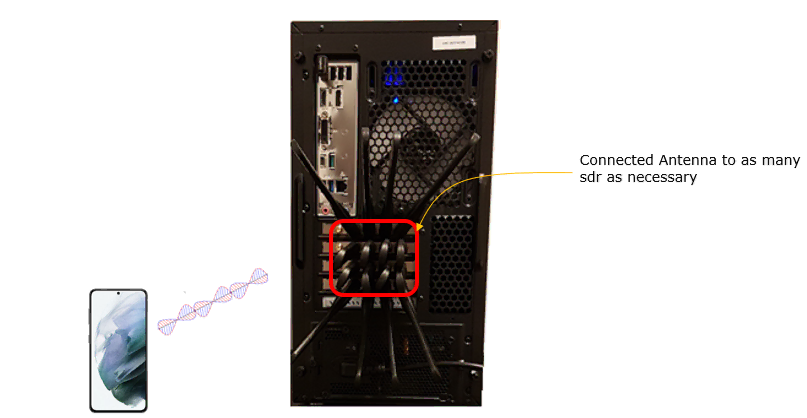
Test setup for this tutorial is as shown below. In this setup, it shows 4 SDR cards are connected with Antenna but not all the test in this tuturial requires the 4 sdr cards. You only have to connect antenna to the number of sdr cards that you need for each test.
Key Configuration Parameters
Followings are important configuration parameters for this tutorial. You may click on the items for the descriptions from Amarisoft documents.
- scell_list: In this link, you will get the descriptions for all the items listed below.
- cell_id
- cross_carrier_scheduling
- scheduling_cell_id
- ul_allowed
- rrc_configuration
- individual_offset
- meas_config_desc : In this link, you would get the descriptions for all the items listed below
- a1_report_type
- a1_rsrp
- a1_hysteresis
- a1_time_to_trigger
- a2_report_type
- a2_hysteresis
- a2_time_to_trigger
- a3_report_type
- a3_offset
- a3_hysteresis
- a3_time_to_trigger
- scell_config
- a2_report_type
- a2_rsrp
- a2_hysteresis
- a2_time_to_trigger
- a4_report_type
- a4_rsrp
- a4_hysteresis
- a4_time_to_trigger
- meas_gap_config
Test 1 : 2CC CA (FDD-FDD) - Inter band without Measurement
This test is to show how to configure a carrier aggregation between two LTE cells with different frequencies. In this test, carrier aggregation will be forced without any measurement report from UE.
This test configures 2cells as follows.
- 2 LTE FDD Cells (2 Cells are in different bands)
It performs following procedure
Step 1 : Initial Attach to LTE
Step 3: Establish 2CC CA in LTE
Configuration
In this test, I used enb-2cc.cfg without modification.
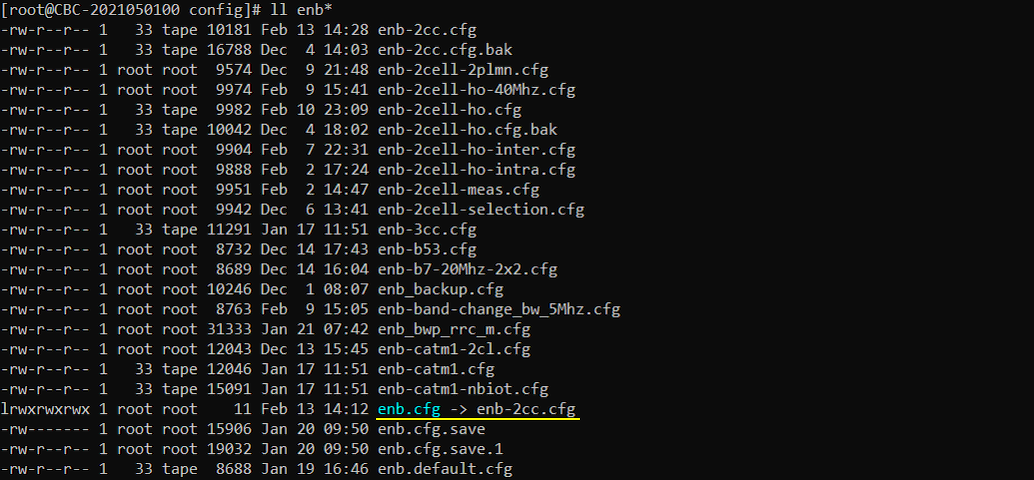
I used the mme-ims.cfg config as it is.

The configuration in enb-2cc.cfg is as shown below.
The first thing to notice is that the number of cells (N_CELL) is set to greater than 1 since this is a type of multi cell scenario. In this test, I set N_CELL to 2.
In this configuration, the most important part is N_CELL = 2. This tells Amarisoft that the eNB will create two LTE cells. Since this tutorial is for LTE Carrier Aggregation, this is the basic starting point. One cell works as the primary cell, and the other cell can be used as the secondary cell.
TDD = 0 means this test uses FDD mode. So uplink and downlink use separate frequency resources. N_RB_DL = 25 means each LTE carrier uses 25 resource blocks, which corresponds to 5 MHz bandwidth. Therefore, this example uses two 5 MHz LTE cells for CA.
N_ANTENNA_DL = 1 and N_ANTENNA_UL = 1 mean this is a SISO test, not MIMO. So the tutorial focuses on carrier aggregation itself, not antenna-layer aggregation. CHANNEL_SIM = 0 means the built-in channel simulator is disabled. CQI_CONFIG = 1 means aperiodic CQI is used, so CQI reporting is triggered when needed rather than being sent periodically.

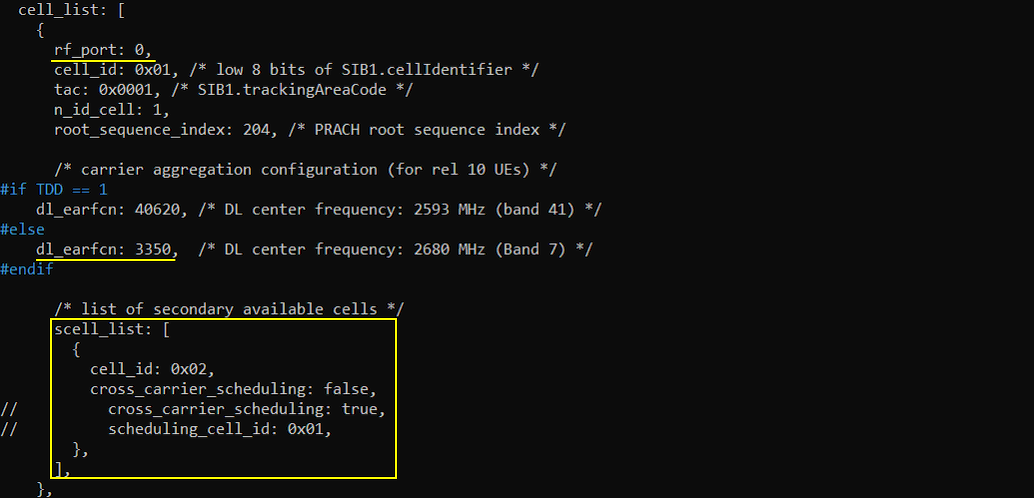
In carrier aggregation, you need to add the parameter scell_list and put the cell information for SCC(Secondary Component Cell) in the configuration. In case of using the first cell as PCC(Primary component cell), put the second cell in scell_list as SCC.
In this part, the first cell is configured as the main serving cell. Its cell_id is 0x01, so this cell becomes the PCC, or Primary Component Cell. This is the cell that the UE first camps on and uses for initial LTE connection setup.
The dl_earfcn value defines the downlink carrier frequency of this primary cell. Since TDD is set to 0 in the previous configuration, the FDD branch is used here. So dl_earfcn is set to 3350, and the inline comment says this corresponds to 2680 MHz in Band 7.
The important CA-related part is scell_list. This is the list of secondary cells that can be added to the UE after the initial connection. Here, cell_id 0x02 is listed as the secondary cell, so the second LTE cell is used as the SCC, or Secondary Component Cell.
cross_carrier_scheduling is set to false, meaning each carrier schedules its own resources. The commented-out lines show an alternative option. If cross_carrier_scheduling is set to true, the scheduling information for the secondary cell can be sent from the primary cell, and scheduling_cell_id 0x01 tells that the primary cell is used as the scheduling cell.
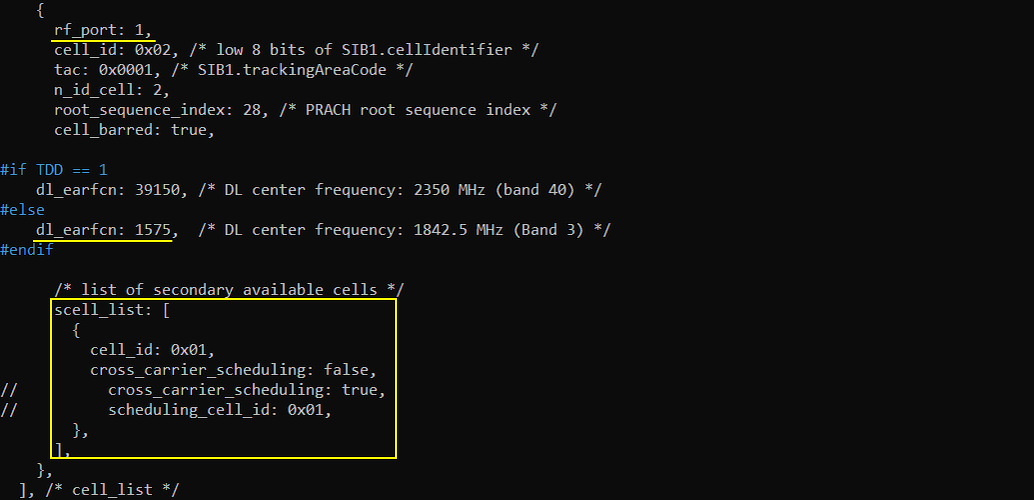
In case of using the second LTEcell as PCC(Primary component cell), put the first LTEcell in scell_list as SCC.
In this configuration, the second LTE cell is defined with rf_port 1 and cell_id 0x02. This means this cell is mapped to the second RF port and has its own cell identity. In this case, this second LTE cell can be used as the PCC, or Primary Component Cell.
The dl_earfcn value defines the downlink frequency of this second cell. Since TDD is 0, the FDD branch is used, so dl_earfcn is set to 1575. The inline comment says this corresponds to 1842.5 MHz in Band 3.
The important CA-related part is again scell_list. Since the second LTE cell is now treated as the PCC, the first LTE cell is added into scell_list as the SCC. This is why cell_id 0x01 is listed inside scell_list.
cross_carrier_scheduling is set to false, so this secondary cell is not scheduled through another carrier. Each carrier handles its own scheduling. The commented-out lines show the alternative cross-carrier scheduling case. If enabled, scheduling_cell_id 0x01 would indicate which cell sends the scheduling information.
This part sets inactivity_timer to 60000 ms. This means the eNB waits for 60 seconds before sending RRC Connection Release after the UE becomes inactive.
This setting is not mandatory for LTE CA itself. It is mainly used to keep the RRC connection alive long enough while the test is running. If the timer is too short, the eNB may release the UE before the SCC is added or before CA behavior can be clearly observed.
So this parameter is a practical test-stability setting. It gives enough time for the UE to stay connected, receive the SCell configuration, and complete the carrier aggregation procedure.

Perform the Test
Check out the result of "cell phy" command and make it sure that the number of cells and other cell parameters (e.g, BAND, BW, ARFCN etc) are configured as expected.
The cell phy command is used to check whether the eNB has created the LTE cells as expected. In this result, two LTE cells are shown, so it confirms that N_CELL = 2 is actually applied.
Cell 0x001 is configured as LTE Band 7 with 5 MHz bandwidth. Its downlink ARFCN is 3350, which matches the first cell configuration. The uplink ARFCN is 21350. The antenna count is 1 for downlink and 1 for uplink, so this matches the SISO setting.
Cell 0x002 is configured as LTE Band 3 with 5 MHz bandwidth. Its downlink ARFCN is 1575, which matches the second cell configuration. The uplink ARFCN is 19575. This also uses 1 downlink antenna and 1 uplink antenna.
So this output confirms the basic CA test setup. There are two LTE carriers, each with 5 MHz bandwidth, different LTE bands, and separate RF paths. This means the eNB side is ready for testing PCC and SCC operation.

This trace output is used to check whether carrier aggregation is actually established for the UE.
The important column is CC. At the beginning, CC is shown as 1. This means the UE is using only one component carrier, so CA has not been established yet.
After CA is configured and the secondary cell is added, CC becomes 2. This means the UE is now using two component carriers. So this is the key indication that LTE CA is working.
You may not always see the CC = 1 line, because this trace is printed as a sampled or averaged status. Depending on the timing, the trace may already show CC = 2 when you start watching it. In that case, you can still consider the CA setup successful as long as CC = 2 is shown.

Run lteSim_server at the directory /root/mme and generate IP traffic as shown below (If you are not familiar with ltesim_server, check out this tutorial)
This step generates user-plane IP traffic after the UE is connected and CA is established.
The command is run from lteSim_server in the /root/mme directory. Here, cbr_send is used to send constant bit rate traffic to the UE IP address 192.168.3.2.
The value 100M means the target traffic rate is 100 Mbps, and 60 means the traffic runs for 60 seconds. This creates enough downlink traffic so that the scheduler has data to transmit and the CA behavior can be observed more clearly.
In this test, the purpose is not just to verify UE attach. The purpose is to load the radio link and check whether data can be scheduled through the carrier aggregation configuration.

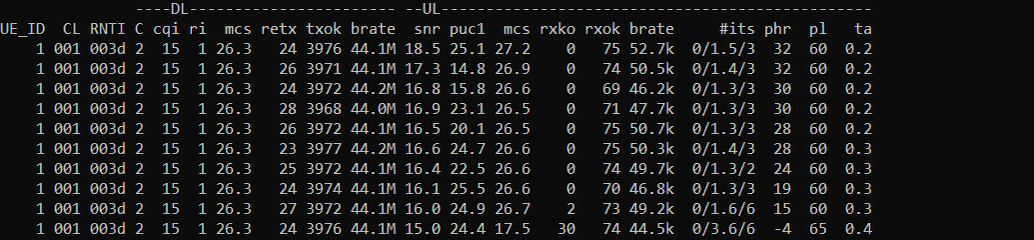
Make it sure that all the cells configured Carrier Aggregation are connected. You can confirm on this by checking the number in the column 'C'. In this example, it is 2 which mean that 2 carriers are connected.
This trace is used to confirm that the UE is connected with all configured CA carriers.
The important column is C. In this example, C is shown as 2. This means two component carriers are connected for this UE. So the UE is not running on a single LTE carrier anymore. It is operating with carrier aggregation.
The downlink bitrate is around 44 Mbps in this trace. This means IP traffic is being transmitted while two carriers are connected. So this output confirms both the CA connection state and active data transfer.
The value in column C is the simplest checkpoint here. If it stays at 2 during traffic, it means the two-carrier CA setup is active and stable.
Log Analysis
In this section, you will see how to confirm if UE registration is complete from trace log. You can use the same method to find any issues (e.g, registration failure) for troubleshooting. When UE registration fails, you may use this tutorial to figure out the point of the failure and troubleshoot
NOTE : This section is just to check quickly some important points in the log, but it may be a little bit tricky to do the detailed log analysis (especially for lower layer log analysis). In that case, I strongly recommend you to use WebGUI for the log analysis. You may refer to WebGUI Tutorial
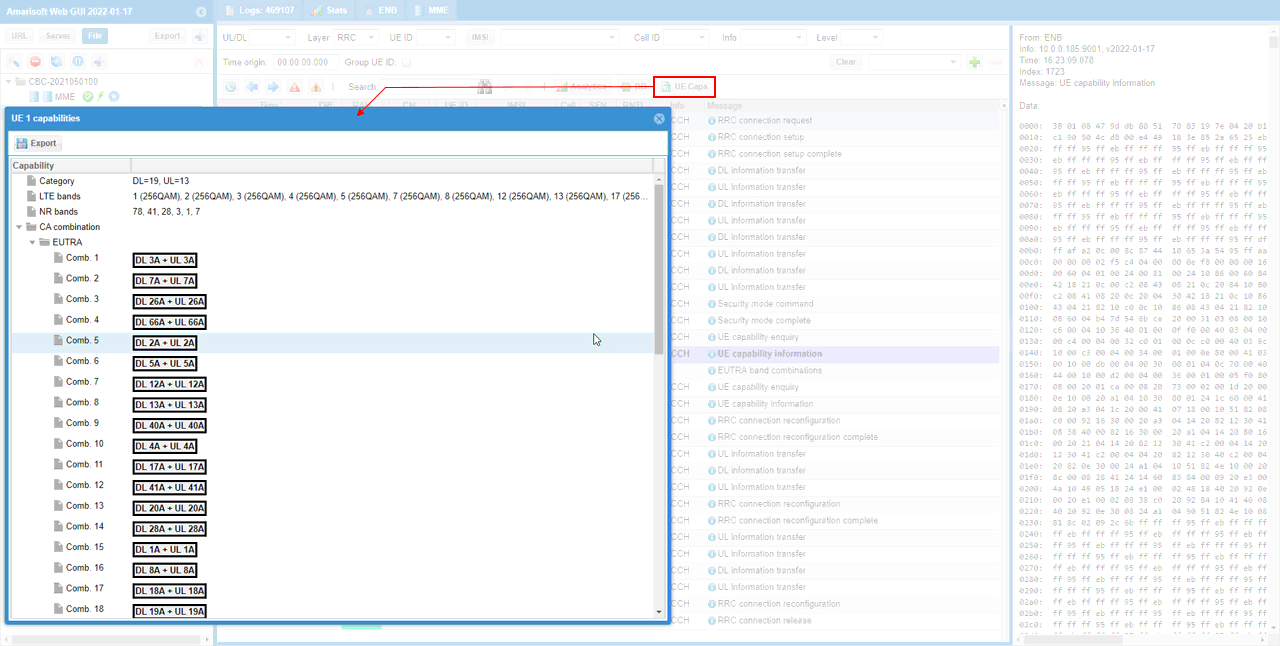
Before running the CA test, it is important to check the UE capability first. Carrier aggregation is not decided only by the eNB configuration. The UE must also support the same CA band combination.
In this Amarisoft Web GUI, the UE Caps button is used to decode and display the UE capability information. The UE capability message is shown in the log as UE capability information, and the decoded result is displayed in the UE 1 capabilities window.
The important part is CA combination. This list shows which LTE band combinations the UE can support. For example, the list includes combinations such as DL 3A + UL 3A, DL 7A + UL 7A, and many others.
For this tutorial, the configured LTE cells use Band 7 and Band 3. So before testing CA, you should check whether the UE capability includes the required Band 3 and Band 7 CA combination. If the UE does not support that combination, the eNB configuration may be correct, but CA will still not be established.
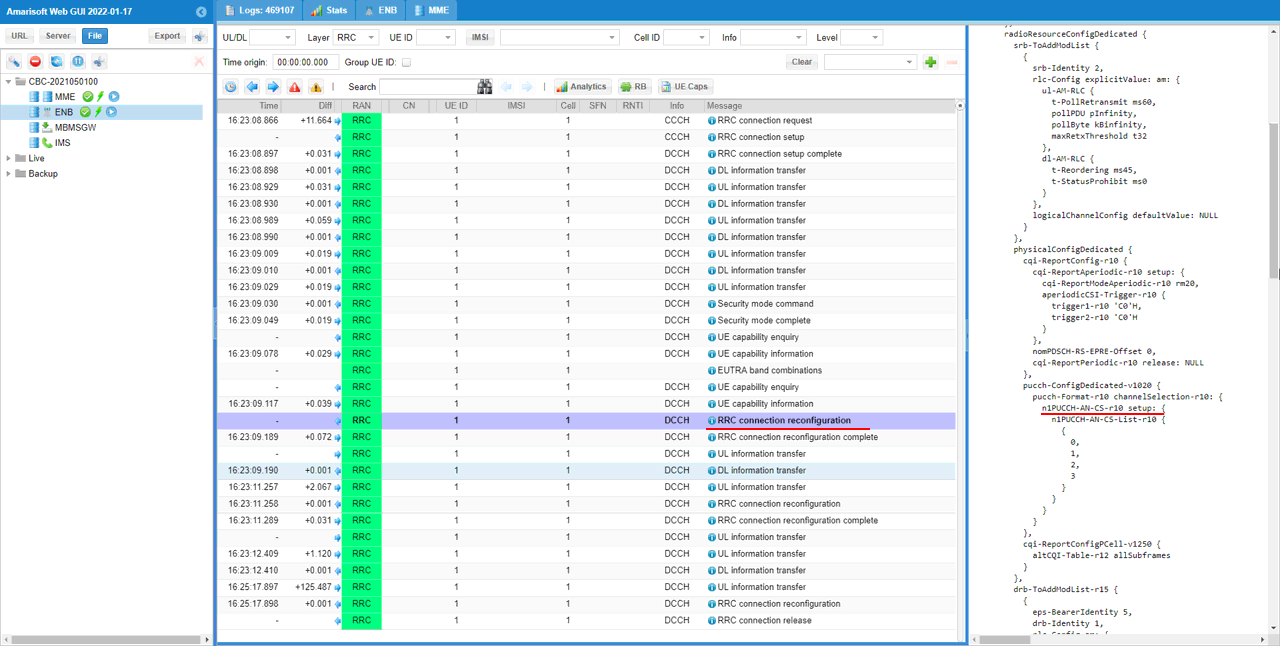
This check is not mandatory for normal operation, but it is useful for confirming that the CA-related uplink control configuration is properly included in RRC Connection Reconfiguration.
In the log, the important message is RRC connection reconfiguration. This is the message where the eNB sends dedicated radio configuration to the UE. On the right side, the decoded RRC message shows pucch-ConfigDedicated.
The highlighted part shows nPUCCH-AN-CS-List-r10. This IE is related to PUCCH resources for carrier aggregation. When CA is used, the UE may need to send HARQ ACK/NACK feedback for multiple component carriers. So the eNB must configure proper PUCCH resources for that feedback.
In this example, the list contains values such as 0, 1, 2, and 3. This indicates that the UE is given multiple PUCCH ACK/NACK resource candidates for CA operation. So this is a good sign that the RRC reconfiguration includes the expected PUCCH setup for carrier aggregation.
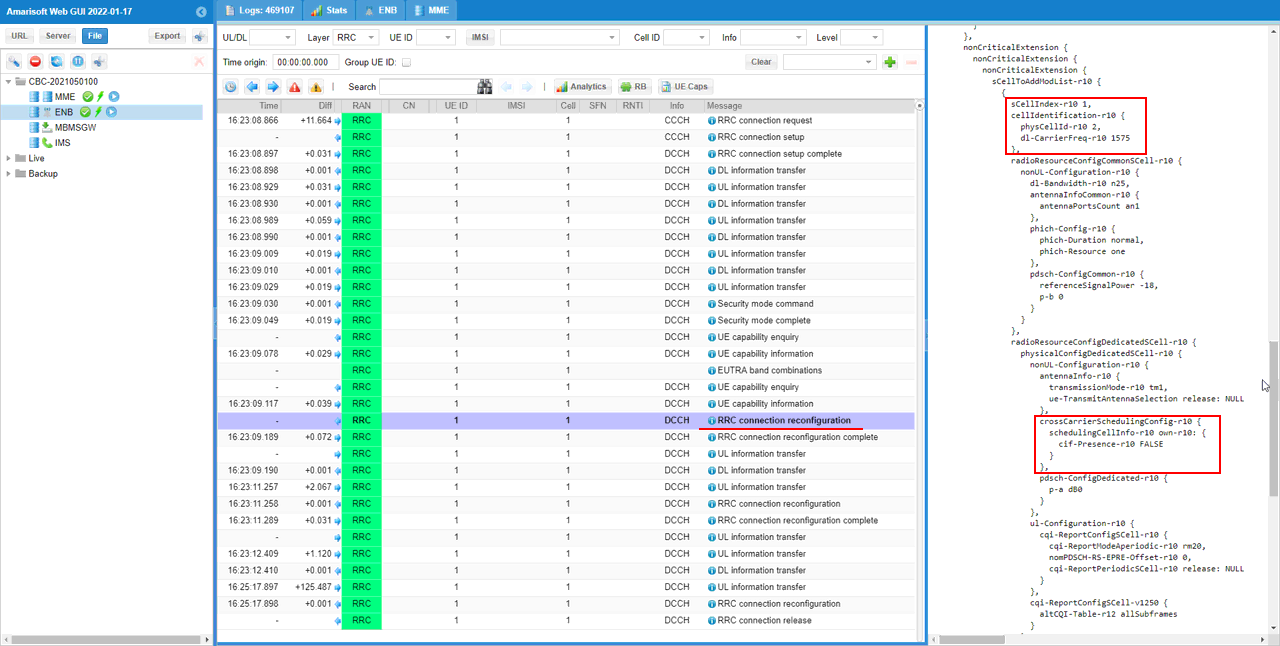
In this step, the key point is to check RRC Connection Reconfiguration and confirm that the SCC is included in sCellToAddModList.
sCellToAddModList is the IE that tells the UE which secondary cell should be added. In this example, sCellIndex-r10 is set to 1, and the physical cell identity is shown as 2. This means the eNB is adding the secondary cell into the UE configuration.
The message also includes dl-CarrierFreq-r10 and radioResourceConfigCommonSCell-r10. These fields provide the frequency and common radio configuration of the secondary cell. So the UE gets the information needed to receive and operate on the SCC.
Another highlighted part is crossCarrierSchedulingConfig-r10. Here, cif-Presence-r10 is set to FALSE. This matches the earlier configuration where cross_carrier_scheduling was disabled. It means the secondary cell is not scheduled through CIF-based cross-carrier scheduling from another cell.
So this RRC Connection Reconfiguration is the main signaling point where carrier aggregation is established. If the SCC appears in sCellToAddModList, it means the eNB has instructed the UE to add the secondary component carrier.
After the SCC is added by RRC Connection Reconfiguration, the eNB still needs to activate the secondary cell at MAC layer.
In this log, the important line is enabling scell 1. This means the eNB has activated SCell index 1 for the UE. At this point, the SCC is not only configured in RRC, but also enabled for actual MAC scheduling.
So the CA procedure has two visible steps here. First, RRC adds the SCC using sCellToAddModList. Then, MAC activates it using enabling scell 1. Once this MAC activation is done, the UE can start using the secondary component carrier for data scheduling.
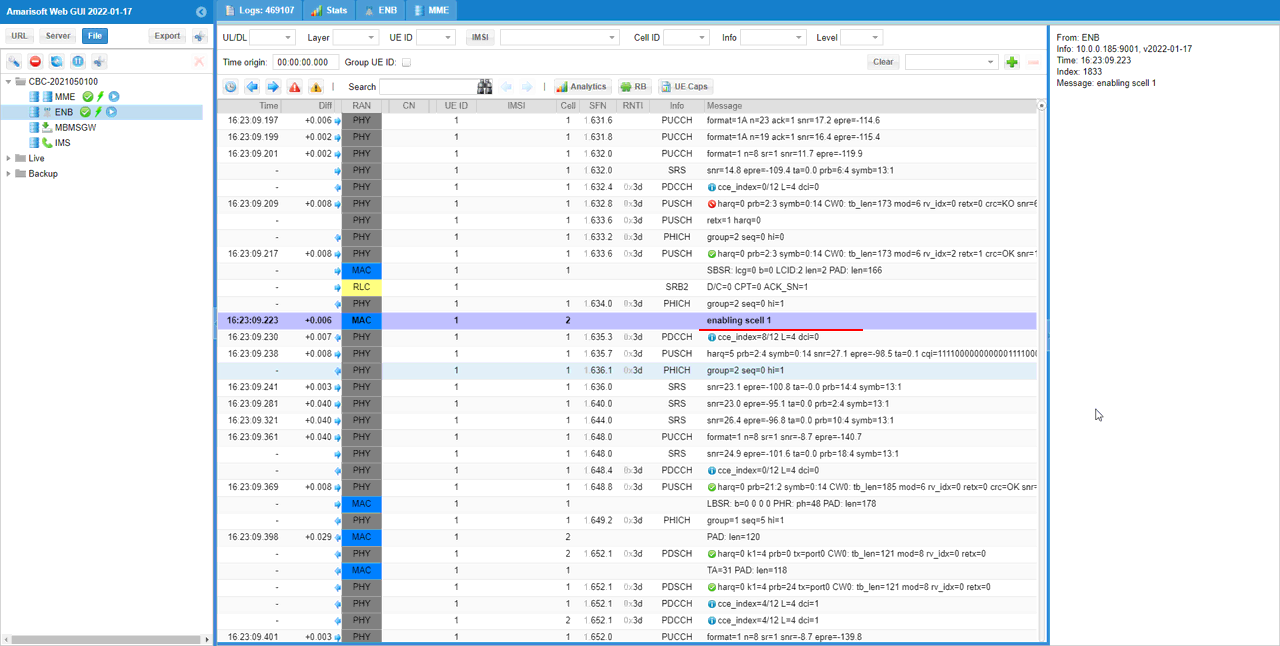
In this log, two PDCCH entries are shown at the same subframe timing. One entry is for cell 1, and the other entry is for cell 2.
This means the eNB sends separate DCI for each component carrier. Each cell has its own scheduling command on its own PDCCH.
This behavior matches the earlier configuration where cross_carrier_scheduling was set to false. Since cross-carrier scheduling is off, the PCC does not schedule the SCC through CIF. Instead, each carrier schedules itself independently.
So this log confirms that the two aggregated cells are active, but they are scheduled separately. This is the normal behavior when cross-scheduling is disabled.
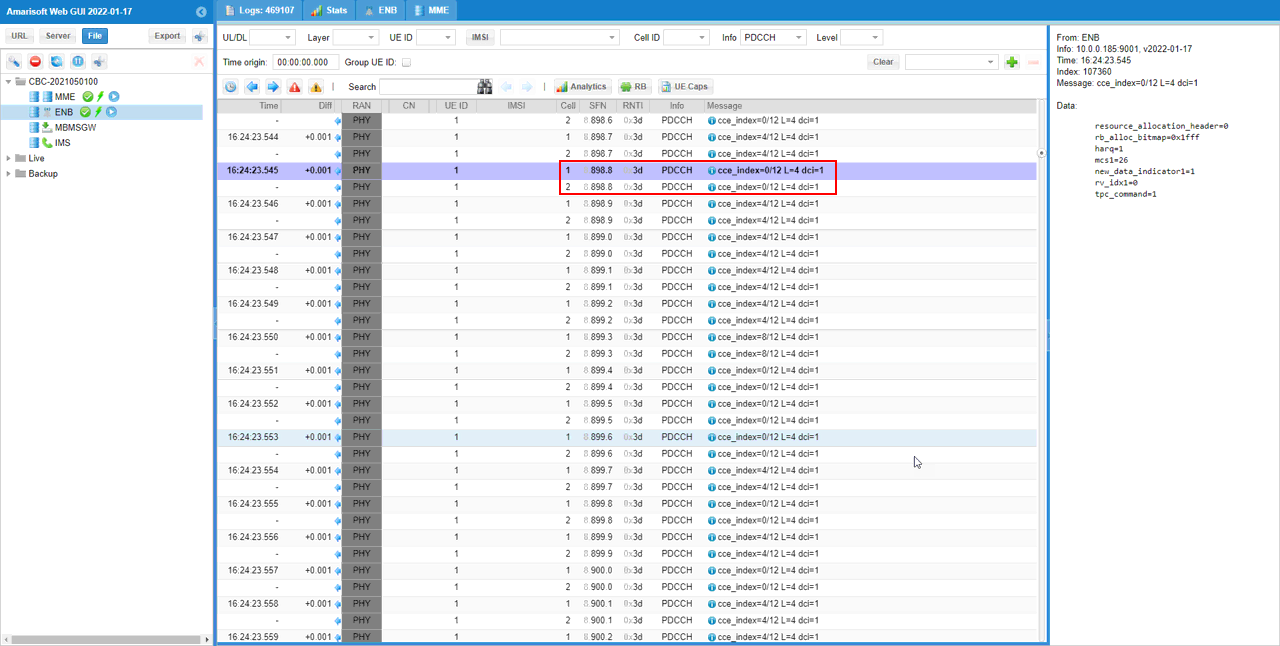
In this log, PDSCH transmissions are shown on both cells. One PDSCH is sent on cell 1, and another PDSCH is sent on cell 2. This means downlink data is being scheduled on both component carriers.
The important point is the corresponding PUCCH feedback. Even though PDSCH is transmitted on both cells, the HARQ ACK/NACK feedback is sent through a single PUCCH on the PCC.
The highlighted PUCCH line shows ack=11. This means the UE sends HARQ ACK for both PDSCH receptions. Each bit corresponds to one downlink assignment, so ack=11 indicates that both downlink transmissions were successfully acknowledged.
So this log confirms the CA feedback behavior. Data can be transmitted on both PCC and SCC, but the uplink control feedback is collected and sent on the primary cell using PUCCH.
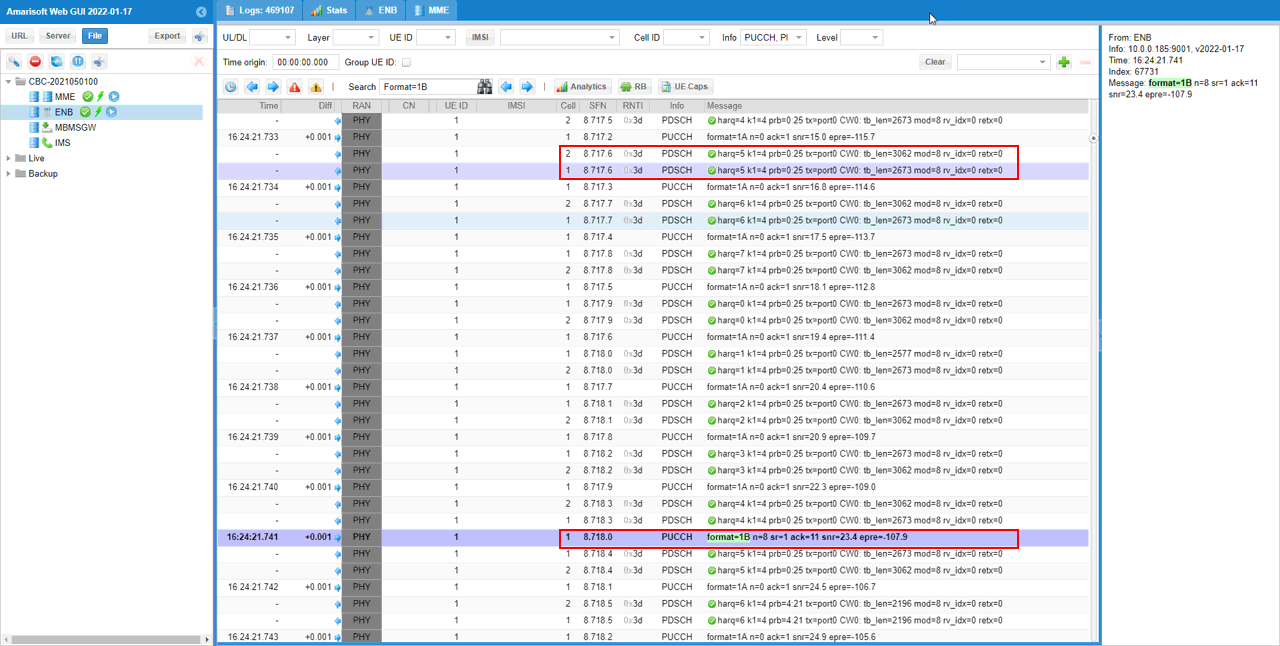
The Resource Block Allocation plot gives a visual confirmation of carrier aggregation operation.
In this example, you can see downlink resource allocation on both CC 0 DL and CC 1 DL. The blue blocks show PDSCH allocation, so this means downlink data is being transmitted on both component carriers.
The uplink control is mainly visible on CC 0 UL. You can see PUCCH and other uplink control/resource activity there. This matches the earlier log behavior where downlink data is sent on both cells, but HARQ feedback is sent through the PCC.
So this plot is an easy way to confirm CA at a glance. If both downlink carriers show active PDSCH allocation during traffic, it means both component carriers are being used for data transmission.
Test 2: 2CC CA (FDD-FDD)- with Measurement
This test is to show how to configure a carrier aggregation between two LTE cells. In this test, carrier aggregation will be triggeredonly whenthe measurement report from UE is recieved.
This test configures 2cells as follows.
- 2 LTE FDD Cells
It performs following procedure
Step 1 : Initial Attach to LTE
Step 2 : Perform Measurement to LTE neighbour cell for SCC detection
Step 3: Establish 2CC CA in LTE
Configuration
In this testI used the enb-2cc-meas.cfg which is copied and modified from enb-2cc.cfg
If you use other Network (e.g, other network simulator or real network), you have to make it sure to configure UE sim according to the settings on network side
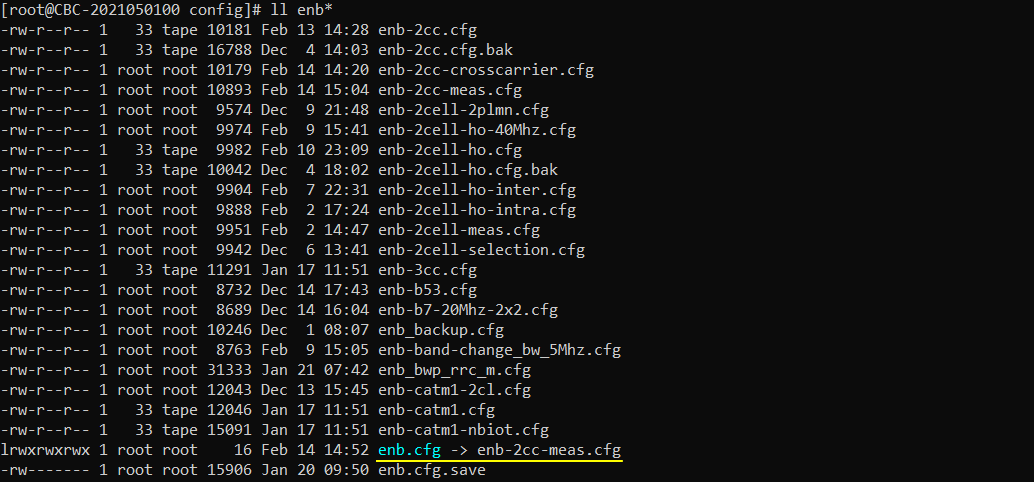

Followings are the configurations in enb-2cc-meas.cfg
In this configuration, N_CELL is set to 2. This means the eNB creates two LTE cells, which is required for this 2CC carrier aggregation test.
TDD is set to 0, so both cells are configured as FDD cells. This matches the purpose of this test, which is FDD-FDD carrier aggregation.
N_RB_DL is set to 25, meaning each LTE carrier uses 25 resource blocks. This corresponds to 5 MHz bandwidth. So this test uses two 5 MHz LTE carriers.
N_ANTENNA_DL and N_ANTENNA_UL are both set to 1, so this is a SISO-based CA test. The focus is on carrier aggregation and measurement-triggered SCC addition, not MIMO.
CHANNEL_SIM is set to 0, so the channel simulator is disabled. CQI_CONFIG is set to 1, meaning aperiodic CQI is used. This allows CQI reporting to be triggered when needed during the test.

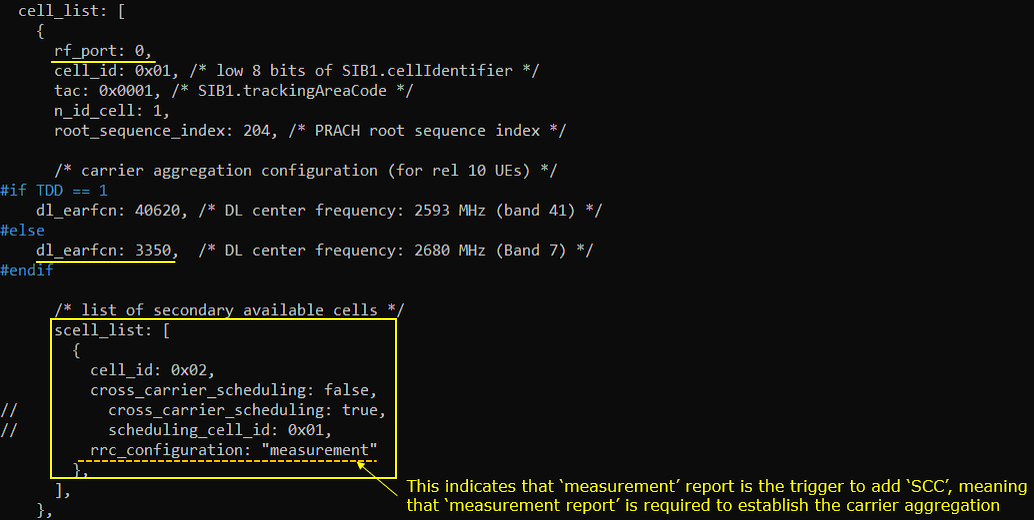
In carrier aggregation, you need to add the parameter scell_list and put the cell information for SCC(Secondary Component Cell) in the configuration. In case of using the first cell as PCC(Primary component cell), put the second cell in scell_list as SCC.
In this configuration, the first LTE cell is used as the PCC. It is defined with rf_port 0 and cell_id 0x01. Since TDD is 0, the FDD branch is used, so dl_earfcn is set to 3350. This corresponds to Band 7.
The CA-related part is scell_list. Here, cell_id 0x02 is listed as the SCC. This means the second LTE cell is available as the secondary component carrier for the first LTE cell.
cross_carrier_scheduling is set to false, so each carrier is scheduled by itself. The SCC is not scheduled through the PCC.
The important difference in this test is rrc_configuration: measurement. This means the SCC is not added immediately. The eNB waits until it receives the expected measurement report from the UE. After that measurement report is received, the eNB triggers the RRC reconfiguration and adds the SCC.
So this test verifies measurement-triggered carrier aggregation. The SCC is configured as an available secondary cell, but the actual CA establishment depends on UE measurement reporting.
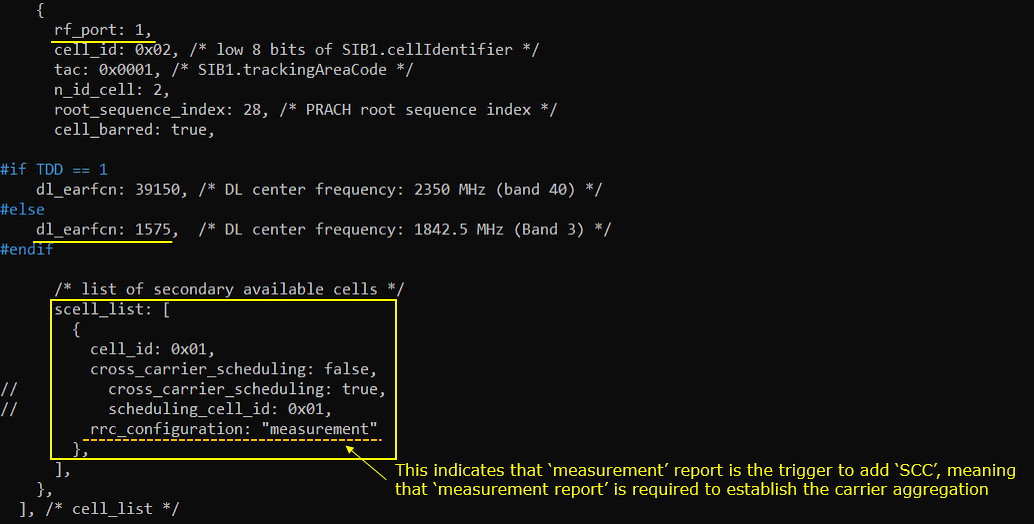
In this configuration, the second LTE cell is used as the PCC. It is defined with rf_port 1 and cell_id 0x02. Since TDD is 0, the FDD branch is used, so dl_earfcn is set to 1575. This corresponds to Band 3.
The CA-related part is scell_list. Here, cell_id 0x01 is listed as the SCC. This means the first LTE cell is available as the secondary component carrier for the second LTE cell.
cross_carrier_scheduling is set to false, so the secondary cell is not scheduled through the primary cell. Each carrier handles its own scheduling.
The important setting in this test is rrc_configuration: measurement. This means the SCC is not added immediately after UE connection. The eNB waits for the UE measurement report first. When the expected measurement report is received, the eNB uses it as the trigger to add the SCC by RRC Connection Reconfiguration.
So this configuration is for measurement-triggered CA, but with the second LTE cell working as the primary cell and the first LTE cell working as the secondary cell.
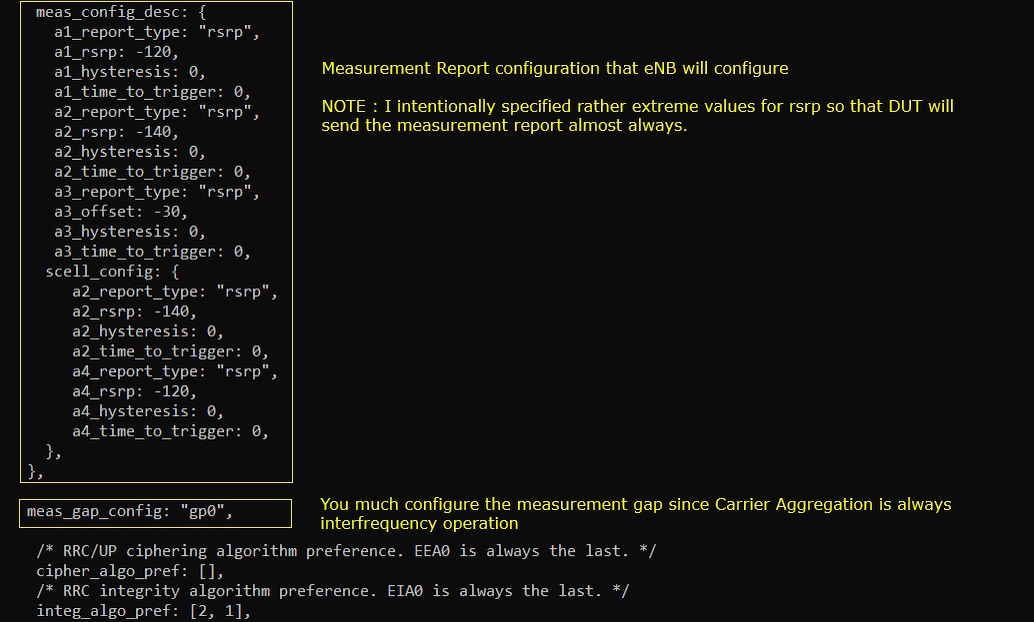
Since this test is measurement-based CA, meas_config_desc becomes an important part of the configuration. This section defines what kind of measurement report the eNB will ask the UE to send.
The first part configures general measurement events such as A1, A2, and A3 based on RSRP. The values are intentionally set with very loose or extreme thresholds, such as a1_rsrp = -120 and a2_rsrp = -140. This makes it easier for the UE to satisfy the condition and send the measurement report during the test.
The most important part for this tutorial is scell_config. This is the measurement configuration related to secondary cell addition. It defines the measurement conditions used to decide when the SCC can be added for carrier aggregation.
Inside scell_config, A2 and A4 events are configured with RSRP-based thresholds. A4 is especially important because it is commonly used to report that a neighbor cell becomes good enough. In this example, a4_rsrp is set to -120 with zero hysteresis and zero time-to-trigger, so the UE can report the SCC very easily.
meas_gap_config is set to gp0. This enables measurement gaps. Measurement gaps are needed because carrier aggregation measurement often involves inter-frequency measurement. During the gap, the UE can temporarily stop serving-cell reception and measure the other LTE carrier.
This setting is not mandatory for carrier aggregation itself, but it is useful for this measurement-based test.
inactivity_timer is set to 60000 ms, so the eNB waits for 60 seconds before releasing the RRC connection due to inactivity.
In this test, the SCC is added only after the UE sends the expected measurement report. If the inactivity timer is too short, the eNB may release the RRC connection before the measurement report is received and before the SCC is added.
So this timer extension gives the UE enough time to stay connected, perform measurement, send the measurement report, and receive the RRC Connection Reconfiguration for SCC addition.

Perform the Test
Check out the result of "cell phy" command and make it sure that the number of cells and other cell parameters (e.g, BAND, BW, ARFCN etc) are configured as expected.
The cell phy command is used to confirm that the eNB has created the expected LTE cells before starting the measurement-based CA test.
In this result, two LTE cells are shown. Cell 0x001 is LTE Band 7 with 5 MHz bandwidth, and its downlink ARFCN is 3350. Cell 0x002 is LTE Band 3 with 5 MHz bandwidth, and its downlink ARFCN is 1575.
This matches the configuration for 2CC FDD-FDD carrier aggregation. Each cell uses one downlink antenna and one uplink antenna, so the setup is still SISO-based.
At this point, this output only confirms that both LTE carriers are configured and running correctly at the PHY level. It does not yet prove that CA is established. For this test, CA should be confirmed later by checking the UE measurement report and the following SCC addition in RRC Connection Reconfiguration.

This trace is used to check whether carrier aggregation has been established for the UE.
The important column is CC. When CC is 1, the UE is still using only one component carrier. This is the state before CA establishment.
After the measurement report is received and the SCC is added, CC becomes 2. This means the UE is now connected with two component carriers, so carrier aggregation is active.
You may not always see the CC = 1 state in the trace. This print is sampled or averaged, so depending on timing, the display may already show CC = 2 when you start checking it. For this test, CC = 2 is the main success indication.

Run lteSim_server at the directory /root/mme and generate IP traffic as shown below (If you are not familiar with ltesim_server, check out this tutorial)
This step generates downlink IP traffic toward the UE after the UE is connected.
The command is run from lteSim_server in the /root/mme directory. cbr_send sends constant bit rate traffic to the UE IP address 192.168.3.2.
Here, 100M means the target traffic rate is 100 Mbps, and 60 means the traffic runs for 60 seconds.
In this measurement-based CA test, this traffic helps you observe the CA operation after the SCC is added. Once the UE sends the measurement report and the eNB activates the SCC, the scheduler can use both component carriers to transmit data. So this command creates enough traffic load to make the two-carrier operation visible in the trace and resource allocation plot.

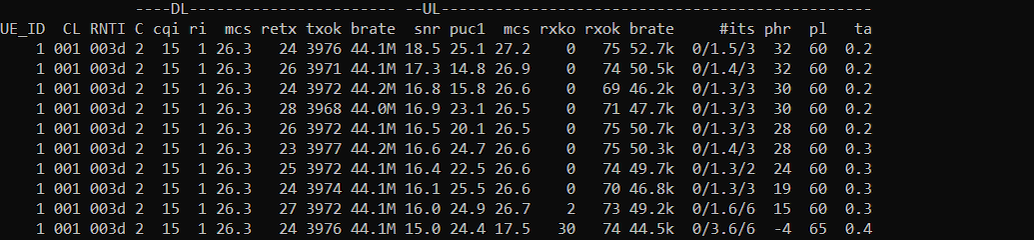
Make it sure that all the cells configured Carrier Aggregation are connected. You can confirm on this by checking the number in the column 'C'. In this example, it is 2 which mean that 2 carriers are connected.
This trace confirms that all configured carrier aggregation cells are connected.
The important column is C. In this example, C is shown as 2 for the UE. This means two component carriers are connected, so the UE is operating in 2CC carrier aggregation mode.
The downlink bitrate is around 44 Mbps, which means user-plane traffic is actively transmitted while CA is enabled. Since the C value stays at 2 during the traffic period, it indicates that both carriers remain connected and usable.
In this measurement-based test, this is an important final confirmation. The SCC was not added immediately at attach. It was added after the UE measurement report triggered the CA procedure. Once C becomes 2, it means the measurement-triggered SCC addition has completed successfully.
Log Analysis
In this section, you will see how to confirm if UE registration is complete from trace log. You can use the same method to find any issues (e.g, registration failure) for troubleshooting. When UE registration fails, you may use this tutorial to figure out the point of the failure and troubleshoot
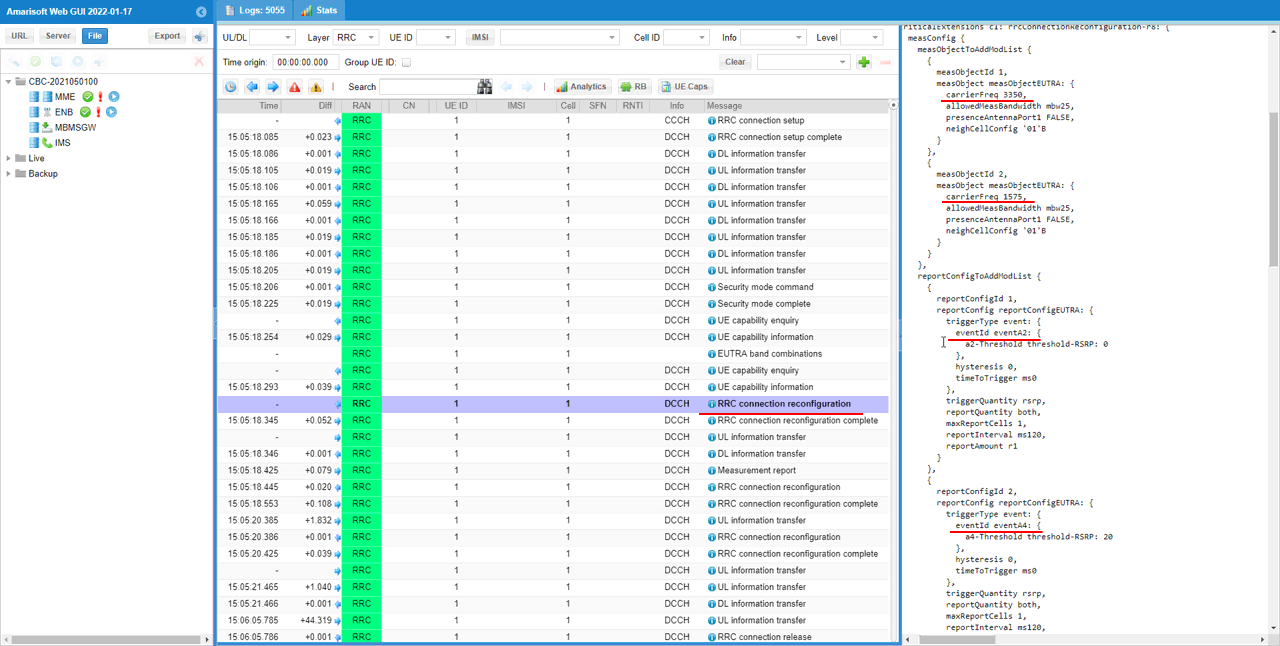
This test is for Carrier Aggregation based on Measurement. So check outeNB configure Measurement Report condition(measConfig) in RRC connection reconfiguration.
In this measurement-based CA test, the first important check is the RRC Connection Reconfiguration that configures measurement reporting for the UE.
In the decoded message, measConfig is included. This means the eNB is telling the UE what cells to measure and what condition should trigger the measurement report.
The highlighted measObjectToAddModList shows two LTE measurement objects. One is for carrierFreq 3350, which corresponds to the Band 7 cell. The other is for carrierFreq 1575, which corresponds to the Band 3 cell. This tells the UE which LTE frequencies should be measured.
The reportConfigToAddModList defines the reporting condition. In this example, event A2 and event A4 are configured. A2 is used when the serving cell becomes worse than a threshold, and A4 is used when a neighbor cell becomes better than a threshold.
This is the key difference from the previous CA test. Here, the eNB does not simply add the SCC immediately. It first configures the UE measurement condition. Then the UE sends a Measurement Report when the configured condition is satisfied. After receiving that report, the eNB can trigger SCC addition for carrier aggregation.
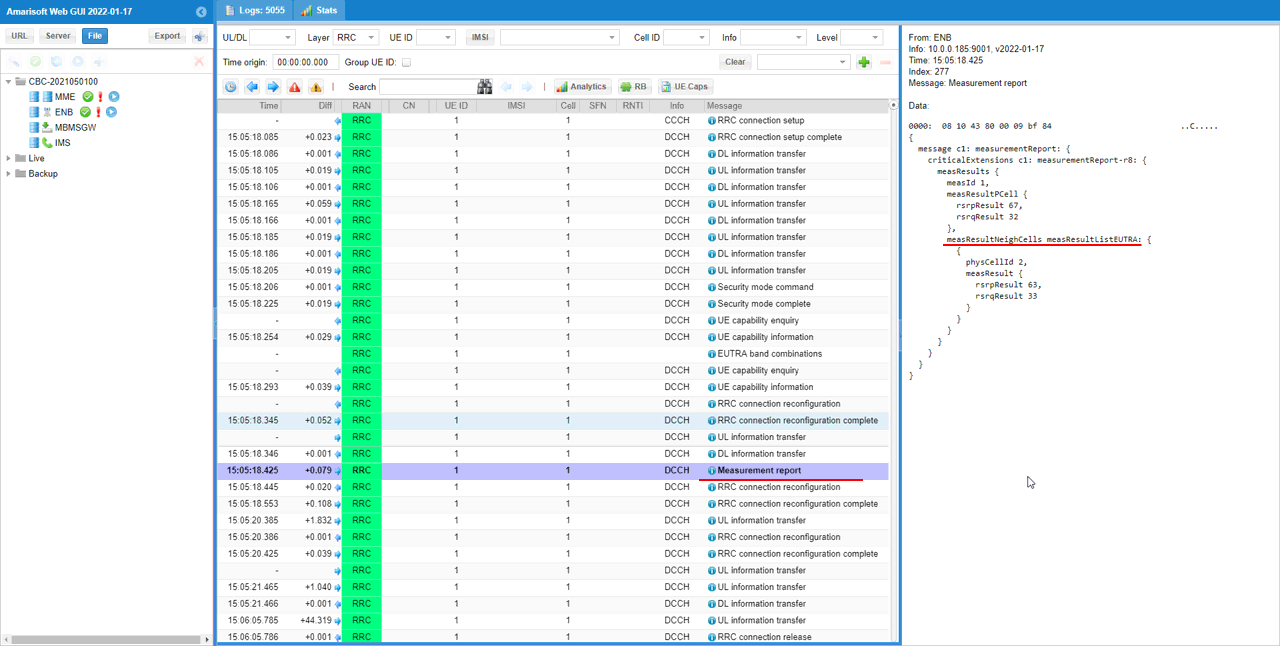
UE send measurement report. this is the trigger to add SCC. If eNB does not receive this message, SCC will not be added. Make it sure that the measurementReport carries the measurement of target cell with measResultNeighCells IE.
This is the key trigger point in the measurement-based CA procedure.
The UE sends Measurement Report after the configured measurement condition is satisfied. In this test, the eNB waits for this message before adding the SCC. So if this Measurement Report is not received, the secondary component carrier will not be added.
In the decoded message, measResultPCell shows the measurement result of the current serving cell. More importantly, measResultNeighCells is included. This part carries the measurement result of the neighbor LTE cell, which is the target cell for SCC addition.
Here, measResultListEUTRA includes physCellId 2 and its RSRP/RSRQ result. This means the UE has measured the target LTE cell and reported it to the eNB.
After receiving this report, the eNB has enough information to continue the CA procedure. The next expected step is RRC Connection Reconfiguration with sCellToAddModList, where the reported neighbor cell is added as the SCC.
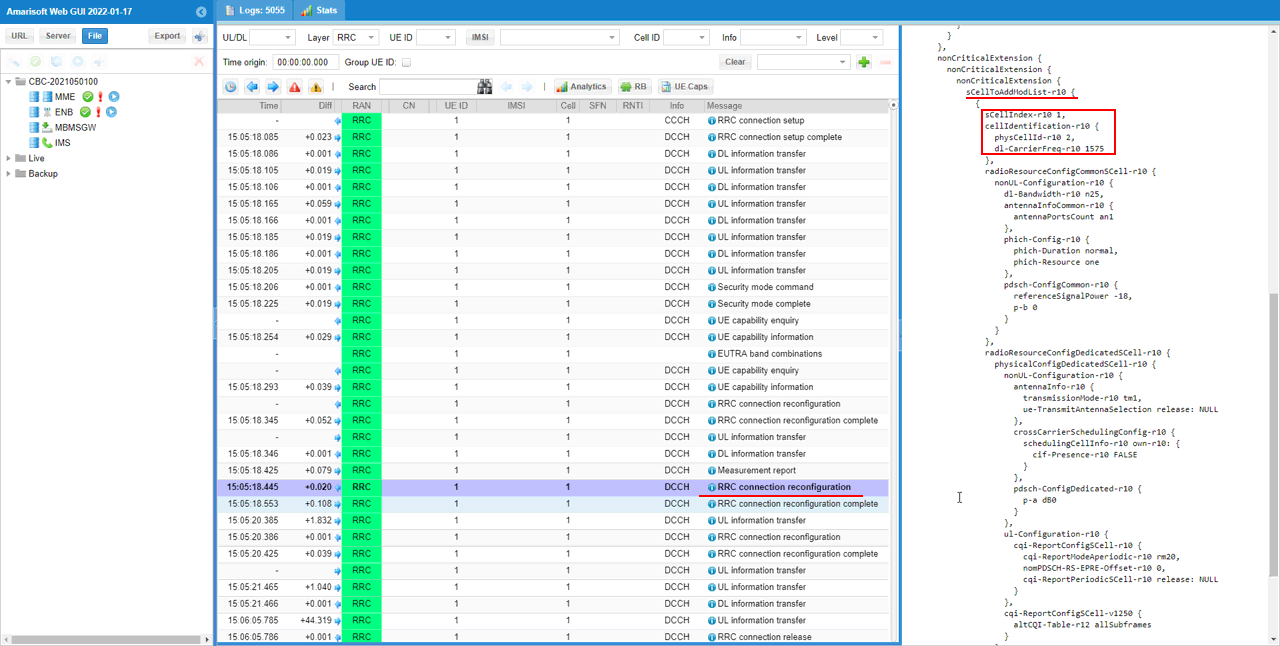
Once the expected measurement report is recieved, eNB send RRC connection reconfiguration toadd SCC. Check out sCellToAddModList IE and make it sure sCellIndex is configured as intended.
The important IE is sCellToAddModList. This is where the secondary cell is actually added to the UE configuration. In this example, sCellIndex-r10 is set to 1. This means the added SCC is assigned SCell index 1.
The highlighted part also shows physCellId 2 and dl-CarrierFreq-r10 1575. This matches the target LTE cell that was reported earlier by the UE measurement report. So the eNB is adding the measured neighbor cell as the secondary component carrier.
This is the main confirmation point for measurement-based CA. The UE first reports the target cell in Measurement Report, and then the eNB uses RRC Connection Reconfiguration with sCellToAddModList to establish the SCC.
Test 3: 2CC CA (FDD-FDD) - DL+ULwithout Measurement
This test is to show how to configure the carrier aggregation with 2CC (Component Carriers) for both Uplink and Downlink. In this test, the carrier aggregation will be forced without measurement from UE.
This test configures 3 cells as follows.
- 2 LTE FDD Cells
It performs following procedure
Step 1 : Initial Attach to LTE
Step 2 : Establish 2CC CA in LTE
Configuration
In this test, I used enb-2cc-ul.cfg which is copied and modified from enb-2cc.cfg.
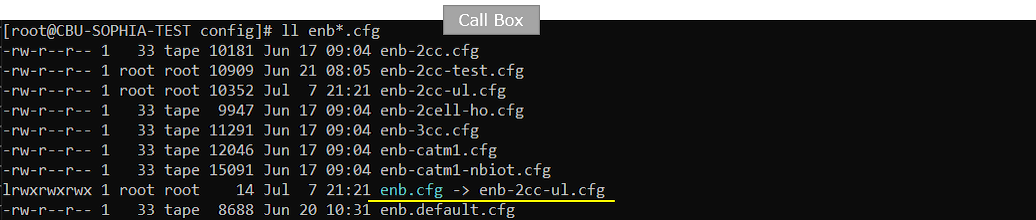
I used the mme-ims.cfg config as it is.
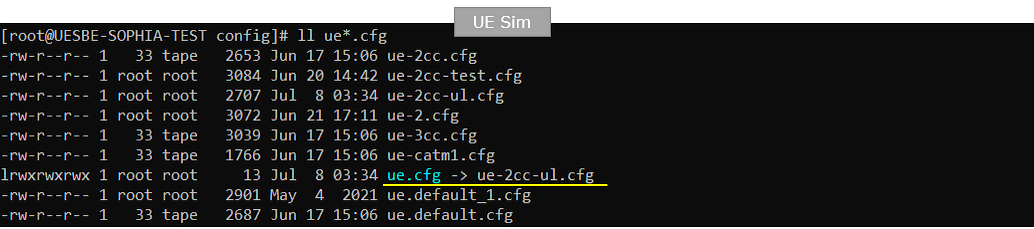
In UEsim, I am using ue-2cc-ul.cfg which is copied from ue-2cc.cfg (
The configuration in enb-2cc-ul.cfg is as shown below.
In this configuration, N_CELL is set to 2. This means the Call Box creates two LTE cells, which is required for this multi-cell carrier aggregation test.
TDD is set to 0, so the test uses FDD mode. N_RB_DL is set to 25, meaning each LTE carrier uses 25 resource blocks, or 5 MHz bandwidth.
N_ANTENNA_DL is set to 1 and N_ANTENNA_UL is also set to 1. This means the test is configured as SISO in both downlink and uplink.
The inline comment is especially important for uplink. It says that most commercial UEs do not support UL MIMO, especially when UL MIMO is combined with UL CA. So unless you are fully sure that the UE supports UL MIMO, it is safer to keep uplink as SISO.
So this setup keeps the test simple and stable. It focuses on carrier aggregation behavior, while avoiding extra UE capability issues caused by uplink MIMO.

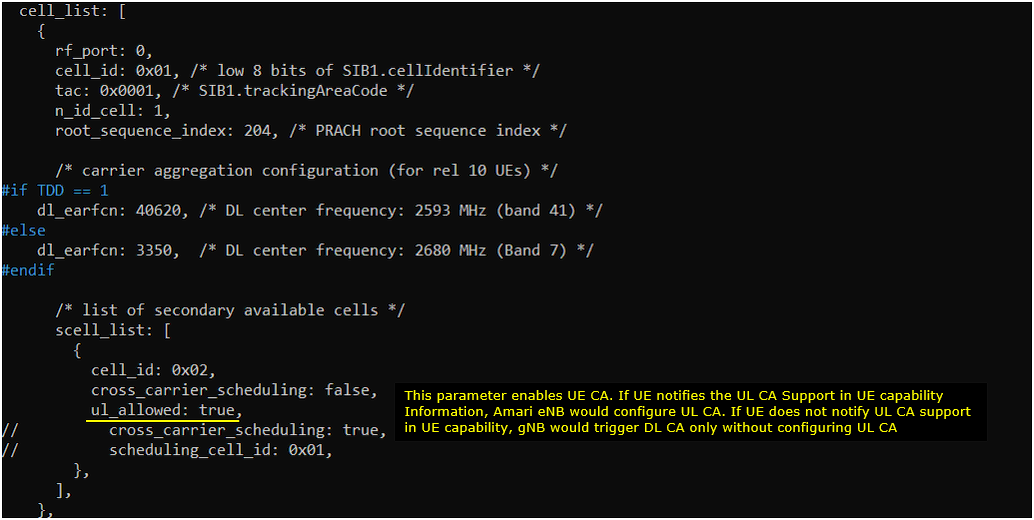
In this configuration, the first LTE cell is used as the PCC. It is defined with rf_port 0 and cell_id 0x01. Since TDD is 0, the FDD branch is used, so dl_earfcn is set to 3350. This corresponds to Band 7.
The scell_list defines the SCC candidate for carrier aggregation. Here, cell_id 0x02 is added as the secondary component carrier.
The important additional parameter is ul_allowed: true. This enables uplink carrier aggregation as well as downlink carrier aggregation. But Amarisoft will configure UL CA only when the UE capability information indicates that the UE supports UL CA.
So this setting does not force UL CA blindly. It allows UL CA when the UE supports it. If the UE does not report UL CA support, the eNB may still trigger downlink CA, but it will not configure uplink CA. This is important because many commercial UEs may support DL CA but not UL CA, or may support UL CA only for limited band combinations.
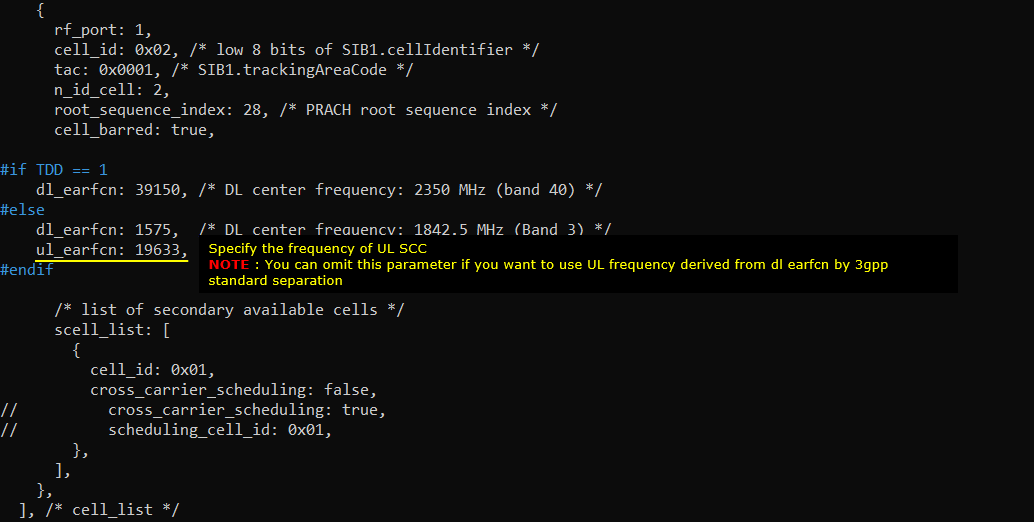
In this configuration, the second LTE cell is used as the PCC. It is defined with rf_port 1 and cell_id 0x02. Since TDD is 0, the FDD branch is used, so dl_earfcn is set to 1575. This corresponds to Band 3.
The first LTE cell is listed in scell_list with cell_id 0x01, so the first cell becomes the SCC for carrier aggregation. (
The highlighted ul_earfcn is used to explicitly specify the uplink frequency for the SCC. In normal FDD operation, the uplink EARFCN can be derived automatically from the downlink EARFCN using the 3GPP band definition. So this parameter is optional in many cases.
However, if you want to use a specific SCC uplink frequency that is not automatically derived in the way you want, you can hardcode it with ul_earfcn. In this example, ul_earfcn is set to 19633, so Amarisoft uses this value directly for the SCC uplink frequency instead of relying only on automatic derivation.
This setting is not mandatory for UL/DL carrier aggregation itself. It is mainly added to make the test more stable.
inactivity_timer is set to 60000 ms, so the eNB waits for 60 seconds before releasing the RRC connection due to inactivity.
This is useful because SCC addition may take some time, especially when UE capability checking and CA configuration are involved. If the timer is too short, the eNB may release the UE before the SCC is added and activated.
So this value gives enough time for the UE to stay in RRC connected state, complete the CA configuration, and allow both downlink and uplink CA behavior to be checked.
Followings are the configuration on UEsim which is configured in ue-2cc-ul.cfg .(
In UEsim, N_CELL should match the Call Box configuration. Here, N_CELL is set to 2, so UEsim knows that two LTE cells are involved in the test.
TDD is set to 0, which means FDD mode. This should also match the Call Box side.
CELL_BANDWIDTH is set to 5, meaning each simulated LTE cell uses 5 MHz bandwidth. N_ANTENNA_DL and N_ANTENNA_UL are both set to 1, so the simulated UE uses SISO for both downlink and uplink.
UE_COUNT is set to 1, so only one simulated UE is created for this test. This keeps the test simple and makes it easier to observe UL/DL carrier aggregation behavior for a single UE.

On the UEsim side, the cell configuration only needs the basic RF-related information, mainly bandwidth and frequency. Most of the detailed radio configuration is received later from the eNB through RRC signaling.
The first cell uses CELL_BANDWIDTH and dl_earfcn 3350 in FDD mode. This matches the Band 7 cell on the Call Box side. The antenna settings also follow N_ANTENNA_DL and N_ANTENNA_UL, so they remain consistent with the SISO setup.
The second cell also uses CELL_BANDWIDTH and dl_earfcn 1575 in FDD mode. This matches the Band 3 cell. The highlighted ul_earfcn 19633 explicitly specifies the uplink frequency for the UL SCC.
This is important when testing uplink carrier aggregation. If a specific SCC uplink frequency is required, UEsim also needs to know that frequency. Otherwise, it may rely on the default frequency relation derived from the downlink EARFCN.
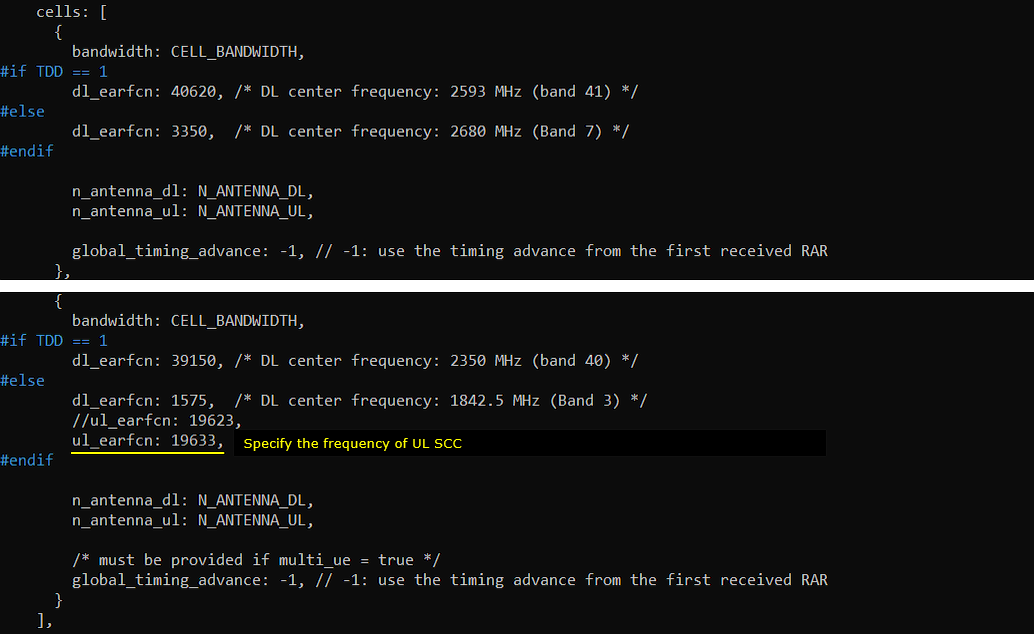
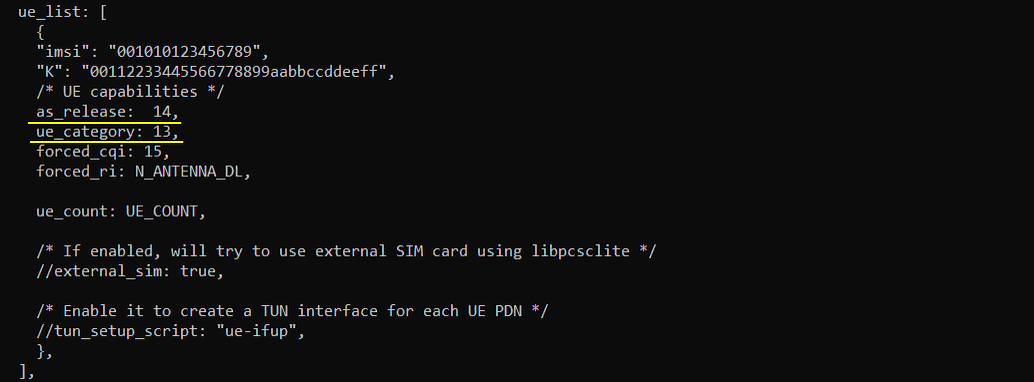
In this UEsim configuration, as_release is set to 14. This means the simulated UE reports LTE Release 14 capability. This is important because carrier aggregation features depend on UE release and capability signaling.
ue_category is set to 13. This defines the UE capability category used by UEsim. A higher UE category allows the simulated UE to report more advanced LTE capability, including carrier aggregation-related capability.
In this test, these values are used to make sure the UE capability is high enough for the intended CA operation. Since this test includes UL carrier aggregation, the UE capability must indicate that the UE can support the required CA feature and band combination.
So this part is not directly configuring the carrier itself. It controls what capability UEsim reports to the eNB. Based on this reported capability, the eNB decides whether it can configure DL CA only, or both DL and UL CA.
Perform the Test
Check out the result of "cell phy" command and make it sure that the number of cells and other cell parameters (e.g, BAND, BW, ARFCN etc) are configured as expected.
The cell phy command is used to confirm that the Call Box created the expected two LTE cells before checking UL/DL carrier aggregation.
In this result, cell 0x001 is LTE Band 7 with 5 MHz bandwidth. Its downlink ARFCN is 3350 and uplink ARFCN is 21350.
Cell 0x002 is LTE Band 3 with 5 MHz bandwidth. Its downlink ARFCN is 1575 and uplink ARFCN is 19633. The highlighted uplink ARFCN confirms that the explicitly configured UL frequency is applied.
Both cells use one downlink antenna and one uplink antenna, so this is still a SISO-based CA setup. This output confirms that the Call Box side has two LTE carriers configured correctly, including the special uplink frequency setting needed for the UL CA test.

Power on UE on UEsim (UE simulator)

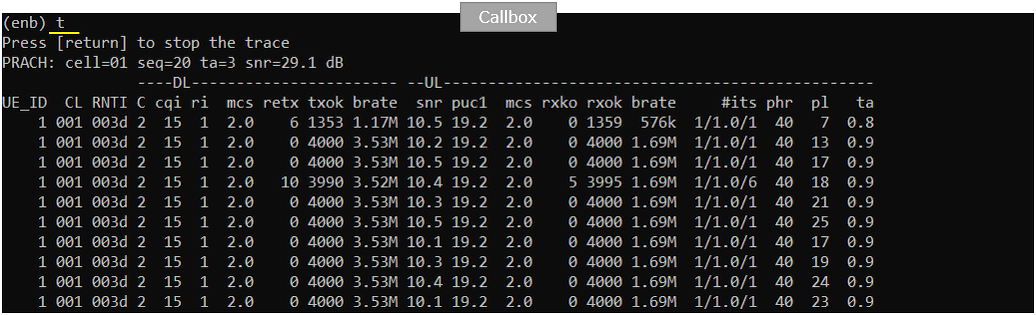
Make it sure that all the cells configured Carrier Aggregation are connected. You can confirm on this by checking the number in the column 'C'. In this example, it is 2 which mean that 2 carriers are connected.
This trace confirms that the UE is connected with carrier aggregation.
The important column is C. In this example, C is shown as 2, which means two component carriers are connected for this UE. So the UE is not operating on a single LTE carrier anymore.
In this UL/DL CA test, you should also check both DL and UL activity. The DL side shows downlink throughput, and the UL side also shows uplink bitrate. Since both sides are active while C remains 2, this indicates that the two-carrier CA connection is established and traffic is running.
So this output confirms the basic CA state from the Call Box side. The two LTE carriers are connected, and the UE is actively exchanging data while carrier aggregation is enabled.
Log Analysis
In any type of Carrier Aggregation test, the first thing you need to check is whether the DUT(UE) support the band combination that is required for the test.
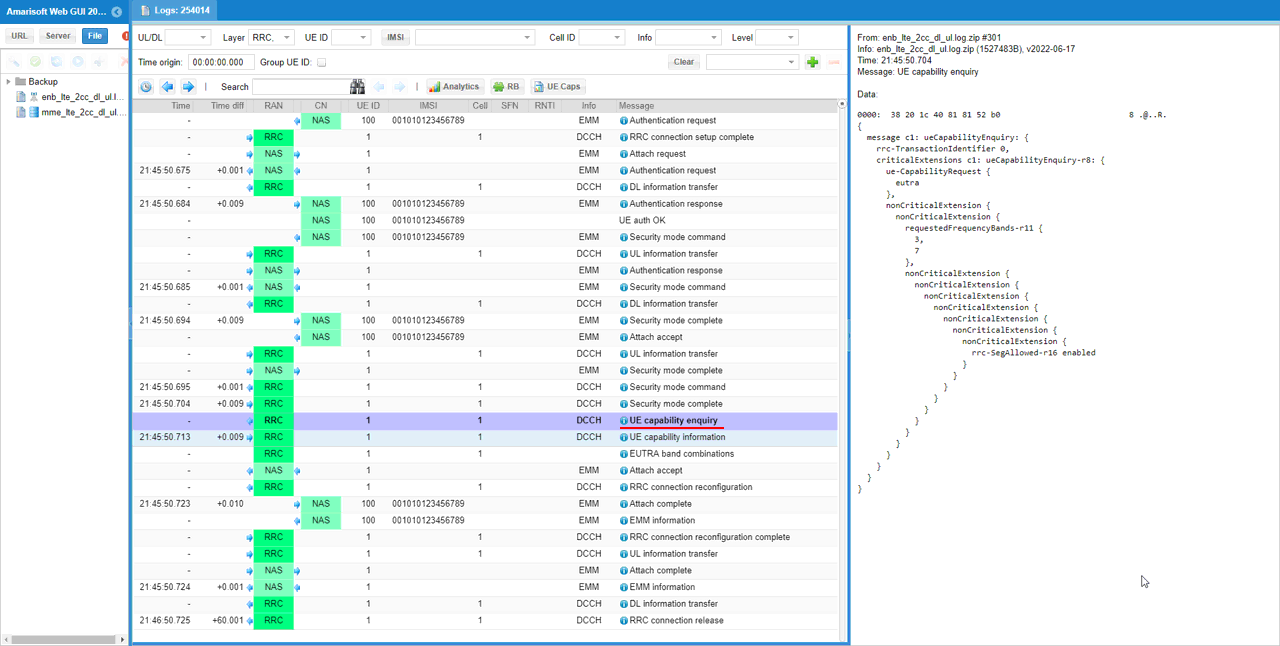
Network send ueCapabilityInquiry message for the list of the bands that you specified in the configuration file. In this step, the network sends UE Capability Enquiry to the UE.
The purpose of this message is to ask the UE to report its supported LTE bands and capability information. In the decoded message, requestedFrequencyBands-r11 includes band 3 and band 7. These are the same bands used in this CA test configuration.
This is important because the eNB should not configure carrier aggregation only based on its own cell setup. It first needs to know whether the UE supports the required band combination, especially when UL CA is also expected.
The message also includes requested capability information for EUTRA, and feature group indication such as SegAllwd-r16 enabled. After this enquiry, the UE responds with UE Capability Information. That response is the key message to check whether the UE actually supports the required DL and UL carrier aggregation combination.
Check out UE capability Information message from UE and see if the intended band combination is supported. In this step, the UE sends UE Capability Information as the response to the UE Capability Enquiry.
This message should be checked to confirm whether the UE supports the intended CA band combination. In the decoded view, the important part is supportedBandCombination. This section lists the CA combinations that the UE can support.
The highlighted content shows bandEUTRA-r10 3 and bandEUTRA-r10 7. These correspond to the two LTE bands used in this test. The bandParametersUL-r10 and bandParametersDL-r10 entries show the supported uplink and downlink bandwidth class for each band.
This is especially important for this UL/DL CA test. For DL-only CA, checking downlink band combination may be enough. But for UL CA, the UE must also report uplink capability for the required band combination. If the UE capability does not include the expected UL CA support, the eNB should not configure UL carrier aggregation, even if ul_allowed is set to true in the Call Box configuration.
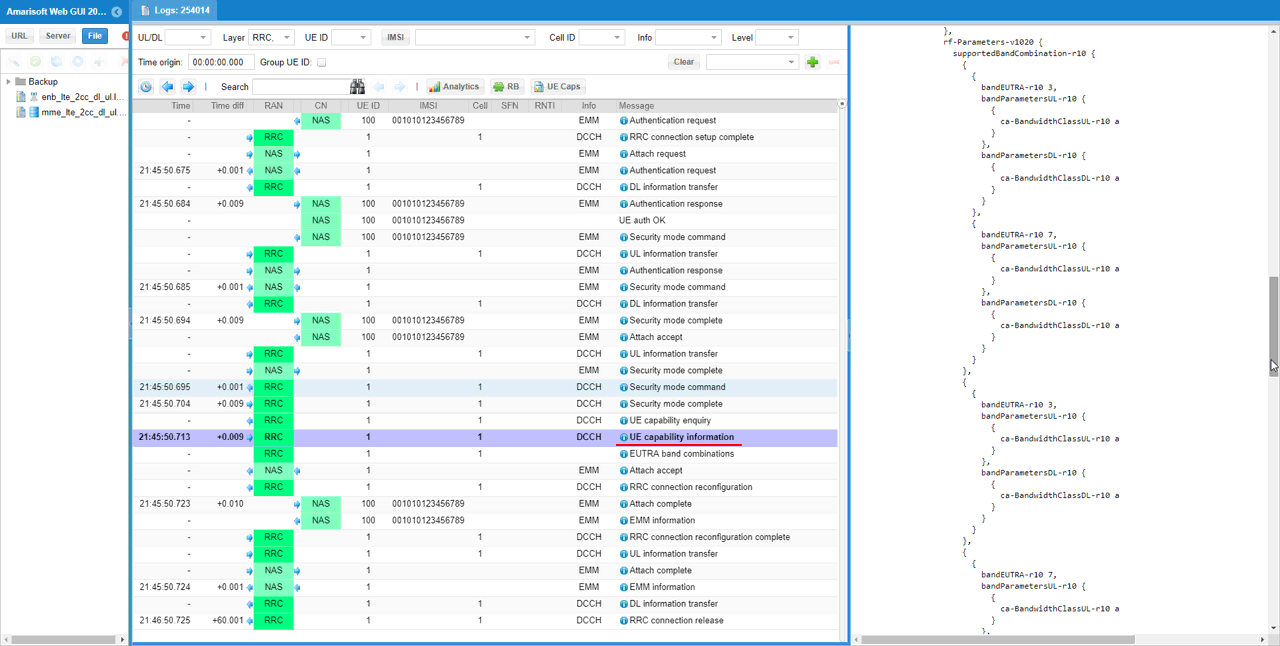
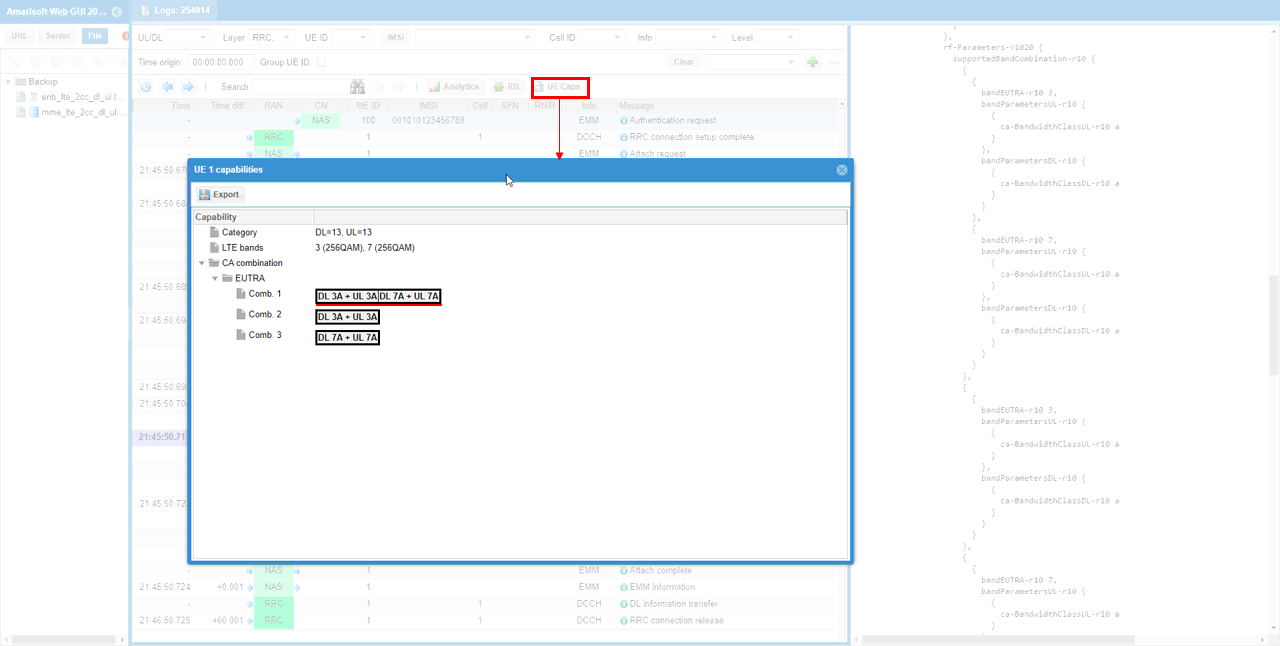
Checking all band combinations directly from the decoded RRC message can be cumbersome because UE Capability Information can be very long.
The Amarisoft Web GUI provides a simpler UE Caps view. This view decodes the UE capability and summarizes the CA combinations in a table-like format.
In this example, the UE category shows DL 13 and UL 13, and the LTE bands include Band 3 and Band 7. Under CA combination, the important entry is DL 3A + UL 3A, DL 7A + UL 7A. This means the UE supports carrier aggregation using Band 3 and Band 7, including uplink capability on both bands.
This is much easier than manually searching through supportedBandCombination in the raw RRC message. For this UL/DL CA test, this table is a quick way to confirm that the UE capability matches the intended CA band combination before expecting UL carrier aggregation to work.
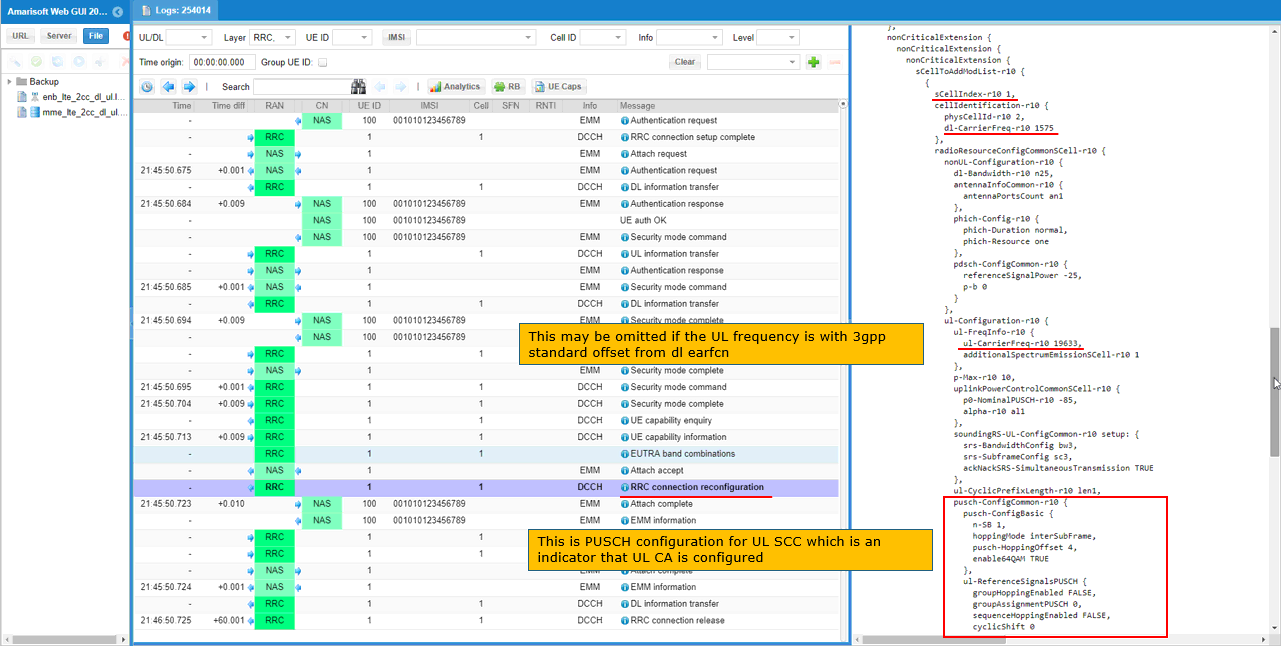
Then check out sCellToAddModList in RRC Connection Reconfiguration for SCC Addition. In this step, RRC Connection Reconfiguration is checked to confirm SCC addition.
The important IE is sCellToAddModList. This shows that sCellIndex 1 is added, with physCellId 2 and dl-CarrierFreq 1575. This confirms that the downlink SCC is added for carrier aggregation.
For this UL/DL CA test, we also need to confirm uplink configuration for the SCC. The highlighted ul-Configuration section shows ul-FreqInfo with ul-CarrierFreq 19633. This means the uplink frequency for the SCC is explicitly configured. This part may be omitted if the uplink frequency can be derived automatically from the downlink EARFCN using the 3GPP standard offset.
The lower highlighted part shows pusch-ConfigCommon-r10. This is important because it provides the PUSCH configuration for the uplink SCC. It means the SCC is not configured only for downlink reception. It also has the uplink radio configuration needed for UL carrier aggregation.
So this message confirms both sides of the CA setup. The SCC is added for downlink, and the required uplink configuration is also included for UL CA operation.
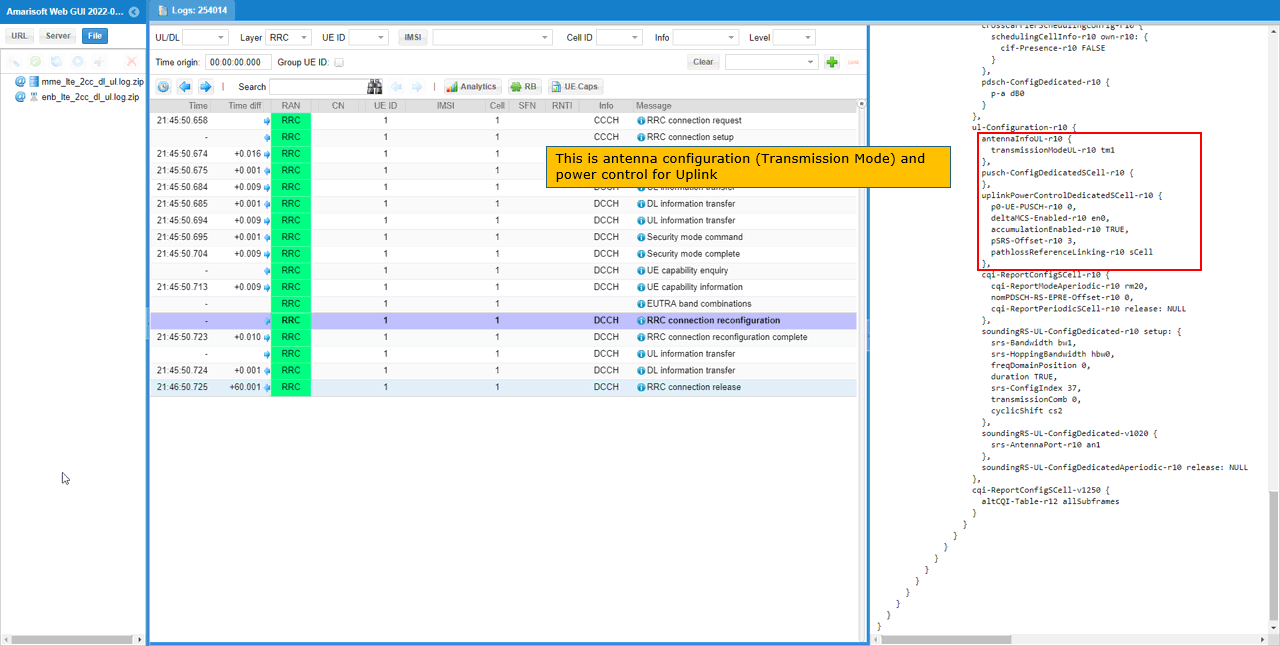
Now check out the antenna configuration(Transmission Mode) and power control for Uplink in ul-Configuration IE. In this part, the ul-Configuration IE is checked in RRC Connection Reconfiguration.
The highlighted antennaInfoUL-r10 shows transmissionModeUL-r10 tm1. This means the uplink SCC is configured with uplink transmission mode 1. In this test, it matches the SISO-based uplink configuration, so the UE uses a single uplink transmission layer.
The highlighted uplinkPowerControlDedicatedSCell-r10 shows the dedicated uplink power control configuration for the secondary cell. This includes parameters such as p0-UE-PUSCH, accumulationEnabled, pSRS-Offset, and pathlossReferenceLinking.
This is important for UL carrier aggregation because the SCC uplink is not only added as a frequency. The UE also needs proper uplink transmission mode and power control configuration for PUSCH/SRS operation on the secondary cell.
So this message confirms that the SCC has the required uplink antenna and power control settings for UL CA operation.
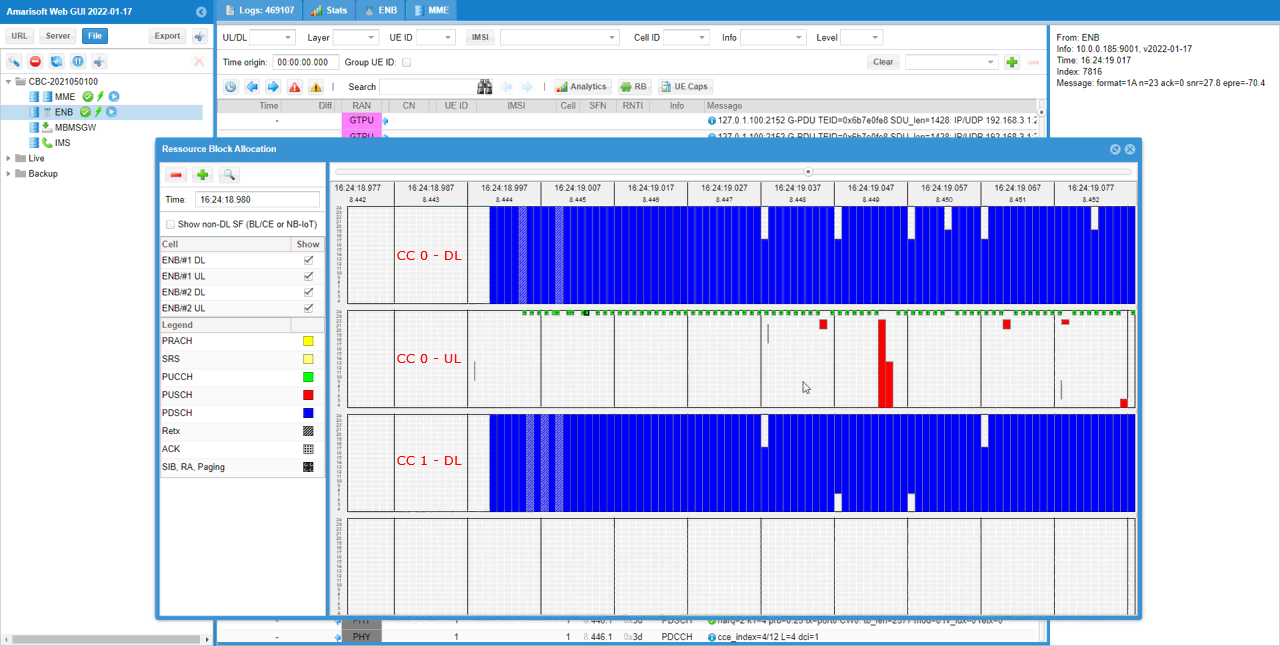
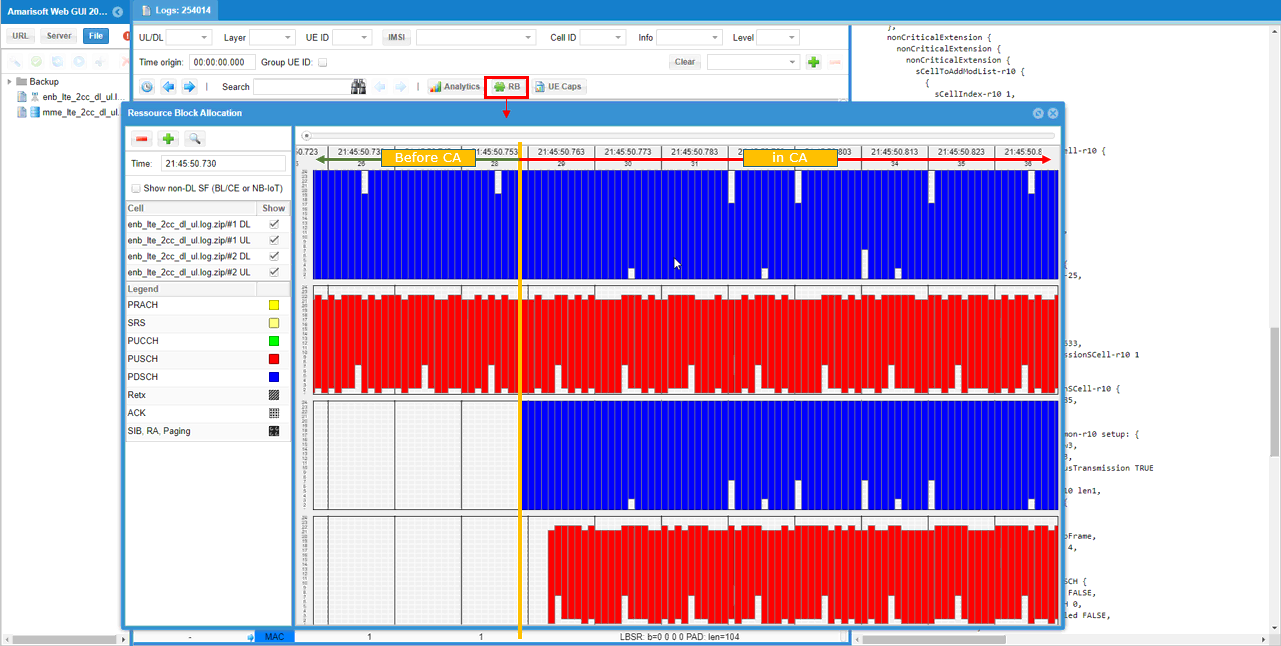
You can confirm on the operation of all the carrier aggregation with Resource Block Allocation plot as shown below. Here you clearly see the aggregation of the traffics on both DL and UL. The Resource Block Allocation plot gives the clearest visual confirmation of UL/DL carrier aggregation.
Before CA, traffic is visible mainly on the primary carrier. After CA is established, resource allocation appears on both component carriers. In the plot, blue blocks show downlink PDSCH allocation, and red blocks show uplink PUSCH allocation.
The important point in this test is that both DL and UL resources are active on more than one carrier after CA starts. This means the UE is not only receiving downlink data through carrier aggregation, but also transmitting uplink data through the secondary carrier.
So this plot confirms the final operation of UL/DL CA. The RRC messages confirmed the configuration, and this RB allocation plot confirms that the configured carriers are actually being used for traffic in both directions.
Test 4: 2CC CA (FDD-FDD) + NR NSA/FDD
This test is to show how to InterRAT carrier aggregation between LTE and NR. Carrier aggregation will be established between two cells and NR cell will be added as NSA SCG cell.
This test configures 3 cells as follows.
- 2 LTE FDD Cells
- 1 NR FDD Cells
It performs following procedure
Step 1 : Initial Attach to LTE
Step 2 : Establish 2CC CA in LTE
Step 3 : Perform measurement for NR neigbhour cell
Step 4: Add NR to establish NSA
Configuration
In this test, I used gnb-nsa-2LTE-1NR.cfg which is copied and modified from gnb-nsa.cfg.
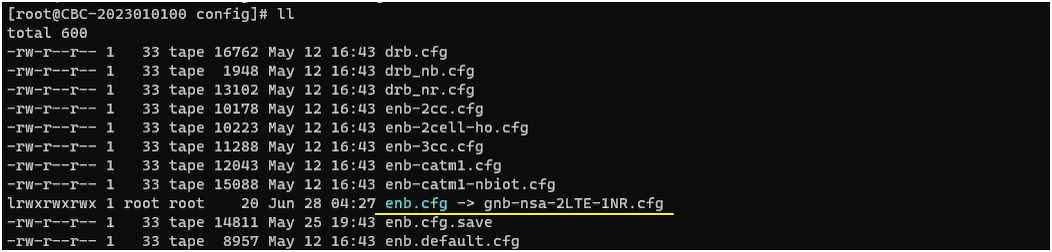
I used the mme-ims.cfg config as it is.
The configuration in gnb-nsa-2LTE-1NR.cfg is as shown below.
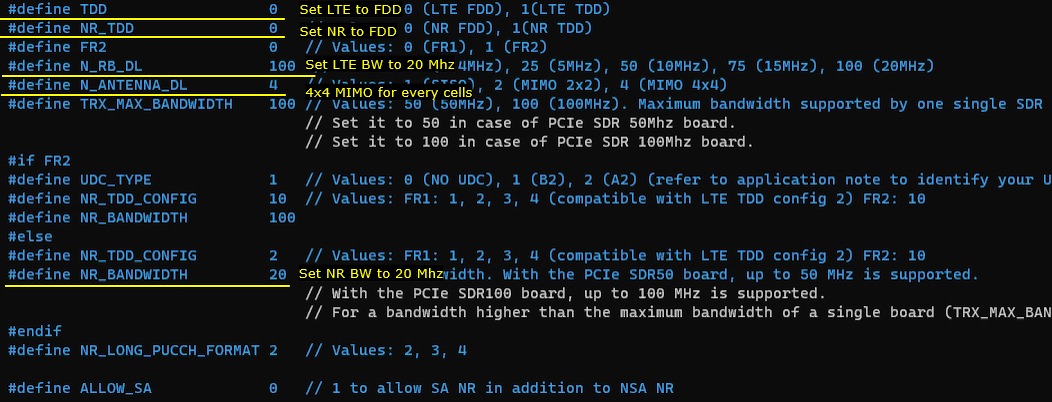
At first, both NR related and LTE related constants are specified. In this test, both NR and LTE is set to FDD and the bandwidth of the both LTE and NR are set to 20 Mhz.
At the beginning of this configuration, both LTE and NR common constants are defined.
TDD is set to 0, so the LTE cells use FDD mode. NR_TDD is also set to 0, so the NR cell also uses FDD mode. This matches the purpose of this test, which is LTE FDD-FDD carrier aggregation plus NR NSA FDD.
N_RB_DL is set to 100, meaning the LTE carrier bandwidth is 20 MHz. For NR, NR_BANDWIDTH is set to 20, so the NR cell is also configured with 20 MHz bandwidth.
N_ANTENNA_DL is set to 4, so the LTE side is configured for 4 downlink antennas. This allows 4x4 MIMO capability for each LTE cell, depending on UE support and test condition.
FR2 is set to 0, so this is an FR1 NR configuration. In the FR1 branch, NR_TDD_CONFIG is set to 2 and NR_BANDWIDTH is set to 20. Since NR_TDD is set to 0, the key point here is that the NR cell is configured as FR1 FDD with 20 MHz bandwidth.
ALLOW_SA is set to 0, meaning SA NR is not allowed. So the NR cell is intended to be used only as NSA NR, added on top of the LTE connection as the SCG cell.
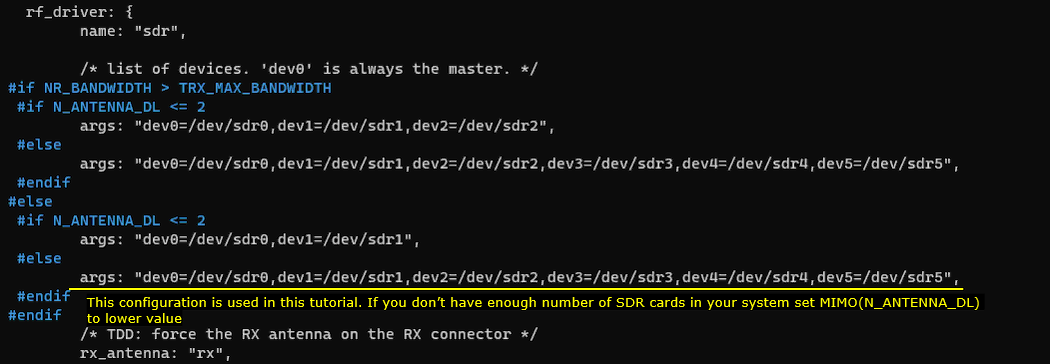
Make it sure that you have configured enough number of sdr card for this test. In this test, NR uses 4x4 MIMO and LTE use 2x2 MIMO. So you would need at least 6 sdr cards (in case of SDR 50) enabled.
This test uses multiple cells and multiple antenna ports. The LTE side uses 2x2 MIMO, and the NR side uses 4x4 MIMO. Because of that, the Call Box needs enough SDR RF chains to support all required transmit and receive paths.
The rf_driver section lists the SDR devices used by Amarisoft. dev0 is the master device, and additional devices such as dev1, dev2, dev3, dev4, and dev5 are added depending on bandwidth and antenna configuration.
The highlighted comment is important. This configuration is written for the tutorial setup. If your system has a smaller number of SDR cards, you should reduce the MIMO setting, especially N_ANTENNA_DL, to match your hardware capability.
So before running this LTE CA plus NR NSA test, you should confirm that the number of SDR cards and RF ports is enough for the configured LTE and NR MIMO setup. Otherwise, the configuration may load incorrectly, or the cells may not start as expected.
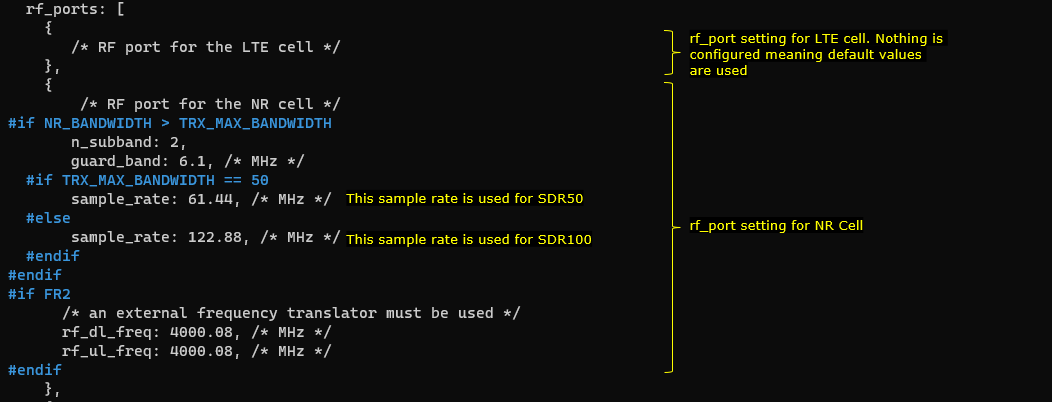
This rf_ports section defines the RF port settings used by LTE and NR cells.
For the LTE cell, the RF port block is almost empty. This means Amarisoft uses the default RF port settings for LTE. No special sample rate or guard band is configured there.
For the NR cell, more RF port parameters are configured. n_subband is set to 2, and guard_band is set to 6.1 MHz. This is related to how the NR signal is handled on the SDR RF path.
The sample_rate depends on the SDR hardware bandwidth. If TRX_MAX_BANDWIDTH is 50, sample_rate is set to 61.44 MHz, which is used for SDR50. Otherwise, sample_rate is set to 122.88 MHz, which is used for SDR100.
So the main point is that LTE uses default RF port settings, while NR needs more explicit RF port configuration. This is because the NR cell has wider RF processing requirements, especially when higher bandwidth or multiple SDR boards are used.
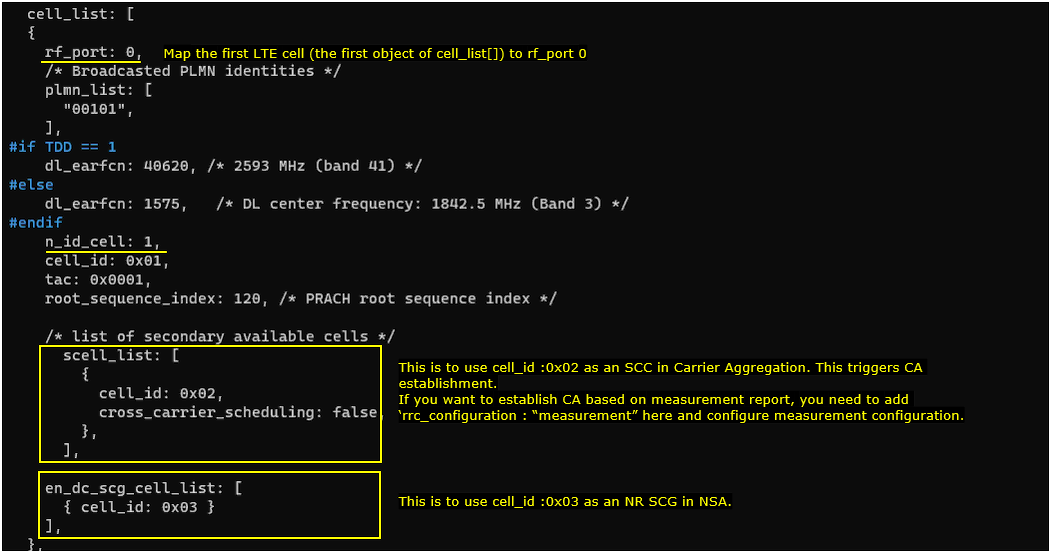
In carrier aggregation, you need to add the parameter scell_list and put the cell information for SCC(Secondary Component Cell) in the configuration. In case of using the first cell as PCC(Primary component cell), put the second cell in scell_list as SCC. In this test, we want to establish carrier aggreation between inter RAT cells (i.e, between LTE and NR). For this, another parameter en_dc_scg_cell_list is configured.
In this configuration, the first LTE cell is mapped to rf_port 0 and configured as cell_id 0x01. This cell works as the LTE PCC, so the UE first attaches to this LTE cell.
The scell_list part is used for LTE carrier aggregation. Here, cell_id 0x02 is listed as the secondary LTE cell. This means the second LTE cell can be added as the SCC. Since cross_carrier_scheduling is set to false, the LTE SCC is scheduled by itself, not through cross-carrier scheduling from the PCC.
The additional important part in this test is en_dc_scg_cell_list. This is used for NSA NR addition. Here, cell_id 0x03 is listed, so the NR cell is configured as the candidate SCG cell for EN-DC operation.
So this configuration prepares two different additions. scell_list is for LTE CA, where the second LTE cell becomes the LTE SCC. en_dc_scg_cell_list is for NR NSA, where the NR cell is later added as the SCG cell. This is why the test can first establish LTE 2CC CA and then add NR as NSA on top of the LTE connection.
In case of using the secondcell as PCC(Primary component cell), put the first cell in scell_list as SCC. In this test, we want to establish carrier aggreation between inter RAT cells (i.e, between LTE and NR). For this, another parameter en_dc_scg_cell_list is configured.
In this configuration, the second LTE cell is mapped to rf_port 1 and configured as cell_id 0x02. This means the second LTE cell can work as the PCC when the UE attaches on this cell.
The scell_list part is used for LTE carrier aggregation. Here, cell_id 0x01 is listed as the SCC. So if the second LTE cell is used as the primary component carrier, the first LTE cell becomes the secondary component carrier for LTE CA.
cross_carrier_scheduling is set to false, so the LTE SCC is scheduled independently. This matches the earlier LTE CA behavior where each carrier sends its own scheduling information.
The additional part for this test is en_dc_scg_cell_list. Here, cell_id 0x03 is configured as the NR SCG cell. This means that after LTE connection and LTE CA are established, the NR cell can be added as the NSA secondary cell group.
So this configuration prepares both parts of the test. The LTE part uses scell_list to establish 2CC LTE CA, and the NR NSA part uses en_dc_scg_cell_list to add the NR cell as SCG.

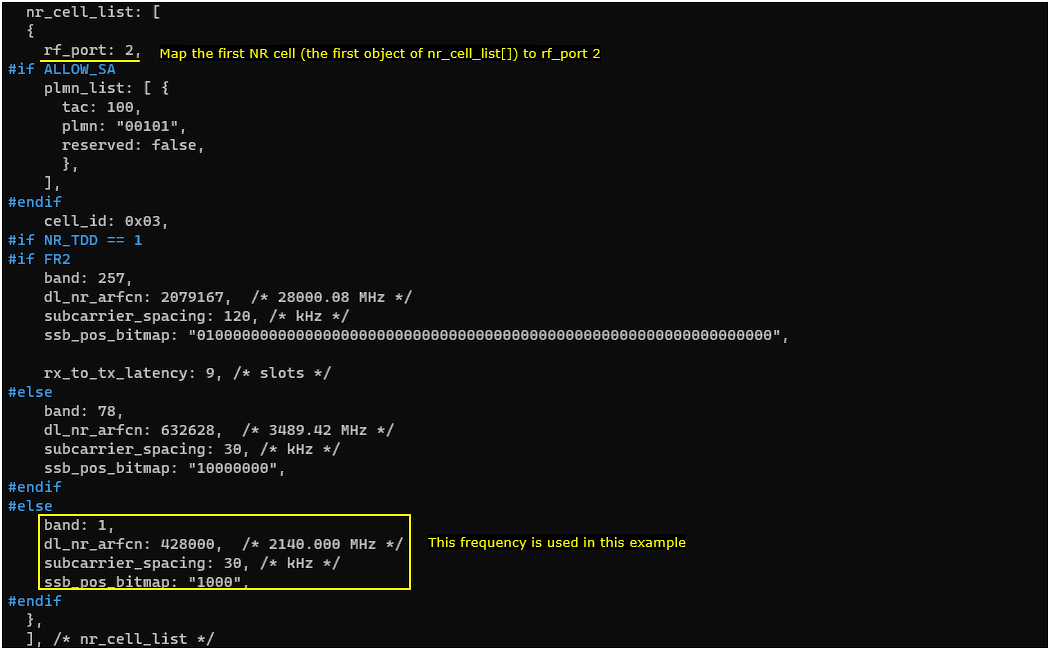
Now comes with NR configuration. In this test, NR will be used only as SCC (Secondary Component Carrier) in CA. So just basic setup will be configured without any secondary cell information.
This part defines the NR cell that will be used for NSA operation.
The NR cell is configured in nr_cell_list and mapped to rf_port 2. This means the first NR cell in the NR cell list uses RF port 2. Its cell_id is 0x03, which matches the NR cell referenced earlier in en_dc_scg_cell_list.
In this test, the NR cell is not configured as a standalone serving cell for initial access. It is prepared as the NR SCG cell that will be added later through NSA signaling after LTE attach and LTE CA are already established.
Since FR2 is not used here, the FR1 configuration branch is applied. The highlighted part shows band 1, dl_nr_arfcn 428000, and subcarrier_spacing 30 kHz. The inline comment says this corresponds to 2140 MHz, which is the NR frequency used in this example.
ssb_pos_bitmap is set to 1000, which defines the SSB position used by this NR cell. So this section provides the basic NR carrier information needed for the UE to detect and measure the NR neighbor cell before it is added as the NSA SCG cell.
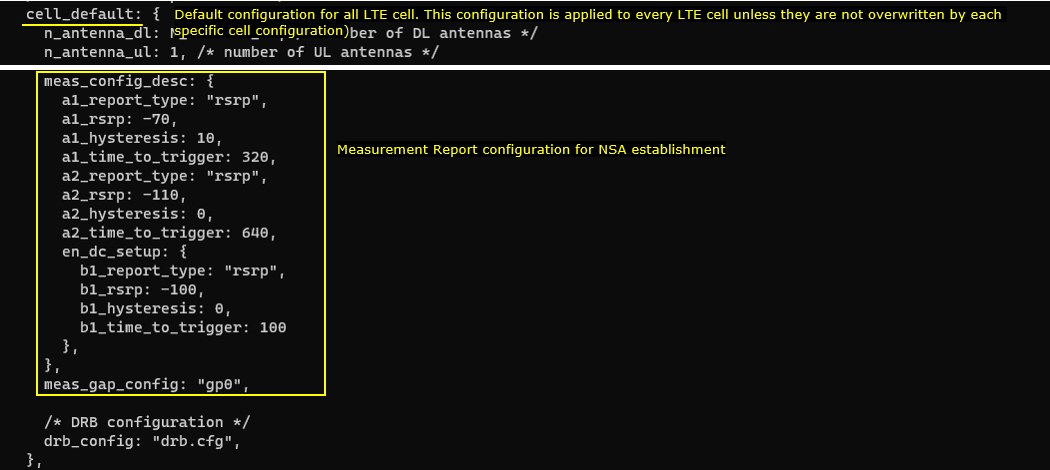
Since this test will be done based on measurement report, you need to configure meas_config_desc.
This section defines the measurement conditions that the eNB sends to the UE. The UE uses these conditions to decide when to send a measurement report. Without this report, the network will not know when to add the NR cell as the NSA SCG cell.
The LTE-related A1 and A2 events are configured first. These are based on RSRP and are used to control LTE measurement behavior. The values define the threshold, hysteresis, and time-to-trigger.
The important part for NSA is en_dc_setup. This part configures the measurement condition for adding the NR cell. Here, B1 measurement is configured with b1_report_type set to rsrp and b1_rsrp set to -100. This means the UE should report when the NR neighbor cell becomes better than the configured RSRP threshold.
b1_time_to_trigger is set to 100, so the condition should remain satisfied for 100 ms before the UE sends the report. This avoids triggering NSA addition from a very short or unstable measurement condition.
meas_gap_config is set to gp0. This is important because the UE may need measurement gaps to measure the NR frequency while staying connected to LTE. So this configuration prepares the UE to measure the NR neighbor cell and trigger NSA SCG addition based on the measurement report.
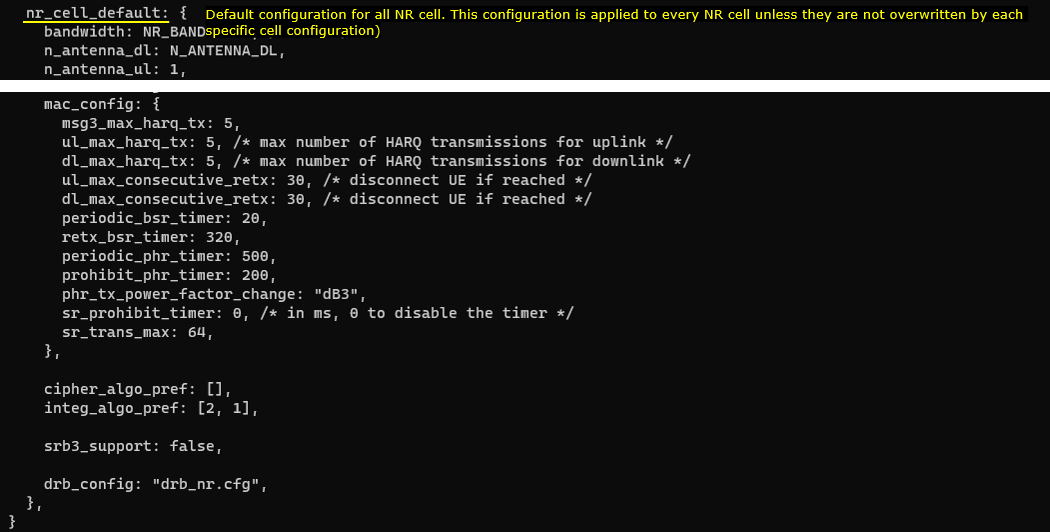
This section defines the default configuration for all NR cells.
nr_cell_default is applied to every NR cell unless a specific NR cell overrides the setting. Here, bandwidth is taken from NR_BANDWIDTH, downlink antenna count is taken from N_ANTENNA_DL, and uplink antenna count is set to 1.
The mac_config section defines basic NR MAC behavior after the NR cell is added as NSA SCG. It includes HARQ retry limits for uplink and downlink, disconnect conditions, BSR timer, PHR timer, and scheduling request parameters.
The important point is that this is not where the NR cell is added to the UE. The actual NSA addition is triggered later by LTE RRC signaling after the UE sends the NR measurement report. This section only prepares the default NR cell behavior once the NR SCG becomes active.
drb_config is set to drb_nr.cfg, meaning the NR side uses a separate DRB configuration file for NSA data bearer handling. This is needed because once NR is added as SCG, user-plane traffic may be split or moved through the NR bearer depending on the bearer configuration.
Perform the Test
Check out the result of "cell phy" command and make it sure that the number of cells and other cell parameters (e.g, BAND, BW, ARFCN etc) are configured as expected.
The cell phy command is used first to confirm that all LTE and NR cells are created correctly.
In this result, there are three cells. Cell 0x001 is LTE Band 3 with 20 MHz bandwidth and downlink ARFCN 1575. Cell 0x002 is also LTE Band 3 with 20 MHz bandwidth and downlink ARFCN 1673. These are the two LTE FDD cells used for LTE carrier aggregation.
Cell 0x003 is the NR cell. It is configured as NR Band n1 with downlink NR ARFCN 428000, 30 kHz subcarrier spacing, and 20 MHz bandwidth. This matches the NR cell that will later be added as the NSA SCG cell.
The cell command gives another summary view. It shows the LTE physical cell IDs and PRACH root sequence indexes, and it also shows the NR cell with PCI 500. So this output confirms that the Call Box has started the expected three-cell setup: two LTE cells for 2CC CA and one NR cell for NSA addition.


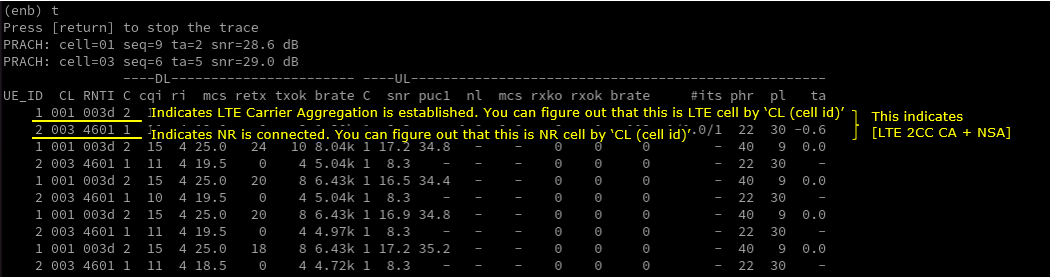
Make it sure that all the cells configured Carrier Aggregation are connected.
This trace is used to confirm both LTE carrier aggregation and NR NSA connection.
The important column is C. For the LTE cell, C is shown as 2. This means the UE is connected with two LTE component carriers, so LTE 2CC carrier aggregation is established.
You also see another entry with cell ID 003. This indicates that the NR cell is connected. Since this test is NSA, the NR cell is not the initial serving cell. It is added later as the NR SCG cell after LTE connection and measurement-based NR addition.
So the alternating values in the trace are expected. The LTE side shows C = 2, which confirms LTE CA. The entry with cell ID 003 confirms that NR is also connected in NSA mode. Together, this indicates that the final target state is reached: LTE 2CC CA plus NR NSA.
Log Analysis
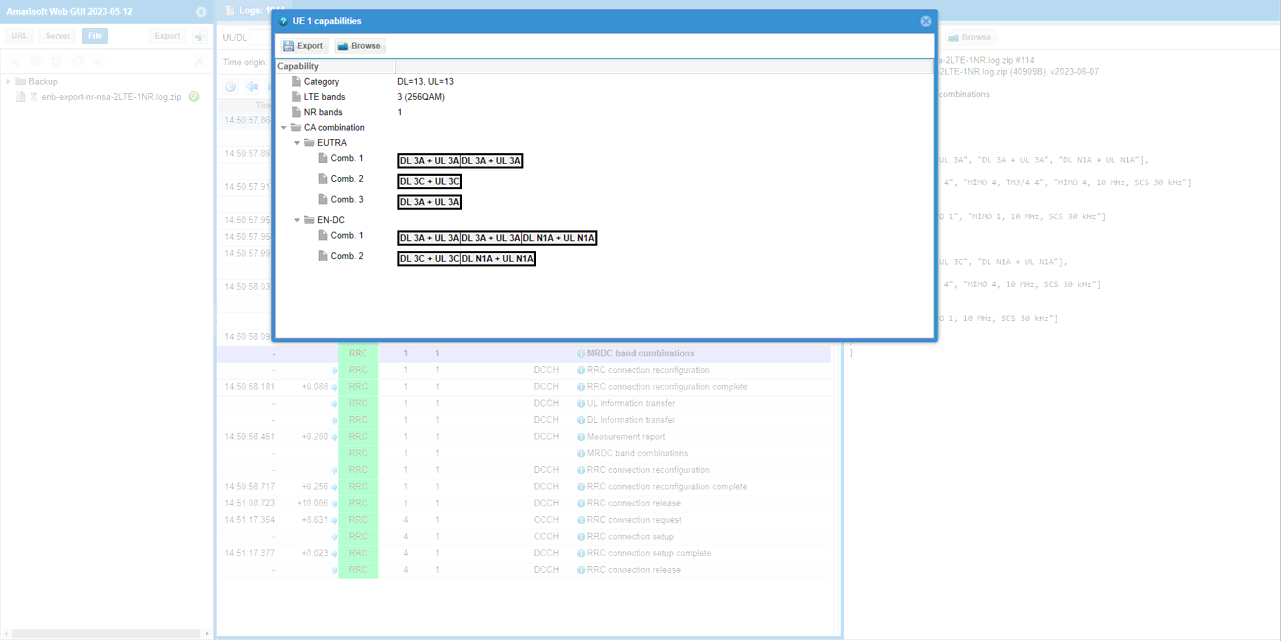
In log analysis, the first thing to check is the UE capability. This is important because the network should add LTE CA and NR NSA only when the UE supports the required band combination.
In the UE capability window, the UE category is shown as DL 13 and UL 13. The LTE band list includes Band 3, and the NR band list includes n1. This matches the test scenario where LTE is used as the anchor and NR n1 is added later as NSA.
The CA combination section shows the LTE carrier aggregation combinations. This confirms whether the UE can support the LTE 2CC CA part of the test.
The EN-DC section is more important for this tutorial. It shows combinations such as LTE Band 3 with NR Band n1. This means the UE supports LTE-NR dual connectivity using the same LTE and NR bands configured in the Call Box.
So this screen confirms that the UE capability matches the intended setup. The UE can support LTE carrier aggregation and can also support NR n1 as an NSA SCG cell. This is the basic requirement before expecting the later RRC reconfiguration to add LTE SCC and NR SCG successfully.
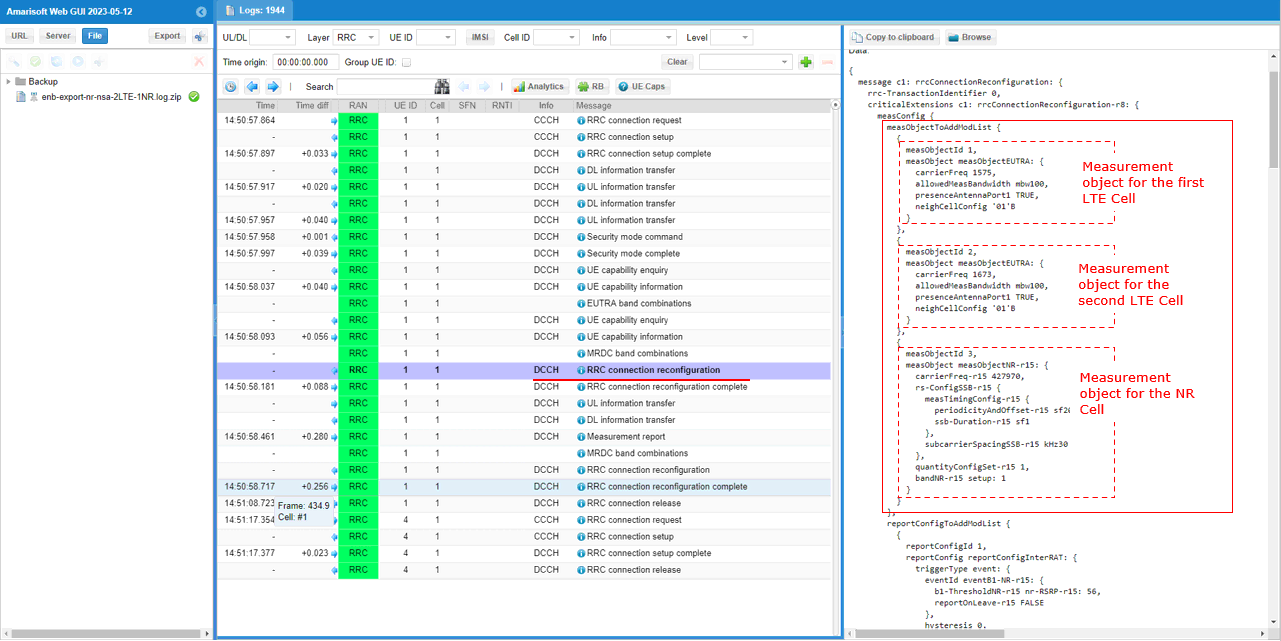
Since this test is measurement-based, the first RRC Connection Reconfiguration should include measConfig. This tells the UE what LTE and NR cells it has to measure before the network adds more carriers.
In the highlighted measObjectToAddModList, measObjectId 1 is for the first LTE cell. It uses carrierFreq 1575, which matches the LTE serving carrier. measObjectId 2 is for the second LTE cell. It uses carrierFreq 1673, which is the LTE neighbor carrier used for LTE CA.
The third measurement object is for NR. measObjectId 3 uses measObjectNR-r15 with carrierFreq-r15 427970. This is the NR frequency that the UE should measure before NSA addition.
So this RRC message prepares the UE for both steps of the test. First, it can measure the second LTE cell for LTE 2CC CA. Then it can measure the NR cell for EN-DC NSA setup. Without these measurement objects, the UE would not know which target LTE and NR carriers should be reported to the eNB.
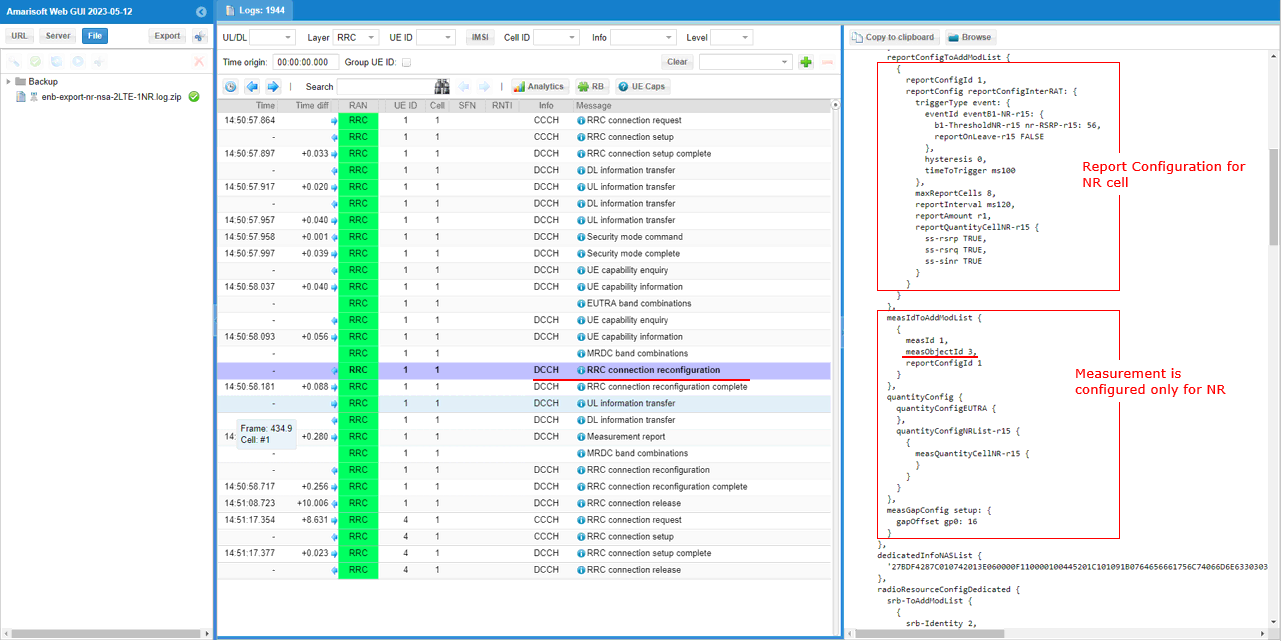
In this part, you check whether the measurement event and the measurement object are properly linked.
The highlighted reportConfigToAddModList defines the reporting condition for the NR cell. Here, reportConfigId 1 is configured with event B1. Event B1 means the inter-RAT neighbor cell becomes better than the configured threshold. Since this is for NR NSA addition, the inter-RAT neighbor cell is the NR cell.
The b1-ThresholdNR-r15 value defines the NR RSRP threshold used to trigger the report. timeToTrigger is set to ms100, so the NR measurement condition should remain valid for 100 ms before the UE sends the report. This helps avoid triggering NSA addition from a short unstable measurement.
The highlighted measIdToAddModList is also important. It links measObjectId 3 with reportConfigId 1. measObjectId 3 is the NR measurement object, and reportConfigId 1 is the NR B1 report condition. So this tells the UE to apply the B1 event condition to the configured NR cell.
So this RRC Connection Reconfiguration is not only giving the NR frequency to measure. It also tells the UE when to report that NR cell. Once this report is sent, the eNB can use it as the trigger to add NR as the NSA SCG cell.
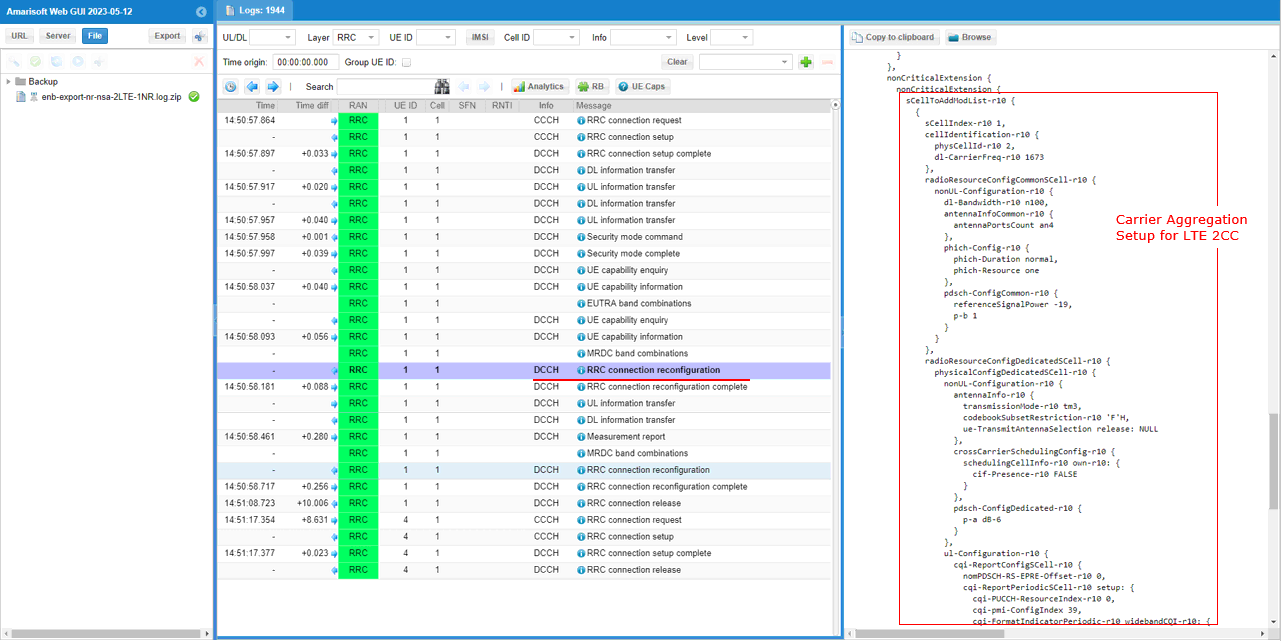
In this step, the eNB establishes LTE carrier aggregation by sending RRC Connection Reconfiguration.
The important IE is sCellToAddModList-r10. This is where the target LTE cell is added as the secondary component carrier. In this example, sCellIndex-r10 is set to 1, and the target LTE cell is identified with physCellId 2 and dl-CarrierFreq-r10 1673.
This means the UE already has the first LTE cell as the PCC, and now the eNB adds the second LTE cell as the SCC. The radioResourceConfigCommonSCell-r10 and radioResourceConfigDedicatedSCell-r10 sections provide the common and dedicated radio parameters needed to operate on this secondary cell.
So this RRC message is the LTE CA setup point. After this message is applied, the UE can operate with two LTE component carriers before the NR cell is added later as the NSA SCG cell.
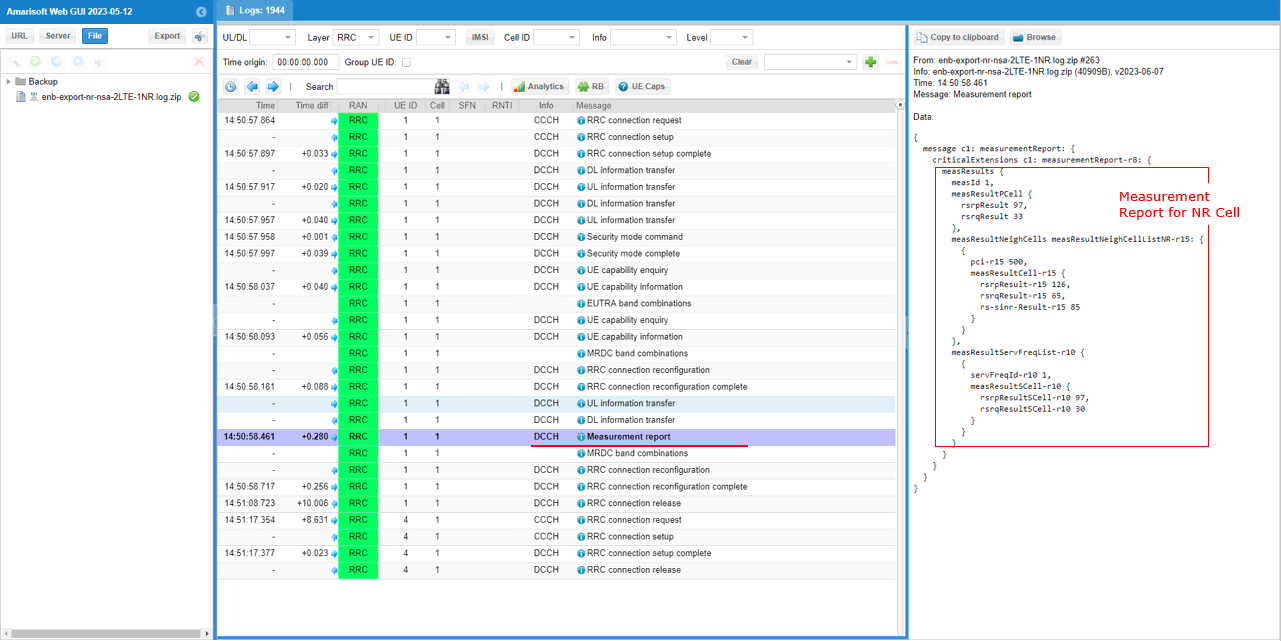
After LTE CA is established, the next step is to wait for the UE Measurement Report for the NR cell.
In this message, measResultPCell shows the measurement result of the current LTE serving cell. The important part is measResultNeighCells. Here, measResultNeighCellListNR-r15 is included, which means the UE is reporting an NR neighbor cell.
The reported NR cell is identified with pci-r15 500. This matches the configured NR cell in this test. The message also includes NR measurement results such as rsrpResult-r15, rsrqResult-r15, and sinr-Result-r15.
This Measurement Report is the trigger for NSA addition. Once the eNB receives this report and confirms that the NR cell satisfies the configured B1 condition, it can proceed with the next RRC Connection Reconfiguration to add the NR cell as the SCG cell.
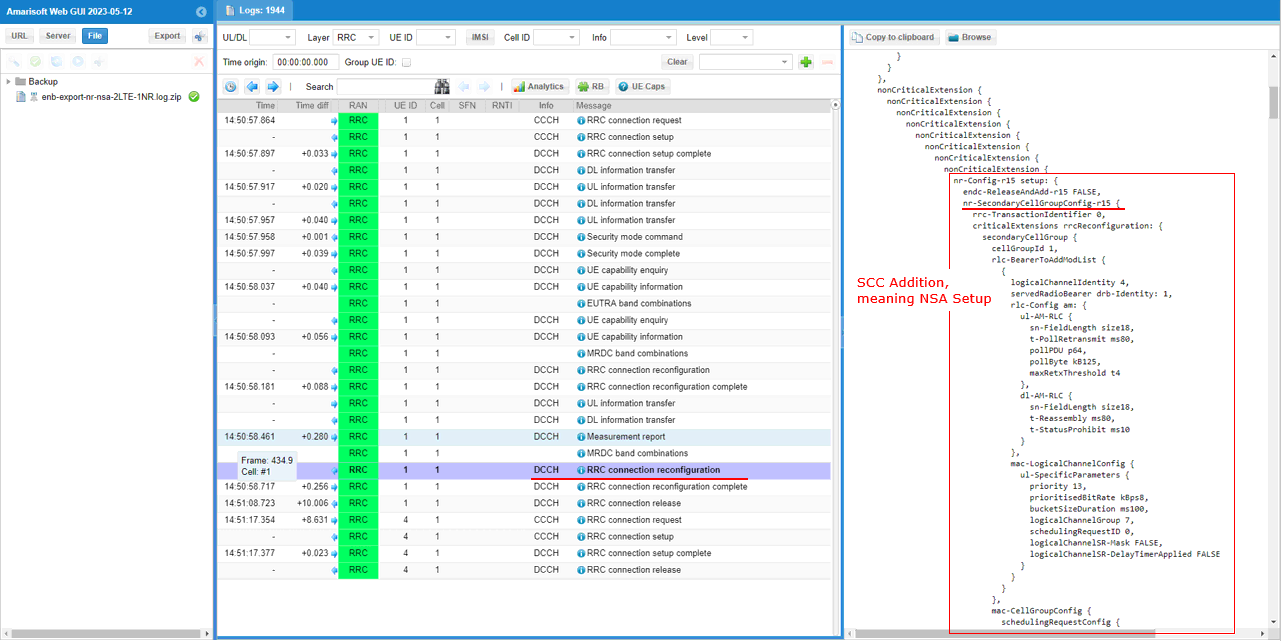
After the NR Measurement Report is received, the eNB sends another RRC Connection Reconfiguration to add the NR cell in NSA mode.
The important IE is nr-SecondaryCellGroupConfig. This carries the NR SCG configuration. In LTE NSA, the LTE cell remains the master side, and the NR cell is added as the secondary cell group. So this IE is the key indication that NSA setup is being performed.
Inside this configuration, you can see secondaryCellGroup and related NR radio configuration. This provides the UE with the NR cell group information, radio bearer configuration, and lower-layer parameters needed to start using the NR cell.
So the flow is clear here. First, LTE CA is established between two LTE cells. Then the UE reports the measured NR neighbor cell. After that, the eNB adds NR through nr-SecondaryCellGroupConfig. This confirms that the NR cell is being added as NSA SCG, not as a standalone NR cell.
Test 5: 2CC CA (TDD-TDD)- with Measurement
This test is to show how to configure a carrier aggregation between two LTE cells. In this test, carrier aggregation will be triggeredonly whenthe measurement report from UE is recieved.
This test configures 2cells as follows.
- 2 LTE TDD Cells
It performs following procedure
Step 1 : Initial Attach to LTE
Step 2 : Perform Measurement to LTE neighbour cell for SCC detection
Step 3: Establish 2CC CA in LTE
Configuration
In this testI used the enb-48A-48A-20-20-NonContiguous.cfg which is copied and modified from enb-2cc.cfg
If you use other Network (e.g, other network simulator or real network), you have to make it sure to configure UE sim according to the settings on network side
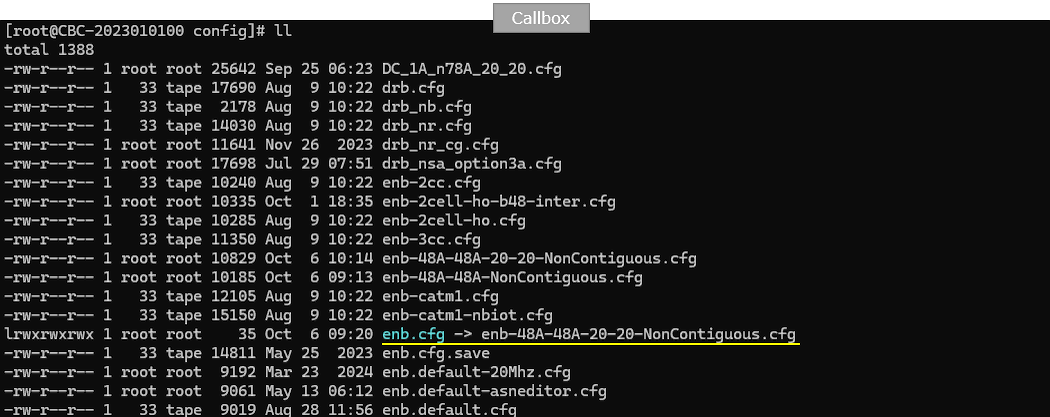
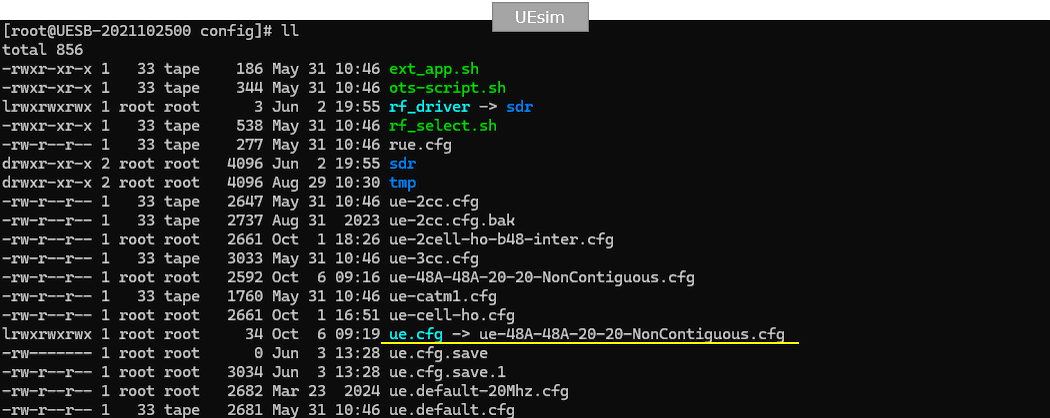
In this test, UEsim is used as a DUT. The configuration for UEsim is ue-48A-48A-20-20-NonContiguous.cfg which is copied and modified from ue-2cc.cfg (
Followings are the configurations in enb-2cc-meas.cfg
The first thing to notice is that the number of cells (N_CELL) is set to greater than 1 since this is a type of multi cell scenario.
In this configuration, N_CELL is set to 2. This means the Call Box creates two LTE cells, which is required for the 2CC carrier aggregation test.
The important change for this tutorial is TDD = 1. This sets the LTE cells to TDD mode. So unlike the previous FDD-FDD test, both component carriers use time-division duplexing.
N_RB_DL is set to 100, which means each LTE carrier uses 100 resource blocks. This corresponds to 20 MHz bandwidth. So this test is configured as 2CC LTE TDD CA with two 20 MHz carriers.
N_ANTENNA_DL and N_ANTENNA_UL are both set to 1, so this is a SISO-based CA test. CHANNEL_SIM is set to 0, so the channel simulator is disabled. CQI_CONFIG is set to 1, meaning aperiodic CQI is used.
So this section prepares the basic TDD CA environment: two LTE TDD cells, each with 20 MHz bandwidth, using simple SISO antenna configuration.

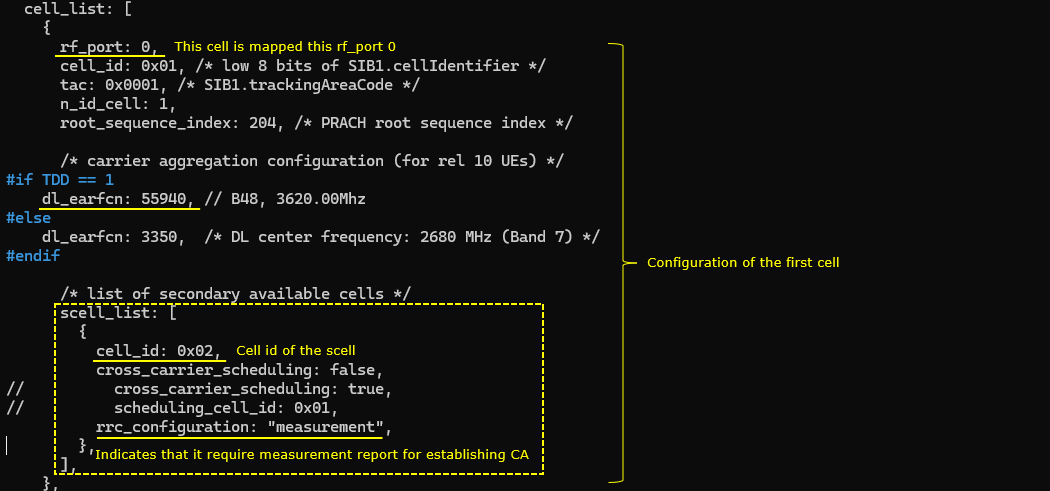
In carrier aggregation, you need to add the parameter scell_list and put the cell information for SCC(Secondary Component Cell) in the configuration.
In this configuration, the first LTE TDD cell is used as the PCC. It is mapped to rf_port 0 and configured with cell_id 0x01. Since TDD is set to 1, the TDD branch is used, so dl_earfcn is set to 55940. The inline comment indicates this is Band 48 at 3620 MHz.
The CA-related part is scell_list. Here, cell_id 0x02 is listed as the secondary available cell. This means the second LTE TDD cell can be added later as the SCC for carrier aggregation.
cross_carrier_scheduling is set to false, so each TDD carrier schedules itself independently. The commented-out configuration shows the alternative case where cross-carrier scheduling is enabled and the scheduling cell is cell_id 0x01.
The key setting for this test is rrc_configuration: measurement. This means the SCC is not added immediately. The eNB waits for the UE measurement report first. Once the expected report is received, the eNB sends RRC Connection Reconfiguration and adds cell_id 0x02 as the secondary component carrier.
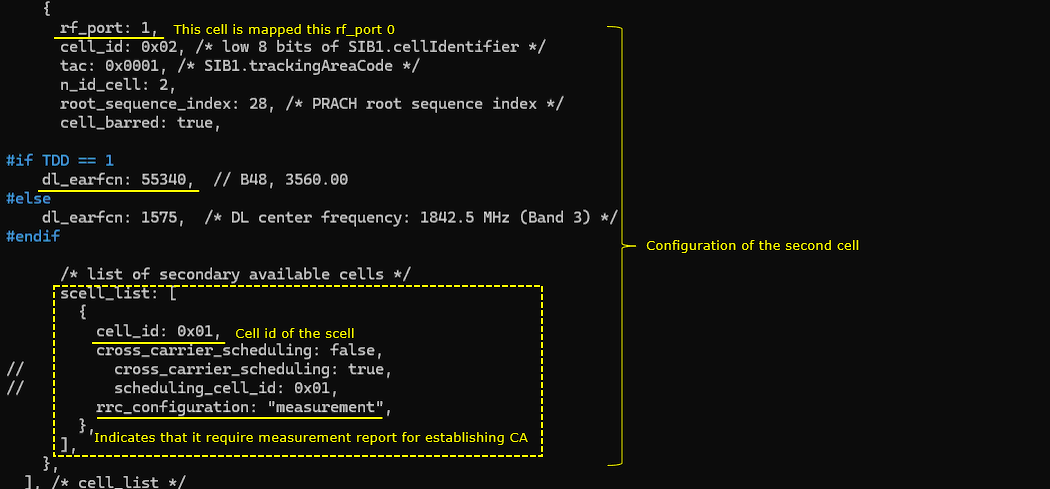
In case of using the second LTEcell as PCC(Primary component cell), put the first LTEcell in scell_list as SCC.
In this configuration, the second LTE TDD cell is used as the PCC. It is mapped to rf_port 1 and configured with cell_id 0x02. Since TDD is set to 1, the TDD branch is used, so dl_earfcn is set to 55340. The inline comment indicates this is Band 48 at 3560 MHz.
The scell_list defines the secondary cell candidate for carrier aggregation. Here, cell_id 0x01 is listed as the SCC. This means if the UE attaches to the second cell as the primary cell, the first LTE TDD cell can be added later as the secondary component carrier.
cross_carrier_scheduling is set to false, so the secondary cell is not scheduled through the primary cell. Each carrier performs its own scheduling. The commented-out lines show the alternative cross-carrier scheduling case.
The important setting is rrc_configuration: measurement. This means the SCC is added only after the expected UE measurement report is received. So the second cell acts as the PCC first, then the UE measures the first cell, reports it, and finally the eNB adds cell_id 0x01 as the SCC for TDD carrier aggregation.
Since this is a TDD carrier aggregation test, the cell default configuration includes TDD-specific parameters.
uldl_config and sp_config define the LTE TDD frame structure. uldl_config controls the uplink and downlink subframe pattern, and sp_config controls the special subframe configuration. These settings are important because both TDD component carriers should have compatible timing for CA operation.
The other important setting is tdd_ack_nack_feedback_mode_r10. This controls how HARQ ACK/NACK feedback is handled for Release 10 TDD carrier aggregation UE.
In this example, tdd_ack_nack_feedback_mode_r10 is set to cs. This means channel selection mode is used for TDD ACK/NACK feedback. The commented alternatives show bundling and multiplexing. This setting matters because, in TDD CA, one UE may need to send feedback for multiple downlink transmissions across multiple component carriers, and the eNB and UE must use the same feedback mode.

Since this is measurement-based TDD carrier aggregation, meas_config_desc is required to define when the UE should send a measurement report.
The general A1, A2, and A3 measurement settings are configured first. These define RSRP-based reporting conditions for LTE measurement. In this tutorial, the threshold values are set in a way that makes the UE report easily during the test.
The most important part is scell_config. This section defines the measurement condition used for SCC addition. In this example, A2 and A4 events are configured. A4 is especially important because it can be used when the neighbor cell becomes good enough to be added as the secondary component carrier.
a4_rsrp is set to -100, with zero hysteresis and zero time-to-trigger. This makes the SCC measurement report easy to trigger. Once the eNB receives this report, it can send RRC Connection Reconfiguration with sCellToAddModList and establish TDD carrier aggregation.
meas_gap_config is set to gp0. This enables measurement gaps, so the UE can measure the neighbor TDD carrier while staying connected to the serving LTE cell.
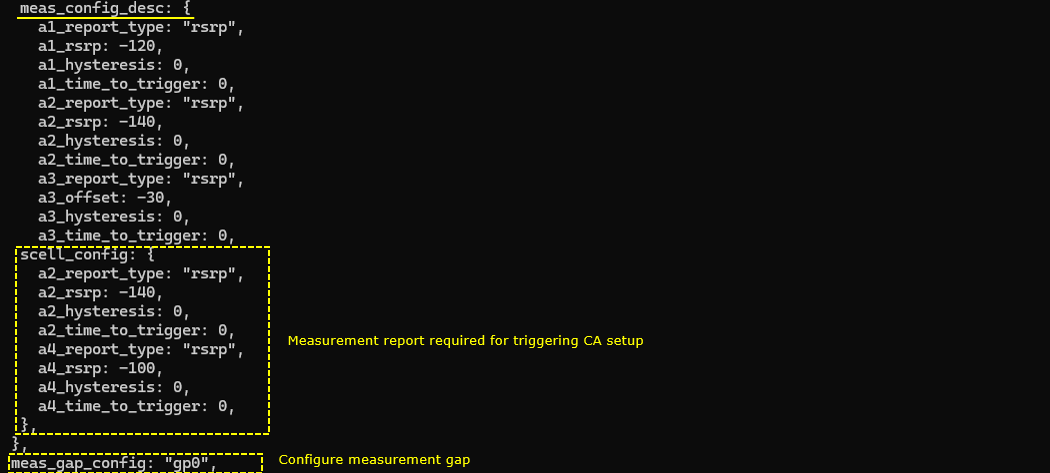
This setting is not mandatory for TDD carrier aggregation itself. It is mainly used to keep the UE connected long enough during the test.
inactivity_timer is set to 60000 ms, so the eNB waits for 60 seconds before releasing the RRC connection because of inactivity.
This is useful in measurement-based CA because the SCC is added only after the UE sends the expected measurement report. If the timer is too short, the eNB may release the RRC connection before the UE completes measurement reporting and before the SCC is added.
So this timer extension gives enough time for the UE to stay connected, measure the neighbor TDD cell, send the measurement report, and receive the RRC Connection Reconfiguration for SCC addition.
Now let's look into the configurations on UEsim (
The first thing to notice is that the number of cells (N_CELL) is set to greater than 1 since this is a type of multi cell scenario.
For UEsim, N_CELL is set to 2. This should match the Call Box side because the test uses two LTE TDD cells for carrier aggregation.
TDD is set to 1, so UEsim also operates in TDD mode. This must match the eNB configuration. If the Call Box is configured as TDD but UEsim is configured as FDD, the UE will not properly detect or attach to the cells.
CELL_BANDWIDTH is set to 20, meaning each LTE cell uses 20 MHz bandwidth. N_ANTENNA_DL and N_ANTENNA_UL are both set to 1, so the simulated UE uses SISO for both downlink and uplink.
UE_COUNT is set to 1, so only one simulated UE is used in this test. This keeps the TDD CA procedure simple and makes it easier to check measurement reporting and SCC addition.

Configure band and frequency (dl_earfcn) to match the band/frequency of eNB(Callbox). In the UEsim cell configuration, the band and frequency should match the Call Box configuration.
Since this test uses TDD mode, the TDD branch is applied. The first UEsim cell uses dl_earfcn 55940, which corresponds to Band 48 at 3620 MHz. This should match the first LTE TDD cell configured on the Call Box side.
The second UEsim cell uses dl_earfcn 55340, which also belongs to Band 48 and corresponds to 3560 MHz. This should match the second LTE TDD cell on the Call Box side.
CELL_BANDWIDTH is used for both cells, so the UEsim bandwidth follows the common bandwidth setting. The antenna settings also follow N_ANTENNA_DL and N_ANTENNA_UL, so they remain aligned with the SISO configuration.

Configure UE specific configuration (ue_list). In this tutorial, I am just using the default configuration. Make it sure that as_release (ASN release) and ue_category is configured to support capability that is required for the test.
In this tutorial, most UE settings are left as default, but as_release and ue_category should be checked carefully because they control what LTE capability the simulated UE reports to the eNB.
as_release is set to 13, so the UE reports LTE Release 13 capability. ue_category is set to 12, which gives the UE enough capability level for carrier aggregation testing.
This is important because the eNB decides whether it can configure CA based on the UE Capability Information message. If as_release or ue_category is too low, the UE may not report the CA capability needed for this test, and the eNB may not add the SCC even if the cell configuration is correct.
So this section is not configuring the radio carrier directly. It controls the UE capability profile used by UEsim, which must be high enough to support the intended TDD carrier aggregation scenario.

Perform the Test
Check out the result of "cell phy" command and make it sure that the number of cells and other cell parameters (e.g, BAND, BW, ARFCN etc) are configured as expected.
In this result, two LTE cells are shown. Cell 0x001 is configured as LTE Band 48 with 20 MHz bandwidth and ARFCN 55940. Cell 0x002 is also LTE Band 48 with 20 MHz bandwidth and ARFCN 55340.
Since this is TDD, the same ARFCN is shown on both DL and UL side for each cell. This is different from FDD, where DL and UL use different paired frequencies.
Both cells use one downlink antenna and one uplink antenna, so the test is running as SISO. This matches the basic TDD CA configuration.
So this output confirms that the two LTE TDD carriers are correctly configured at PHY level. At this point, it confirms the cell setup only. The actual CA establishment should be checked later by measurement report, sCellToAddModList, and the C value in the trace.

If you want the UE to attach to a specific LTE TDD cell first, you can adjust the cell power so that the UE selects the intended cell during cell selection.
In this example, the command cell_gain 2 -60 reduces the power of cell 2. By making cell 2 much weaker, the UE is more likely to camp on cell 1 and use it as the initial serving cell.
This is useful in CA testing because the first attached cell becomes the PCC. If the UE camps on the wrong cell, the PCC and SCC relationship may become different from what you intended in the tutorial.
So this command is not directly configuring carrier aggregation. It is a practical control method to guide UE cell selection before the CA procedure starts.

NOTE : you may not always see the print for CC=1 because the print shown here is a sampled / averaged. You may take it as success as long as you see the print for CC = 2.
This trace shows the UE state before carrier aggregation is established.
The important column is C. Here, C is shown as 1, meaning the UE is currently connected with only one component carrier. So at this moment, the SCC has not been added yet.
This is expected at the early stage of the test. The UE first attaches to the primary LTE TDD cell, then it performs measurement on the neighbor cell. After the expected measurement report is received, the eNB can add the SCC and the C value should become 2.
You may not always see this C = 1 state because the trace output is sampled or averaged. If the procedure moves quickly, the trace may already show C = 2 when you check it. In that case, C = 2 is enough to confirm successful CA establishment.

After the initial attach is complete and the UE is still in RRC connected state, the SCC cell power is increased.
The command cell_gain 2 -20 changes the gain of cell 2. In this test, cell 2 is the target SCC. By increasing its power, the UE can measure the SCC with better RSRP and satisfy the configured measurement condition.
This is important because the TDD CA setup is measurement-triggered. The eNB will not add the SCC only because it exists in the configuration. The UE must first report that the target cell is good enough.
So this command is used to force or help the measurement condition. After the UE detects the stronger SCC and sends the measurement report, the eNB can proceed with RRC Connection Reconfiguration and add the SCC for carrier aggregation.
You may need to keep the UE connected long enough while doing this. This can be done by using a longer inactivity_timer or by generating continuous traffic such as ping.

This trace shows the UE state after the SCC measurement condition is satisfied.
The important column is C. Here, C is shown as 2, meaning the UE is now connected with two component carriers. This indicates that the SCC has been successfully added and carrier aggregation is established.
In this measurement-based TDD CA test, this happens only after the UE measures the target SCC, sends the expected measurement report, and the eNB adds the SCC through RRC Connection Reconfiguration.
So the change from C = 1 to C = 2 is the simplest confirmation. C = 1 means before CA establishment, and C = 2 means the UE is now operating with 2CC LTE TDD carrier aggregation.

Log Analysis (eNB)
In this section, you will see how to confirm if UE registration is complete from trace log. You can use the same method to find any issues (e.g, registration failure) for troubleshooting. When UE registration fails, you may use this tutorial to figure out the point of the failure and troubleshoot
First check the UE capability enquiry and UE capability Information and see if UE declare the capability that is required for the test.
In this test, the eNB sends UE Capability Enquiry to ask the UE for LTE capability related to Band 48. This matches the TDD CA configuration, where both LTE cells are configured on Band 48.
The highlighted requestedFrequencyBands-r11 value shows 48. This means the network is specifically asking the UE to report capability for LTE Band 48.
This step is important because TDD carrier aggregation can be configured only when the UE declares support for the required band and CA combination. If the UE does not report the expected Band 48 CA capability in UE Capability Information, the eNB may not proceed with SCC addition even if the cell configuration itself is correct.

UE Capability Information can be checked directly in the RRC message, but it is usually easier to use the UE Caps button in Amarisoft Web GUI.
In this view, the CA combination is displayed in a compact table. For this TDD CA test, the important entries are the Band 48 combinations.
The shown combinations include DL 48A + UL 48A, DL 48C + UL 48, and DL 48A + UL 48A. This means the UE reports support for Band 48 carrier aggregation, including both downlink and uplink capability information.
This check is important before analyzing SCC addition. If the required Band 48 CA combination is not shown here, the eNB may not configure 2CC CA even if both TDD cells are running correctly. So this UE Caps window is a quick way to confirm that the UE capability matches the intended TDD carrier aggregation test.

This test is for Carrier Aggregation based on Measurement. So check outeNB configure Measurement Report condition(measConfig) in RRC connection reconfiguration.
Since this test is measurement-based carrier aggregation, the eNB first sends RRC Connection Reconfiguration with measConfig.
The important part here is measObjectToAddModList. This defines which LTE cells the UE should measure.
measObjectId 1 is configured with carrierFreq 55940. This corresponds to the first LTE TDD cell. measObjectId 2 is configured with carrierFreq 55340. This corresponds to the second LTE TDD cell.
So the UE is given measurement objects for both TDD carriers. This is required because the eNB needs UE measurement feedback before adding the SCC. After the UE measures the target cell and sends the expected Measurement Report, the eNB can continue with SCC addition using sCellToAddModList.
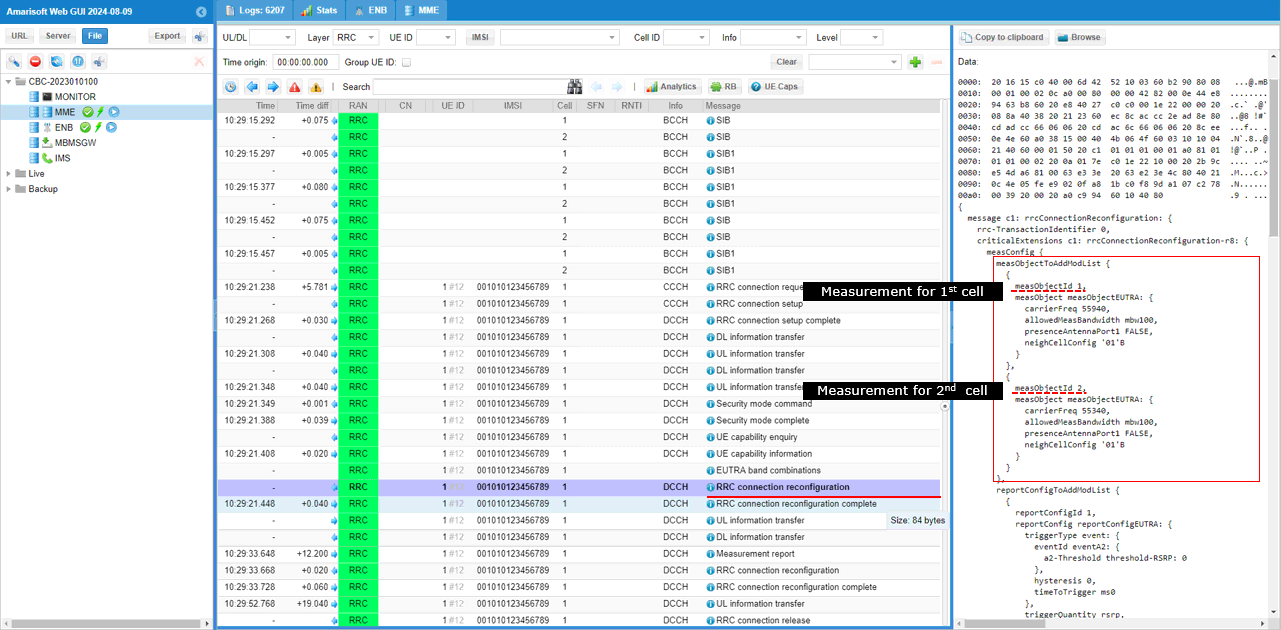
In this part, reportConfigToAddModList defines the measurement events used for the TDD CA trigger.
Event A2 is configured with reportConfigId 1. A2 means the serving cell becomes worse than the configured threshold. This can be used as part of the measurement condition setup.
Event A4 is configured with reportConfigId 2. A4 means the neighbor cell becomes better than the configured threshold. This is the more important event for SCC addition, because the eNB wants to know when the second TDD cell is good enough to be added as the secondary component carrier.
The measIdToAddModList connects the measurement object and the report configuration. Here, measId 1 links measObjectId 2 with reportConfigId 2. This means Event A4 is applied to the second LTE TDD cell.
So this RRC Connection Reconfiguration tells the UE to measure the second TDD cell and report it when it satisfies the A4 condition. Once the eNB receives that Measurement Report, it can add the second cell as the SCC for TDD carrier aggregation.

UE send measurement report. this is the trigger to add SCC. If eNB does not receive this message, SCC will not be added. Make it sure that the measurementReport carries the measurement of target cell with measResultNeighCells IE.
The important point is measId 1. This matches the earlier measIdToAddModList, where measObjectId 2 was linked with Event A4. So this report means the second LTE TDD cell has satisfied the A4 condition.
The message also includes measResultNeighCells. This is important because it carries the measurement result of the target neighbor cell. In this example, the reported neighbor cell has physCellId 2, which matches the intended SCC.
So if this Measurement Report is received, the eNB can proceed with SCC addition. If this message is not received, the eNB will not add the secondary component carrier, even if the SCC is already listed in the configuration file.

Once the expected Measurement Report is received, the eNB sends RRC Connection Reconfiguration to add the SCC.
The key IE is sCellToAddModList-r10. This is where the secondary component carrier is added to the UE configuration. In this example, sCellIndex-r10 is set to 1, and the target cell is identified with physCellId-r10 2 and dl-CarrierFreq-r10 55340.
This matches the second LTE TDD cell that was measured and reported earlier by the UE. So the eNB is now adding that measured cell as the SCC.
The message also includes the common and dedicated SCell radio configuration. For TDD CA, this is important because the SCC needs proper TDD-related configuration such as subframe assignment and special subframe pattern.
So this RRC Connection Reconfiguration confirms the SCC addition step. After this message is completed, the UE can operate with two LTE TDD component carriers.
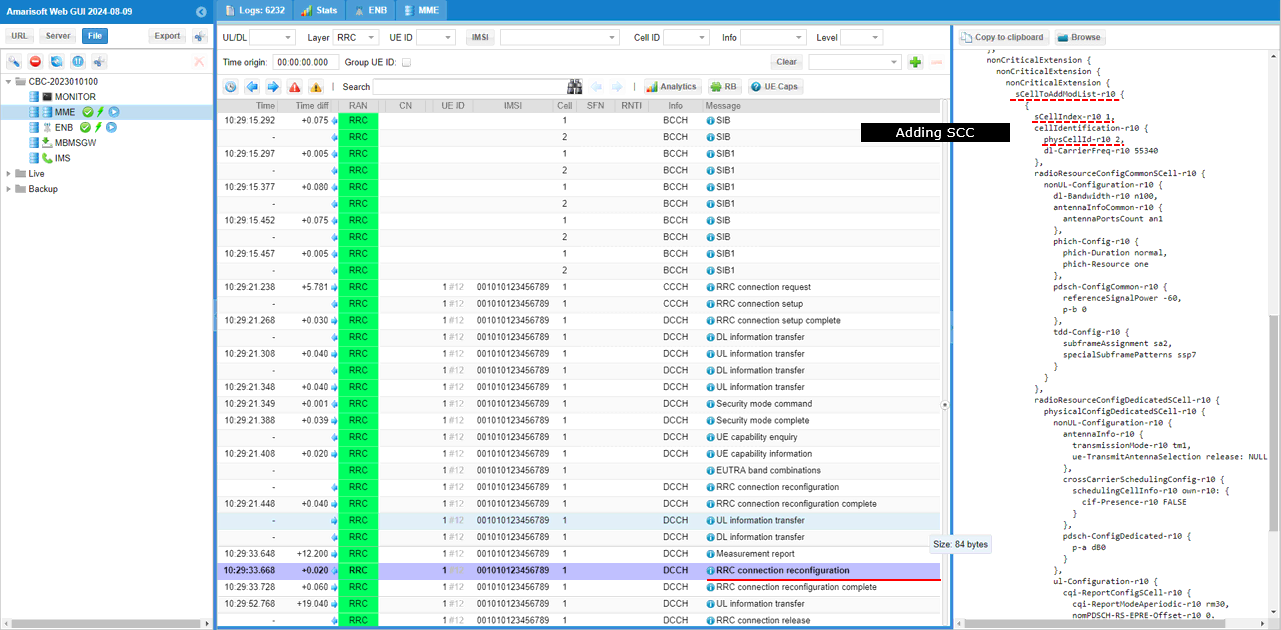
Finally, SCC activation can be confirmed from the MAC log.
After the SCC is added by RRC Connection Reconfiguration, the eNB activates it at MAC layer. In this log, the important print is enabling scell 1. This means SCell index 1 has been enabled for the UE.
So the procedure is complete at this point. The UE first reports the measured TDD neighbor cell, the eNB adds that cell in sCellToAddModList, and then MAC activates it with enabling scell 1.
Once this MAC activation is done, the SCC is not just configured in RRC anymore. It is active and can be used for actual TDD carrier aggregation scheduling.

Log Analysis (UEsim)
This section is for UEsim log analysis of the same TDD CA test.
For OTA signaling such as RRC and NAS, the UEsim log shows the same message flow as the eNB log. So the attach, measurement configuration, Measurement Report, RRC Connection Reconfiguration, and SCC addition can be checked in the same way.
The extra useful point in UEsim is UE-side measurement logging. This is supported by UEsim and helps you see how the simulated UE measures the serving cell and neighbor cell before sending the Measurement Report.
To enable this, open the Configure UE window and check the Cell meas option. This enables measurement logging. After this option is enabled, the UEsim log can show measurement-related events such as connected cell measurement refresh and measurement condition evaluation.
This is useful for troubleshooting measurement-based CA. If SCC is not added, you can check whether the UE is actually measuring the target cell and whether the measurement condition is being satisfied before looking only at the eNB-side RRC messages.

The Cell selection measurements log shows what the UE measured before the initial attach.
In this example, the UE sees two TDD cells. One cell has PCI 1 on ARFCN 55940, and the other cell has PCI 2 on ARFCN 55340.
The important value is RSRP. PCI 1 has much higher RSRP than PCI 2, while the other quality measurements are roughly similar. Because of this, the UE selects PCI 1 as the initial serving cell and starts the attach procedure on that cell.
This is useful in CA testing because the initially selected cell becomes the PCC. So by checking this log, you can confirm why the UE attached to a specific LTE TDD cell before SCC addition.

After the UE completes initial attach and enters connected mode, UEsim periodically performs Connected cell measurement refresh.
The first highlighted measurement shows the condition before the SCC power is increased. At this point, the target SCC is still too weak, so Event A4 is not satisfied. Because of this, UEsim does not send the measurement report yet.
After the SCC cell power is increased, the second and third measurements show that the target cell becomes strong enough. The RSRP of PCI 2 improves and the Event A4 condition is met.
Once Event A4 is detected, UEsim enters the reporting condition for measId 1 and sends the Measurement Report. In the decoded message, measResultNeighCells includes physCellId 2 with its RSRP and RSRQ result. This confirms that the UE reported the target SCC cell.
So this UEsim-side log is useful because it shows the internal measurement decision before the RRC message is sent. It explains why the SCC was not added at first, and why it was added after the SCC power became high enough.
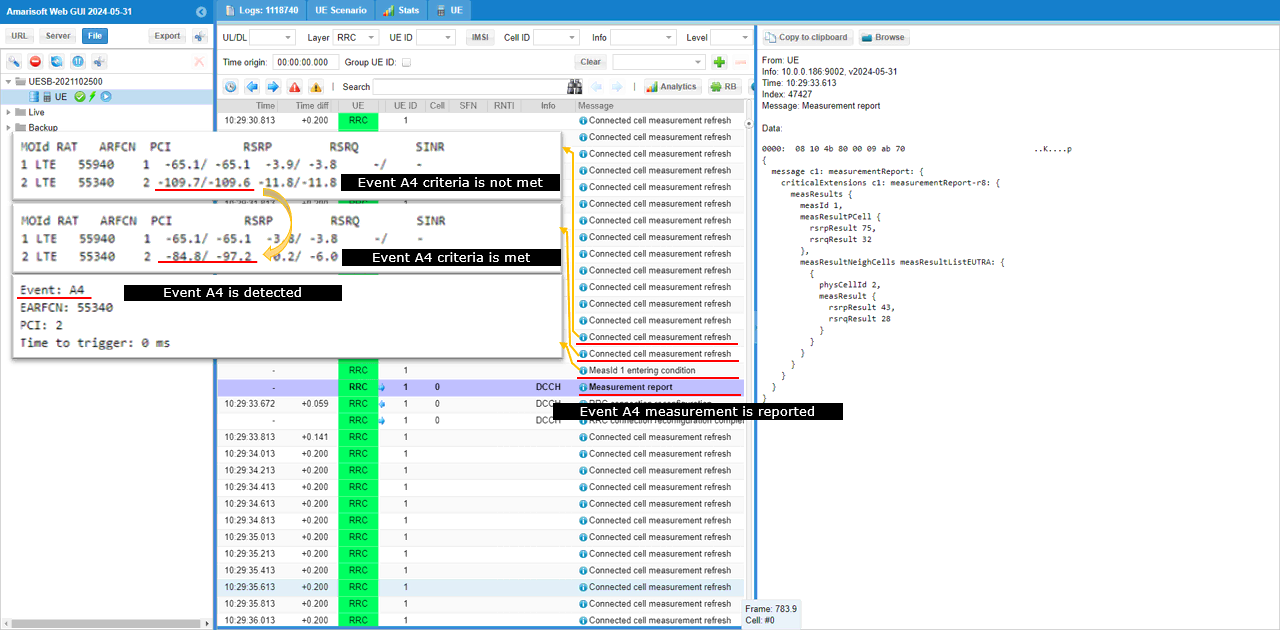
RRC / NAS Signaling
RrcConnectionReconfiguration
: This is the RrcConnectionReconfigurationmessage sent by eNB to configure Carrier Aggregation. (
{
message c1: rrcConnectionReconfiguration: {
rrc-TransactionIdentifier 0,
criticalExtensions c1: rrcConnectionReconfiguration-r8: {
dedicatedInfoNASList {
'...'H
},
radioResourceConfigDedicated {
srb-ToAddModList {
...
},
physicalConfigDedicated {
...
},
drb-ToAddModList-r15 {
...
}
},
nonCriticalExtension {
nonCriticalExtension {
nonCriticalExtension {
sCellToAddModList-r10 {
{
sCellIndex-r10 1,
cellIdentification-r10 {
physCellId-r10 2,
dl-CarrierFreq-r10 1575
},
radioResourceConfigCommonSCell-r10 {
nonUL-Configuration-r10 {
dl-Bandwidth-r10 n25,
antennaInfoCommon-r10 {
antennaPortsCount an1
},
phich-Config-r10 {
phich-Duration normal,
phich-Resource one
},
pdsch-ConfigCommon-r10 {
referenceSignalPower -18,
p-b 0
}
}
},
radioResourceConfigDedicatedSCell-r10 {
physicalConfigDedicatedSCell-r10 {
nonUL-Configuration-r10 {
antennaInfo-r10 {
transmissionMode-r10 tm1,
ue-TransmitAntennaSelection release: NULL
},
crossCarrierSchedulingConfig-r10 {
schedulingCellInfo-r10 own-r10: {
cif-Presence-r10 FALSE
}
},
pdsch-ConfigDedicated-r10 {
p-a dB0
}
},
ul-Configuration-r10 {
cqi-ReportConfigSCell-r10 {
cqi-ReportModeAperiodic-r10 rm20,
nomPDSCH-RS-EPRE-Offset-r10 0,
cqi-ReportPeriodicSCell-r10 release: NULL
}
},
cqi-ReportConfigSCell-v1250 {
altCQI-Table-r12 allSubframes
}
}
}
}
},
...
}
}
}
}
}
}
}
FAQ
[Q1] Why I see less PDSCH scheduling on SCC ?
[A1] there are various factors affecting the scheduling on SCC. Some of the typical factors are as follows.
- Available downlink data
- CSI Report type
- PUCCH format
I would not comment anything about "Available Downlink Data" here. I am assuming in this comment that DL data is available high enough to utilize the full SCC resources or force_dl_schedule is enabled.
Bascally when the eNB is expecting PUCCH format other than format 3, it doesnot schedule PDSCH on SCC. So what you can do to work around the underscheduling issue on SCC would be one of the followings :
- Use Aperiodic CQI report instead of Periodic CQI : In case of Aperiodic CQI, it is reported on PUSCH (not on PUCCH), so the limiting factors on PUCCH would not apply
- Use PUCCH format3 : "pucch3" as opposed to "cs" and enable simultaneousAckNackAndCQI
Followings are the list of configuration parameters that are related to this issue.