
NB IoT (standalone) -UEsim
The purpose of this tutorial is to show you how to do basic connectivity test between a UEsim and Amari Callbox with LTE NB in standaloneMode. NB IoT is designed to use the bandwidth 200khz which issingle LTE RB(180khz) plusa little bit of guardband. It can be deployed in a few different operationmode called Inband, Guardband, Standalone mode as illustrated below.
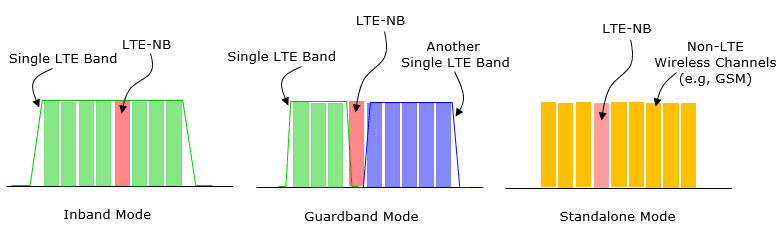
Source : Sharetechnote
On top of the operation mode, there are a few additional featuresdepending on operation mode.
- Inband Mode
- with Same PCI
- Non-Anchor Carrier Disabled
- Non-Anchor Carrier Enabled
- with Different PCI
- Guarband Mode
- Standalone Mode
This tutorial is based on the configuration for standalone mode.
Table of Contents
Introduction
Narrowband IoT (NB-IoT) is a specialized cellular technology within the LTE family, optimized for low-power, wide-area (LPWA) connectivity and addressing the requirements of massive Internet of Things (IoT) deployments. NB-IoT operates within a narrow bandwidth of 200 kHz, utilizing the equivalent of a single LTE resource block (180 kHz) with additional guard bands to minimize interference and optimize spectrum efficiency. This technology supports three main deployment modes: Inband (within existing LTE carriers), Guardband (using unused LTE spectrum), and Standalone (utilizing re-farmed GSM spectrum). Standalone mode is particularly significant for rural or remote deployments where dedicated spectrum is available, providing robust coverage and simple network architecture. The Amari Callbox, a comprehensive LTE test platform, together with a UEsim (User Equipment Simulator), enables detailed emulation and testing of NB-IoT connectivity scenarios, ensuring that devices and networks conform to the 3GPP NB-IoT specifications. Understanding the architectural differences, such as anchor versus non-anchor carriers and PCI (Physical Cell ID) configurations, is essential for effective deployment and troubleshooting. This tutorial focuses on performing a basic connectivity test between a UEsim and an Amari Callbox configured for LTE NB-IoT in standalone mode, equipping engineers and researchers with practical insights into the initial phases of NB-IoT network validation.
-
Context of NB-IoT Technology
- NB-IoT is a 3GPP standardized technology under the LTE umbrella, designed for massive IoT applications requiring low power consumption, extended coverage, and minimal data throughput.
-
It operates in three deployment modes:
- Inband Mode: NB-IoT channels are embedded within existing LTE carriers.
- Guardband Mode: NB-IoT is deployed in the unused guard bands of LTE spectrum.
- Standalone Mode: NB-IoT is deployed independently, often in re-farmed 2G/GSM spectrum, allowing for dedicated operation.
- The Amari Callbox serves as an all-in-one LTE eNodeB and core network emulator, while the UEsim acts as a programmable user equipment simulator for comprehensive connectivity testing.
-
Relevance and Importance of the Tutorial Topic
- NB-IoT is critical for enabling scalable, energy-efficient IoT deployments across diverse scenarios such as smart metering, asset tracking, and environmental monitoring.
- Standalone mode provides enhanced coverage and reduced complexity, making it pivotal for isolated or specialized IoT networks.
- Validating basic connectivity between simulated UE and network infrastructure is essential for ensuring device interoperability and network reliability.
-
Learning Outcomes
- Understand the fundamental principles of NB-IoT, particularly standalone mode operation.
- Gain practical experience in configuring and validating connectivity between a UEsim and Amari Callbox.
- Learn to identify and resolve common configuration issues specific to NB-IoT deployment modes.
- Develop familiarity with key NB-IoT parameters such as bandwidth, carrier type, PCI, and guardband allocation.
-
Prerequisite Knowledge and Skills
- Basic understanding of LTE architecture and radio access network concepts.
- Familiarity with NB-IoT operational principles and deployment modes.
- Experience with laboratory test equipment, specifically UEsim and Amari Callbox platforms.
- Knowledge of spectrum allocation and resource block configuration in LTE.
- Fundamental troubleshooting skills for wireless connectivity issues.
Summary of the Tutorial
This tutorial describes the end-to-end procedure for setting up and verifying NB-IoT UE attach using Amarisoft UE simulator (UEsim) and Callbox (eNB), with a focus on test configuration, execution, and log analysis.
-
Test Configuration and Setup:
- Ensure configuration files ue-nbiot-standalone.cfg (for UEsim) and enb-nbiot-standalone.cfg (for Callbox) are present and correctly linked using symbolic links.
- Verify that important parameters such as dl_earfcn, n_antenna_dl, n_antenna_ul, operation_mode, cell bandwidth, and USIM-related fields (imsi, K) are matched between UEsim and Callbox.
- On the Callbox, ensure the mme-ims.cfg is used and includes the relevant authentication and IMS registration information from ue_db-ims.cfg.
-
Service Verification and Screen Access:
- Confirm that the LTE service is running on the Callbox using service lte status. If issues arise, restart the service with service lte restart.
- Access the screen session for both UEsim and Callbox using screen -r to enable command execution and monitoring.
- Familiarize yourself with command-line operations within the Amarisoft environment for test execution and monitoring.
-
UE Attach Procedure:
- Initiate the UE attach process by powering on the UE in the simulator.
- Monitor both the UEsim and Callbox screens for key indicators:
- Use cell phy and cell commands on Callbox to check basic configuration (ARFCN, BAND, BW, etc.).
- On successful SIB decoding and cell detection, UEsim will display relevant messages and initial attach progress.
- Callbox will trace the attach process; use cells and ue commands to verify UE registration.
- Switch between UEsim and Callbox screens as needed to observe attach signaling and status.
-
Log Analysis and Verification:
- Collect and inspect log files /tmp/ue0.log (UEsim) and /tmp/enb0.log (Callbox) using a text editor or the Amarisoft WebGUI for detailed analysis.
- Ensure full stack logging is enabled for comprehensive traceability of all protocol layers.
- Verify the occurrence of key signaling and configuration messages in the logs:
- NPSS/NPBCH detection, SIB1/SIB2 decoding for cell and NB-IoT configuration.
- Attach Request from UE with correct IMSI and capability information.
- NB-IoT RRC Connection Request, Setup, and Setup Complete messages confirming RRC establishment.
- Authentication Request/Response and Security Mode Command/Complete exchanges for NAS and RRC security.
- UE Capability Enquiry and Information for feature support (multi-tone, NB1 category, etc.).
- RRC Connection Reconfiguration and Complete for DRB and NAS bearer setup.
- Attach Accept and Attach Complete messages confirming successful network registration and bearer activation (including APN, PDN address, and feature support).
- Use the log traces to troubleshoot failures by identifying points where the expected signaling does not occur or indicates an error.
-
Key Signaling Messages and Parameters:
- SIB1/SIB2: Cell and NB-IoT configuration broadcast by eNB, including paging, random access, and channel parameters.
- Attach Request: UE informs network of its NAS and RRC capabilities, IMSI, and requests EPS attach.
- RRC Connection Setup: Network configures dedicated resources for the UE.
- UE Capability Information: UE reports supported NB-IoT features and bands.
- Attach Accept: Network assigns PDN address, EPS bearer, and confirms attach result.
- Security establishment: Authentication, security mode command/complete for both NAS and RRC layers.
Conclusion: The tutorial provides a comprehensive, step-by-step methodology for configuring NB-IoT test scenarios with Amarisoft tools, executing UE attach, and analyzing logs for successful attach and troubleshooting. Following these procedures ensures correct configuration alignment, successful protocol signaling, and the ability to identify and resolve any issues encountered during attach tests.
Test Setup
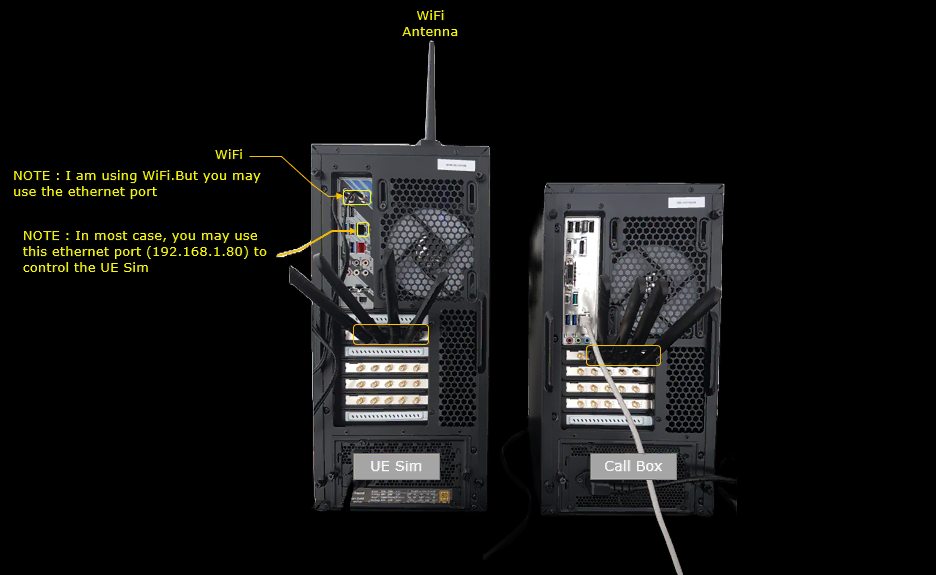
Test setup for this tutorial is as shown below.
The UEsim is on the left and the Callbox is on the right, and the single card slot marked on each box is the pair of ports used for the RF connection between them. Everything runs conducted over that cable, so there is no antenna in the RF path and no path loss to worry about.
I am using WiFi to reach the UEsim in this setup, with the WiFi antenna on the top of the box, but you may use the ethernet port instead. In most cases the ethernet port on 192.168.1.80 is the one you use to control the UEsim, and that is the address you log in to when you want to open a shell on it.
Configuration
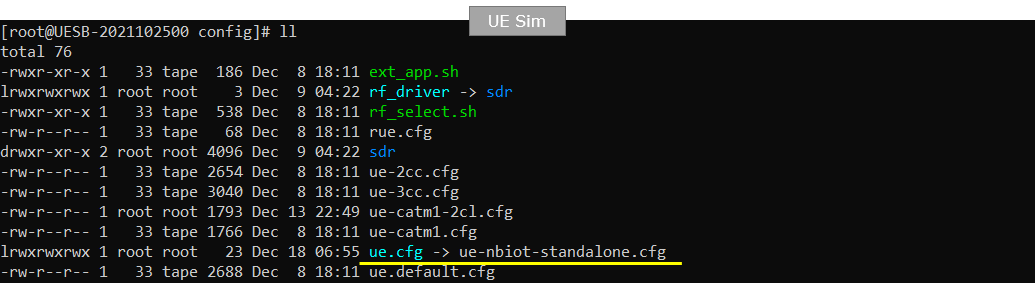
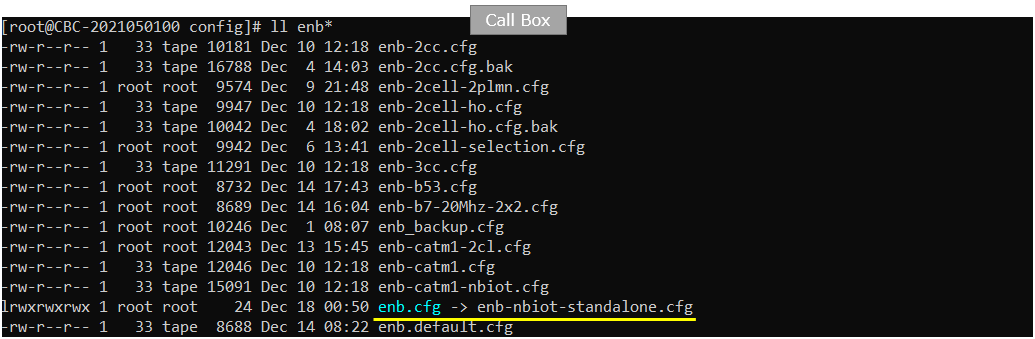
An important thing in using UE sim is to do proper matching between UE sim configuration and Call box configuration In this tutorial, I used the ue-nbiot-standalone.cfgand and enb-nbiot-standalone.cfgwithout any change
If you use other Network (e.g, other network simulator or real network), you have to make it sure to configure UE sim according to the settings on network side
For UEsim, the ue-nbiot-standalone.cfg is used (
For Callbox, the enb-nbiot-standalone.cfg is used (
For the core network, mme-ims.cfg is used for configuration.
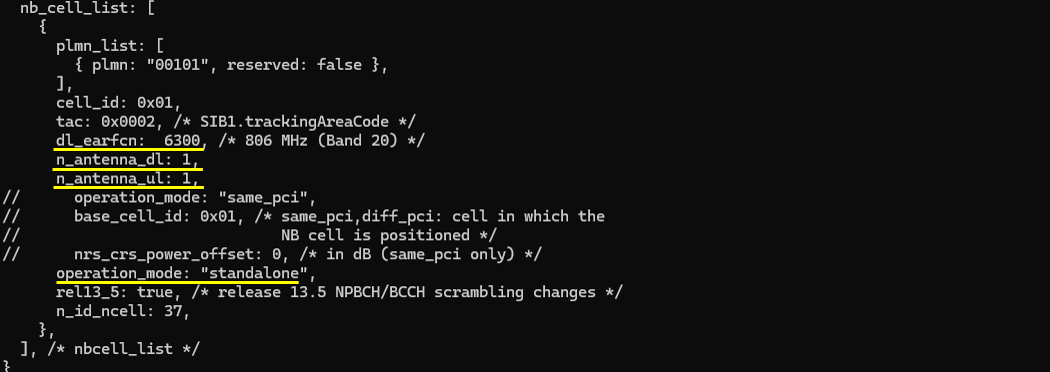
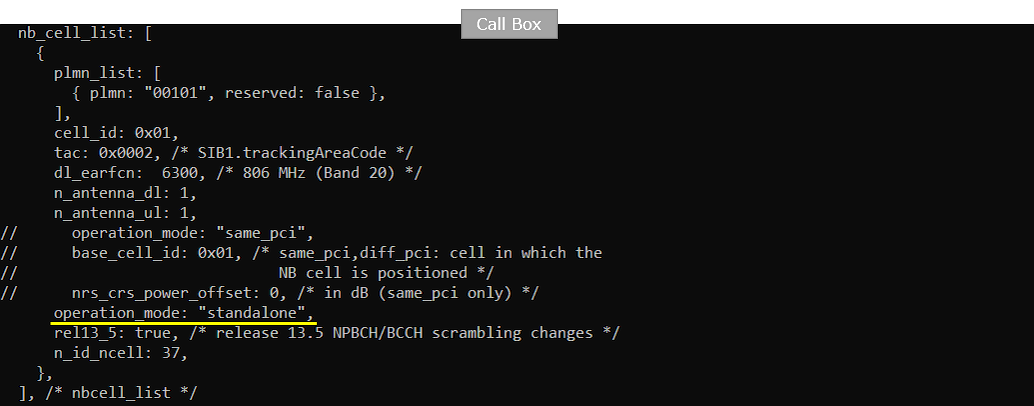
Open upenb-nbiot-standalone.cfg and note some fundamental configuration parameter for this test. It is important to note dl_earfcn, n_antenna_dl, n_antenna_ul and operation_mode and UEsim configuration should set to match these parameters.
dl_earfcn is 6300, which puts the cell at 806 MHz in band 20. n_antenna_dl and n_antenna_ul are both 1, so the cell is single antenna in both directions. operation_mode is set to "standalone", and that is the setting that makes this an NB-IoT carrier standing on its own rather than one embedded in an LTE carrier.
The same block sets plmn to "00101" with reserved false, cell_id to 0x01, tac to 0x0002 and n_id_ncell to 37. rel13_5 is true, which turns on the release 13.5 NPBCH and BCCH scrambling.
The commented out lines just above operation_mode are the inband variants. base_cell_id and nrs_crs_power_offset only mean something when operation_mode is "same_pci" or "diff_pci", since they describe the LTE cell that the NB carrier would sit inside, and none of that applies here.
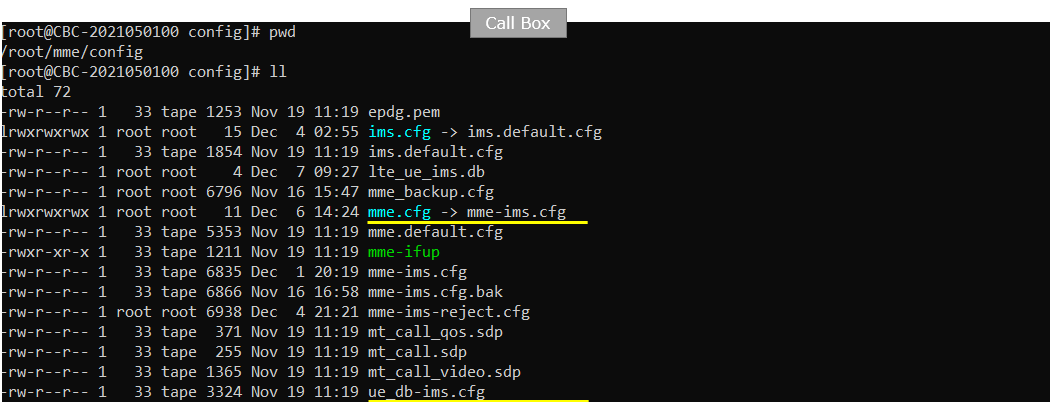
You would see following in /root/mme/config/ims-ims.cfg file on Callbox. The important part to note is 'include "ue_db-ims.cfg" which carries the information about authentication and IMS registration.
The include is written as a plain file name, so the file is read from the same /root/mme/config directory that mme.cfg lives in. If you keep your subscribers in a different file, this one line is what you change.

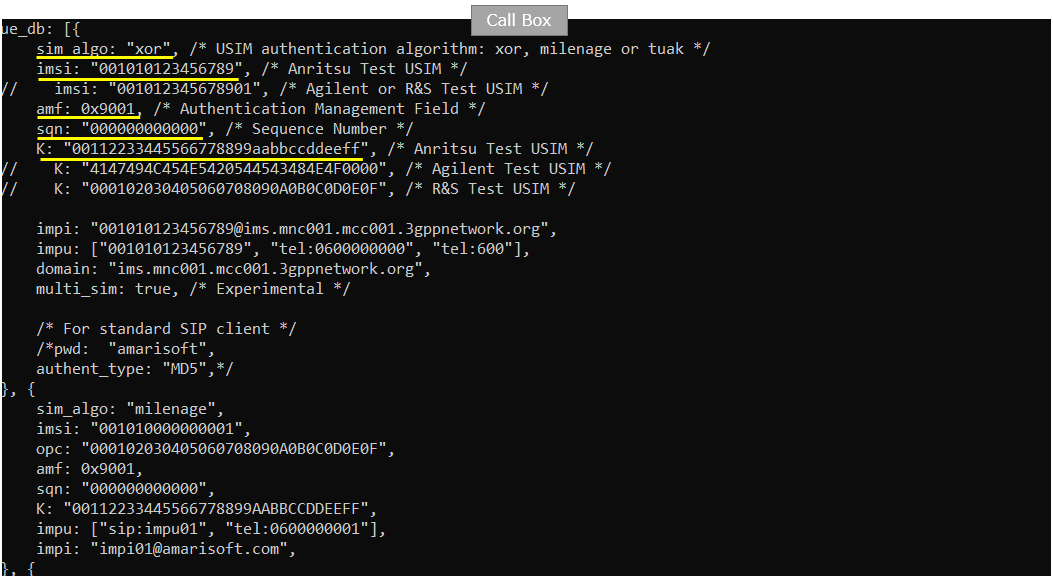
Following is the contents of "ue_db-ims.cfg" on Callbox. sim_algo, imsi, amf, sqn, K are authentication related parameters and other parts (impi, impu, domain) are for IMS registration and basic call setup.
The first entry in ue_db is the one used in this test. sim_algo is "xor", imsi is "001010123456789", K is "00112233445566778899aabbccddeeff", amf is 0x9001 and sqn is "000000000000". The entry is commented as the Anritsu Test USIM, and the equivalent imsi and K pairs for the Agilent and R&S test USIMs are sitting commented out right below it, so switching to a different test USIM is a matter of moving the comment markers.
imsi and K are the two that have to be identical to what the UEsim is configured with. sim_algo picks the authentication algorithm and the choices are xor, milenage or tuak, and it has to be the same on both sides as well.
ue_db is a list, and the second entry uses sim_algo "milenage" with imsi "001010000000001" and its own opc instead of a plain K. Adding another UE to the test means adding another entry here and giving the UEsim a matching imsi and K.
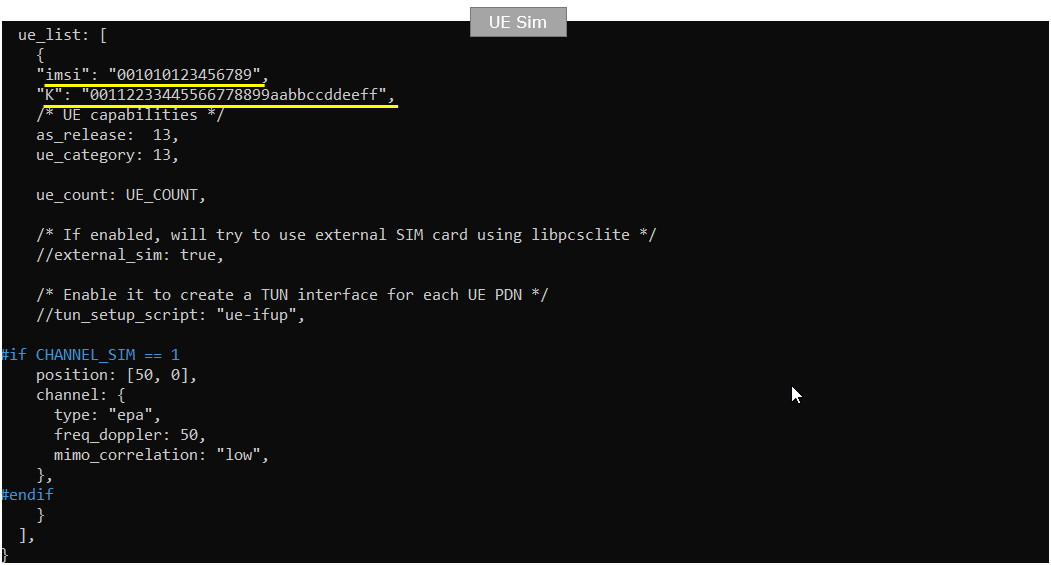
In this tutorial, following SIM information will be used. this is the configuration in ue-nbiot-standalone.cfg on UEsim.The important part to note are imsi and K which is USIM parameter for attach.
imsi is "001010123456789" and K is "00112233445566778899aabbccddeeff", the same pair as the first ue_db entry on the Callbox. A mismatch here does not stop the UE from finding the cell, it stops the attach at the authentication step, which is worth knowing when you are working out how far the log got before it stopped.
The same entry sets as_release to 13 and ue_category to 13, and ue_count comes from the UE_COUNT define at the top of the file. external_sim and tun_setup_script are both left commented out, so the UEsim authenticates from the imsi and K written here rather than from a physical SIM card, and no TUN interface is created for the PDN.
The block under #if CHANNEL_SIM == 1 places the UE at position [50, 0] and applies an epa channel with freq_doppler 50 and low mimo_correlation. It only takes effect when CHANNEL_SIM is set to 1, and this tutorial does not use the channel simulator.
Following is the configuration on Callbox (enb-nbiot-standalone.cfg). The important part to note is dl_earfcn and operation_mode in this test. You should match dl_earfcn on Call box with dl_earfcn on UEsim.
There is no ul_earfcn in this block. The uplink frequency comes from the default duplex spacing of band 20, which is why the eNB reports the uplink as earfcn 24300 once the cell is up. You only have to set ul_earfcn explicitly when the spacing you want differs from the default for the band.
operation_mode is the parameter that decides which of the three NB-IoT deployment modes this configuration runs. Setting it to "same_pci" or "diff_pci" instead would also mean uncommenting base_cell_id and nrs_crs_power_offset above it, because those describe the host LTE cell that the NB carrier would be placed in.
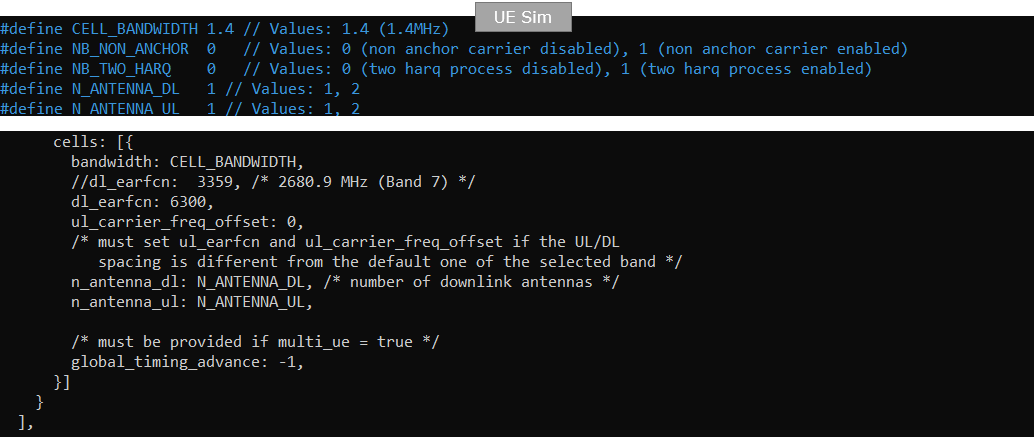
Following is the configuration on UEsim (ue-nbiot-standalone.cfg) . The important things to note are to match the UEsim parameters (CELL_BANDWIDTH, N_ANTENNA_DL, N_ANTENNA_UL, dl_earfcn) with the correspoinding configurations of Callbox (eNB)
The defines at the top of the file carry the values. CELL_BANDWIDTH is 1.4 for 1.4 MHz, N_ANTENNA_DL and N_ANTENNA_UL are both 1, NB_NON_ANCHOR is 0 so the non anchor carrier is disabled, and NB_TWO_HARQ is 0 so a single HARQ process is used. The cells block then refers to those defines rather than to literal values, so changing the define at the top is enough to change the cell.
dl_earfcn is 6300, the same value as on the Callbox. ul_carrier_freq_offset is 0 and ul_earfcn is not set at all, which is what you want for band 20 where the UL to DL spacing is the default one. The comment in the file spells out the exception, that both have to be set when the spacing differs from the default of the selected band.
global_timing_advance is -1, which lets the UEsim work the timing advance out from what it receives instead of holding a fixed value. It has to be provided when multi_ue is true.
Check if LTE service is Running
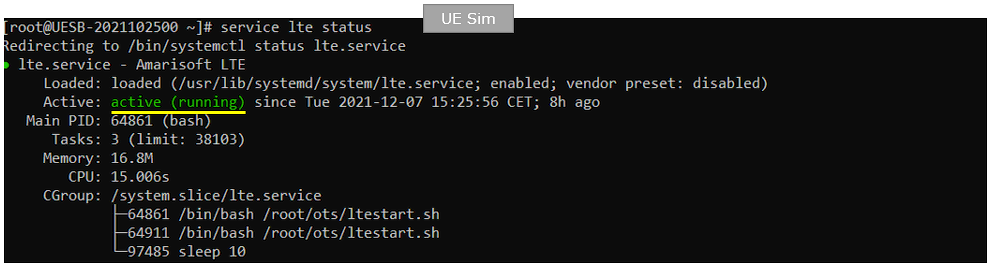
Whatever you want to test, the first thing you need to do is that call box program (LTE Service) is running. You can check on the execution status of the call box program by running following command and you should get the result as shown below
# service lte status
You have to run this on both boxes, and this first one is the UEsim. The line to look at is Active, and it has to read active (running) in green. The unit is lte.service, described as Amarisoft LTE and loaded from /usr/lib/systemd/system/lte.service, and it is enabled so it comes back up by itself after a reboot. The CGroup block at the bottom lists the /root/ots/ltestart.sh processes that the service started, and those are what create the screen session you attach to next.
The Callbox gives the same output. The uptime is the only thing that differs here, 7s on the Callbox because I had just restarted it against 8h on the UEsim, and that difference does not matter. What matters is that both boxes report active (running) before you go any further.
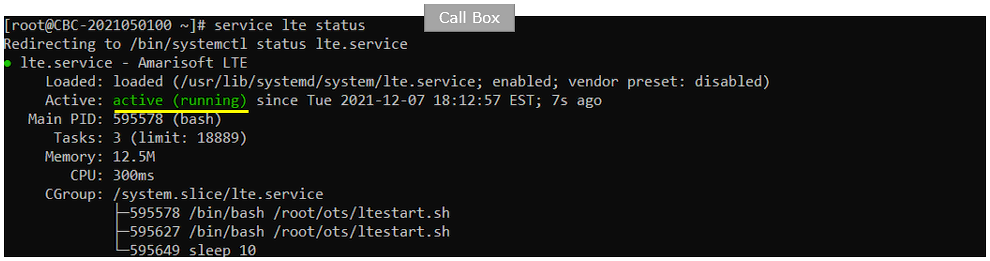
NOTE : Getting this result is pre-requisite for Call Box Operation, but this result itself does not guarantee the normal operation. If you see some unexpected issues. You may restart the call box with following command
# service lte restart
Getting into Screen Mode
If it is confirmed that the lte service is running, go to screen mode by running 'screen -r' and follow through the steps as shown below. The steps shown here is the procedure that you would use for almost every test and it is highly recommended to get familiar with these steps. For further commands you can use in this screen mode, refer to the tutorial : Command Line Command
Run following command on UE sim
The prompt reads UESB-2021102500, so this is the UEsim box and not the Callbox. screen -r does not start anything, it reattaches you to the session that ltestart.sh already created when the lte service came up.

You will get the screen as shown below
The RF line printed at startup is what to check on this side. RF0 runs at sample_rate 1.920 MHz with dl_freq 806.000 MHz and ul_freq 847.000 MHz on band 20, and dl_ant=1 and ul_ant=1. This is the UEsim reading back what dl_earfcn 6300 and the antenna defines in ue-nbiot-standalone.cfg actually resolved to, so it is the quickest confirmation that the file you edited is the file being used.
The status bar at the bottom lists [2 UE], 7 (PROBE) and 9 (SCAN), and 2 UE is the window you land in. The Cell 0: SIB found line above the prompt is left over from an earlier power on and is not part of this step.
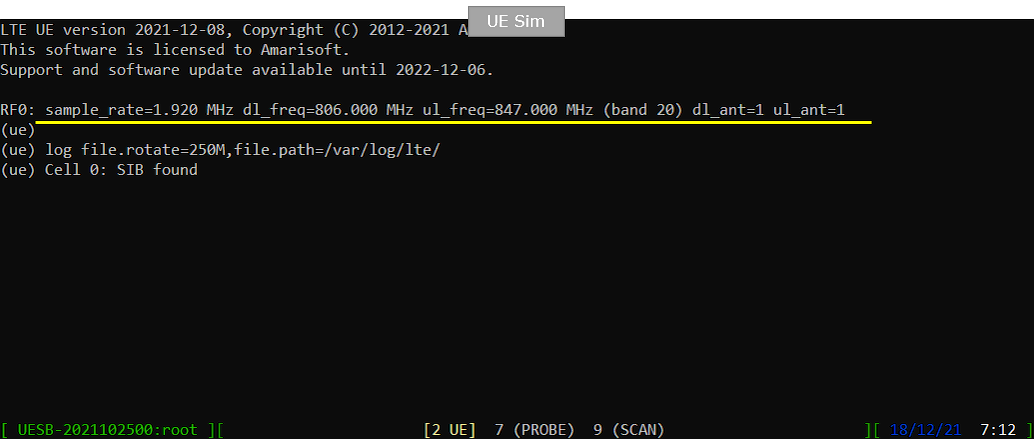
Run following command on Callbox
Same command, different box. The prompt here is CBC-2021050100. From this point you have two screen sessions open, one on each box, and you go back and forth between them by switching terminal rather than by anything inside screen.

You will get the screen as shown below
What comes up first on the Callbox is the [0 MME] window. The status bar lists the four modules that the service runs, 0 MME, 1 ENB, 3 IMS and 4 MBMSGW, and the one shown in yellow is the module you are currently in. You move between them by pressing Ctrl+A first and then the number key, not all of them at the same time.
This window was started with ltelaunch.sh MME from /root/mme, and two commands have already been entered in it. log file.rotate=250M,file.path=/var/log/lte/ sets where the log is written and how large it grows before it rotates, and imsconnect connects the MME to the IMS module. The rest of this tutorial works in the [1 ENB] window, so Ctrl+A followed by 1 is the one you need next.
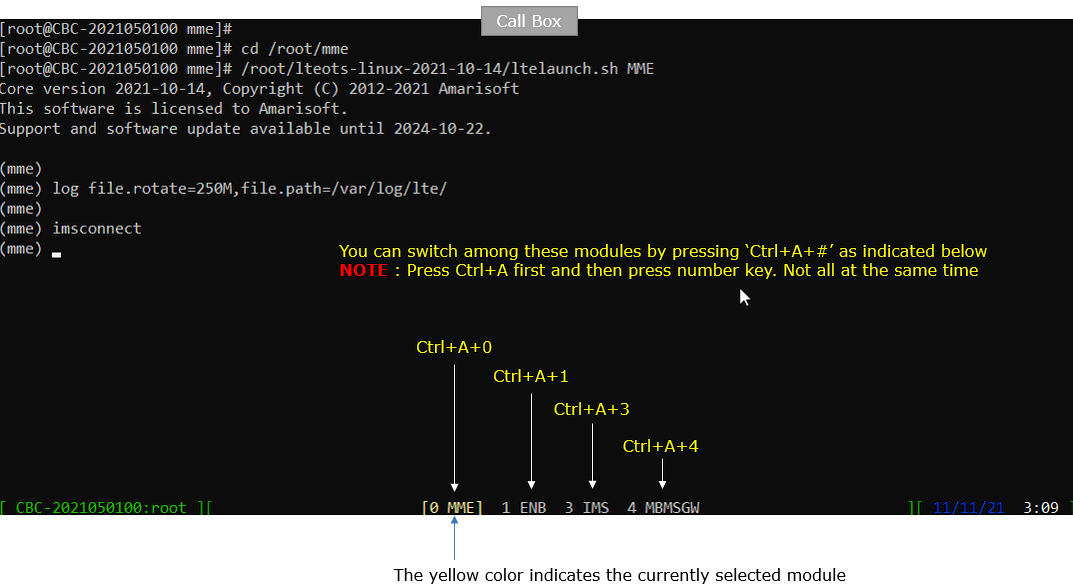
Attach UE
Now perform UE attach procedure. This would be a little bit busy process since you need to switch back and forth between Callbox screen and UEsim screen.
This is not the mandatory step, but I would stronly recommend you to check the output of 'cell phy' and 'cell' command in (ENB) screen and check out the basic configuration (e.g, ARFCN, BAND, BW etc) is configured as intended.
cell phy lists cell 0x001 with RAT NBIoT on band 20, BW 0.2 and P 0. The downlink is on ARFCN 6300 with 1 antenna, 1 layer, 15 kHz subcarrier spacing, QAM 4 and POW -9, and the uplink is on ARFCN 24300, again with 1 antenna and 1 layer and QAM 4. BW 0.2 is the 200 kHz NB-IoT carrier and QAM 4 means QPSK, which is as high as NB-IoT goes.
cell shows the same cell from the higher layer side, with TAC 0x0002, dl_arfcn 6300, pci 37, dl_gain 0.0, ul_dis N and plmn 00101. tac, n_id_ncell and plmn all match what is set in enb-nbiot-standalone.cfg, so this is where you confirm the file you linked is the one that actually came up. prach_seq shows a dash, since NB-IoT random access is driven by the NPRACH parameters broadcast in SIB2 rather than by a PRACH sequence index.

Start tracing on Callbox
This is entered in the [1 ENB] window. t is a toggle, and once it is entered the prompt replies with Press [return] to stop the trace. Leave it running through the attach, because the per UE table further down only appears while the trace is on.

power_on UE on UE sim.
Switch back to the UEsim and enter this in the [2 UE] window. power_on is what starts the cell search, and nothing at all happens on either box until it is entered.

You will see following message once UE detect the cell and decoded SIBs.
Cell 0: SIB found is the single line you are waiting for, and it comes back within a second or two of power_on. It means the UEsim locked onto the sync signals, decoded the MIB and read the system information, so the cell is usable.
If this line never appears, the problem is in the frequency, bandwidth or antenna matching between the two configuration files rather than in the USIM parameters, because none of the USIM values are used yet at this point.

Once UE completed SIB decoding and perform initial attach, you will see following trace on Callbox screen.
The per UE table starts scrolling as soon as the UE is scheduled. The DL columns carry mcs, retx, txok and brate and the UL columns carry mcs, rxko, rxok and brate. The DL mcs sits at 5.0 and the UL mcs at 4.0 and neither moves, which is what you get in NB-IoT where the modulation never goes past QPSK and the adaptation happens through repetitions instead.
The DL brate reaches 556 and then 1.01k while the UL reaches 720 and then 300, and everything falls to 0 once the attach signalling is finished and there is nothing left to send. snr stays around 35 dB and ta stays at 0.2 to 0.3, which is what a cabled setup should look like.
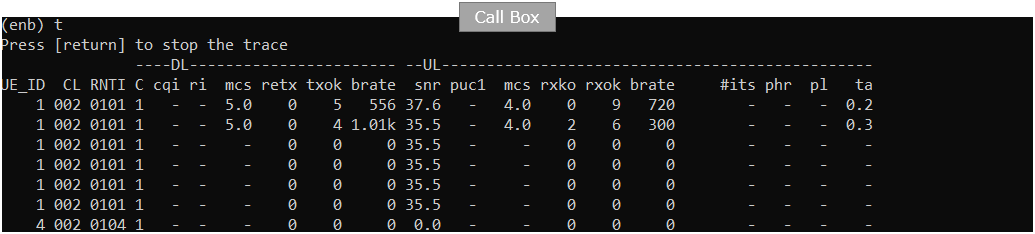
When the initial attach completed, you can check on the cell information to which the UE sim is registered to with 'cells' command.
Cell #0 is reported as NB-IoT with PCI 37, FDD duplexing, EARFCN DL=6300 and UL=24300, and RB DL=1 UL=1. Every one of these is the UEsim reading back what the Callbox actually broadcast, which makes this the point where you confirm the two sides agreed rather than just that the two files looked alike.
RB DL=1 UL=1 is the single resource block that an NB-IoT carrier occupies. PCI 37 is the n_id_ncell from enb-nbiot-standalone.cfg and 24300 is the uplink earfcn that band 20 pairs with a downlink earfcn of 6300.

You can get the ue information that is in connection with gNB on Callbox with 'ue' command in (enb) screen.
There is one entry, RAN_UE_ID 6 with CN_UE_ID 102, on cell 0x001 with RNTI 0x0106. RAN_UE_ID counts up every time a UE connects, so a value other than 1 only means this was not the first connection since the eNB started.
This command reports UEs that currently hold an RRC connection. Once the UE goes idle the list goes empty even though the registration on the core network side is still there, so an empty result is not a failure by itself.

You can get the ue information that is in connection with gNB on Callbox with 'ue' command in (mme) screen.
The core network side reports SUPI 001010123456789 and IMEISV 0123456700000101, with CN as EPC, M-TMSI 0x39c831d1 and REG set to Y. The SUPI is the imsi from ue_db-ims.cfg and TAC is shown as 00101.0x2, the plmn and the tracking area code from enb-nbiot-standalone.cfg.
#BEARER is 1 and IP_ADDR is 192.168.2.2, so the default bearer is up and the UE has an address on the default APN. This is the line that tells you the attach really finished, because REG set to Y with no bearer and no address would mean the procedure stopped part way through.

Log Analysis
In this section, you will see how to confirm if UE registration is complete from trace log. You can use the same method to find any issues (e.g, registration failure) for troubleshooting. When UE registration fails, you may use this tutorial to figure out the point of the failure and troubleshoot
Open /tmp/ue0.log on UEsim using any text editor. I am using nano in this tutorial. (NOTE : In the same way, you can check eNB log by opening /tmp/enb0.log on Callbox).
The commented header lines at the top of the file are worth reading before you go looking for messages. lteue version 2021-12-08 is the build that produced the log, and the log file format line gives the column layout that every line below it follows, time layer dir ue_id {cell_id rnti sfn channel:} message. SMP DRBs=1 RF0=1/1 says one data radio bearer and one transmit and one receive antenna on RF0.
The first message in the file is 07:19:59.500 [RRC] DL f000 00 BCCH-NB: SIB1, so the log opens at the point where the UE decoded SIB1. The layer field is the one to search on when you are finding your way around, PHY for the physical layer prints, RRC for the RRC messages and NAS for the EMM and ESM messages.
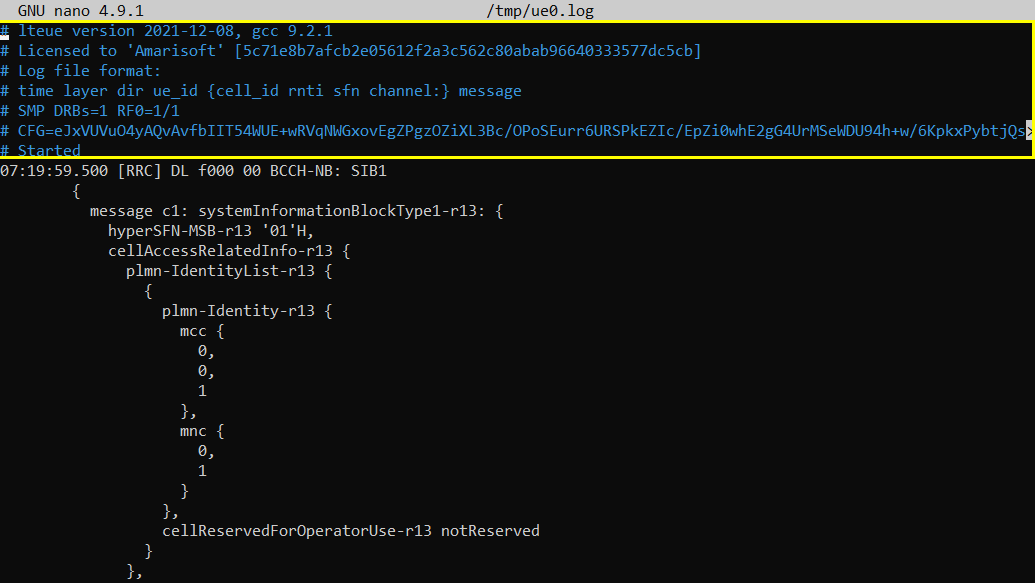
First thing to note is to check if NPSS and NPBCH is logged. If you find this, it indcates that UEsim successfully detected sync channels and decoded MIB.
The NPSS line reports n_id_ncell=37, the physical cell id the UE recovered from the sync signals, and it is the same 37 that n_id_ncell is set to in enb-nbiot-standalone.cfg.
The NPBCH line is the decoded MIB-NB. It gives n_antenna_npbch=1, sched_info_sib1=0, si_value_tag=0, ab_enabled=0, op_mode=3, add_trans_sib1=0 and ab_enabled_5gc=0. op_mode=3 is standalone, so this is the earliest point in the log where you can confirm the cell came up in the operation mode you configured rather than in inband or guardband. sched_info_sib1=0 is the index that tells the UE where to look for SIB1, which is why the SIB1 decode follows immediately.

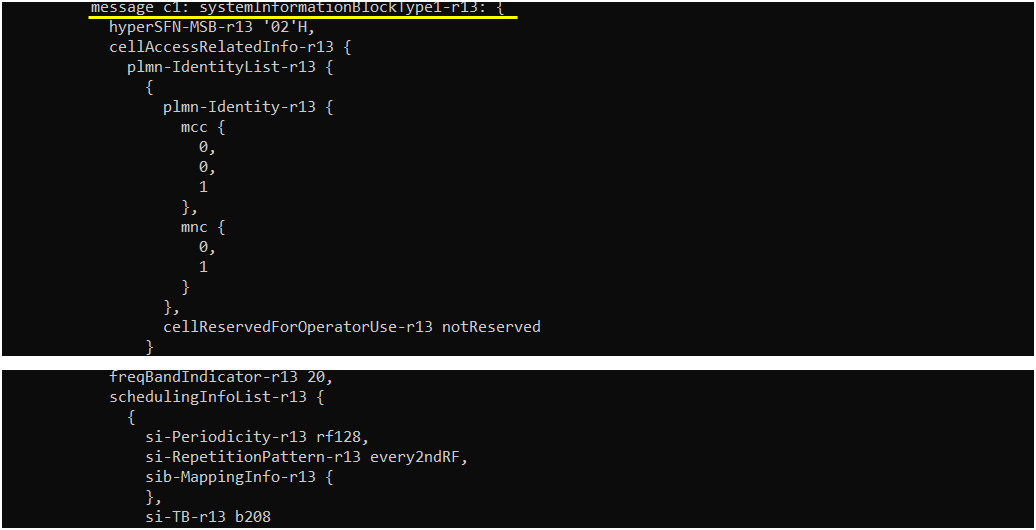
This is SystemInformationBlockType1-r13 message indicating that the cell operates on frequency band 20 (freqBandIndicator-r13) and broadcasts system information every 128 radio frames with repetition every 2nd frame (si-Periodicity-r13, si-RepetitionPattern-r13). The PLMN is identified as MCC 001 and MNC 01 (plmn-Identity-r13), and the cell is not reserved (cellReservedForOperatorUse-r13 notReserved). The system information(i.e, SIB2 and others)is carried in transport block index b208 (si-TB-r13).
hyperSFN-MSB-r13 is '02'H in this instance of the message, and cellAccessRelatedInfo-r13 carries a plmn-IdentityList-r13 with the single entry mcc 0,0,1 and mnc 0,1.
si-TB-r13 b208 is the 208 bit transport block used to carry each SI transmission on this cell. Taken together with si-Periodicity-r13 rf128 and si-RepetitionPattern-r13 every2ndRF, that is the whole schedule the UE has to follow to pick SIB2 up.
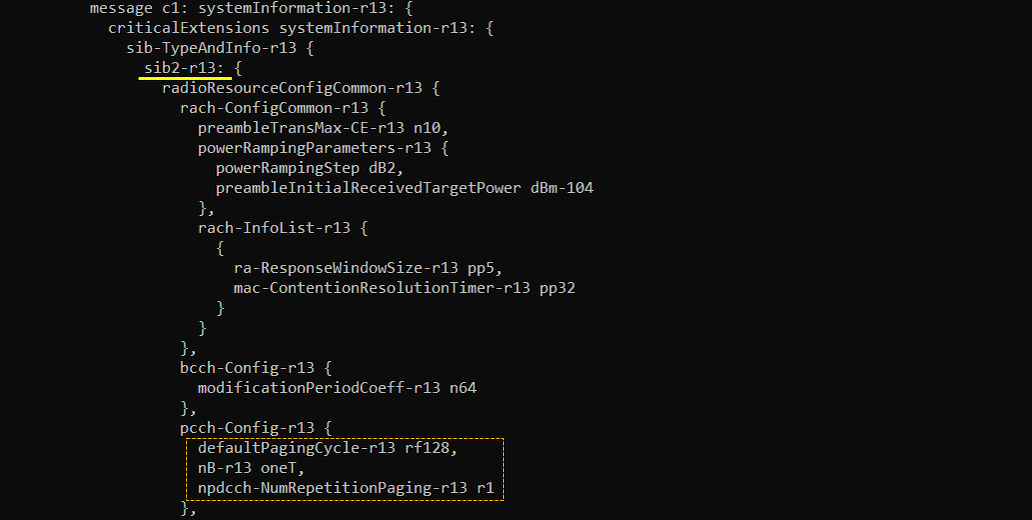
This is sib2-r13, which configures essential NB-IoT parameters for random access, paging, and uplink/downlink channels.
The paging configuration (pcch-Config-r13) sets the default paging cycle to rf128 and defines one repetition (npdcch-NumRepetitionPaging-r13 r1), indicating how often and how many times paging messages are sent. Random access settings (rach-ConfigCommon-r13) allow up to 10 preamble transmissions with an initial target power of -104 dBm, and the contention resolution timer is set to 32 subframes.
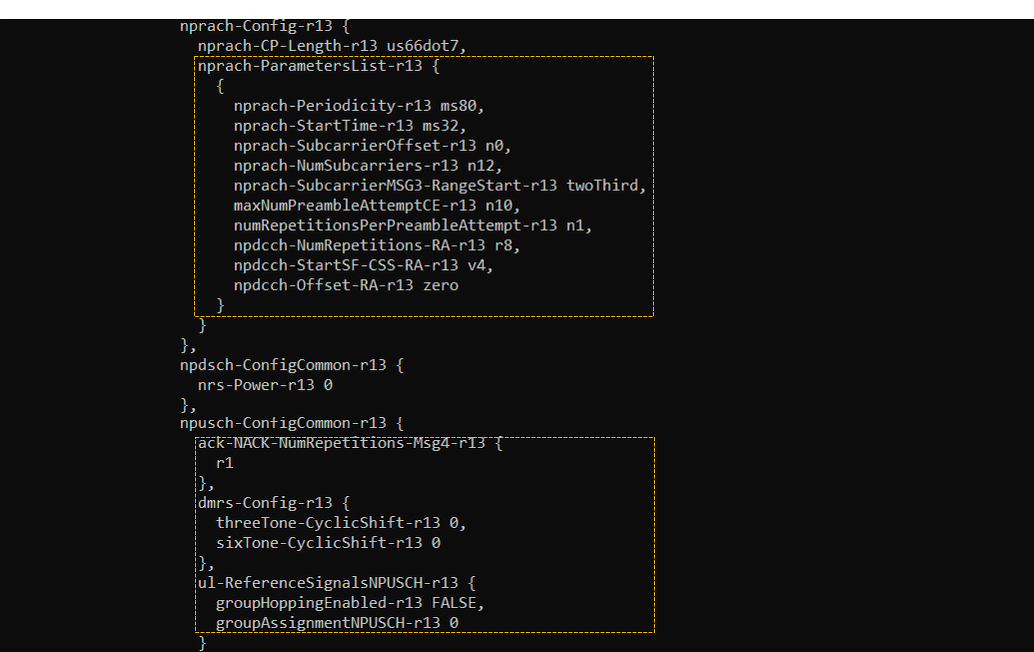
For NPRACH (nprach-Config-r13), preambles are scheduled every 80 ms(nprach-Periodicity-r13) with 12 subcarriers and allow up to 10 attempts per CE level(maxNumPreambleAttemptCE-r13). Each RA preamble is repeated once, and the downlink control channel uses 8 repetitions (npdcch-NumRepetitions-RA-r13 r8).
The uplink shared channel (npusch-ConfigCommon-r13) uses 1 repetition for HARQ feedback and disables group hopping (groupHoppingEnabled-r13 FALSE). For downlink, the NPDSCH transmit power is set to 0 dB (nrs-Power-r13 0).
The random access part of radioResourceConfigCommon-r13 comes first. preambleTransMax-CE-r13 is n10, powerRampingStep is dB2 and preambleInitialReceivedTargetPower is dBm-104, so each retry raises the transmit power by 2 dB from a starting target of -104 dBm. ra-ResponseWindowSize-r13 is pp5 and mac-ContentionResolutionTimer-r13 is pp32, the pp prefix meaning the value is counted in NPDCCH periods.
bcch-Config-r13 sets modificationPeriodCoeff-r13 to n64, which fixes how often the cell is allowed to change its system information. In pcch-Config-r13, nB-r13 is oneT alongside the defaultPagingCycle-r13 of rf128, so there is one paging occasion per paging frame.
nprach-CP-Length-r13 is us66dot7, the 66.7 microsecond cyclic prefix, which is the shorter of the two NPRACH formats. nprach-StartTime-r13 is ms32 and nprach-SubcarrierOffset-r13 is n0, so the NPRACH resource starts 32 ms into each 80 ms period and begins at subcarrier 0.
nprach-SubcarrierMSG3-RangeStart-r13 is twoThird, which is where the 12 NPRACH subcarriers get divided between UEs that support multi-tone Msg3 and those that do not. npdcch-StartSF-CSS-RA-r13 is v4 and npdcch-Offset-RA-r13 is zero, and those two define where the UE looks for its random access response.
On the uplink side, dmrs-Config-r13 sets threeTone-CyclicShift-r13 and sixTone-CyclicShift-r13 both to 0 and groupAssignmentNPUSCH-r13 is 0, while npdsch-ConfigCommon-r13 carries only nrs-Power-r13 0.
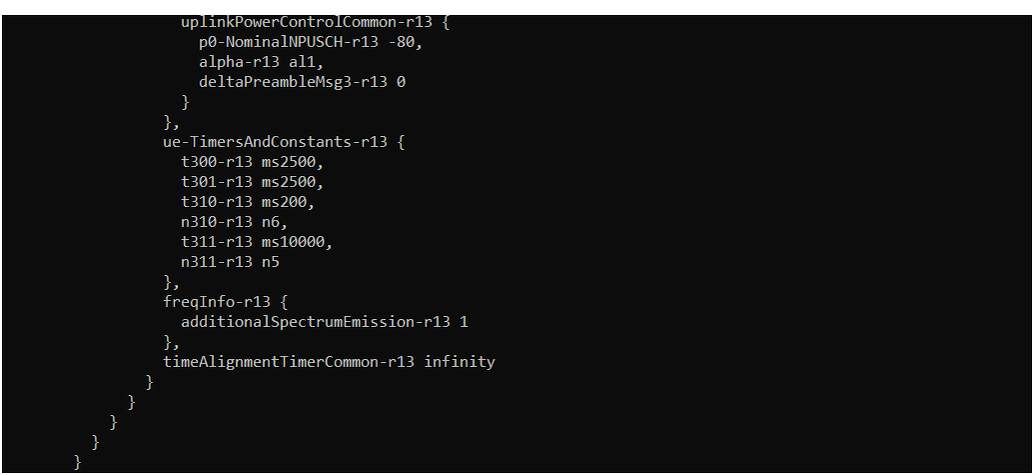
uplinkPowerControlCommon-r13 sets p0-NominalNPUSCH-r13 to -80 with alpha-r13 al1 and deltaPreambleMsg3-r13 0. alpha al1 is full pathloss compensation, so the UE is expected to transmit at whatever power brings the received level up to the -80 dBm target.
ue-TimersAndConstants-r13 carries the timers the UE falls back on when a connection goes wrong. t300-r13 and t301-r13 are both ms2500, t310-r13 is ms200 with n310-r13 n6, and t311-r13 is ms10000 with n311-r13 n5. t300 is the one that matters for this test, since it is the 2500 ms the UE waits for the RRC Connection Setup after sending its request.
timeAlignmentTimerCommon-r13 is infinity, so the UE never treats its timing advance as having expired, and freqInfo-r13 carries additionalSpectrumEmission-r13 1.
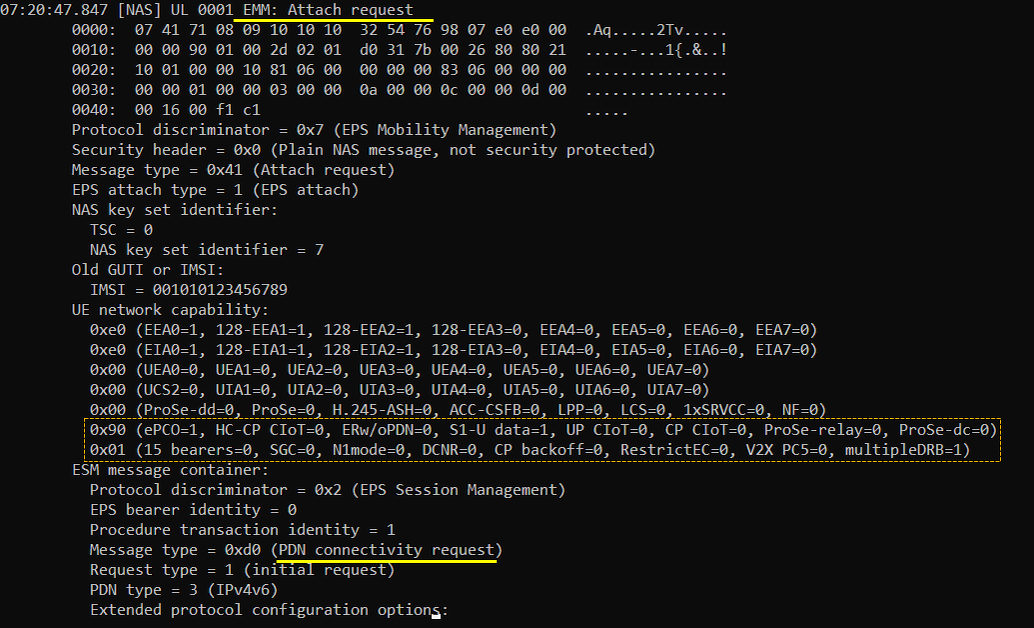
This is an LTE Attach Request message where the UE initiates an EPS attach with IMSI 001010123456789 and requests a PDN connection. It supports extended protocol configuration (ePCO=1) and multiple DRBs (multipleDRB=1). The embedded PDN Connectivity Request asks for an IPv6 connection (PDN type = 3) with an initial request type.
Pay attention to UE network capability and see if the UE support all the capabilities that is required for the intended test.
Security header is 0x0 and message type is 0x41, so this is a plain NAS message sent before any security context exists. That is why the IMSI 001010123456789 is readable in the clear here and nowhere later in the log.
The UE network capability lines list the algorithms the UE will accept. 0xe0 on the first line means EEA0, 128-EEA1 and 128-EEA2 for ciphering and 0xe0 on the second means EIA0, 128-EIA1 and 128-EIA2 for integrity. The network picks out of this list in the Security Mode Command further down.
NAS key set identifier is 7, the value that means no valid key set is held, which is what an initial attach should look like. The ESM message container carries EPS bearer identity 0 with procedure transaction identity 1, and the bearer only gets its real identity of 5 when the network answers with the Activate Default EPS Bearer Context Request.
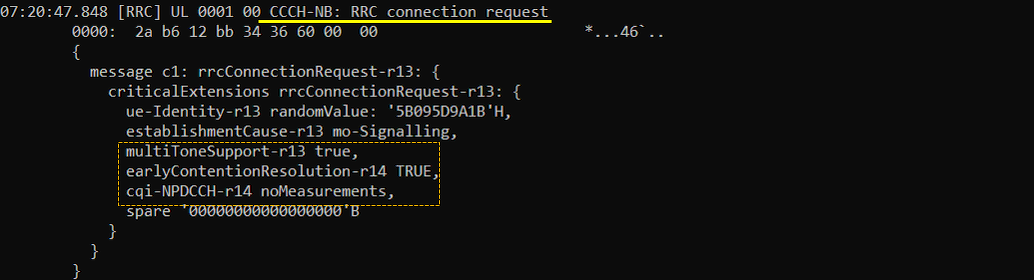
This is an NB-IoT RRC Connection Request message with establishmentCause-r13 set to mo-Signalling, indicating the UE is initiating signaling. The UE identity is provided as a random value (5B095D9A1B'H). It supports multi-tone operation (multiToneSupport-r13 = true) and early contention resolution (earlyContentionResolution-r14 = TRUE), with no CQI measurements reported (cqi-NPDCCH-r14 = noMeasurements).
It goes up on CCCH-NB, the common control channel the UE has to use before it holds any dedicated resources, and the whole encoded message is 8 bytes.
mo-Signalling as the establishment cause tells the eNB the UE is coming up for signalling and not for user data, which is what an attach looks like from the network side. multiToneSupport-r13 true is the same capability the UE repeats later in the UE Capability Information, and it is what lets the uplink use more than one subcarrier.
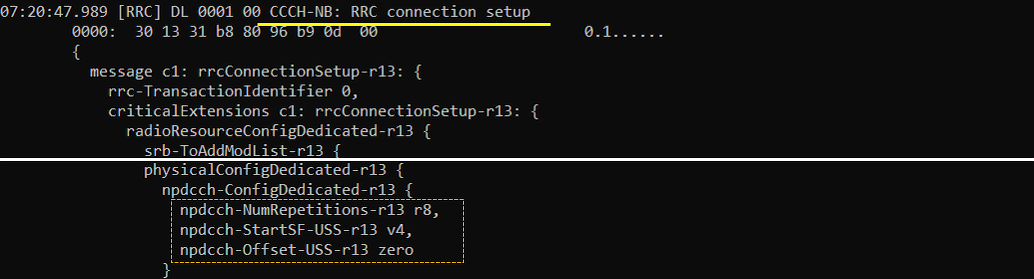
This is an NB-IoT RRC Connection Setup message with transaction ID 0. It configures the dedicated radio resources (radioResourceConfigDedicated-r13), including control signaling over the NPDCCH. The configuration sets npdcch-NumRepetitions-r13 to r8 (8 repetitions), with npdcch-StartSF-USS-r13 as v4 and npdcch-Offset-USS-r13 as zero, defining the starting subframe and offset for NPDCCH in the uplink shared search space (USS).
srb-ToAddModList-r13 comes before the physicalConfigDedicated-r13 block, and that is where the signalling radio bearer is set up. The data radio bearer is not created here, it arrives later in the RRC Connection Reconfiguration.
npdcch-NumRepetitions-r13 r8 is the same value that SIB2 broadcasts for random access, so the dedicated search space is repeated as many times as the common one. Lowering it shortens the time the UE spends decoding every downlink grant at the cost of coverage, which is the trade-off that repetitions exist for in NB-IoT.
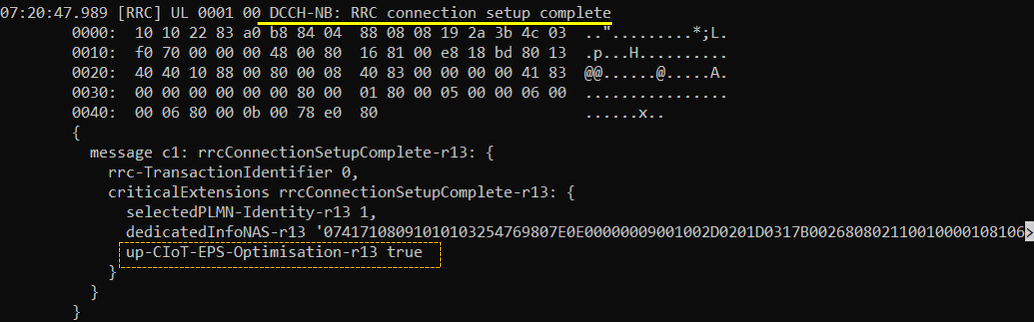
This is an NB-IoT RRC Connection Setup Complete message indicating the UE has successfully completed the RRC setup procedure. It includes the selected PLMN ID (selectedPLMN-Identity-r13 = 1) and carries the NAS message (dedicatedInfoNAS-r13). The flag up-CIoT-EPS-Optimisation-r13 = true confirms that the UE is using control plane CIoT EPS optimization for efficient small data transmission over NAS.
This is the first message to go up on DCCH-NB rather than CCCH-NB, which on its own confirms the signalling radio bearer from the previous message is now in use.
dedicatedInfoNAS-r13 is the container carrying the Attach Request through to the core network. The NAS layer already logged that Attach Request separately a moment earlier, so the same message appears twice in the log, once decoded by NAS and once as the encoded octet string inside RRC.
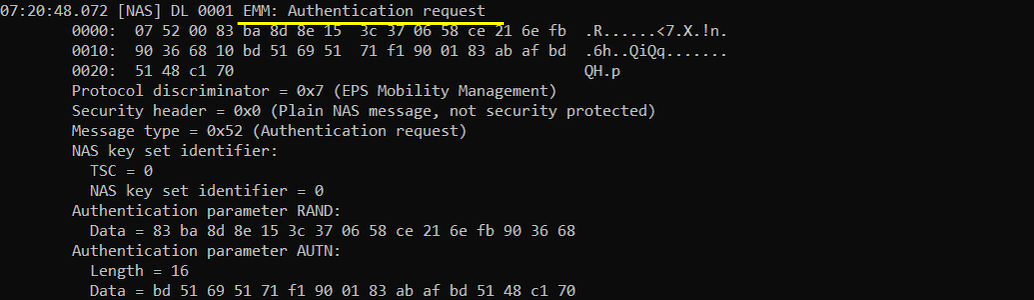
This is an EMM Authentication Request message (message type = 0x52) from Network to the UE during the LTE attach procedure. It includes a random challenge value (RAND) and an authentication token (AUTN) used for mutual authentication. The message is a plain NAS message (not ciphered or integrity protected) with NAS key set identifier set to 0, indicating initial security context establishment.
RAND is 83 ba 8d 8e 15 3c 37 06 58 ce 21 6e fb 90 36 68 and AUTN is 16 bytes long, bd 51 69 51 71 f1 90 01 83 ab af bd 51 48 c1 70. Both are computed from the K and sqn in ue_db-ims.cfg, which is why a mismatch between the two boxes shows up right after this message rather than earlier.
NAS key set identifier is 0 here rather than the 7 the UE sent in the Attach Request. That 0 is the identifier the network is assigning to the security context this exchange is about to create.
This is an EMM Authentication Response message (message type = 0x53) from the UE to the network. It contains the authentication response parameter, an 8-byte value used to verify the UE's identity based on the earlier challenge (RAND). The message is a plain NAS message, indicating it is still part of the initial security setup.
The response parameter is 83 ab af bd 51 69 51 71. The network works the same value out from the RAND it sent and the K it holds, and it only moves on to the Security Mode Command if the two agree.
If the K in ue-nbiot-standalone.cfg and the K in ue_db-ims.cfg do not match, this is where the log stops, either with no response at all or with an authentication failure in place of this message. The timestamp is the same 07:20:48.072 as the request, so the UEsim answers within the same millisecond.

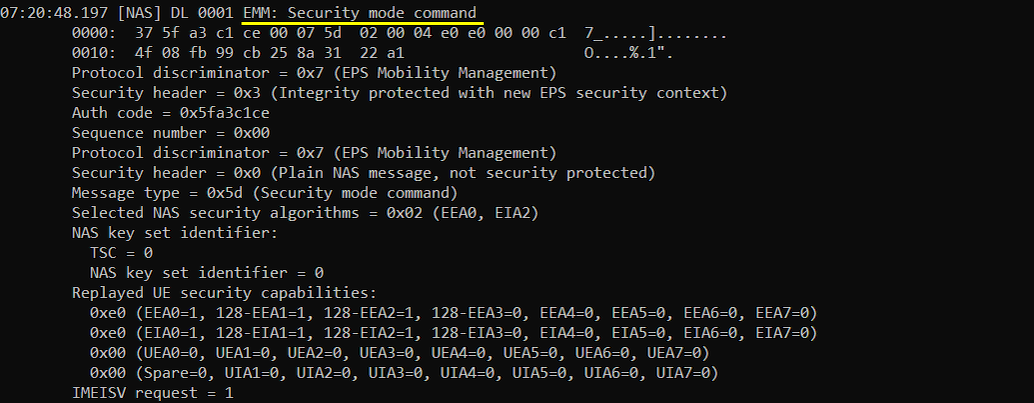
This is a Security Mode Command message (message type = 0x5d) from the network to UE to establish NAS security. It is protected with a new EPS security context (Security header = 0x3) and selects EEA0 for encryption and EIA2 for integrity (Selected NAS security algorithms = 0x02). The UE is asked to confirm previously reported security capabilities, and the network also requests the IMEISV (IMEISV request = 1) for identity verification.
Auth code is 0x5fa3c1ce and the sequence number is 0x00, the first message counted under the new context.
The replayed UE security capabilities are the same 0xe0 and 0xe0 values the UE sent in the Attach Request. The UE compares them against what it actually sent, and that check is what stops anyone from stripping the capability list down to a weaker algorithm while it was travelling unprotected.
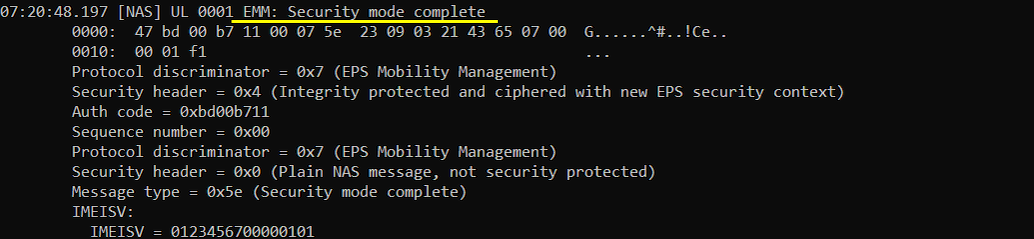
This is a Security Mode Complete message (message type = 0x5e) sent by the UE, confirming acceptance of the NAS security algorithms and EPS security context. The message is both integrity protected and ciphered (Security header = 0x4). The UE also includes its IMEISV (0123456700000101) as requested earlier by the network.
Auth code is 0xbd00b711 and the sequence number is still 0x00, since uplink and downlink are counted separately and this is the first protected message going up.
The IMEISV 0123456700000101 is the same value that turns up in the IMEISV column of the mme ue output once the attach is finished, so this message is where the core network learned it.
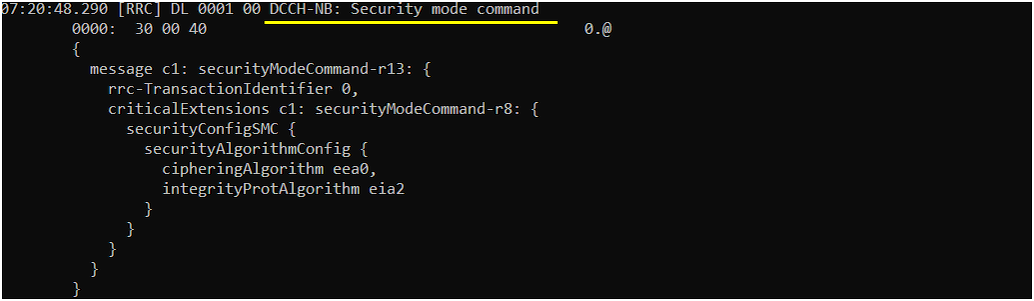
This is an NB-IoT RRC Security Mode Command message (securityModeCommand-r13) sent from the network to the UE. It specifies the selected security algorithms: eea0 for ciphering (no encryption) and eia2 for integrity protection
This is the RRC layer running its own security setup on DCCH-NB with rrc-TransactionIdentifier 0, separate from the NAS exchange in the two messages before it. NB-IoT needs both, and the two use different keys even though the algorithms selected here happen to be the same pair.
eea0 means the RRC traffic is not ciphered, which is the usual choice in a lab because it keeps the log readable. eia2 still applies integrity protection, so the messages are protected against modification even though they are in the clear.
This is an NB-IoT RRC Security Mode Complete message (securityModeComplete-r13) sent by the UE in response to the Security Mode Command. It confirms acceptance of the configured security algorithms (eea0 for ciphering and eia2 for integrity).
The whole message is 2 bytes, 18 00, and carries nothing beyond the rrc-TransactionIdentifier 0 that matches the command. From this point on every RRC message on the connection is integrity protected.

This is an NB-IoT RRC UE Capability Enquiry message (ueCapabilityEnquiry-r13) sent by the network to request the UE�s supported features and capabilities
The enquiry is 2 bytes and carries nothing but rrc-TransactionIdentifier 0. There is no RAT type list or band filter in the NB-IoT version of this message, unlike the LTE one, because an NB-IoT UE only has the one set of capabilities to report.

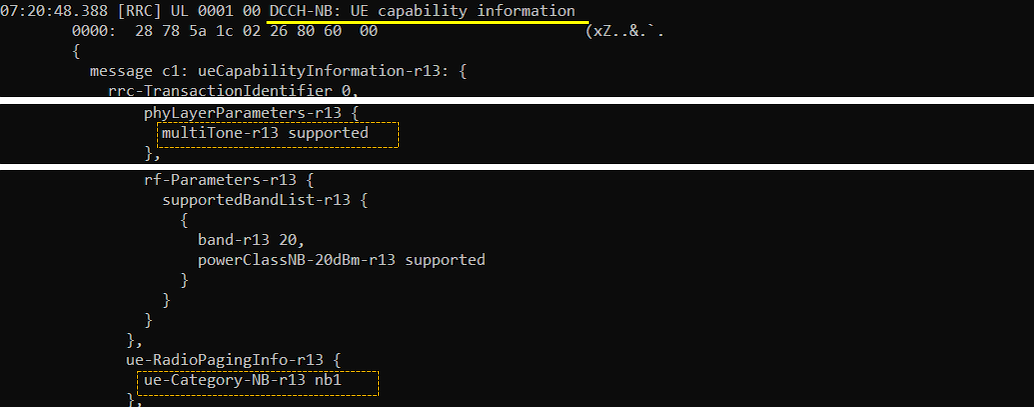
This is an NB-IoT RRC UE Capability Information message (ueCapabilityInformation-r13) sent by the UE in response to the UE Capability Enquiry. It indicates that the UE supports multi-tone operation (multiTone-r13 = supported), operates on band 20 with 20 dBm power class (powerClassNB-20dBm-r13 = supported), and belongs to Category NB1 (ue-Category-NB-r13 = nb1).
The three values sit in three different places in the message. multiTone-r13 supported is under phyLayerParameters-r13, band-r13 20 with powerClassNB-20dBm-r13 supported is under rf-Parameters-r13 in the supportedBandList-r13, and ue-Category-NB-r13 nb1 is under ue-RadioPagingInfo-r13.
The band the UE reports has to include the band the cell is on, which is band 20 from dl_earfcn 6300. ue-RadioPagingInfo-r13 is the part the network keeps hold of so that it can page the UE correctly later, and nb1 is the base NB-IoT category, which is what caps the transport block size and therefore the throughput you can expect out of this setup.
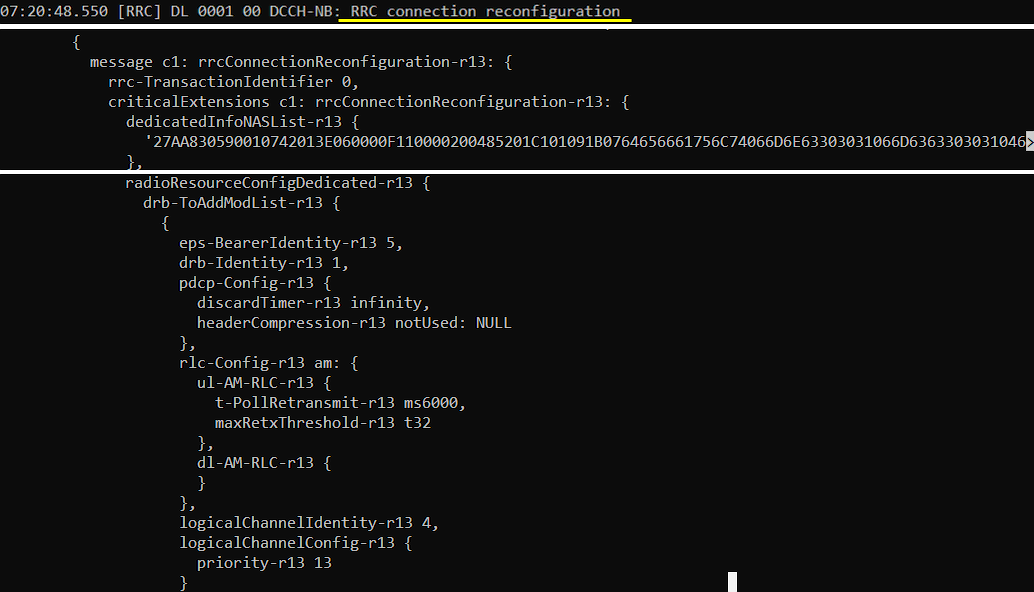
This is an NB-IoT RRC Connection Reconfiguration message (rrcConnectionReconfiguration-r13) used to set up data radio bearer configuration after the attach. It includes dedicatedInfoNASList-r13, which carries a NAS message, and configures DRB 1 for EPS bearer ID 5. The PDCP configuration disables header compression and sets discardTimer to infinity. The RLC is configured in AM mode with retransmission timer t-PollRetransmit = 6000 ms and maxRetxThreshold = 32. The logical channel is assigned ID 4 with priority 13.
dedicatedInfoNASList-r13 is the container that carries the Attach Accept down to the UE, which is why the NAS layer logs the Attach Accept at the same 07:20:48.550 timestamp as this message.
The PDCP and RLC settings are what you would expect for a bearer that has to survive very poor radio conditions. headerCompression-r13 is notUsed and discardTimer-r13 is infinity, so PDCP never drops a packet for being too old, and the AM configuration with t-PollRetransmit ms6000 and maxRetxThreshold t32 gives the bearer a long time and a lot of retries before it is declared failed.
This is an NB-IoT RRC Connection Reconfiguration Complete message (rrcConnectionReconfigurationComplete-r13) sent by the UE. It confirms successful application of the configuration received in the preceding RRC Connection Reconfiguration message, including DRB setup and NAS content.
The message is 2 bytes, 00 00, and carries only the matching transaction identifier. The data radio bearer is up from here, and the UE sends its Attach Complete straight afterwards.

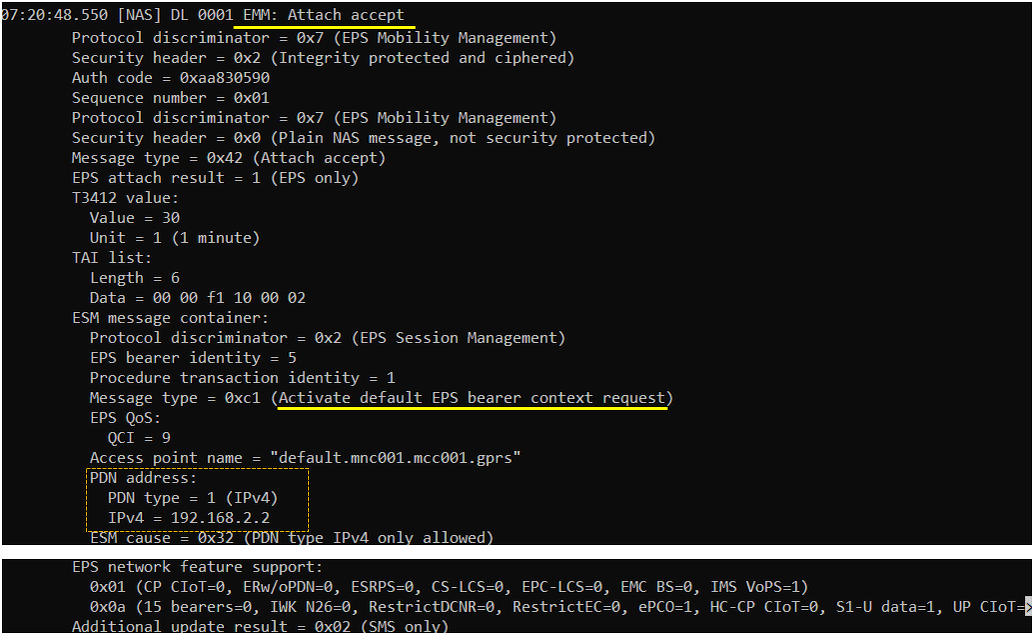
This is an EMM Attach Accept message sent from the Network to the UE, confirming successful attach with result "EPS only". The timer T3412 is set to 30 minutes, and the UE is assigned a PDN address (192.168.2.2) with PDN type = IPv4.
Embedded within is an ESM Activate Default EPS Bearer Context Request message (message type = 0xc1), assigning EPS bearer ID 5 with QCI = 9 and APN "default.mnc001.mcc001.gprs". The ESM cause = 0x32 indicates that only IPv4 is allowed. The UE is also informed of supported network features like ePCO=1, S1-U data=1, and IMS VoPS=1
Security header is 0x2 with auth code 0xaa830590 and sequence number 0x01, so the message is integrity protected and ciphered and the context set up earlier is now doing its job on the NAS side.
The TAI list is 6 bytes, 00 00 f1 10 00 02, which encodes plmn 00101 and tac 0x0002, the same tracking area the cell broadcasts and the same one the mme ue output reports. Additional update result is 0x02 for SMS only, and the EPS network feature support lines carry IMS VoPS=1, ePCO=1 and S1-U data=1.
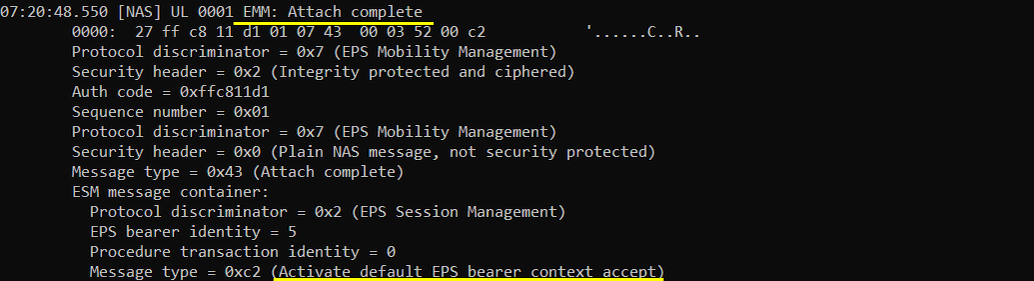
This is an EMM Attach Complete message sent by the UE, confirming successful completion of the attach procedure. It includes an ESM message container with Activate Default EPS Bearer Context Accept (message type = 0xc2) for EPS bearer ID 5, confirming acceptance of the default bearer and PDN connectivity settings provided earlier.
Security header is 0x2 with auth code 0xffc811d1 and sequence number 0x01, matching the protection level of the Attach Accept it answers.
Procedure transaction identity is 0 in the ESM container rather than the 1 used earlier, because the Activate Default EPS Bearer Context Accept is a reply to a network initiated procedure and does not start one of its own. This is the last message of the attach, and after it the mme ue output shows the UE with #BEARER 1 and IP_ADDR 192.168.2.2.
RRC / NAS Signaling
SIB1
: This is the SIB1 sent by eNB to configiture NB IoT (
{
message c1: systemInformationBlockType1-r13: {
hyperSFN-MSB-r13 '01'H,
cellAccessRelatedInfo-r13 {
plmn-IdentityList-r13 {
{
...
}
},
...
},
cellSelectionInfo-r13 {
...
},
p-Max-r13 10,
freqBandIndicator-r13 7,
eutraControlRegionSize-r13 n3,
nrs-CRS-PowerOffset-r13 dB0,
schedulingInfoList-r13 {
{
si-Periodicity-r13 rf128,
si-RepetitionPattern-r13 every2ndRF,
sib-MappingInfo-r13 {
},
si-TB-r13 b208
}
},
si-WindowLength-r13 ms160,
systemInfoValueTagList-r13 {
0
}
SIB2
: This is the SIB2 sent by eNB to configiture NB IoT (
{
message c1: systemInformation: {
criticalExtensions systemInformation-r8: {
sib-TypeAndInfo {
sib2: {
radioResourceConfigCommon {
rach-ConfigCommon {
preambleInfo {
numberOfRA-Preambles n52
},
powerRampingParameters {
powerRampingStep dB2,
preambleInitialReceivedTargetPower dBm-104
},
ra-SupervisionInfo {
preambleTransMax n10,
ra-ResponseWindowSize sf10,
mac-ContentionResolutionTimer sf40
},
maxHARQ-Msg3Tx 5
},
bcch-Config {
...
},
pcch-Config {
...
},
prach-Config {
rootSequenceIndex 204,
prach-ConfigInfo {
prach-ConfigIndex 4,
highSpeedFlag FALSE,
zeroCorrelationZoneConfig 11,
prach-FreqOffset 2
}
},
pdsch-ConfigCommon {
...
},
pusch-ConfigCommon {
pusch-ConfigBasic {
n-SB 1,
hoppingMode interSubFrame,
pusch-HoppingOffset 4,
enable64QAM TRUE
},
ul-ReferenceSignalsPUSCH {
groupHoppingEnabled FALSE,
groupAssignmentPUSCH 0,
sequenceHoppingEnabled FALSE,
cyclicShift 0
}
},
pucch-ConfigCommon {
...
},
soundingRS-UL-ConfigCommon setup: {
...
},
uplinkPowerControlCommon {
...
},
ul-CyclicPrefixLength len1,
pusch-ConfigCommon-v1270 {
enable64QAM-v1270 true
}
},
ue-TimersAndConstants {
t300 ms200,
t301 ms200,
t310 ms200,
n310 n6,
t311 ms10000,
n311 n5
},
freqInfo {
additionalSpectrumEmission 1
},
timeAlignmentTimerCommon infinity
},
Attach Request
: This is the AttachRequest sent by UE to inform UE capability for NB IoT NAS feature (
Protocol discriminator = 0x7 (EPS Mobility Management)
Security header = 0x0 (Plain NAS message, not security protected)
Message type = 0x41 (Attach request)
EPS attach type = 1 (EPS attach)
NAS key set identifier:
TSC = 0
NAS key set identifier = 7
Old GUTI or IMSI:
IMSI = 001010123456789
UE network capability:
0xe0 (EEA0=1, 128-EEA1=1, 128-EEA2=1, 128-EEA3=0, EEA4=0, EEA5=0, EEA6=0, EEA7=0)
0xe0 (EIA0=1, 128-EIA1=1, 128-EIA2=1, 128-EIA3=0, EIA4=0, EIA5=0, EIA6=0, EIA7=0)
0x00 (UEA0=0, UEA1=0, UEA2=0, UEA3=0, UEA4=0, UEA5=0, UEA6=0, UEA7=0)
0x00 (UCS2=0, UIA1=0, UIA2=0, UIA3=0, UIA4=0, UIA5=0, UIA6=0, UIA7=0)
0x00 (ProSe-dd=0, ProSe=0, H.245-ASH=0, ACC-CSFB=0, LPP=0, LCS=0, 1xSRVCC=0, NF=0)
0x90 (ePCO=1, HC-CP CIoT=0, ERw/oPDN=0, S1-U data=1, UP CIoT=0, CP CIoT=0, ProSe-relay=0, ProSe-dc=0)
0x01 (15 bearers=0, SGC=0, N1mode=0, DCNR=0, CP backoff=0, RestrictEC=0, V2X PC5=0, multipleDRB=1)
ESM message container:
Protocol discriminator = 0x2 (EPS Session Management)
EPS bearer identity = 0
Procedure transaction identity = 1
Message type = 0xd0 (PDN connectivity request)
Request type = 1 (initial request)
PDN type = 3 (IPv4v6)
Extended protocol configuration options:
Ext = 1
Configuration protocol = 0
Protocol ID = 0x8021 (IPCP)
Data = 01 00 00 10 81 06 00 00 00 00 83 06 00 00 00 00
Protocol ID = 0x0001 (P-CSCF IPv6 Address Request)
Data =
Protocol ID = 0x0003 (DNS Server IPv6 Address Request)
Data =
Protocol ID = 0x000a (IP address allocation via NAS signalling)
Data =
Protocol ID = 0x000c (P-CSCF IPv4 Address Request)
Data =
Protocol ID = 0x000d (DNS Server IPv4 Address Request)
Data =
Protocol ID = 0x0016 (APN rate control support indicator)
Data =
Additional update type = 0x01 (no additional information, keeping NAS signalling connection not required, SMS only)
MS network feature support = 0x01 (MS supports the extended periodic timer in this domain)
RrcConnectionSetup
: This is the RrcConnectionSetup sent by eNB to configiture NB IoT (
{
message c1: rrcConnectionSetup-r13: {
rrc-TransactionIdentifier 0,
criticalExtensions c1: rrcConnectionSetup-r13: {
radioResourceConfigDedicated-r13 {
srb-ToAddModList-r13 {
{
rlc-Config-r13 explicitValue: am: {
ul-AM-RLC-r13 {
t-PollRetransmit-r13 ms6000,
maxRetxThreshold-r13 t32
},
dl-AM-RLC-r13 {
}
},
logicalChannelConfig-r13 explicitValue: {
priority-r13 1
}
}
},
mac-MainConfig-r13 explicitValue-r13: {
ul-SCH-Config-r13 {
periodicBSR-Timer-r13 pp16,
retxBSR-Timer-r13 pp64
},
timeAlignmentTimerDedicated-r13 infinity
},
physicalConfigDedicated-r13 {
npdcch-ConfigDedicated-r13 {
npdcch-NumRepetitions-r13 r8,
npdcch-StartSF-USS-r13 v4,
npdcch-Offset-USS-r13 zero
},
npusch-ConfigDedicated-r13 {
npusch-AllSymbols-r13 FALSE
}
UE Capability Information
: This is the UE Capability Information sent by UE to inform RRC capability for NB IoT (
{
message c1: ueCapabilityInformation-r13: {
rrc-TransactionIdentifier 0,
criticalExtensions ueCapabilityInformation-r13: {
ue-Capability-r13 {
accessStratumRelease-r13 rel14,
ue-Category-NB-r13 nb1,
multipleDRB-r13 supported,
pdcp-Parameters-r13 {
supportedROHC-Profiles-r13 {
profile0x0002 TRUE,
profile0x0003 FALSE,
profile0x0004 TRUE,
profile0x0006 FALSE,
profile0x0102 FALSE,
profile0x0103 FALSE,
profile0x0104 FALSE
},
maxNumberROHC-ContextSessions-r13 cs12
},
phyLayerParameters-r13 {
multiTone-r13 supported
},
rf-Parameters-r13 {
supportedBandList-r13 {
{
band-r13 7,
powerClassNB-20dBm-r13 supported
}
}
}
},
ue-RadioPagingInfo-r13 {
ue-Category-NB-r13 nb1
},
nonCriticalExtension {
ue-Capability-ContainerExt-r14 {
ue-Category-NB-r14 nb2,
rf-Parameters-v1430 {
}
Attach Accept
: This is the AttachAccept sent by UE to inform NW capability for IoT NAS feature and Activate Default EPS Bearer(
Protocol discriminator = 0x7 (EPS Mobility Management)
Security header = 0x2 (Integrity protected and ciphered)
Auth code = 0x8cd0b681
Sequence number = 0x01
Protocol discriminator = 0x7 (EPS Mobility Management)
Security header = 0x0 (Plain NAS message, not security protected)
Message type = 0x42 (Attach accept)
EPS attach result = 1 (EPS only)
T3412 value:
Value = 30
Unit = 1 (1 minute)
TAI list:
Length = 6
Data = 00 00 f1 10 00 02
ESM message container:
Protocol discriminator = 0x2 (EPS Session Management)
EPS bearer identity = 5
Procedure transaction identity = 1
Message type = 0xc1 (Activate default EPS bearer context request)
EPS QoS:
QCI = 9
Access point name = "default.mnc001.mcc001.gprs"
PDN address:
PDN type = 1 (IPv4)
IPv4 = 192.168.2.2
ESM cause = 0x32 (PDN type IPv4 only allowed)
Extended protocol configuration options:
Ext = 1
Configuration protocol = 0
Protocol ID = 0x8021 (IPCP)
Data = 03 00 00 0a 81 06 08 08 08 08
Protocol ID = 0x000d (DNS Server IPv4 Address)
Data = 8.8.8.8
Protocol ID = 0x0016 (APN rate control parameters)
Data = 00 00 00 00
GUTI:
MCC = 001
MNC = 01
MME Group ID = 32769
MME Code = 1
M-TMSI = 0x209e332f
Emergency number list:
Length = 8
Data = 03 1f 19 f1 03 1f 11 f2
EPS network feature support:
0x01 (CP CIoT=0, ERw/oPDN=0, ESRPS=0, CS-LCS=0, EPC-LCS=0, EMC BS=0, IMS VoPS=1)
0x0a (15 bearers=0, IWK N26=0, RestrictDCNR=0, RestrictEC=0, ePCO=1, HC-CP CIoT=0, S1-U data=1, UP CIoT=0)
Additional update result = 0x02 (SMS only)