
NB IoT -UEsim
The purpose of this tutorial is to show you how to do basic connectivity test between a UEsim and Amari Callbox with LTE NB in Inband Mode. NB IoT is designed to use the bandwidth 200khz which issingle LTE RB(180khz) plusa little bit of guardband. It can be deployed in a few different operationmode called Inband, Guardband, Standalone mode as illustrated below.
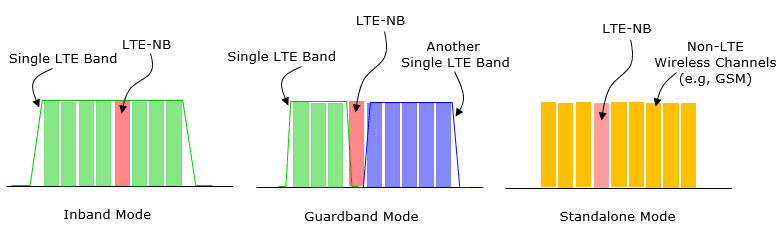
Source : Sharetechnote
On top of the operation mode, there are a few additional featuresdepending on operation mode.
- Inband Mode
- with Same PCI
- Non-Anchor Carrier Disabled
- Non-Anchor Carrier Enabled
- with Different PCI
- Guarband Mode
- Standalone Mode
This tutorial is based on the configuration for Inband ,same PCI ,Non-Anchor Carrier Disabled.
Table of Contents
Introduction
Narrowband Internet of Things (NB-IoT) is a 3GPP standardized cellular technology designed to provide low-power, wide-area connectivity for a vast number of IoT devices. Operating within the LTE spectrum, NB-IoT occupies a narrow bandwidth of 200 kHz—equivalent to a single LTE Resource Block (RB) plus a minimal guard band—making it highly efficient for connecting devices that require small, infrequent data transmissions. NB-IoT supports three deployment modes: Inband, where NB-IoT utilizes resource blocks within a normal LTE carrier; Guardband, placing NB-IoT in the unused spectrum between LTE carriers; and Standalone, leveraging re-farmed GSM spectrum. This tutorial focuses on the Inband mode, specifically with the same Physical Cell Identity (PCI) and with the Non-Anchor Carrier feature disabled, using a UEsim (user equipment simulator) and an Amari Callbox, a sophisticated LTE test platform. Understanding and validating basic connectivity in this scenario is critical for engineers verifying NB-IoT device integration, network configuration, and performance. The tutorial walks through the architecture, signaling flows, and configuration steps necessary for establishing a successful NB-IoT connection in the specified mode, providing foundational knowledge essential for further NB-IoT development, deployment, and troubleshooting.
-
Technology Context and Background
- NB-IoT is a cellular IoT technology standardized by 3GPP, optimized for low power, wide coverage, and massive device density.
- It operates within LTE infrastructure, supporting three deployment modes: Inband, Guardband, and Standalone.
- Inband mode allows NB-IoT channels to be embedded within an existing LTE carrier, sharing spectral resources with standard LTE traffic.
- The Amari Callbox provides a controlled LTE eNodeB environment for testing device connectivity, while the UEsim emulates NB-IoT device behavior.
-
Relevance and Importance
- Verifying basic NB-IoT connectivity is a crucial step in device and network validation, ensuring that devices can attach, communicate, and operate as expected.
- This connectivity test is especially significant for deployments where spectral efficiency and coexistence with LTE are paramount, such as in Inband mode with the same PCI and Non-Anchor Carrier disabled.
- The procedures outlined in this tutorial are foundational for further NB-IoT feature testing and real-world deployment readiness.
-
Learner Outcomes
- Understand NB-IoT deployment modes, with a focus on Inband operation.
- Gain practical experience configuring and testing connectivity between a UEsim and Amari Callbox under precise operational parameters.
- Develop the ability to interpret relevant signaling, troubleshoot connection issues, and validate NB-IoT network settings.
- Acquire skills applicable to broader NB-IoT testing, integration, and deployment projects.
-
Prerequisite Knowledge and Skills
- Familiarity with LTE architecture and basic concepts such as Resource Blocks, Physical Cell Identity (PCI), and carrier configuration.
- Understanding of NB-IoT features and deployment scenarios.
- Basic hands-on experience with network test equipment, such as the Amari Callbox and UEsim, including configuration and operation.
- Ability to interpret protocol logs and diagnose connectivity issues in a laboratory environment.
Summary of the Tutorial
This tutorial provides a comprehensive procedure for setting up and testing NB-IoT UE simulation against a call box or network simulator, focusing on configuration, execution, attach procedure, and log analysis for troubleshooting and verification.
-
Test Environment Configuration:
- Ensure matching configurations between the UE simulator (UEsim) and the call box (e.g., Amarisoft eNB). Use ue-nbiot.cfg for UEsim and enb-nbiot.cfg for the call box, creating symbolic links as required.
- Configure the core network using mme-ims.cfg and ensure the correct SIM information is set in ue_db-ims.cfg.
- Critical parameters to match include CELL_BANDWIDTH, NB_NON_ANCHOR, N_ANTENNA_DL, and N_ANTENNA_UL in both UEsim and ENB configurations; NB_MODE is set automatically by UEsim based on signaling messages.
-
Service Verification and Preparation:
- Verify that the LTE service on the call box is running using service lte status. If issues arise, restart the service with service lte restart.
- Enter screen mode on both UEsim and call box using screen -r to access interactive control.
- Check cell configurations using cell phy and cell commands to confirm cells are set as intended.
-
Attach Procedure:
- Start tracing on the call box to monitor signaling and attach progress.
- Power on the UE in UEsim (power_on UE), observe cell detection, SIB decoding, and initial attach messages.
- Upon successful SIB decoding and attach, verify cell registration using cells command and retrieve UE information with ue commands on the call box (both eNB and MME screens).
-
Log Analysis and Verification:
- Examine logs on UEsim (/tmp/ue0.log) and call box (/tmp/enb0.log) using a text editor (e.g., nano) or Amarisoft WebGUI, with a recommendation to use full-stack debug logging for complete visibility.
- Identify and analyze key NB-IoT and LTE signaling messages, including:
- SIB1/SIB2: Confirm correct NB-IoT cell configuration, paging, random access, uplink/downlink channels, and power settings.
- Attach Request/Accept: Trace the NAS/EPS attach sequence, including UE capability, IMSI, bearer requests, and PDN connection details.
- RRC Connection Procedures: Follow RRC Connection Request, Setup, Setup Complete, Security Mode Command/Complete, and UE Capability Enquiry/Information messages to verify dedicated resource assignment and security establishment.
- Authentication/Security: Validate EMM Authentication Request/Response, Security Mode Command/Complete, including algorithm selection (EEA0/EIA2), integrity, and IMEISV reporting.
- Bearer Context: Inspect ESM Activate Default EPS Bearer Context Request/Accept messages for successful allocation of EPS bearers and PDN address assignment.
- For troubleshooting, identify failure points in the registration or attach process by comparing expected and actual log entries.
- For deeper analysis, especially of lower layers, the use of Amarisoft WebGUI is recommended.
-
Best Practices and Notes:
- Always ensure configuration files are synchronized between UE and eNB/call box to prevent mismatches.
- Use the provided commands and log references as templates, adjusting values as needed for specific test requirements.
- Leverage WebGUI for enhanced log navigation and troubleshooting as familiarity with Amarisoft tools increases.
- Full-stack logging is strongly recommended for comprehensive analysis and troubleshooting.
Conclusion: The tutorial outlines a step-by-step methodology for NB-IoT attach and registration testing, emphasizing precise configuration, systematic execution, and structured log analysis to ensure test success and facilitate troubleshooting of failures in UE-to-network interactions.
Test Setup
Test setup for this tutorial is as shown below.
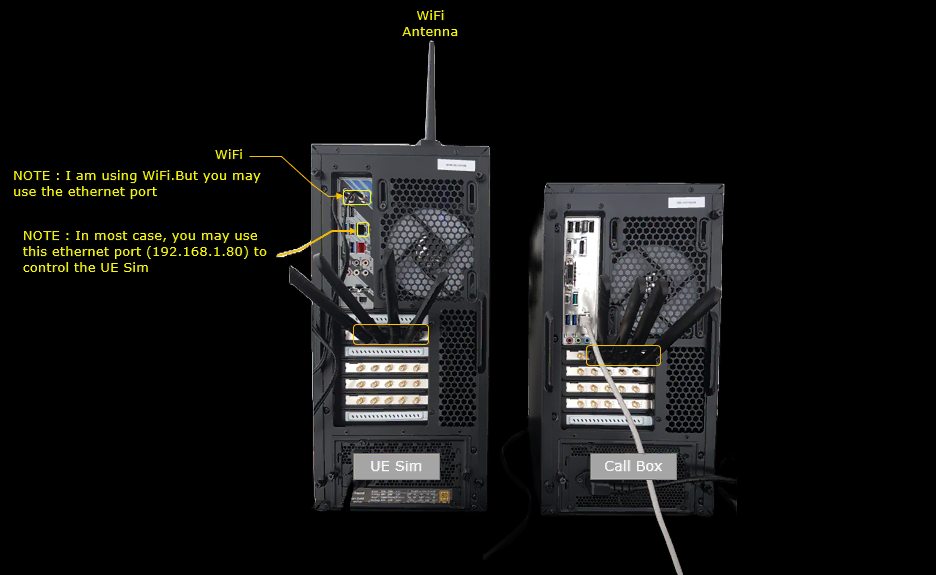
Configuration
An important thing in using UE sim is to do proper matching between UE sim configuration and Call box configuration In this tutorial, I used the ue-catm1.cfgand and enb-catm1.cfgwithout any change
If you use other Network (e.g, other network simulator or real network), you have to make it sure to configure UE sim according to the settings on network side
For UEsim, the ue-nbiot.cfg is used (
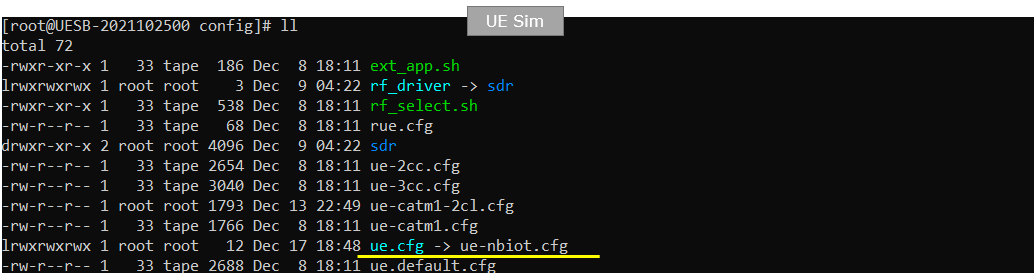
For Callbox, the enb-nbiot.cfg is used (
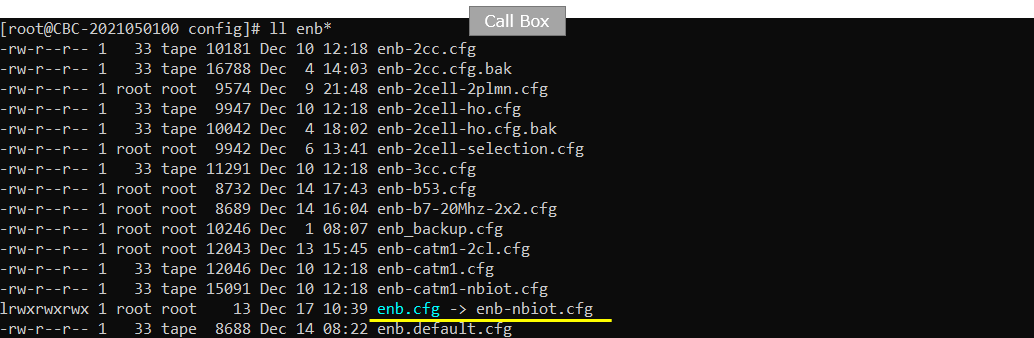
For the core network, mme-ims.cfg is used for configuration.
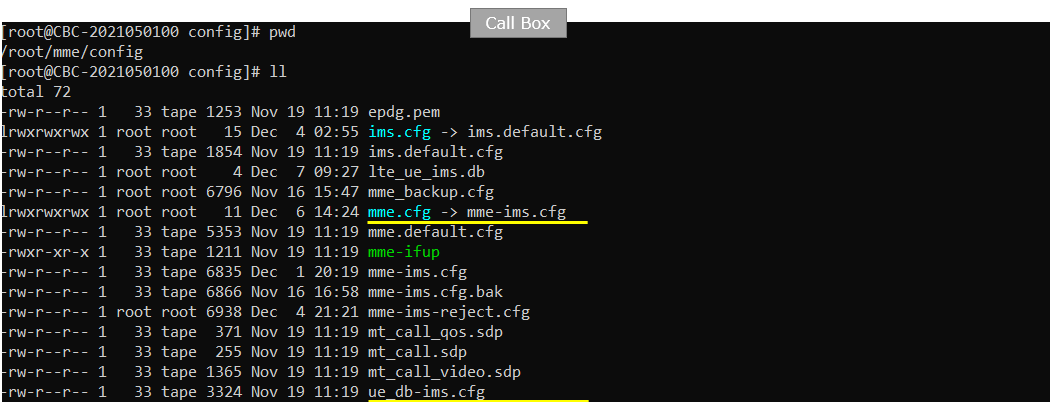
The IMS configuration file is located at /root/mme/config/ims-ims.cfg on the Callbox. The include statement loads ue_db-ims.cfg, which contains the IMS subscriber database and related UE authentication or service configuration used by the IMS server.

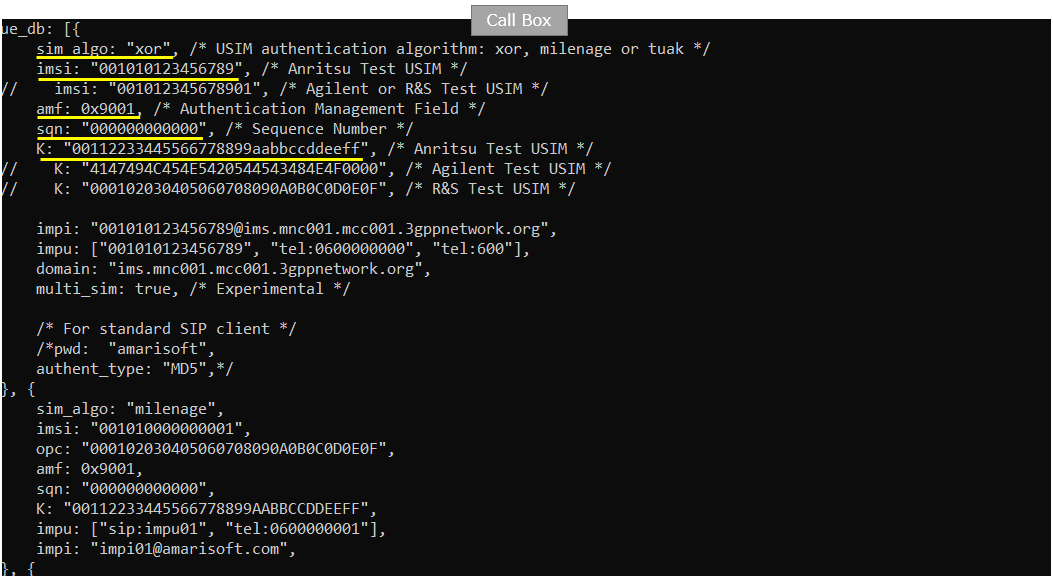
The ue_db-ims.cfg file defines the IMS subscriber profiles used by the Callbox. Each ue_db entry contains the USIM authentication parameters, including sim_algo, IMSI, AMF, sequence number and authentication key K. These values must match the corresponding USIM configuration in UEsim.
The IMS-related fields define the subscriber identities used for IMS registration. impi specifies the private IMS identity, impu lists one or more public IMS identities such as the SIP URI and telephone number, and domain specifies the IMS home domain. The example enables multi_sim so that multiple simulated UEs can use the subscriber profile. Additional ue_db entries can be added when multiple UEs with different IMSIs and authentication credentials are required.
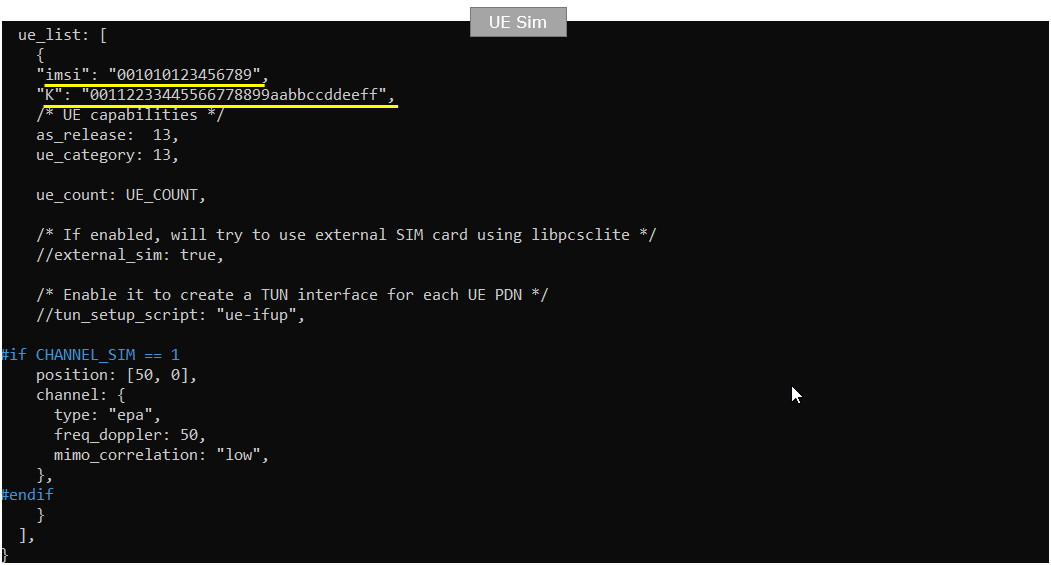
In this tutorial, the UE is configured in ue-nbiot.cfg with IMSI 001010123456789 and authentication key K 00112233445566778899aabbccddeeff. These values must match the corresponding subscriber entry configured on the Callbox.
as_release and ue_category are both set to 13, indicating an NB-IoT UE operating with the Release 13 capability set. ue_count specifies the number of simulated UEs to be created. The optional external_sim and tun_setup_script settings are disabled in this example.
When channel simulation is enabled, the UE position is set to [50, 0] and an EPA fading channel is applied with a Doppler frequency of 50 Hz and low MIMO correlation.
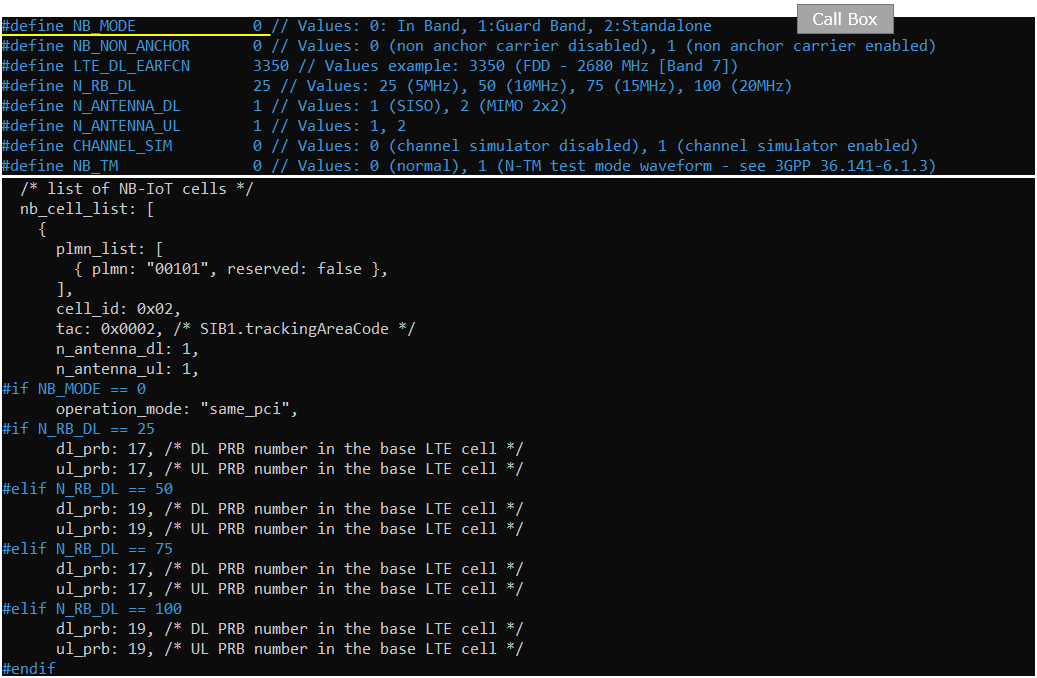
The NB-IoT cell is configured in enb-nbiot.cfg on the Callbox. In this example, NB_MODE is set to 0 for in-band deployment, NB_NON_ANCHOR is set to 0 to use only the anchor carrier, and the underlying LTE cell uses downlink EARFCN 3350 with a 5 MHz bandwidth.
The parameters LTE_DL_EARFCN, NB_NON_ANCHOR, N_ANTENNA_DL and N_ANTENNA_UL must be configured consistently on UEsim. NB_MODE is mainly an eNB-side setting because the UE determines the NB-IoT deployment mode from the broadcast RRC system information.
LTE_DL_EARFCN specifies the carrier frequency of the underlying LTE cell, not the exact NB-IoT carrier frequency. For in-band deployment, the NB-IoT carrier is placed on a selected LTE physical resource block, so its actual center frequency is derived from LTE_DL_EARFCN and the configured PRB position.
The nb_cell_list section defines the NB-IoT cell identity, PLMN, tracking area and antenna configuration. operation_mode is set to same_pci, meaning that the NB-IoT carrier uses the same physical cell identity as the LTE cell. For the configured 5 MHz LTE bandwidth, dl_prb and ul_prb are set to 17, selecting the resource-block position used by the NB-IoT carrier in downlink and uplink. (
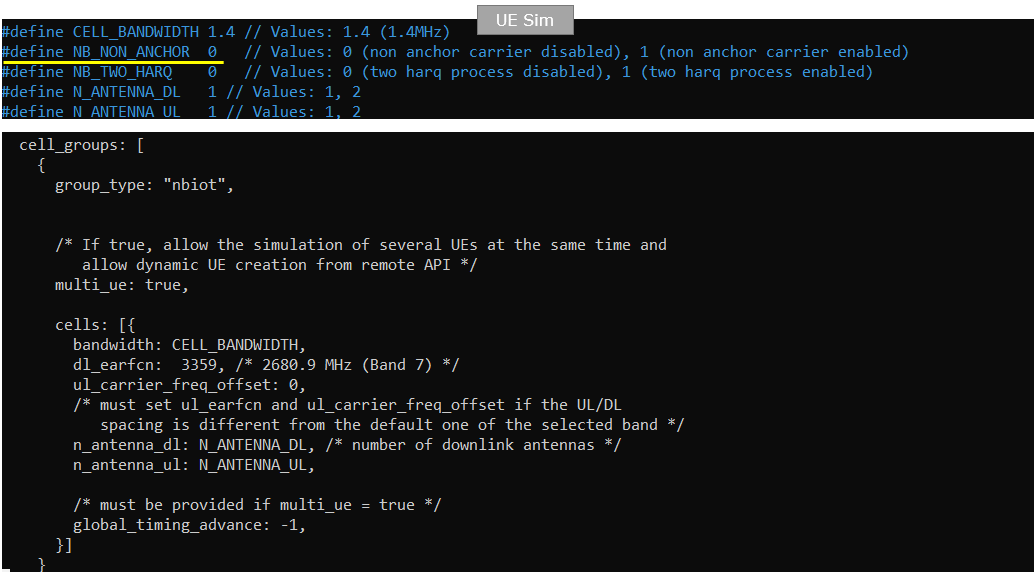
The corresponding NB-IoT cell is configured in ue-nbiot.cfg on UEsim. CELL_BANDWIDTH, NB_NON_ANCHOR, N_ANTENNA_DL and N_ANTENNA_UL must match the related Callbox configuration. In this example, the UE uses a 1.4 MHz cell bandwidth, the non-anchor carrier is disabled, and one antenna is configured for both downlink and uplink.
The cell group is configured with group_type set to nbiot. multi_ue is enabled so that multiple NB-IoT UEs can be simulated and dynamically controlled through the remote API. The bandwidth and antenna parameters are applied to the cell through the corresponding predefined values.
The dl_earfcn parameter is set to 3359. This is different from LTE_DL_EARFCN 3350 configured on the Callbox because the Callbox value identifies the underlying LTE carrier, whereas the UEsim value must identify the actual NB-IoT carrier. For in-band deployment, the NB-IoT EARFCN is derived from the LTE carrier frequency and the selected NB-IoT PRB position.
ul_carrier_freq_offset is set to 0 because the default uplink and downlink frequency spacing of the selected LTE band is used. global_timing_advance is set to -1, allowing UEsim to determine and manage the timing advance during the connection procedure. (
 e
e
Check if LTE service is Running
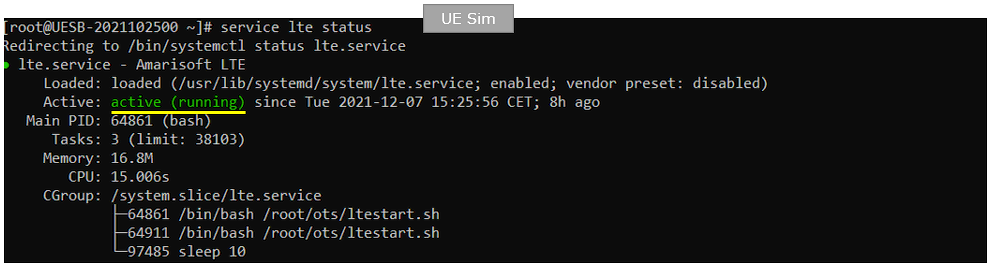
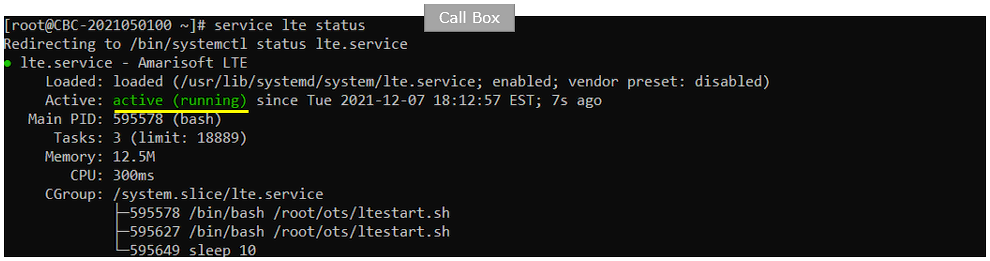
Whatever you want to test, the first thing you need to do is that call box program (LTE Service) is running. You can check on the execution status of the call box program by running following command and you should get the result as shown below
# service lte status
The output should show Active: active (running), confirming that the LTE service and its associated processes have started successfully. If the service is not running, start it before proceeding with the NB-IoT connectivity test.
NOTE : Getting this result is pre-requisite for Call Box Operation, but this result itself does not guarantee the normal operation. If you see some unexpected issues. You may restart the call box with following command
# service lte restart
Getting into Screen Mode
If it is confirmed that the lte service is running, go to screen mode by running 'screen -r' and follow through the steps as shown below. The steps shown here is the procedure that you would use for almost every test and it is highly recommended to get familiar with these steps. For further commands you can use in this screen mode, refer to the tutorial : Command Line Command
After confirming that the LTE service is running, connect to the Amarisoft screen session by executing the following command on UEsim: screen -r
This attaches the terminal to the running Amarisoft processes and provides access to their interactive command-line interfaces. The same procedure is commonly used for many Amarisoft tests, so it is useful to become familiar with navigating between the different windows in screen mode.

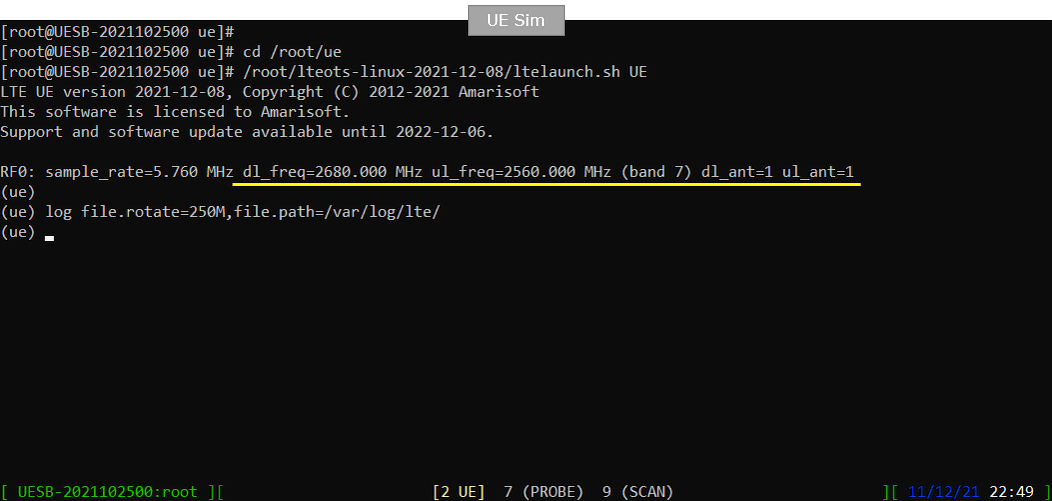
After attaching to the screen session, the UE console is displayed. The startup information confirms that the LTE UE application has been launched successfully.
The RF0 status line shows the configured radio parameters: a 5.760 MHz sampling rate, 2680 MHz downlink frequency, 2560 MHz uplink frequency, LTE Band 7, and one antenna for both downlink and uplink. The (ue) prompt indicates that the UE command-line interface is ready to accept commands.
On the Callbox, attach to the running Amarisoft screen session by executing: screen -r
This opens the Callbox console and provides access to the interactive windows for the eNB, MME, IMS and other running LTE components.

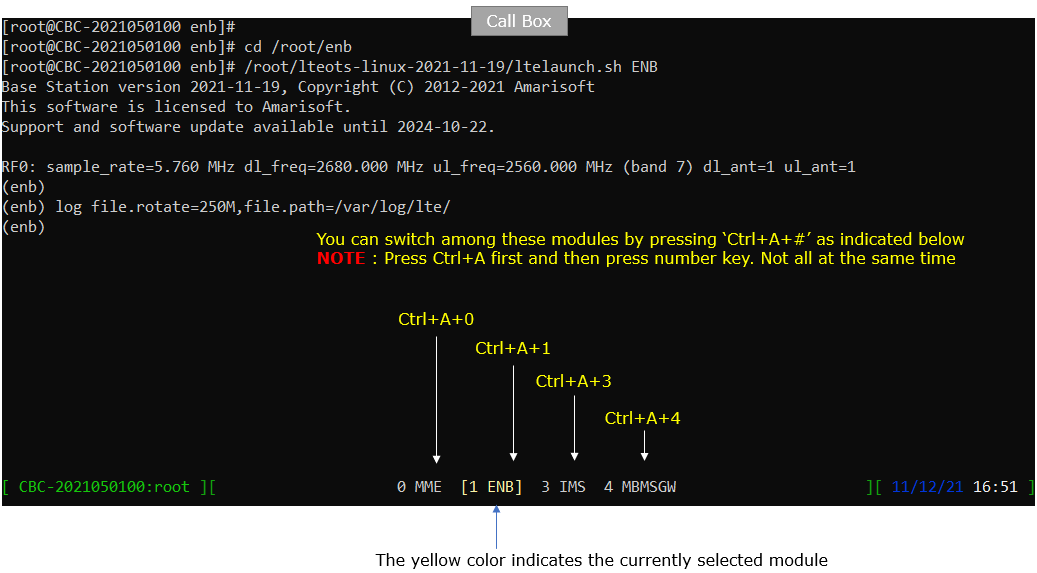
After attaching to the Callbox screen session, the eNB console is displayed. The startup information confirms that the Amarisoft base-station application is running with a 5.760 MHz sampling rate, 2680 MHz downlink frequency, 2560 MHz uplink frequency, LTE Band 7, and one antenna in each direction.
The available Callbox modules are shown at the bottom of the screen. Switch between them by pressing Ctrl+A, releasing the keys, and then pressing the corresponding number: 0 for MME, 1 for eNB, 3 for IMS, and 4 for MBMSGW. The module highlighted in yellow is the currently selected console.
Attach UE
Now perform UE attach procedure. This would be a little bit busy process since you need to switch back and forth between Callbox screen and UEsim screen.
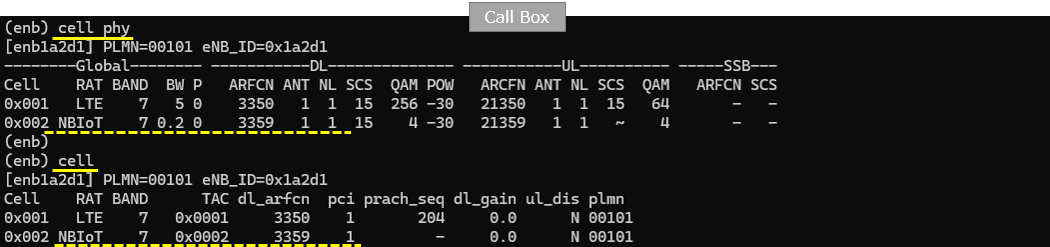
Before you start test, it is always recommed to check out basic cell configurations with 'cell phy' and 'cell' command and see if all the cells are configured as intended. (
Run cell_phy and cell from the eNB console to verify the configured LTE and NB-IoT cells.
The cell_phy output shows the underlying LTE cell on Band 7 with a 5 MHz bandwidth and downlink EARFCN 3350. The NB-IoT cell is shown separately with a 0.2 MHz bandwidth and downlink EARFCN 3359. Both cells use one downlink and one uplink antenna.
The cell output confirms that the LTE cell uses cell ID 0x001, TAC 0x0001 and PCI 1, while the NB-IoT cell uses cell ID 0x002, TAC 0x0002 and the same PCI 1. This confirms the same-PCI in-band NB-IoT configuration and shows that the NB-IoT carrier frequency differs from the underlying LTE carrier frequency.
Start Tracing on the Callbox
From the eNB console, enter the following command to start real-time protocol tracing: t
The console displays Press [return] to stop the trace, indicating that tracing is active. Keep the trace running while starting the NB-IoT UE so that the connection procedure and exchanged messages can be observed. Press Enter when you want to stop the trace.

From the UEsim console, enter the following command: power_on
This powers on the simulated NB-IoT UE and starts the cell search, synchronization, system-information acquisition and network registration procedure. Keep the Callbox trace running to observe the signaling messages exchanged during the connection process.

After the UE is powered on, UEsim searches for the configured NB-IoT carrier and attempts to decode the broadcast system information. The message Cell 0: SIB found confirms that the UE has detected the cell, achieved synchronization and successfully decoded the required System Information Blocks.

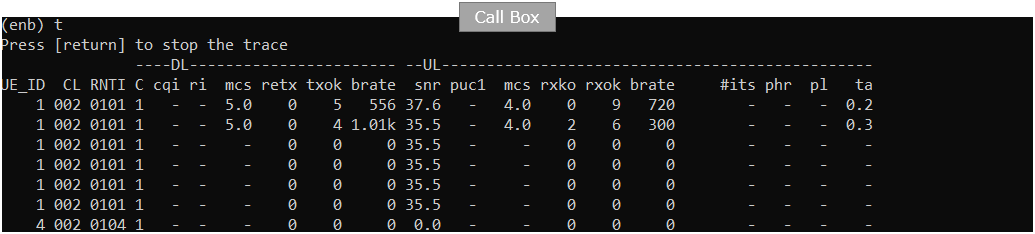
Once SIB decoding and the initial attach procedure are completed, the Callbox trace begins displaying the connected UE’s real-time radio statistics.
The UE is shown on NB-IoT cell 002 with RNTI 0101. The trace reports downlink and uplink scheduling activity, MCS, retransmissions, transport-block size, SNR, received packets, bit rate and timing advance. The presence of non-zero downlink and uplink values confirms that the UE has successfully connected and is exchanging data with the Callbox.
After the initial attach is completed, enter the cells command on the UEsim console to verify the serving cell information.
The output confirms that Cell 0 is an NB-IoT FDD cell using PCI 1, downlink EARFCN 3359 and uplink EARFCN 21359. It also shows one configured resource block for both downlink and uplink, confirming that the UE is registered to the expected NB-IoT carrier.

After the initial attach is completed, enter the ue command in the Callbox eNB console to display the connected UE context.
The output shows the RAN UE ID, Core Network UE ID, serving cell and assigned RNTI. In this example, the UE is connected through NB-IoT cell 0x002 and uses RNTI 0x0106, confirming that the Callbox has successfully created and maintained the UE connection context.

After the initial attach is completed, enter the ue command in the Callbox MME console to display the registered UE information.
The output shows the UE SUPI, temporary identity, core-network registration status, tracking area, default bearer and assigned IP address. In this example, the UE is registered for EPC service, has default bearer 1, and has been assigned the IP address 192.168.2.2.

Log Analysis
In this section, you will see how to confirm if UE registration is complete from trace log. You can use the same method to find any issues (e.g, registration failure) for troubleshooting. When UE registration fails, you may use this tutorial to figure out the point of the failure and troubleshoot
Open /tmp/ue0.log on UEsim using any text editor. I am using nano in this tutorial. (NOTE : In the same way, you can check eNB log by opening /tmp/enb0.log on Callbox).
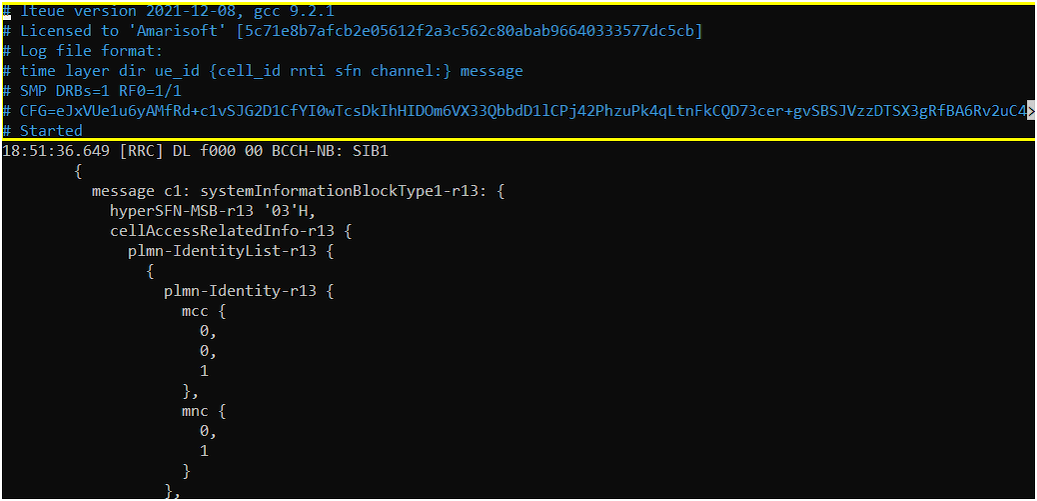
The highlighted block is the log-file header generated when UEsim starts. It records the software build, license, runtime configuration and the format used by the following log entries.
lteue version 2021-12-08, gcc 9.2.1 identifies the Amarisoft LTE UE software release and the compiler version used to build it. This information is useful when comparing logs from different software releases or reporting an issue to Amarisoft support.
Licensed to Amarisoft, followed by the hexadecimal value, identifies the license associated with the running software. The hexadecimal string is a license or installation identifier rather than UE signaling information.
Log file format describes the structure of each subsequent log line: time layer dir ue_id {cell_id rnti sfn channel:} message
SMP DRBs=1 RF0=1/1 summarizes the active runtime configuration. DRBs=1 indicates that one data-radio-bearer context is configured or available in this setup. RF0 identifies the first RF interface, and 1/1 indicates one downlink and one uplink antenna or RF chain.
CFG= followed by the long encoded string is an encoded snapshot of the effective UEsim configuration used when the log was created. It allows the software configuration associated with the trace to be preserved in the log, which is useful when reproducing or troubleshooting a test.
Started marks the end of the header and indicates that normal runtime logging begins after this point. The next entry, BCCH-NB: SIB1, is therefore the first protocol event shown in this trace.
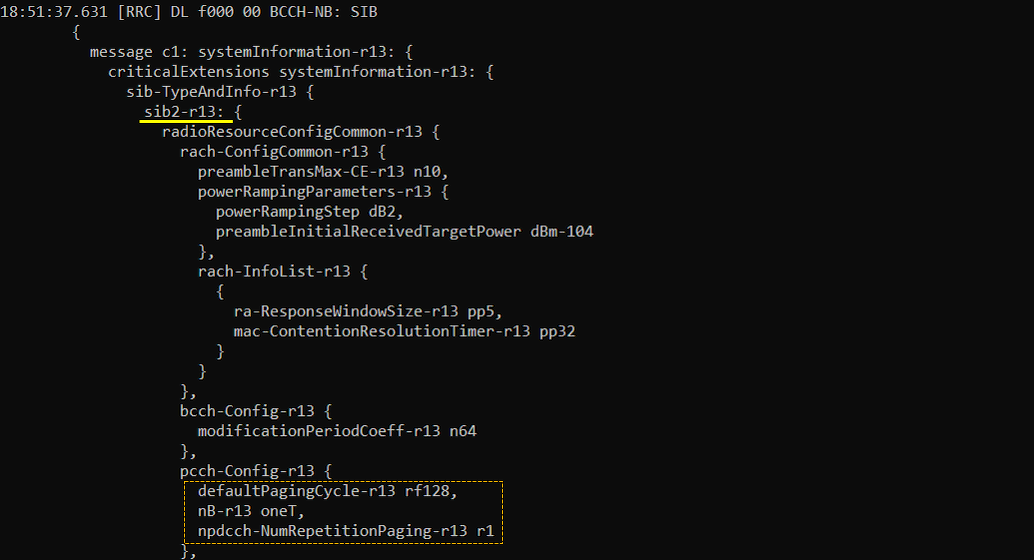
This is SIB2-NB, which provides the common radio-resource configuration required for random access, paging, uplink transmission and downlink reception.
rach-ConfigCommon-r13 configures the initial random-access procedure. The UE may transmit the preamble up to 10 times, starts with a target received power of −104 dBm and increases the transmit power in 2 dB steps when retransmission is required. ra-ResponseWindowSize-r13 pp5 defines the time during which the UE waits for a Random Access Response, while mac-ContentionResolutionTimer-r13 pp32 defines how long it waits for contention resolution.
pcch-Config-r13 defines the paging configuration. defaultPagingCycle-r13 rf128 sets the default paging cycle to 128 radio frames. nB-r13 oneT determines the distribution of paging occasions within the paging cycle, and npdcch-NumRepetitionPaging-r13 r1 configures one NPDCCH repetition for paging.
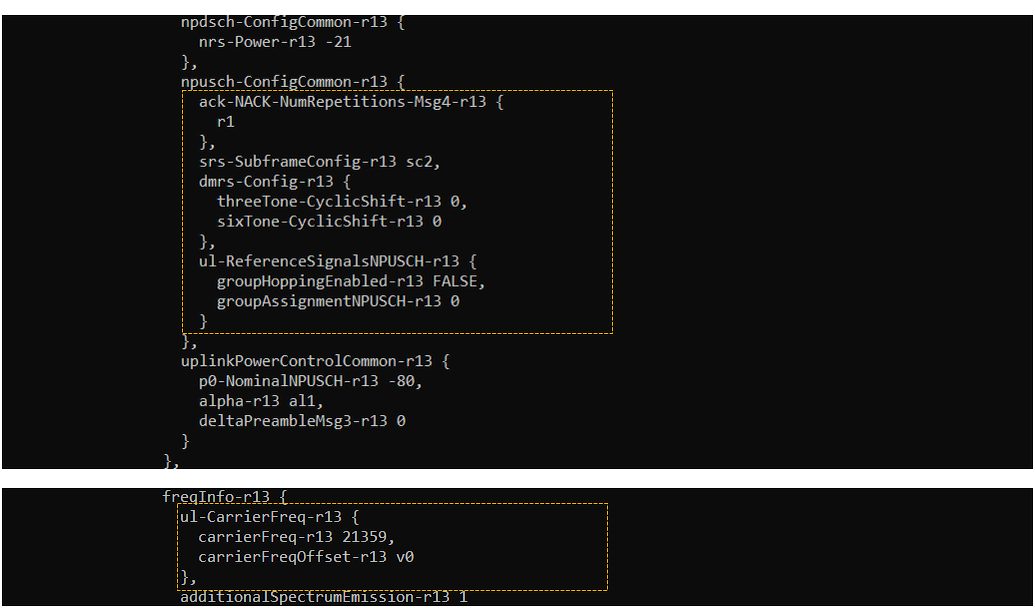
npusch-ConfigCommon-r13 defines common NPUSCH parameters. ack-NACK-NumRepetitions-Msg4-r13 r1 configures one NPUSCH repetition when the UE sends HARQ acknowledgement for Msg4. srs-SubframeConfig-r13 sc2 identifies the configured SRS subframe pattern. The DMRS cyclic shifts are set to 0 for both three-tone and six-tone NPUSCH transmission. groupHoppingEnabled-r13 FALSE disables NPUSCH reference-signal group hopping, and groupAssignmentNPUSCH-r13 is set to 0.
uplinkPowerControlCommon-r13 configures the common NPUSCH power-control parameters. p0-NominalNPUSCH-r13 is set to −80 dBm, alpha-r13 is set to 1, and deltaPreambleMsg3-r13 is set to 0 dB.
npdsch-ConfigCommon-r13 sets nrs-Power-r13 to −21 dB. This value represents the relative power offset used for the NB-IoT narrowband reference signal and should not be interpreted as an absolute transmit power.
freqInfo-r13 provides the uplink carrier information. carrierFreq-r13 21359 identifies the uplink EARFCN, while carrierFreqOffset-r13 v0 indicates that no additional carrier-frequency offset is applied.
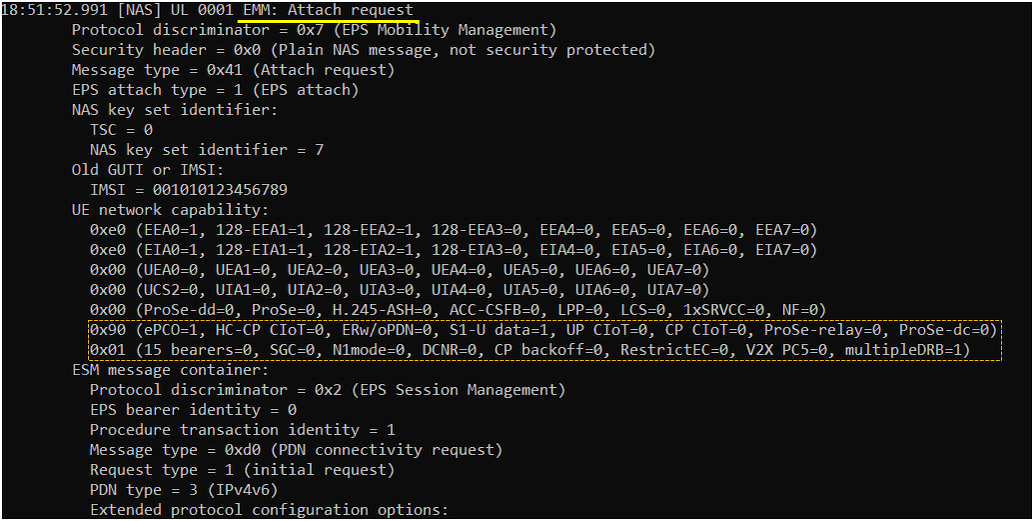
This is an LTE Attach Request sent by the UE to initiate EPS registration. Because no valid temporary identity is available, the UE identifies itself using IMSI 001010123456789. The message is sent as a plain NAS message because NAS security has not yet been established.
EPS attach type is set to 1, indicating a normal EPS attach. The Attach Request also contains an embedded PDN Connectivity Request, allowing the UE to request both network registration and establishment of the initial PDN connection within the same procedure. The request type is initial request, and PDN type 3 indicates that the UE requests IPv4v6 connectivity.
The UE network capability IE indicates which NAS security algorithms and optional EPS features are supported. The UE supports EEA0, 128-EEA1 and 128-EEA2 for encryption, and EIA0, 128-EIA1 and 128-EIA2 for integrity protection. Other listed algorithms and optional features are not supported in this configuration.
The highlighted capability bits show that ePCO is set to 1, meaning that the UE supports extended Protocol Configuration Options for exchanging additional PDN and IP-related parameters. multipleDRB is also set to 1, indicating support for multiple data radio bearers. CP-CIoT and UP-CIoT are set to 0, so the UE does not indicate support for the Control Plane or User Plane CIoT EPS optimization features in this Attach Request.
When analyzing an attach failure, verify that the UE network capability includes all security algorithms and optional features required by the network configuration and intended test scenario.
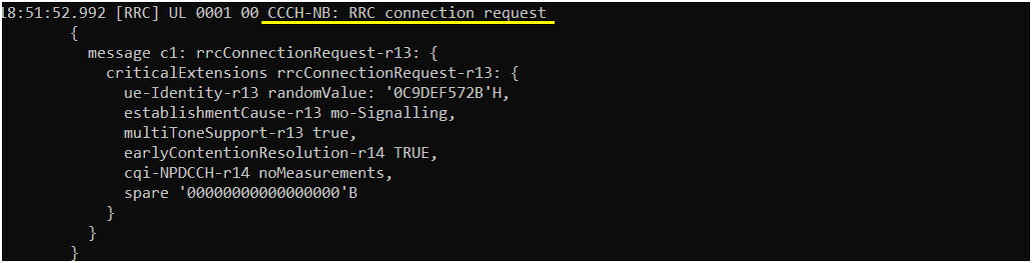
This is an NB-IoT RRC Connection Request sent on CCCH-NB after completion of the random-access procedure. It requests establishment of an RRC connection so that the UE can transfer the NAS Attach Request to the network.
ue-Identity-r13 is set to the random value 0C9DEF572B. A random identity is used because the UE does not have a valid S-TMSI that can be used for this connection attempt.
establishmentCause-r13 is set to mo-Signalling, indicating that the UE is establishing the connection for mobile-originated signaling rather than user-plane data.
multiToneSupport-r13 is true, indicating that the UE supports multi-tone NPUSCH transmission in addition to single-tone operation. earlyContentionResolution-r14 is TRUE, indicating support for the Release 14 early contention-resolution mechanism. cqi-NPDCCH-r14 is set to noMeasurements, meaning that no NPDCCH CQI measurement information is included in this request.
The final spare field is reserved and is set to all zeros.
This is an NB-IoT RRC Connection Setup message sent by the eNB on CCCH-NB. It accepts the UE’s connection request and establishes the initial dedicated radio configuration. rrc-TransactionIdentifier is set to 0 and will be echoed by the UE in the corresponding RRC Connection Setup Complete message.
The srb-ToAddModList-r13 section configures SRB1, which will carry subsequent RRC and NAS signaling. SRB1 uses acknowledged-mode RLC. The uplink AM-RLC configuration sets t-PollRetransmit-r13 to 6000 ms and maxRetxThreshold-r13 to 32, defining how long the UE waits before retransmitting a poll and how many retransmissions are allowed before declaring an RLC failure. The logical-channel priority is set to 1, giving this signaling bearer the highest priority.
The MAC configuration sets periodicBSR-Timer-r13 to 16 subframes and retxBSR-Timer-r13 to 64 subframes. These timers control periodic and retransmitted Buffer Status Reports. timeAlignmentTimerDedicated-r13 is set to infinity, meaning that uplink time alignment does not expire while this configuration remains active.
The dedicated physical configuration defines how the UE monitors NPDCCH in its UE-specific search space. npdcch-NumRepetitions-r13 is set to r8, so each NPDCCH transmission may be repeated eight times to improve reliability. npdcch-StartSF-USS-r13 v4 and npdcch-Offset-USS-r13 zero define the starting position and offset of the UE-specific NPDCCH search space.
The NPUSCH dedicated configuration sets npusch-AllSymbols-r13 to FALSE. This means that NPUSCH transmission does not automatically use every available SC-FDMA symbol; symbols reserved for reference signals or other required purposes remain excluded.
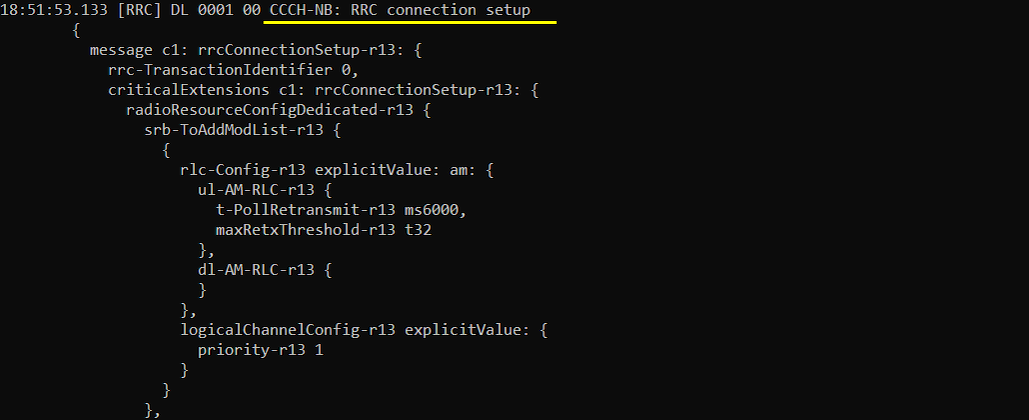
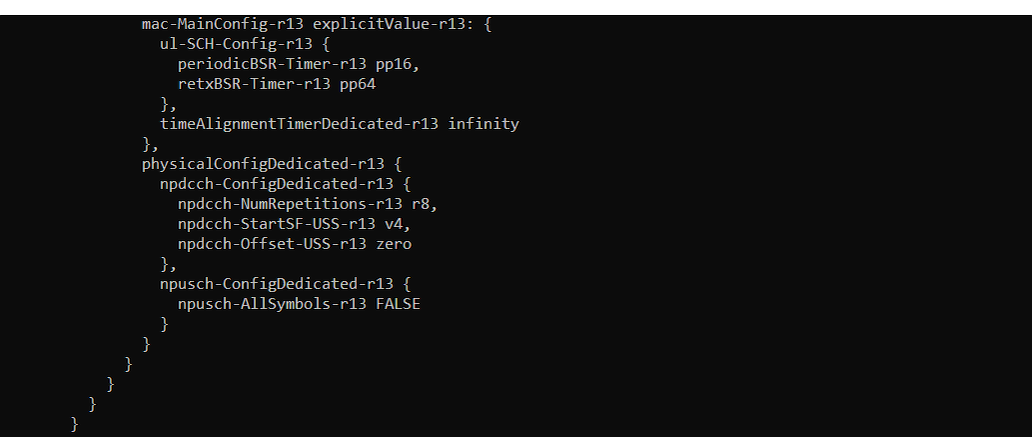
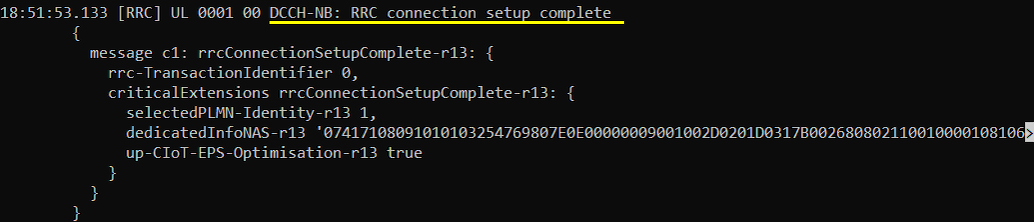
This is an NB-IoT RRC Connection Setup Complete message sent by the UE on DCCH-NB. It confirms that the UE has successfully applied the configuration provided in the RRC Connection Setup message and completed establishment of the RRC connection.
rrc-TransactionIdentifier is set to 0, matching the transaction identifier received in the RRC Connection Setup message. selectedPLMN-Identity-r13 is set to 1, indicating that the UE selected the first PLMN entry broadcast by the cell.
dedicatedInfoNAS-r13 carries the initial NAS message, in this case the EPS Attach Request, from the UE to the core network. The RRC layer transparently transports this NAS payload without interpreting its contents.
up-CIoT-EPS-Optimisation-r13 is set to true, indicating that the UE requests or supports User Plane CIoT EPS optimization for this connection. This should not be confused with Control Plane CIoT EPS optimization. User Plane optimization maintains a user-plane bearer context and can support features such as RRC connection suspend and resume, whereas Control Plane optimization transports small user data through NAS signaling.
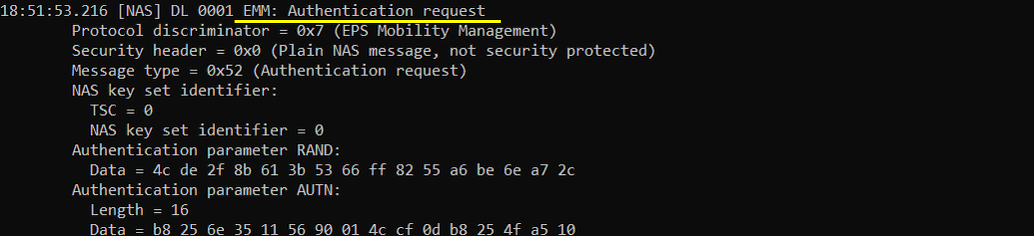
This is an EMM Authentication Request sent by the network to the UE during the EPS attach procedure. It starts the EPS AKA authentication process by providing the UE with a random challenge, RAND, and an authentication token, AUTN.
The message uses protocol discriminator 0x7 for EPS Mobility Management and message type 0x52 for Authentication Request. The security header is 0x0, meaning that this NAS message is sent before NAS integrity protection and ciphering have been activated.
The NAS key set identifier is 0 with TSC set to 0. TSC 0 indicates that the key set belongs to the native EPS security context. The key set identifier identifies the security context that will be associated with the authentication procedure.
RAND is a 128-bit random challenge generated by the home-network authentication system. The UE uses RAND together with its secret USIM key to calculate the authentication response and derive session keys.
AUTN is the authentication token used by the UE to verify that the challenge came from an authorized network and that the sequence number is valid. It contains protected synchronization and authentication information derived from the subscriber credentials.
After receiving this message, the USIM verifies AUTN and calculates RES. If verification succeeds, the UE returns RES in an Authentication Response. If AUTN validation fails, the UE sends an Authentication Failure, for example because of a MAC failure or sequence-number synchronization problem.
This is an EMM Authentication Response sent by the UE to the network during the EPS attach procedure. It confirms that the UE has processed the RAND and AUTN values received in the preceding Authentication Request.
The message uses protocol discriminator 0x7 for EPS Mobility Management and message type 0x53 for Authentication Response. The security header is 0x0, meaning that the message is still sent as plain NAS because NAS integrity protection and ciphering have not yet been activated.
The Authentication Response parameter contains the 8-byte RES value calculated by the USIM from RAND and the subscriber’s secret authentication key. The network compares this value with the expected response, XRES, generated by the authentication system.
When RES matches XRES, the network confirms that the UE possesses the correct subscriber credentials and continues with NAS security establishment, normally by sending a Security Mode Command. A mismatch indicates authentication failure and the attach procedure cannot proceed.

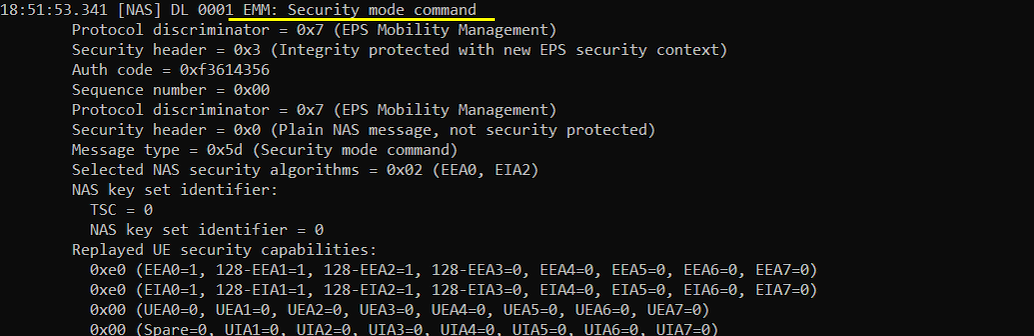
This is an EMM Security Mode Command sent by the network to activate NAS security after successful authentication.
The outer NAS security header is 0x3, indicating that the message is integrity protected using a newly established EPS security context. The authentication code is the NAS message authentication code calculated by the network, and the sequence number is used for replay protection. The inner decoded message still shows security header 0x0 because the actual Security Mode Command payload is a plain EMM message carried inside the protected NAS envelope.
Selected NAS security algorithms 0x02 corresponds to EEA0 for ciphering and EIA2 for integrity protection. EEA0 means that NAS ciphering is not applied, while EIA2 means that integrity protection uses the 128-EIA2 algorithm. Therefore, subsequent NAS messages are integrity protected, but their payload is not encrypted.
The NAS key set identifier is 0 with TSC set to 0, identifying the newly established native EPS security context derived during the preceding authentication procedure.
The Replayed UE security capabilities field contains the capabilities previously reported by the UE in the Attach Request. The UE verifies that these values have not been modified during signaling, which helps prevent security-algorithm downgrade attacks.
The network may also include an IMEISV request in this message. When IMEISV request is set to 1, the UE must include its IMEISV in the following Security Mode Complete message. After validating this command, the UE activates the selected NAS security algorithms and responds with Security Mode Complete.
This is an EMM Security Mode Complete message sent by the UE after it successfully verifies and applies the NAS security configuration selected by the network.
The outer security header is 0x4, indicating that the message is integrity protected and ciphered using the newly established EPS security context. The authentication code provides integrity protection, while the sequence number supports replay protection.
The inner decoded message shows security header 0x0 because the Security Mode Complete payload itself is encapsulated inside the protected NAS envelope. This inner value does not mean that the transmitted message was unprotected.
The Security Mode Complete confirms that the UE accepts the selected NAS security algorithms and has activated the corresponding security context. Since the preceding Security Mode Command requested the UE identity, the message also includes IMEISV 0123456700000101.
After receiving and validating this response, the network can continue the attach procedure using the established NAS security context.

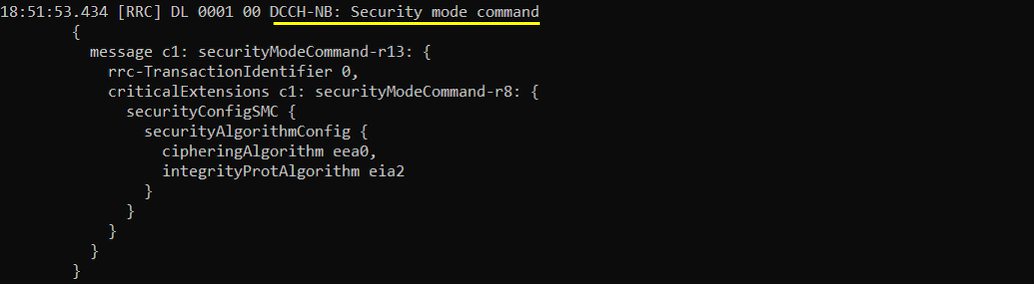
This is an NB-IoT RRC Security Mode Command sent by the eNB to activate Access Stratum security for the RRC connection.
rrc-TransactionIdentifier is set to 0 and is used to associate this command with the UE’s Security Mode Complete response.
The securityAlgorithmConfig field selects eea0 as the ciphering algorithm and eia2 as the integrity-protection algorithm. eea0 means that RRC and user-plane data are not encrypted, while eia2 enables integrity protection using the 128-EIA2 algorithm.
This message applies to Access Stratum security between the UE and eNB. It is separate from the earlier NAS Security Mode Command, which establishes security between the UE and MME.
After receiving this message, the UE activates the selected RRC integrity-protection configuration and responds with an RRC Security Mode Complete message.
This is an NB-IoT RRC Security Mode Complete message sent by the UE in response to the RRC Security Mode Command.
rrc-TransactionIdentifier is set to 0, matching the transaction identifier in the preceding command. This confirms that the response belongs to the same RRC security procedure.
The message indicates that the UE has successfully applied the selected Access Stratum security configuration. In this case, eea0 is used for ciphering, meaning that no RRC or user-plane encryption is applied, while eia2 is used for RRC integrity protection.
After this message is accepted by the eNB, subsequent RRC signaling is integrity protected according to the activated security context.

This is an NB-IoT RRC UE Capability Enquiry message sent by the eNB on DCCH-NB to request the UE’s supported NB-IoT radio capabilities.
rrc-TransactionIdentifier is set to 0 and is used to associate this enquiry with the corresponding UE Capability Information response.
Unlike the conventional LTE UE Capability Enquiry, this NB-IoT-specific message does not contain a RAT request list in the shown configuration. The message itself implicitly requests the UE’s E-UTRA NB-IoT capability information.
After receiving the enquiry, the UE responds with UE Capability Information containing supported features such as UE category, Release-specific capabilities, multi-tone uplink support, power class, coverage enhancement support and other optional NB-IoT functions. The eNB can then use this information when selecting radio parameters and scheduling features supported by the UE.

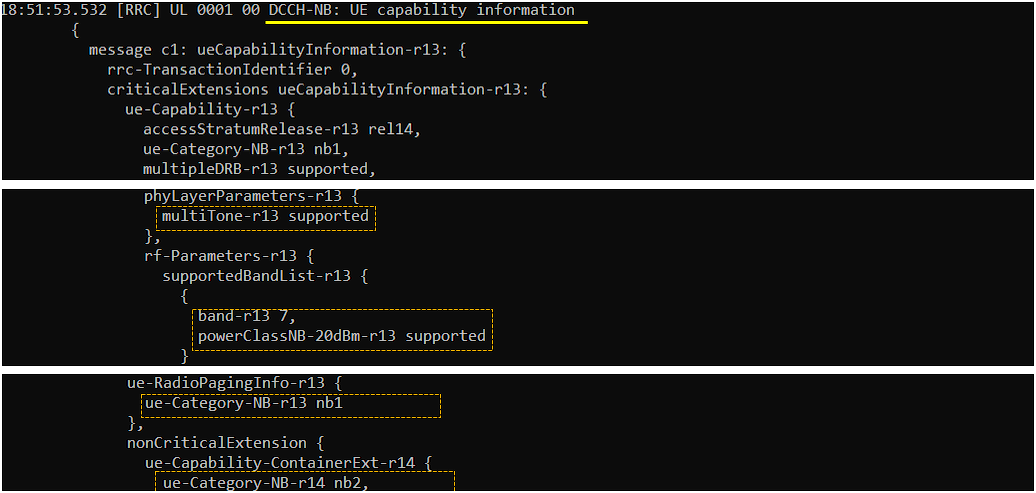
This is an NB-IoT RRC UE Capability Information message sent by the UE in response to the UE Capability Enquiry. rrc-TransactionIdentifier is set to 0, matching the preceding enquiry.
accessStratumRelease-r13 is set to rel14, indicating that the UE supports Release 14 Access Stratum functionality even though the main capability container uses the Release 13 structure. ue-Category-NB-r13 is set to nb1, identifying the UE as Category NB1. multipleDRB-r13 is supported, indicating that the UE can support multiple data radio bearers.
Under phyLayerParameters-r13, multiTone-r13 is supported. This confirms that the UE can transmit NPUSCH using multiple subcarriers rather than being limited to single-tone uplink transmission.
The supportedBandList-r13 contains band-r13 7, so the UE supports NB-IoT operation in LTE Band 7. powerClassNB-20dBm-r13 is supported, indicating support for the reduced 20 dBm NB-IoT power class rather than only the conventional 23 dBm class.
ue-RadioPagingInfo-r13 reports ue-Category-NB-r13 nb1 for paging-related capability handling. The nonCriticalExtension also includes ue-Category-NB-r14 nb2, indicating that the UE additionally supports the Release 14 Category NB2 capability set. Therefore, the UE advertises baseline NB1 capability while also exposing enhanced NB2 support through the Release 14 extension.
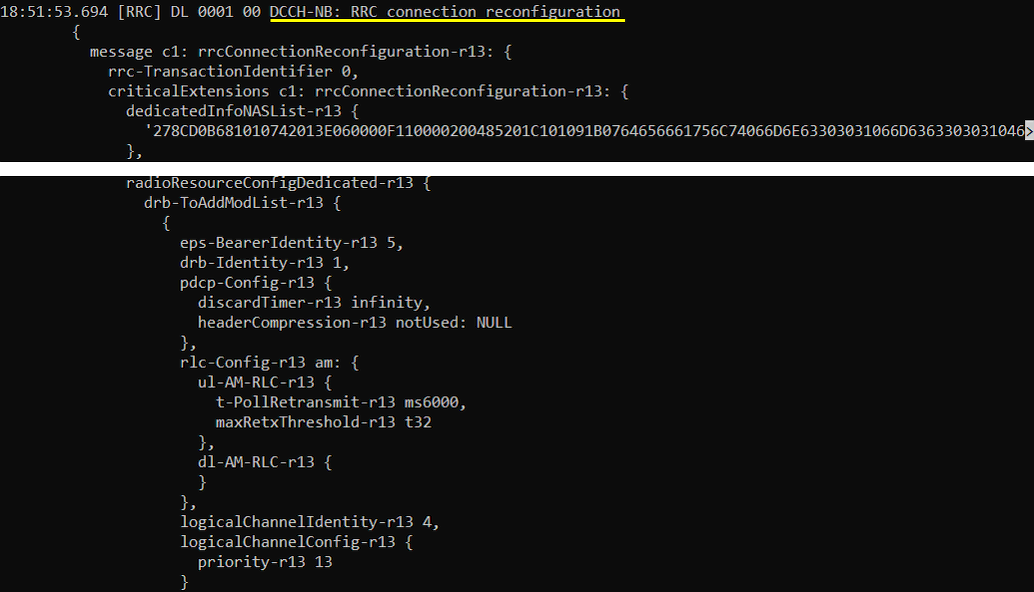
This is an NB-IoT RRC Connection Reconfiguration message sent by the eNB to establish the user-plane radio bearer and deliver the NAS attach-related message. rrc-TransactionIdentifier is set to 0 and must be echoed in the UE’s RRC Connection Reconfiguration Complete response.
dedicatedInfoNASList-r13 contains a NAS PDU that is transparently delivered from the core network to the UE. In this stage, it typically carries the Attach Accept together with the default EPS bearer activation information.
The radioResourceConfigDedicated-r13 section adds DRB 1 and maps it to EPS bearer identity 5. This creates the Access Stratum bearer used to transport the default EPS bearer’s user-plane traffic.
The PDCP configuration sets discardTimer-r13 to infinity, meaning that queued PDCP SDUs are not discarded due to timer expiry. headerCompression-r13 is set to notUsed, so ROHC header compression is disabled.
The RLC bearer is configured in Acknowledged Mode. t-PollRetransmit-r13 is set to 6000 ms, defining how long the transmitter waits before retransmitting a poll, while maxRetxThreshold-r13 t32 allows up to 32 retransmission attempts before an RLC failure is declared.
logicalChannelIdentity-r13 is set to 4, identifying the logical channel associated with this DRB. priority-r13 is set to 13, giving the bearer a relatively low scheduling priority compared with signaling radio bearers such as SRB1.
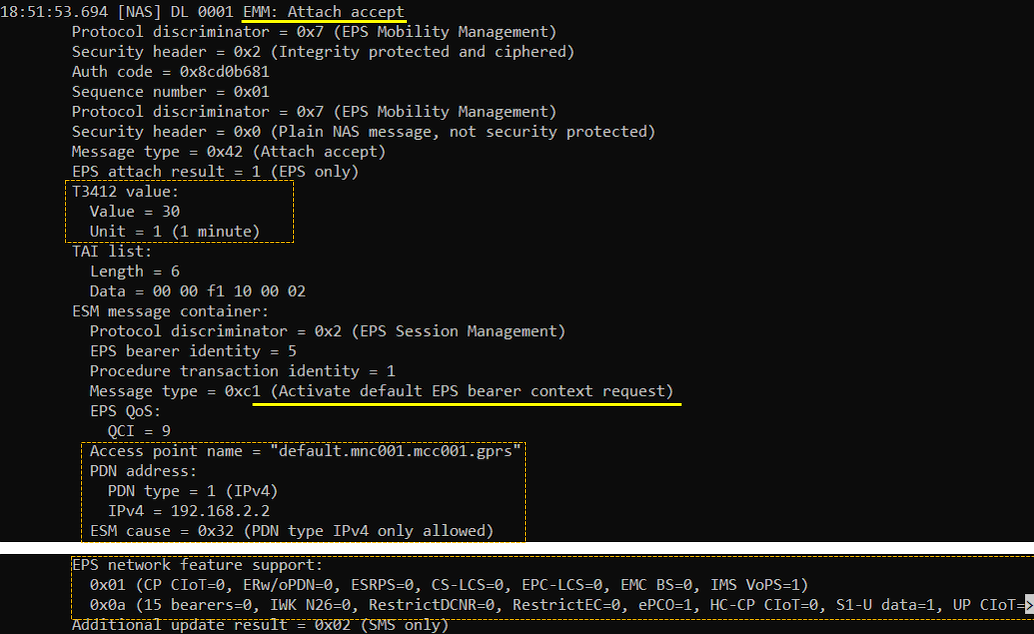
This is an EMM Attach Accept message sent by the network to confirm successful EPS registration. EPS attach result is set to EPS only, and T3412 is configured as 30 minutes, defining the periodic Tracking Area Update interval. The message also provides the accepted Tracking Area Identity list.
The Attach Accept is carried with NAS security header 0x2, indicating integrity protection and ciphering. However, because EEA0 was selected earlier, the ciphering operation does not provide actual payload encryption.
The embedded ESM message is an Activate Default EPS Bearer Context Request. It establishes EPS bearer identity 5 with QCI 9 and APN default.mnc001.mcc001.gprs. Although the UE initially requested IPv4v6 connectivity, the network assigns IPv4 address 192.168.2.2. ESM cause 0x32, PDN type IPv4 only allowed, informs the UE that only IPv4 connectivity is available for this PDN.
The EPS network feature support IE advertises additional network capabilities. ePCO is supported, S1-U data transfer is supported, and IMS VoPS is indicated as supported. The UE uses this information to determine which optional EPS and CIoT-related features are available in the registered network.
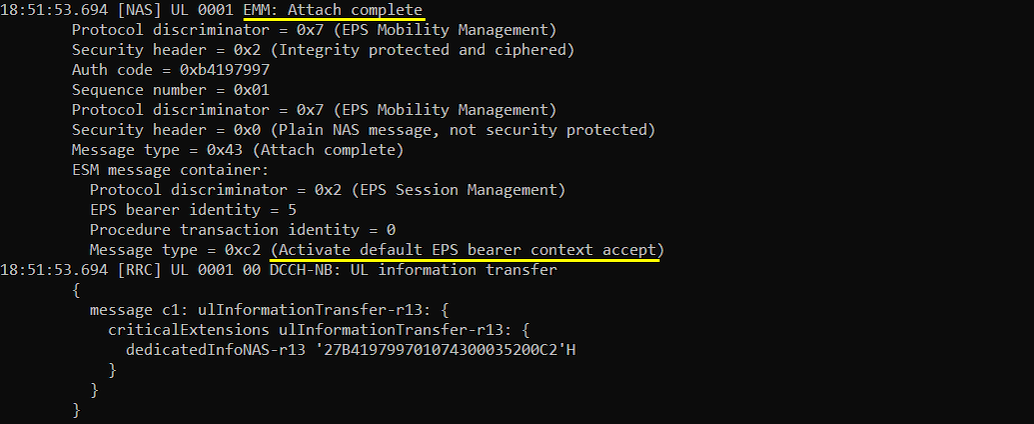
This is an EMM Attach Complete message sent by the UE to confirm successful completion of the EPS attach procedure.
The outer NAS security header is 0x2, indicating that the message is integrity protected and ciphered using the established EPS security context. Since EEA0 was selected, the ciphering procedure uses the null ciphering algorithm, so the payload is not actually encrypted.
The ESM message container carries an Activate Default EPS Bearer Context Accept message for EPS bearer identity 5. This confirms that the UE has accepted the default bearer, APN, QoS and IPv4 connectivity parameters provided in the preceding Attach Accept message.
The NAS message is transported over RRC using UL Information Transfer. dedicatedInfoNAS-r13 contains the encoded Attach Complete and bearer activation response, which the eNB forwards transparently to the MME.
After the network receives this message, the UE is considered fully EPS-attached and the default bearer is available for user-plane data transfer.
RRC / NAS Signaling
SIB1
: This is the SIB1 sent by eNB to configiture Cat M1 (
{
message c1: systemInformationBlockType1: {
cellAccessRelatedInfo {
plmn-IdentityList {
{
...
},
...
}
},
...
},
cellSelectionInfo {
...
},
p-Max 10,
freqBandIndicator 7,
schedulingInfoList {
...
},
si-WindowLength ms40,
systemInfoValueTag 0,
nonCriticalExtension {
nonCriticalExtension {
nonCriticalExtension {
nonCriticalExtension {
cellAccessRelatedInfo-v1250 {
},
nonCriticalExtension {
hyperSFN-r13 '0000001111'B,
eDRX-Allowed-r13 true,
bandwidthReducedAccessRelatedInfo-r13 {
si-WindowLength-BR-r13 ms40,
si-RepetitionPattern-r13 every4thRF,
schedulingInfoList-BR-r13 {
{
si-Narrowband-r13 1,
si-TBS-r13 b504
}
},
startSymbolBR-r13 3,
si-HoppingConfigCommon-r13 off
}
SIB2
: This is the SIB2 sent by eNB to configiture Cat M1 (
{
message c1: systemInformation: {
criticalExtensions systemInformation-r8: {
sib-TypeAndInfo {
sib2: {
radioResourceConfigCommon {
rach-ConfigCommon {
...
},
maxHARQ-Msg3Tx 5,
preambleTransMax-CE-r13 n10,
rach-CE-LevelInfoList-r13 {
{
preambleMappingInfo-r13 {
firstPreamble-r13 0,
lastPreamble-r13 63
},
ra-ResponseWindowSize-r13 sf50,
mac-ContentionResolutionTimer-r13 sf80,
rar-HoppingConfig-r13 off
}
}
},
bcch-Config {
...
},
pcch-Config {
...
},
prach-Config {
rootSequenceIndex 648,
prach-ConfigInfo {
prach-ConfigIndex 4,
highSpeedFlag FALSE,
zeroCorrelationZoneConfig 11,
prach-FreqOffset 4
}
},
pdsch-ConfigCommon {
...
},
pusch-ConfigCommon {
...
},
pucch-ConfigCommon {
...
},
soundingRS-UL-ConfigCommon setup: {
...
},
uplinkPowerControlCommon {
...
},
ul-CyclicPrefixLength len1,
pusch-ConfigCommon-v1270 {
enable64QAM-v1270 true
},
bcch-Config-v1310 {
modificationPeriodCoeff-v1310 n64
},
pcch-Config-v1310 {
paging-narrowBands-r13 1,
mpdcch-NumRepetition-Paging-r13 r1
},
freqHoppingParameters-r13 {
interval-ULHoppingConfigCommonModeA-r13 interval-FDD-r13: int1
},
pdsch-ConfigCommon-v1310 {
pdsch-maxNumRepetitionCEmodeA-r13 r16
},
pusch-ConfigCommon-v1310 {
pusch-maxNumRepetitionCEmodeA-r13 r8
},
prach-ConfigCommon-v1310 {
rsrp-ThresholdsPrachInfoList-r13 {
0
},
mpdcch-startSF-CSS-RA-r13 fdd-r13: v1,
prach-ParametersListCE-r13 {
{
prach-ConfigIndex-r13 4,
prach-FreqOffset-r13 4,
prach-StartingSubframe-r13 sf2,
maxNumPreambleAttemptCE-r13 n3,
numRepetitionPerPreambleAttempt-r13 n1,
mpdcch-NarrowbandsToMonitor-r13 {
1
},
mpdcch-NumRepetition-RA-r13 r1,
prach-HoppingConfig-r13 off
}
}
},
pucch-ConfigCommon-v1310 {
n1PUCCH-AN-InfoList-r13 {
38
},
pucch-NumRepetitionCE-Msg4-Level0-r13 n1
}
},
ue-TimersAndConstants {
t300 ms200,
t301 ms200,
t310 ms200,
n310 n6,
t311 ms10000,
n311 n5,
t300-v1310 ms5000,
t301-v1310 ms5000
},
freqInfo {
additionalSpectrumEmission 1
},
timeAlignmentTimerCommon infinity
},
Attach Request
: This is the AttachRequest sent by UE to inform UE capability for IoT NAS feature (
Protocol discriminator = 0x7 (EPS Mobility Management)
Security header = 0x0 (Plain NAS message, not security protected)
Message type = 0x41 (Attach request)
EPS attach type = 1 (EPS attach)
NAS key set identifier:
TSC = 0
NAS key set identifier = 7
Old GUTI or IMSI:
IMSI = 001010123456789
UE network capability:
0xe0 (EEA0=1, 128-EEA1=1, 128-EEA2=1, 128-EEA3=0, EEA4=0, EEA5=0, EEA6=0, EEA7=0)
0xe0 (EIA0=1, 128-EIA1=1, 128-EIA2=1, 128-EIA3=0, EIA4=0, EIA5=0, EIA6=0, EIA7=0)
0x00 (UEA0=0, UEA1=0, UEA2=0, UEA3=0, UEA4=0, UEA5=0, UEA6=0, UEA7=0)
0x00 (UCS2=0, UIA1=0, UIA2=0, UIA3=0, UIA4=0, UIA5=0, UIA6=0, UIA7=0)
0x00 (ProSe-dd=0, ProSe=0, H.245-ASH=0, ACC-CSFB=0, LPP=0, LCS=0, 1xSRVCC=0, NF=0)
0x80 (ePCO=1, HC-CP CIoT=0, ERw/oPDN=0, S1-U data=0, UP CIoT=0, CP CIoT=0, ProSe-relay=0, ProSe-dc=0)
ESM message container:
Protocol discriminator = 0x2 (EPS Session Management)
EPS bearer identity = 0
Procedure transaction identity = 1
Message type = 0xd0 (PDN connectivity request)
Request type = 1 (initial request)
PDN type = 3 (IPv4v6)
Protocol configuration options:
Ext = 1
Configuration protocol = 0
Protocol ID = 0x8021 (IPCP)
Data = 01 00 00 10 81 06 00 00 00 00 83 06 00 00 00 00
Protocol ID = 0x0001 (P-CSCF IPv6 Address Request)
Data =
Protocol ID = 0x0003 (DNS Server IPv6 Address Request)
Data =
Protocol ID = 0x000a (IP address allocation via NAS signalling)
Data =
Protocol ID = 0x000c (P-CSCF IPv4 Address Request)
Data =
Protocol ID = 0x000d (DNS Server IPv4 Address Request)
Data =
Voice domain preference and UE's usage setting = 0x05 (IMS PS Voice only, Data centric)
MS network feature support = 0x01 (MS supports the extended periodic timer in this domain)
RrcConnectionSetup
: This is the RrcConnectionSetup sent by eNB to configiture Cat M1 (
{
message c1: rrcConnectionSetup: {
rrc-TransactionIdentifier 0,
criticalExtensions c1: rrcConnectionSetup-r8: {
radioResourceConfigDedicated {
srb-ToAddModList {
...
},
mac-MainConfig explicitValue: {
...
},
physicalConfigDedicated {
...
},
soundingRS-UL-ConfigDedicated release: NULL,
schedulingRequestConfig setup: {
...
},
epdcch-Config-r11 {
config-r11 setup: {
setConfigToAddModList-r11 {
{
setConfigId-r11 0,
transmissionType-r11 distributed,
resourceBlockAssignment-r11 {
numberPRB-Pairs-r11 n2,
resourceBlockAssignment-r11 'E'H
},
dmrs-ScramblingSequenceInt-r11 1,
pucch-ResourceStartOffset-r11 0,
mpdcch-config-r13 setup: {
csi-NumRepetitionCE-r13 sf1,
mpdcch-pdsch-HoppingConfig-r13 off,
mpdcch-StartSF-UESS-r13 fdd-r13: v1,
mpdcch-NumRepetition-r13 r1,
mpdcch-Narrowband-r13 1
}
}
}
}
},
ce-Mode-r13 setup: ce-ModeA
}
UE Capability Information
: This is the UE Capability Information sent by UE to inform RRC capability for Cat M1 (
{
message c1: ueCapabilityInformation: {
rrc-TransactionIdentifier 0,
criticalExtensions c1: ueCapabilityInformation-r8: {
ue-CapabilityRAT-ContainerList {
{
rat-Type eutra,
ueCapabilityRAT-Container {
accessStratumRelease rel13,
ue-Category 1,
pdcp-Parameters {
...
}
},
phyLayerParameters {
...
},
rf-Parameters {
...
},
measParameters {
bandListEUTRA {
...
}
},
featureGroupIndicators '4E001002'H /*
2: PUCCH 2a/2b, abs TPC, RB alloc type 1 for PDSCH, Periodic CQI/PMI/RI reporting on PUCCH: Modes 2-0 and 2-1
5: Long DRX cycle, DRX Mac CE
6: Prioritized bit rate
7: RLC UM
20: SRB1 and SRB2 for DCCH + 8x DRB
31: MFBI
*/,
interRAT-Parameters {
},
nonCriticalExtension {
phyLayerParameters-v920 {
},
interRAT-ParametersGERAN-v920 {
},
csg-ProximityIndicationParameters-r9 {
},
neighCellSI-AcquisitionParameters-r9 {
},
son-Parameters-r9 {
},
nonCriticalExtension {
lateNonCriticalExtension {
nonCriticalExtension {
nonCriticalExtension {
nonCriticalExtension {
nonCriticalExtension {
nonCriticalExtension {
nonCriticalExtension {
nonCriticalExtension {
nonCriticalExtension {
nonCriticalExtension {
nonCriticalExtension {
nonCriticalExtension {
nonCriticalExtension {
ce-Parameters-v1370 {
tm9-CE-ModeA-r13 supported
},
nonCriticalExtension {
ce-Parameters-v1380 {
tm6-CE-ModeA-r13 supported
},
fdd-Add-UE-EUTRA-Capabilities-v1380 {
ce-Parameters-v1380 {
}
},
tdd-Add-UE-EUTRA-Capabilities-v1380 {
ce-Parameters-v1380 {
}
...
},
nonCriticalExtension {
nonCriticalExtension {
nonCriticalExtension {
nonCriticalExtension {
pdcp-Parameters-v1130 {
},
phyLayerParameters-v1130 {
tdd-SpecialSubframe-r11 supported
},
rf-Parameters-v1130 {
},
measParameters-v1130 {
},
interRAT-ParametersCDMA2000-v1130 {
},
otherParameters-r11 {
},
nonCriticalExtension {
nonCriticalExtension {
rf-Parameters-v1180 {
freqBandRetrieval-r11 supported
},
nonCriticalExtension {
nonCriticalExtension {
nonCriticalExtension {
nonCriticalExtension {
nonCriticalExtension {
nonCriticalExtension {
ue-CategoryDL-v1310 m1,
ue-CategoryUL-v1310 m1,
pdcp-Parameters-v1310 {
},
rlc-Parameters-v1310 {
},
mac-Parameters-v1310 {
extendedLongDRX-r13 supported
},
ce-Parameters-r13 {
ce-ModeA-r13 supported
},
interRAT-ParametersWLAN-r13 {
},
wlan-IW-Parameters-v1310 {
},
lwip-Parameters-r13 {
}
....
},
nonCriticalExtension {
nonCriticalExtension {
ue-RadioPagingInfo-r12 {
ue-CategoryDL-v1310 m1,
ce-ModeA-r13 true
}
Attach Accept
: This is the AttachAccept sent by UE to inform NW capability for IoT NAS feature and Activate Default EPS Bearer(
Protocol discriminator = 0x7 (EPS Mobility Management)
Security header = 0x2 (Integrity protected and ciphered)
Auth code = 0x63483d18
Sequence number = 0x01
Protocol discriminator = 0x7 (EPS Mobility Management)
Security header = 0x0 (Plain NAS message, not security protected)
Message type = 0x42 (Attach accept)
EPS attach result = 1 (EPS only)
T3412 value:
Value = 30
Unit = 1 (1 minute)
TAI list:
Length = 6
Data = 00 00 f1 10 00 01
ESM message container:
Protocol discriminator = 0x2 (EPS Session Management)
EPS bearer identity = 5
Procedure transaction identity = 1
Message type = 0xc1 (Activate default EPS bearer context request)
EPS QoS:
QCI = 9
Access point name = "default.mnc001.mcc001.gprs"
PDN address:
PDN type = 1 (IPv4)
IPv4 = 192.168.2.2
ESM cause = 0x32 (PDN type IPv4 only allowed)
Extended protocol configuration options:
Ext = 1
Configuration protocol = 0
Protocol ID = 0x8021 (IPCP)
Data = 03 00 00 0a 81 06 08 08 08 08
Protocol ID = 0x000d (DNS Server IPv4 Address)
Data = 8.8.8.8
GUTI:
MCC = 001
MNC = 01
MME Group ID = 32769
MME Code = 1
M-TMSI = 0x275be002
Emergency number list:
Length = 8
Data = 03 1f 19 f1 03 1f 11 f2
EPS network feature support:
0x01 (CP CIoT=0, ERw/oPDN=0, ESRPS=0, CS-LCS=0, EPC-LCS=0, EMC BS=0, IMS VoPS=1)
0x08 (15 bearers=0, IWK N26=0, RestrictDCNR=0, RestrictEC=0, ePCO=1, HC-CP CIoT=0, S1-U data=0, UP CIoT=0)