NR Multi UE
This tutorial is to show how to simulate multiple UEs with a single UEsim. For the simplicity, You can simulate maximum of 500 or 1000 UEs with single Amari UEsim and single Amarisoft Callbox. Since Amarisoft Callbox support multiple UE in simultaneous connection, it can have diverse use case as follows. Amarisoft Callbox would be the only solution in test and measurement area that support Use Case 2.
Use Case 1 : LTE/NR network with single UE (single DUT) for protocol, function and performance testing in a lab
Use Case 2 : Single LTE/NR network shared by multiple UE (multiple DUT) for protocol, function in a lab
Use Case 3 : LTE/NR network with external RRH. With this setup, you can use Amarosft callbox as a deployed live network or test live network in UE development.
Following table shows the list of UE Simbox product line and major features supported by each model.
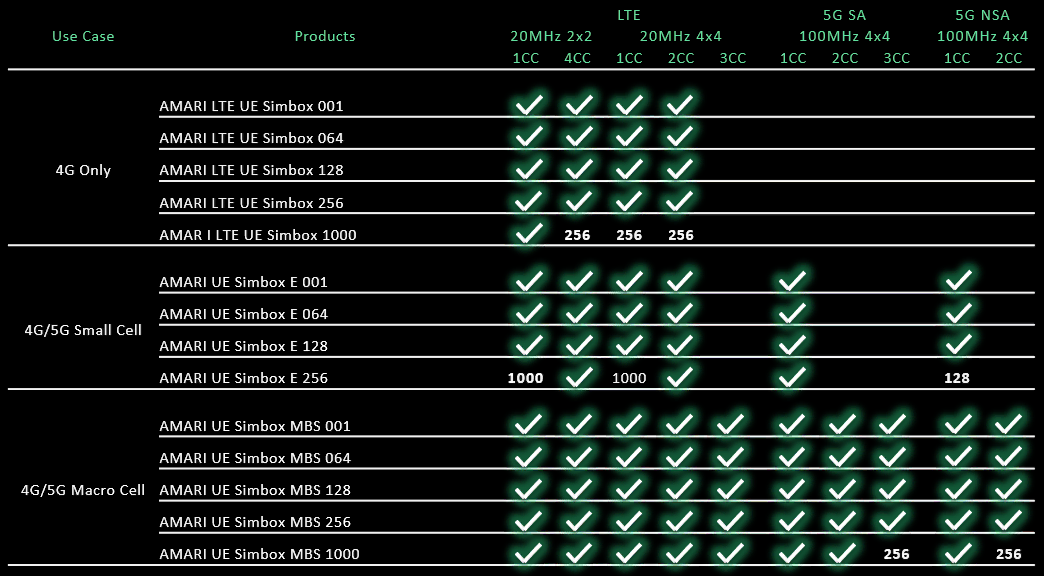
Table of Contents
Introduction
Amarisoft Callbox, coupled with UEsim, represents a highly flexible and scalable solution for simulating user equipment (UE) in LTE and 5G NR (New Radio) network environments. This integrated system enables the emulation of hundreds or even thousands of UEs using a single UEsim instance, seamlessly interacting with a single Amarisoft Callbox. Designed to address the growing complexity of mobile broadband and IoT scenarios, the platform empowers network engineers, protocol developers, and device manufacturers to perform comprehensive protocol, functional, and performance testing under realistic and controlled laboratory conditions. Architecturally, Amarisoft Callbox acts as a fully virtualized base station or core network emulator, supporting both standalone (SA) and non-standalone (NSA) network configurations. UEsim, in turn, generates virtual UEs that can attach, authenticate, and perform data transactions with the simulated network, mimicking the behavior of real devices. This approach is particularly significant in validating network performance, optimizing resource scheduling, and ensuring compliance with 3GPP standards without the logistical overhead of managing physical devices. The ability to simulate multiple UEs in parallel not only enhances test coverage but also enables use cases such as massive connectivity, handover scenarios, and stress testing of network infrastructure. Within the broader telecom ecosystem, Amarisoft solutions occupy a pivotal role in accelerating R&D, facilitating operator acceptance tests, and supporting continuous integration pipelines for evolving 4G/5G technologies.
-
Technology and Framework Context
- Amarisoft Callbox is a software-based radio access network (RAN) and core network emulator supporting LTE and 5G NR protocols.
- UEsim is a scalable virtual UE simulation platform, capable of generating hundreds or thousands of virtual UEs for laboratory testing.
- The architecture is designed for rapid deployment, ease of configuration, and interoperability with a range of test and measurement equipment.
- The system supports both standalone (SA) and non-standalone (NSA) modes, allowing for diverse deployment and testing scenarios.
-
Relevance and Importance of Multi-UE Simulation
- Simulating multiple UEs on a single platform reduces hardware requirements, operational costs, and complexity in laboratory environments.
- Enables testing of network scalability, resource management, and performance under high load or dense UE scenarios.
-
Supports a wide range of use cases:
- Use Case 1: Single UE protocol, function, and performance testing.
- Use Case 2: Multiple UEs sharing a single LTE/NR network for advanced protocol and function testing.
- Use Case 3: Integration with external RRH for live network emulation or device development.
- Unique in supporting simultaneous multi-UE connections with a single callbox, which is especially valuable for stress and interoperability testing.
-
Learning Outcomes
- Understanding how to configure and operate UEsim and Amarisoft Callbox for multi-UE simulation.
- Gaining insight into best practices for scalable UE emulation and network performance evaluation.
- Acquiring knowledge of test planning, execution, and result analysis in high-density UE environments.
- Familiarity with key product features, selection criteria, and licensing considerations for large-scale simulation.
-
Prerequisite Knowledge
- Basic understanding of LTE and 5G NR network architectures and protocols.
- Familiarity with RF concepts and test lab environments.
- Experience with network configuration, IP connectivity, and test automation frameworks is beneficial but not required.
- Awareness of product-specific limitations, such as maximum supported UEs depending on technology, product variant, and licensing.
-
Tutorial Scope
- The tutorial focuses on step-by-step procedures for simulating multiple UEs with a single UEsim and Amarisoft Callbox instance.
- Architectural overview, configuration guidelines, and practical tips for maximizing test coverage and efficiency are provided.
- Special considerations for scenarios exceeding standard UE limits, such as the use of Simbox-MBS for large-scale NR SA and NSA simulations, are discussed.
Summary of the Tutorial
This tutorial demonstrates the procedure for testing up to 1000 UEs using Amarisoft UEsim and callbox (gNB), focusing on configuration-based multi-UE simulation. The test methodology, configuration steps, and analysis procedures are outlined below, with all original indentation, formatting, and structure preserved.
-
Test Setup Overview
- Case 1: Utilizes one callbox (gNB) and one UEsim, where the UEsim emulates multiple UEs (up to 1000 in this tutorial).
- Case 2: Involves multiple real mobile phones instead of UEsim. This configuration allows shared test equipment with many DUTs and supports various function tests (e.g., initial call setup, data connectivity, IMS). An external radio head can be added for increased coverage in a private network scenario.
-
Key Configuration Parameters
-
UEsim:
- multi_ue, ue_count, global_timing_advance, sim_events
-
Callbox:
- sr_period, n_rb_max, ue_count_max, short_pucch_an_rsc_count, cb_preambles_per_ssb, duration (pdcch->duration), sched_latency_for_prb_max
-
UEsim:
-
Test 1: Test with Configuration File Only
-
Configuration Procedure:
-
UEsim Configuration:
- Use the configuration file ue-nr-sa-1000.cfg, which includes the file ue-list-1000-UE.cfg.
- Each UE’s USIM information is predefined in ue-list-1000-UE.cfg (parameters such as imsi, K, amf, sqn, sim_algo).
- The sim_events section configures each UE’s behavior (e.g., when to power on, start IP traffic, and power off).
- The configuration covers the basic physical information for cell camping.
- The Scenario function in the WebGUI can automate file creation, though the tutorial uses a predefined file.
-
Callbox (gNB) Configuration:
- Use gnb-sa-1000-UE-bis.cfg, similar to gnb-sa.cfg.
- Set NR_TDD = 1 for NR TDD operation (can switch to FDD as needed).
- Configure NR band 78, subcarrier spacing 30kHz, and SSB bitmap (modifiable as per 3GPP compliance).
- Increase sr_period to 320 (from default 40) to prevent excessive SR requests from numerous UEs.
- Increase cb_preambles_per_ssb to provide sufficient PRACH resources for simultaneous RACH attempts by many UEs.
- Increase duration (pdcch->duration) to ensure enough PDCCH resources for control information transmission to multiple UEs.
- Adjust short_pucch_an_rsc_count to accommodate more simultaneous uplink Ack/Nack feedbacks.
- Set n_rb_max to prevent PUCCH from occupying all uplink bandwidth, preserving space for PUSCH.
-
Core Network Configuration:
- Use mme-ims-1000.cfg (modified from mme-ims.cfg) with included ue_db_1000-UE.cfg for large-scale UE support.
- Specify a wide enough IP address range using first_ip_addr and last_ip_addr to accommodate all UEs.
- Ensure the same SIM parameters are configured on both UE and core network sides.
-
UEsim Configuration:
-
Test Execution Steps:
- Verify the cell physical configuration to ensure intended settings.
- Start UEsim, execute the t command, and confirm all UEs (ID 1 to 1000) register successfully.
- Use the t command on the callbox if using commercial UEs to check registration.
- Retrieve global statistics with t g to observe UE states (idle, off, connected).
-
Test Analysis Methods:
-
While UEs are connected, analyze log files to:
- Observe PDCCH scheduling per slot, ensuring multiple DCI (DL/UL) are transmitted within a single slot.
- Verify PDSCH and PUSCH transmissions based on corresponding DCI scheduling.
- Check total and per-UE throughput statistics.
- Review aggregated physical resource allocation for all connected UEs.
-
While UEs are connected, analyze log files to:
-
Configuration Procedure:
Note: The tutorial emphasizes the importance of adequate configuration for large-scale UE simulation, including resource allocation, parameter adjustments, and log/statistical analysis to validate system behavior under high UE density scenarios.
Test Setup
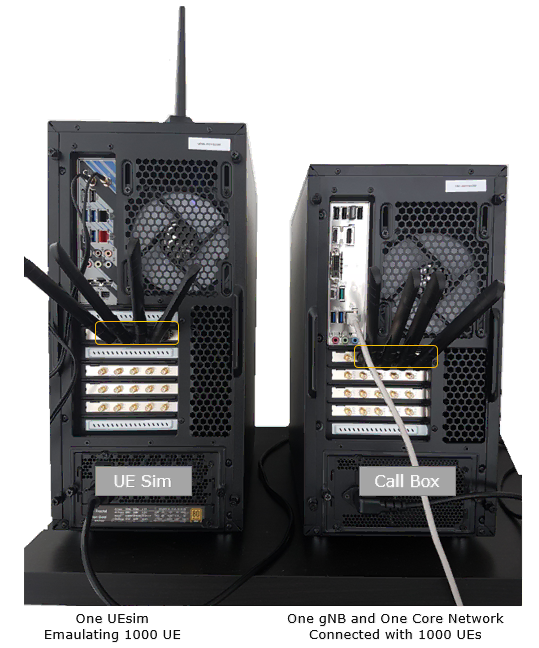
Test setup for this tutorial is as shown below. In this tutorial, < Case 1 > setup is used, but < Case 2 > setup is also possible. The fact that <Case 2> is possible indicates you can use Amarisoft callbox as a deployed network(live network) as well.
Case 1
: In this setup, one callbox (gNB) and one UEsim is used. The single UEsim can emulate multiple UEs (1000 UEs in this tutorial).
Case 2
In stead of using UEsim, you can use multiple of real mobilephones for the same test. With this setup, you can share one test equipment with many DUTs and do various function test (e.g, initial call setup, data connectivity, IMS etc) or you can use this setup as private network if you add external radio head to increase the coverage.

Key Configuration Parameters
Followings are important configuration parameters for this tutorial. You may click on the items for the descriptions from Amarisoft documents.
- UEsim
- Callbox
Test 1 : Test with Configuration File Only
In this test, I will show you how to test 1000 UE with configuration file only. It mean that the information (USIM information) for each and every UE is prepared in advance in configuration file. (
Configuration
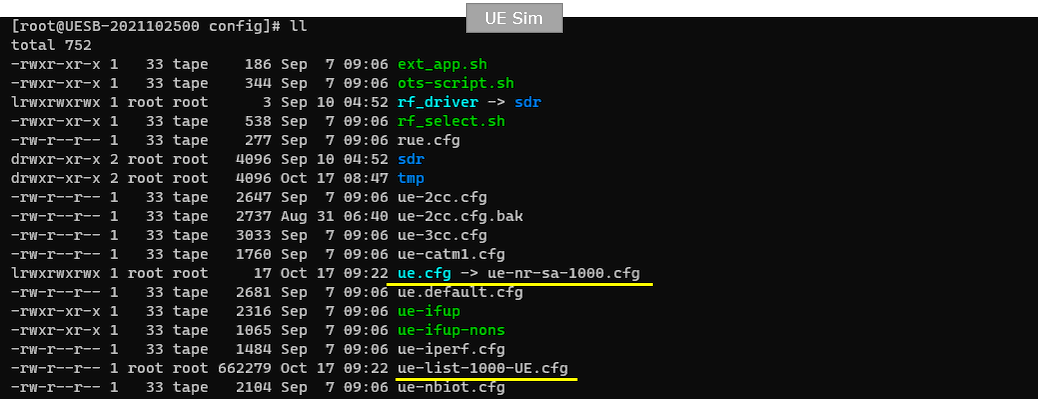
On UEsim, I used the ue-nr-sa-1000.cfg which is similar to ue-nr-sa.cfg. The configuration includes ue-list-1000-UE.cfg in it.
On callbox, I used gnb-sa-1000-UE-bis.cfg which is similar to gnb-sa.cfg.
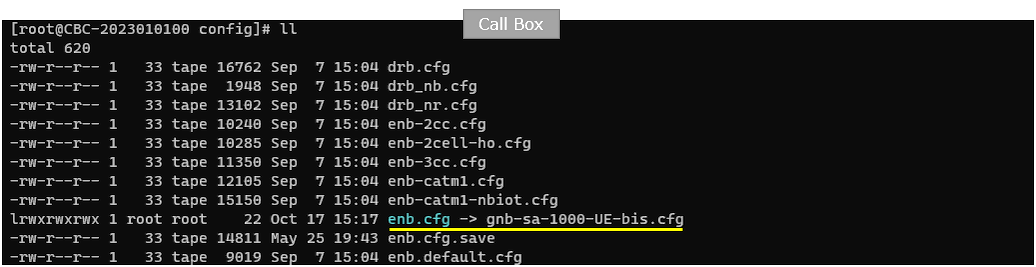
To configure such a many UEs, we need to use special configurations for core network. For this purpose, I used the mme-ims-1000.cfg which is copied and modeified from mme-ims.cfg. In mme-ims-1000.cfg, an external ue_db file ue_db_1000-UE.cfg is included.
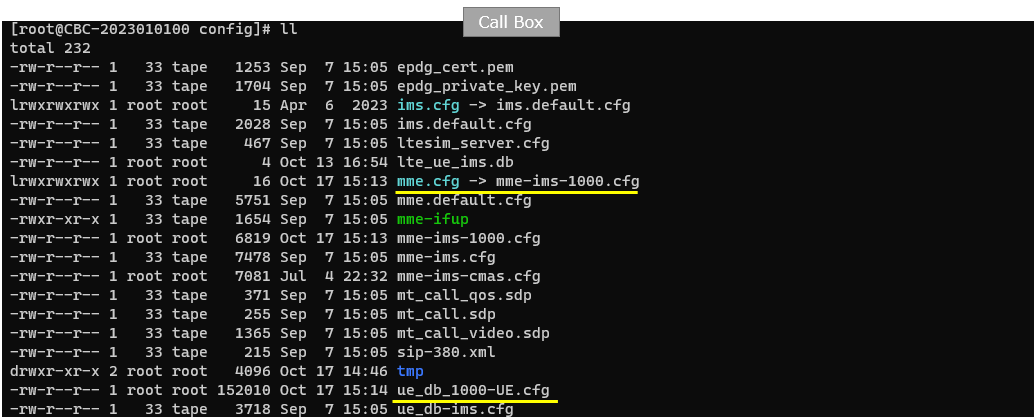
In the mme-ims-1000.cfg a few parameters are modified specifically to handle huge numbers of UEs as highlighted below. The most important part is the IP address pool configuration. first_ip_addr defines the first IP address that can be assigned to a UE, and last_ip_addr defines the last IP address in the pool. Since this test is intended to support around 1000 UEs, this range must be wide enough to allocate a different IP address to each UE. In this example, the address range starts from 192.168.128.2 and ends at 192.168.255.254, so the Callbox has enough IP addresses available for many simulated UEs.
Another important point is the UE database include line at the end of the configuration. The file ue_db_1000-UE.cfg is included from the MME configuration, and this file contains the USIM-related information for the simulated UEs. In other words, mme-ims-1000.cfg prepares the network side to handle many UE connections, while ue_db_1000-UE.cfg provides the individual UE subscription information needed for those 1000 UEs to register and attach to the network.
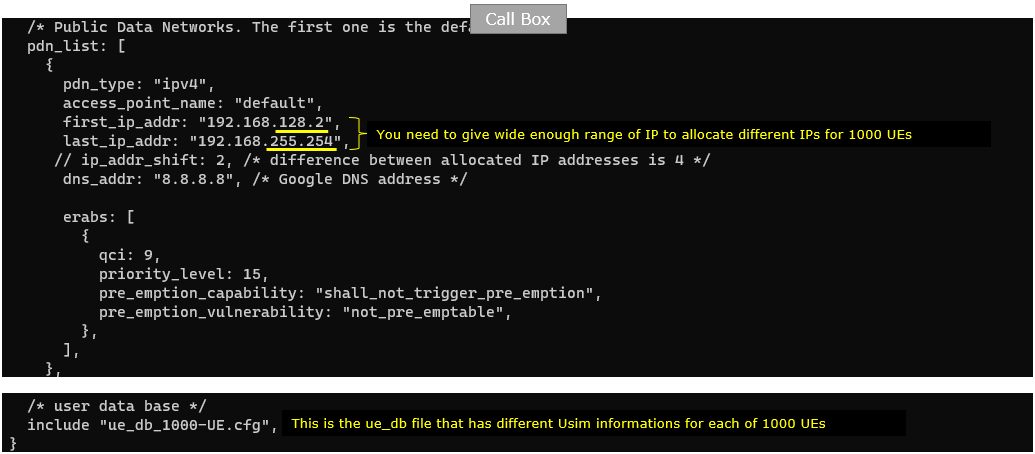
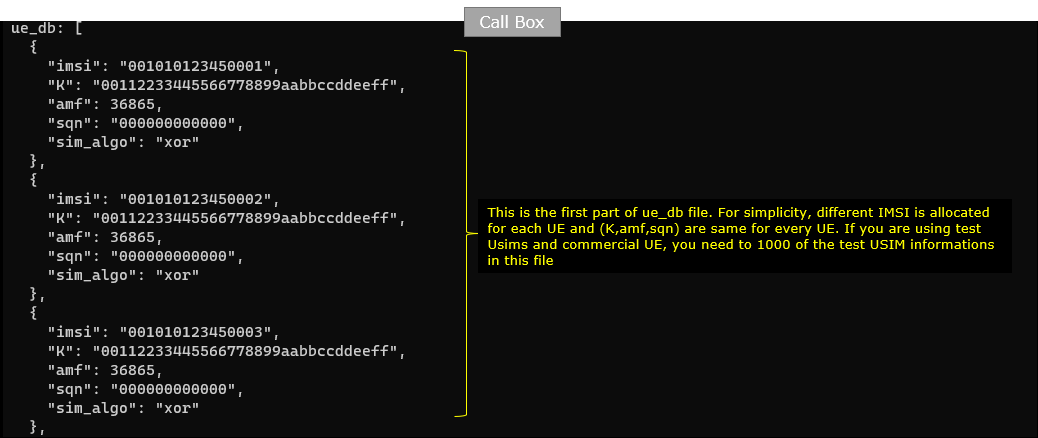
In this tutorial, following SIM information will be used within ue_db_1000-UE.cfg . This file is used on the Callbox side as the UE database, so the same SIM-related parameters must also be configured on the UE side. Each UE entry includes parameters such as imsi, K, amf, sqn, and sim_algo. The imsi value is different for each UE, so the network can identify each UE individually, while K, amf, sqn, and sim_algo are kept the same in this simple example.
The ue_db file is basically a list of USIM profiles. For example, the first UE uses IMSI 001010123450001, the second UE uses IMSI 001010123450002, and the third UE uses IMSI 001010123450003. This pattern can be repeated until all 1000 UE profiles are created. If you are using Amarisoft UEsim with xor as sim_algo, UEsim can generate this type of file automatically by incrementing the IMSI value while keeping the other USIM parameters the same. If you are using commercial UEs with physical test USIMs, then the UE database should contain the actual USIM information for all test UEs.
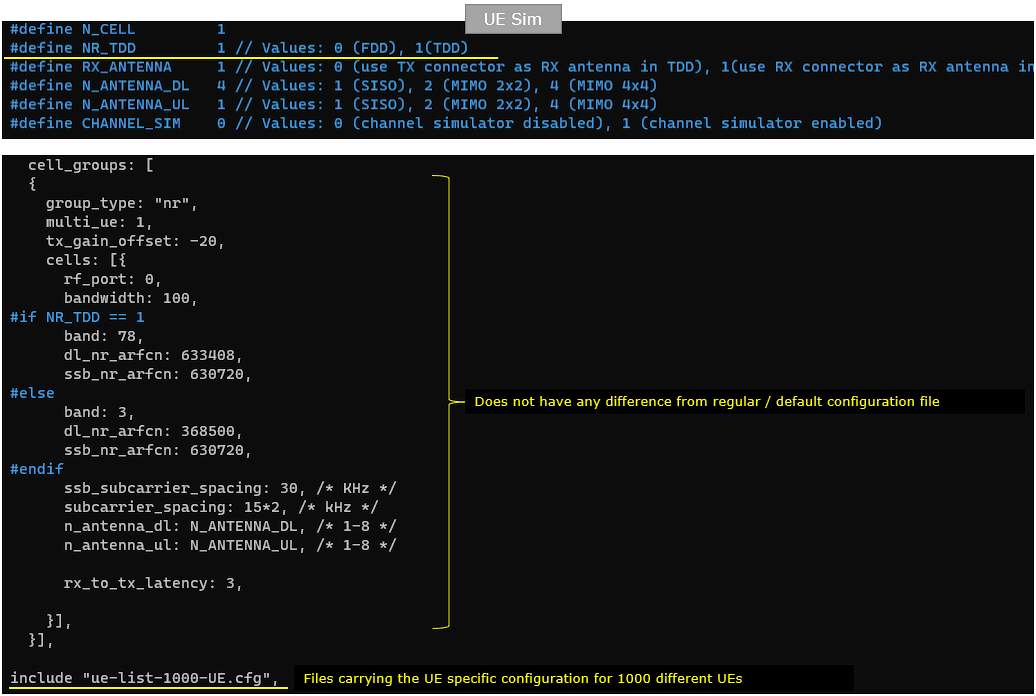
In ue-nr-sa-1000.cfg on UEsim, Notice that all the individual UE information is included as a separate file named ue-list-1000-UE.cfg.
The first part of the configuration defines the basic radio and cell information that the simulated UEs will use to camp on the NR cell. Parameters such as NR_TDD, antenna configuration, bandwidth, band, dl_nr_arfcn, ssb_nr_arfcn, subcarrier spacing, and antenna numbers are configured here. This part is not very different from a normal single-UE UEsim configuration, because the cell that the UEs camp on is still the same cell. If you are using commercial UEs instead of Amarisoft UEsim, this part is not needed on the UE side because commercial UEs detect and select the cell automatically during cell search.
The important point for the multi-UE test is the include line at the end of the configuration. ue-list-1000-UE.cfg is included from ue-nr-sa-1000.cfg, and this separate file contains the UE-specific configuration for all simulated UEs. In other words, ue-nr-sa-1000.cfg defines the common cell environment, while ue-list-1000-UE.cfg defines the individual UE instances. So before running this test, you need to prepare the UE list file with the required information for 1000 different UEs.
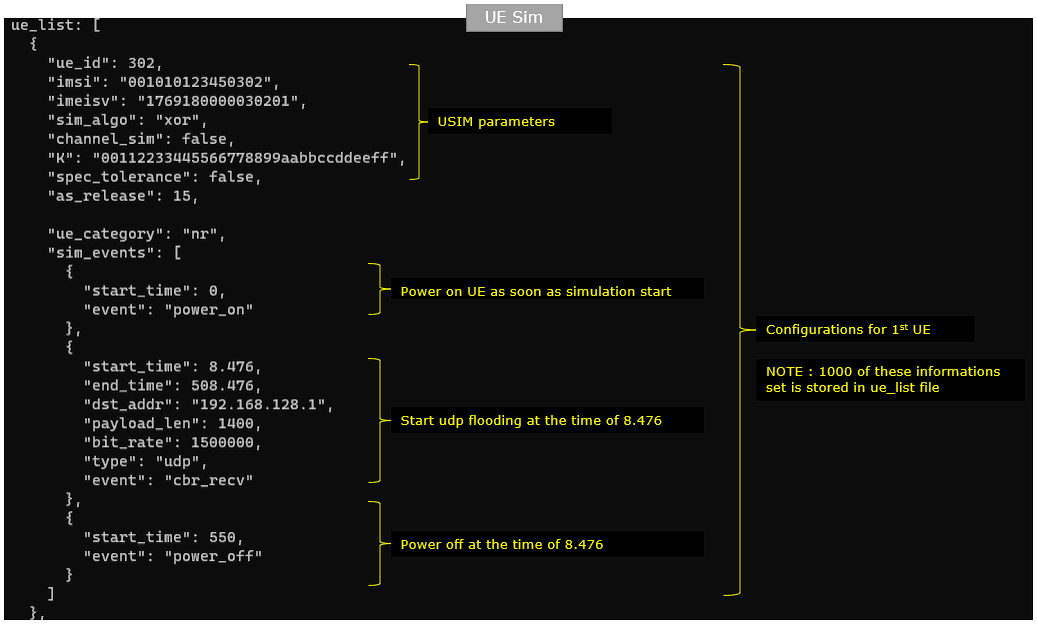
You should prepare the ue_list file in a form as follows. In this file, each UE has its own set of parameters, so for a 1000 UE test you need 1000 similar UE configuration blocks. The values should be different where UE identity must be unique, such as ue_id, imsi, and imeisv, while common parameters such as sim_algo, K, ue_category, and access-related options can be kept the same if the test scenario allows it.
The first part of each UE block defines the USIM and basic UE capability information. For example, imsi identifies the UE subscription, imeisv identifies the UE equipment, sim_algo defines the authentication algorithm, and K defines the authentication key. The ue_category value indicates that this UE is configured as an NR UE. After this initial part, sim_events defines the behavior of the UE during the simulation. In this example, the UE powers on at start_time 0, starts UDP traffic at start_time 8.476, continues the traffic until end_time 508.476, and then powers off at start_time 550. The traffic event uses cbr_recv, with dst_addr, payload_len, bit_rate, and type defining the UDP traffic behavior.
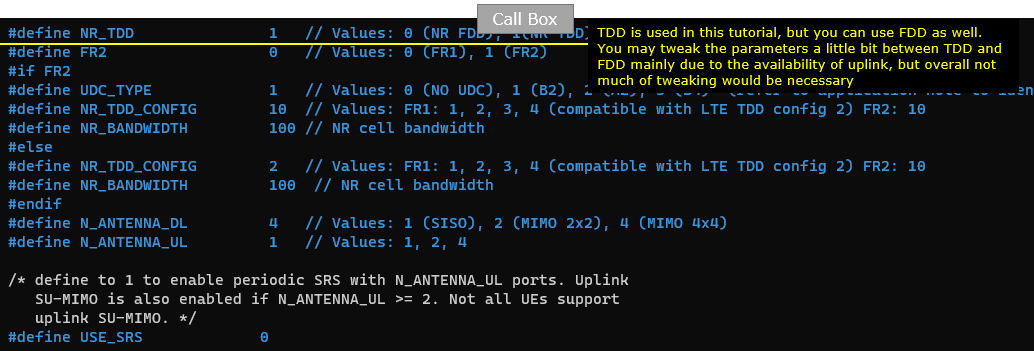
Following is the configuration in gnb-sa-1000-UE-bis.cfg
In this example, NR_TDD is set to 1, meaning that the test is configured as NR TDD. The same multi-UE concept can also be used with FDD, but in this tutorial TDD is used as the reference setup.
FR2 is set to 0, so this configuration is for FR1. Since FR2 is not used, the configuration selects the FR1-related values under the else condition. In this case, NR_TDD_CONFIG is set to 2 and NR_BANDWIDTH is set to 100, meaning that the NR cell uses 100 MHz bandwidth with the selected TDD pattern. N_ANTENNA_DL is set to 4, so the downlink is configured for 4 antenna ports, while N_ANTENNA_UL is set to 1, so the uplink is configured with one antenna port. USE_SRS is set to 0, so periodic SRS is not enabled in this example.
You can change the setup to FDD by setting NR_TDD to 0, but you may need to adjust some related parameters such as band, bandwidth, ARFCN, and duplex-related settings depending on the target spectrum and test purpose. The main multi-UE configuration does not fundamentally depend on TDD or FDD, but the radio configuration still has to match the intended deployment condition.
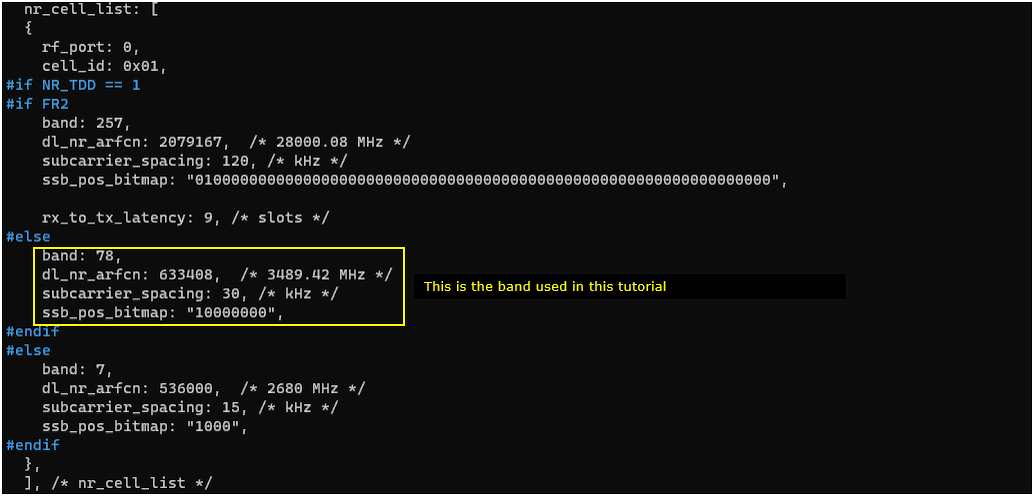
In this tutorial, the NR cell is configured with band 78, dl_nr_arfcn 633408, subcarrier_spacing 30 kHz, and ssb_pos_bitmap 10000000. Since NR_TDD is set to 1 and FR2 is set to 0, this configuration follows the FR1 TDD branch, and the highlighted part becomes the actual cell configuration used in this example.
These parameters mainly define the radio frequency and synchronization signal configuration of the NR cell. band 78 selects the NR operating band, dl_nr_arfcn defines the downlink RF channel, subcarrier_spacing 30 sets the numerology used by the cell, and ssb_pos_bitmap defines which SSB position is transmitted. These values are not directly related to the multi-UE feature itself, so you can change them depending on your target band, frequency, bandwidth, and deployment condition. The important point is that the selected combination must be valid according to the 3GPP NR band and numerology rules, and the UE side configuration should match the same cell configuration so that the simulated UEs can find and camp on the cell.
In nr_cell_default, sr_period is increased from the default value to 320 slots. This parameter controls the periodicity of Scheduling Request resources. When only one or a few UEs are connected, a shorter SR period is usually fine because the number of SR opportunities is small. However, in a 1000 UE simulation, many UEs may try to send SR frequently, and this can create too much SR load on the uplink control resources.
By setting sr_period to 320, each UE gets less frequent SR opportunities, so the overall SR activity is spread out more sparsely in time. This helps prevent excessive SR flooding when many UEs are connected at the same time. The purpose of this change is not to improve the access speed of each UE, but to make the multi-UE test more stable and realistic by reducing unnecessary uplink control channel pressure from a large number of simulated UEs.

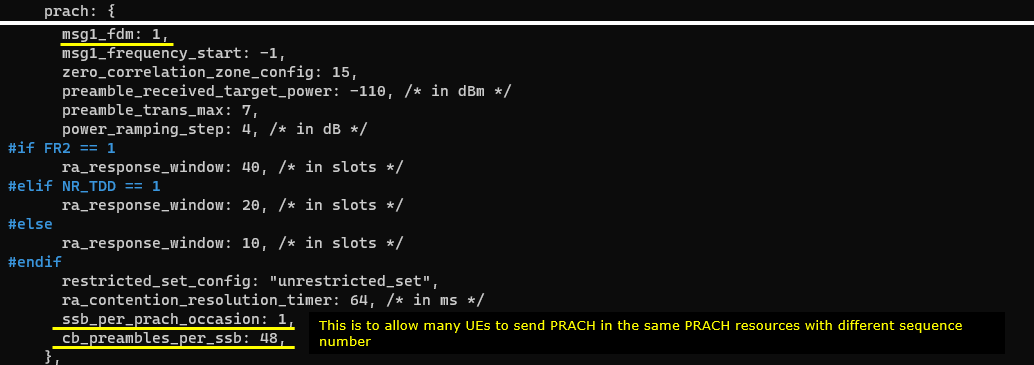
For a large-scale simulation such as 1000 UEs, the PRACH configuration should provide enough random access opportunities so that many UEs can attempt initial access without waiting too long. This is controlled by a combination of parameters such as msg1_fdm, ssb_per_prach_occasion, and cb_preambles_per_ssb. msg1_fdm defines how many PRACH frequency-domain occasions are available, ssb_per_prach_occasion defines how SSBs are mapped to PRACH occasions, and cb_preambles_per_ssb defines how many contention-based preambles are available per SSB.
In this tutorial, cb_preambles_per_ssb is increased to 48. This allows many UEs associated with the same SSB and PRACH occasion to select different PRACH preamble sequences. It does not completely remove contention, because two or more UEs can still choose the same preamble at the same time, but it reduces the probability of collision and allows a larger number of UEs to attempt PRACH access in a short period. This setting is especially useful when many simulated UEs are powered on around the same time and start the registration process almost together. (You may check out this note for further details on meaning of msg1_fdm, ssb_per_prach_occasion, cb_preambles_per_ssb)
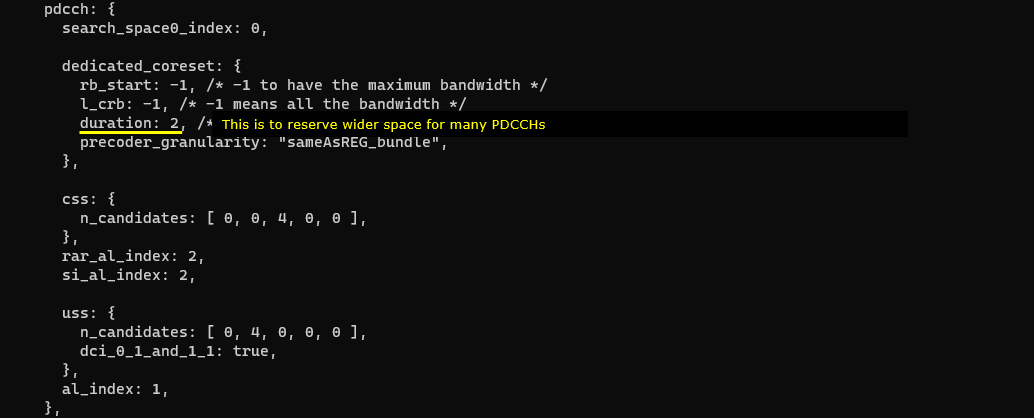
For this type of multi-UE use case, the gNB may need to transmit many PDCCH messages within a short time because each UE requires DCI for scheduling, random access response, uplink grant, downlink assignment, and other control procedures. If the PDCCH resource is too small, the gNB may not have enough control channel capacity to schedule many UEs efficiently, even if there are enough PDSCH or PUSCH resources available.
In this configuration, the duration value in dedicated_coreset is increased to 2. This means the CORESET occupies more OFDM symbols, so more physical resources are reserved for PDCCH transmission. rb_start is set to -1 and l_crb is set to -1, meaning that the CORESET can use the maximum available bandwidth. With a wider frequency range and longer duration, the gNB has more room to transmit multiple PDCCH/DCI messages for many UEs. This is especially important in a 1000 UE simulation, where the limitation can easily come from control channel capacity, not only from user data channel capacity.
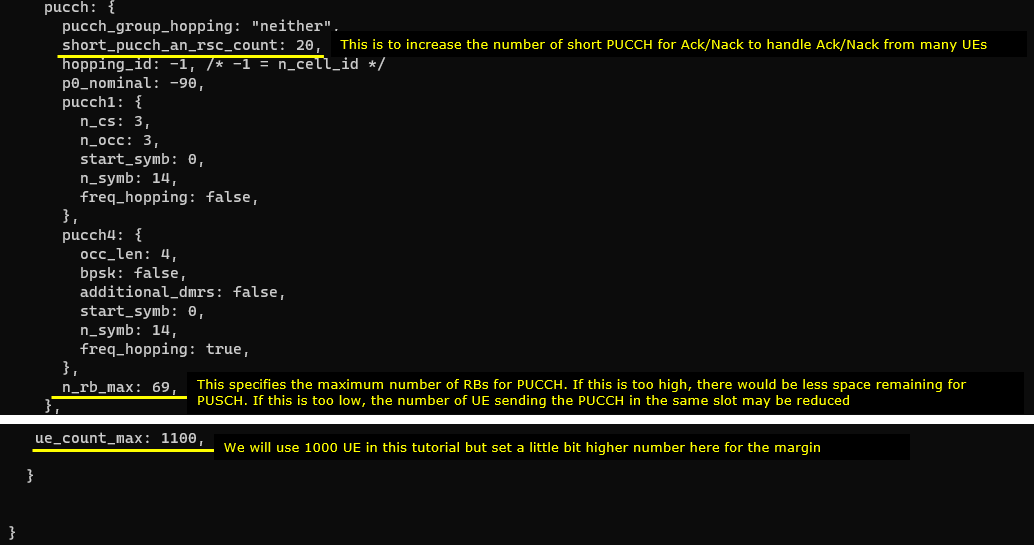
Not only the downlink control channel, but also the uplink control channel should have enough physical resources when many UEs are connected. In this example, short_pucch_an_rsc_count is increased to 20. This increases the number of short PUCCH resources used for ACK/NACK transmission, so the gNB can handle ACK/NACK feedback from many UEs more easily. This is important because in a 1000 UE test, many UEs may receive downlink data and need to send HARQ feedback around the same time.
At the same time, PUCCH should not consume too much uplink resource. If too many RBs are reserved for PUCCH, there may not be enough remaining uplink resource for PUSCH. For this reason, n_rb_max is configured as 69 to limit the maximum number of RBs that can be used for PUCCH. If this value is too high, PUSCH capacity may be reduced. If this value is too low, the number of UEs that can send PUCCH in the same slot may be limited.
ue_count_max is set to 1100. Although this tutorial uses 1000 UEs, the value is set slightly higher to provide some margin. This tells the gNB that the cell should be prepared to handle a large number of UE contexts in this multi-UE test.
Perform the test
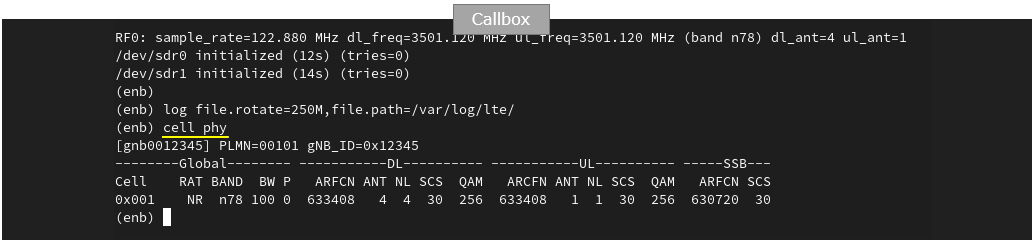
Perform the test by first starting the Callbox and checking the cell PHY configuration. After the service starts, run cell phy and confirm that the configured cell parameters are shown as intended.
In this example, the output shows one NR cell with cell ID 0x001. The RAT is NR, the band is n78, and the bandwidth is 100 MHz. For downlink, ARFCN is 633408, the number of antennas is 4, the number of layers is 4, subcarrier spacing is 30 kHz, and the maximum modulation is 256QAM. For uplink, ARFCN is also 633408, the number of antennas is 1, the number of layers is 1, subcarrier spacing is 30 kHz, and the maximum modulation is 256QAM. The SSB ARFCN is 630720 and the SSB subcarrier spacing is 30 kHz.
This confirms that the Callbox cell is running with the intended NR n78, 100 MHz, 30 kHz SCS, 4 DL antenna, and 1 UL antenna configuration before starting the multi-UE simulation from UEsim.
Start UEsim and run the t command to check the UE status. The important point is to wait until all simulated UEs are registered and connected. In this example, the UE IDs go from 1 to 1000, so the test is considered ready when UE ID 1000 is also shown in the status output.
The t command output shows each UE with its radio and traffic status, including UE_ID, RAT, RNTI, CFO, SRO, SINR, RSRP, downlink MCS, downlink bitrate, uplink MCS, timing advance, retransmission count, and uplink bitrate. In the screenshot, the last UE ID is 1000, which confirms that all 1000 UEs are connected. You can also run the t command on the Callbox side to confirm the same connection status from the network side. This is especially useful when commercial UEs are used instead of Amarisoft UEsim, because the Callbox becomes the common place to verify how many UEs are actually attached and active.
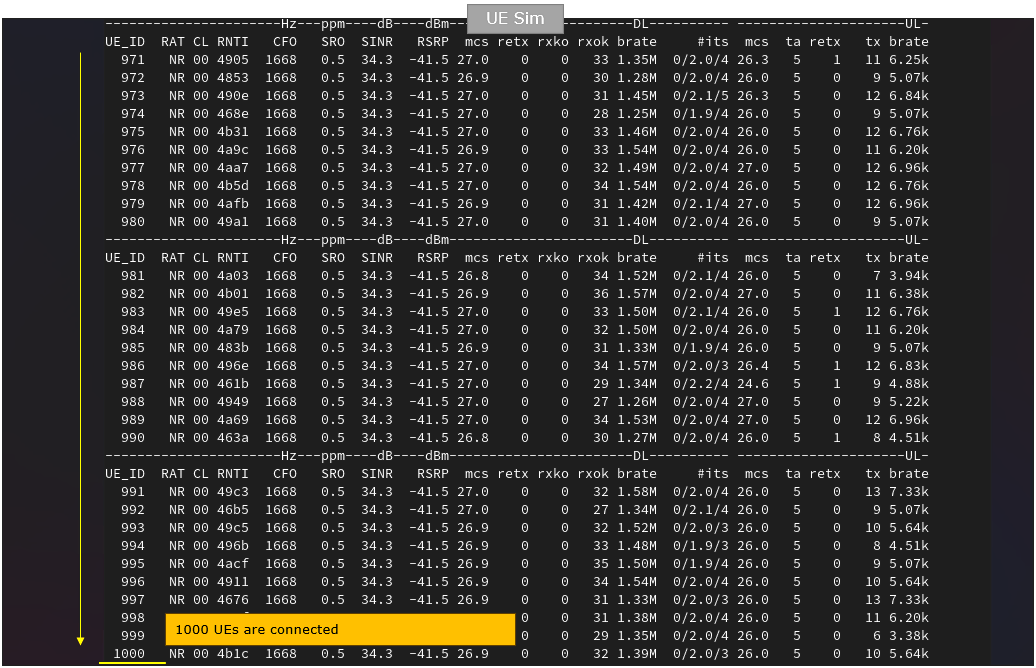
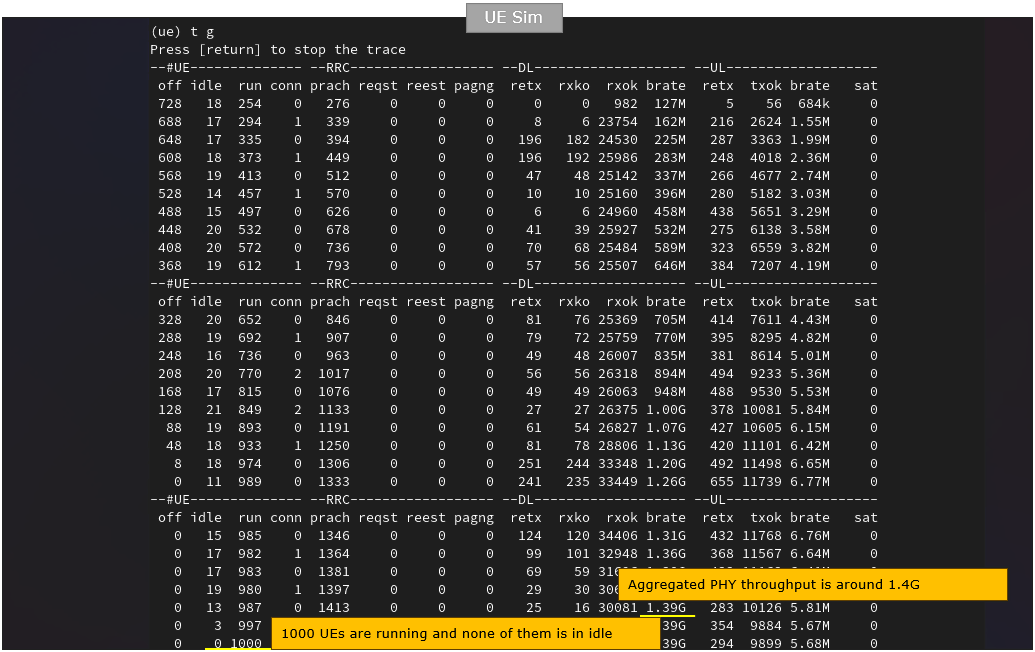
You can also check the global UE statistics by running the t g command on UEsim. Unlike the normal t command, which shows per-UE status, t g gives an aggregated view of the whole simulation. This is useful when the number of UEs is very large and it is difficult to inspect each UE one by one.
In this output, the off column shows how many UEs are powered off, the idle column shows how many UEs are in idle state, the run column shows how many UEs are running, and the conn column shows how many UEs are connected. In the last line, off is 0, idle is 0, run is 1000, and conn is 0, meaning that all 1000 UEs are running and none of them are idle or powered off at that moment. The same output also shows high-level PHY statistics such as PRACH count, DL retransmission count, DL bitrate, UL retransmission count, UL transmitted data, and UL bitrate.
In this example, the aggregated downlink PHY throughput reaches around 1.4 Gbps. This confirms not only that the 1000 UEs are created and running, but also that the simulation is carrying real traffic and the system is producing measurable aggregate throughput.
Log Analysis
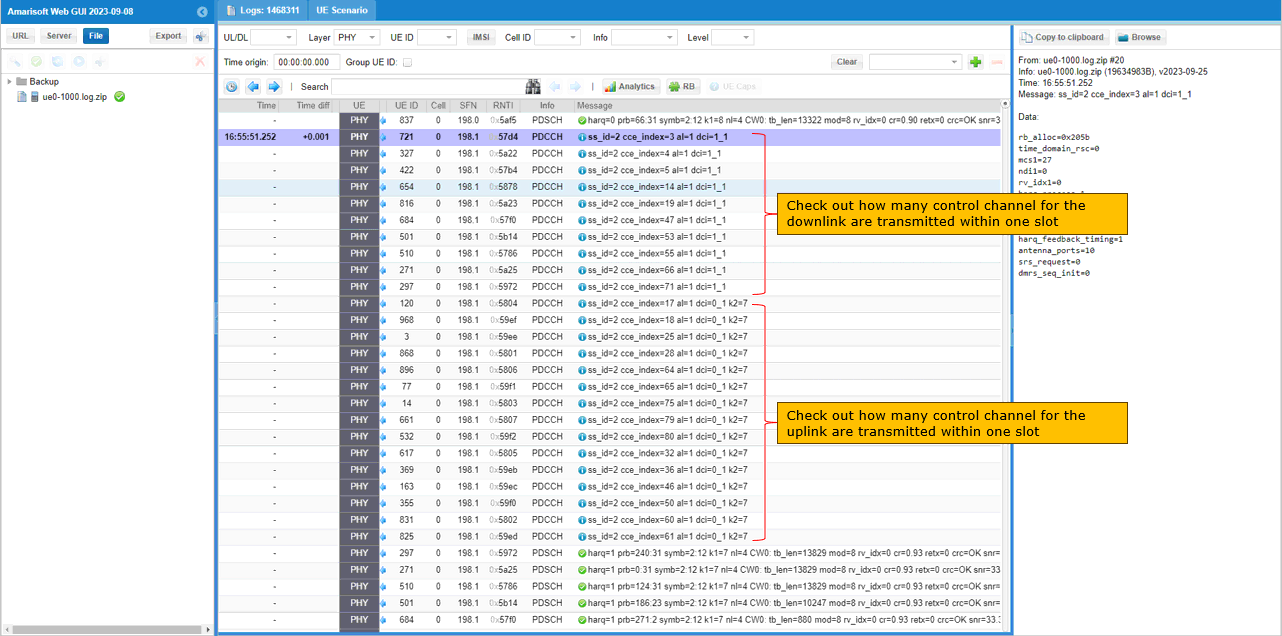
While UEs are in connected state, you can check out how many UEs and which UEs are scheduled for each slot as shown below. You may check out the same thing on gNB log as well. In this log, I would not look much into signaling process because basically they are typical initial attach sequence. What I want to highlight is about lower layer scheduling and see how gNB allocates physical resources to handle such a large amount of UEs.
In this log view, first check how the gNB transmits control information. You can see that many PDCCH messages are transmitted within a single slot, in this example SFN 198 slot 1. This means the gNB is scheduling or controlling many UEs at the same time.
Some of the PDCCH entries carry dci_1_1, which is used for downlink scheduling. These messages tell each UE where its PDSCH is located and how to receive the downlink data. Other PDCCH entries carry dci_0_1, which is used for uplink scheduling. These messages provide uplink grants and tell each UE where and how to transmit PUSCH.
This log is a good confirmation that the increased CORESET/PDCCH resource is actually useful in a 1000 UE test. When many UEs are active, the gNB needs to send many DCI messages in the same slot, and these DCI messages become one of the key control channel loads in the system.
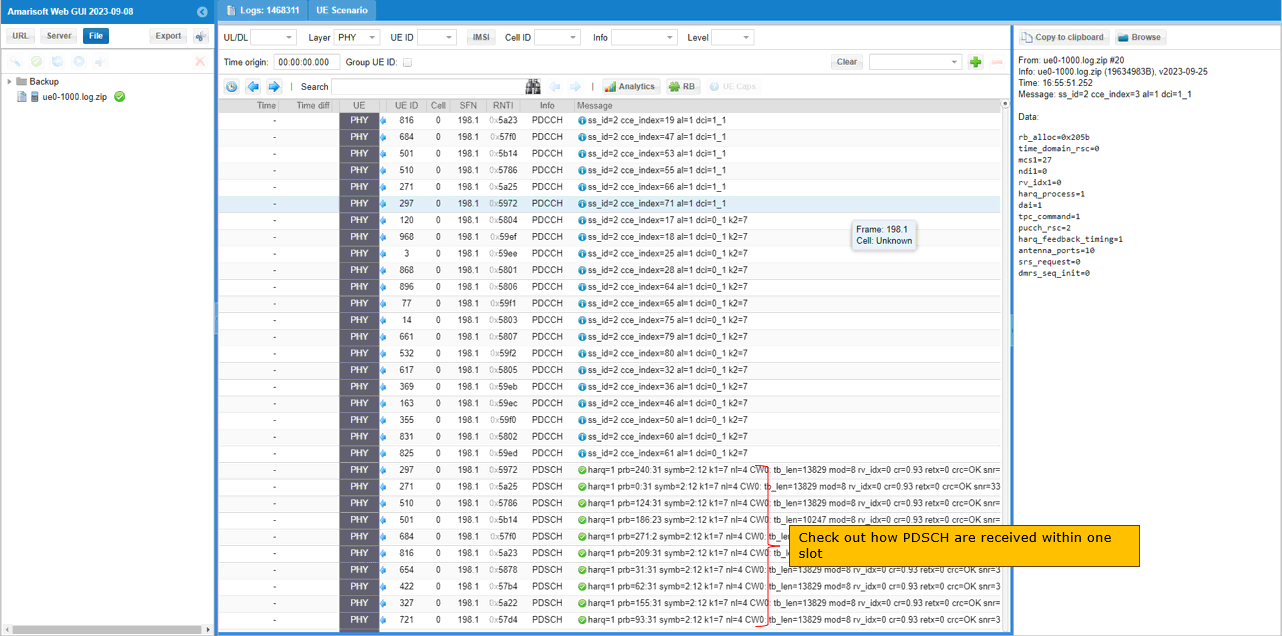
Based on the downlink scheduling shown above, the corresponding PDSCH transmissions are also shown in the same log. Each dci_1_1 on PDCCH gives a downlink scheduling assignment to one UE, and the actual user data is then transmitted on PDSCH according to that assignment.
In this example, k0 for dci_1_1 is 0 by default. This means the scheduled PDSCH is transmitted in the same slot as the PDCCH carrying the downlink DCI. Because of this, when you count the number of dci_1_1 messages in one slot, you should see the same number of corresponding PDSCH entries in that same slot. This is a useful way to confirm that the downlink control scheduling and the actual downlink data transmission are aligned correctly.
The highlighted PDSCH entries show multiple UEs receiving downlink data within one slot. This confirms that the gNB is not only sending many downlink scheduling DCIs, but also allocating PDSCH resources to many UEs in the same slot as part of the 1000 UE traffic test.
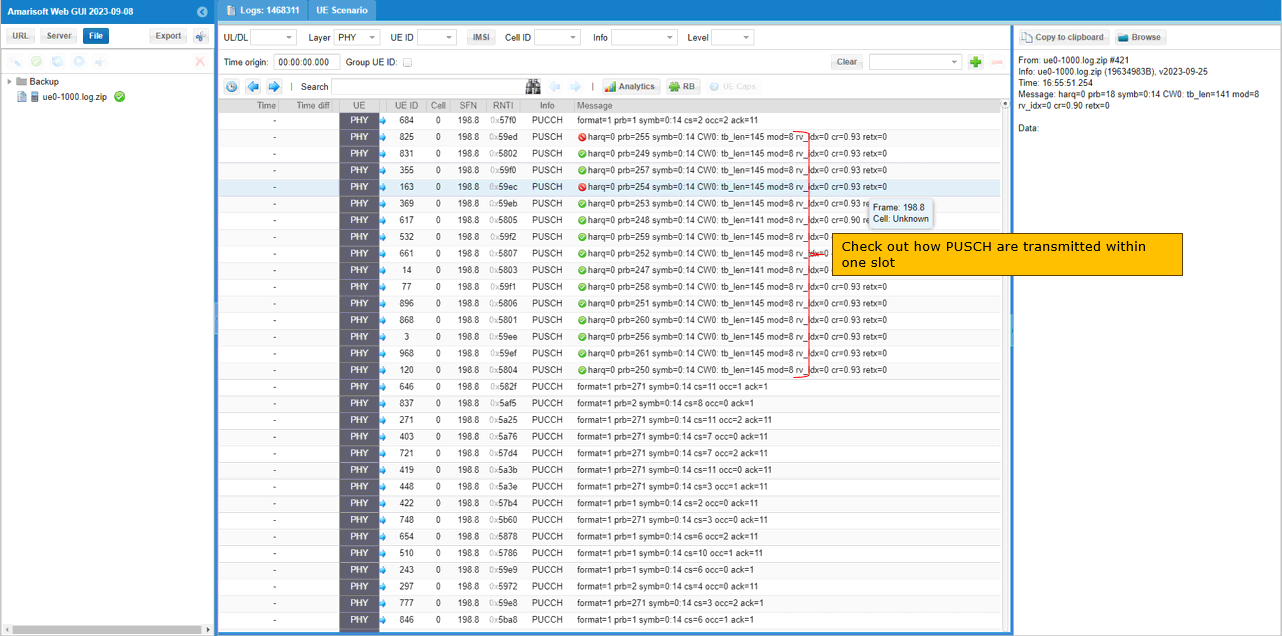
Based on the uplink scheduling shown above, the corresponding PUSCH transmissions are shown in this log. Each dci_0_1 on PDCCH gives an uplink grant to one UE, and the UE transmits PUSCH according to that grant.
In this example, k2 for dci_0_1 is 7. This means the UE does not transmit PUSCH in the same slot where it receives the uplink grant. Instead, it transmits PUSCH 7 slots later. For example, if the uplink grant is sent at SFN 198 slot 1, the corresponding PUSCH transmission appears at SFN 198 slot 8. Because all dci_0_1 messages use the same k2 value in this example, you should see the same number of PUSCH entries in the target uplink slot as the number of dci_0_1 entries in the scheduling slot.
The highlighted PUSCH entries show many UEs transmitting uplink data within one slot. This confirms that the gNB is giving uplink grants to multiple UEs and that the UEs are transmitting their corresponding PUSCH after the configured k2 delay. This is useful for checking whether uplink scheduling is working correctly under the 1000 UE load.
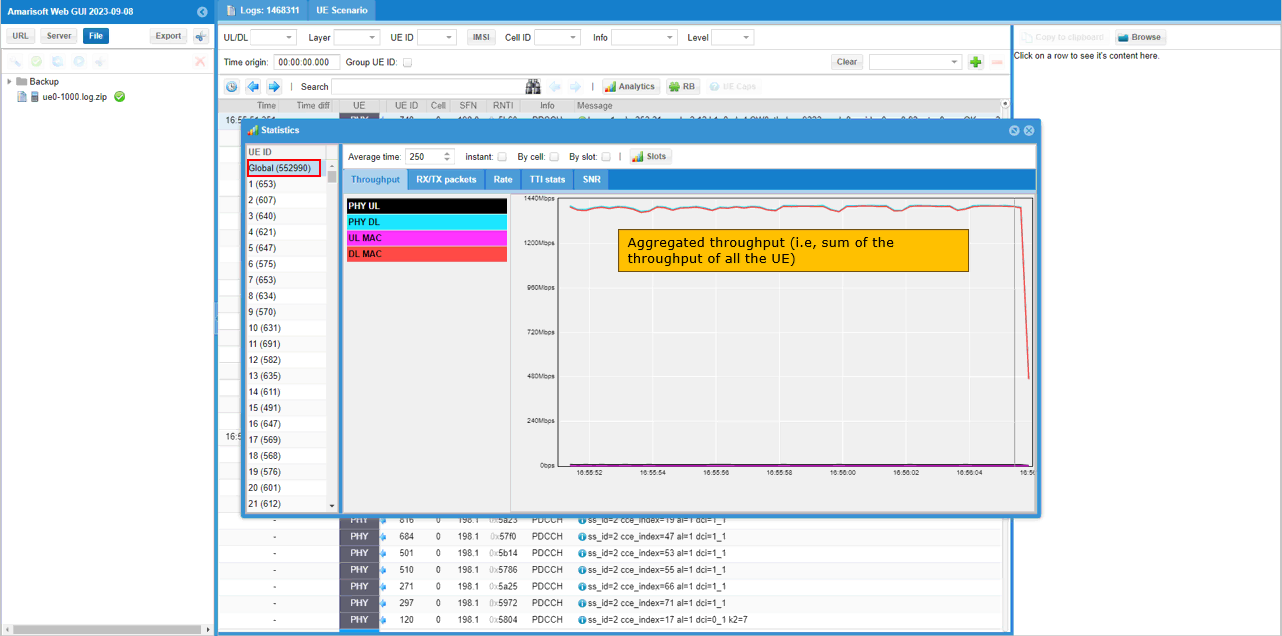
While the UEs are in connected state, you can also check the throughput statistics from the log viewer. This is useful because it shows not only whether the UEs are connected, but also whether they are actually carrying traffic.
In the Statistics window, selecting Global shows the aggregated throughput, which means the sum of the throughput from all connected UEs. In this example, the graph shows the total PHY DL throughput staying around 1.4 Gbps for most of the measured period. This gives a quick high-level view of the overall system throughput under the 1000 UE load.
You can also select each individual UE from the UE ID list on the left side. In that case, the graph shows the throughput of that specific UE instead of the total throughput. This is useful when you want to check whether traffic is evenly distributed across UEs, whether some UEs are not receiving traffic, or whether a specific UE has abnormal throughput compared to others. The same kind of throughput check can also be done from the gNB log side.
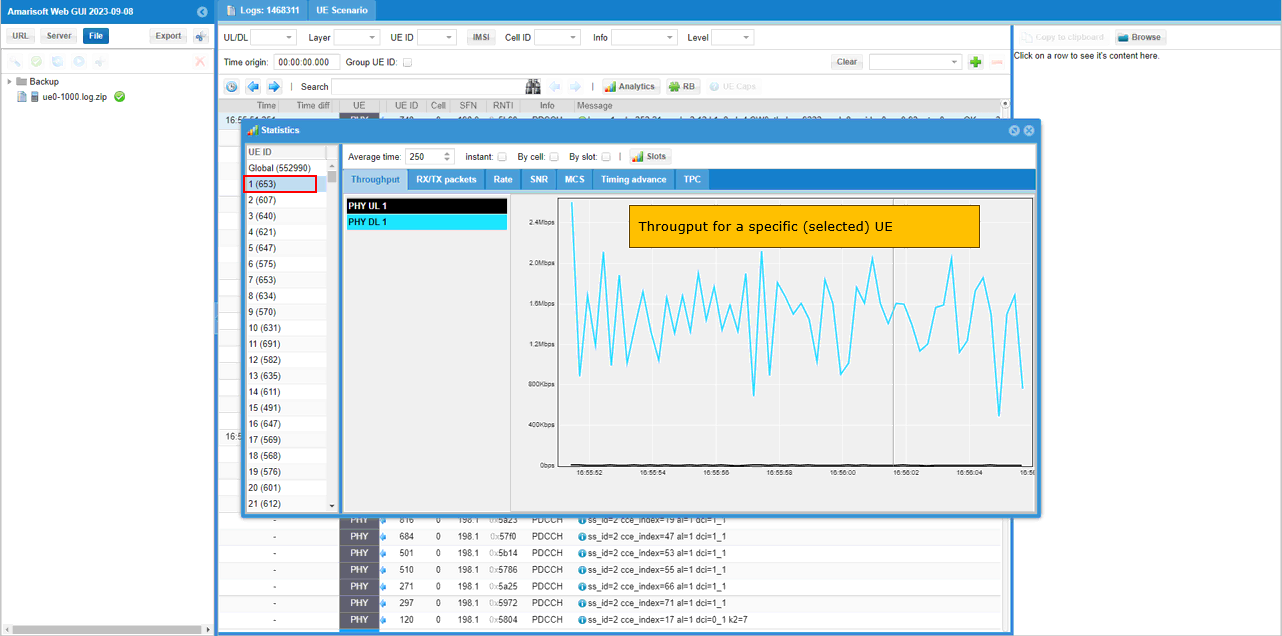
When you select a specific UE from the UE ID list, the Statistics window shows the throughput only for that UE. This is different from the Global view, where the graph shows the aggregated throughput of all connected UEs.
In this example, UE 1 is selected, and the graph shows the PHY DL throughput for that UE. The throughput fluctuates over time, roughly around the Mbps range, because the scheduler distributes resources among many active UEs instead of giving all resources to one UE continuously. This kind of per-UE view is useful when you want to verify whether a specific UE is receiving traffic, compare throughput among UEs, or check if any UE behaves differently from the others.
By checking both Global throughput and individual UE throughput, you can confirm two things at the same time: the whole system is carrying the expected aggregate traffic, and each selected UE is receiving its own scheduled traffic properly.
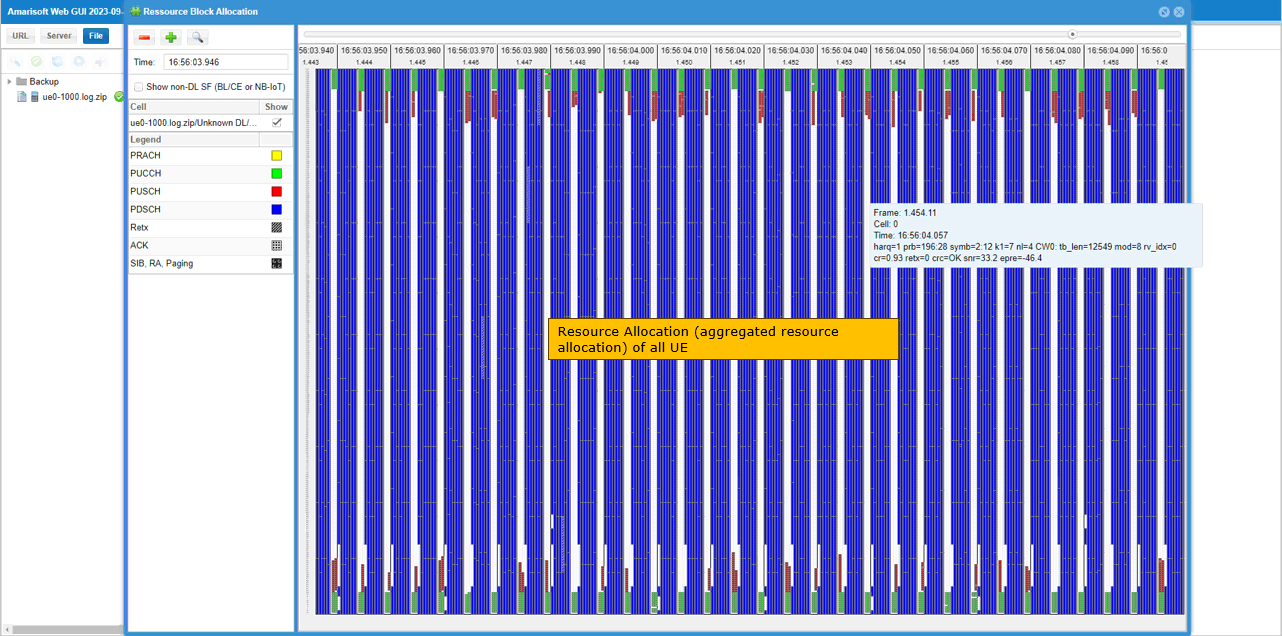
While the UEs are in connected state, you can also check the Resource Block Allocation view to see how physical resources are allocated across all connected UEs. This gives a visual view of the aggregated resource usage, so it is easier to understand how busy the cell is compared to checking only throughput numbers.
In this view, different colors represent different physical channels. For example, PDSCH is shown in blue, PUSCH in red, PUCCH in green, and PRACH in yellow. Since this is an aggregated view, the resource allocation from many UEs is displayed together across time and frequency. In this example, you can see that a large portion of downlink resources is occupied by PDSCH, while uplink control and uplink data resources are also allocated in their corresponding positions.
This view is useful for confirming whether the scheduler is actively using the available radio resources, whether PDSCH and PUSCH allocations are distributed as expected, and whether control channels such as PUCCH are consuming a reasonable amount of uplink resource. You can check the same type of resource allocation from the gNB log as well.