UEsim Scenario
This tutorial shows how to define and perform various sequence of test procedure using WebGUI. You may consider this as a kind of batch procedure defined for each UE simulated by UEsim. This predefined test procedure in WebGUI is called Scenario. This feature is especially usefull for simulating multiple UEs. There are many different things you can configure. Some of the most basic and commonly used configuration is as follows. These are only some important configurations. There are many other parameters that are not listed here.
- The number of UE to be created (simulated)
- USIM parameters for each of the UEs
- Power-on Timing : You may choose on whether you want to power on all the UEs at the same time or power on one by one with a certain time interval etc.
- Thing to do after the initial attach : You can define various tasks about what you want to do after the completion of the initial attach like Ping, UDP, Flooding, RTP etc.
- Display of UE status : Once the scenario is configured and run, WebGUI shows various information of each and every UE like connection status, rsrp, data rate etc.
Table of Contents
Introduction
In modern mobile network testing and validation, the ability to simulate multiple User Equipments (UEs) under varied and complex operational scenarios is crucial for evaluating network performance, robustness, and scalability. UEsim is an advanced UE simulator platform designed to facilitate these requirements by offering an extensive set of configuration and automation tools accessible through an intuitive WebGUI interface. Central to this platform is the concept of a Scenario, a predefined sequence of test procedures tailored for each simulated UE. Scenarios enable automated, reproducible batch testing, allowing users to configure diverse aspects such as USIM parameters, network attach sequences, data traffic generation, and device behavior after connection establishment. Architecturally, UEsim is structured to manage multiple virtual UEs concurrently, leveraging web-based orchestration for real-time monitoring, status visualization, and detailed test control. This approach significantly streamlines the process of large-scale test case execution, supports rapid prototyping, and enhances the reliability of results by minimizing manual intervention. By integrating scenario-based automation with comprehensive configuration options, UEsim plays a pivotal role in the end-to-end validation of 4G/5G core and radio access networks, contributing to the accelerated deployment and improved quality assurance of next-generation mobile services.
-
Technology and Platform Context
- UEsim provides a high-fidelity simulation environment for emulating large numbers of UEs.
- The WebGUI offers a centralized interface for defining, executing, and monitoring complex test scenarios.
- Scenario-based testing automates workflows, minimizing manual setup and reducing the risk of human error.
-
Relevance and Importance of Tutorial Topic
- Efficient scenario creation and execution is vital for thorough network validation and troubleshooting.
- Automated scenario workflows enhance repeatability and scalability in testing, supporting both functional and performance assessments.
- This tutorial empowers network engineers and QA teams to simulate real-world UE behaviors, enabling robust network evaluation.
-
What Learners Will Gain
- Understanding of scenario structure and key configuration parameters in UEsim WebGUI.
- Ability to define and execute automated test procedures for multiple UEs.
- Skills to monitor, interpret, and troubleshoot scenario execution outcomes via the WebGUI dashboard.
- Insights into best practices for scalable and reproducible network testing.
-
Prerequisite Knowledge or Skills
- Familiarity with basic mobile network concepts, including UE, core network, and attach processes.
- Basic understanding of network testing principles and objectives.
- Prior exposure to web-based management interfaces is beneficial but not mandatory.
Summary of the Tutorial
This tutorial outlines two comprehensive test procedures for LTE multi-UE simulation using a callbox and UE simulator environment. The tutorial is structured into setup, configuration, and step-by-step methodologies for executing an Attach test and a Ping test.
-
Test Setup and Configuration:
- Utilizes a SIM card provided with the system as default. Configuration changes can be referenced in the Configuration Guide.
- Configurations involve use and modification of default files:
- ue.default-multi-ue.cfg (for multi-UE scenarios, copied and modified from ue.default.cfg).
- enb.default.cfg for eNB setup.
- mme-ims-multi-ue.cfg and ue_db-ims-multi-ue.cfg for MME and UE database settings, ensuring parameter consistency (e.g., IMSI and K value) across entities.
- On the callbox side, main LTE radio and network parameters (such as TDD mode, N_RB_DL, N_ANTENNA_DL) can be configured as required, provided UE connectivity is unaffected.
- For extended RRC connection, the inactivity_timer in enb.default.cfg is set to a large value.
- In ue.default-multi-ue.cfg, UE_COUNT is set to 5 for multi-UE simulation; note that WebGUI settings can override certain parameters like multi_ue and ue_count.
-
Test 1: Attach Procedure
- Access the UE sim WebGUI and navigate to the [UE Scenario] tab.
- Create a new scenario by clicking the [+Add] button, opening a panel with default settings.
- Specify the scenario name and UE count, then apply changes.
- Within the 'Create UEs' tab, configure relevant parameters such as:
- Count, IMSI, Cell list, RAT, AS Release, Category, Forced RI, Forced CQI, Algorithm, K, Response length, Type, PDSCH Max decoder iteration
- In the 'Power on/off' configuration, set power conditions for each UE (e.g., power on/off duration).
- Other scenario tabs (PDN, channel simulation, simulations) are left at default for this basic test.
- Ensure LTE service is running in the background, then initiate the test by clicking the [Run] button.
-
Monitoring:
- Use the Test tab to view ongoing test status, number of UEs, and call status per UE in graphical mode.
- Use the UE tab to check call status, activation, and RRC/EMM status for each UE in tabular form.
-
Test 2: Ping Procedure
- This test builds upon the Attach scenario from Test 1; ensure the Attach test is working before proceeding.
- With previous configurations intact, adjust the [Simulation] section for this test.
- Add a simulation script by clicking the [+] button, which opens a dialog to select simulation types such as ICMP PING, UDP, RTP, VOIP, Flood, HTTP transfer, Application, etc.
- Select ICMP PING for this test, specify the script name, and add the script.
- Configure script parameters, including:
- Probability, APN, Start Delay, Duration, Payload size, Delay, Destination
- Apply changes and start the test by clicking the [Run] button.
-
Monitoring:
- Graphically monitor UE data traffic and activity under the simulation scenario.
The tutorial emphasizes the importance of parameter consistency across configurations and proper scenario setup in the WebGUI. Tests are monitored through graphical and tabular interfaces, allowing for real-time observation of multi-UE attach and data (ping) scenarios.
Test Setup
Test setup for this tutorial is as shown below.
- SIM Card used in this tutorial is the one delivered with the system as it is.
- If you want to change the configuration, The tutorial Configuration Guide would help
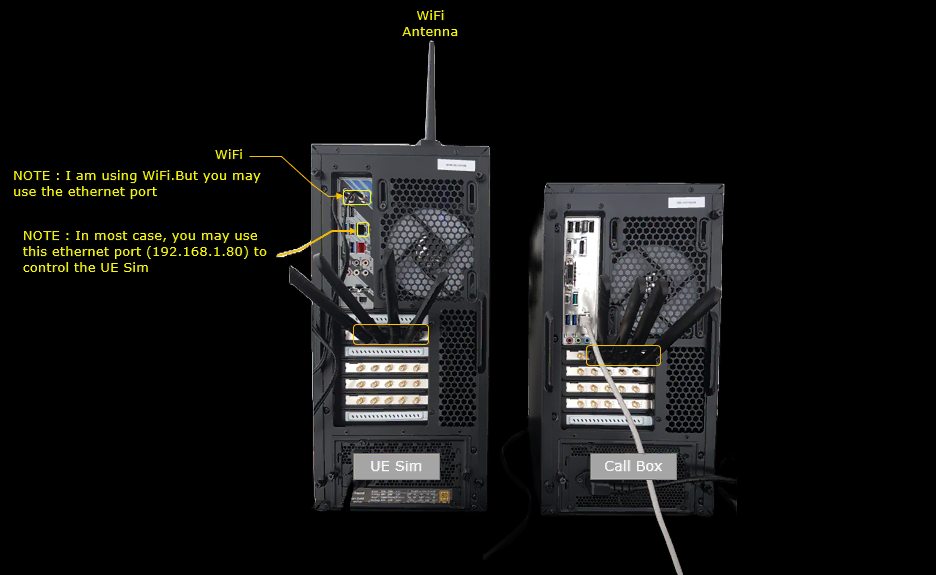
I used WiFi to control the UE simulator. You can also use the Ethernet port assigned 192.168.1.80 in this setup.
The UE simulator and Callbox both have antennas connected to their SDR ports. The WiFi antenna on the UE simulator provides the management connection.
Configuration
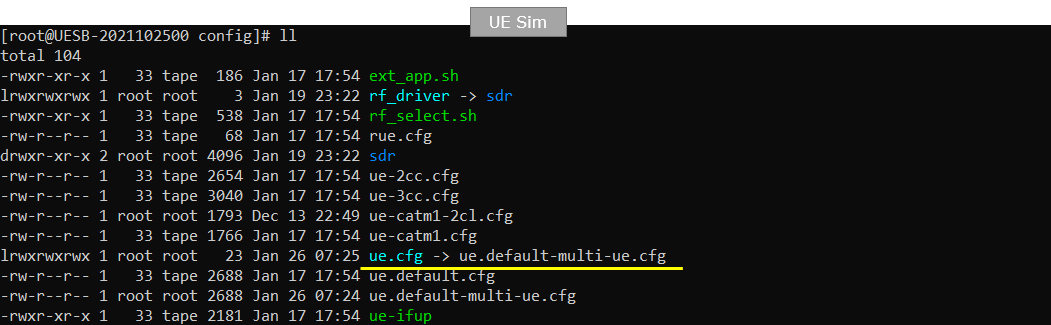
I used the ue.default-multi-ue.cfg which is copied and modified from ue.default.cfg (LTE default configuration).
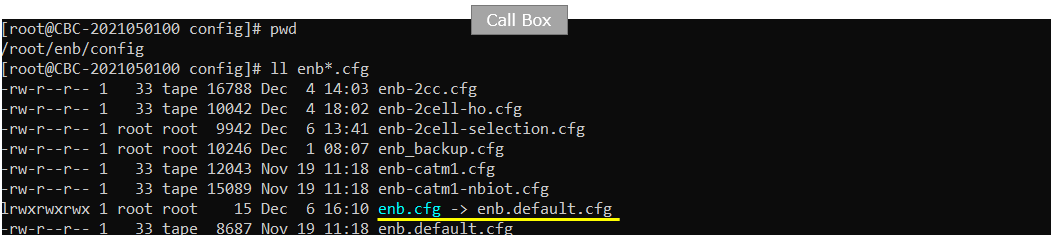
I used the enb.default.cfg (LTE default configuration).
I used the mme-ims-multi-ue.cfg which is copied and modeified from mme-ims.cfg
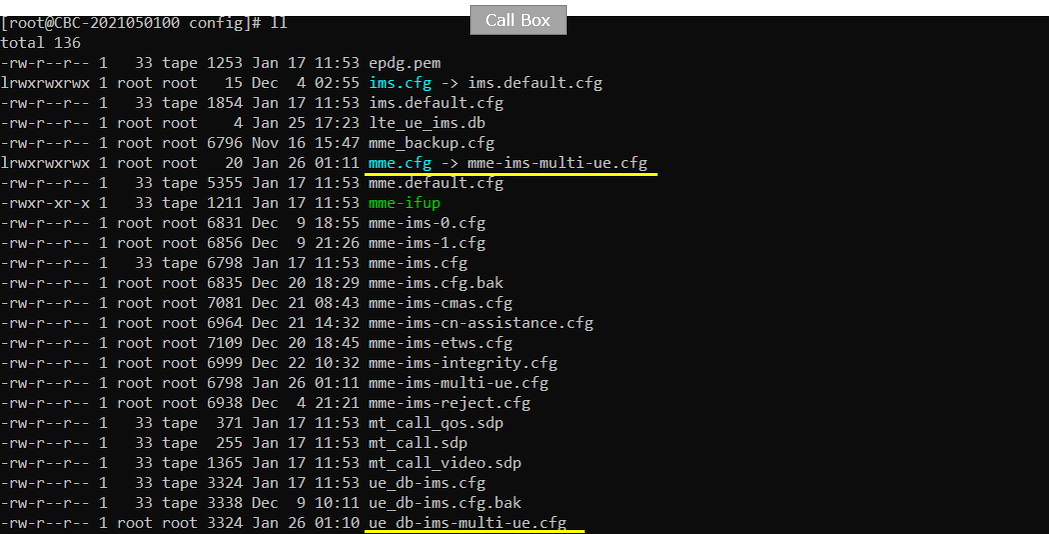
In the mme-ims-multi-ue.cfg, I changed the configuration so that ue_db-ims-multi-ue.cfg is used on Callbox.
The include directive points to "ue_db-ims-multi-ue.cfg". This selects the subscriber database for the multi-UE test. If you create another database file, change this include to its name.

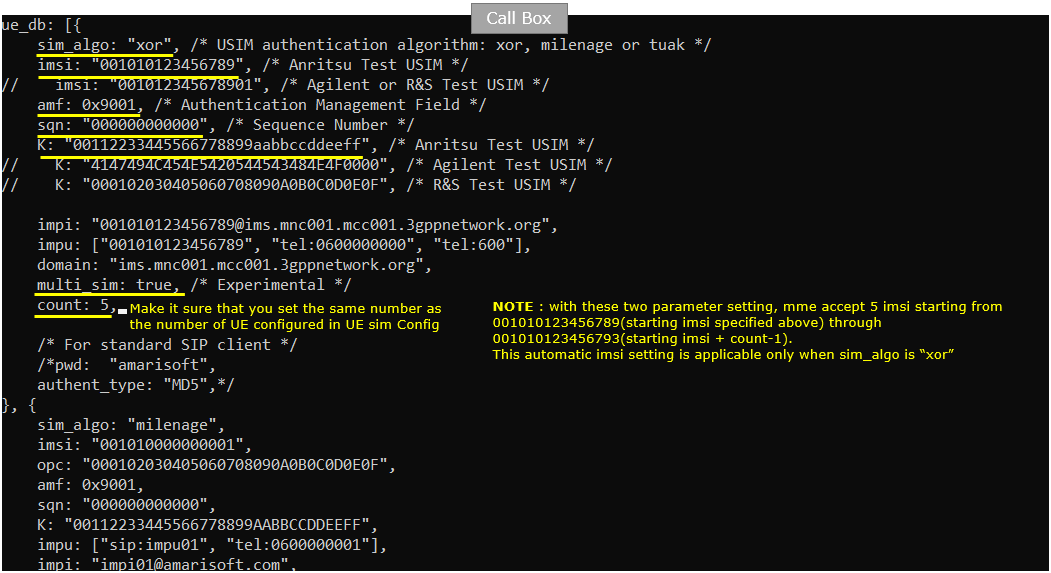
In this tutorial, following SIM information will be used within ue_db-ims-multi-ue.cfg. Make it sure to configure the same parameters on UE side as well.
I set multi_sim to true and count to 5. The starting imsi is "001010123456789", so the five entries cover 001010123456789 through 001010123456793.
The active entry uses sim_algo: "xor", amf: 0x9001 and sqn: "000000000000". Its K value is "00112233445566778899aabbccddeeff". The automatic IMSI range in this example uses XOR authentication.
The count must cover the UEs you create. This database example has five entries, while the later WebGUI scenario sets Count to 10. Check the subscriber entries before using that larger scenario.
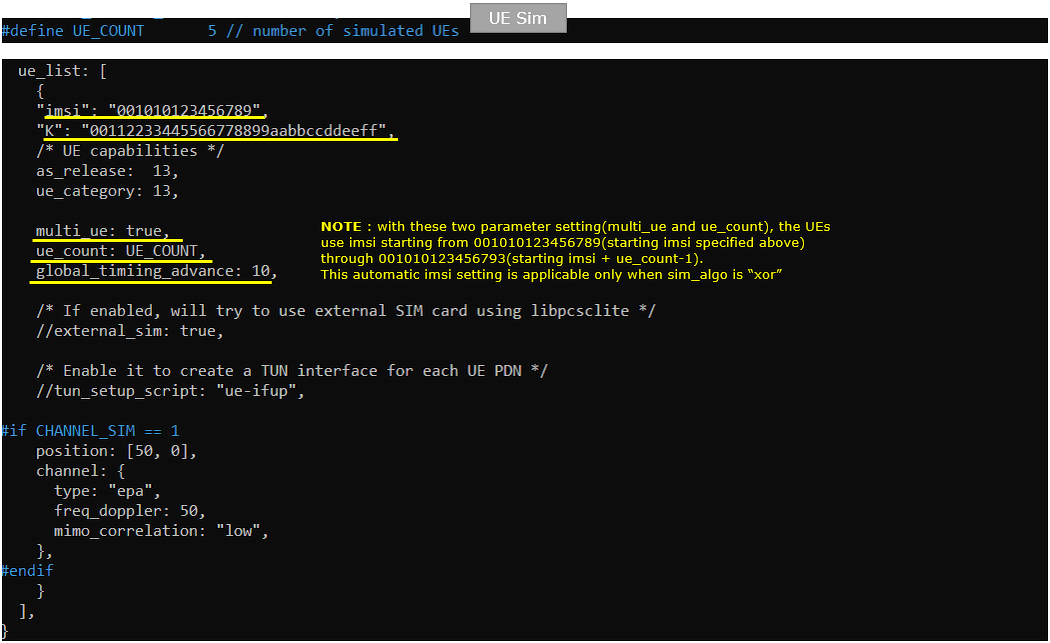
In ue.default-multi-ue.cfg on UEsim, Make it sure that imsi and K value in this file matches the value on enb side shown in previous slide
The starting imsi is "001010123456789" and K is "00112233445566778899aabbccddeeff". These match the first XOR subscriber entry on the Callbox. The file sets multi_ue: true and ue_count: UE_COUNT, with UE_COUNT defined as 5.
I used as_release: 13, ue_category: 13 and global_timing_advance: 10 in this file. The external_sim and tun_setup_script lines are commented out. The conditional channel block is not used here because CHANNEL_SIM is set to 0.
Following is the configuration in enb.default.cfg on Callbox. You can configure these (TDD, N_RB_DL, N_ANTENNA_DL etc) in anyway you like as long as it has no problem with UE connection.
I set TDD to 0 for FDD and N_RB_DL to 25 for a 5 MHz cell. N_ANTENNA_DL and N_ANTENNA_UL are both 1.
CHANNEL_SIM is 0, so channel simulation is disabled. NG_ENB is also 0 for this LTE configuration. If you change the bandwidth or antenna configuration, check the corresponding UE simulator settings.

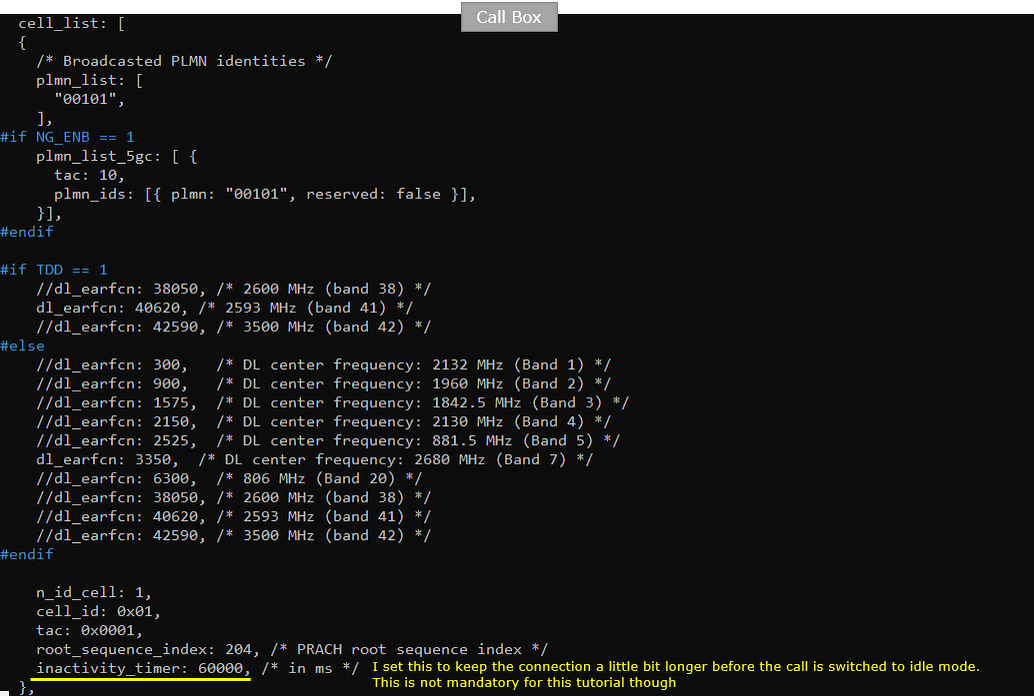
This is optional. In enb.default.cfg, I made a small change as shown below. Everything is same as the default. The only thing that I changed is to put the large value for inactivity_timer to maintain the connection time before releasing RRC connection.
I set inactivity_timer to 60000 ms, or 60 seconds. You can reduce this value if you want an idle connection to be released sooner.
The active FDD branch uses dl_earfcn: 3350, corresponding to 2680 MHz in band 7. The cell uses PLMN "00101", n_id_cell: 1 and tac: 0x0001. The TDD and NG_ENB branches are not used with the macro settings above.
Following is the configuration in ue.default-multi-ue.cfg on UE sim. I set UE_COUNT to 5 for this test.
TDD is 0 and CELL_BANDWIDTH is 5, matching the Callbox FDD cell with 25 resource blocks. N_ANTENNA_DL and N_ANTENNA_UL are both 1. CHANNEL_SIM is 0.
UE_COUNT is the file setting for five simulated UEs. The later scenario uses Count: 10 in the WebGUI, so use that value when checking the scenario UE population.

Test 1 : Attach
Connect to UE sim WebGUI and follow the procedures in following slides
In this test, I will use the default setting in most of the parameters. Only a few changes from the default setting to make a scenario creation as simple as possible
Define a Scenario and Perform the test
Select [UE Scenario] tab
The scenario list is empty at this point. Use the Add control in the toolbar to create the first entry.
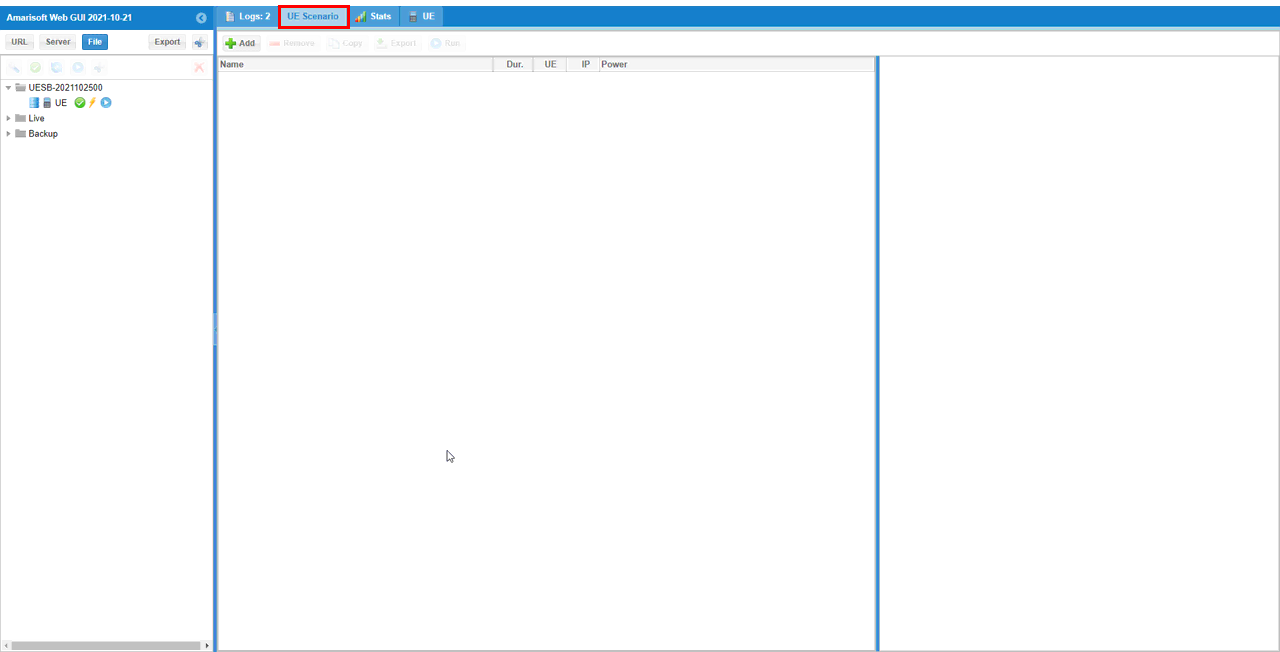
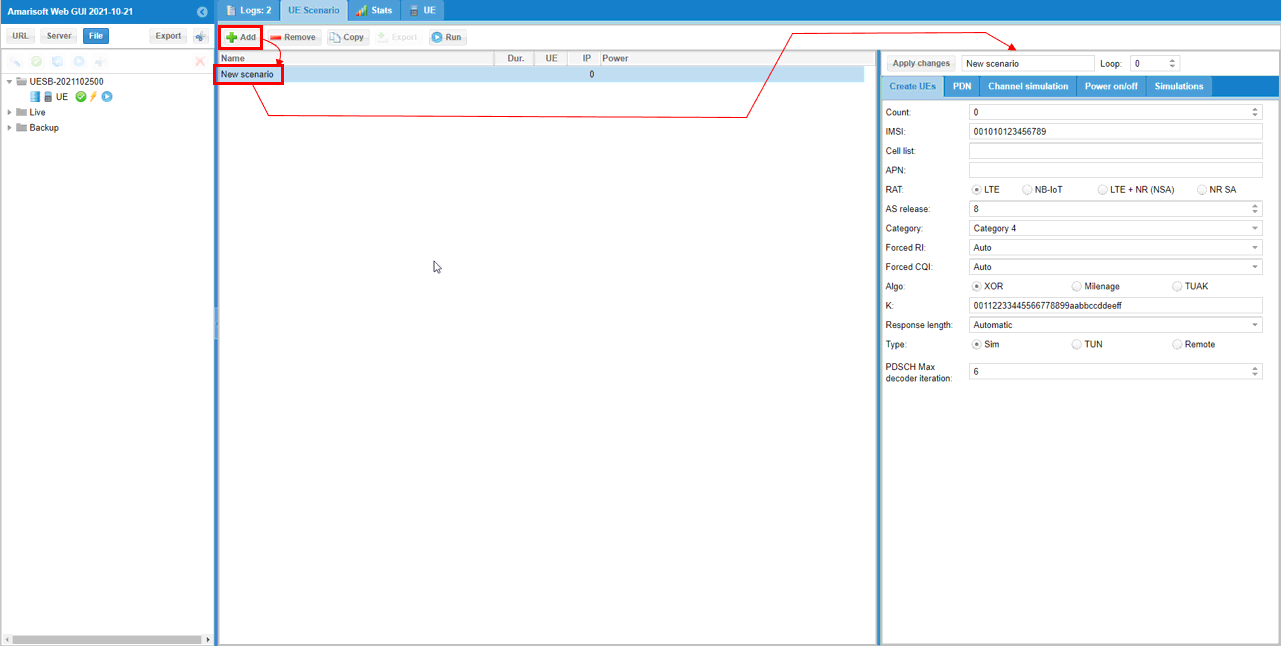
Hit [+Add] button and you will get a new Scenario panel with default settings. This is to create a new Scenario pannel where you can specify various items like 'Create UEs', 'PDN','Channel Simulation', 'Power on/off' and 'Simulation'. Most of these tabs comes with default values. You only need to change values which you want to set differently from the default values.
The new entry is named "New scenario" and Count starts at 0. The Create UEs settings select LTE, AS release 8, Category 4 and Type: Sim.
Forced RI and Forced CQI are both Auto. Algo is XOR, with IMSI 001010123456789 and K 00112233445566778899aabbccddeeff. Check these authentication values against the Callbox database before applying the scenario.
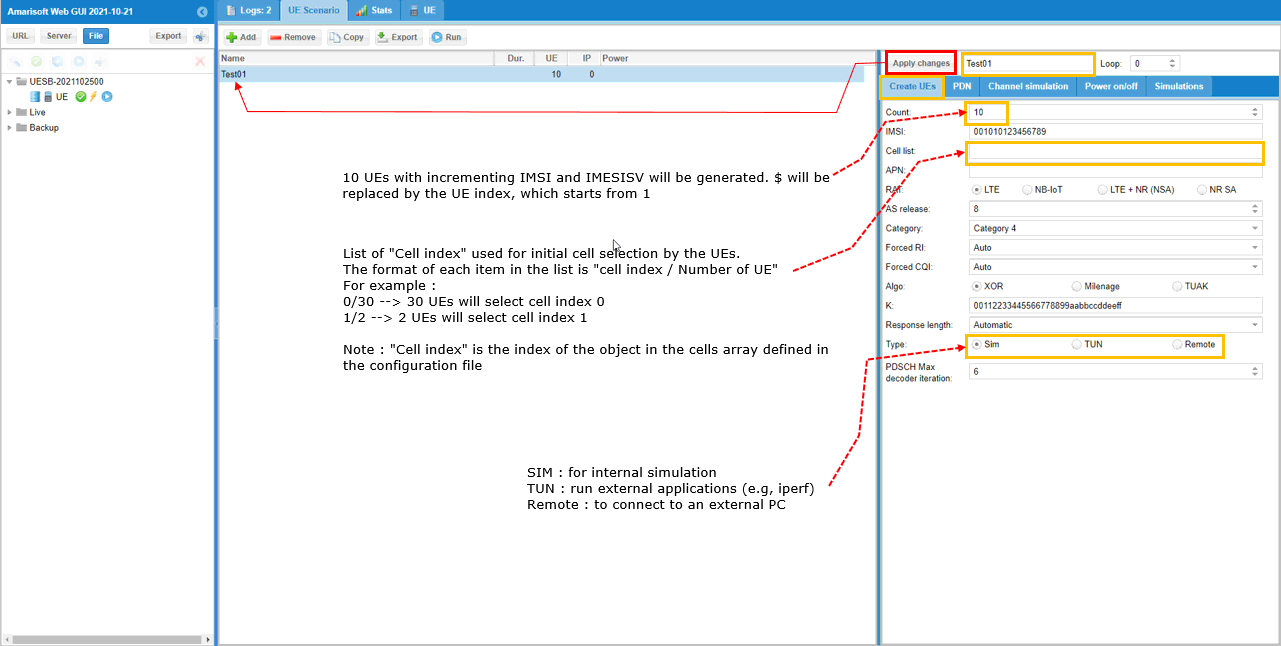
Specify Scenario Name and UE count and hit [Apply Changes] button. In 'Create UEs' tabs, you can specify various items like 'Count', 'IMSI', 'Cell list', 'RAT', 'AS Release', 'Category', 'Forced RI', 'Forced CQI', 'Algo', 'K', 'Response length', 'Type', 'PDSCH Max decoder iteration'. For the descriptions on each of these parameters, refer to UEsim document.
I named the scenario Test01 and set Count to 10. The scenario list also reports 10 UEs after Apply changes. The IMSI field contains 001010123456789 and Cell list is empty.
You can use Cell list to assign UEs to an initial cell index. Each entry uses the format "cell index / Number of UE". For example, 0/30 assigns 30 UEs to cell index 0, and 1/2 assigns two UEs to cell index 1.
The cell index refers to an object in the cells array of the configuration file. Type: Sim selects internal simulation for this test. TUN is for an external application such as iperf, and Remote connects to an external PC.
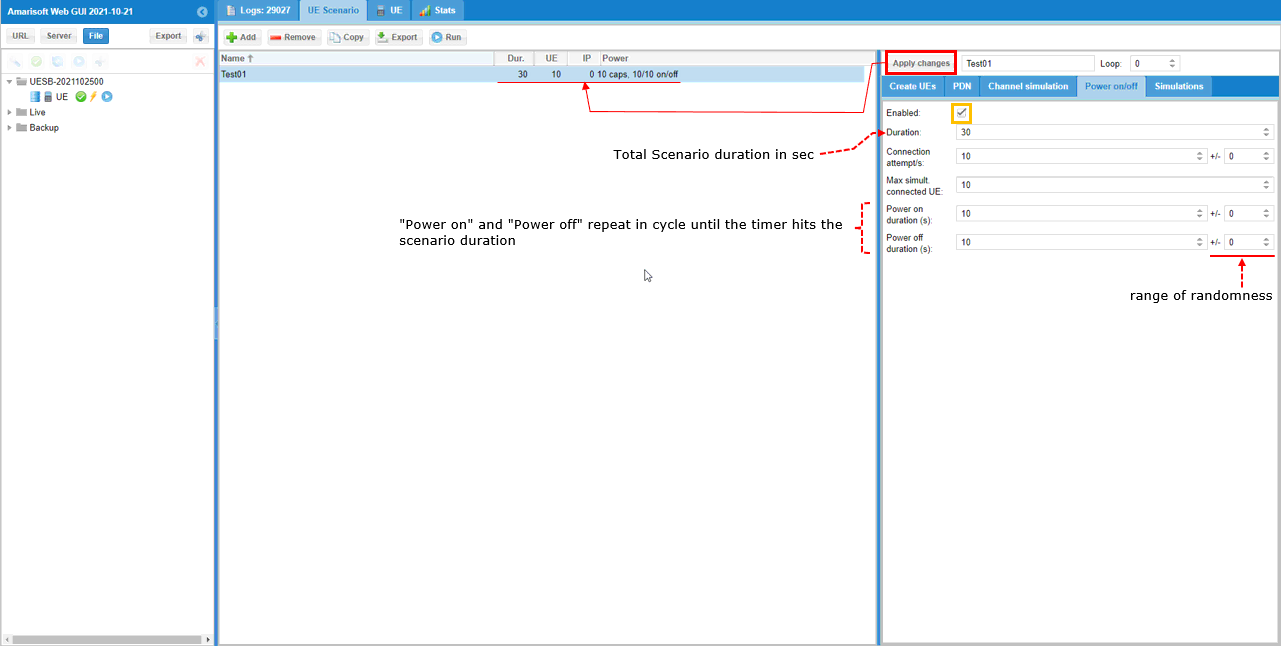
Now Set the 'Power on/off' configuration. Here you can specify on the conditions of power on/off for each UE (e.g, power on duration, power off duration etc). For the descriptions on each of these parameters, refer to UEsim document.
I enabled Power on/off and set Duration to 30 seconds. Connection attempt/s is 10 and Max simult. connected UE is 10. These settings limit the connection attempts per second and the simultaneous UE count.
Power on duration and Power off duration are both 10 seconds. The on/off sequence repeats within the scenario duration. The +/- fields are 0, so no timing randomness is requested here.
In this simple test, I would leave other configurations (PDN, channel simulation, Simulations) as it is.
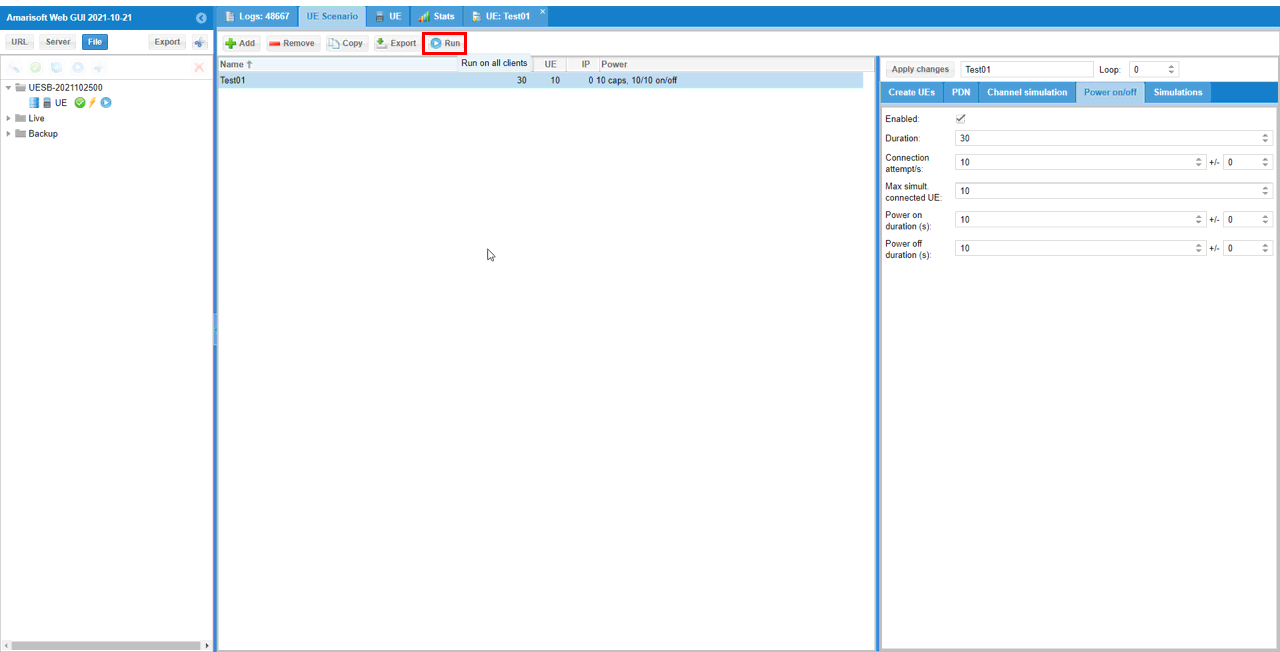
Now that we configured everything as we want. Hit [Run] button (
Before starting, I check the Test01 row for Dur.: 30 and UE: 10. The Power column reads "10 caps, 10/10 on/off", matching the applied power settings. The IP column is 0 because this attach test has no IP simulation script.
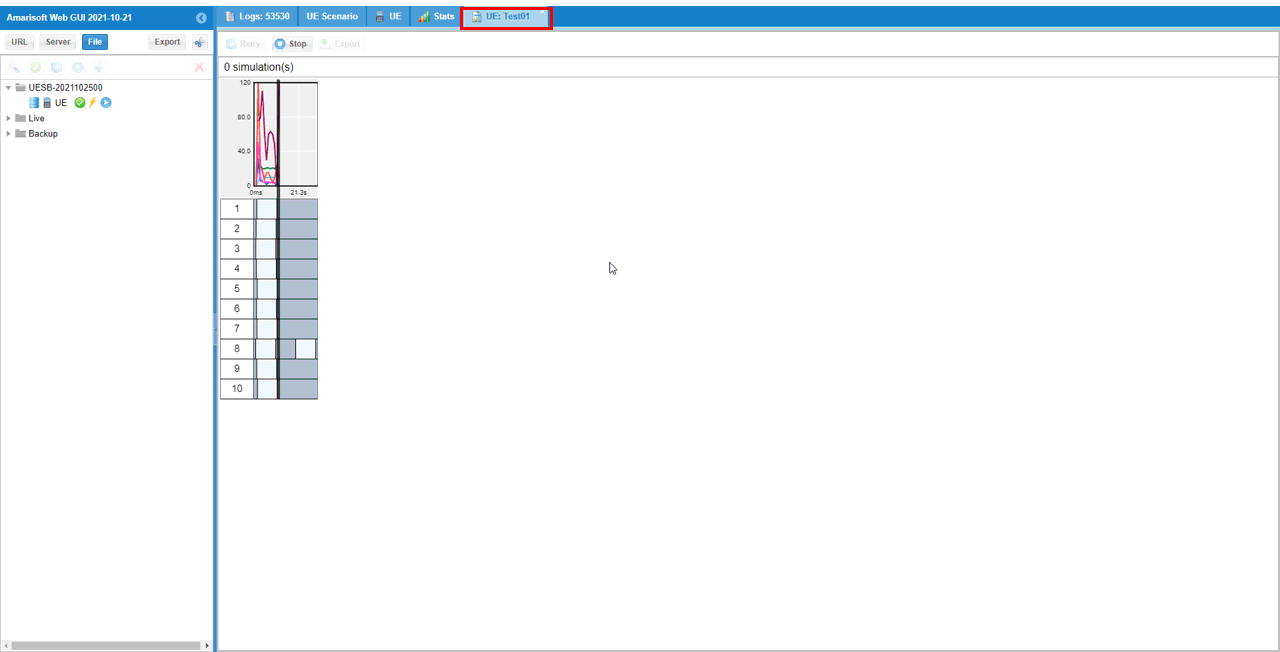
If you go to the test tab, you would see the test is on-going as shown below. In this tab, you can confirm how many UEs are being used and check the call status of each of the UEs in Graph mode
The execution tab is named UE: Test01. It contains rows numbered 1 through 10, with each UE arranged against the same time axis.
The status reads "0 simulation(s)" because no IP simulation was added for the attach test. Use the UE tab to check RRC and EMM state for each row.
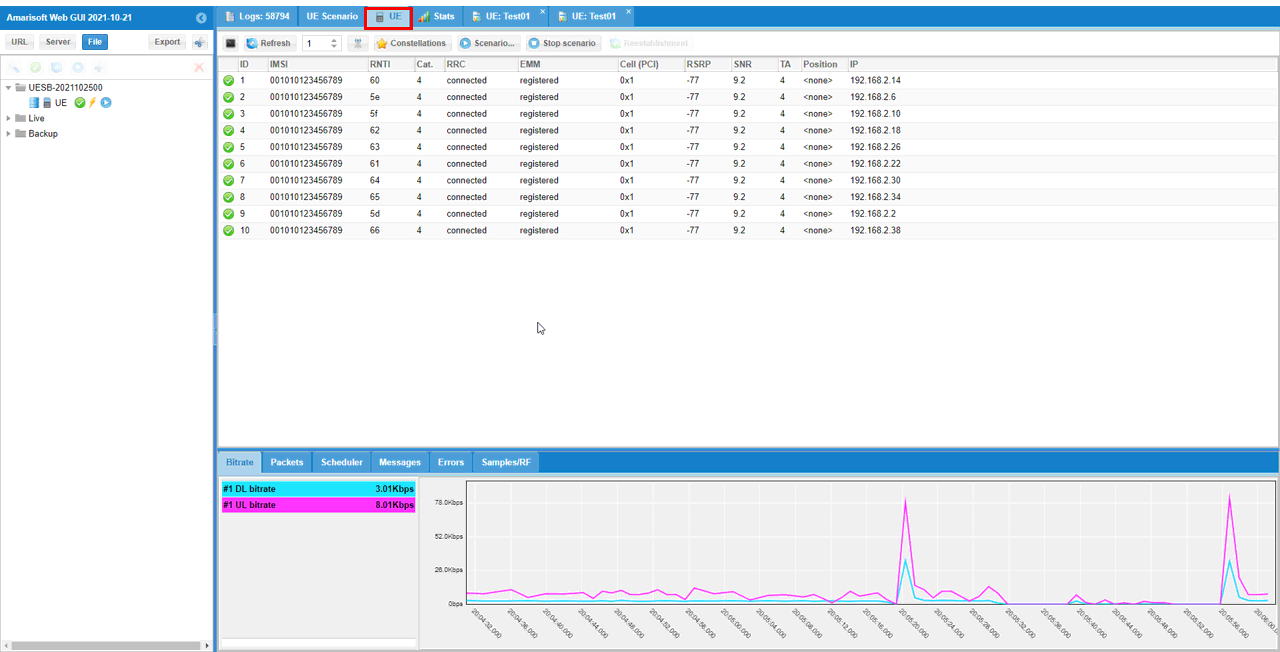
If you go to the [UE] tab, you would see call status and various plots as shown here. In this pannel, you can confirm how many UEs are activated and RRC/EMM status of each UEs and other information in tabular format.
All ten entries report RRC connected and EMM registered. Each uses Cell (PCI) 0x1 and Category 4. The RSRP column reads -77, SNR reads 9.2 and TA reads 4 for these entries.
The UEs have separate IP addresses, including 192.168.2.14 for UE 1 and 192.168.2.38 for UE 10. The IMSI column repeats 001010123456789 in all ten rows.
The Bitrate panel lists UE 1 DL bitrate as 3.01 Kbps and UL bitrate as 8.01 Kbps at this point. These are the current readings for the selected UE.
Test 2 : Ping
This test is configured just by adding a few more configuration to Test 1. So make it sure that you have the Test1 scenario working (
Define a Scenario and Perform the test
With all other configuration as set in previous test, let's set [Simulation] part for this test.
I selected the existing Test01 entry and opened Simulations. The row still has a 30 second duration and 10 UEs. The empty script selector and IP value of 0 indicate that no traffic script has been added yet.
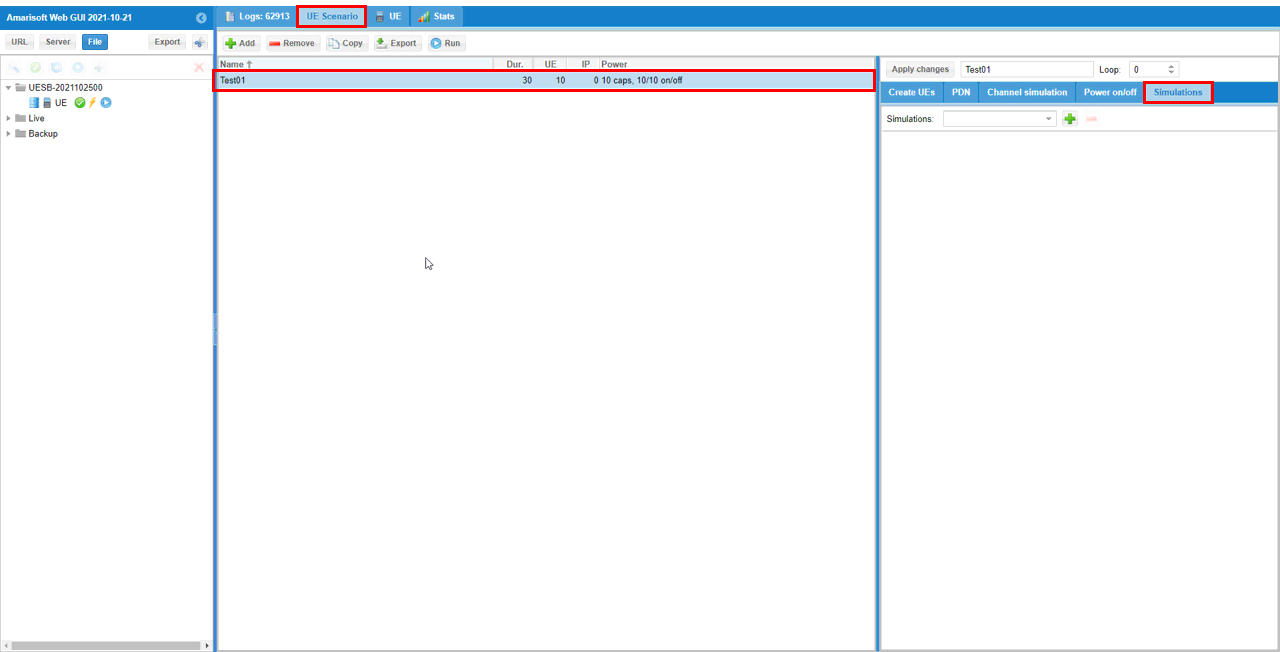
Add Simulation functionality(script) by hitting [+] button. It will popup a dialog where you can select various types of simulation like 'ICMP PNG', 'UDP', 'RTP', 'VOIP', 'Flood', 'HTTP transfer' and 'Application' etc. In this test, I will use 'ICMP PING'.
The green plus control opens Add script. I selected ICMP PING from the Type list to generate ICMP echo requests. The other traffic types are not used in this test.
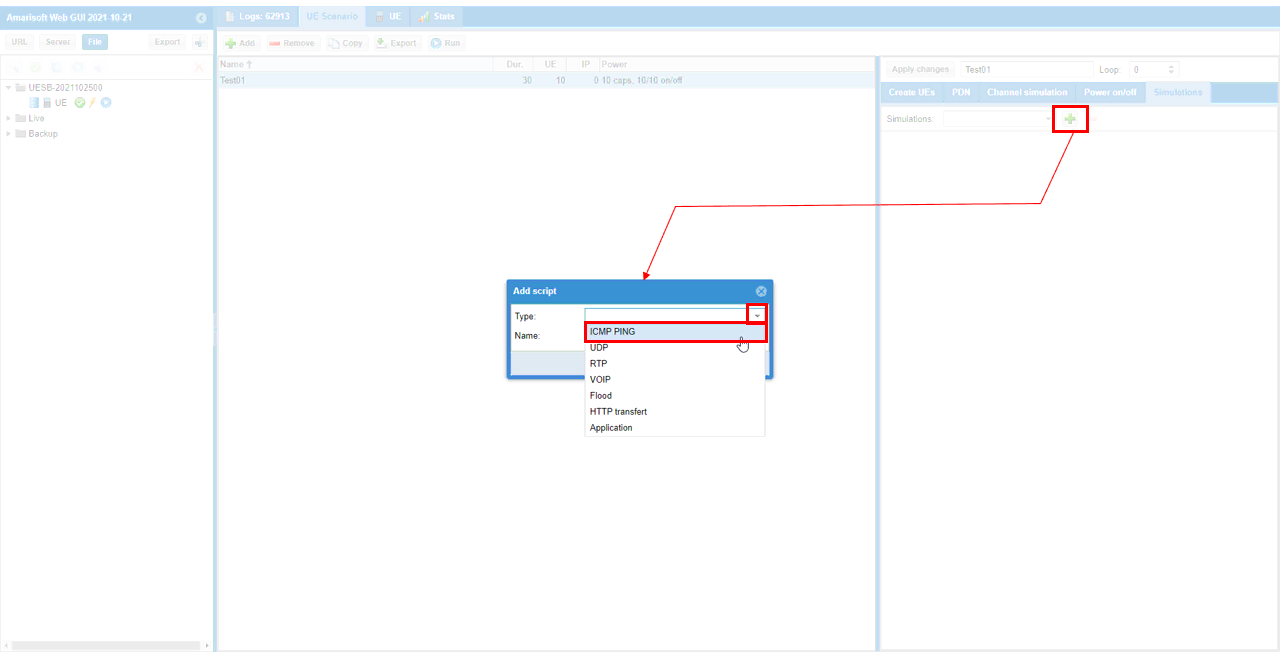
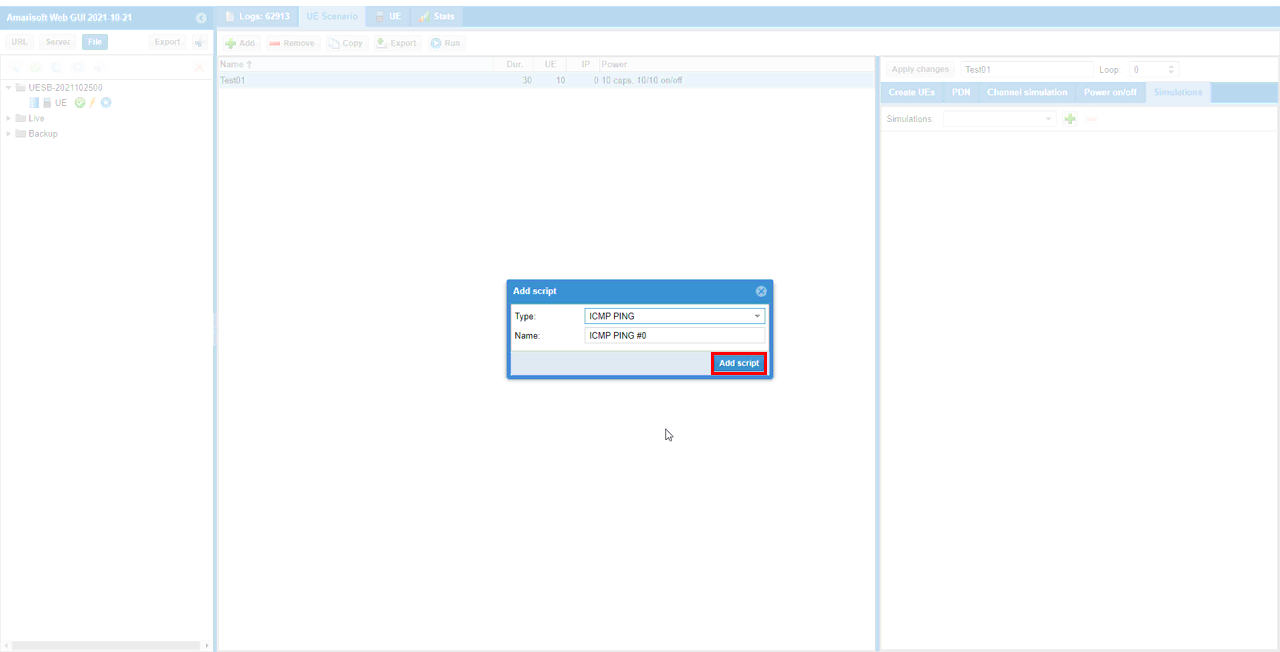
Specify the script name as you like and hit [Add script] button.
I kept the name "ICMP PING #0" with Type set to ICMP PING. Add script creates this entry so that its traffic parameters can be edited in Simulations.
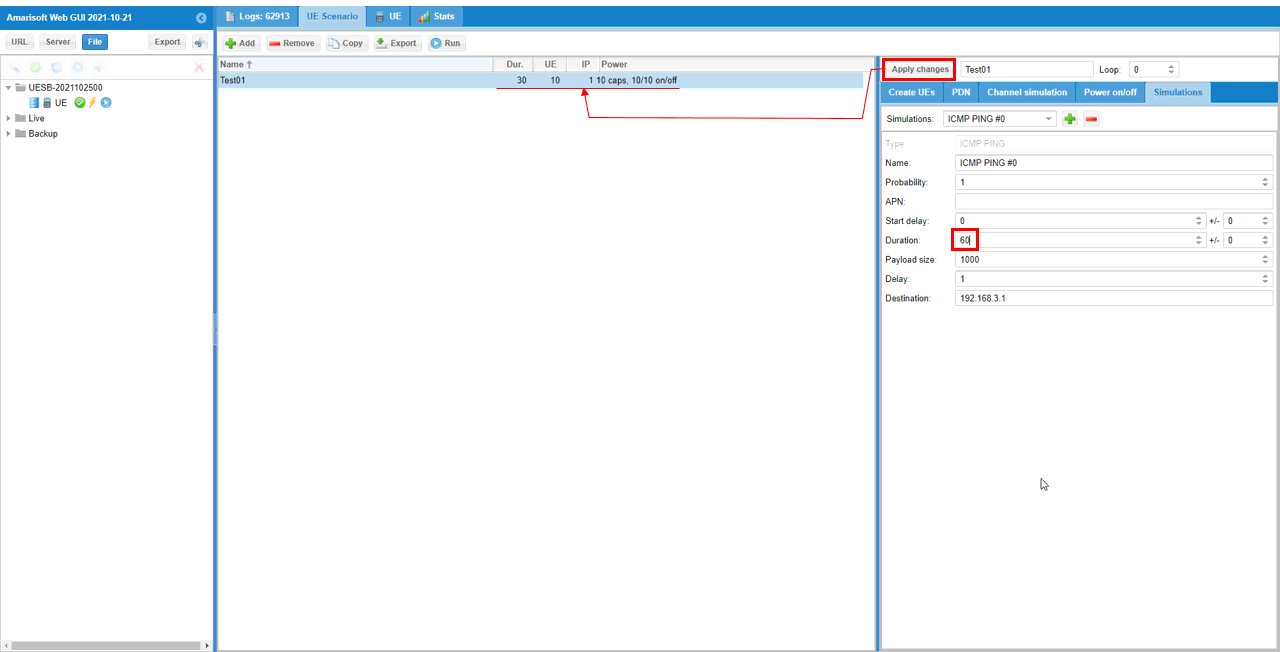
Now specify the details of the script that you selected like 'Probability', 'APN', 'Start Delay', 'Duration', 'Payload size', 'Delay', 'Destination' etc and hit [Apply changes]. For the descriptions on each of these parameters, refer to UEsim document.
I set Duration to 60 seconds, Payload size to 1000 bytes and Delay to 1 second. Destination is 192.168.3.1 and APN is empty. Change Destination if your test server uses another address.
The script duration is separate from the 30 second Power on/off duration. The scenario row still reads Dur.: 30, while IP is now 1 for the added script. These settings do not establish a continuous 60 second ping session for every UE.
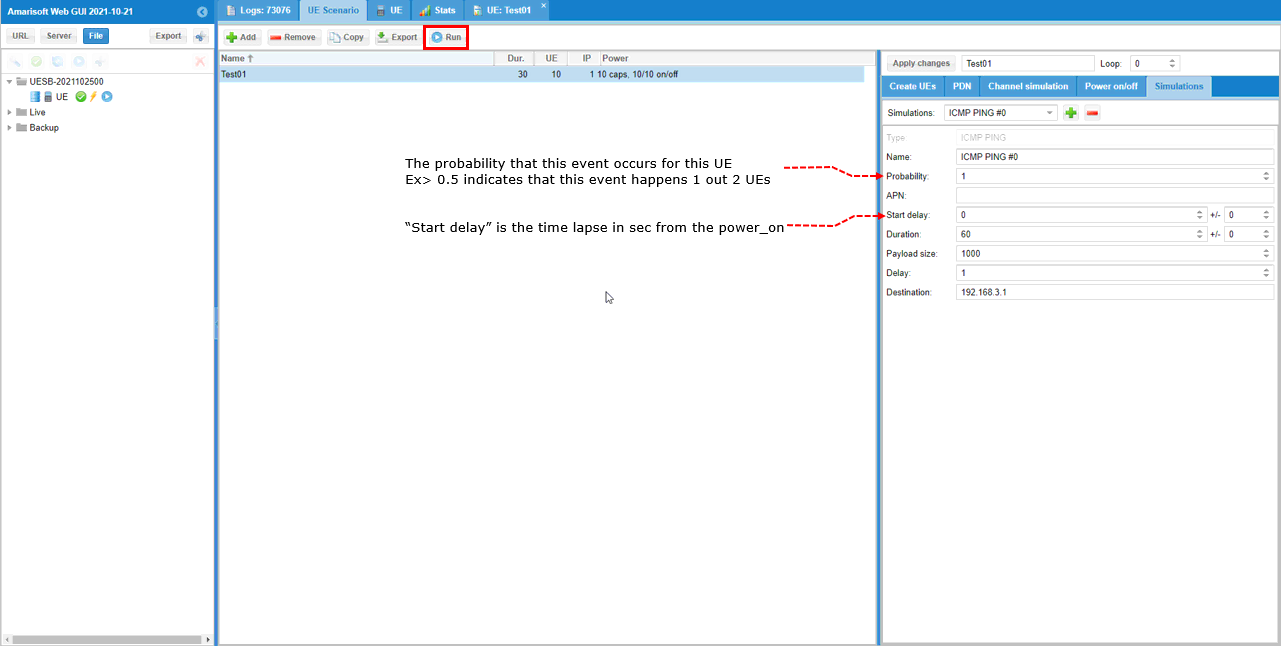
Now that the configuration is done as intended, hit [Run] button.
Probability is 1, so the ping event is selected for each UE. A value of 0.5 would give each UE a 50 percent chance of running the event.
Start delay is 0 seconds and is measured from power_on in this scenario. Increase it if you want time between power-on and the start of the script. The +/- value is 0.
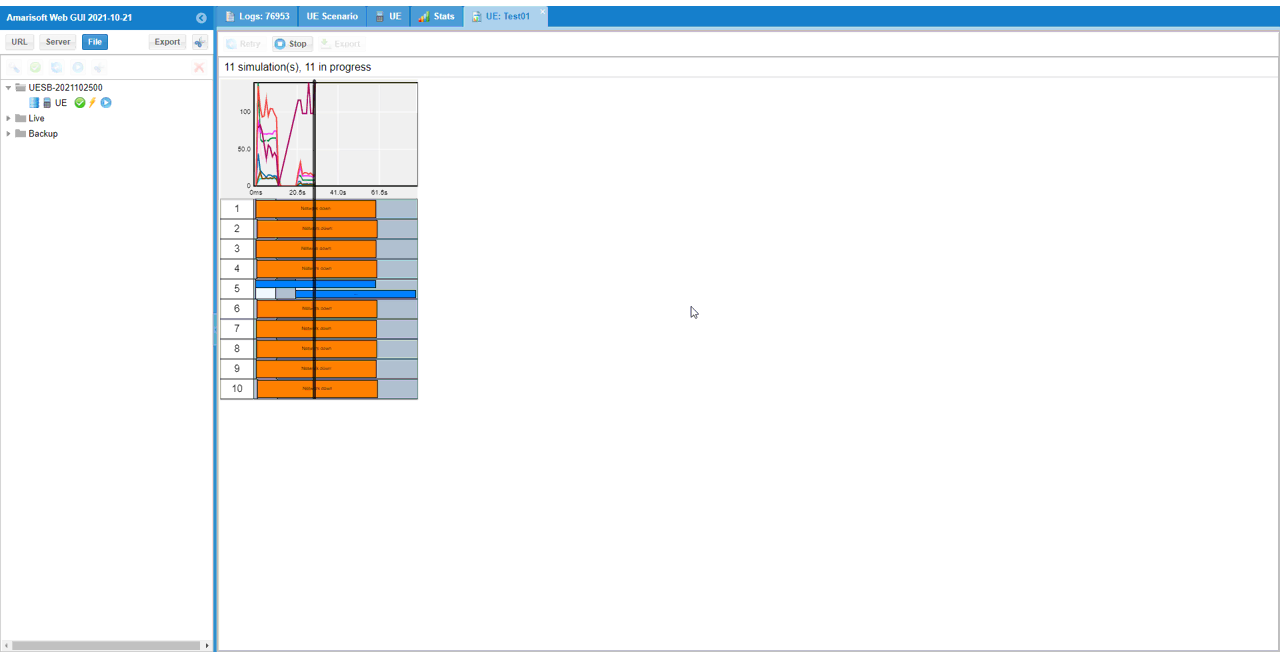
Now you can check out graphically how all the UE is doing with the data traffic
The status reads "11 simulation(s), 11 in progress", while the UE timeline has rows 1 through 10. The simulation count is not the UE count.
Multiple rows contain orange "Network down" results, while UE 5 has blue activity bars. This run does not confirm successful ping traffic for every UE. Check the affected UEs and their data connection before treating the test as successful.