Remote Control GUI - Python
The purpose of this tutorial is to show to provide a Python template showing various components to control the equipment in GUI (Graphic User Interface). Motivations for this tutorial are as follows :
- Python is believed to be more wide spread and dominant language
- Since it would be more widely known and the code would be better understood for most of user and the user may be able to extend the code as they like.
- Build a single GUI program that can do almost every aspect of remote control including Remote API, lte service start/stop, file copy between control PC and remote PC, configuration file editing etc.
Table of Contents
- Remote Control GUI - Python
- Introduction
- Summary of the Tutorial
- Test Setup
- Python and Development Enviorment
- Python Script
- Highlevel Overview
- User Operation
- Code Description
- Overall Layout
- Callbox (I)
- GUI Component Layout
- Section C (Row 3) - Command, SubCommand Dropdown box
- Section F (Row 6) - [Send] button
- Section H (Row 8) - [Process] button
- Section J (Row 10) - [Expand All], [Collpase All], [Expand Level 1] button
- Section K (Row 11) - [Stop LTE Service], [Restart LTE Service] button
- Callbox (II)
- GUI Component Layout
- Section A (Row 1) - Set button, Tx Gain Value setting field
- Section B (Row 2) - Set button, Rx Gain Value setting field
- Section C (Row 3) - DL Phy Scheduling
- Section D (Row 4) - UL Phy Scheduling
- Section E (Row 5) - Inactivity Timer Setting
- Section F (Row 6) - Update and Clear Log button
- UEsim
- GUI Component Layout
- Section D (Row 4) - Set button, Tx Gain Value setting field
- Section E (Row 5) - Set button, Rx Gain Value setting field
- Section F (Row 6) - Power On/Power Off button
- Section I (Row 9) - Send button
- Section K (Row 11) - Stop LTE Service/Restart LTE Service
- FileBrowser (Callbox)
- GUI Component Layout
- Section B - Download/Upload button
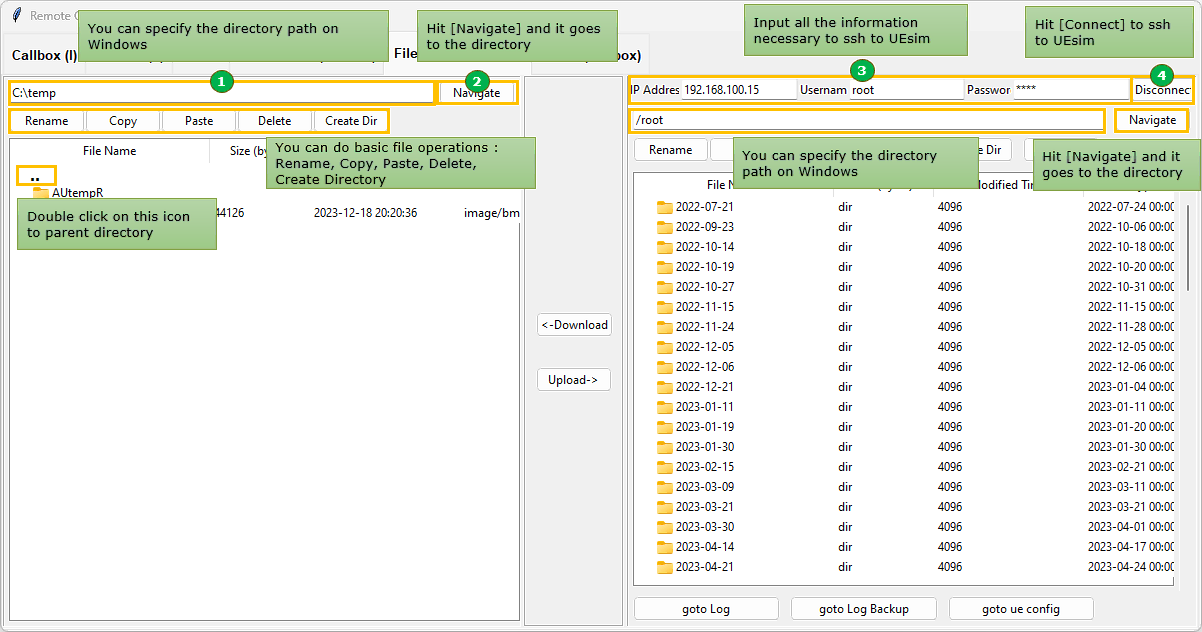
- Section D - Navigate button on Local PC
- Section E - Menu Buttons (Copy, Paste, Delete, Rename, Create Dir) on Local PC
- Section E-1 - Popup Menu (Copy, Paste, Delete, Rename, Create Directory, Open File) on Local PC
- Section F - File Browser Table on Local PC
- Section G - Connection to Remote PC
- Section H - Navigate button on Remote PC
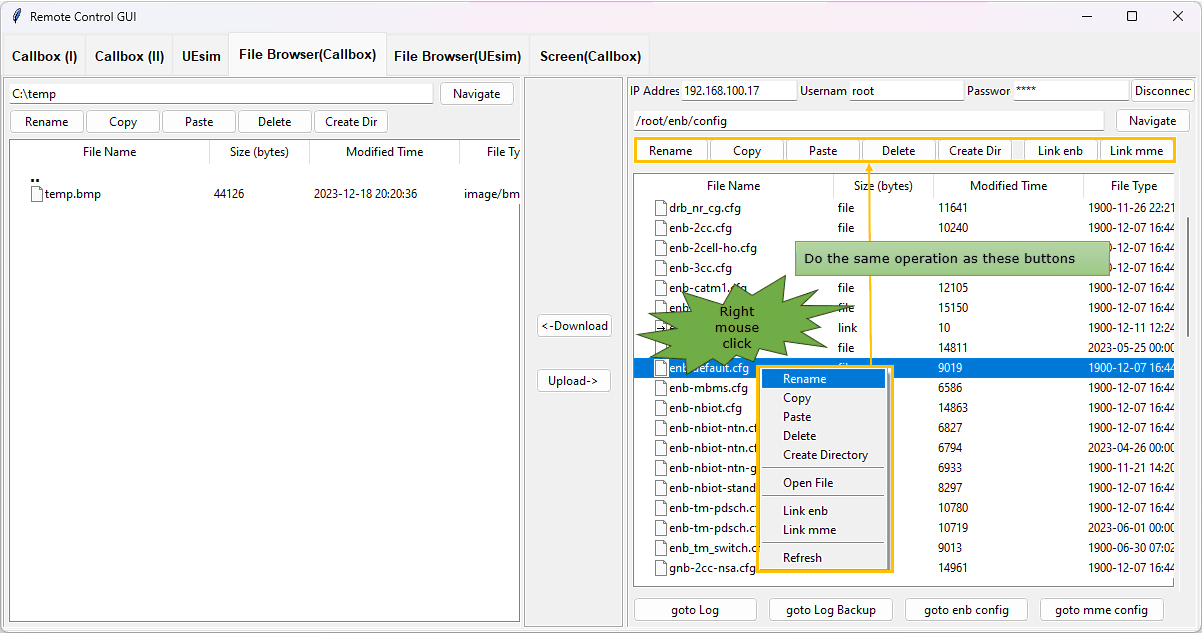
- Section I - Menu Buttons (Copy, Paste, Delete, Rename, Create Dir, Link enb, Link mme) on Remote PC
- Section I-1 - Popup Menu (Copy, Paste, Delete, Rename, Create Directory, Link enb, Link mme) on Remote PC
- Section J - File Browser Table on Remote PC
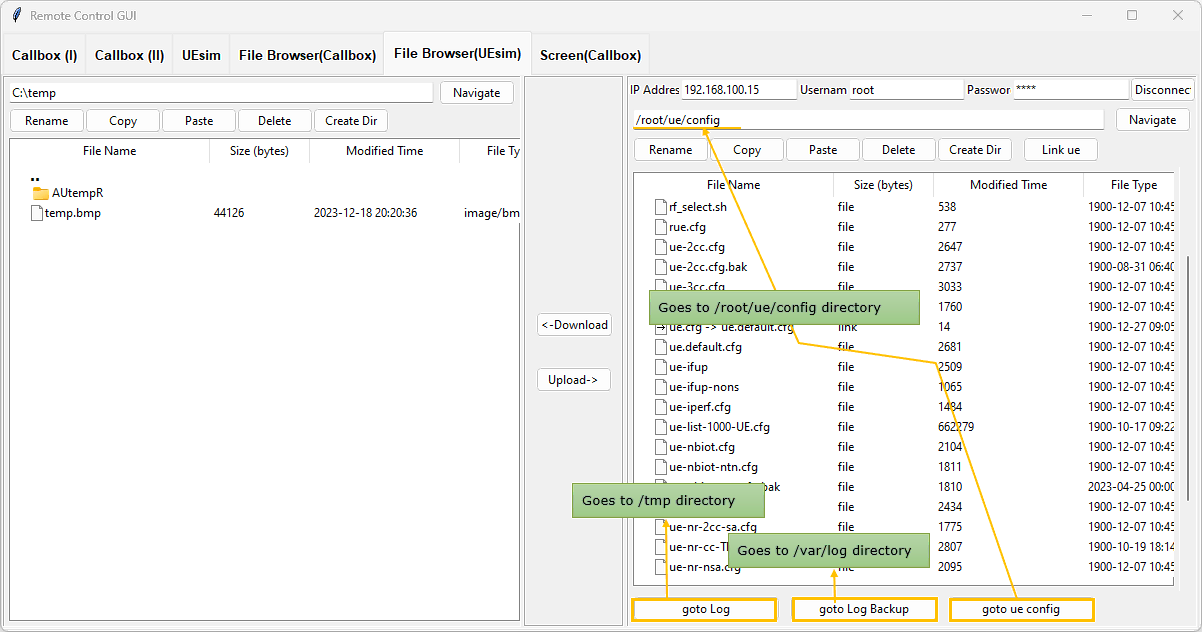
- Section K - Menu Buttons (goto Log, goto Log backup, goto enb config, go to mme config) on Remote PC
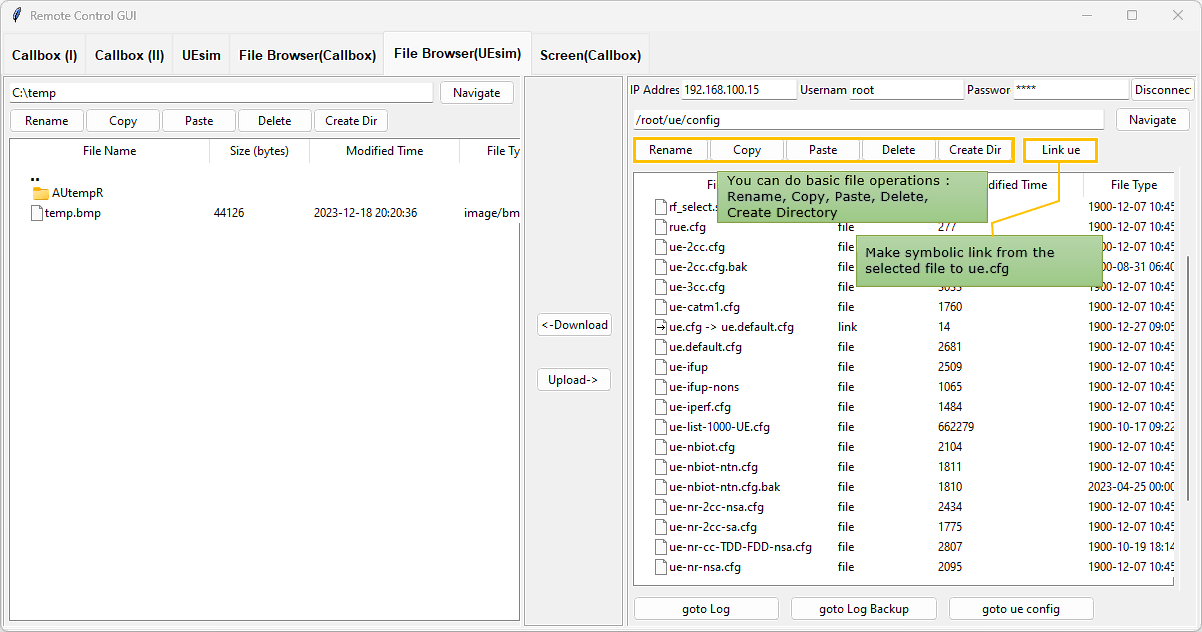
- FileBrowser (UEsim)
- Screen (Callbox)
Introduction
The development of graphical user interfaces (GUIs) for remote equipment control has become increasingly significant in modern automation and network management tasks. Python, recognized for its readability, extensive libraries, and robust community support, has emerged as a preferred language for rapid prototyping and deployment of such applications. This tutorial focuses on constructing a Python-based GUI template capable of integrating multiple remote control functionalities, such as initiating remote APIs, managing LTE service operations, performing secure file transfers between local and remote machines, and editing configuration files. By leveraging widely adopted Python frameworks like Tkinter or PyQt, alongside modules for network communication and file handling, developers can architect modular, extensible GUI applications that bridge the gap between end-users and complex backend systems. The underlying architecture typically consists of a user interface layer, a control logic layer, and integration points for remote procedure calls and file transfer protocols. The significance of this approach lies in its adaptability: with Python’s cross-platform capabilities and the GUI’s modular design, users can tailor and expand the template to suit varied operational scenarios. As industries move toward more automated, remotely managed infrastructures, such solutions play a pivotal role in simplifying user interactions, centralizing control, and accelerating deployment cycles within broader IT and telecom ecosystems.
-
Context and Background
- Python is renowned for its versatility and widespread adoption, making it an ideal choice for rapid development and prototyping of GUI-based control applications.
- Graphical user interfaces abstract the complexity of backend processes, enabling users to perform advanced remote operations with minimal technical overhead.
- This tutorial demonstrates how to integrate multiple remote control components—such as API triggers, LTE service management, file transfers, and configuration editing—into a cohesive Python GUI application.
-
Relevance and Importance
- Centralized remote control GUIs streamline operational workflows, reduce manual intervention, and improve system accessibility for both technical and non-technical users.
- Python’s ecosystem provides mature libraries for GUI development, secure communication, and cross-platform compatibility, making it well-suited for building robust remote management tools.
- The template provided in this tutorial serves as a proof-of-concept, allowing users to experiment with and extend remote control functionalities according to their specific needs.
-
Learning Outcomes
- Understand the architectural principles behind Python-based GUI applications for remote equipment control.
- Gain practical experience in integrating network operations, API triggers, file transfer mechanisms, and configuration editors within a single GUI framework.
- Develop the ability to extend and customize the provided template for diverse remote management scenarios.
- Acquire insights into best practices for modular software design, error handling, and user interface architecture in Python.
-
Prerequisite Knowledge
- Basic proficiency in Python programming, including familiarity with object-oriented concepts and module usage.
- Understanding of GUI frameworks such as Tkinter or PyQt for interface design and event handling.
- General knowledge of network communication principles, remote procedure calls, and file transfer protocols is beneficial.
- Experience with Windows operating systems, as the provided scripts are developed and tested on Windows platforms. Cross-platform compatibility with other operating systems is not guaranteed.
Summary of the Tutorial
This tutorial details the test procedures and methodologies for verifying and operating a Python-based GUI application designed to remotely control and manage Amarisoft Callbox and UEsim environments. The setup utilizes Amarisoft Callbox, Amarisoft UEsim, and a control PC within the same WiFi subnet. The tutorial comprehensively explains each functional tab of the GUI, including remote API operations, file browsing, and direct shell access via SSH.
-
Test Setup:
- The hardware environment involves Amarisoft Callbox, UEsim, and a control PC, all connected via WiFi on the same IP subnet.
- Python environment utilizes version 3.11.3, ANACONDA, and VS Code, with package management via pip. All necessary libraries are installed and imported as specified in the tutorial.
-
GUI Functional Tabs and Test Procedures:
-
Callbox (I) Tab:
- Implements RemoteAPI in a GUI format, allowing users to input IP, port, user ID, and password to initiate and control LTE services.
- Key procedures include dynamic population of command/subcommand dropdowns from a JSON file, generation of RemoteAPI commands, and execution via [Send] button.
- Additional controls for stopping and restarting LTE service via SSH, not available through the standard RemoteAPI websocket.
- JSON responses can be parsed and visualized in a tree view using the [Process] button, with expandable/collapsible views for structured data.
-
Callbox (II) Tab:
- Extends Callbox (I) by providing GUI controls for commonly used and PHY-related RemoteAPI commands (e.g., Tx/Rx gain settings, DL/UL scheduling, inactivity timer).
- Users can adjust parameters via checkboxes and spinboxes, and the system generates and sends the corresponding RemoteAPI commands automatically.
- Includes log viewing, with log retrieval and parsing into tables, focusing on higher-layer messages (e.g., RRC/NAS) for efficient analysis.
-
UEsim Tab:
- Combines functionalities of Callbox (I) and (II) for UEsim, providing a single-tab interface for RemoteAPI and SSH-based controls.
- Allows setting Tx/Rx gain, power on/off via RemoteAPI, and sending custom commands through the GUI.
- Includes service stop/restart controls via SSH, mirroring the operational flow used for Callbox.
-
File Browser (Callbox/UEsim) Tabs:
- Split view file browser: left pane for local PC, right pane for remote device (Callbox or UEsim) accessed via SCP over SSH.
- Supports download/upload operations between local and remote systems using dedicated buttons.
- File operations (rename, copy, paste, delete, create directory) are available via buttons and context menus on both local and remote panes.
- Navigation to frequently used directories (e.g., logs, config folders) is facilitated by dedicated buttons.
-
Screen (Callbox) Tab:
- Provides a direct SSH terminal interface to the Callbox, allowing execution of screen commands (e.g., 'screen -r') and navigation between different system contexts (enb, mme, ims).
- Predefined command buttons (e.g., cell phy, t, ue) automate the entry and execution of common commands.
- Users can also manually input and execute arbitrary commands via the terminal interface.
- Supports connection/disconnection, clearing the terminal, and controlled switching between different screen modes (enb/mme/ims) using special key sequences.
-
Callbox (I) Tab:
-
Methodology Highlights:
- Each tab’s GUI components are programmatically generated using Tkinter and ttk, with dynamic layout management for responsive resizing.
- Core test procedures involve interactive user operations through the GUI, with logic mapped to backend RemoteAPI websocket or SSH/SCP calls, depending on the tab and functionality.
- For file operations and logs, data is parsed, validated, and presented in user-friendly formats, leveraging pandas for log analysis and treeview/table widgets for visualization.
- Modular design enables extensibility, allowing new RemoteAPI commands or file operation types to be added with minimal disruption to the GUI flow.
-
Critical Observations:
- Large log files may present challenges due to Python library limitations on JSON parsing and potential API response size issues.
- Some GUIs (especially the SSH-based screen view) may exhibit imperfect text alignment due to the complexities of shell output handling.
In summary, the tutorial outlines systematic procedures for setup, configuration, and testing of a Python-based GUI for remote control and file management in Amarisoft test environments, with an emphasis on modular, interactive, and user-extensible methodologies.
Test Setup
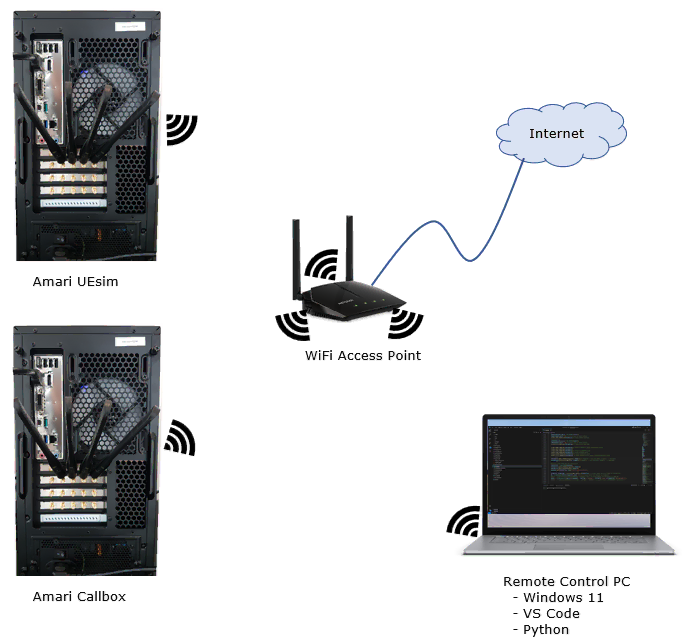
Following is the hardware setup in which the script is tested. In this environment, Amarisoft Callbox, Amarisoft UEsim and a control PC are connected over WiFi with same IP subnet.
Python and Development Enviorment
Following is the version of the python and package that are used for this tutorial. (I tested this on Windows 11 Home Edition). I don't think there is any specific dependencies for Windows Powershell version and Windows Commad Line Windows version. For python, first try with whatever version you are using as long as it is ver 3.x and upgrade it to latest version if it does not work.
- Python version : 3.11.3
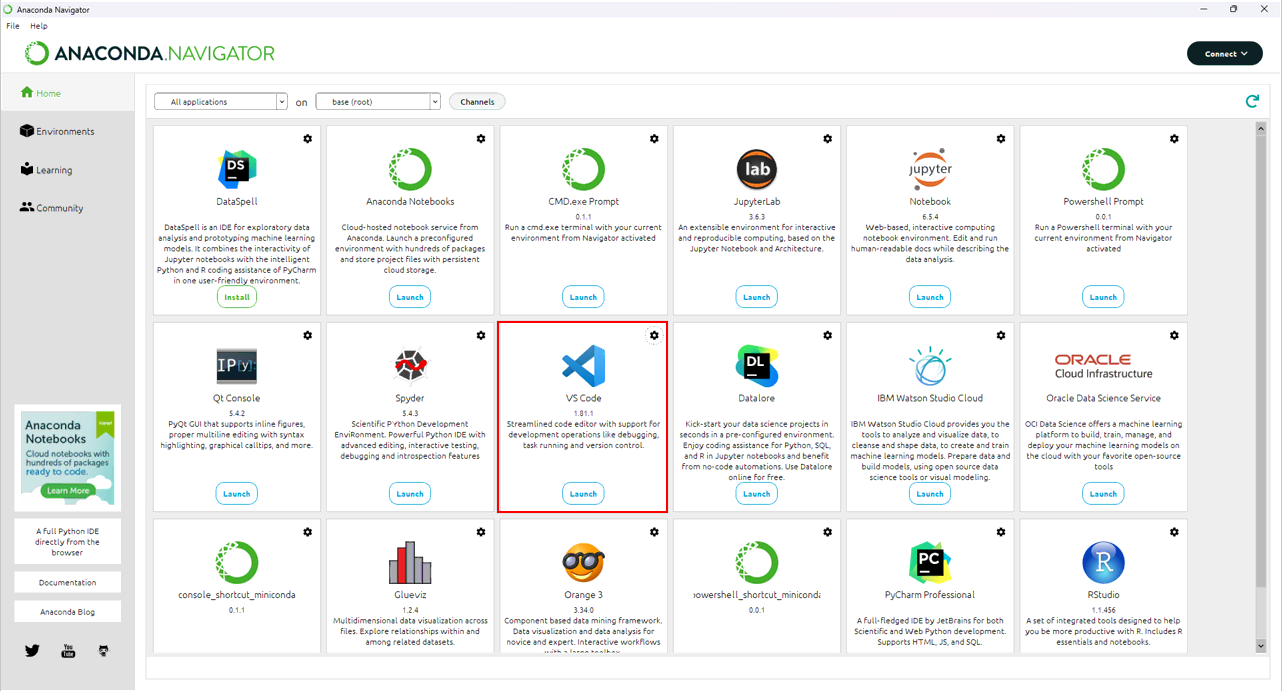
In this script, so many different Python libraries are used. I am using ANACONDA and VS Code. (
When you use ANACONDA and VS Code, it is important to run VS Code within ANACONDA NAVIGATOR as highlighted below. If you use VS Code independantly and run Python, it may fail to import libraries by ANACONDA.
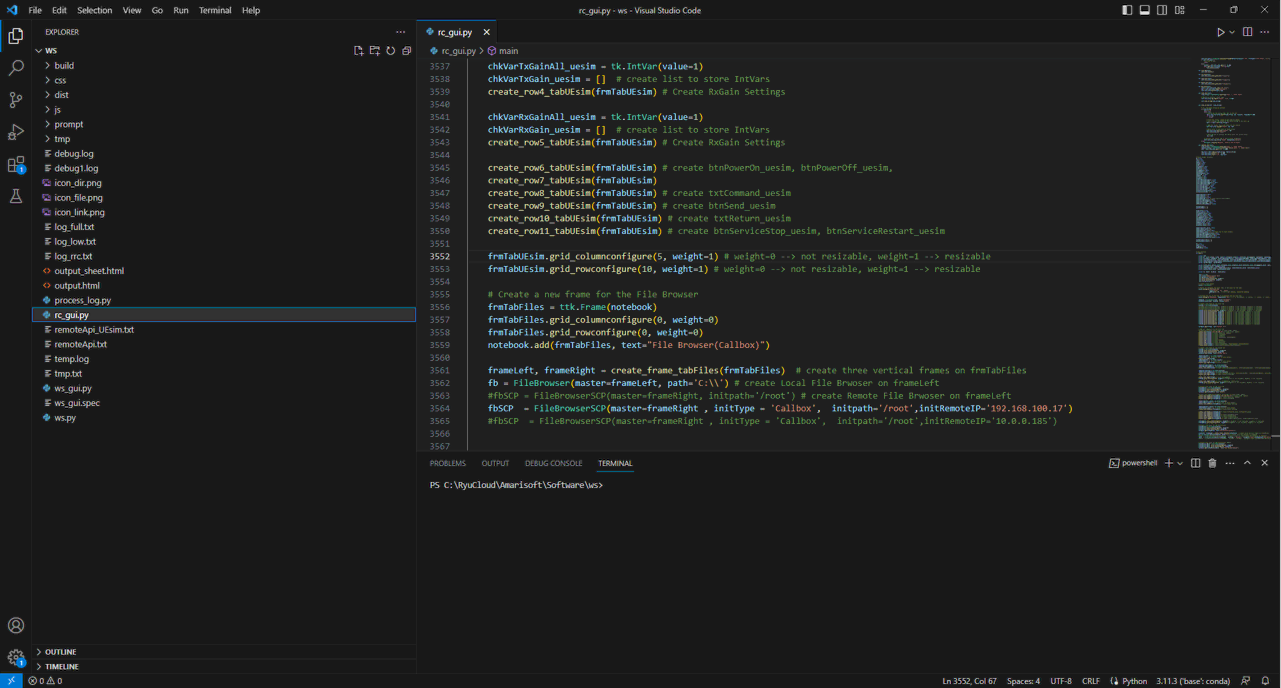
Execution of the script is done within the TERMINAL within VS Code environment.
Once Python and coding environment is setup, install all the python packages that are required for the following import. I would not explain about how to install each of these packages since googling would give you the better instruction. I insalled all of these packages with pip within VS Code TERMINAL.
- import tkinter as tk
- from tkinter import ttk
- import tkinter.messagebox
- from websocket import create_connection
- import json
- import ijson
- import re
- import paramiko
- import time
- import json
- import pandas as pd
- import chardet
- import os
- import tkinter as tk
- from tkinter import ttk
- from tkinter import messagebox
- from tkinter import simpledialog
- from tkinter import scrolledtext
- import shutil
- import datetime
- import mimetypes
- from tkinter import filedialog
- import mimetypes
- from tkinter import filedialog
- from scp import SCPClient, SCPException
- import time
- import stat
- import tempfile
- import posixpath
Python Script
Here I share the full source code here. Download the zip file and unzip into any location where your python enviroment can recognize.
If you set up all the necessary Python enviroment on your Windows PC, it should run as explained in this tutorial. I will explain about the source code at high level function level in later sections, but there would not be line by line comments about the code assuming that the readers have a certain level of python skills.
Highlevel Overview
In this program, there are 6 tabs. Each of tab has a set of related functions as is explained below. In this section, I will go over the screenshot of each tabs and high level descriptions for the function. The detailed operations for each tab will be explained in later section.
In terms of programming, basically fundamental of each tabs are based on various socket libraries as summarized below.
- Callbox(I) : Websocket, SSH socket
- Callbox(II) : Websocket
- UEsim : Websocket, SSH socket
- File Browser(Callbox) : SCP socket
- File Browser(UEsim) : SCP socket
- Screen(Callbox) : SSH
The software interface for each of these sockets are supported by Python libraries and the details will be explained in later section.
Callbox (I)
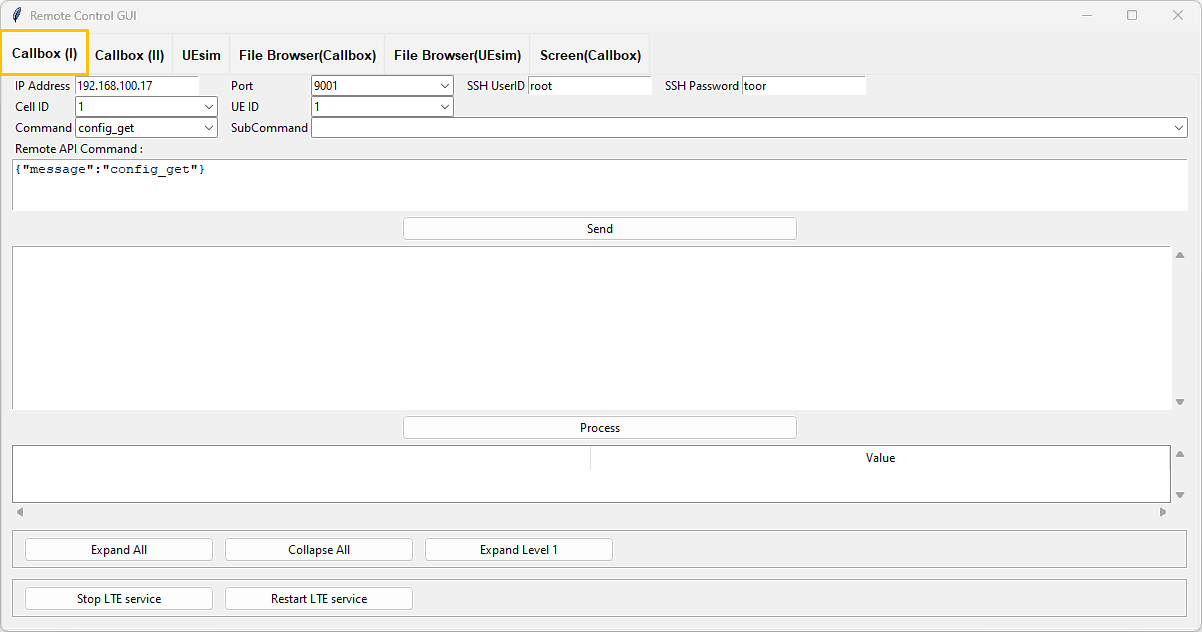
Basically this tab is for implementing RemoteAPI in GUI. So the basic frame of the script is very similar to the tutorial RemoteAPI Python . The difference is that the RemoteAPI is implemented in GUI. In addition to Remote API, [Stop LTE Service] and [Restart LTE Service] are added and these functions are not supported by Remote API web socket. The detailed usage will be explained in later section.
Callbox (II)
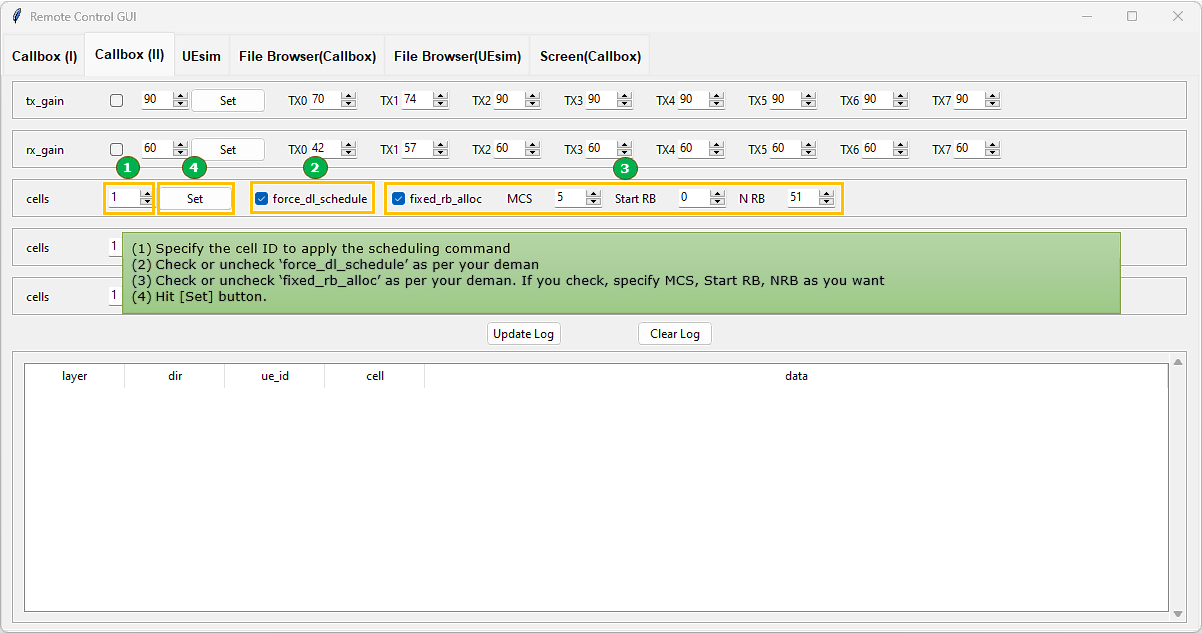
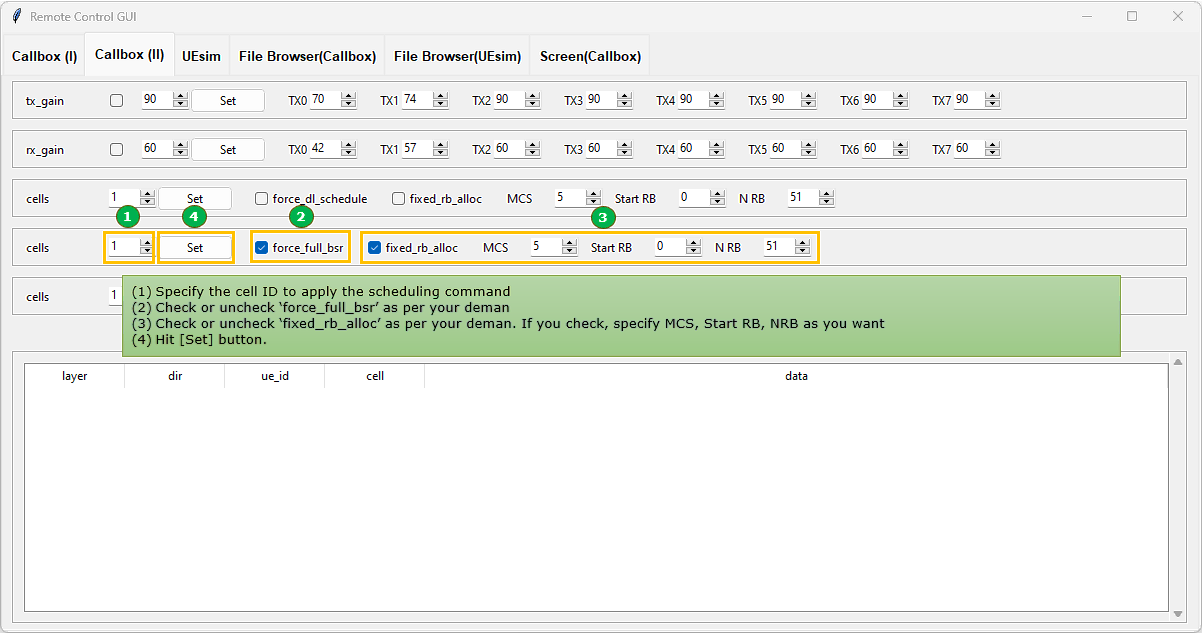
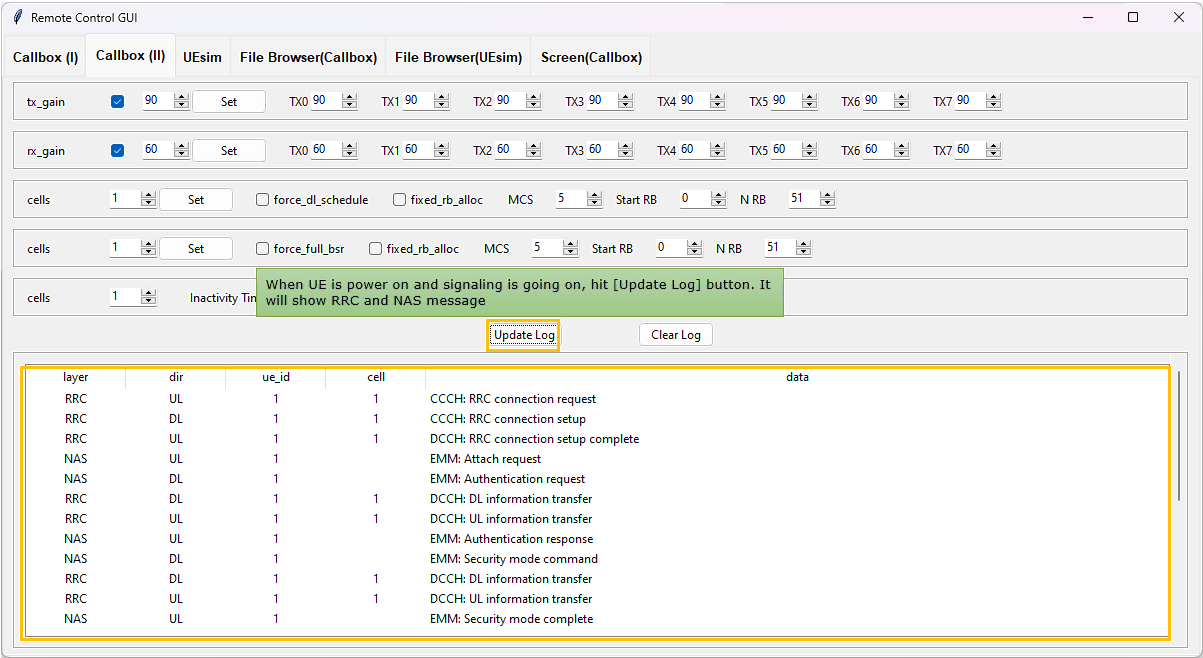
This is an extension to Callbox(I) tab. The purpose of this tap is to send several most commonly used and PHY related remote API command just by clicking on a few options without typing in command mannually. As an additional information, there is a log viewer that shows RRC / NAS messages. The details on usage will be explained in later section.
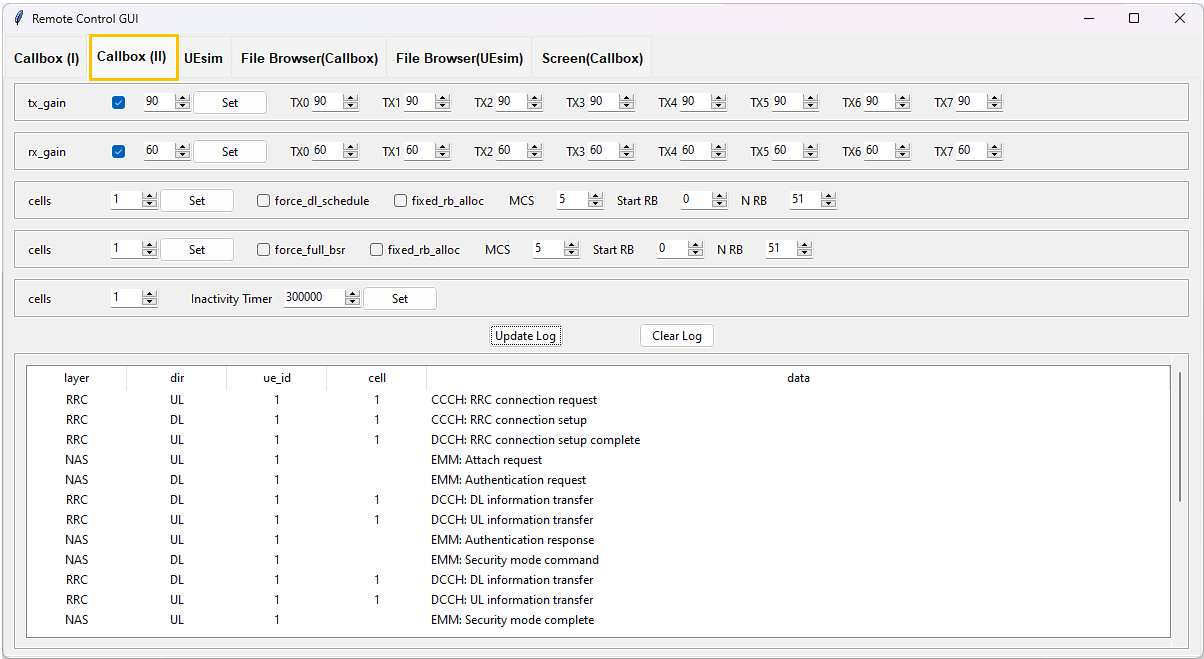
UEsim
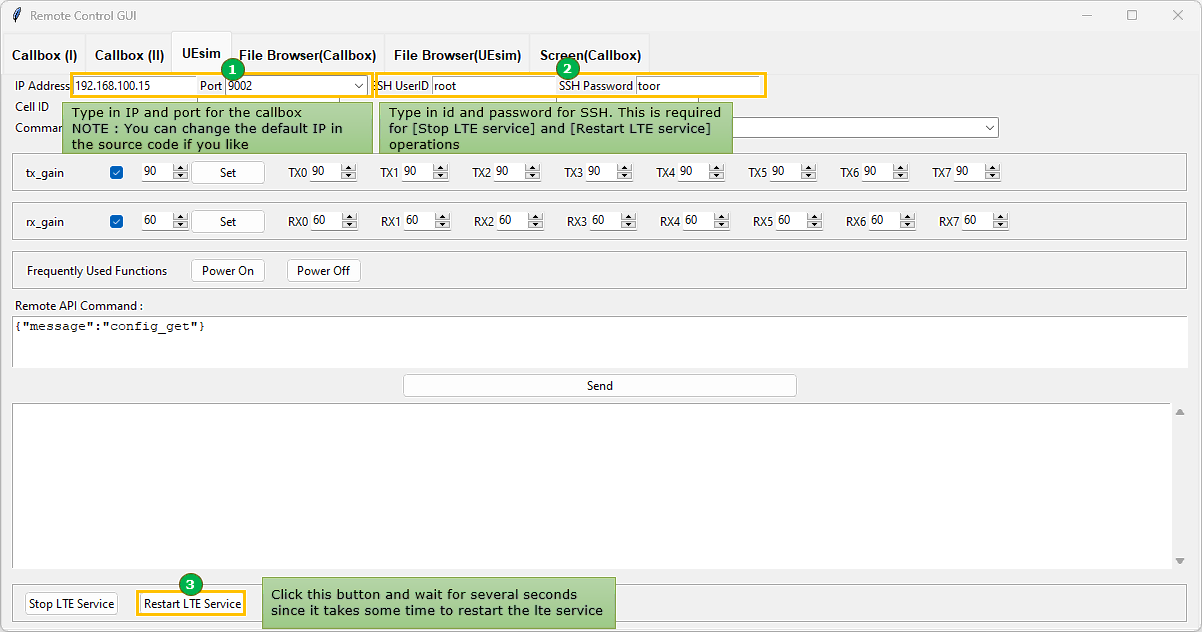
UEsim tab does same thing as Callbox(I) + Callbox(II). The difference is that this tab is to implement Remote API for UEsim instead of the callbox. To avoid the situation of having too many tabs, I tried to pack UEsim Remote API within a single tab. I think the single tab is good enough since we use relatively small and simple remote API commands in UEsim comparing to Callbox.
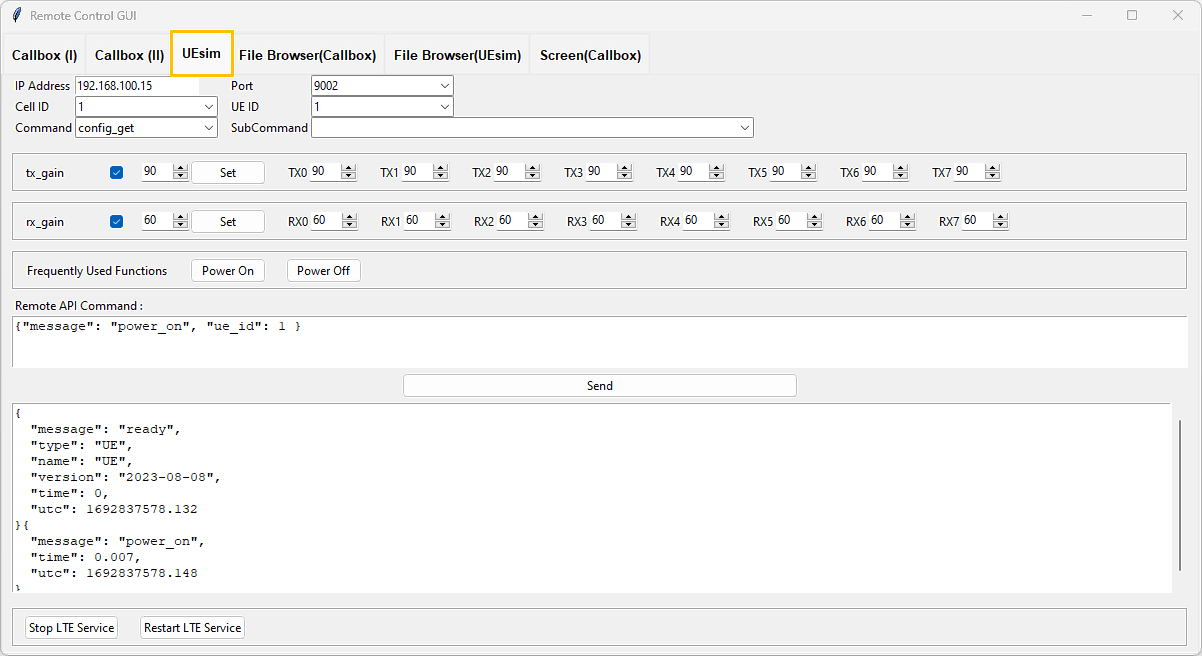
File Browser(Callbox)
File Browser (Callbox) tab is to browse files on local PC (control PC, the Windows PC in this case) and the remote PC (Callbox PC) and transfer files between local PC and callbox PC.
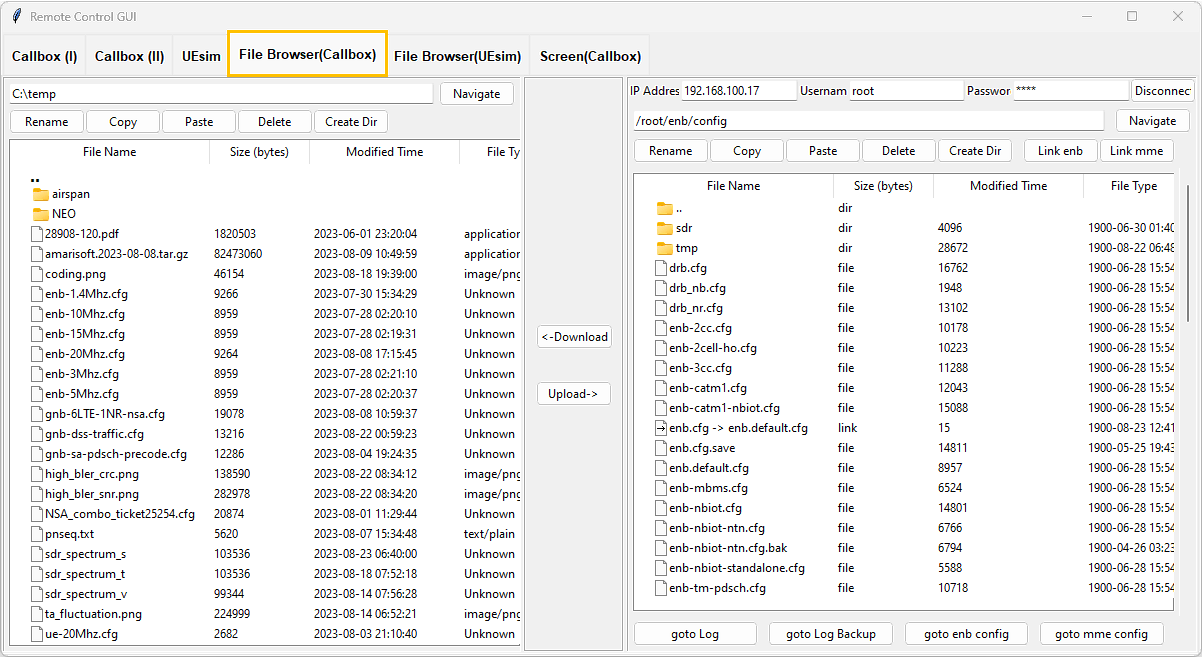
File Browser(UEsim)
File Browser (Callbox) tab is to browse files on local PC (control PC, the Windows PC in this case) and the remote PC (UEsim PC) and transfer files between local PC and UEsim PC.
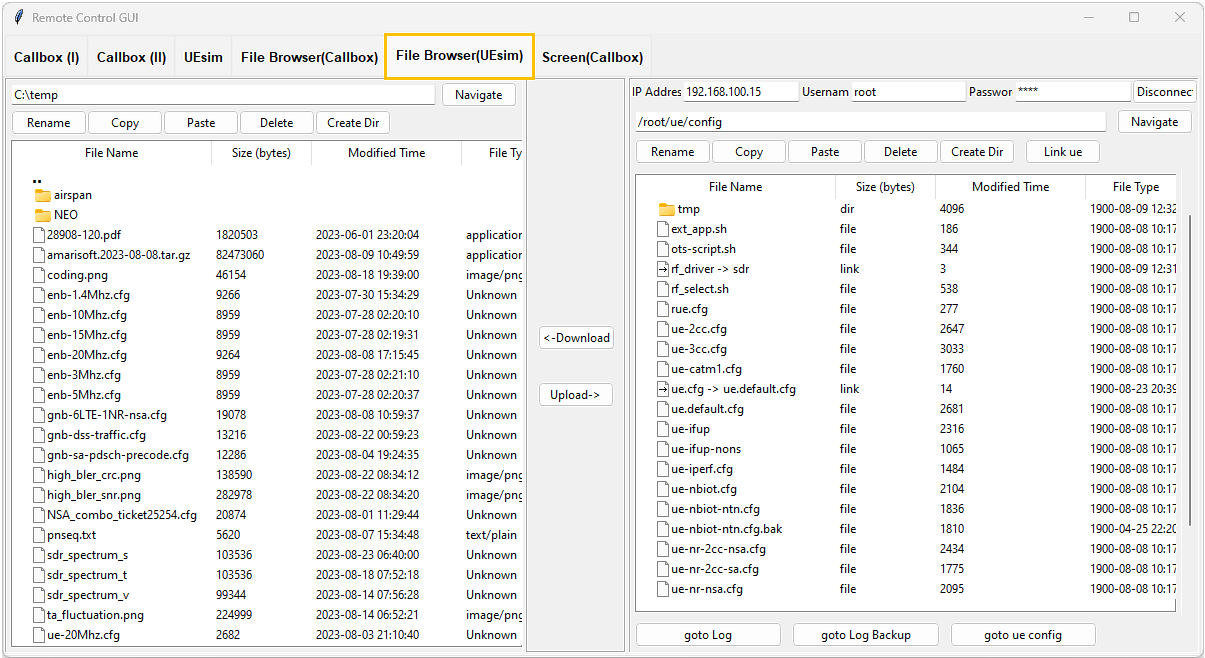
Screen(Callbox)
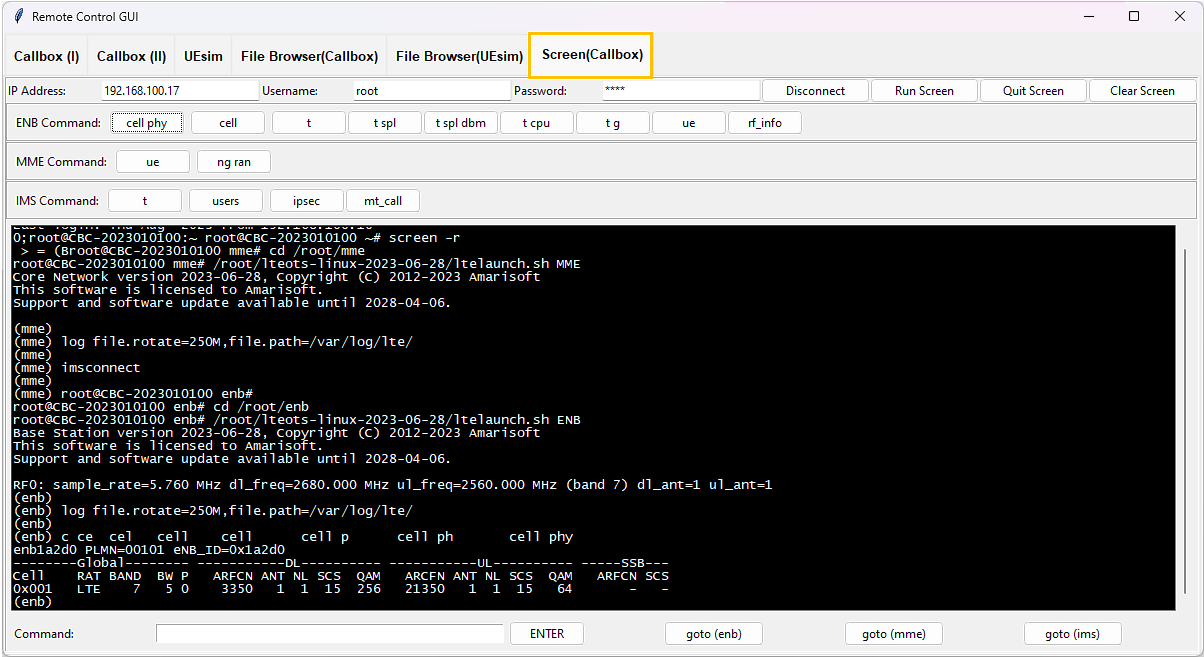
Screen(Callbox) is to run 'screen -r' command on Callbox. The basic idea is to capture and display the output of screen command and run some of the frequently used command with button click rather than typing in the command. You can manually type in a specify command and run if you like .
User Operation
In this section, I will describe on the detailed operation of each tabs. Most of the explanation will be commented right on the screen capture rather than writing in separate text. In GUI program, there is no single path of operation. There would be almost infinite different path to follow. The flow that I show here is the way that I personally follow most of the time. Just try to catch the overall flow and you will come up with your own way of operation flow.
Callbox (I)
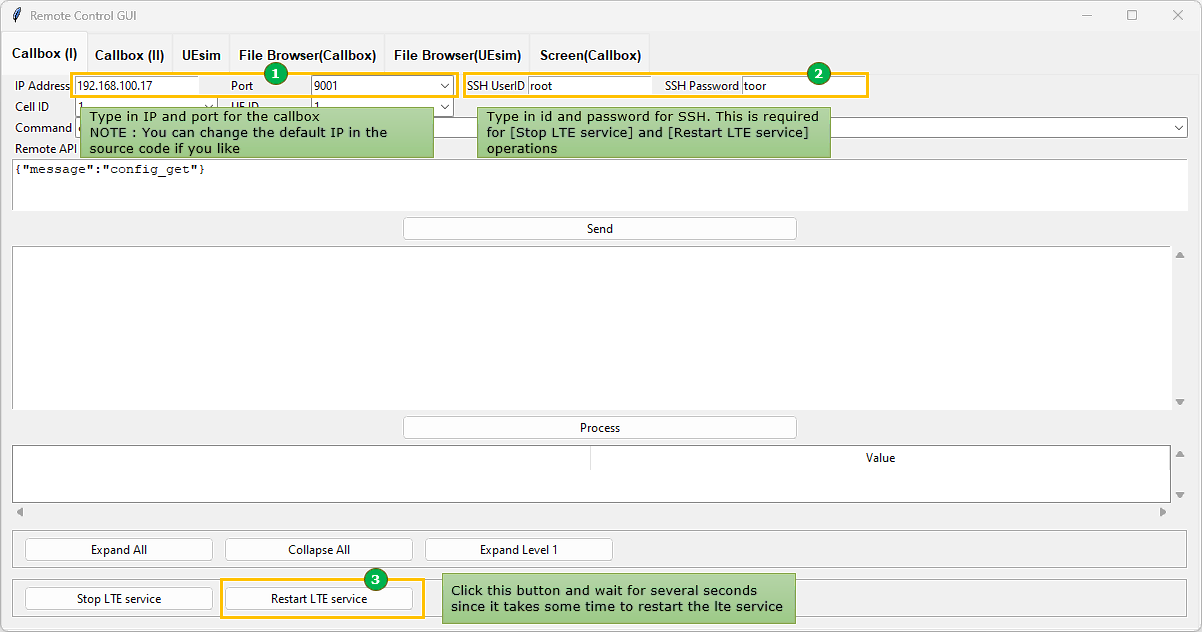
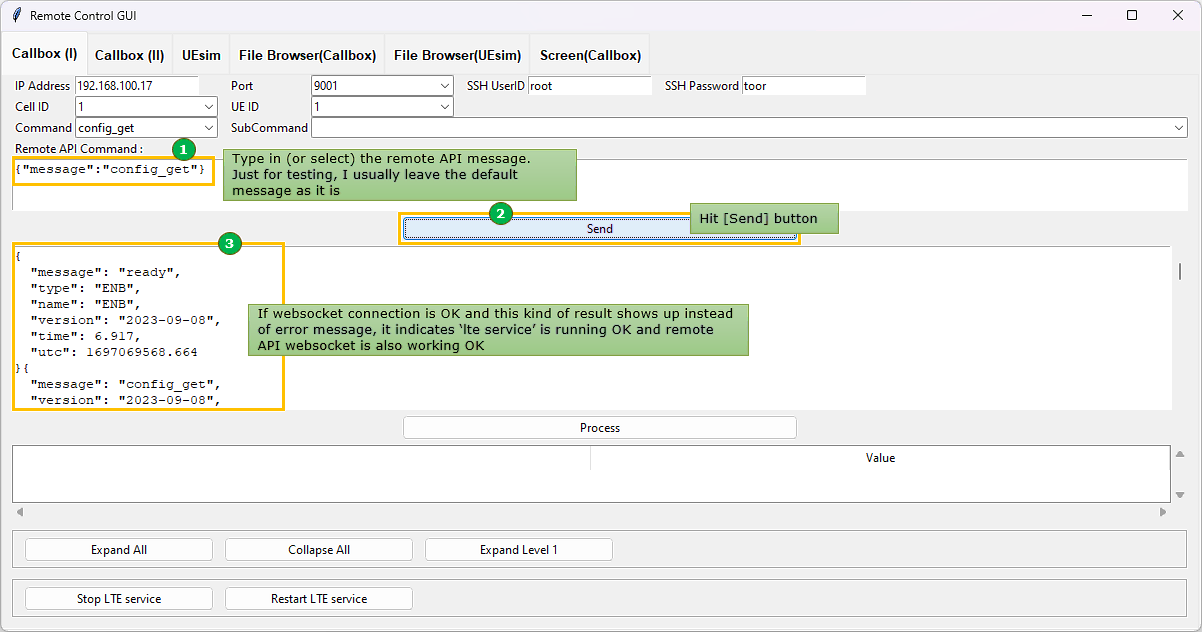
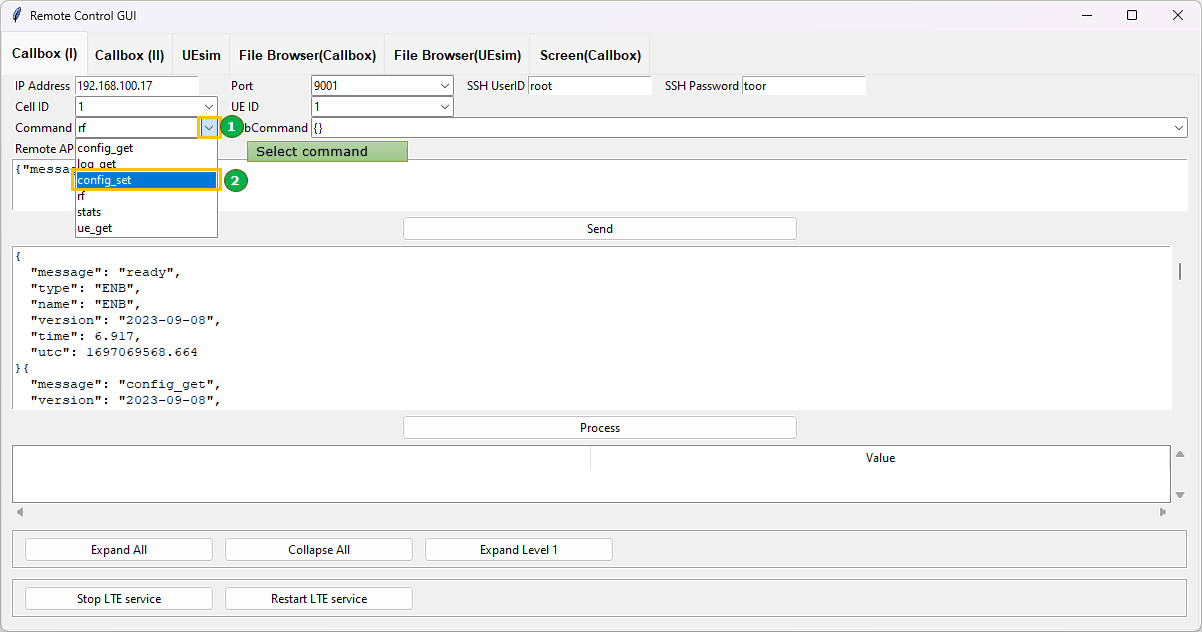
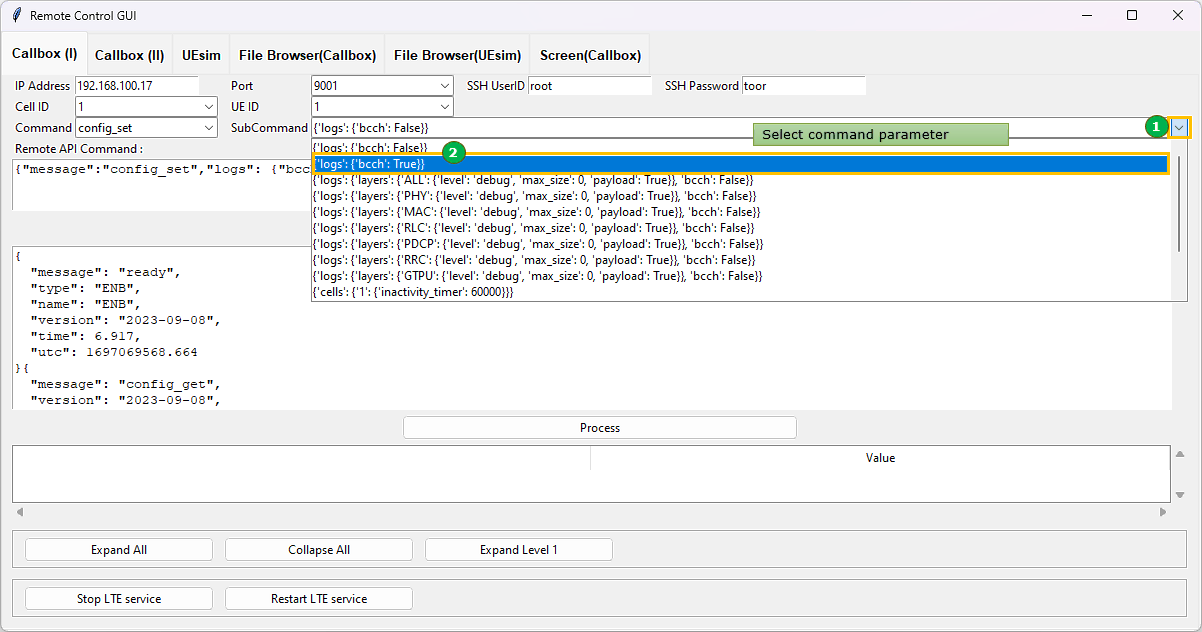
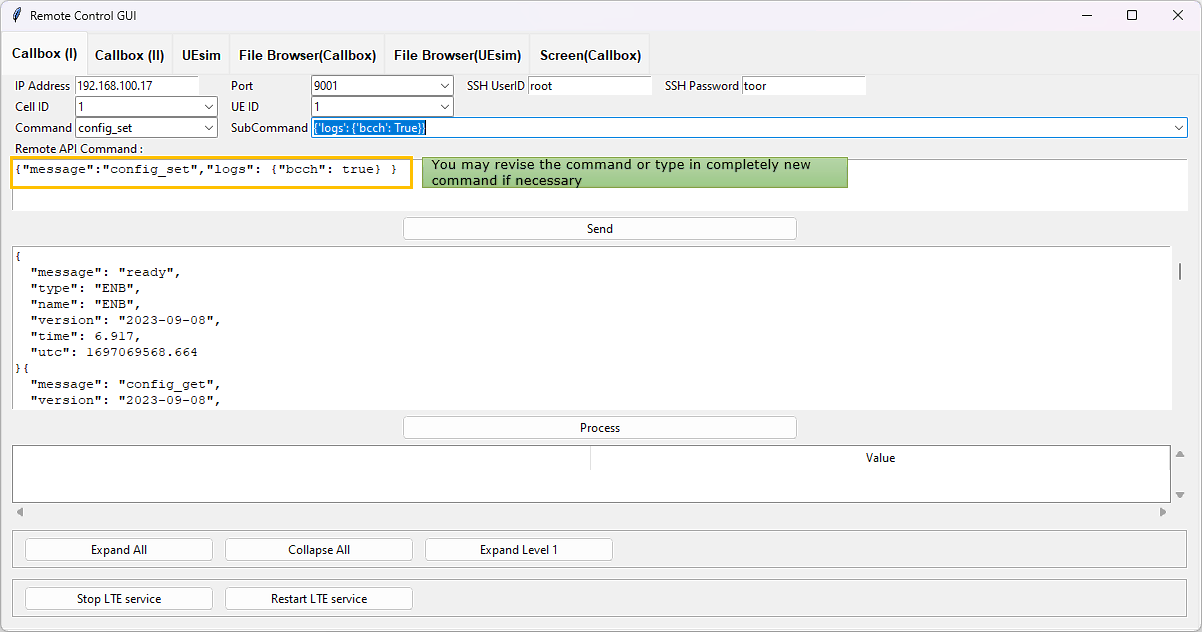
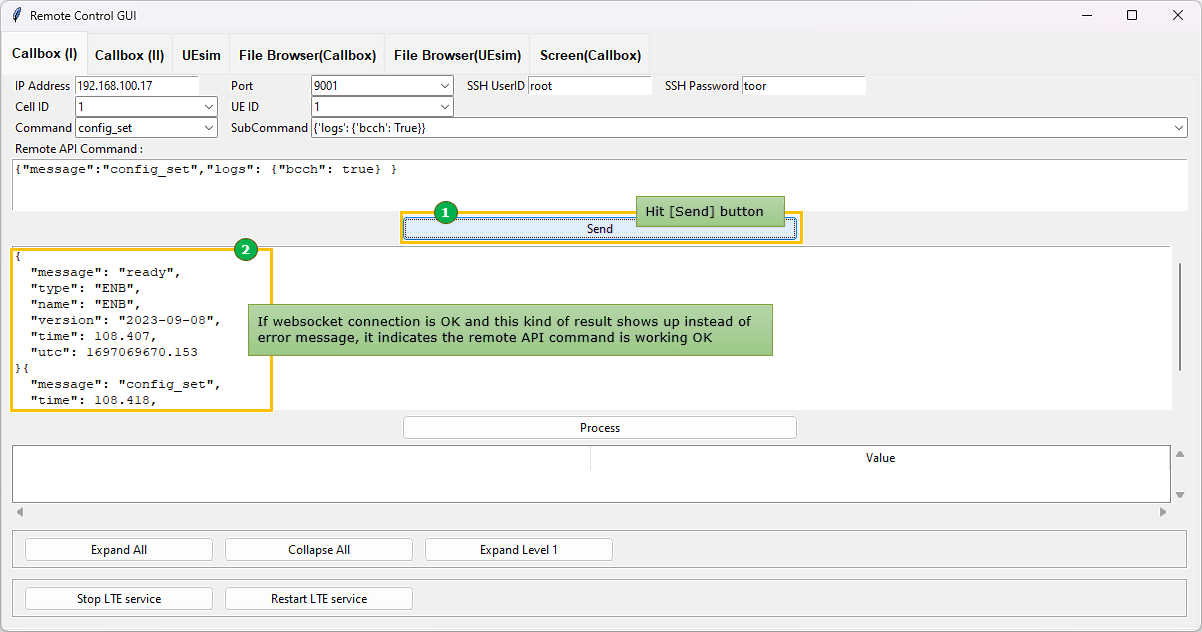
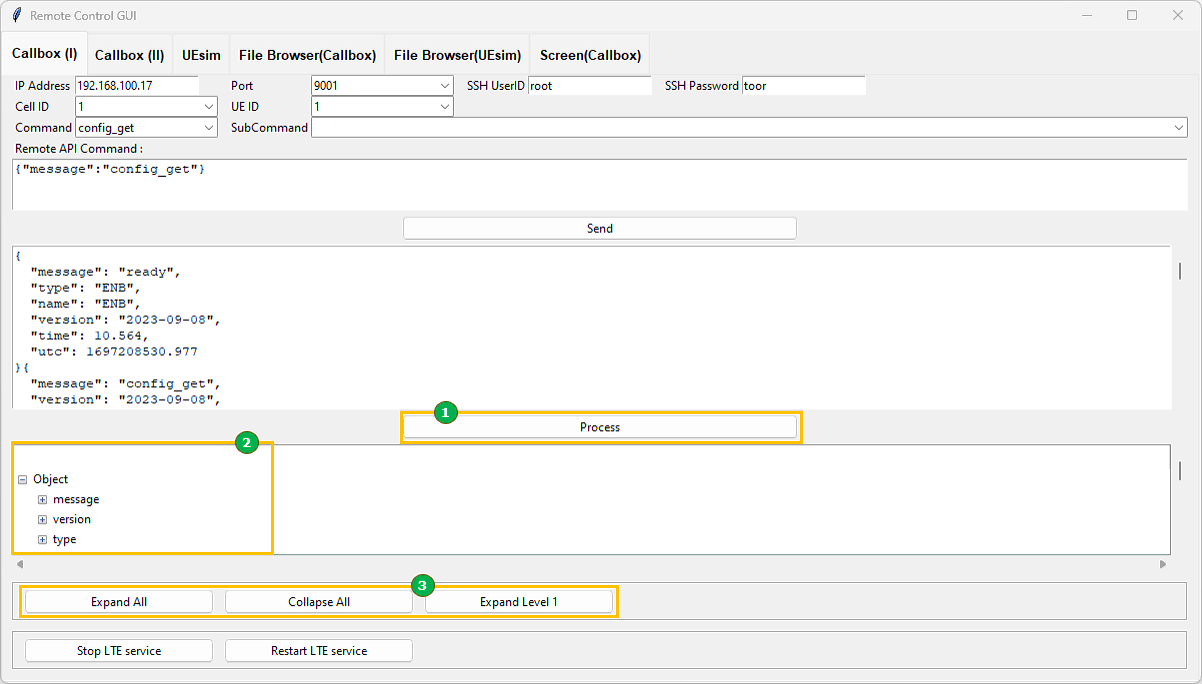
Basically this tab is for implementing RemoteAPI in GUI. So the basic frame of the script is very similar to the tutorial RemoteAPI Python . The difference is that the RemoteAPI is implemented in GUI. In addition to Remote API, [Stop LTE Service] and [Restart LTE Service] are added and these functions are not supported by Remote API web socket. The detailed usage will be explained in later section.
In terms of usage, the only requirement is to put the correct IP, port, user id and password and to start lte service. Once these information are correctly input and lte service is running, all the remaining workflow is up to you.
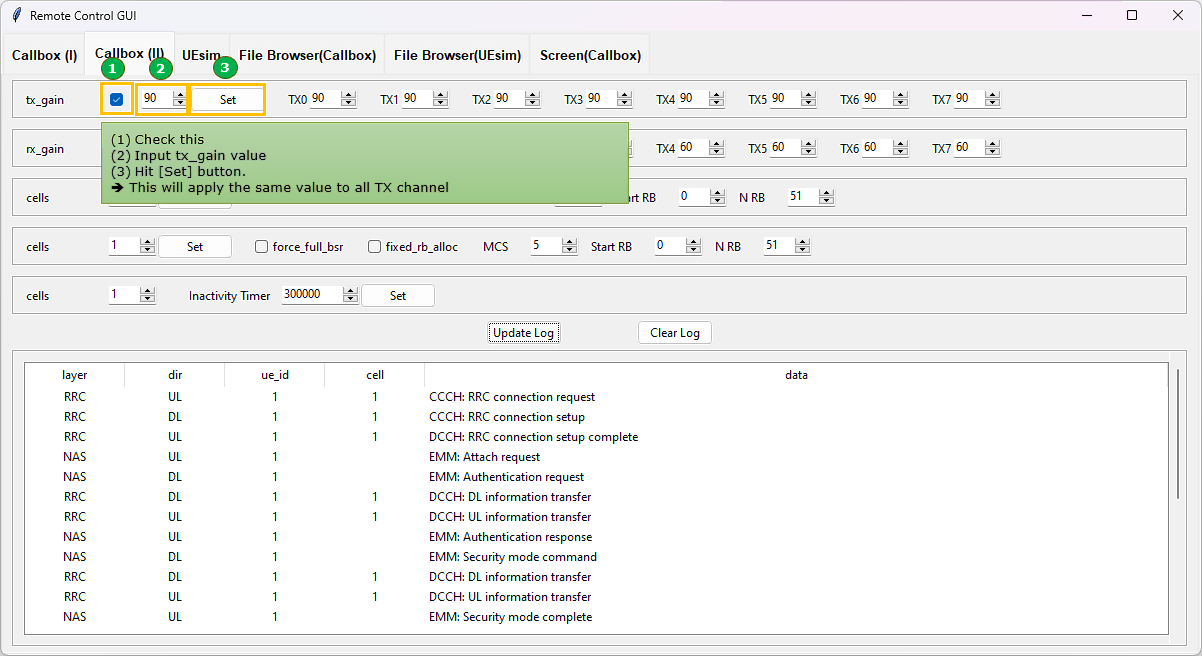
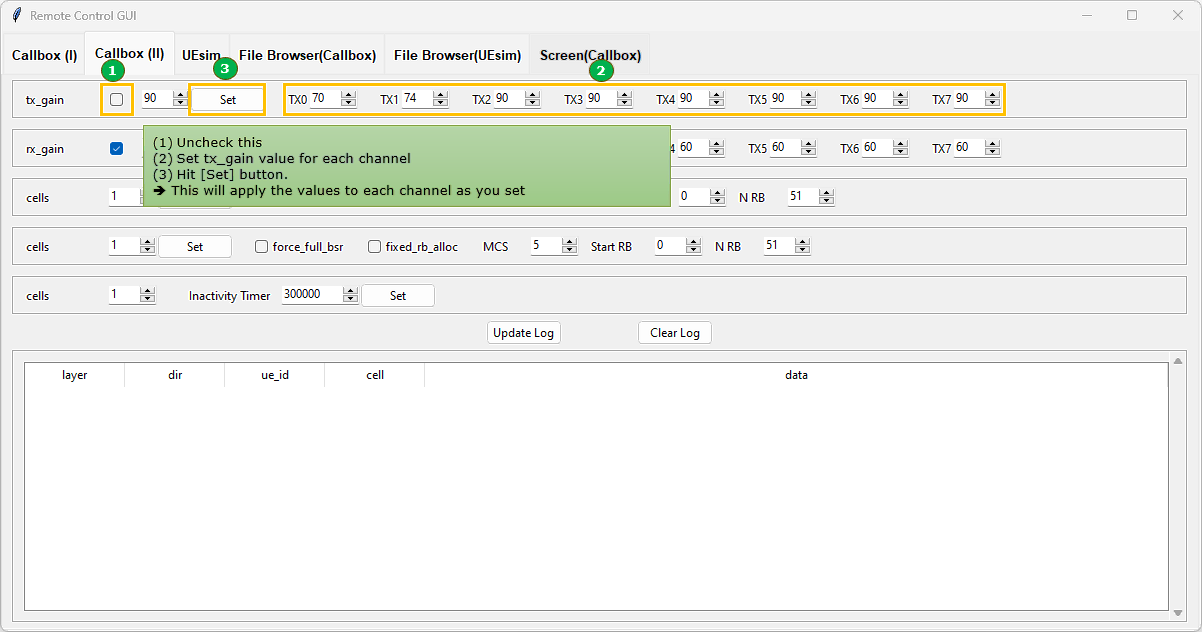
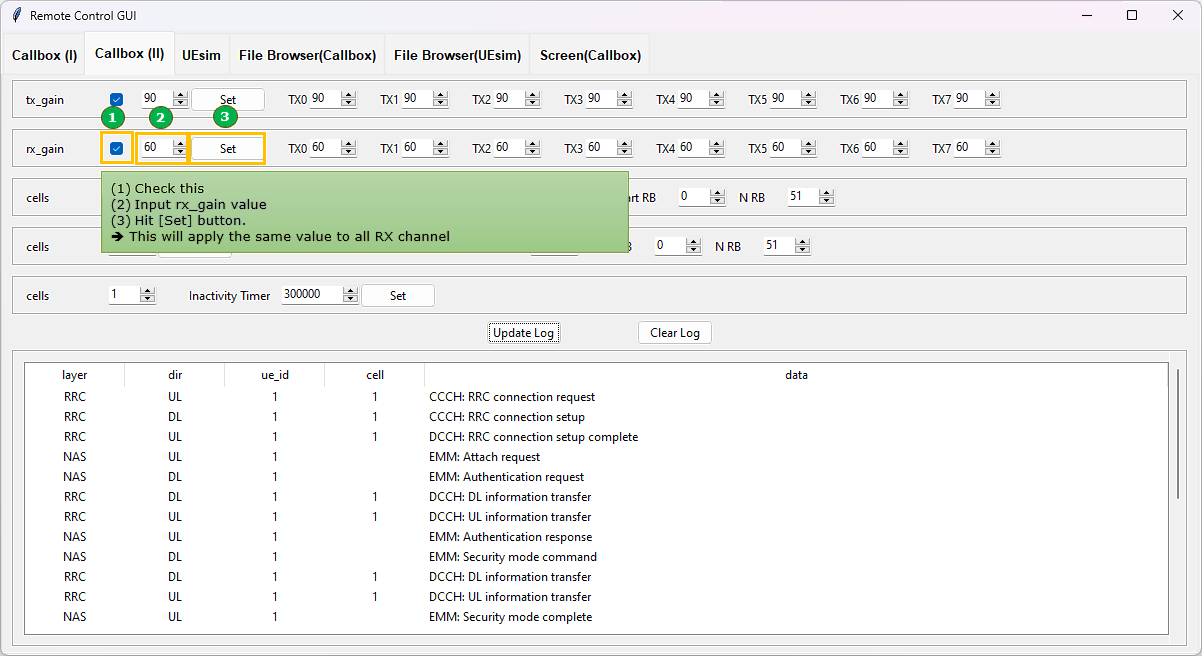
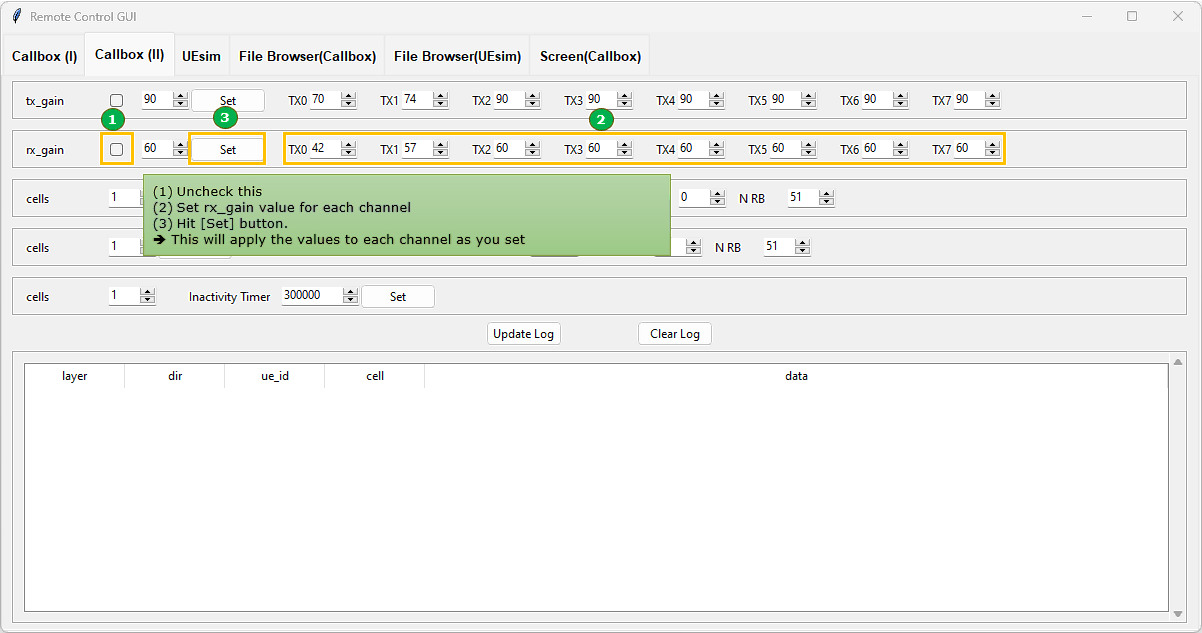
Callbox (II)
Basically this is an extension to Callbox (I). There are many things that I wanted to implment in GUI for callbox remote API, but the space on single tab is limited. So I justed created another tap.
UEsim
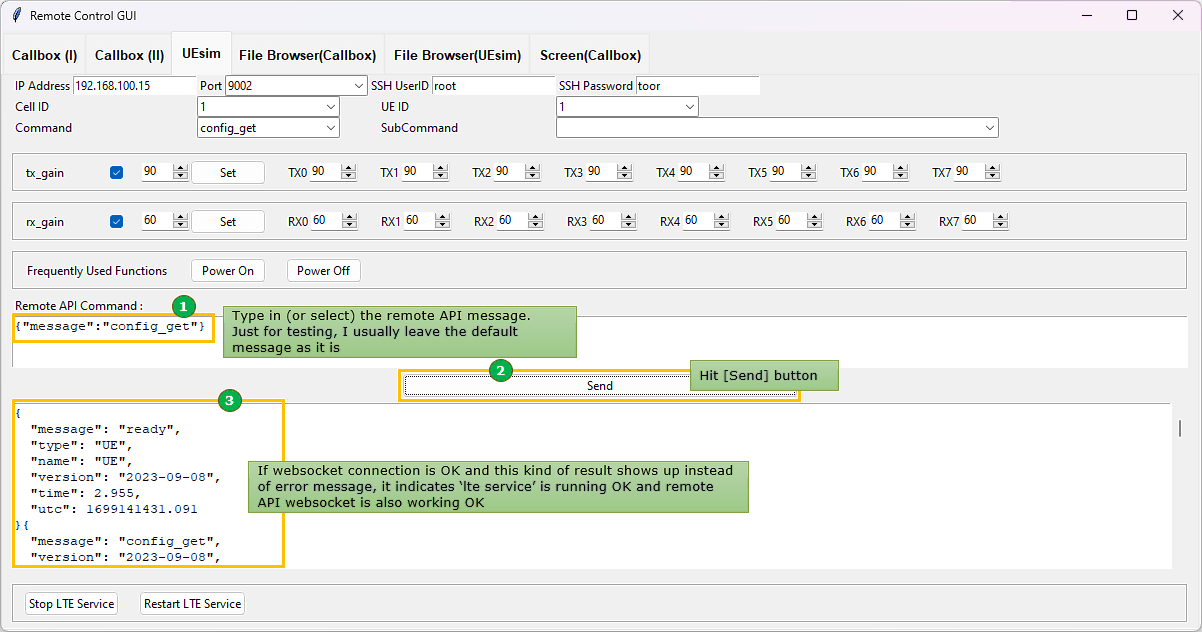
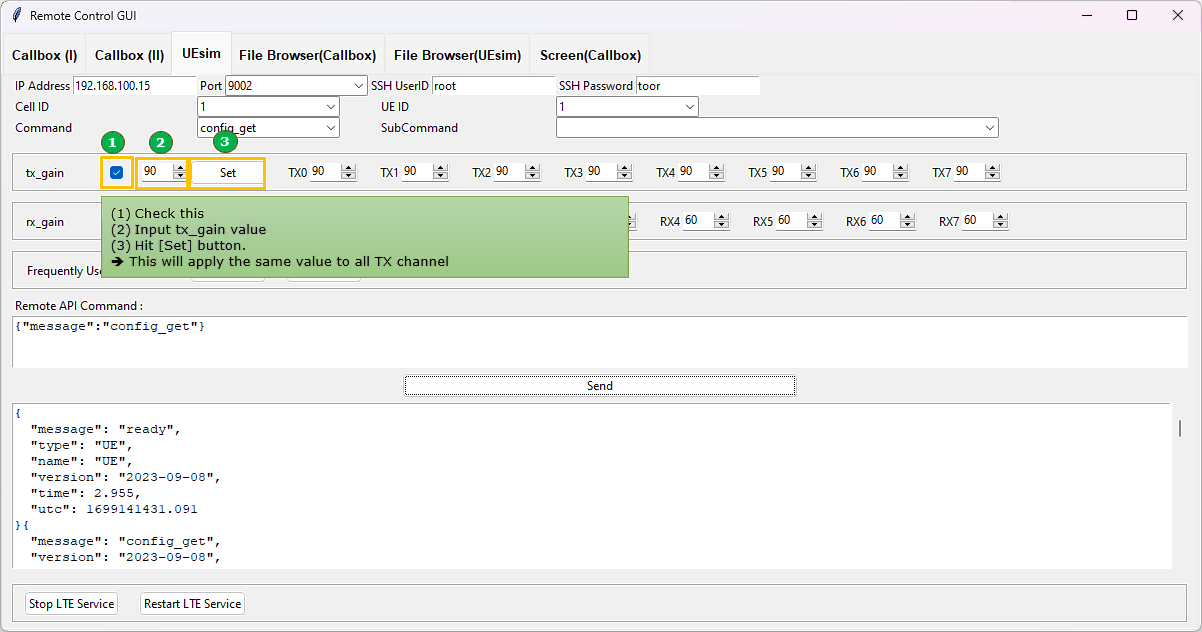
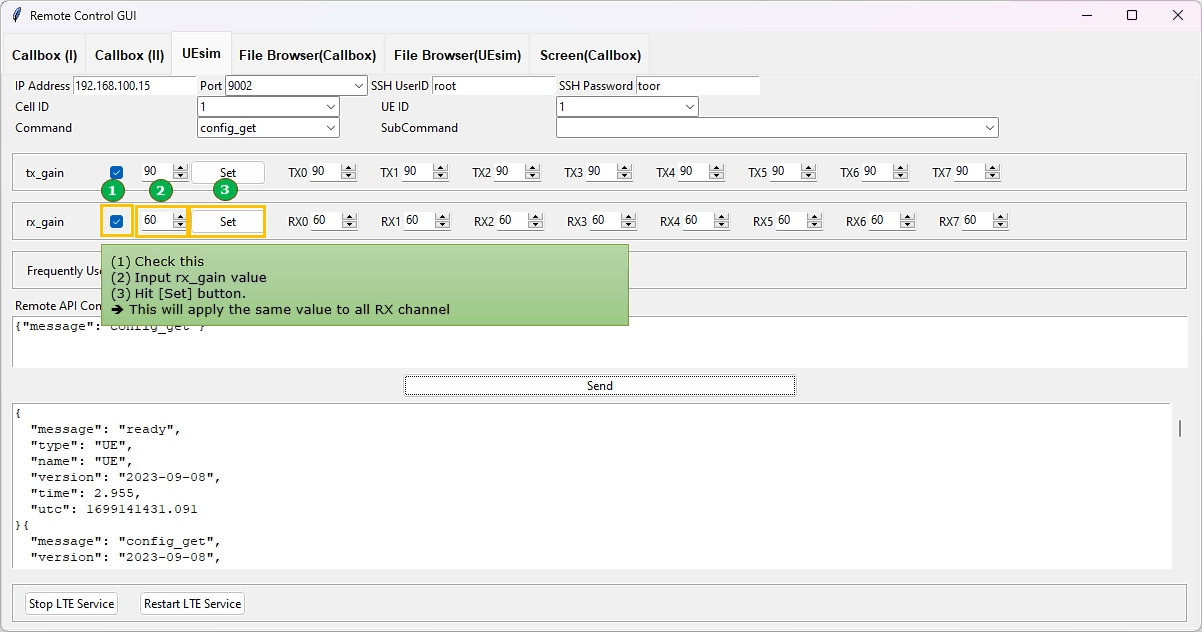
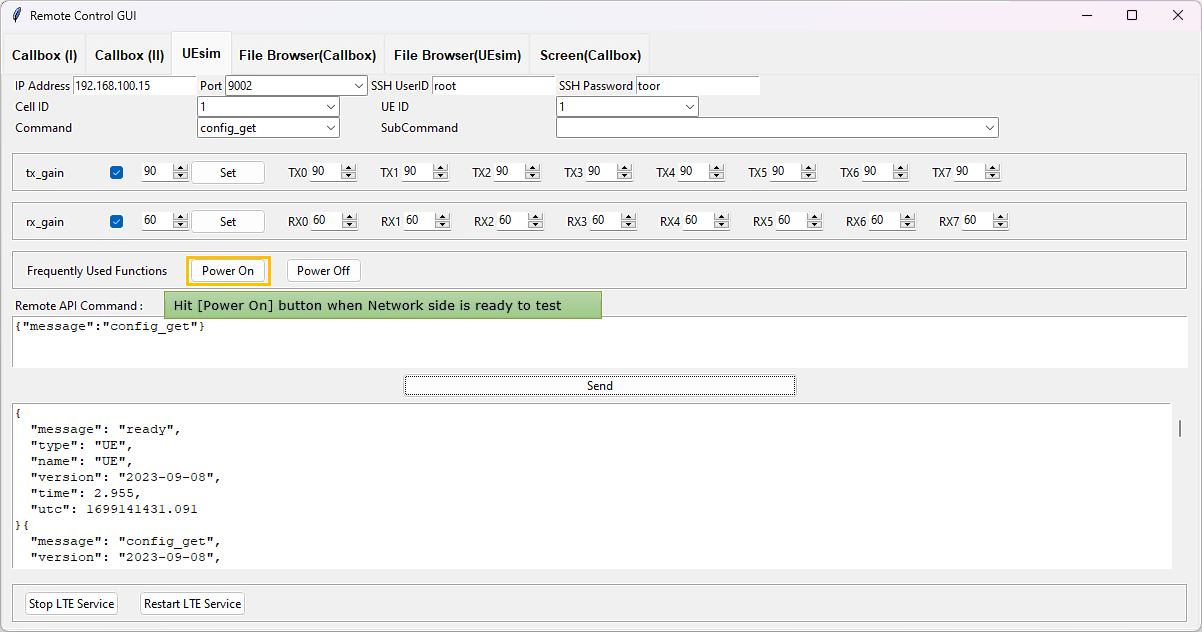
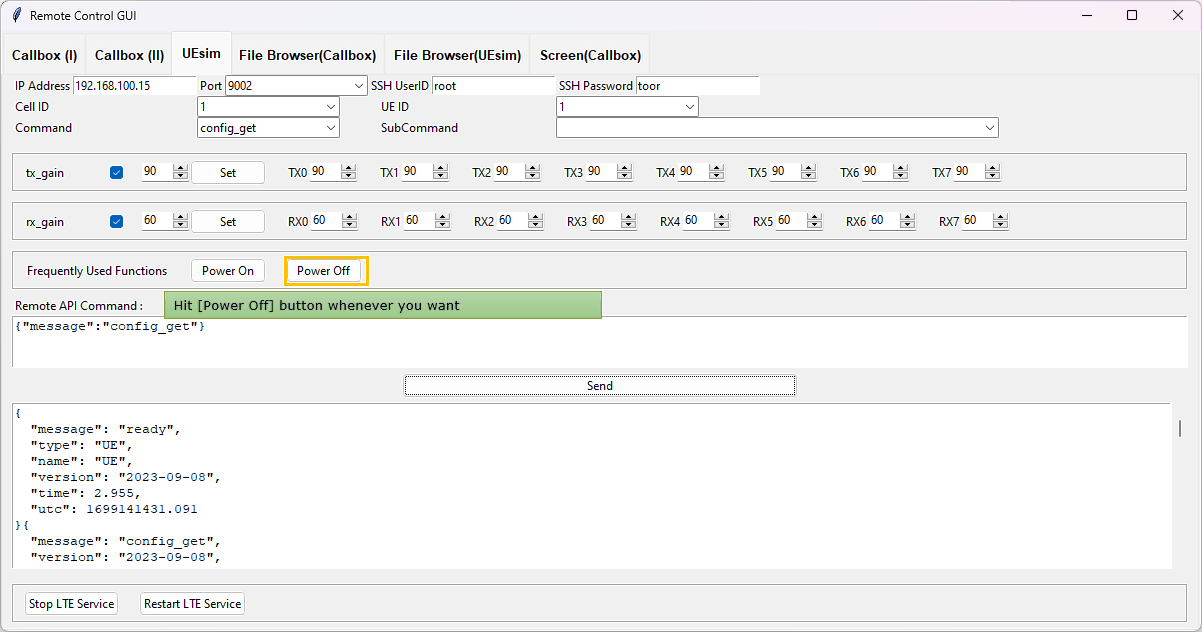
File Browser (Callbox)
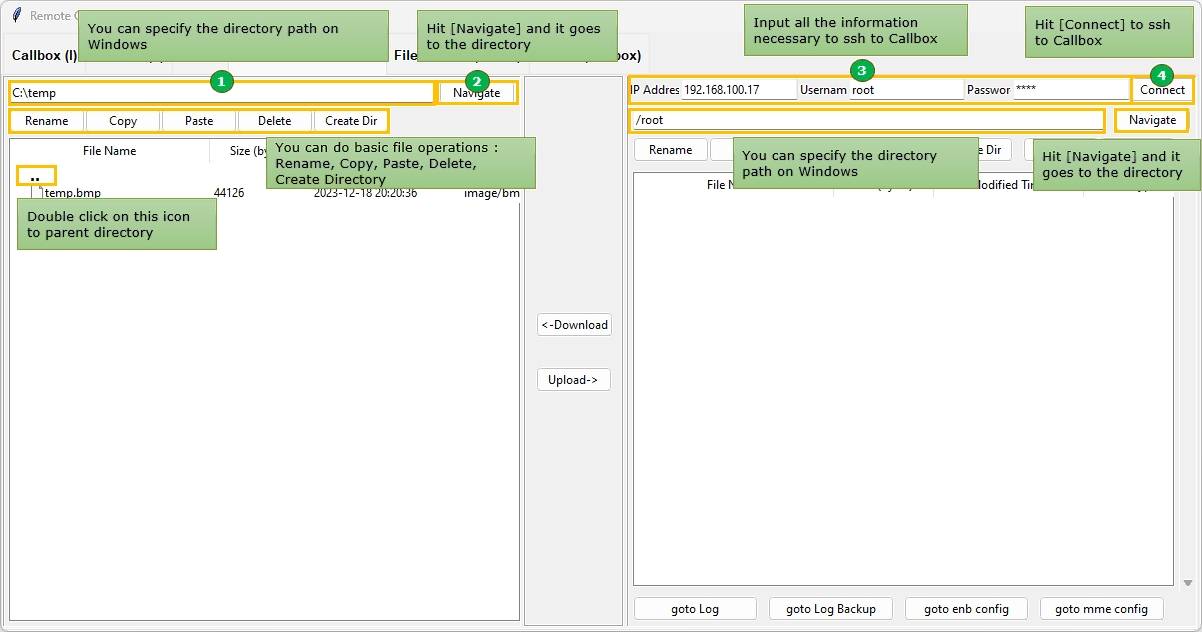
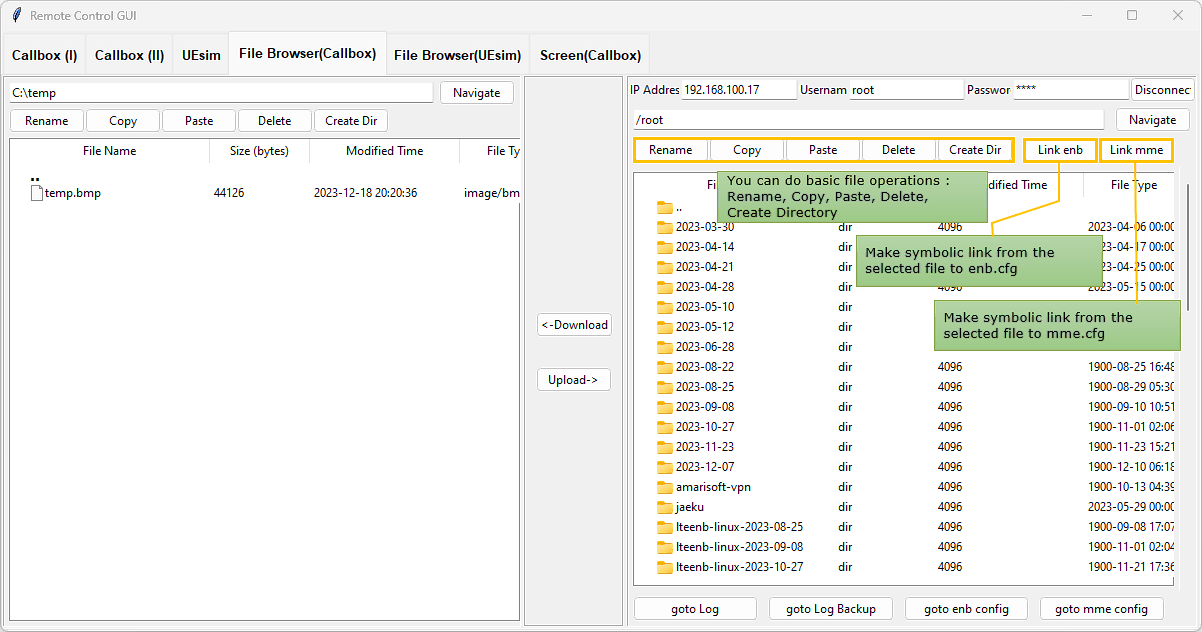

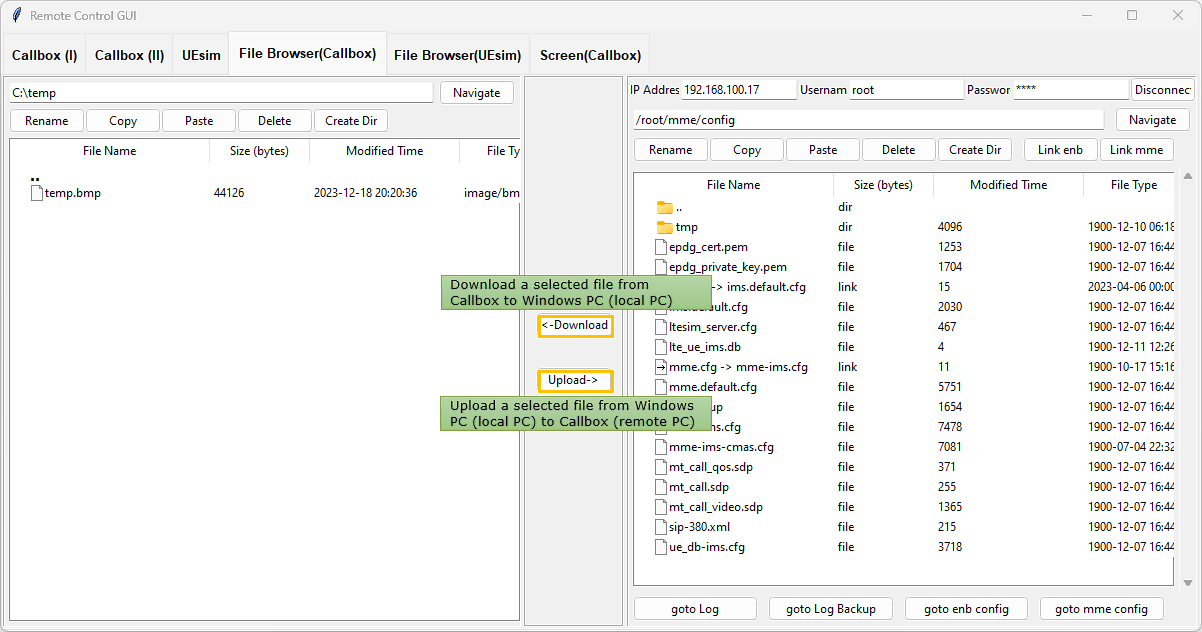
File Browser (UEsim)
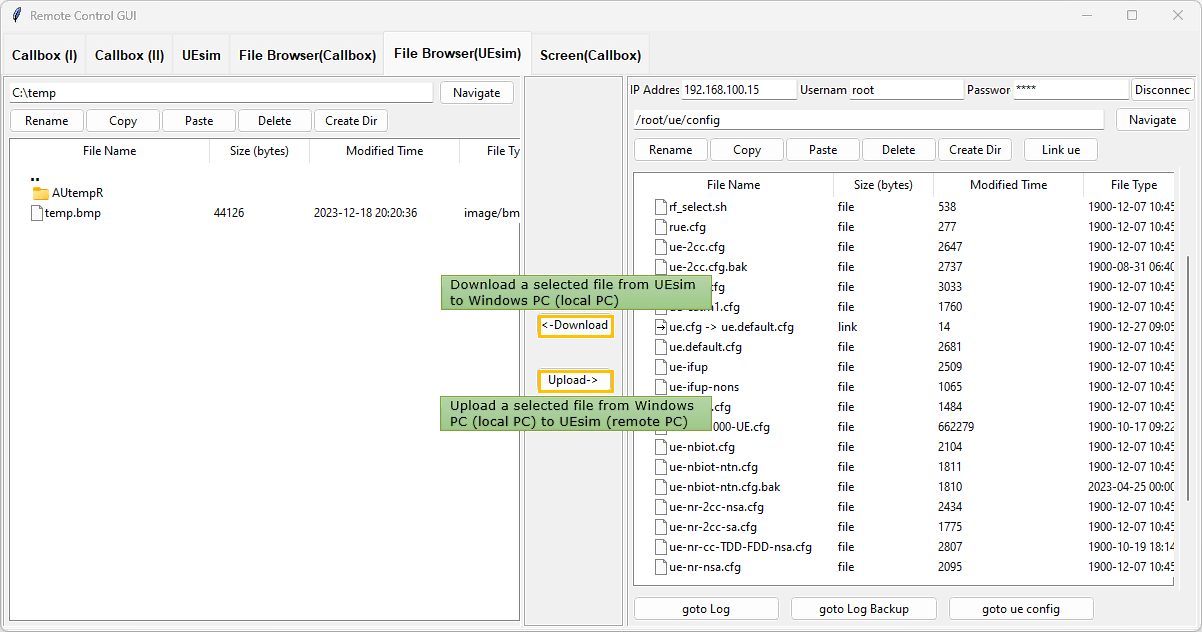
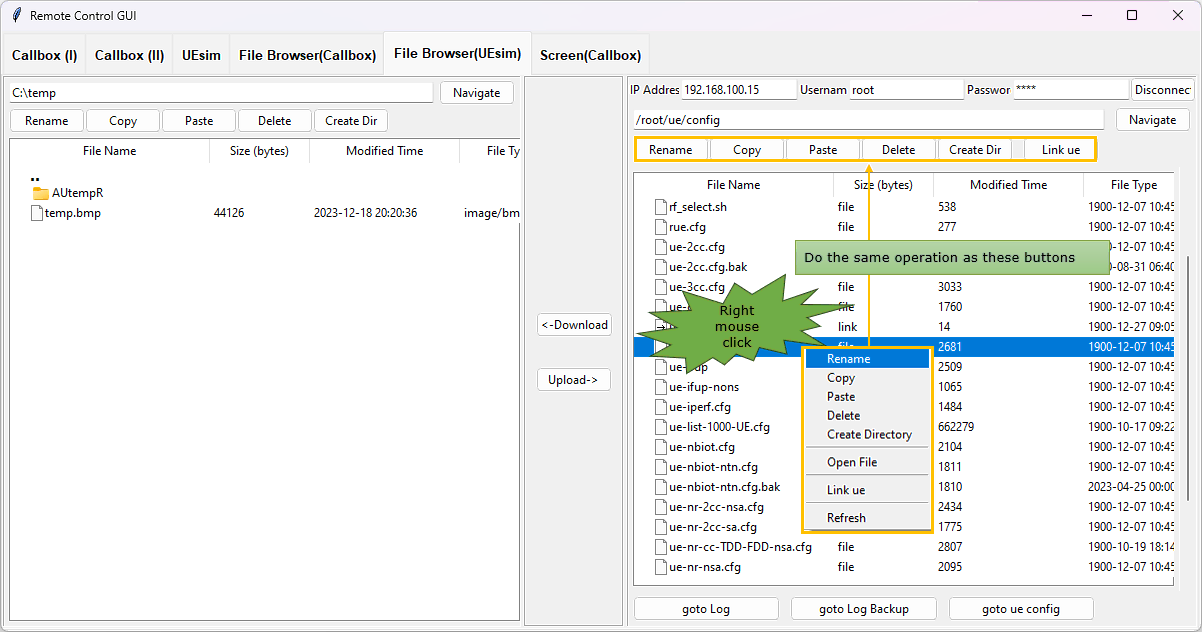
Screen (Callbox)
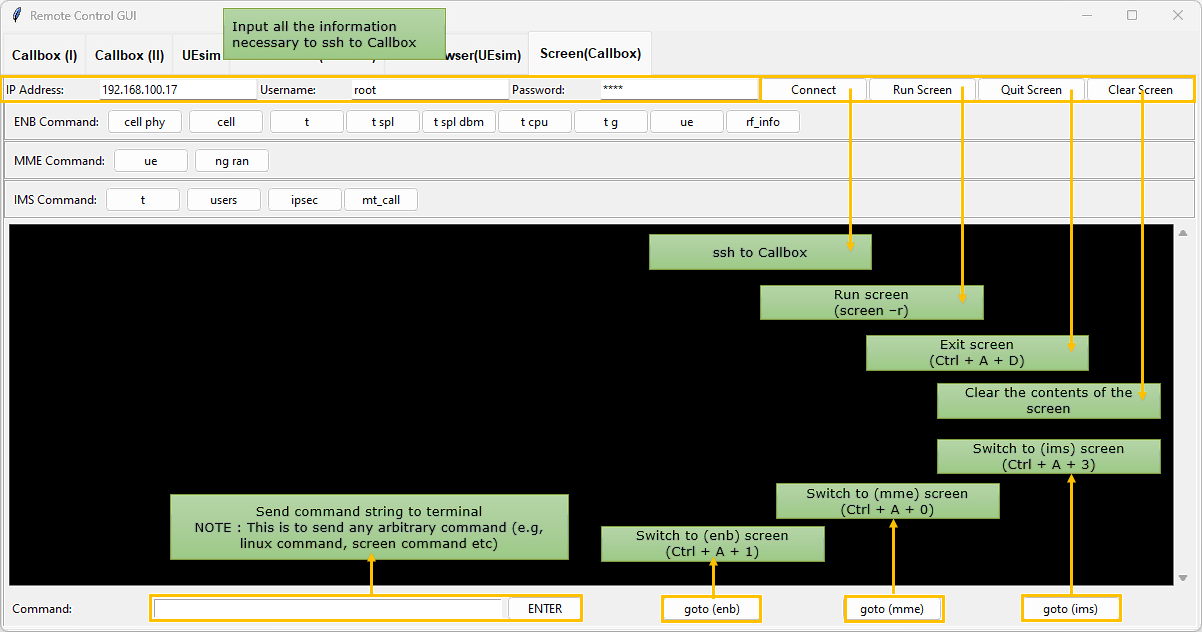
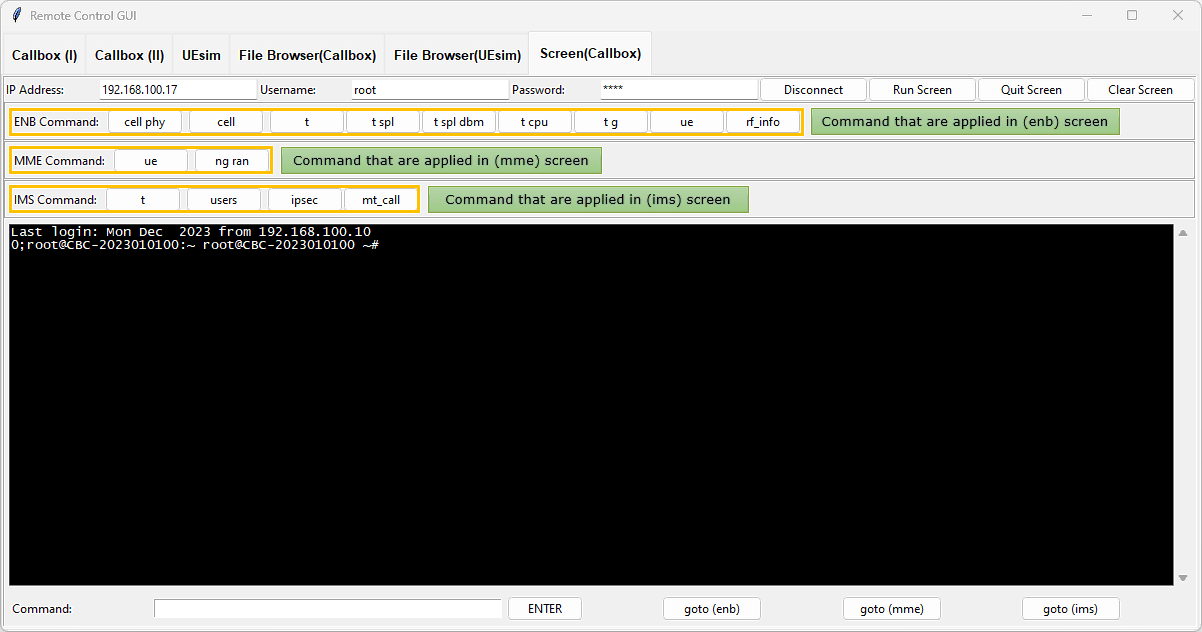
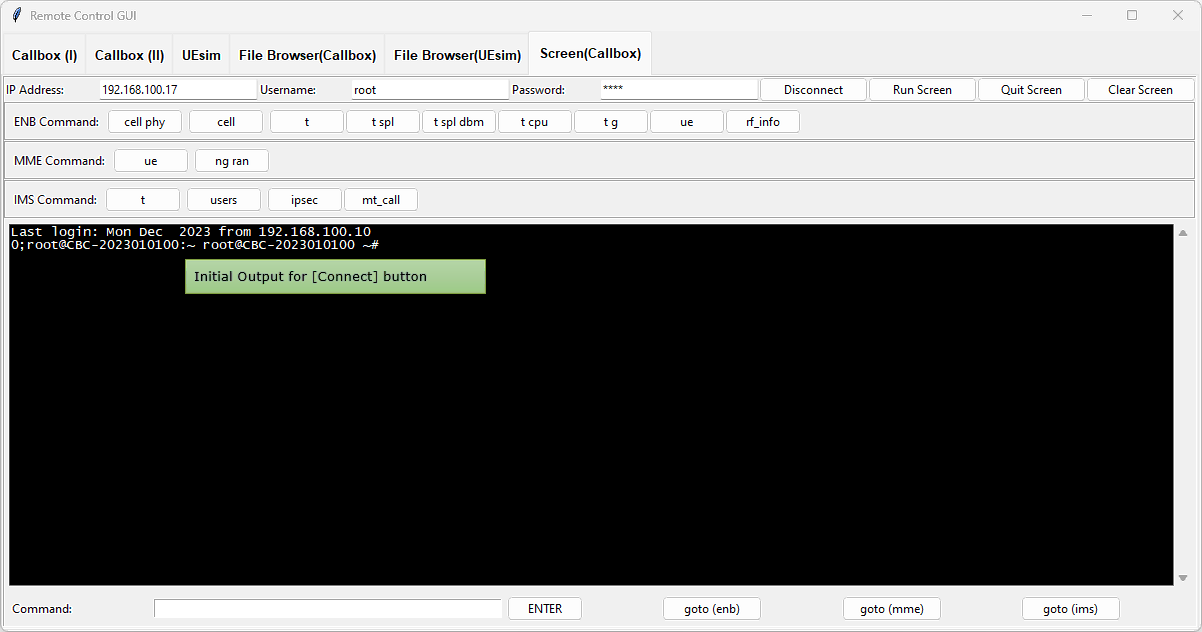
If you hit on [Connect] button, you will get a prompt as shown below.
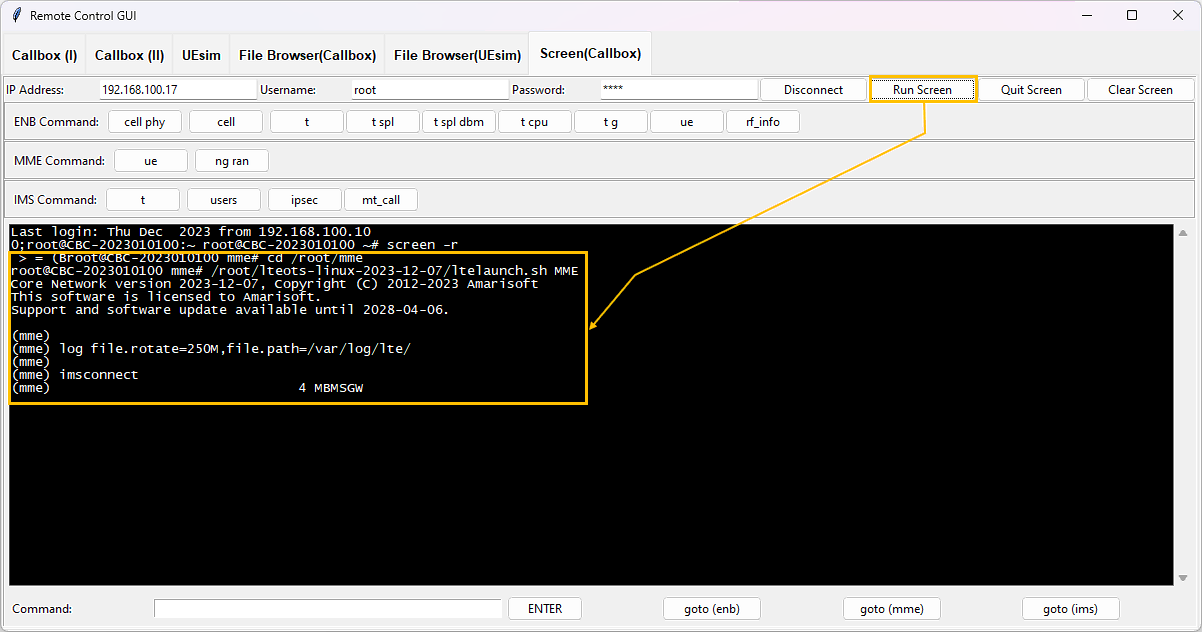
Hit [Run Screen] button and you will get the initial screen with (mme) mode.
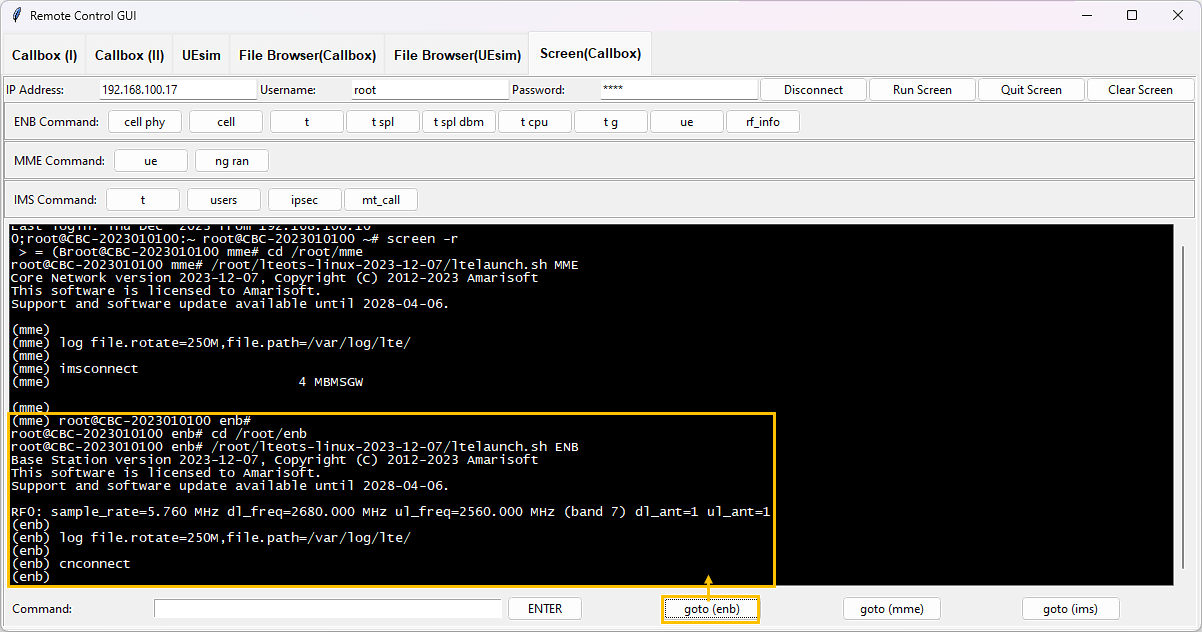
If you hit [go to (enb)] button, the screen switches to (enb) and print out the initial text of (enb) screen.
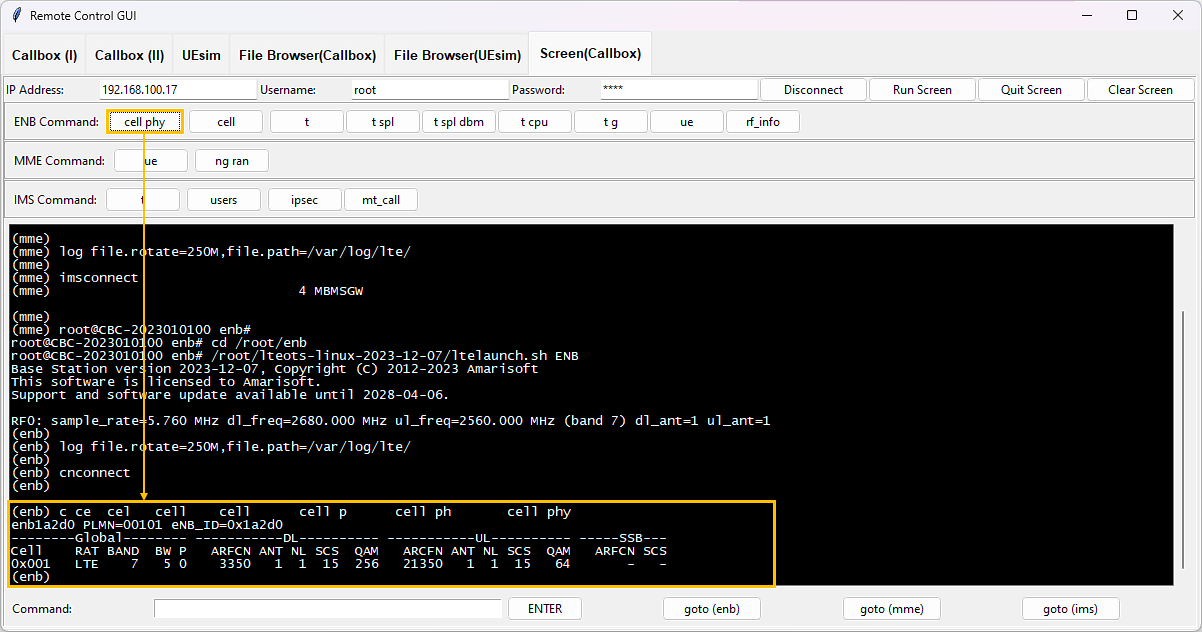
Now you can run various (enb) commands by clicking on ready made buttons, for example, [cell phy] button as shown below (
Code Description
In this section, I will describe on the source code of the program, but I will not go through each and every line of the code. I would go through chunks(block) of code which are associated with certain user interactions (e.g, poping up a window, clicking a button or route mouse click for a popup menu etc). For further details, you can refer to the source code that you downloaded and go to the block of the code mentioned here and check the details.
Overall Layout
As you may notice, this program is made up of single window with single notebook GUI component (Multiple tabs that you see in this program is just components of the Notebook component). So the first part of the program is to create a window (a dialogbox) and a Notebook component within the window. That is done by the code shown below.
|
root = tk.Tk() # this creates a window (main window) of this program root.title("Remote Control GUI") root.geometry("1200x600") root.grid_columnconfigure(0, weight=1) root.grid_rowconfigure(0, weight=1) root.config(cursor="")
# Create a style object style = ttk.Style()
# Modify the TNotebook.Tab style (this is the style for the tabs) style.configure('TNotebook.Tab', font=('Arial', '10', 'bold'), padding=[5, 10], # [left/right padding, top/bottom padding] )
# Increase the size of the tabs to accommodate the new font size style.configure('TNotebook', tabposition='nw') # 'n' is the default: 'n' (north), 's' (south), 'w' (west), 'e' (east)
notebook = ttk.Notebook(root, style='TNotebook') # this creates a Notebook and put it into 'root' (main window). notebook.grid(row=0, column=0, sticky="nsew") |
Callbox (I)
Now let's look into the code for the Callbox (I) tab. There are quite a lot of GUI components in this tab. For easy association for each GUI components and corresponding source code, I split this tab into multiple sections and labeled as shown below.
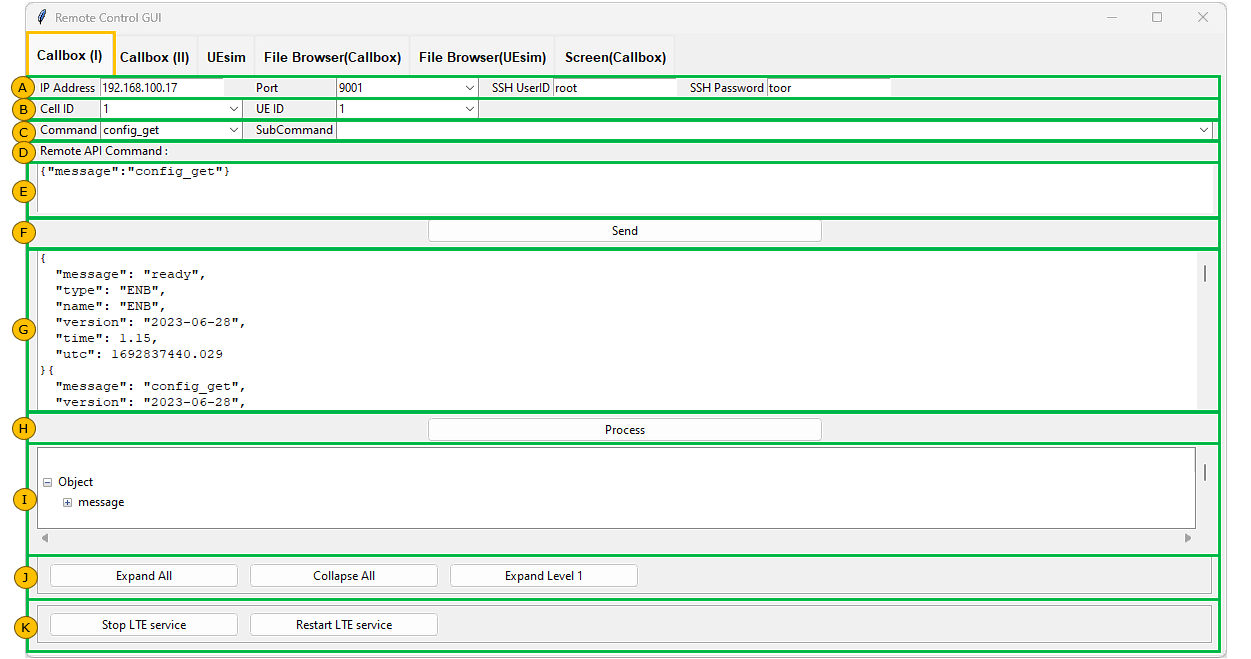
GUI Component Layout
This is to create all the graphical components within the first tab (Callbox (I)). Overall idea is to create a frame(boundary is not shown though) filling out the whole tab area and put all the remaining components within the frame. I would not cover the code for every sections labeled above. I would just go over the part that are associated with user interactions.
|
# Create a new frame for the first tab frmTab1 = ttk.Frame(notebook)
# Based on this block, only the section I would get resized as the main window size changes in both horizontal and vertical direction. All other components resizes only in horizontal direction and does not # change size in vertical direction. frmTab1.grid_columnconfigure(8, weight=1) # weight=0 --> not resizable, weight=1 --> resizable , Make Section I resizable in horizontal direction frmTab1.grid_rowconfigure(0, weight=0) # weight=0 --> not resizable, weight=1 --> resizable frmTab1.grid_rowconfigure(1, weight=0) # weight=0 --> not resizable, weight=1 --> resizable frmTab1.grid_rowconfigure(2, weight=0) # weight=0 --> not resizable, weight=1 --> resizable frmTab1.grid_rowconfigure(3, weight=0) # weight=0 --> not resizable, weight=1 --> resizable frmTab1.grid_rowconfigure(4, weight=0) # weight=0 --> not resizable, weight=1 --> resizable frmTab1.grid_rowconfigure(5, weight=0) # weight=0 --> not resizable, weight=1 --> resizable frmTab1.grid_rowconfigure(6, weight=0) # weight=0 --> not resizable, weight=1 --> resizable frmTab1.grid_rowconfigure(7, weight=0) # weight=0 --> not resizable, weight=1 --> resizable frmTab1.grid_rowconfigure(8, weight=1) # weight=0 --> not resizable, weight=1 --> resizable , Make Section I resizable in vertical direction frmTab1.grid_rowconfigure(9, weight=0) # weight=0 --> not resizable, weight=1 --> resizable
notebook.add(frmTab1, text="Callbox (I)")
# Add your components to the first tab #create_row1(frmTab1,"10.0.0.185") # create txtIP, cboPort create_row1(frmTab1,"192.168.100.17") # create txtIP, cboPort create_row2(frmTab1) # create cboCellID, cboUEID create_row5(frmTab1) # create txtCommand create_row7(frmTab1) # create txtReturn create_row3(frmTab1) # create cboCommand, cboSubCommand create_row4(frmTab1) # create create_row6(frmTab1) # create btnSend create_row9(frmTab1) # create tblProcess create_row8(frmTab1) # create btnProcess create_row10(frmTab1) # create btnExpandAll, btnCollapseAll,btnExpandLevel1 create_row11(frmTab1) # create btnServiceStop,btnServiceRestart |
Section C (Row 3) - Command, SubCommand Dropdown box
This is for the components in the section C. The important part of this section is two dropdown box labeled as 'Command' and 'Sub Command'. The important functionalities for this section are
- Read json file that contains the command and subcommand of various remote API command
- Parse the json file and fill out the dropdown box Command (cboCommand))
- When a user select an item in Command dropdown box, fill out the SubCommand dropdown box with the list of the subcommand that are associated with the selected command
- When a select an item in SubCommand dropdown box, create a complete RemoteAPI command based on the selected Command item and SubCommand item and put the generated Remote API command into 'Remote API Command' text box.
|
def create_row3(root):
# Read the JSON file with open('remoteApi.txt', 'r') as f: data = json.load(f)
# Create the 'Command' drop-down command_var = tk.StringVar() cboCommand = ttk.Combobox(root, textvariable=command_var) cboCommand['values'] = [item['message'] for item in data] cboCommand.current(0) # Select the first item by default
# Create the 'SubCommand' drop-down subcommand_var = tk.StringVar() cboSubCommand = ttk.Combobox(root, textvariable=subcommand_var)
# Function to update the 'SubCommand' drop-down def update_subcommand(*args): message = command_var.get() for item in data: if item['message'] == message: cboSubCommand['values'] = item['settings'] item_count = len(cboSubCommand['values']) if item_count > 0 : cboSubCommand.current(0) # Select the first item by default after updating values break
# Function to update the command string in txtCommand def update_command_string(*args): if not subcommand_var.get() : cmdString = "{}".format('{"message"'+':'+'"'+command_var.get()+'"' + '}') else : if subcommand_var.get() != "{}" : cmdString = "{},{}".format('{"message"'+':'+'"'+command_var.get()+'"', subcommand_var.get()[1:-1] + ' }') cmdString = cmdString.replace("'", '"') cmdString = cmdString.replace("False", 'false') cmdString = cmdString.replace("True", 'true') else : cmdString = "{}".format('{"message"'+':'+'"'+command_var.get()+'"' + '}')
txtCommand.delete("1.0", tk.END) # Clear the current text txtCommand.insert("1.0", cmdString) # Insert the new command string
# Update the 'SubCommand' drop-down when the 'Command' selection changes command_var.trace('w', update_subcommand) command_var.trace('w', update_command_string) # Update the command string when command_var changes subcommand_var.trace('w', update_command_string) # Update the command string when subcommand_var changes
# Arrange the widgets using grid (or use pack/place, depending on your layout) lbl_command = tk.Label(root, text="Command") lbl_command.grid(row=2, column=0, sticky="w",padx=(10, 0)) cboCommand.grid(row=2, column=1, sticky="w")
lbl_sub_command = tk.Label(root, text="SubCommand") lbl_sub_command.grid(row=2, column=2, sticky="w",padx=(10, 0)) cboSubCommand.grid(row=2, column=3, columnspan=7, sticky="ew",padx=(0, 10)) |
|
[ { "message": "config_get", "settings": [ ] }, { "message": "log_get", "settings": [ ] }, { "message": "config_set", "settings": [ {"logs": { "bcch": false } } , {"logs": { "bcch": true } } , {"logs": { "layers": { "ALL": { "level": "debug", "max_size": 0, "payload": true } }, "bcch": false }}, {"logs": { "layers": { "PHY": { "level": "debug", "max_size": 0, "payload": true } }, "bcch": false }}, {"logs": { "layers": { "MAC": { "level": "debug", "max_size": 0, "payload": true } }, "bcch": false }}, {"logs": { "layers": { "RLC": { "level": "debug", "max_size": 0, "payload": true } }, "bcch": false }}, {"logs": { "layers": { "PDCP": { "level": "debug", "max_size": 0, "payload": true } }, "bcch": false }}, {"logs": { "layers": { "RRC": { "level": "debug", "max_size": 0, "payload": true } }, "bcch": false }}, {"logs": { "layers": { "GTPU": { "level": "debug", "max_size": 0, "payload": true } }, "bcch": false }}, {"cells": {"1":{"inactivity_timer":60000} } }, {"cells": {"1":{"force_dl_schedule":true, "pdsch_fixed_rb_alloc":true,"pdsch_fixed_rb_start":0,"pdsch_fixed_l_crb":20 }}}, {"cells": {"1":{"pdsch_mcs":4} } }, {"cells": {"1":{"force_full_bsr":true, "pusch_fixed_rb_alloc":true,"pusch_fixed_rb_start":0,"pusch_fixed_l_crb":20 }}}, {"cells": {"1":{"pusch_mcs":4} } }
] }, { "message": "rf", "settings": [ {}, {"tx_gain": 80}, {"tx_gain": [80, 70]}, {"tx_gain": [80, 80, 70, 70]}, {"tx_gain": [80, 80, 70, 70, 60, 60]}, {"tx_gain": [80, 80, 80, 80, 70, 70, 70, 70]}, {"rx_gain": 50}, {"rx_gain": [60, 50]}, {"rx_agc": -10} ] }, { "message": "stats", "settings": [ {}, {"samples": true}, {"samples": true, "rf": true}, {"samples": true, "rf": true, "Initial_delay": 0.7} ] }, { "message": "ue_get", "settings": [ {}, {"stats":true} ] } ] |
Section F (Row 6) - [Send] button
This is the code for the Section F. High level code is very simple as shown below. What it does is just to create a button labeled 'Send' (btnSend) and link it with the function send_command(). As you may guess, the important part is the implementation of send_command() function. Basically send_command() is super simple version of RemoteAPI program.
If you want to understand the details of send_command() function, check out this tutorial first. If you don't have any problem with understanding Remote API Python tutorial, you should have no problem with understanding send_command() function.
|
def create_row6(root):
btnSend = ttk.Button(root, text="Send", command=lambda: send_command()) btnSend.grid(row=5, column=0, columnspan=9, sticky="ew", padx=(400, 400), pady=(5, 5)) |
Section H (Row 8) - [Process] button
This is the code for the Section H. What it does is just to create a button labeled 'Process' (btnProcess) and link it with the function process_txtReturn(). What process_txtReturn() does is to parse the json format data printed in txtReturn textbox and display it in tree form as shown in Section I.
As you may guess, process_txtReturn() would implement the process of json parsing and manipulation of the treeview GUI component. I would not go into the details on json parsing and treeview manipulation here. Following note in sharetechnote may help of understanding the process.
|
def create_row8(root):
btnProcess = ttk.Button(root, text="Process", command=lambda: process_txtReturn()) btnProcess.grid(row=7, column=0, columnspan=9, sticky="ew", padx=(400, 400), pady=(5, 5)) |
Section J (Row 10) - [Expand All], [Collpase All], [Expand Level 1] button
This is the code for the Section J. What it does is just to create three buttons labeled 'Expand All' (btnExpandAll), 'Collapse All' (btnCollapseAll) and 'Expand Level 1' (btn btnExpandLevel1) respectively, and link them with the corresponding function(callback) as commented below. Bascially all these three buttons are to change the display pattern of treeview (Section (I))
|
def create_row10(root):
frame = tk.Frame(root,borderwidth=2, relief="groove") frame.grid_rowconfigure(0, weight=1) frame.grid_columnconfigure(0, weight=0)
colOffset = 0 btnExpandAll = ttk.Button(frame, text="Expand All", width=30, command=lambda: ExpandAll(tblProcess)) # if you click btnExpandAll button, ExpandAll(tblProcess) will be executed btnExpandAll.grid(row=10, column=0+colOffset, sticky="n", padx=(10, 0), pady=(5, 5))
btnCollapseAll = ttk.Button(frame, text="Collapse All", width=30, command=lambda: CollapseAll(tblProcess)) # if you click btnCollapseAll button, CollapseAll(tblProcess) will be executed btnCollapseAll.grid(row=10, column=1+colOffset, sticky="n", padx=(10, 0), pady=(5, 5))
btnExpandLevel1 = ttk.Button(frame, text="Expand Level 1", width=30, command=lambda: ExpandLevel1(tblProcess)) # if you click btnExpandLevel1 button, ExpandLevel1(tblProcess) will be executed btnExpandLevel1.grid(row=10, column=2+colOffset, sticky="n", padx=(10, 0), pady=(5, 5))
frame.grid(row=10, columnspan=9, sticky="nsew", padx=(10, 10), pady=(0, 10)) |
Section K (Row 11) - [Stop LTE Service], [Restart LTE Service] button
This is the code for the Section K. What it does is just to create three buttons labeled 'Stop LTE service' (btnServiceStop) and 'Restart LTE service' (btnServiceRestart ) respectively, and link them with the corresponding function(callback) as commented below. Bascially the two buttons are to setup an ssh socket and send 'service lte stop' or 'service lte restart' command.
|
def create_row11(root):
frame = tk.Frame(root,borderwidth=2, relief="groove") frame.grid_rowconfigure(0, weight=1) frame.grid_columnconfigure(0, weight=0)
colOffset = 0
btnServiceStop = ttk.Button(frame, text="Stop LTE service", width=30, command=lambda: lteServiceStop(txtIP)) # if you click btnServiceStop button, lteServiceStop(txtIP) will be executed btnServiceStop.grid(row=11, column=3+colOffset, sticky="n", padx=(10, 0), pady=(5, 5))
btnServiceRestart = ttk.Button(frame, text="Restart LTE service", width=30, command=lambda: lteServiceRestart(txtIP)) # if you click btnServiceRestart button, lteServiceRestart(txtIP) will be executed btnServiceRestart.grid(row=11, column=4+colOffset, sticky="n", padx=(10, 0), pady=(5, 5))
frame.grid(row=11, columnspan=9, sticky="nsew", padx=(10, 10), pady=(0, 10)) |
Callbox (II)
Now let's look into the code for the Callbox (II) tab. There are also quite a lot of GUI components in this tab. For easy association for each GUI components and corresponding source code, I split this tab into multiple sections and labeled as shown below.
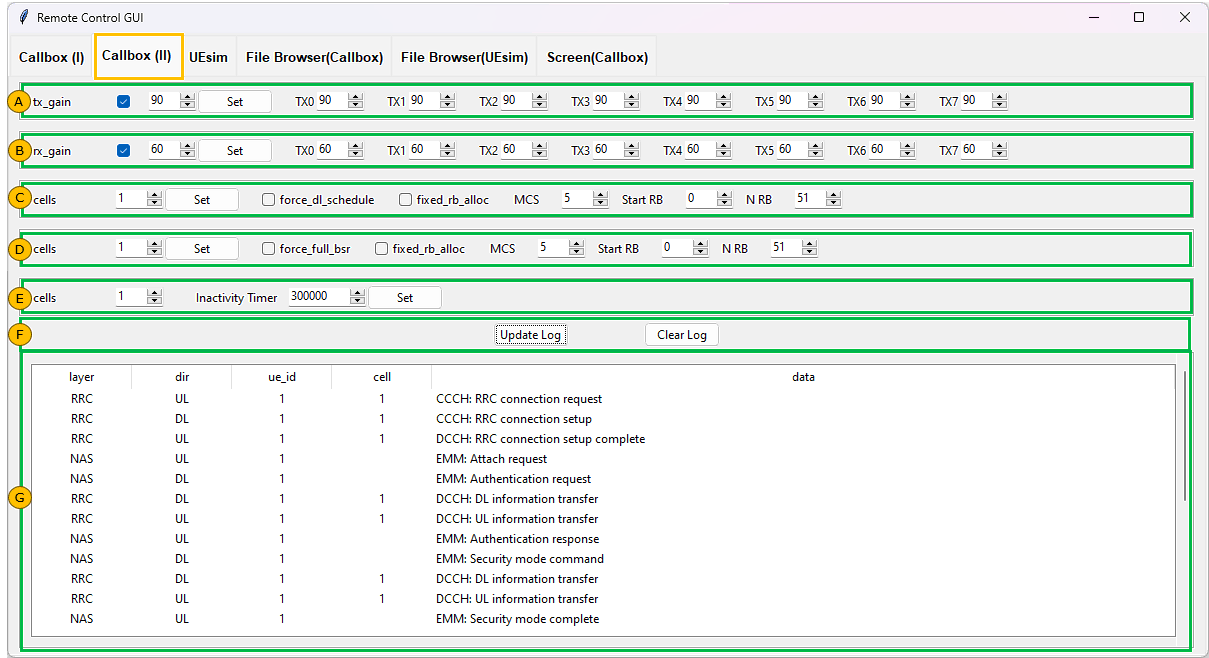
GUI Component Layout
This is to create all the graphical components within the second tab (Callbox (II)). Overall idea is to create a frame(boundary is not shown though) filling out the whole tab area and put all the remaining components within the frame. I would not cover the code for every sections labeled above. I would just go over the part that are associated with user interactions.
|
# Create a new frame for the second tab frmTab2 = ttk.Frame(notebook) frmTab2.grid_columnconfigure(0, weight=0) frmTab2.grid_rowconfigure(0, weight=0) notebook.add(frmTab2, text="Callbox (II)")
chkVarTxGainAll = tk.IntVar(value=1) chkVarTxGain = [] # create list to store IntVars create_row1_tab2(frmTab2) chkVarRxGainAll = tk.IntVar(value=1) chkVarRxGain = [] # create list to store IntVars create_row2_tab2(frmTab2) # Create txtRxGain
chkVarForceDlSchedule = tk.IntVar(value=0) chkVarPdschFixedRbAlloc = tk.IntVar(value=0) create_row3_tab2(frmTab2) # Create txtForceDlScheduleCells, txtForceDlScheduleMCS , txtForceDlScheduleRbStart, txtForceDlScheduleRbN
chkVarForceFullBsr = tk.IntVar(value=0) chkVarPuschFixedRbAlloc = tk.IntVar(value=0) create_row4_tab2(frmTab2) # create txtorceFullBsrCells, txtorceFullBsrMCS , txtorceFullBsrRbStart, txtorceFullBsrRbN create_row5_tab2(frmTab2) # create txtInactivityTimer
create_row7_tab2(frmTab2) # create tblLogUpdate frmTab2.grid_rowconfigure(6, weight=1) # weight=0 --> not resizable, weight=1 --> not resizable
create_row6_tab2(frmTab2) # create btnUpdateLog, btnClearLog frmTab2.grid_columnconfigure(6, weight=1) # weight=0 --> not resizable, weight=1 --> not resizable tion |
Section A (Row 1) - Set button, Tx Gain Value setting field
This is the code for the Section A. For most part, you would not need any specific comments because those are just putting a specific GUI components at a specific position. The only thing that I want to comment is about process_btnTxGain() without showing the code details. You just check out the code details of this function in the source code you can download in this tutorial.
What process_btnTxGain() does is :
- check if chkTxGainAll checkbox is checked.
- If it is checked, send remoteAPI command to apply the value of txtTxGain for all Tx channel.
- If it is not checked, send remoteAPI command to apply the value of spinTxGain for each of TX channel separately.
- To do this, we need to know how many TX channel is configured now. In order to figure it out, run getTxport() function.
- What getTxport() function does is to send '{"message":"rf","tx_gain": {tx_gain_value} }}' and get the return, and then analyze the return to figure out the number of tx channels.
Followings are examples of RemoteAPI command generated by 'Set' button
{"message":"rf","tx_gain": 90 } when checkbox is checked
{"message":"rf","tx_gain":[ 89, 83]} when checkbox is unchecked
|
def create_row1_tab2(root):
global txtTxGain nested_frame = tk.Frame(root, bd=2, relief="groove") nested_frame.grid(row=0, column=0, columnspan=18,sticky="we", padx=(10,10), pady=(5,5))
# creating a label with the text "Tx Gain" and check box lblTxGain = ttk.Label(nested_frame , text="tx_gain", width=10) lblTxGain.grid(row=0, column=0, sticky="w", padx=(10,10), pady=(5,5)) chkTxGainAll = ttk.Checkbutton(nested_frame, text="", variable=chkVarTxGainAll) chkTxGainAll.grid(row=0, column=1, sticky="ew", padx=(10,0), pady=(5,5))
# creating a textbox with the text "Tx Gain" txtTxGain = ttk.Spinbox(nested_frame , from_=0, to=100, width=5) txtTxGain.set(90) # Set the default value txtTxGain.grid(row=0, column=2, sticky="ew", padx=(10,0), pady=(5,5))
# creating the button labeled as "Set". When this button is clicked, the function process_btnTxGain() gets executed btnTxGain = ttk.Button(nested_frame, text="Set", command=process_btnTxGain) btnTxGain.grid(row=0, column=3, sticky="ew", padx=(0,10), pady=(5,5))
# creating the 8 labels and spinbox(a textbox with up/down button). for i in range(8): spinVarTxGain.append(tk.IntVar(value=90)) lblTxGain = ttk.Label(nested_frame , text="TX{}".format(i)) lblTxGain.grid(row=0, column=4+2*i, sticky="w", padx=(10,0), pady=(5,5)) spinTxGain = ttk.Spinbox(nested_frame, from_=0, to=90, textvariable=spinVarTxGain[i], width=5, name='txtTxGainNo{}'.format(i)) spinTxGain.grid(row=0, column=4+2*i+1, sticky="w", padx=(0,10), pady=(5,5)) |
Section B (Row 2) - Set button, Rx Gain Value setting field
This is the code for the Section B. For most part, you would not need any specific comments because those are just putting a specific GUI components at a specific position. The only thing that I want to comment is about process_btnRxGain() without showing the code details. You just check out the code details of this function in the source code you can download in this tutorial.
What process_btnRxGain() does is :
- check if chkRxGainAll checkbox is checked.
- If it is checked, send remoteAPI command to apply the value of txtRxGain for all Tx channel.
- If it is not checked, send remoteAPI command to apply the value of spinRxGain for each of RX channel separately.
- To do this, we need to know how many RX channel is configured now. In order to figure it out, run getRxport() function.
- What getRxport() function does is to send '{"message":"rf","rx_gain": {rx_gain_value} }}' and get the return, and then analyze the return to figure out the number of rx channels.
Followings are examples of RemoteAPI command generated by 'Set' button
{"message":"rf","rx_gain": 60 } when checkbox is checked
{"message":"rf","rx_gain":[ 53]} when checkbox is unchecked
|
def create_row2_tab2(root):
global txtRxGain nested_frame = tk.Frame(root, bd=2, relief="groove") nested_frame.grid(row=1, column=0, columnspan=18,sticky="we", padx=(10,10), pady=(5,5))
# creating a label with the text "Rx Gain" and check box lblRxGain = ttk.Label(nested_frame , text="rx_gain", width=10) lblRxGain.grid(row=0, column=0, sticky="w", padx=(10,10), pady=(5,5)) chkRxGainAll = ttk.Checkbutton(nested_frame, text="", variable=chkVarRxGainAll) chkRxGainAll.grid(row=0, column=1, sticky="ew", padx=(10,0), pady=(5,5))
# creating a textbox with the text "Rx Gain" txtRxGain = ttk.Spinbox(nested_frame , from_=0, to=100, width=5) txtRxGain.set(60) # Set the default value txtRxGain.grid(row=0, column=2, sticky="ew", padx=(10,0), pady=(5,5))
# creating the button labeled as "Set". When this button is clicked, the function process_btnRxGain() gets executed btnRxGain = ttk.Button(nested_frame , text="Set", command = process_btnRxGain) btnRxGain.grid(row=0, column=3, sticky="ew", padx=(0,10), pady=(5,5))
# creating the 8 labels and spinbox(a textbox with up/down button). for i in range(8): spinVarRxGain.append(tk.IntVar(value=60)) lblRxGain = ttk.Label(nested_frame , text="TX{}".format(i)) lblRxGain.grid(row=0, column=4+2*i, sticky="w", padx=(10,0), pady=(5,5)) spinRxGain = ttk.Spinbox(nested_frame, from_=0, to=60, textvariable=spinVarRxGain[i], width=5, name='txtRxGainNo{}'.format(i)) spinRxGain.grid(row=0, column=4+2*i+1, sticky="w", padx=(0,10), pady=(5,5)) |
Section C (Row 3) - DL Phy Scheduling
This is the code for the Section C. For most part, you would not need any specific comments because those are just putting a specific GUI components at a specific position. The only thing that I want to comment is about process_btnPhyDL() without showing the code details. You just check out the code details of this function in the source code you can download in this tutorial.
What process_btnPhyDL() does is to create a Remote API command based on options selected by checking / unchecking checkboxes. For example, if you check all the options the generated remoteAPI command is like this.
- force_dl_schedule and pdsch_fixed_rb_alloc is set by the check box
- pdsch_fixed_rb_start, pdsch_fixed_l_crb ,pdsch_mcs are applied only when "pdsch_fixed_rb_alloc":true
{"message": "config_set", "cells": {"1":{"pdsch_fixed_rb_start":0, "pdsch_fixed_l_crb":51 ,"pdsch_mcs":5 , "force_dl_schedule":true, "pdsch_fixed_rb_alloc":true } } }
|
def create_row3_tab2(root):
global txtForceDlScheduleCells, txtForceDlScheduleMCS , txtForceDlScheduleRbStart, txtForceDlScheduleRbN
#nested_frame = tk.Frame(root) nested_frame = tk.Frame(root, bd=2, relief="groove") nested_frame.grid(row=2, column=0, columnspan=14,sticky="we", padx=(10,10), pady=(5,5))
lblForceDlScheduleCells = ttk.Label(nested_frame, text="cells", width=10) lblForceDlScheduleCells.grid(row=0, column=0, sticky="w", padx=(10,10), pady=(5,5))
txtForceDlScheduleCells = ttk.Spinbox(nested_frame, from_=0, to=100, width = 5) txtForceDlScheduleCells.set(1) # Set the default value txtForceDlScheduleCells.grid(row=0, column=1, sticky="ew", padx=(10,0), pady=(5,5))
btnPhyDL = ttk.Button(nested_frame, text="Set", command=process_btnPhyDL) btnPhyDL.grid(row=0, column=2, sticky="ew", padx=(0,10), pady=(5,5))
chkForceDlSchedule = ttk.Checkbutton(nested_frame, text="force_dl_schedule", variable=chkVarForceDlSchedule) chkForceDlSchedule.grid(row=0, column=3, sticky="w", padx=(10,10), pady=(5,5))
chkPdschFixedRbAlloc= ttk.Checkbutton(nested_frame, text="fixed_rb_alloc", variable=chkVarPdschFixedRbAlloc) chkPdschFixedRbAlloc.grid(row=0, column=4, sticky="w", padx=(10,10), pady=(5,5))
lblForceDlScheduleMCS = ttk.Label(nested_frame, text="MCS") lblForceDlScheduleMCS.grid(row=0, column=5, sticky="w", padx=(10,10), pady=(5,5))
txtForceDlScheduleMCS = ttk.Spinbox(nested_frame, from_=0, to=28, width = 5) txtForceDlScheduleMCS.set(5) # Set the default value txtForceDlScheduleMCS.grid(row=0, column=6, sticky="ew", padx=(10,0), pady=(5,5))
lblForceDlScheduleRbStart = ttk.Label(nested_frame, text="Start RB") lblForceDlScheduleRbStart.grid(row=0, column=7, sticky="w", padx=(10,10), pady=(5,5))
txtForceDlScheduleRbStart = ttk.Spinbox(nested_frame, from_=0, to=273, width = 5) txtForceDlScheduleRbStart.set(0) # Set the default value txtForceDlScheduleRbStart.grid(row=0, column=8, sticky="ew", padx=(10,0), pady=(5,5))
lblForceDlScheduleRbN = ttk.Label(nested_frame , text="N RB") lblForceDlScheduleRbN.grid(row=0, column=9, sticky="w", padx=(10,10), pady=(5,5))
txtForceDlScheduleRbN = ttk.Spinbox(nested_frame, from_=1, to=273, width = 5) txtForceDlScheduleRbN.set(51) # Set the default value txtForceDlScheduleRbN.grid(row=0, column=10, sticky="ew", padx=(10,0), pady=(5,5)) |
Section D (Row 4) - UL Phy Scheduling
This is the code for the Section D. For most part, you would not need any specific comments because those are just putting a specific GUI components at a specific position. The only thing that I want to comment is about process_btnPhyUL() without showing the code details. You just check out the code details of this function in the source code you can download in this tutorial.
What process_btnPhyUL() does is to create a Remote API command based on options selected by checking / unchecking checkboxes. For example, if you check all the options the generated remoteAPI command is like this.
- force_full_bsr and pusch_fixed_rb_alloc is set by the check box
- pusch_fixed_rb_start, pusch_fixed_l_crb ,pusch_mcs are applied only when "pusch_fixed_rb_alloc":true
{"message": "config_set", "cells": {"1":{"pusch_fixed_rb_start":0, "pusch_fixed_l_crb":51 ,"pusch_mcs":5 , "force_full_bsr":true, "pusch_fixed_rb_alloc":true } } }
|
def create_row4_tab2(root):
global txtForceFullBsrCells, txtForceFullBsrMCS , txtForceFullBsrRbStart, txtForceFullBsrRbN #nested_frame = tk.Frame(root) nested_frame = tk.Frame(root, bd=2, relief="groove") nested_frame.grid(row=3, column=0, columnspan=14,sticky="we", padx=(10,10), pady=(5,5))
lblForceFullBsrCells = ttk.Label(nested_frame, text="cells", width=10) lblForceFullBsrCells.grid(row=0, column=0, sticky="w", padx=(10,10), pady=(5,5))
txtForceFullBsrCells = ttk.Spinbox(nested_frame, from_=0, to=100, width = 5) txtForceFullBsrCells.set(1) # Set the default value txtForceFullBsrCells.grid(row=0, column=1, sticky="ew", padx=(10,0), pady=(5,5))
btnPhyUL = ttk.Button(nested_frame, text="Set", command=process_btnPhyUL) btnPhyUL.grid(row=0, column=2, sticky="ew", padx=(0,10), pady=(5,5))
chkForceFullBsr = ttk.Checkbutton(nested_frame, text="force_full_bsr", variable=chkVarForceFullBsr) chkForceFullBsr.grid(row=0, column=3, sticky="w", padx=(10,10), pady=(5,5))
chkPuschFixedRbAlloc= ttk.Checkbutton(nested_frame, text="fixed_rb_alloc", variable=chkVarPuschFixedRbAlloc) chkPuschFixedRbAlloc.grid(row=0, column=4, sticky="w", padx=(10,10), pady=(5,5))
lblForceFullBsrMCS = ttk.Label(nested_frame, text="MCS") lblForceFullBsrMCS.grid(row=0, column=5, sticky="w", padx=(10,10), pady=(5,5))
txtForceFullBsrMCS = ttk.Spinbox(nested_frame, from_=0, to=100, width = 5) txtForceFullBsrMCS.set(5) # Set the default value txtForceFullBsrMCS.grid(row=0, column=6, sticky="ew", padx=(10,0), pady=(5,5))
lblForceFullBsrRbStart = ttk.Label(nested_frame, text="Start RB") lblForceFullBsrRbStart.grid(row=0, column=7, sticky="w", padx=(10,10), pady=(5,5))
txtForceFullBsrRbStart = ttk.Spinbox(nested_frame, from_=0, to=273, width = 5) txtForceFullBsrRbStart.set(0) # Set the default value txtForceFullBsrRbStart.grid(row=0, column=8, sticky="ew", padx=(10,0), pady=(5,5))
lblForceFullBsrRbN = ttk.Label(nested_frame , text="N RB") lblForceFullBsrRbN.grid(row=0, column=9, sticky="w", padx=(10,10), pady=(5,5))
txtForceFullBsrRbN = ttk.Spinbox(nested_frame, from_=1, to=273, width = 5) txtForceFullBsrRbN.set(51) # Set the default value txtForceFullBsrRbN.grid(row=0, column=10, sticky="ew", padx=(10,0), pady=(5,5)) |
Section E (Row 5) - Inactivity Timer Setting
This is the code for the Section E. It is relatively simple GUI components and relatively simple remote API command. Again, the only thing I want to note is the 'Set' button and process_btnInactivityTimer() function. What this function does is to generate remote API command as follows :
- The value set for inactivity_timer comes from the user input to txtInactivityTimerCells
{"message":"config_set","cells": {"1":{"inactivity_timer":300000 } } }
|
def create_row5_tab2(root):
global txtInactivityTimer, txtInactivityTimerCells #nested_frame = tk.Frame(root) nested_frame = tk.Frame(root, bd=2, relief="groove") nested_frame.grid(row=4, column=0, columnspan=14,sticky="we", padx=(10,10), pady=(5,5))
lblInactivityTimerCells = ttk.Label(nested_frame, text="cells", width=10) lblInactivityTimerCells.grid(row=0, column=0, sticky="w", padx=(10,10), pady=(5,5))
txtInactivityTimerCells = ttk.Spinbox(nested_frame, from_=0, to=100, width = 5) txtInactivityTimerCells.set(1) # Set the default value txtInactivityTimerCells.grid(row=0, column=1, sticky="ew", padx=(10,0), pady=(5,5))
lblInactivityTimer = ttk.Label(nested_frame, text="Inactivity Timer", width=15) lblInactivityTimer.grid(row=0, column=2, sticky="e", padx=(30,0), pady=(5,5))
txtInactivityTimer = ttk.Spinbox(nested_frame, from_= 0, to = 600000, width = 10, increment=1000) txtInactivityTimer.set(300000) # Set the default value txtInactivityTimer.grid(row=0, column=3, sticky="ew", padx=(0,0), pady=(5,5))
btnInactivityTimer = ttk.Button(nested_frame, text="Set",command=process_btnInactivityTimer) btnInactivityTimer.grid(row=0, column=4, sticky="ew", padx=(0,10), pady=(5,5)) |
Section F (Row 6) - Update and Clear Log button
This is the code for the Section E. GUI component in this section is very simple. Only two buttons. The important part of this sections is process_LogUpdate() which is executed by clicking on [Update Log] button. This function may be one of the most complicated part in this program. Overview of what this function does is :
i) send 'log_get' rempote API command and get the return value (i.e, log in json format)
ii) save the returned json file into a text file
iii) parse the saved log and save it into panda dataFrame
iv) from the panda dataFrame, extract the data with layer = RRC or NAS
v) display the extracted data in the table
- Python library for json parsing have difficulties in handling very large sized json file. I have tried two libraries : json and ijson. I think json package is being used widely but this library seems to have more difficulties handling large json file. ijson seems to work better with handling large json file, but there may still be some issues.
- There might be issues with log_get remote API when the size of the return value (i.e, size of the log) gets very large
|
def create_row6_tab2(root):
# Configure the root's grid to expand horizontally root.grid_columnconfigure(0, weight=1)
nested_frame = tk.Frame(root) nested_frame.grid(row=5, column=0, columnspan=14, sticky="ew") # make the frame expand to fill its grid cell in the horizontal direction
# Configure the nested_frame's grid to expand horizontally nested_frame.grid_columnconfigure(0, weight=1)
btnUpdateLog = ttk.Button(nested_frame, text="Update Log", command=lambda: process_LogUpdate()) btnUpdateLog.grid(row=0, column=6) # the button is placed in the center of the frame btnClearLog = ttk.Button(nested_frame, text="Clear Log", command=lambda: process_LogClear()) btnClearLog.grid(row=0, column=7) # the button is placed in the center of the frame
# Add padding around the button to center it in the frame for i in range(1, 14): nested_frame.grid_columnconfigure(i, weight=1) |
UEsim
Now let's look into the code for the UEsim tab. This is to control UEsim via Remote API and ssh. This is equivalent to Callbox(I) + Callbox(II). Since I don't do much of operations on UEsim, I tried to put every operations on a single tab.
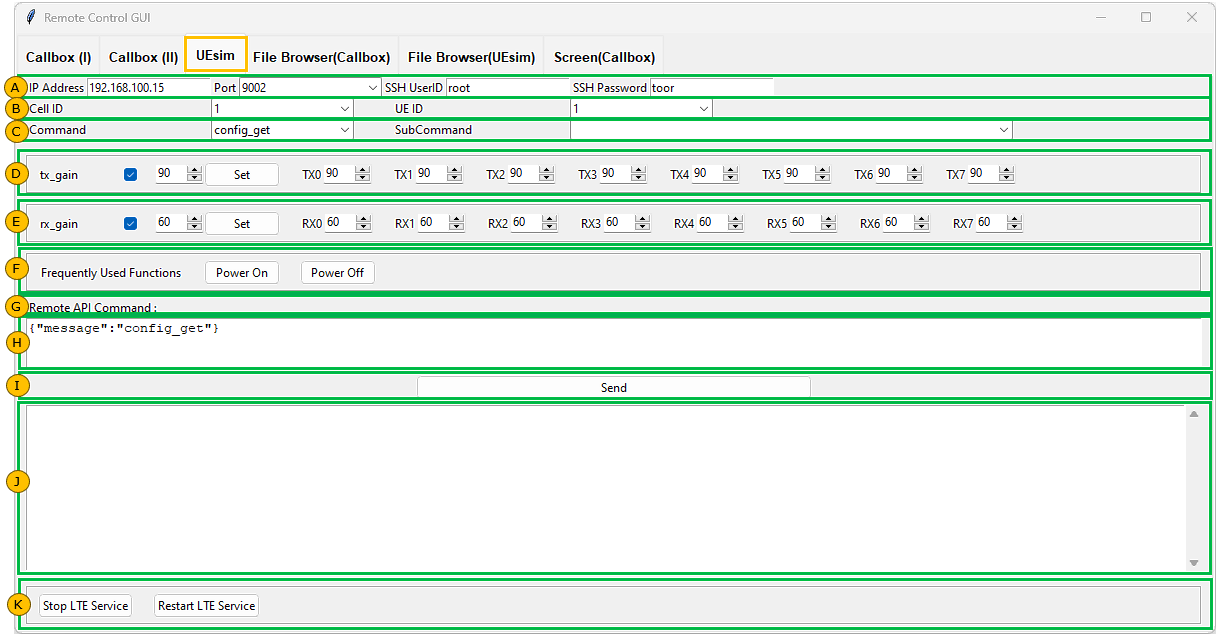
GUI Component Layout
This is to create all the graphical components within the UEsim tab. Overall idea is to create a frame(boundary is not shown though) filling out the whole tab area and put all the remaining components within the frame. I would not cover the code for every sections labeled above. I would just go over the part that are associated with user interactions.
|
# Create a new frame for the third tab frmTabUEsim = ttk.Frame(notebook) frmTabUEsim.grid_columnconfigure(0, weight=0) frmTabUEsim.grid_rowconfigure(0, weight=0) notebook.add(frmTabUEsim, text="UEsim")
#create_row1_tabUEsim(frmTabUEsim,"10.0.0.35") # create txtIP, cboPort create_row1_tabUEsim(frmTabUEsim,"192.168.100.15") # create txtIP, cboPort create_row2_tabUEsim(frmTabUEsim) # create cboCellID, cboUEID create_row3_tabUEsim(frmTabUEsim) # create txtCommand
chkVarTxGainAll_uesim = tk.IntVar(value=1) chkVarTxGain_uesim = [] # create list to store IntVars create_row4_tabUEsim(frmTabUEsim) # Create RxGain Settings
chkVarRxGainAll_uesim = tk.IntVar(value=1) chkVarRxGain_uesim = [] # create list to store IntVars create_row5_tabUEsim(frmTabUEsim) # Create RxGain Settings
create_row6_tabUEsim(frmTabUEsim) # create btnPowerOn_uesim, btnPowerOff_uesim, create_row7_tabUEsim(frmTabUEsim) create_row8_tabUEsim(frmTabUEsim) # create txtCommand_uesim create_row9_tabUEsim(frmTabUEsim) # create btnSend_uesim create_row10_tabUEsim(frmTabUEsim) # create txtReturn_uesim create_row11_tabUEsim(frmTabUEsim) # create btnServiceStop_uesim, btnServiceRestart_uesim
frmTabUEsim.grid_columnconfigure(5, weight=1) # weight=0 --> not resizable, weight=1 --> resizable frmTabUEsim.grid_rowconfigure(10, weight=1) # weight=0 --> not resizable, weight=1 --> resizable |
Section D (Row 4) - Set button, Tx Gain Value setting field
This is the code for the Section D. For most part, you would not need any specific comments because those are just putting a specific GUI components at a specific position. The only thing that I want to comment is about process_btnTxGain_uesim() without showing the code details. You just check out the code details of this function in the source code you can download in this tutorial.
What process_btnTxGain_uesim() does is :
- check if chkTxGainAll_uesim checkbox is checked.
- If it is checked, send remoteAPI command to apply the value of txtTxGain for all Tx channel.
- If it is not checked, send remoteAPI command to apply the value of spinTxGain for each of TX channel separately.
- To do this, we need to know how many TX channel is configured now. In order to figure it out, run getTxport_uesim() function.
- What getTxport_uesim() function does is to send '{"message":"rf","tx_gain": {tx_gain_value} }}' and get the return, and then analyze the return to figure out the number of tx channels.
Followings are examples of RemoteAPI command generated by 'Set' button
{"message":"rf","tx_gain": 90 } when checkbox is checked
{"message":"rf","tx_gain":[ 89]} when checkbox is unchecked
|
def create_row4_tabUEsim(root):
global txtTxGain_uesim nested_frame = tk.Frame(root, bd=2, relief="groove") nested_frame.grid(row=4, column=0, columnspan=18,sticky="we", padx=(10,10), pady=(15,5))
# i) lblTxGain = ttk.Label(nested_frame , text="tx_gain", width=10) lblTxGain.grid(row=0, column=0, sticky="w", padx=(10,10), pady=(5,5)) chkTxGainAll_uesim = ttk.Checkbutton(nested_frame, text="", variable=chkVarTxGainAll_uesim) chkTxGainAll_uesim.grid(row=0, column=1, sticky="ew", padx=(10,0), pady=(5,5))
# ii) txtTxGain_uesim = ttk.Spinbox(nested_frame , from_=0, to=100, width=5) txtTxGain_uesim.set(90) # Set the default value txtTxGain_uesim.grid(row=0, column=2, sticky="ew", padx=(10,0), pady=(5,5))
# iii) btnTxGain_uesim = ttk.Button(nested_frame, text="Set", command=process_btnTxGain_uesim) btnTxGain_uesim.grid(row=0, column=3, sticky="ew", padx=(0,10), pady=(5,5))
for i in range(8): spinVarTxGain_uesim.append(tk.IntVar(value=90)) lblTxGain = ttk.Label(nested_frame , text="TX{}".format(i)) lblTxGain.grid(row=0, column=4+2*i, sticky="w", padx=(10,0), pady=(5,5)) spinTxGain_uesim = ttk.Spinbox(nested_frame, from_=0, to=90, textvariable=spinVarTxGain_uesim[i], width=5, name='txtTxGainNo_uesim{}'.format(i)) spinTxGain_uesim.grid(row=0, column=4+2*i+1, sticky="w", padx=(0,10), pady=(5,5)) |
Section E (Row 5) - Set button, Rx Gain Value setting field
This is the code for the Section E. For most part, you would not need any specific comments because those are just putting a specific GUI components at a specific position. The only thing that I want to comment is about process_btnRxGain_uesim() without showing the code details. You just check out the code details of this function in the source code you can download in this tutorial.
What process_btnRxGain_uesim() does is :
- check if chkRxGainAll_uesim checkbox is checked.
- If it is checked, send remoteAPI command to apply the value of txtRxGain_uesim for all Tx channel.
- If it is not checked, send remoteAPI command to apply the value of spinRxGain for each of RX channel separately.
- To do this, we need to know how many RX channel is configured now. In order to figure it out, run getRxport_uesim() function.
- What getRxport_uesim() function does is to send '{"message":"rf","rx_gain": {rx_gain_value} }}' and get the return, and then analyze the return to figure out the number of rx channels.
Followings are examples of RemoteAPI command generated by 'Set' button
{"message":"rf","rx_gain": 60 } when checkbox is checked
{"message":"rf","rx_gain":[ 53, 50]} when checkbox is unchecked
|
def create_row5_tabUEsim(root):
global txtRxGain_uesim nested_frame = tk.Frame(root, bd=2, relief="groove") nested_frame.grid(row=5, column=0, columnspan=18,sticky="we", padx=(10,10), pady=(5,5))
# i) lblRxGain = ttk.Label(nested_frame , text="rx_gain", width=10) lblRxGain.grid(row=0, column=0, sticky="w", padx=(10,10), pady=(5,5)) chkRxGainAll_uesim = ttk.Checkbutton(nested_frame, text="", variable=chkVarRxGainAll_uesim) chkRxGainAll_uesim.grid(row=0, column=1, sticky="ew", padx=(10,0), pady=(5,5))
# ii) txtRxGain_uesim = ttk.Spinbox(nested_frame , from_=0, to=100, width=5) txtRxGain_uesim.set(60) # Set the default value txtRxGain_uesim.grid(row=0, column=2, sticky="ew", padx=(10,0), pady=(5,5))
# iii) btnRxGain_uesim = ttk.Button(nested_frame, text="Set", command=process_btnRxGain_uesim) btnRxGain_uesim.grid(row=0, column=3, sticky="ew", padx=(0,10), pady=(5,5))
for i in range(8): spinVarRxGain_uesim.append(tk.IntVar(value=60)) lblRxGain = ttk.Label(nested_frame , text="RX{}".format(i)) lblRxGain.grid(row=0, column=4+2*i, sticky="w", padx=(10,0), pady=(5,5)) spinRxGain_uesim = ttk.Spinbox(nested_frame, from_=0, to=90, textvariable=spinVarRxGain_uesim[i], width=5, name='txtRxGainNo_uesim{}'.format(i)) spinRxGain_uesim.grid(row=0, column=4+2*i+1, sticky="w", padx=(0,10), pady=(5,5)) |
Section F (Row 6) - Power On/Power Off button
This is the code for the Power On and Power Off button. Main points are process_btnPowerOn_uesim() and process_btnPowerOff_uesim() functions. process_btnPowerOn_uesim() is executed when btnPowerOn_uesim is clicked process_btnPowerOff_uesim() is executed when btnPowerOff_uesim button is clicked.
What process_btnPowerOn_uesim() button does is to send remote API message '{"message": "power_on", "ue_id": 1 }' and what process_btnPowerOff_uesim() button does is to send remote API message '{"message": "power_off", "ue_id": 1 }'
|
def create_row6_tabUEsim(root):
nested_frame = tk.Frame(root, bd=2, relief="groove") nested_frame.grid(row=6, column=0, columnspan=18,sticky="we", padx=(10,10), pady=(5,5))
title = tk.Label(nested_frame, text="Frequently Used Functions") title.grid(row=0, column=0, sticky='w', padx=(10,10), pady=(5,5))
btnPowerOn_uesim = ttk.Button(nested_frame, text="Power On", command=lambda: process_btnPowerOn_uesim()) btnPowerOn_uesim.grid(row=0, column=1, sticky='w', padx=(10,10), pady=(5,5))
btnPowerOff_uesim = ttk.Button(nested_frame, text="Power Off", command=lambda: process_btnPowerOff_uesim()) btnPowerOff_uesim.grid(row=0, column=2, sticky='w', padx=(10,10), pady=(5,5)) |
Section I (Row 9) - Send button
This is the code for the Section I. High level code is very simple as shown below. What it does is just to create a button labeled 'Send' (btnSend_uesim) and link it with the function send_command_uesim(). As you may guess, the important part is the implementation of send_command_uesim() function. Basically send_command_uesim() is super simple version of RemoteAPI program.
If you want to understand the details of send_command_uesim() function, check out this tutorial first. If you don't have any problem with understanding Remote API Python tutorial, you should have no problem with understanding send_command_uesim() function.
|
def create_row9_tabUEsim(root):
btnSend_uesim = ttk.Button(root, text="Send", command=lambda: send_command_uesim()) btnSend_uesim.grid(row=9, column=0, columnspan=6, sticky="ew", padx=(400, 400), pady=(5, 5)) |
Section K (Row 11) - Stop LTE Service/Restart LTE Service
This is the code for the Section K. What it does is just to create three buttons labeled 'Stop LTE service' (btnServiceStop_uesim) and 'Restart LTE service' (btnServiceRestart_uesim ) respectively, and link them with the corresponding function(callback) as commented below. Bascially the two buttons are to setup an ssh socket and send 'service lte stop' or 'service lte restart' command.
|
def create_row11_tabUEsim(root):
nested_frame = tk.Frame(root, bd=2, relief="groove") nested_frame.grid(row=11, column=0, columnspan=18,sticky="we", padx=(10,10), pady=(5,5))
#title = tk.Label(nested_frame, text="Frequently Used Functions") #title.grid(row=0, column=0, sticky='w', padx=(10,10), pady=(5,5))
btnServiceStop_uesim = ttk.Button(nested_frame, text="Stop LTE Service", command=lambda: lteServiceStop_uesim(txtIP_uesim)) btnServiceStop_uesim.grid(row=0, column=0, sticky='w', padx=(10,10), pady=(5,5))
btnServiceRestart_uesim = ttk.Button(nested_frame, text="Restart LTE Service", command=lambda: lteServiceRestart_uesim(txtIP_uesim)) btnServiceRestart_uesim.grid(row=0, column=1, sticky='w', padx=(10,10), pady=(5,5)) |
FileBrowser (Callbox)
Now let's look into the code for the FileBrowser(Callbox) tab. This is to make two file browsers : one for file browser on local PC and the other one for the file browser on remotePC (callbox) and let them upload/download files between them.
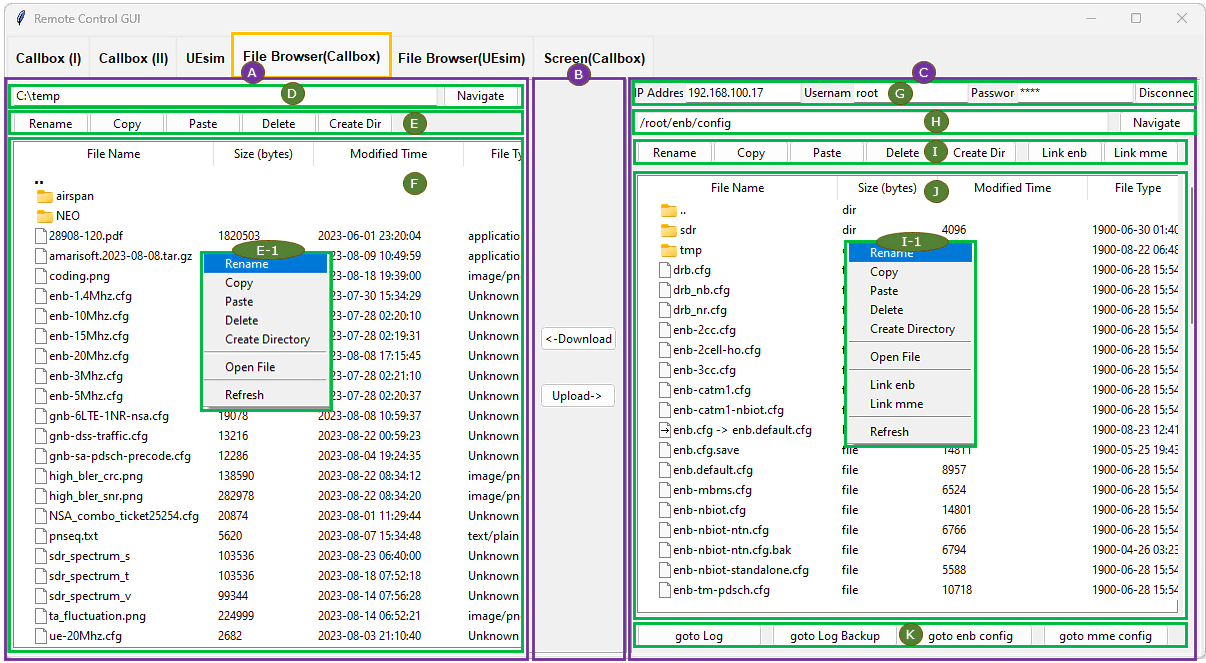
GUI Component Layout
This is to create all the graphical components within the FileBrowser(Callbox). This is to create the sub section (A),(B),(C) within this tab.
|
frmTabFiles = ttk.Frame(notebook) frmTabFiles.grid_columnconfigure(0, weight=0) frmTabFiles.grid_rowconfigure(0, weight=0) notebook.add(frmTabFiles, text="File Browser(Callbox)")
frameLeft, frameRight = create_frame_tabFiles(frmTabFiles) # create three vertical frames on frmTabFiles fb = FileBrowser(master=frameLeft, path='C:\\') # create Local File Brwoser on frameLeft fbSCP = FileBrowserSCP(master=frameRight , initType = 'Callbox', initpath='/root',initRemoteIP='192.168.100.17') |
Following is to creates three sub sections in this tab : left section, right section and middle section.
|
def create_frame_tabFiles(root): # Create PanedWindow for vertical frames panedwindow = tk.PanedWindow(root, orient='horizontal') panedwindow.pack(fill='both', expand=True)
# Create the frames frameLeft = ttk.Frame(panedwindow, relief='groove', borderwidth=1) frameMiddle = ttk.Frame(panedwindow, relief='groove', borderwidth=1) frameRight = ttk.Frame(panedwindow, relief='groove', borderwidth=1)
# Add the frames to the PanedWindow panedwindow.add(frameLeft, stretch='always') panedwindow.add(frameMiddle) panedwindow.add(frameRight, stretch='always')
# Set the width of frameMiddle to 100 pixels frameMiddle.config(width=100)
# Add buttons to frameMiddle btnDownload = ttk.Button(frameMiddle, text='<-Download', command=lambda: process_Download(fb, fbSCP)) btnUpload = ttk.Button(frameMiddle, text='Upload->',command=lambda:process_Upload(fb, fbSCP))
# Calculate the vertical center position for the buttons btnDownload.place(relx=0.5, rely=0.45, anchor='center') btnUpload.place(relx=0.5, rely=0.55, anchor='center')
return frameLeft, frameRight |
Following is for the GUI component layout for local PC file browser layout which is a method of FileBrowser Class. This function creates all the gui components within the section (A).
|
def create_widgets(self):
# Load the icons self.folder_icon = tk.PhotoImage(file="icon_dir.png") self.file_icon = tk.PhotoImage(file="icon_file.png")
# Create a Menu self.popup_menu = tk.Menu(self, tearoff=0)
# Add commands to the menu self.popup_menu.add_command(label="Rename", command=self.rename_file) self.popup_menu.add_command(label="Copy", command=self.copy_file) self.popup_menu.add_command(label="Paste", command=self.paste_file) self.popup_menu.add_command(label="Delete", command=self.delete_file) self.popup_menu.add_command(label="Create Directory", command=self.create_dir) self.popup_menu.add_separator() self.popup_menu.add_command(label="Open File", command=self.open_with_simple_notepad) self.popup_menu.add_separator() self.popup_menu.add_command(label="Refresh", command=self.update_file_list)
self.navigation_frame = tk.Frame(self) # Frame to hold the Entry and Button self.navigation_frame.pack(fill='x') self.directory = tk.StringVar(value=self.path)
self.entry = ttk.Entry(self.navigation_frame, textvariable=self.directory) self.button = ttk.Button(self.navigation_frame, text="Navigate", command=self.update_file_list)
self.entry.pack(side='left', fill='x', padx=[5,0], pady=[5,5], expand=True) self.button.pack(side='right',padx=[5,5])
# Bind the Enter key to the update_file_list function self.entry.bind('<Return>', lambda event: self.update_file_list())
# Creating button frame self.button_frame = tk.Frame(self) self.button_frame.pack(fill='x')
self.rename_button = ttk.Button(self.button_frame, text="Rename", command=self.rename_file) self.copy_button = ttk.Button(self.button_frame, text="Copy", command=self.copy_file) self.paste_button = ttk.Button(self.button_frame, text="Paste", command=self.paste_file) self.delete_button = ttk.Button(self.button_frame, text="Delete", command=self.delete_file) self.create_dir_button = ttk.Button(self.button_frame, text="Create Dir", command=self.create_dir)
self.rename_button.pack(side='left', padx=[5,0], pady=[0,5]) self.copy_button.pack(side='left', pady=[0,5]) self.paste_button.pack(side='left', pady=[0,5]) self.delete_button.pack(side='left', pady=[0,5]) self.create_dir_button.pack(side='left', padx=[0,5], pady=[0,5])
self.file_frame = tk.Frame(self) # Frame to hold the Treeview and Scrollbar self.file_frame.pack(fill='both', expand=True)
self.file_list = ttk.Treeview(self.file_frame, columns=('fullpath', 'type', 'size'), show='tree headings') # Note the change here self.file_list.column("#1", width=100) self.file_list.column("#2", width=150) self.file_list.column("#3", width=100) self.file_list.heading("#0", text="File Name") self.file_list.heading("#1", text="Size (bytes)") self.file_list.heading("#2", text="Modified Time") self.file_list.heading("#3", text="File Type") self.file_list.bind('<Double-1>', self.navigate) # Bind the function navigate to double click event self.file_list.tag_configure('parent_directory', font=('TkDefaultFont', 14, 'bold')) self.file_list.bind("<Button-3>", self.show_popup_menu) # Button-3 is right-click
# Add binding for 'Ctrl + C' to copy_file self.file_list.bind('<Control-c>', self.copy_file)
# Add binding for 'Ctrl + V' to paste_file self.file_list.bind('<Control-v>', self.paste_file)
# Add binding for 'File Selection' to paste_file self.file_list.bind('<<TreeviewSelect>>', self.select_file)
self.scrollbar = ttk.Scrollbar(self.file_frame, orient="vertical", command=self.file_list.yview) self.file_list.configure(yscrollcommand=self.scrollbar.set)
self.file_list.pack(side='left', fill='both', expand=True, padx=[5,0], pady=[0,5]) # Use side option to pack Treeview and Scrollbar horizontally self.scrollbar.pack(side='right', fill='y') |
Following is for the GUI component layout for local PC file browser layout which is a method of FileBrowserSCP Class. This function creates all the gui components within the section (C).
|
def create_widgets(self):
# Load the icons self.folder_icon = tk.PhotoImage(file="icon_dir.png") self.file_icon = tk.PhotoImage(file="icon_file.png")
# Create a Menu self.popup_menu = tk.Menu(self, tearoff=0)
# Add commands to the menu self.popup_menu.add_command(label="Rename", command=self.rename_file) self.popup_menu.add_command(label="Copy", command=self.copy_file) self.popup_menu.add_command(label="Paste", command=self.paste_file) self.popup_menu.add_command(label="Delete", command=self.delete_file) self.popup_menu.add_command(label="Create Directory", command=self.create_dir) self.popup_menu.add_separator() self.popup_menu.add_command(label="Open File", command=self.open_with_simple_notepad) self.popup_menu.add_separator() self.popup_menu.add_command(label="Refresh", command=self.update_file_list)
self.navigation_frame = tk.Frame(self) # Frame to hold the Entry and Button self.navigation_frame.pack(fill='x') self.directory = tk.StringVar(value=self.path)
self.entry = ttk.Entry(self.navigation_frame, textvariable=self.directory) self.button = ttk.Button(self.navigation_frame, text="Navigate", command=self.update_file_list)
self.entry.pack(side='left', fill='x', padx=[5,0], pady=[5,5], expand=True) self.button.pack(side='right',padx=[5,5])
# Bind the Enter key to the update_file_list function self.entry.bind('<Return>', lambda event: self.update_file_list())
# Creating button frame self.button_frame = tk.Frame(self) self.button_frame.pack(fill='x')
self.rename_button = ttk.Button(self.button_frame, text="Rename", command=self.rename_file) self.copy_button = ttk.Button(self.button_frame, text="Copy", command=self.copy_file) self.paste_button = ttk.Button(self.button_frame, text="Paste", command=self.paste_file) self.delete_button = ttk.Button(self.button_frame, text="Delete", command=self.delete_file) self.create_dir_button = ttk.Button(self.button_frame, text="Create Dir", command=self.create_dir)
self.rename_button.pack(side='left', padx=[5,0], pady=[0,5]) self.copy_button.pack(side='left', pady=[0,5]) self.paste_button.pack(side='left', pady=[0,5]) self.delete_button.pack(side='left', pady=[0,5]) self.create_dir_button.pack(side='left', padx=[0,5], pady=[0,5])
self.file_frame = tk.Frame(self) # Frame to hold the Treeview and Scrollbar self.file_frame.pack(fill='both', expand=True)
self.file_list = ttk.Treeview(self.file_frame, columns=('fullpath', 'type', 'size'), show='tree headings') # Note the change here self.file_list.column("#1", width=100) self.file_list.column("#2", width=150) self.file_list.column("#3", width=100) self.file_list.heading("#0", text="File Name") self.file_list.heading("#1", text="Size (bytes)") self.file_list.heading("#2", text="Modified Time") self.file_list.heading("#3", text="File Type") self.file_list.bind('<Double-1>', self.navigate) # Bind the function navigate to double click event self.file_list.tag_configure('parent_directory', font=('TkDefaultFont', 14, 'bold')) self.file_list.bind("<Button-3>", self.show_popup_menu) # Button-3 is right-click
# Add binding for 'Ctrl + C' to copy_file self.file_list.bind('<Control-c>', self.copy_file)
# Add binding for 'Ctrl + V' to paste_file self.file_list.bind('<Control-v>', self.paste_file)
# Add binding for 'File Selection' to paste_file self.file_list.bind('<<TreeviewSelect>>', self.select_file)
self.scrollbar = ttk.Scrollbar(self.file_frame, orient="vertical", command=self.file_list.yview) self.file_list.configure(yscrollcommand=self.scrollbar.set)
self.file_list.pack(side='left', fill='both', expand=True, padx=[5,0], pady=[0,5]) # Use side option to pack Treeview and Scrollbar horizontally self.scrollbar.pack(side='right', fill='y') |
Section B - Download/Upload button
Most of this code is for creating and placing GUI components which are straightforward. The code to pay attention tos are following two functions.
- process_Download(fb, fbSCP) : copy a file from the remotePC to local PC. p_fbSCP.sftp_client.get(remote_file_path, local_file_path) within the function performs the copy process.
- process_Upload(fb, fbSCP) : copy a file from the localPC to remote PC. p_fbSCP.sftp_client.put(local_file_path, remote_file_path) within the function performs the copy process.
|
def create_frame_tabFiles(root): # Create PanedWindow for vertical frames panedwindow = tk.PanedWindow(root, orient='horizontal') panedwindow.pack(fill='both', expand=True)
# Create the frames frameLeft = ttk.Frame(panedwindow, relief='groove', borderwidth=1) frameMiddle = ttk.Frame(panedwindow, relief='groove', borderwidth=1) frameRight = ttk.Frame(panedwindow, relief='groove', borderwidth=1)
# Add the frames to the PanedWindow panedwindow.add(frameLeft, stretch='always') panedwindow.add(frameMiddle) panedwindow.add(frameRight, stretch='always')
# Set the width of frameMiddle to 100 pixels frameMiddle.config(width=100)
# Add buttons to frameMiddle btnDownload = ttk.Button(frameMiddle, text='<-Download', command=lambda: process_Download(fb, fbSCP)) btnUpload = ttk.Button(frameMiddle, text='Upload->',command=lambda:process_Upload(fb, fbSCP))
# Calculate the vertical center position for the buttons btnDownload.place(relx=0.5, rely=0.45, anchor='center') btnUpload.place(relx=0.5, rely=0.55, anchor='center')
return frameLeft, frameRight |
Section D - Navigate button on Local PC
What this code does is to move the path specified in path textbox and list all the directories and files within the path. This procedure is done by the method update_file_list().
|
# In FileBrowser() Class def create_widgets(self): .... self.navigation_frame = tk.Frame(self) # Frame to hold the Entry and Button self.navigation_frame.pack(fill='x') self.directory = tk.StringVar(value=self.path)
self.entry = ttk.Entry(self.navigation_frame, textvariable=self.directory) self.button = ttk.Button(self.navigation_frame, text="Navigate", command=self.update_file_list) .... |
Section E - Menu Buttons (Copy, Paste, Delete, Rename, Create Dir) on Local PC
What this code does is to perform the basic operations in file browser, which are Copy, Paste, Delete, Rename, Create Dir. These operations are done by following methods. If you want to check out the detailed implementation, look into the definition of these functions.
- rename_file()
- copy_file()
- paste_file()
- delete_file()
- create_dir()
|
# In FileBrowser() Class def create_widgets(self): .... # Creating button frame self.button_frame = tk.Frame(self) self.button_frame.pack(fill='x')
self.rename_button = ttk.Button(self.button_frame, text="Rename", command=self.rename_file) self.copy_button = ttk.Button(self.button_frame, text="Copy", command=self.copy_file) self.paste_button = ttk.Button(self.button_frame, text="Paste", command=self.paste_file) self.delete_button = ttk.Button(self.button_frame, text="Delete", command=self.delete_file) self.create_dir_button = ttk.Button(self.button_frame, text="Create Dir", command=self.create_dir) .... |
Section E-1 - Popup Menu (Copy, Paste, Delete, Rename, Create Directory, Open File) on Local PC
This is a mirror functionality of the buttons explained in previous section except 'Open File' and 'Refresh' menu item. If you want to check out the detailed implementation, look into the definition of these functions.
- rename_file()
- copy_file()
- paste_file()
- delete_file()
- create_dir()
- open_with_simple_notepad()
- update_file_list()
|
# In FileBrowser() Class def create_widgets(self): .... # Create a Menu self.popup_menu = tk.Menu(self, tearoff=0)
# Add commands to the menu self.popup_menu.add_command(label="Rename", command=self.rename_file) self.popup_menu.add_command(label="Copy", command=self.copy_file) self.popup_menu.add_command(label="Paste", command=self.paste_file) self.popup_menu.add_command(label="Delete", command=self.delete_file) self.popup_menu.add_command(label="Create Directory", command=self.create_dir) self.popup_menu.add_separator() self.popup_menu.add_command(label="Open File", command=self.open_with_simple_notepad) self.popup_menu.add_separator() self.popup_menu.add_command(label="Refresh", command=self.update_file_list) .... |
Section F - File Browser Table on Local PC
This is the code to populate the table with file / directory list within the path specified in 'Navigate' input box. It also responds to mouse double click to move to parent or child directory and respond to mouse right click to show the popup menu. Followings are the two import lines to look into if you want to get the details.
- self.file_list.bind('<Double-1>', self.navigate) # Bind the function navigate to double click event
- self.file_list.bind("<Button-3>", self.show_popup_menu) # Button-3 is right-click
|
# In FileBrowser() Class def create_widgets(self): .... self.file_list = ttk.Treeview(self.file_frame, columns=('fullpath', 'type', 'size'), show='tree headings') # Note the change here self.file_list.column("#1", width=100) self.file_list.column("#2", width=150) self.file_list.column("#3", width=100) self.file_list.heading("#0", text="File Name") self.file_list.heading("#1", text="Size (bytes)") self.file_list.heading("#2", text="Modified Time") self.file_list.heading("#3", text="File Type") self.file_list.bind('<Double-1>', self.navigate) # Bind the function navigate to double click event self.file_list.tag_configure('parent_directory', font=('TkDefaultFont', 14, 'bold')) self.file_list.bind("<Button-3>", self.show_popup_menu) # Button-3 is right-click .... |
Section G - Connection to Remote PC
This is to establish ssh connection to Remote PC. Most of the code is to create and place GUI components which does not require any explanation. For the details of the implementation of the operation (i.e, establishing ssh connection), look into the following function.
- toggle_connection()
|
# In FileBrowserSCP() Class def create_widgets(self): .... # IP address widget self.ip_label = ttk.Label(self.connection_frame, text="IP Address:") self.ip_label.grid(row=0, column=0, sticky='w') self.ip_entry = ttk.Entry(self.connection_frame) self.ip_entry.grid(row=0, column=1, sticky='ew') self.ip_entry.insert(0, self.remote_ip)
# Username widget self.username_label = ttk.Label(self.connection_frame, text="Username:") self.username_label.grid(row=0, column=2, sticky='w') self.username_entry = ttk.Entry(self.connection_frame) self.username_entry.grid(row=0, column=3, sticky='ew') self.username_entry.insert(0, self.remote_username)
# Password widget self.password_label = ttk.Label(self.connection_frame, text="Password:") self.password_label.grid(row=0, column=4, sticky='w') self.password_entry = ttk.Entry(self.connection_frame, show="*") self.password_entry.grid(row=0, column=5, sticky='ew') self.password_entry.insert(0, self.remote_password)
self.connected = False
# Connect/Disconnect button self.connect_button = ttk.Button(self.connection_frame, text="Connect", command=self.toggle_connection) self.connect_button.grid(row=0, column=6, sticky='ew') .... |
Section H - Navigate button on Remote PC
What this does is to change directory to the specified path (specified in the inputbox) and populate the file list with the subdirectories and files within the directory. Following function is the one that performs this operation.
- navigate_to_directory()
|
# In FileBrowserSCP() Class def create_widgets(self): .... self.navigation_frame = tk.Frame(self) self.navigation_frame.grid(row=1, column=0, sticky='we') self.navigation_frame.grid_columnconfigure(0, weight=1)
self.directory = tk.StringVar(value=self.path) self.entry = ttk.Entry(self.navigation_frame, textvariable=self.directory) self.button = ttk.Button(self.navigation_frame, text="Navigate", command=self.navigate_to_directory) .... |
Section I - Menu Buttons (Copy, Paste, Delete, Rename, Create Dir, Link enb, Link mme) on Remote PC
What this code does is to perform the basic operations in file browser on remote PC, which are Copy, Paste, Delete, Rename, Create Dir. These operations are done by following methods. If you want to check out the detailed implementation, look into the definition of these functions.
- rename_file()
- copy_file()
- paste_file()
- delete_file()
- create_dir()
|
# In FileBrowserSCP() Class def create_widgets(self): .... # Creating button frame self.button_frame = tk.Frame(self) #self.button_frame.pack(fill='x') self.button_frame.grid(row=2, column=0, sticky='nsew')
self.rename_button = ttk.Button(self.button_frame, text="Rename", command=self.rename_file) self.copy_button = ttk.Button(self.button_frame, text="Copy", command=self.copy_file) self.paste_button = ttk.Button(self.button_frame, text="Paste", command=self.paste_file) self.delete_button = ttk.Button(self.button_frame, text="Delete", command=self.delete_file) self.create_dir_button = ttk.Button(self.button_frame, text="Create Dir", command=self.create_dir) if self.Type == 'CALLBOX' : self.linkenb_button = ttk.Button(self.button_frame, text="Link enb", command=self.link_enb) self.linkmme_button = ttk.Button(self.button_frame, text="Link mme", command=self.link_mme) if self.Type == 'UESIM' : self.linkue_button = ttk.Button(self.button_frame, text="Link ue", command=self.link_ue)
self.rename_button.pack(side='left', padx=[5,0], pady=[0,5]) self.copy_button.pack(side='left', pady=[0,5]) self.paste_button.pack(side='left', pady=[0,5]) self.delete_button.pack(side='left', pady=[0,5]) self.create_dir_button.pack(side='left', pady=[0,5]) if self.Type == 'CALLBOX' : self.linkenb_button.pack(side='left', padx=[10,0], pady=[0,5]) self.linkmme_button.pack(side='left', pady=[0,5]) if self.Type == 'UESIM' : self.linkue_button.pack(side='left', padx=[10,0], pady=[0,5]) .... |
Section I-1 - Popup Menu (Copy, Paste, Delete, Rename, Create Directory, Link enb, Link mme) on Remote PC
This is a mirror functionality of the buttons explained in previous section except 'Open File' and 'Refresh' menu item. If you want to check out the detailed implementation, look into the definition of these functions.
- rename_file()
- copy_file()
- paste_file()
- delete_file()
- create_dir()
- open_with_simple_notepad()
- update_file_list()
|
# In FileBrowserSCP() Class def create_widgets(self): .... # Create a Menu self.popup_menu = tk.Menu(self, tearoff=0) self.popup_menu.add_command(label="Rename", command=self.rename_file) self.popup_menu.add_command(label="Copy", command=self.copy_file) self.popup_menu.add_command(label="Paste", command=self.paste_file) self.popup_menu.add_command(label="Delete", command=self.delete_file) self.popup_menu.add_command(label="Create Directory", command=self.create_dir) self.popup_menu.add_separator() if self.Type == 'CALLBOX' : self.popup_menu.add_command(label="Link enb", command=self.link_enb) self.popup_menu.add_command(label="Link mme", command=self.link_mme) if self.Type == 'UESIM' : self.popup_menu.add_command(label="Link ue", command=self.link_ue) self.popup_menu.add_separator() self.popup_menu.add_command(label="Refresh", command=self.update_file_list) .... |
Section J - File Browser Table on Remote PC
This is the code to populate the table with file / directory list within the path specified in 'Navigate' input box. It also responds to mouse double click to move to parent or child directory and respond to mouse right click to show the popup menu. Followings are the two import lines to look into if you want to get the details.
- self.file_list.bind('<Double-1>', self.navigate) # Bind the function navigate to double click event
- self.file_list.bind("<Button-3>", self.show_popup_menu) # Button-3 is right-click
|
# In FileBrowserSCP() Class def create_widgets(self): .... # Creating Fileview frame self.file_frame = tk.Frame(self) self.file_frame.grid(row=3, column=0, sticky='nsew') self.file_frame.rowconfigure(0, weight=1) self.file_frame.columnconfigure(0, weight=1) self.rowconfigure(3, weight=1) self.columnconfigure(0, weight=1)
self.file_list = ttk.Treeview(self.file_frame, columns=('fullpath', 'type', 'size'), show='tree headings') self.file_list.column("#1", width=100) self.file_list.column("#2", width=150) self.file_list.column("#3", width=100) self.file_list.heading("#0", text="File Name") self.file_list.heading("#1", text="Size (bytes)") self.file_list.heading("#2", text="Modified Time") self.file_list.heading("#3", text="File Type") self.file_list.bind('<Double-1>', self.navigate) self.file_list.tag_configure('parent_directory', font=('TkDefaultFont', 14, 'bold')) self.file_list.bind("<Button-3>", self.show_popup_menu)
self.file_list.bind('<Control-c>', self.copy_file) self.file_list.bind('<Control-v>', self.paste_file)
self.file_list.bind('<<TreeviewSelect>>', self.select_file)
self.file_list.grid(row=0, column=0, padx=5, pady=5, sticky='nsew') self.file_frame.columnconfigure(0, weight=1) self.file_frame.rowconfigure(0, weight=1)
self.scrollbar = ttk.Scrollbar(self.file_frame, orient="vertical", command=self.file_list.yview) self.scrollbar.grid(row=0, column=1, sticky='ns') .... |
Section K - Menu Buttons (goto Log, goto Log backup, goto enb config, go to mme config) on Remote PC
This code is to change directories to a couple of predefined directories which are the most frequently used for callbox operation. Following functions are what you need to look into for further details.
- goto_log() : change directory to /tmp directory
- goto_log_backup() : change directory to /var/log
- goto_enb_config() : change directory to /root/enb/config
- goto_mme_config : change directory to /root/mme/config
|
# In FileBrowserSCP() Class def create_widgets(self): .... # create the button frame at the bottom self.button_frame = tk.Frame(self) self.button_frame.grid(row=4, column=0, sticky='we')
self.goto_log_button = ttk.Button(self.button_frame, text="goto Log", command=self.goto_log, width=15) self.goto_log_backup_button = ttk.Button(self.button_frame, text="goto Log Backup", command=self.goto_log_backup, width=15) if self.Type == 'CALLBOX' : self.goto_enb_config_button = ttk.Button(self.button_frame, text="goto enb config", command=self.goto_enb_config, width=15) self.goto_mme_config_button = ttk.Button(self.button_frame, text="goto mme config", command=self.goto_mme_config, width=15) if self.Type == 'UESIM' : self.goto_ue_config_button = ttk.Button(self.button_frame, text="goto ue config", command=self.goto_ue_config, width=15)
self.goto_log_button.grid(row=0, column=0, padx=5, pady=5, sticky='ew') self.goto_log_backup_button.grid(row=0, column=1, padx=5, pady=5, sticky='ew') if self.Type == 'CALLBOX' : self.goto_enb_config_button.grid(row=0, column=2, padx=5, pady=5, sticky='ew') self.goto_mme_config_button.grid(row=0, column=3, padx=5, pady=5, sticky='ew') if self.Type == 'UESIM' : self.goto_ue_config_button.grid(row=0, column=2, padx=5, pady=5, sticky='ew') .... |
FileBrowser (UEsim)
Now let's look into the code for the FileBrowser(UEsim) tab. This is to make two file browsers : one for file browser on local PC and the other one for the file browser on remotePC (UEsim) and let them upload/download files between them.
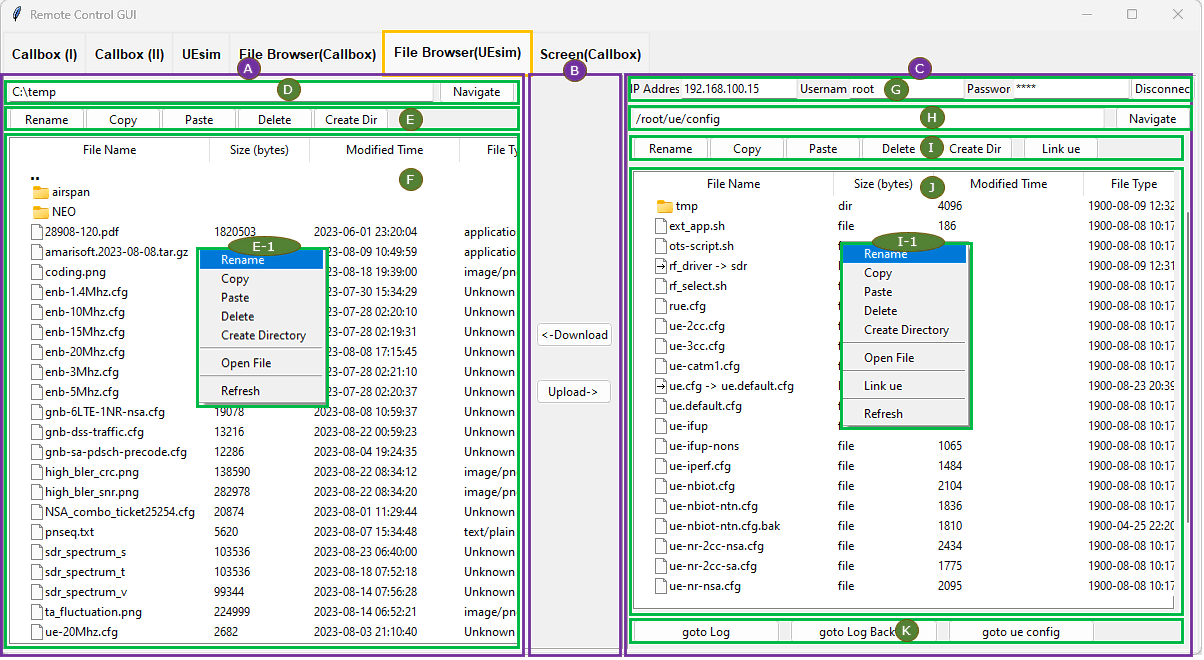
GUI Component Layout
This is to create all the graphical components within the FileBrowser(UEsim). This is to create the sub section (A),(B),(C) within this tab.
|
# Create a new frame for the File Browser (UEsim) frmTabFiles_UEsim = ttk.Frame(notebook) frmTabFiles_UEsim .grid_columnconfigure(0, weight=0) frmTabFiles_UEsim .grid_rowconfigure(0, weight=0) notebook.add(frmTabFiles_UEsim , text="File Browser(UEsim)")
frameLeft_UEsim , frameRight_UEsim = create_frame_tabFiles_UEsim(frmTabFiles_UEsim) # create three vertical frames on frmTabFiles fb_UEsim = FileBrowser(master=frameLeft_UEsim , path='C:\\') # create Local File Brwoser on frameLeft fbSCP_UEsim = FileBrowserSCP(master=frameRight_UEsim , initType = 'UEsim', initpath='/root',initRemoteIP='192.168.100.15') |
All other Sections : (D)~(K)
The code for these sections are identical to the part used for FileBrowser (Callbox).
Screen (Callbox)
This is the code for the Screen(Callbox) tab.
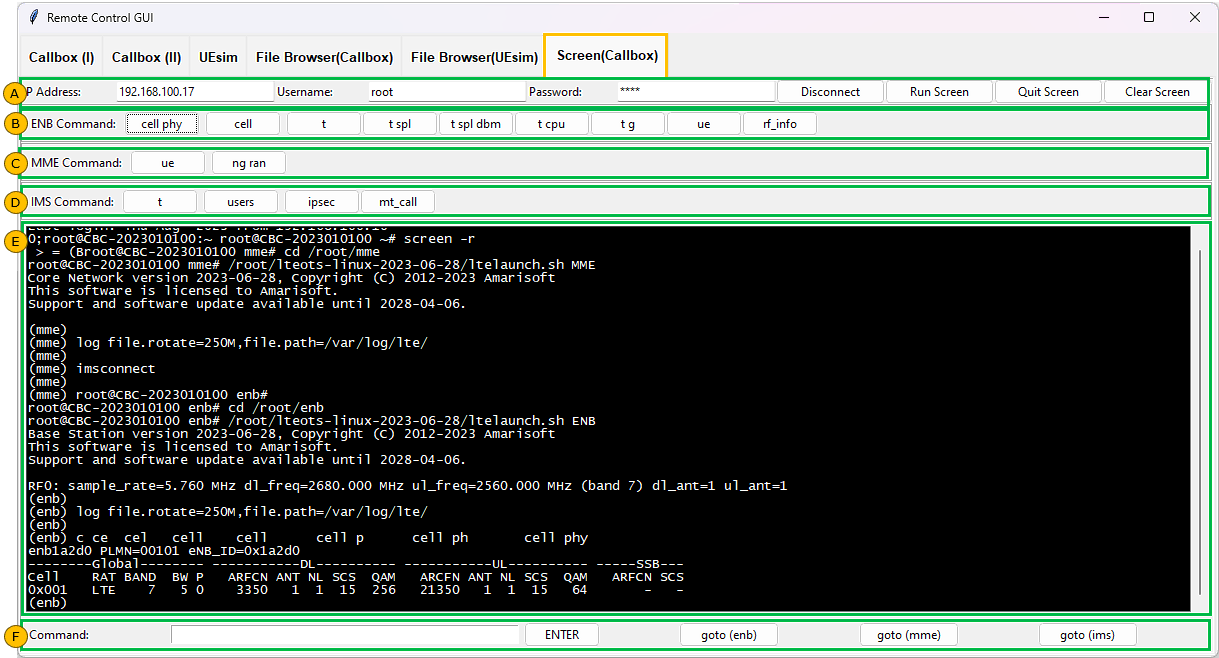
GUI Component Layout
This is to create all the graphical components within the Screen(Callbox).
|
# Create a new frame for the Screen (Callbox) frmTabScreen_Callbox = ttk.Frame(notebook) frmTabScreen_Callbox.grid_columnconfigure(0, weight=0) frmTabScreen_Callbox.grid_rowconfigure(0, weight=0) notebook.add(frmTabScreen_Callbox, text="Screen(Callbox)")
frameScreen_Callbox = create_frame_tabScreen_Callbox(frmTabScreen_Callbox) # create three vertical frames on frmTabFiles screen_CallBox = ScreenSSH(master=frameScreen_Callbox , initType = 'Callbox', initpath='/root',initRemoteIP='192.168.100.17') |
Following is for the GUI component layout for local PC file browser layout which is a method of FileBrowser Class. This function creates all the gui components within the section (A).
|
#In ScreenSSH() class def create_widgets(self):
self.grid(sticky='nsew') self.master.grid_rowconfigure(0, weight=1) self.master.grid_columnconfigure(0, weight=1)
# Initialize SFTP client as None self.ssh = None self.sftp_client = None
self.paths_to_copy = []
# Load the icons self.folder_icon = tk.PhotoImage(file="icon_dir.png") self.file_icon = tk.PhotoImage(file="icon_file.png") self.link_icon = tk.PhotoImage(file="icon_link.png")
# Create connection frame self.connection_frame = ttk.Frame(self) self.connection_frame.grid(row=0, column=0, sticky='ew')
# IP address widget self.ip_label = ttk.Label(self.connection_frame, text="IP Address:") self.ip_label.grid(row=0, column=0, sticky='w') self.ip_entry = ttk.Entry(self.connection_frame) self.ip_entry.grid(row=0, column=1, sticky='ew') self.ip_entry.insert(0, self.remote_ip)
# Username widget self.username_label = ttk.Label(self.connection_frame, text="Username:") self.username_label.grid(row=0, column=2, sticky='w') self.username_entry = ttk.Entry(self.connection_frame) self.username_entry.grid(row=0, column=3, sticky='ew') self.username_entry.insert(0, self.remote_username)
# Password widget self.password_label = ttk.Label(self.connection_frame, text="Password:") self.password_label.grid(row=0, column=4, sticky='w') self.password_entry = ttk.Entry(self.connection_frame, show="*") self.password_entry.grid(row=0, column=5, sticky='ew') self.password_entry.insert(0, self.remote_password)
self.connected = False
# Connect/Disconnect button self.connect_button = ttk.Button(self.connection_frame, text="Connect", command=self.toggle_connection) self.connect_button.grid(row=0, column=6, sticky='ew')
# Launch Screen self.RunScreen_button = ttk.Button(self.connection_frame, text="Run Screen", command=self.process_RunScreen) self.RunScreen_button.grid(row=0, column=7, sticky='ew')
# Quit Screen self.RunScreen_button = ttk.Button(self.connection_frame, text="Quit Screen", command=self.process_QuitScreen) self.RunScreen_button.grid(row=0, column=8, sticky='ew')
# Clear Screen self.ClearScreen_button = ttk.Button(self.connection_frame, text="Clear Screen", command=self.process_ClearScreen) self.ClearScreen_button.grid(row=0, column=9, sticky='ew')
for col in range(10): self.connection_frame.grid_columnconfigure(col, weight=1)
# Creating button frame for eNB screen command self.button_frame = tk.Frame(self, bd=2, relief="groove") self.button_frame.grid(row=2, column=0, sticky='nsew')
self.enb_label = tk.Label(self.button_frame, text="ENB Command:") self.enb_cell_phy_button = ttk.Button(self.button_frame, text="cell phy", command=self.process_Cmd_cell_phy) self.enb_cell_button = ttk.Button(self.button_frame, text="cell", command=self.process_Cmd_cell) self.enb_t_button = ttk.Button(self.button_frame, text="t", command=self.process_Cmd_t) self.enb_t_spl_button = ttk.Button(self.button_frame, text="t spl", command=self.process_Cmd_t_spl) self.enb_t_spl_dbm_button = ttk.Button(self.button_frame, text="t spl dbm", command=self.process_Cmd_t_spl_dbm) self.enb_t_cpu_button = ttk.Button(self.button_frame, text="t cpu", command=self.process_Cmd_t_cpu) self.enb_t_g_button = ttk.Button(self.button_frame, text="t g", command=self.process_Cmd_t_g) self.enb_ue_button = ttk.Button(self.button_frame, text="ue", command=self.process_Cmd_enb_ue) self.enb_rf_info_button = ttk.Button(self.button_frame, text="rf_info", command=self.process_Cmd_rf_info)
self.enb_label.pack(side='left', padx=[5,0], pady=[5,5]) self.enb_cell_phy_button.pack(side='left', padx=[5,0], pady=[5,5]) self.enb_cell_button.pack(side='left', padx=[5,0], pady=[5,5]) self.enb_t_button.pack(side='left', padx=[5,0], pady=[5,5]) self.enb_t_spl_button.pack(side='left', pady=[5,5]) self.enb_t_spl_dbm_button.pack(side='left', pady=[5,5]) self.enb_t_cpu_button.pack(side='left', pady=[5,5]) self.enb_t_g_button.pack(side='left', pady=[5,5]) self.enb_ue_button.pack(side='left', pady=[5,5]) self.enb_rf_info_button.pack(side='left', pady=[5,5])
# Creating button frame for mme screen command self.button_frame = tk.Frame(self, bd=2, relief="groove") self.button_frame.grid(row=3, column=0, sticky='nsew')
self.mme_label = tk.Label(self.button_frame, text="MME Command:") self.mme_ue_button = ttk.Button(self.button_frame, text="ue", command=self.process_mme_ue) self.mme_ng_ran_button = ttk.Button(self.button_frame, text="ng ran", command=self.process_mme_ng_ran)
self.mme_label.pack(side='left', padx=[5,0], pady=[5,5]) self.mme_ue_button.pack(side='left', padx=[5,0], pady=[5,5]) self.mme_ng_ran_button.pack(side='left', padx=[5,0], pady=[5,5])
# Creating button frame for ims screen command self.button_frame = tk.Frame(self, bd=2, relief="groove") self.button_frame.grid(row=4, column=0, sticky='nsew')
self.ims_label = tk.Label(self.button_frame, text="IMS Command:") self.ims_t_button = ttk.Button(self.button_frame, text="t", command=self.process_ims_t) self.ims_users_button = ttk.Button(self.button_frame, text="users", command=self.process_ims_users) self.ims_ipsec_button = ttk.Button(self.button_frame, text="ipsec", command=self.process_ims_ipsec) self.ims_mt_call_button = ttk.Button(self.button_frame, text="mt_call", command=self.process_ims_mt_call)
self.ims_label.pack(side='left', padx=[5,0], pady=[5,5]) self.ims_t_button.pack(side='left', padx=[5,0], pady=[5,5]) self.ims_users_button.pack(side='left', padx=[5,0], pady=[5,5]) self.ims_ipsec_button.pack(side='left', padx=[5,0], pady=[5,5]) self.ims_mt_call_button.pack(side='left', pady=[5,5])
# Creating terminal frame self.terminal_frame = tk.Frame(self) self.terminal_frame.grid(row=5, column=0, sticky='nsew') self.terminal_frame.rowconfigure(0, weight=1) self.terminal_frame.columnconfigure(0, weight=1) self.rowconfigure(3, weight=1) self.columnconfigure(0, weight=1)
self.terminal = scrolledtext.ScrolledText(self.terminal_frame, font=("Lucida Console", 10), bg="black", fg="white") self.terminal.grid(row=0, column=0, padx=5, pady=5, sticky='nsew') self.terminal.columnconfigure(0, weight=1) self.terminal.rowconfigure(0, weight=1)
# create the button frame at the bottom self.button_frame = tk.Frame(self) self.button_frame.grid(row=6, column=0, sticky='we')
self.screen_label = tk.Label(self.button_frame, text="Command:") self.screen_label.grid(row=0, column=0, padx=[5,0], pady=[5,5],sticky='w')
self.entry = tk.Entry(self.button_frame) self.entry.grid(row=0, column=1, columnspan=3,padx=[5,0], pady=[5,5], sticky='we') # sticky='we' makes the Entry expand horizontally self.entry.bind('<Return>', self.on_enter_key) self.entry.bind('<Control-a>', self.send_ctrl_a)
self.run_button = ttk.Button(self.button_frame, text="ENTER", command=self.process_Run) self.run_button.grid(row=0, column=4, padx=[5,0], pady=[5,5],sticky='w')
self.goto_enb_button = ttk.Button(self.button_frame, text="goto (enb)", command=self.process_goto_enb, width=15) self.goto_mme_button = ttk.Button(self.button_frame, text="goto (mme)", command=self.process_goto_mme, width=15) self.goto_ims_button = ttk.Button(self.button_frame, text="goto (ims)", command=self.process_goto_ims, width=15)
self.goto_enb_button.grid(row=0, column=5, padx=[5,0], pady=[5,5],sticky='w') self.goto_mme_button.grid(row=0, column=6, padx=[5,0], pady=[5,5],sticky='w') self.goto_ims_button.grid(row=0, column=7, padx=[5,0], pady=[5,5],sticky='w') |
Section A - SSH Connection and Screen Run/Stop
This is to establish ssh connection to Remote PC and Start/Stop screen command. Most of the code is to create and place GUI components which does not require any explanation. For the details of the implementation of the operation (i.e, establishing ssh connection), look into the following functions.
- toggle_connection() : establish ssh connection to remote PC when it is not connected and disconnect the ssh connection when the connection is already established
- process_RunScreen() : run the linux command 'screen -r'
- process_QuitScreen() : run the screen command 'Ctrl+A+D'
- process_ClearScreen() : clear the terminal text box
|
# In FileBrowserSCP() Class def create_widgets(self): .... # Create connection frame self.connection_frame = ttk.Frame(self) self.connection_frame.grid(row=0, column=0, sticky='ew')
# IP address widget self.ip_label = ttk.Label(self.connection_frame, text="IP Address:") self.ip_label.grid(row=0, column=0, sticky='w') self.ip_entry = ttk.Entry(self.connection_frame) self.ip_entry.grid(row=0, column=1, sticky='ew') self.ip_entry.insert(0, self.remote_ip)
# Username widget self.username_label = ttk.Label(self.connection_frame, text="Username:") self.username_label.grid(row=0, column=2, sticky='w') self.username_entry = ttk.Entry(self.connection_frame) self.username_entry.grid(row=0, column=3, sticky='ew') self.username_entry.insert(0, self.remote_username)
# Password widget self.password_label = ttk.Label(self.connection_frame, text="Password:") self.password_label.grid(row=0, column=4, sticky='w') self.password_entry = ttk.Entry(self.connection_frame, show="*") self.password_entry.grid(row=0, column=5, sticky='ew') self.password_entry.insert(0, self.remote_password)
self.connected = False
# Connect/Disconnect button self.connect_button = ttk.Button(self.connection_frame, text="Connect", command=self.toggle_connection) self.connect_button.grid(row=0, column=6, sticky='ew')
# Launch Screen self.RunScreen_button = ttk.Button(self.connection_frame, text="Run Screen", command=self.process_RunScreen) self.RunScreen_button.grid(row=0, column=7, sticky='ew')
# Quit Screen self.RunScreen_button = ttk.Button(self.connection_frame, text="Quit Screen", command=self.process_QuitScreen) self.RunScreen_button.grid(row=0, column=8, sticky='ew')
# Clear Screen self.ClearScreen_button = ttk.Button(self.connection_frame, text="Clear Screen", command=self.process_ClearScreen) self.ClearScreen_button.grid(row=0, column=9, sticky='ew') .... |
Section B - Command Buttons for (enb) screen
This is to implement the functionalities of each (enb) screen command. Followings are the list of the functions and the screen command. Basic logic for each of these button is to type int to a command to 'Command' textbox and hit [ENTER] button.
- process_Cmd_cell_phy() : type in the 'cell phy' command and hit [ENTER]
- process_Cmd_cell() : type in the 'cell' command and hit [ENTER]
- process_Cmd_t() : type in the 't' command and hit [ENTER]
- process_Cmd_t_spl() : type in the 't spl' command and hit [ENTER]
- process_Cmd_t_cpu() : type in the 't cpu' command and hit [ENTER]
- process_Cmd_t_g() : type in the 't g' command and hit [ENTER]
- process_Cmd_enb_ue() : type in the 'ue' command and hit [ENTER]
- process_Cmd_rf_info() : type in the 'rf_info command and hit [ENTER]
|
# In FileBrowserSCP() Class def create_widgets(self): .... # Creating button frame for eNB screen command self.button_frame = tk.Frame(self, bd=2, relief="groove") self.button_frame.grid(row=2, column=0, sticky='nsew')
self.enb_label = tk.Label(self.button_frame, text="ENB Command:") self.enb_cell_phy_button = ttk.Button(self.button_frame, text="cell phy", command=self.process_Cmd_cell_phy) self.enb_cell_button = ttk.Button(self.button_frame, text="cell", command=self.process_Cmd_cell) self.enb_t_button = ttk.Button(self.button_frame, text="t", command=self.process_Cmd_t) self.enb_t_spl_button = ttk.Button(self.button_frame, text="t spl", command=self.process_Cmd_t_spl) self.enb_t_spl_dbm_button = ttk.Button(self.button_frame, text="t spl dbm", command=self.process_Cmd_t_spl_dbm) self.enb_t_cpu_button = ttk.Button(self.button_frame, text="t cpu", command=self.process_Cmd_t_cpu) self.enb_t_g_button = ttk.Button(self.button_frame, text="t g", command=self.process_Cmd_t_g) self.enb_ue_button = ttk.Button(self.button_frame, text="ue", command=self.process_Cmd_enb_ue) self.enb_rf_info_button = ttk.Button(self.button_frame, text="rf_info", command=self.process_Cmd_rf_info) .... |
Section C - Command Buttons for (mme) screen
This is to implement the functionalities of each (mme) screen command. Followings are the list of the functions and the screen command. Basic logic for each of these button is to type int to a command to 'Command' textbox and hit [ENTER] button.
- process_mme_ue() : type in the 'ue' command and hit [ENTER]
- process_mme_ng_ran() : type in the 'ng ran' command and hit [ENTER]
|
# In FileBrowserSCP() Class def create_widgets(self): .... # Creating button frame for mme screen command self.button_frame = tk.Frame(self, bd=2, relief="groove") self.button_frame.grid(row=3, column=0, sticky='nsew')
self.mme_label = tk.Label(self.button_frame, text="MME Command:") self.mme_ue_button = ttk.Button(self.button_frame, text="ue", command=self.process_mme_ue) self.mme_ng_ran_button = ttk.Button(self.button_frame, text="ng ran", command=self.process_mme_ng_ran) .... |
Section D - Command Buttons for (ims) screen
This is to implement the functionalities of each (ims) screen command. Followings are the list of the functions and the screen command. Basic logic for each of these button is to type int to a command to 'Command' textbox and hit [ENTER] button.
- process_ims_t() : type in the 't' command and hit [ENTER]
- process_ims_users() : type in the 'users' command and hit [ENTER]
- process_ims_ipsec() : type in the 'ipsec' command and hit [ENTER]
- process_ims_mt_call() : type in the 'mt_call' command and hit [ENTER]
|
# In FileBrowserSCP() Class def create_widgets(self): .... # Creating button frame for ims screen command self.button_frame = tk.Frame(self, bd=2, relief="groove") self.button_frame.grid(row=4, column=0, sticky='nsew')
self.ims_label = tk.Label(self.button_frame, text="IMS Command:") self.ims_t_button = ttk.Button(self.button_frame, text="t", command=self.process_ims_t) self.ims_users_button = ttk.Button(self.button_frame, text="users", command=self.process_ims_users) self.ims_ipsec_button = ttk.Button(self.button_frame, text="ipsec", command=self.process_ims_ipsec) self.ims_mt_call_button = ttk.Button(self.button_frame, text="mt_call", command=self.process_ims_mt_call) .... |
Section E - Screen Terminal
This is for the big textbox (black) to display the text from remote PC. This is just to display text from the remote PC and does not do any interactions with users. So the code here is just to create a GUI component for the text box.
|
# In FileBrowserSCP() Class def create_widgets(self): .... # Creating terminal frame self.terminal_frame = tk.Frame(self) self.terminal_frame.grid(row=5, column=0, sticky='nsew') self.terminal_frame.rowconfigure(0, weight=1) self.terminal_frame.columnconfigure(0, weight=1) self.rowconfigure(3, weight=1) self.columnconfigure(0, weight=1)
self.terminal = scrolledtext.ScrolledText(self.terminal_frame, font=("Lucida Console", 10), bg="black", fg="white") .... |
Section F - Run Command Text/Screen mode switching
This is for the buttons to swich the screen to (enb), (mme) or (ims). What this does is
- process_goto_enb() : send '1' key
- process_goto_mme() : send '0' key
- process_goto_ims() : send '3' key
i) press [ENTER] button to quite any existing command if it is running. This is done by on_enter_key()
ii) send Ctrl+A : This is done by send_ctrl_a()
iii) send a specific number key for each network component
|
# In FileBrowserSCP() Class def create_widgets(self): .... # create the button frame at the bottom self.button_frame = tk.Frame(self) self.button_frame.grid(row=6, column=0, sticky='we')
self.screen_label = tk.Label(self.button_frame, text="Command:") self.screen_label.grid(row=0, column=0, padx=[5,0], pady=[5,5],sticky='w')
self.entry = tk.Entry(self.button_frame) self.entry.grid(row=0, column=1, columnspan=3,padx=[5,0], pady=[5,5], sticky='we') # sticky='we' makes the Entry expand horizontally self.entry.bind('<Return>', self.on_enter_key) self.entry.bind('<Control-a>', self.send_ctrl_a)
self.run_button = ttk.Button(self.button_frame, text="ENTER", command=self.process_Run) self.run_button.grid(row=0, column=4, padx=[5,0], pady=[5,5],sticky='w')
self.goto_enb_button = ttk.Button(self.button_frame, text="goto (enb)", command=self.process_goto_enb, width=15) self.goto_mme_button = ttk.Button(self.button_frame, text="goto (mme)", command=self.process_goto_mme, width=15) self.goto_ims_button = ttk.Button(self.button_frame, text="goto (ims)", command=self.process_goto_ims, width=15) .... |