Remote API - Python
The purpose of this tutorial is to show to provide a simple python code example by which you can use Amarisoft Remote API. Motivations for this tutorial are as follows :
- Python is believed to be more wide spread and dominant language
- Since it would be more widely known and the code would be better understood for most of user and the user may be able to extend the code as they like.
- Python would be more widely used scripting environment than Nodejs based Javascripting.
Table of Contents
Introduction
The Amarisoft Remote API is a powerful and flexible interface designed to allow external systems and users to interact programmatically with Amarisoft software suites, such as LTE and 5G NR testbeds and network simulators. Built on modern web technologies, the Remote API exposes a set of commands and data streams via WebSocket and HTTP protocols, making it possible to monitor, control, and automate a wide range of radio access network (RAN) operations from remote clients. This API is crucial for network engineers, researchers, and developers who need to integrate Amarisoft's advanced radio technologies with custom test automation frameworks, real-time monitoring dashboards, or external orchestration systems. Leveraging the popularity and accessibility of the Python programming language, this tutorial offers a practical introduction to interfacing with the Amarisoft Remote API using Python, highlighting key architectural principles such as client-server communication, asynchronous event handling, and structured data exchange (typically in JSON format). By bridging Amarisoft's robust radio emulation capabilities with Python's extensive ecosystem of libraries and tools, users can rapidly develop custom test scripts, automate repetitive tasks, and extend the functionality of their wireless research and development environments. Understanding how to interact with the Remote API in Python not only empowers users to tailor Amarisoft solutions to their specific needs but also facilitates seamless integration within broader DevOps and CI/CD workflows in modern telecommunication ecosystems.
-
Context and Background
- Amarisoft Remote API offers programmatic access to Amarisoft LTE and 5G core and radio network components.
- Designed for flexible automation, remote monitoring, and seamless integration with third-party tools and test frameworks.
- Utilizes modern web protocols (WebSocket/HTTP) for real-time, bidirectional communication and data exchange.
- Enables advanced use cases in R&D, QA, network deployment, and educational environments.
-
Relevance and Importance of the Tutorial
- Python is a widely adopted, versatile language, well-suited for rapid prototyping, automation, and data analysis.
- Python-based API interaction lowers the entry barrier for users unfamiliar with Node.js or JavaScript, making Amarisoft Remote API more accessible.
- This tutorial provides a proof-of-concept approach to integrating Amarisoft solutions with Python, enabling users to extend, customize, and automate network operations.
-
Learning Outcomes
- Understand the architecture and principles behind the Amarisoft Remote API.
- Learn how to establish a connection to the Remote API using Python.
- Send basic commands and receive responses or event notifications through the API interface.
- Gain insight into post-processing received data within Python for further analysis or automation.
- Develop foundational skills to extend or customize interaction scripts based on specific project requirements.
-
Prerequisite Knowledge and Skills
- Basic proficiency in Python programming (including modules, functions, and data structures).
- Familiarity with network concepts and protocols, especially WebSocket and HTTP.
- General understanding of cellular network principles (LTE/5G) is beneficial, though not mandatory for following API basics.
- Access to an environment running Amarisoft software with Remote API enabled.
Summary of the Tutorial
This tutorial covers procedures for testing and post-processing with Python scripts, specifically focusing on interacting with a remote API over WebSocket and processing log data output for further analysis and visualization.
-
Test Setup:
- Any test setup can be used as long as it allows the User Equipment (UE) to attach to a callbox. There are no specific constraints on the hardware or environment.
-
Python and Shell Environment:
- The tutorial utilizes Python 3.8.10 and the websocket-client package version 1.5.1. Users should install this package if not already present.
- The scripts are tested on Windows 11 Home Edition, but should also work on other platforms with Python 3.x.
- Shell environments tested include Windows Powershell and Windows Command Line. String formatting may differ between platforms.
-
Remote API Script Testing Procedure:
- A simple Python script is provided to send JSON messages to a remote WebSocket server and receive responses.
-
The script:
- Uses command line arguments to specify the server address and JSON message payload.
- Establishes a WebSocket connection to the target server.
- Sends the specified JSON message.
- Enters a loop to receive responses from the server, parsing each incoming message as JSON and printing it in a formatted manner.
- Exits the loop if the received message's "message" attribute is not "ready".
- Closes the WebSocket connection at the end.
-
Testing steps:
- Run the Python script from the command line, providing the server address and JSON payload as arguments.
- On Windows, ensure proper string formatting for JSON arguments to avoid syntax errors; consult the linked section for platform-specific issues.
- The output of the script will be displayed in the terminal, showing the formatted response(s) from the server.
-
Post-Processing Log Output Procedure:
- The tutorial provides a Python script to post-process log files containing JSON objects, typically output from a log_get remote API call.
-
Pre-requisites:
- Execute the log_get remote API to generate output and save it to a text file (e.g., log.txt).
-
Post-processing steps:
-
Run the processing script on the saved log file using the command:
python process_log.py log.txt - The script reads the log file, detects file encoding, and extracts all JSON objects by tracking opening and closing braces.
- It parses each JSON object into Python dictionaries and extracts relevant fields to organize them into rows and columns.
- These rows are used to form a Pandas DataFrame, enabling easy manipulation and further processing.
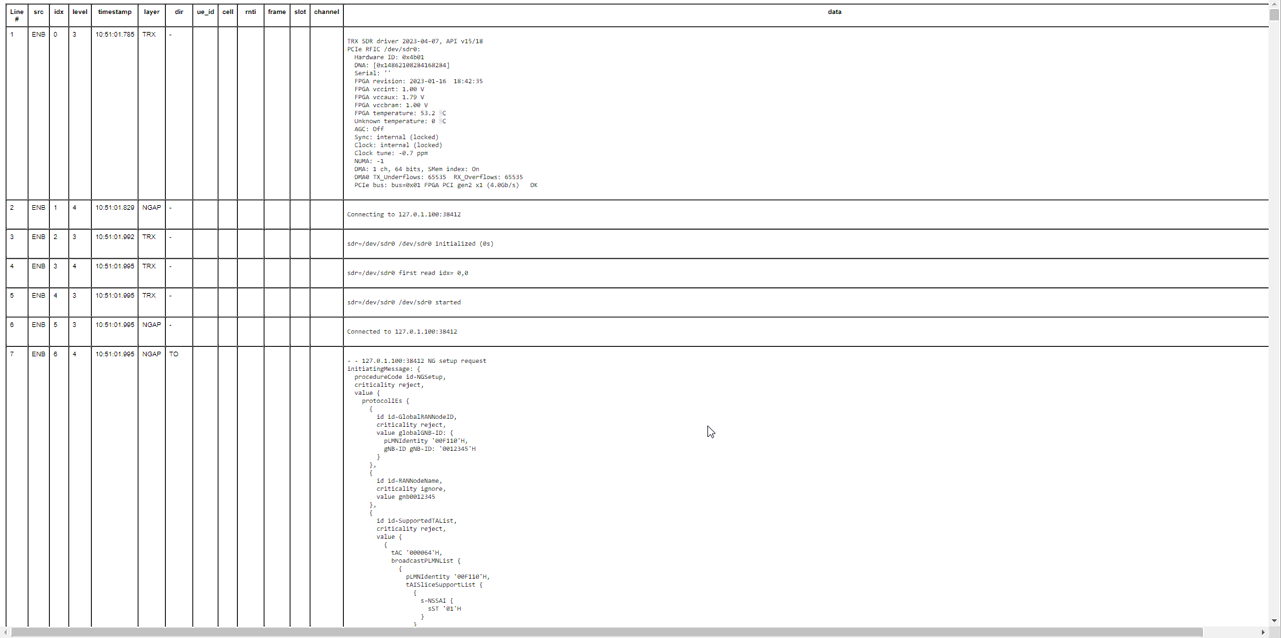
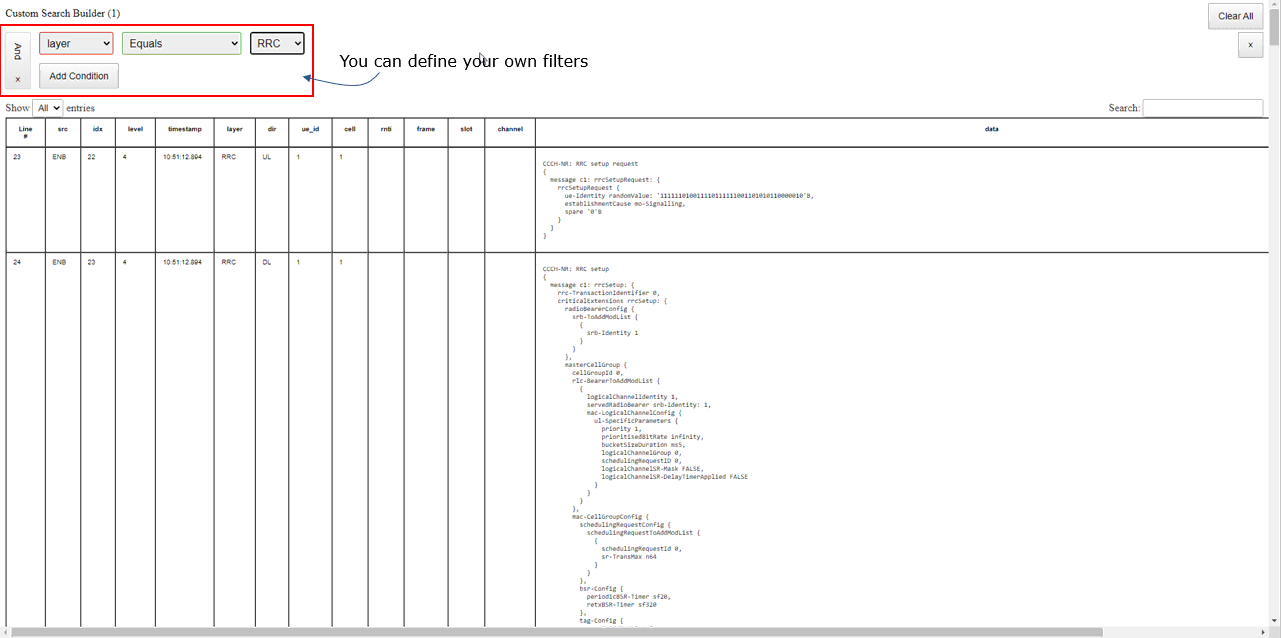
- The DataFrame is then exported to an HTML file, either as a basic table or as a searchable/sortable table using the DataTables JavaScript plugin (depending on the function called in the script).
-
Run the processing script on the saved log file using the command:
-
Required Python packages for post-processing:
- pandas, ijson, chardet (install via pip if necessary)
- Standard libraries used: json, sys, re, html, datetime
-
The script includes utility functions to:
- Extract JSON objects from arbitrary text.
- Convert log entries into structured DataFrames.
- Export DataFrames to HTML, with options for simple or interactive tables.
All procedures are provided with detailed code and step-by-step instructions, including explicit command-line usage and platform-specific notes, ensuring reproducibility for both the remote API interaction and log data post-processing workflows.
Test Setup
You can use any kind of test setup that allow you to get UE attached to callbox.
Python and Shell Information
Following is the version of the python and package that are used for this tutorial. (I tested this on Windows 11 Home Edition). I don't think there is any specific dependencies for Windows Powershell version and Windows Commad Line Windows version. For python, first try with whatever version you are using as long as it is ver 3.x and upgrade it to latest version if it does not work.
- Python version : 3.8.10
- websocket-client : 1.5.1 #
NOTE : You would need to install this package if you have not installed. - Windows Powershell version : Major.Minor.Build.Revision = 5.1.22621.963
- Windows Command Line Window version : Microsoft Windows [Version 10.0.22621.1413]
Python Script - Command Line
Here I share a super simple python code that can do the function of Remote API. The purpose is to provide you with the most fundamental skeletone of the code in the simplest form and I think this simple code would be more helpful for you to get the big picture of the implementation. Intentionally I didn't put any error trapping or other auxiliary routines for the simplicity. You may extend this code depending on your own necessity.
Script - Barebone
Following is the source script without any comments. I didn't put any comments on purpose for simplicity.
|
import sys import json import argparse from websocket import create_connection
def main(): parser = argparse.ArgumentParser(description="WebSocket remote API tool") parser.add_argument("server", help="Server address") parser.add_argument("message", help="JSON message") args = parser.parse_args()
ws = create_connection("ws://" + args.server) ws.send(args.message)
while True: result = ws.recv() if result: message = json.loads(result) print(json.dumps(message, indent=2, ensure_ascii=False)) if message.get("message") != "ready": break
ws.close()
if __name__ == "__main__": main() |
Script - Comments
For the readers who is not familiar with python script and packages that are used in the code. I put the comments for each lines.
|
import sys
import json
import argparse
from websocket import create_connection
def main():
parser = argparse.ArgumentParser(description="WebSocket remote API tool")
parser.add_argument("server", help="Server address")
parser.add_argument("message", help="JSON message")
args = parser.parse_args()
ws = create_connection("ws://" + args.server)
ws.send(args.message)
while True:
result = ws.recv()
if result: message = json.loads(result)
print(json.dumps(message, indent=2, ensure_ascii=False))
if message.get("message") != "ready": break
ws.close()
if __name__ == "__main__": main()
|
Script - Test
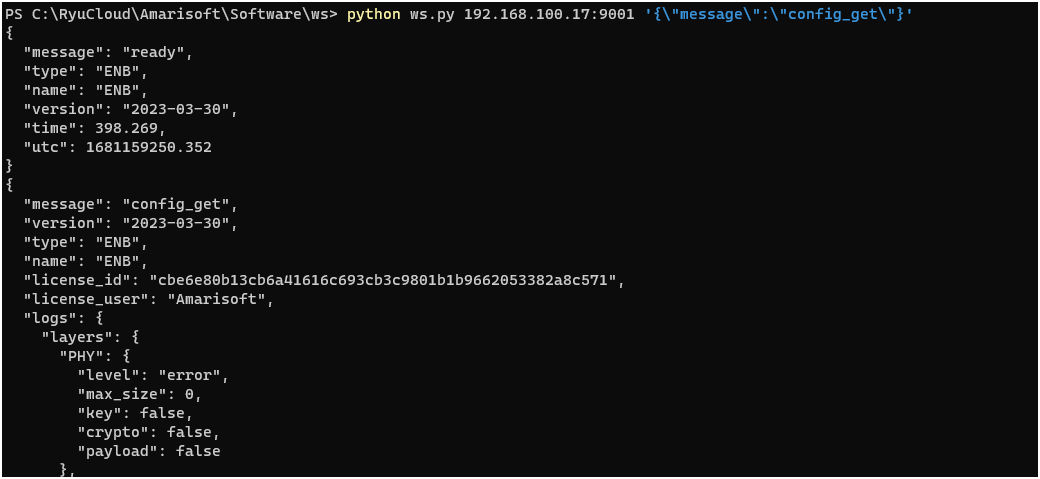
This is how I tested the script. I tested the scrip on a windows PC using Powershell. As you would notice, the string format is a little bit different from the native string format shown in the tutorial Remote API because of the way Windows Powersheel process the string. (

Following is the result for the command :

Post Processingy - Command Line
In this section, I will provide some examples of utility script to post process the log_get output. Before you use this script, you need to do following :
- execute log_get remote API and get the output
- save the output into a text file
Once you get the output file, you can post process the output file using this script as follows. It is assumed that the python script filename is process_log.py and the file containing the log is log.txt
$> python process_log.py log.txt.
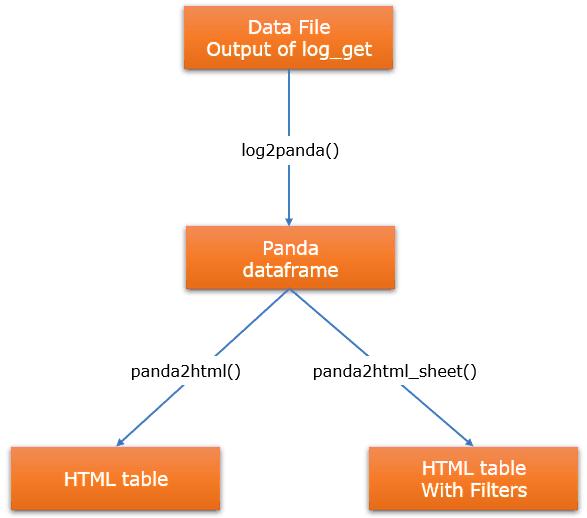
Overall Procedure (or Program Structure) is as follows :


Script - Barebone
This script reads log files containing JSON objects and converts them into a Pandas DataFrame. The script is designed to process log files that have JSON objects embedded within them. The script reads the log file and identifies JSON objects by counting the opening and closing braces, and then extracts the JSON objects from the text. These JSON objects are then parsed using the Python json library to create Python dictionaries. The dictionaries are further processed and their relevant information is extracted and organized into rows with specific columns that correspond to the log file attributes. These rows are then used to create a Pandas DataFrame, which is a two-dimensional, size-mutable, and potentially heterogeneous tabular data structure with labeled axes (rows and columns). The DataFrame allows for easy manipulation, analysis, and export of the log data in various formats, such as HTML tables in this case.
|
import json import pandas as pd import sys import re import ijson import chardet import html import datetime
def find_json_objects(text): json_objects = [] open_braces = 0 json_start = -1
for idx, char in enumerate(text): if char == '{': if open_braces == 0: json_start = idx open_braces += 1 elif char == '}': open_braces -= 1 if open_braces == 0: json_objects.append(text[json_start:idx+1])
return json_objects
def log2panda(log_filename: str): column_names = ['src', 'idx', 'level', 'timestamp', 'layer', 'dir', 'ue_id', 'cell', 'rnti', 'frame', 'slot', 'channel', 'data'] data = []
# Detect the file encoding with open(log_filename, 'rb') as log_file: encoding_result = chardet.detect(log_file.read()) file_encoding = encoding_result['encoding']
# Open the file with the detected encoding with open(log_filename, 'r', encoding=file_encoding) as log_file: content = log_file.read() json_objects = find_json_objects(content)
for json_object in json_objects: try: log_json = json.loads(json_object)
if "logs" in log_json: logs = log_json["logs"] else: logs = [log_json]
for log in logs: if log.get("message") != "ready": row = [] for column in column_names: cell_value = log.get(column) if column == 'data' and isinstance(cell_value, list): cell_value = '\n'.join(cell_value) if cell_value is not None: if column == 'data': cell_value = cell_value.replace('\\r\\n', '<br> ;') cell_value = cell_value.replace('\\t', ' ') cell_value = str(cell_value).replace('"', '') else: cell_value = ' ' row.append(cell_value) data.append(row) except json.JSONDecodeError: continue
df = pd.DataFrame(data, columns=column_names) return df
def panda2html(df, html_filename): with open(html_filename, 'w', encoding='utf-8') as f: f.write('<!DOCTYPE html>\n') f.write('<html>\n') f.write('<head>\n') f.write('<style>\n') f.write('table { font-family: Arial, sans-serif; font-size: 10px; }\n') f.write('</style>\n') f.write('</head>\n') f.write('<body>\n')
f.write('<table border="1" cellspacing="0" cellpadding="5">\n')
# Write the header row f.write('<thead>\n') f.write('<tr>') f.write('<th style="vertical-align: top;">Line #</th>') # Add 'Line #' column header for column in df.columns: if column == 'data': f.write(f'<th style="width:50%; vertical-align: top;">{column}</th>') else: f.write(f'<th style="vertical-align: top;">{column}</th>') f.write('</tr>\n') f.write('</thead>\n')
# Write the data rows f.write('<tbody>\n') for row_num, row in enumerate(df.iterrows(), start=1): f.write('<tr>') f.write(f'<td style="vertical-align: top;">{row_num}</td>') # Add row number for index, cell in enumerate(row[1]): if index == df.columns.get_loc('timestamp'): timestamp = datetime.datetime.fromtimestamp(int(cell) / 1000) formatted_timestamp = timestamp.strftime("%H:%M:%S.%f")[:-3] f.write(f'<td style="vertical-align: top;">{formatted_timestamp}</td>') elif index == df.columns.get_loc('data'): cell = cell.replace('\\r\\n', '\n') cell = cell.replace('\\t', ' ') f.write(f'<td style="vertical-align: top;"><pre>{html.escape(cell)}</pre></td>') else: f.write(f'<td style="vertical-align: top;">{html.escape(cell)}</td>') f.write('</tr>\n') f.write('</tbody>\n')
f.write('</table>')
f.write('</body>\n') f.write('</html>\n')
def panda2html_sheet(df, html_filename): with open(html_filename, 'w', encoding='utf-8') as f: f.write('<!DOCTYPE html>\n') f.write('<html>\n') f.write('<head>\n') #f.write('<link rel="stylesheet" type="text/css" href="https://cdn.datatables.net/1.11.5/css/jquery.dataTables.min.css">\n') #f.write('<link rel="stylesheet" type="text/css" href="https://cdn.datatables.net/searchbuilder/1.3.1/css/searchBuilder.dataTables.min.css">\n') #f.write('<script src="https://code.jquery.com/jquery-3.6.0.min.js"></script>\n') #f.write('<script type="text/javascript" src="https://cdn.datatables.net/1.11.5/js/jquery.dataTables.min.js"></script>\n') #f.write('<script type="text/javascript" src="https://cdn.datatables.net/searchbuilder/1.3.1/js/dataTables.searchBuilder.min.js"></script>\n') f.write('<link rel="stylesheet" type="text/css" href="css/jquery.dataTables.min.css">\n') f.write('<link rel="stylesheet" type="text/css" href="css/searchBuilder.dataTables.min.css">\n') f.write('<script src="js/jquery-3.6.0.min.js"></script>\n') f.write('<script type="text/javascript" src="js/jquery.dataTables.min.js"></script>\n') f.write('<script type="text/javascript" src="js/dataTables.searchBuilder.min.js"></script>\n') f.write('<style>\n') f.write('table { font-family: Arial, sans-serif; font-size: 10px; }\n') f.write('</style>\n') f.write('</head>\n') f.write('<body>\n')
f.write('<table id="data-table" border="1" cellspacing="0" cellpadding="5">\n')
f.write('<thead>\n') f.write('<tr>') f.write('<th style="vertical-align: top;">Line #</th>') # Add 'Line #' column header for column in df.columns: if column == 'data': f.write(f'<th style="width:50%; vertical-align: top;">{column}</th>') else: f.write(f'<th style="vertical-align: top;">{column}</th>') f.write('</tr>\n') f.write('</thead>\n')
f.write('<tbody>\n') for row_num, row in enumerate(df.iterrows(), start=1): f.write('<tr>') f.write(f'<td style="vertical-align: top;">{row_num}</td>') # Add row number for index, cell in enumerate(row[1]): if index == df.columns.get_loc('timestamp'): timestamp = datetime.datetime.fromtimestamp(int(cell) / 1000) formatted_timestamp = timestamp.strftime("%H:%M:%S.%f")[:-3] f.write(f'<td style="vertical-align: top;">{formatted_timestamp}</td>') elif index == df.columns.get_loc('data'): cell = cell.replace('\\r\\n', '\n') cell = cell.replace('\\t', ' ') f.write(f'<td style="vertical-align: top;"><pre>{html.escape(cell)}</pre></td>') else: f.write(f'<td style="vertical-align: top;">{html.escape(cell)}</td>') f.write('</tr>\n') f.write('</tbody>\n') f.write('</table>\n')
f.write('<script>\n') f.write('$(document).ready(function() {\n') f.write(' var table = $("#data-table").DataTable({\n') f.write(' searchBuilder: {\n') f.write(' columns: [2, 3, 4, 5, 6, 7, 8, 9, 10, 11, 12, 13, 14, 15, 16, 17, 18, 19] // Add more column indexes if you have more columns\n') f.write(' },\n') f.write(' pageLength: -1, // Set the default number of rows to display to "All"\n') f.write(' lengthMenu: [[10, 25, 50, -1], [10, 25, 50, "All"]], // Define the options for the "Show entries" dropdown\n') f.write(' dom: "Qlfrtip" // Add "Q" to the "dom" parameter to enable the searchBuilder extension\n') f.write(' });\n') f.write('});\n') f.write('</script>\n')
f.write('</body>\n') f.write('</html>\n')
def main(log_filename: str): df = log2panda(log_filename) #print(df.head(20)) #html_filename = 'output.html' #panda2html(df, html_filename) html_filename = 'output_sheet.html' panda2html_sheet(df, html_filename)
if __name__ == "__main__": log_filename = sys.argv[1] main(log_filename)
|
Script - Comment
|
import json import pandas as pd import sys import re import ijson import chardet import html import datetime
def find_json_objects(text): json_objects = [] open_braces = 0 json_start = -1
for idx, char in enumerate(text): if char == '{': if open_braces == 0: json_start = idx open_braces += 1 elif char == '}': open_braces -= 1 if open_braces == 0: json_objects.append(text[json_start:idx+1])
return json_objects
def log2panda(log_filename: str): column_names = ['src', 'idx', 'level', 'timestamp', 'layer', 'dir', 'ue_id', 'cell', 'rnti', 'frame', 'slot', 'channel', 'data'] data = []
# Detect the file encoding with open(log_filename, 'rb') as log_file: encoding_result = chardet.detect(log_file.read()) file_encoding = encoding_result['encoding']
# Open the file with the detected encoding with open(log_filename, 'r', encoding=file_encoding) as log_file: content = log_file.read() json_objects = find_json_objects(content)
for json_object in json_objects: try: log_json = json.loads(json_object)
if "logs" in log_json: logs = log_json["logs"] else: logs = [log_json]
for log in logs: if log.get("message") != "ready": row = [] for column in column_names: cell_value = log.get(column) if column == 'data' and isinstance(cell_value, list): cell_value = '\n'.join(cell_value) if cell_value is not None: if column == 'data': cell_value = cell_value.replace('\\r\\n', '<br> ;') cell_value = cell_value.replace('\\t', ' ') cell_value = str(cell_value).replace('"', '') else: cell_value = ' ' row.append(cell_value) data.append(row) except json.JSONDecodeError: continue
df = pd.DataFrame(data, columns=column_names) return df
def panda2html(df, html_filename): with open(html_filename, 'w', encoding='utf-8') as f: f.write('<!DOCTYPE html>\n') f.write('<html>\n') f.write('<head>\n') f.write('<style>\n') f.write('table { font-family: Arial, sans-serif; font-size: 10px; }\n') f.write('</style>\n') f.write('</head>\n') f.write('<body>\n')
f.write('<table border="1" cellspacing="0" cellpadding="5">\n')
# Write the header row f.write('<thead>\n') f.write('<tr>') f.write('<th style="vertical-align: top;">Line #</th>') # Add 'Line #' column header for column in df.columns: if column == 'data': f.write(f'<th style="width:50%; vertical-align: top;">{column}</th>') else: f.write(f'<th style="vertical-align: top;">{column}</th>') f.write('</tr>\n') f.write('</thead>\n')
# Write the data rows f.write('<tbody>\n') for row_num, row in enumerate(df.iterrows(), start=1): f.write('<tr>') f.write(f'<td style="vertical-align: top;">{row_num}</td>') # Add row number for index, cell in enumerate(row[1]): if index == df.columns.get_loc('timestamp'): timestamp = datetime.datetime.fromtimestamp(int(cell) / 1000) formatted_timestamp = timestamp.strftime("%H:%M:%S.%f")[:-3] f.write(f'<td style="vertical-align: top;">{formatted_timestamp}</td>') elif index == df.columns.get_loc('data'): cell = cell.replace('\\r\\n', '\n') cell = cell.replace('\\t', ' ') f.write(f'<td style="vertical-align: top;"><pre>{html.escape(cell)}</pre></td>') else: f.write(f'<td style="vertical-align: top;">{html.escape(cell)}</td>') f.write('</tr>\n') f.write('</tbody>\n')
f.write('</table>')
f.write('</body>\n') f.write('</html>\n')
def panda2html_sheet(df, html_filename): with open(html_filename, 'w', encoding='utf-8') as f: f.write('<!DOCTYPE html>\n') f.write('<html>\n') f.write('<head>\n') f.write('<link rel="stylesheet" type="text/css" href="https://cdn.datatables.net/1.11.5/css/jquery.dataTables.min.css">\n') f.write('<link rel="stylesheet" type="text/css" href="https://cdn.datatables.net/searchbuilder/1.3.1/css/searchBuilder.dataTables.min.css">\n') f.write('<script src="https://code.jquery.com/jquery-3.6.0.min.js"></script>\n') f.write('<script type="text/javascript" src="https://cdn.datatables.net/1.11.5/js/jquery.dataTables.min.js"></script>\n') f.write('<script type="text/javascript" src="https://cdn.datatables.net/searchbuilder/1.3.1/js/dataTables.searchBuilder.min.js"></script>\n') # f.write('<link rel="stylesheet" type="text/css" href="css/jquery.dataTables.min.css">\n') # f.write('<link rel="stylesheet" type="text/css" href="css/searchBuilder.dataTables.min.css">\n') # f.write('<script src="js/jquery-3.6.0.min.js"></script>\n') #f.write('<script type="text/javascript" src="js/jquery.dataTables.min.js"></script>\n') #f.write('<script type="text/javascript" src="js/dataTables.searchBuilder.min.js"></script>\n') f.write('<style>\n') f.write('table { font-family: Arial, sans-serif; font-size: 10px; }\n') f.write('</style>\n') f.write('</head>\n') f.write('<body>\n')
f.write('<table id="data-table" border="1" cellspacing="0" cellpadding="5">\n')
f.write('<thead>\n') f.write('<tr>') f.write('<th style="vertical-align: top;">Line #</th>') # Add 'Line #' column header for column in df.columns: if column == 'data': f.write(f'<th style="width:50%; vertical-align: top;">{column}</th>') else: f.write(f'<th style="vertical-align: top;">{column}</th>') f.write('</tr>\n') f.write('</thead>\n')
f.write('<tbody>\n') for row_num, row in enumerate(df.iterrows(), start=1): f.write('<tr>') f.write(f'<td style="vertical-align: top;">{row_num}</td>') # Add row number for index, cell in enumerate(row[1]): if index == df.columns.get_loc('timestamp'): timestamp = datetime.datetime.fromtimestamp(int(cell) / 1000) formatted_timestamp = timestamp.strftime("%H:%M:%S.%f")[:-3] f.write(f'<td style="vertical-align: top;">{formatted_timestamp}</td>') elif index == df.columns.get_loc('data'): cell = cell.replace('\\r\\n', '\n') cell = cell.replace('\\t', ' ') f.write(f'<td style="vertical-align: top;"><pre>{html.escape(cell)}</pre></td>') else: f.write(f'<td style="vertical-align: top;">{html.escape(cell)}</td>') f.write('</tr>\n') f.write('</tbody>\n') f.write('</table>\n')
f.write('<script>\n') f.write('$(document).ready(function() {\n') f.write(' var table = $("#data-table").DataTable({\n') f.write(' searchBuilder: {\n') f.write(' columns: [2, 3, 4, 5, 6, 7, 8, 9, 10, 11, 12, 13, 14, 15, 16, 17, 18, 19] // Add more column indexes if you have more columns\n') f.write(' },\n') f.write(' pageLength: -1, // Set the default number of rows to display to "All"\n') f.write(' lengthMenu: [[10, 25, 50, -1], [10, 25, 50, "All"]], // Define the options for the "Show entries" dropdown\n') f.write(' dom: "Qlfrtip" // Add "Q" to the "dom" parameter to enable the searchBuilder extension\n') f.write(' });\n') f.write('});\n') f.write('</script>\n')
f.write('</body>\n') f.write('</html>\n')
def main(log_filename: str): df = log2panda(log_filename) #print(df.head(20)) #html_filename = 'output.html' #panda2html(df, html_filename) html_filename = 'output_sheet.html' panda2html_sheet(df, html_filename)
if __name__ == "__main__": log_filename = sys.argv[1] main(log_filename)
|