NR SSB Precoding
This tutorial show you how to apply precoding to SSB. Actually, the precoding in this context is to multiply a specific number (a real or complex number) to a SSB burst from each antenna. We configure the multiplier in the form of matrix since there can be multiple SSB burst and multiple antenna, but strictly speaking the matrix is not applied to SSB burst as in MIMO precoding. In MIMO precoding, the precoding matrix is applied by matrix multiplication, but in SSB precoding the matrix is applied to SSB by element by element multiplication (more like scaler multiplication). Basically what we call SSB precoding matrix is just to adjust the power and phase of each SSB birst. It may not sound clear, but it would be clearer if you see real examples in this note.
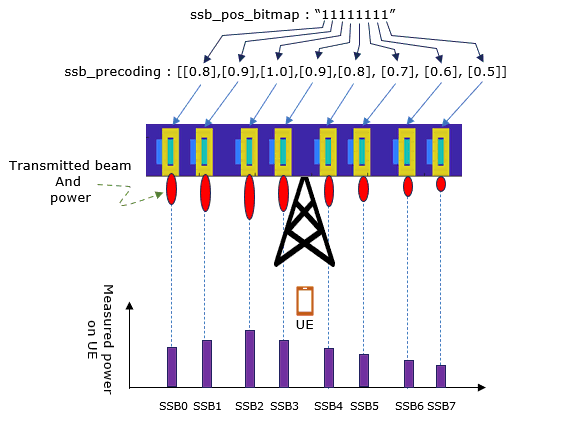
The only thing I want you to remember is that you can change the power and phase of each SSB burst using SSB precoding. You may use this method to test Initial Beam Selection of beam management. In case of live network, the gNB active antenna module changes the direction of each SSB beams with the same power to test P1 process, but it is difficult to create such a beam transmitting in different directions in test equipment. Instead of changing the direction of SSB beam, you may simulate SSB burst in different beams direction by setting different power to each SSB burst. This would works because UE does not directly measuring the beam angle/direction when it detects an SSB burst, it just measures the signal quality(e.g, RSRP) of all the SSB it detected and pick the one with the best signal quality. This can be a typical application of SSB precoding in Amarisoft gNB.
Table of Contents
- NR SSB Precoding
Introduction
Precoding in the context of Synchronization Signal Blocks (SSBs) is a foundational technique in modern wireless communication systems, particularly within 5G New Radio (NR) architectures. Unlike traditional Multiple Input Multiple Output (MIMO) precoding, where a matrix operation is executed across spatial streams, SSB precoding involves element-wise multiplication—typically by real or complex scalars—applied to each SSB burst from each transmitting antenna. This approach allows for fine-grained control over the power level and phase of individual SSB bursts, which is crucial for simulating and managing beamforming behavior, especially during initial access procedures such as beam sweeping and selection. In commercial networks, active antenna systems in a gNB (next-generation NodeB) dynamically steer SSB beams for optimal coverage and efficient initial user equipment (UE) attachment. However, in test and simulation environments—such as those using Amarisoft gNB—directional beamforming can be emulated by adjusting the power and phase of SSB bursts via the SSB precoding matrix. This enables the evaluation of UE-side beam management algorithms, particularly for testing how UEs select the best beam based on signal quality metrics like Reference Signal Received Power (RSRP). By understanding and applying SSB precoding effectively, engineers and researchers can replicate real-world beam management scenarios, analyze network performance, and accelerate the development and optimization of 5G NR deployments.
-
Context and Background
- SSB precoding is a specialized technique in 5G NR, distinct from conventional MIMO precoding, enabling manipulation of SSB burst characteristics on a per-antenna basis.
- It is instrumental in simulating beam management processes during initial access, where UEs detect and select optimal SSB beams for network attachment.
- The approach is especially valuable in environments where hardware constraints prevent the generation of physically distinct beam directions, as often encountered in test setups.
-
Relevance and Importance of This Tutorial
- The tutorial addresses the need for practical methods to emulate beam behavior and evaluate UE beam selection mechanisms in non-live network environments.
- Mastery of SSB precoding facilitates accurate simulation of power and phase variations across SSB bursts, supporting advanced testing and validation of beam management algorithms.
- These capabilities are critical for network engineers, researchers, and developers aiming to ensure robust initial access and mobility management in 5G NR systems.
-
Outcomes and Learning Objectives
- Gain a comprehensive understanding of SSB precoding concepts and their application within 5G NR architectures.
- Learn how to configure and apply SSB precoding matrices for test and simulation purposes, especially using platforms like Amarisoft gNB.
- Develop the capability to emulate beam directionality through scalar modifications to SSB bursts, enabling effective UE beam management testing.
- Acquire practical skills to analyze and interpret UE behavior during initial beam selection based on SSB signal quality measurements.
-
Prerequisite Knowledge and Skills
- Familiarity with basic 5G NR architecture, including the roles of gNB, SSB, and UE.
- Understanding of fundamental beamforming and precoding concepts.
- Experience with wireless communication testing tools or simulation environments (such as Amarisoft gNB) is recommended for hands-on exercises.
- Basic knowledge of signal quality metrics (e.g., RSRP) and their relevance in initial access procedures.
Summary of the Tutorial
This tutorial presents procedures for testing SSB (Synchronization Signal Block) precoding with different TX (transmit) antenna configurations using Amarisoft callbox and SDR-based spectrum analysis. The focus is on configuration, execution, and analysis of SSB precoding settings for both 1 TX and 2 TX antenna cases, without the use of a commercial UE.
-
Test Setup
- The test does not utilize a UE, as commercial UEs do not support the required non-3GPP bands and EARFCNs.
- The setup involves Amarisoft gNB configuration and a spectrum analyzer (sdr_spectrum) for SSB burst verification.
-
Key Configuration Parameters
- ssb_pos_bitmap: Indicates which SSB bursts are enabled.
- ssb_precoding: Specifies the power/phase settings for each enabled SSB burst.
-
Test 1: SSB Precoding for 1 TX Antenna
-
Configuration Steps:
- Start with the gnb-sa-1x1-ssb-precoding.cfg configuration, based on gnb-sa.cfg.
- Set the TDD flag and custom frequency in the TDD options.
- Set N_ANTENNA_DL to 1 for single TX operation.
- Assign ssb_pos_bitmap to enable the desired SSB bursts (e.g., "11111111" for all 8 bursts).
- Define ssb_precoding as an array of vectors (one per enabled SSB). In the 1 TX case, each vector has one element (e.g., [[1],[1],[1],[1],[1],[1],[1],[1]]).
- Ensure the number of vectors in ssb_precoding matches the number of '1's in ssb_pos_bitmap.
-
Test Execution:
- Use sdr_spectrum as the analysis tool. Identify the absolute frequency either from the enb command line printout or by running rf_info.
- Run sdr_spectrum
-
Analysis:
- Verification is conducted using spectrum analyzer output (waterfall/spectrogram).
-
The mapping between ssb_pos_bitmap and ssb_precoding is visually confirmed. For example:
- All-ones in both parameters yield 8 visible, equal-power SSB bursts.
- Adjusting elements in ssb_precoding to zero for certain bursts disables them in the spectrum output.
- Using fractional values in ssb_precoding produces bursts with different power levels, visible as alternating color patterns.
-
Configuration Steps:
-
Test 2: SSB Precoding for 2 TX Antennas
-
Configuration Steps:
- Use gnb-sa-2x2-ssb-precoding.cfg (based on gnb-sa.cfg).
- Set the TDD flag and custom frequency; set N_ANTENNA_DL to 2.
- Set ssb_pos_bitmap to enable the SSB bursts (e.g., "11111111").
- Configure ssb_precoding as an array of vectors (one per enabled SSB), each vector with two elements (e.g., [[1,1],[1,1],[1,1],[1,1],[1,1],[1,1],[1,1],[1,1]]). Each element corresponds to one TX antenna.
-
Test Execution:
- Use sdr_spectrum for analysis; determine the absolute frequency as before.
-
Analysis:
- Waterfall plots display two tracks, one per antenna.
- Variations in ssb_precoding across antennas are reflected as differences in the spectrograms for each antenna.
- Settings such as alternating [1,0] and [0,1] per burst allow visual confirmation of antenna-specific SSB transmission.
-
Configuration Steps:
-
Tips and Additional Notes
-
Confirmation on Selected SSB:
- In a live UE scenario, the selected SSB index can be confirmed via PRACH log prints in the gNB logs, indicating which SSB the UE used for PRACH mapping.
-
Application to UE Testing:
- The described configuration can be used to test initial beam selection by manipulating SSB transmission power instead of direction, simulating different beams for the UE.
- For laboratory environments lacking many antennas, external horn antennas can be positioned in different directions to create spatial diversity, but fast port switching is not currently supported.
- Power variation among SSBs can be a practical method for beam selection tests, though it does not replace directionality-based tests for panel or codebook selection.
-
Confirmation on Selected SSB:
Test Setup
I would not use the UE here since commercial UE would not support non-3GPP band and earfcn.
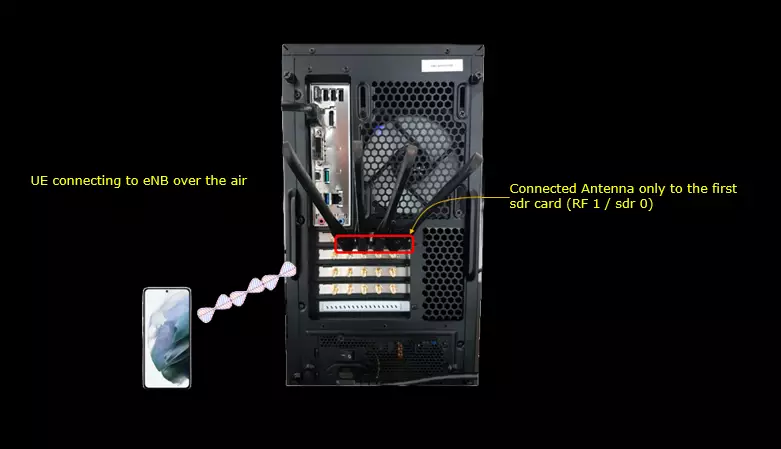
The antenna is connected only to the first sdr card, RF 1 / sdr 0. That is the port the SSB is transmitted from, and it is the port you point the spectrum analyzer at later.
The UE connects to the gNB over the air. It takes no part in the power measurement of this tutorial. The only place a UE is involved is the Tips section at the end. There the gNB log tells you which SSB index the UE picked.
Key Configuration Parameters
Followings are important configuration parameters for this tutorial. You may click on the items for the descriptions from Amarisoft documents.
Test 1 : SSB Precoding for 1 TX Antenna
This test is to show how to ssb precoding for 1 TX antenna (1 Downlink Antenna) and verify it.
Configuration
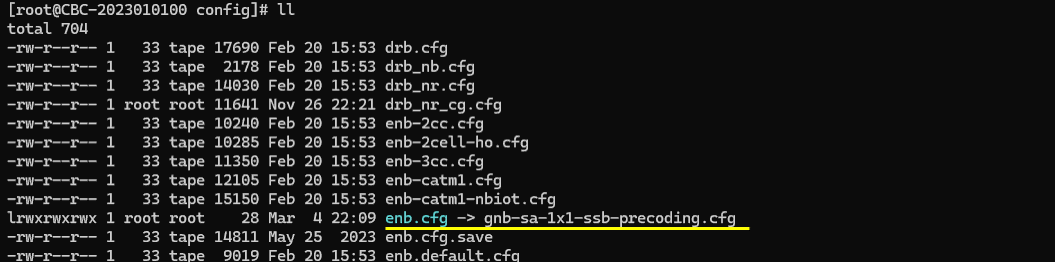
I am using gnb-sa-1x1-ssb-precoding.cfg which is copied and modified from gnb-sa.cfg
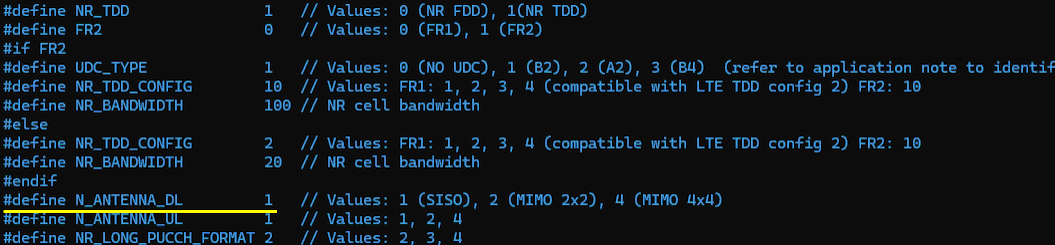
I added a new TDD flag option as shown below. I added an option for custom frequency to TDD option. Since this test is for single TX case, I set N_ANTENNA_DL to 1.
NR_TDD is set to 1 and FR2 is set to 0. Those two flags decide which branch of the file is compiled. With FR2 at 0 the #else branch is taken, so NR_TDD_CONFIG is 2 and NR_BANDWIDTH is 20 MHz. The #if FR2 branch above it carries UDC_TYPE 1, NR_TDD_CONFIG 10 and NR_BANDWIDTH 100, and none of that is used in this test.
N_ANTENNA_DL is set to 1, which the comment on the same line calls SISO. N_ANTENNA_UL is also 1. The downlink antenna count is the one that matters here. It fixes how many elements each vector of ssb_precoding must have, and with 1 downlink antenna each vector holds a single element.
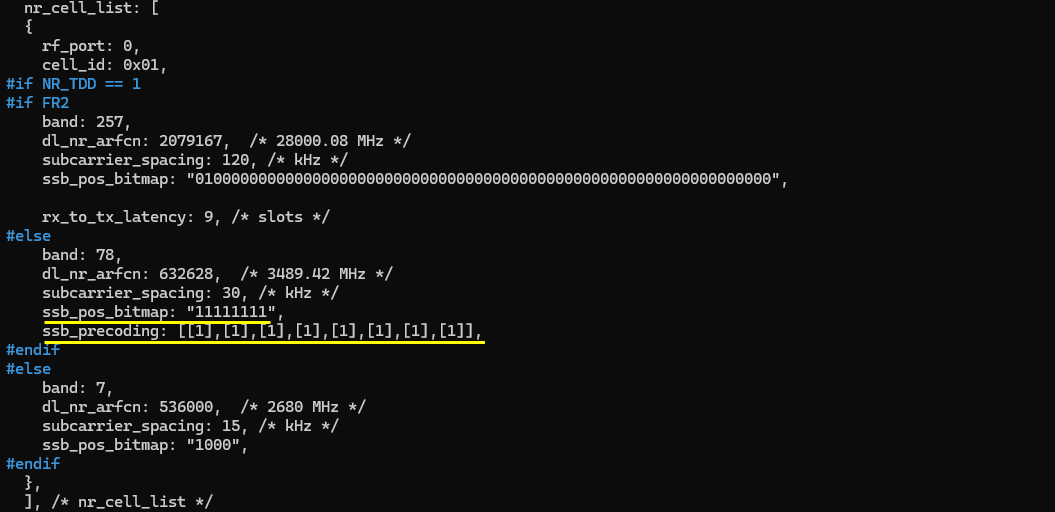
Then specify the value of ssb_pos_bitmap and ssb_precoding. You wouldn't need any explanation of ssb_pos_bitmap. In this test, ssb_pos_bitmap indicates 8 SSB burst is enabled. Then take a look at the structure of ssb_precoding. It has an array that is consists of 8 vectors and each of the vector has 1 elements. Each of the vector corresponds to the bit position of the value '1' in ssb_pos_bitmap. The number of element vector in ssb_precoding should be same as the number of '1's in ssb_pos_bitmap.
For example, for ssb_pos_bitmap = "11111111", the number of element vector of ssb_precoding should be 8. For ssb_pos_bitmap = "10101010", the number of element vector of ssb_precoding should be 4 (e.g, ssb_precoding=[[1],[1],[1],[1],])
Both parameters sit inside nr_cell_list, in the cell with rf_port 0 and cell_id 0x01. The branch that is active is NR_TDD == 1 with FR2 at 0, so the cell runs on band 78 with dl_nr_arfcn 632628. The comment next to it gives the absolute frequency as 3489.42 MHz, and subcarrier_spacing is 30 kHz. Keep that frequency in mind, because it is what you feed to the spectrum analyzer in the next section.
The other two branches are not used. The #if FR2 branch above sets band 257 with dl_nr_arfcn 2079167 and a 64 bit ssb_pos_bitmap. The FDD branch at the bottom sets band 7 with dl_nr_arfcn 536000 and ssb_pos_bitmap "1000". They are there so that the same file can serve the other cases.
In the active branch ssb_pos_bitmap is "11111111" and ssb_precoding is [[1],[1],[1],[1],[1],[1],[1],[1]]. Eight bits are set and there are eight vectors, so the counts match. A weight of 1 is the default value. If you leave ssb_precoding out of the configuration altogether, every element is set to one and the result is the same as this line.
Run and Check
In this test, I would not use any UE for verification. I will use a spectrum analyzer(sdr_spectrum) to verify the power of each SSB bursts.
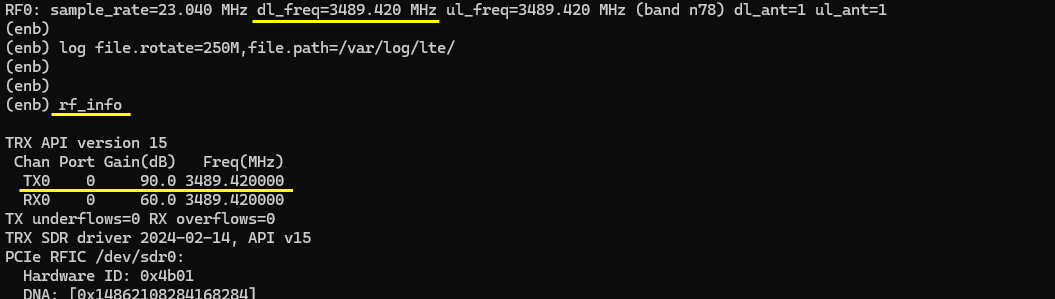
In order to configure, sdr_spectrum the only important information is frequency (the absolute frequency, not arfcn). You can figure out the absolute frequency from the initial print of (enb) command line or you can get the frequency by running the command rf_info as shown below.
The RF0 line printed at start up already carries the number. dl_freq is 3489.420 MHz and ul_freq is the same, with the band given as n78. dl_ant=1 and ul_ant=1 on that line confirm the N_ANTENNA_DL setting took effect. The sample rate of the card is 23.040 MHz, which is not the same thing as the analyzer rate you set later.
rf_info prints the same frequency per channel. TX0 is at 3489.420000 MHz with 90.0 dB of gain, and RX0 is at the same frequency with 60.0 dB. Only one TX channel is listed, since this test runs with a single downlink antenna. The card is /dev/sdr0, and the TX underflow and RX overflow counters are both 0.
Once you figure out the frequency, you can run the following command for the sdr card that is connected to the callbox TX port that is transmitting the SSB (
-args picks the card with dev0=/dev/sdr0, the same device name rf_info printed. -rx_freq 3489.420e6 is the absolute frequency you just read off, entered in Hz. -rate 50.0e6 opens a 50 MHz window, which is wider than the 20 MHz cell. The extra width is there so the whole SSB burst set stays inside the view.
|
./sdr_spectrum -args "dev0=/dev/sdr0" -rx_freq 3489.420e6 -rate 50.0e6 |
Analysis
For verification of this configuration, trace log would not help much. Spectrum Analyzer would be the better solution for verification. If you have vector signal analyzer with NR analysis capability, it would be the best. I used Amarisoft sdr_spectrum for the verification. (
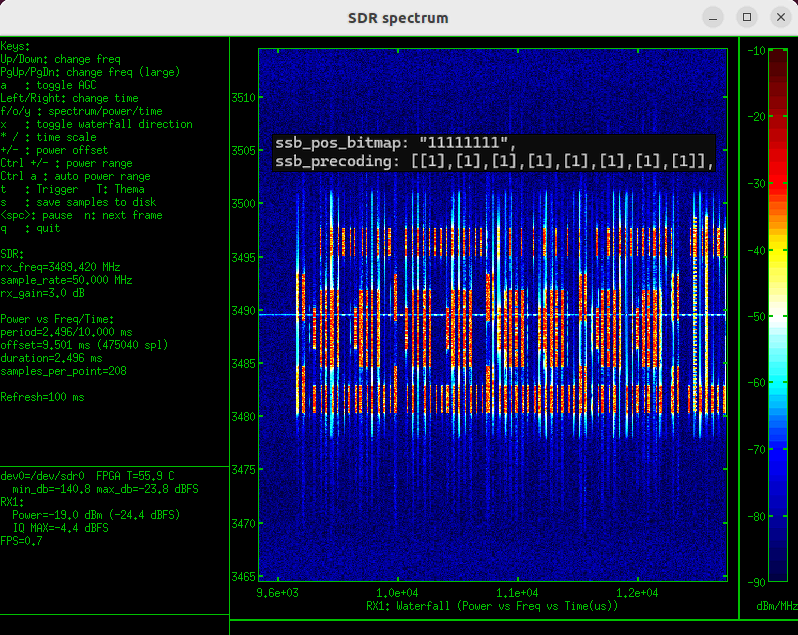
This is an example configuration and the resulting spectrum. In this example, ssb_pos_bitmap is set to "11111111" which indicates 8 contiguous SSB index are enabled and ssb_precoding is set to [[1],[1],[1],[1],[1],[1],[1],[1]] which indicates the ssb power/phase are all set to 1. As a result, in spectrogram (waterfall) you see all 8 SSBs with almost same color code.
The analyzer is set to rx_freq 3489.420 MHz with a sample rate of 50.000 MHz and rx_gain 3.0 dB. The time window is 2.496 ms out of a 10.000 ms period, so one full SSB burst set fits in the view. The eight bursts sit at even spacing in time, all in the same colour range, and the measured RX1 power is -19.0 dBm.
The horizontal band the bursts occupy is narrow compared to the 50 MHz window. That is the SSB bandwidth, and it stays the same in every example that follows. Only the colour of the bursts changes when you change ssb_precoding.
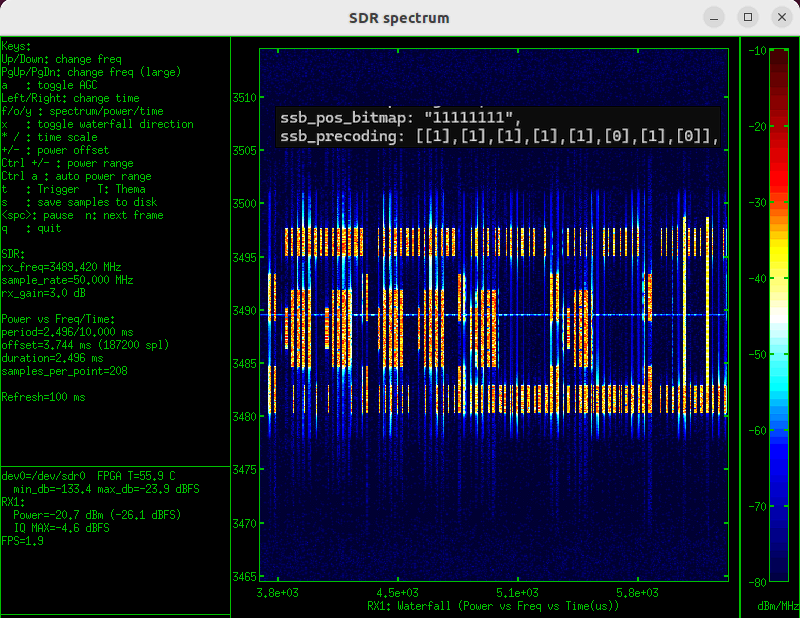
In this example, ssb_pos_bitmap is set to "11111111" which indicates 8 contiguous SSB index are enabled and ssb_precoding is set to [[1],[1],[1],[1],[1],[0],[1],[0]] which indicates the ssb power/phase of index 5 and 7 are all set to 0. As a result, in spectrogram (waterfall) you see no detection for SSB index 5 and 7 (NOTE : ssb index start from 0) .
Note that ssb_pos_bitmap is still "11111111" here. All eight positions are still enabled, so ssb_precoding still needs eight vectors. Two of them are simply driven with a weight of 0. The SSB position is allocated but no power is put into it.
The measured RX1 power drops to -20.7 dBm from the -19.0 dBm of the previous example. Two of the eight bursts no longer carry power, and that is the whole difference. The rx_gain is unchanged at 3.0 dB, so the two readings can be compared directly.
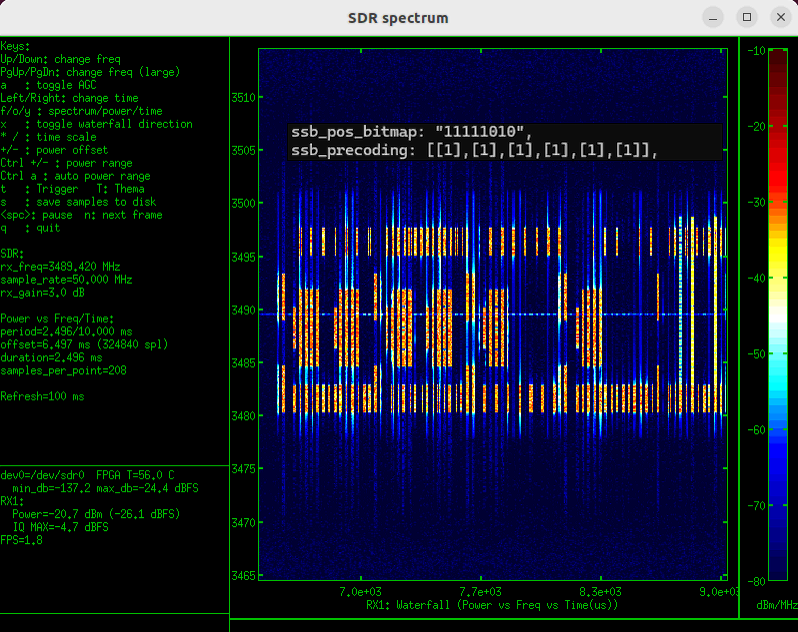
In this example, ssb_pos_bitmap is set to "11111010" which indicates 6 SSB index are enabled and ssb_precoding is set to [[1],[1],[1],[1],[1],[1]] which indicates the ssb power/phase of all the transmitted ssb index are all set to 1. As a result, in spectrogram (waterfall) you see no detection for SSB index 5 and 7 (NOTE : ssb index start from 0) .
This example reaches the same on air result as the previous one, but by the other route. Here the bits for index 5 and 7 are cleared in ssb_pos_bitmap instead of being zeroed in ssb_precoding. Six bits are set, so ssb_precoding has six vectors and not eight.
The measured RX1 power is -20.7 dBm, the same value as the previous example. That is what you would expect, since the same two positions end up with no power. Use the bitmap when you want the SSB gone from the burst set. Use a zero weight when you want to keep the burst set intact and only mute one beam.
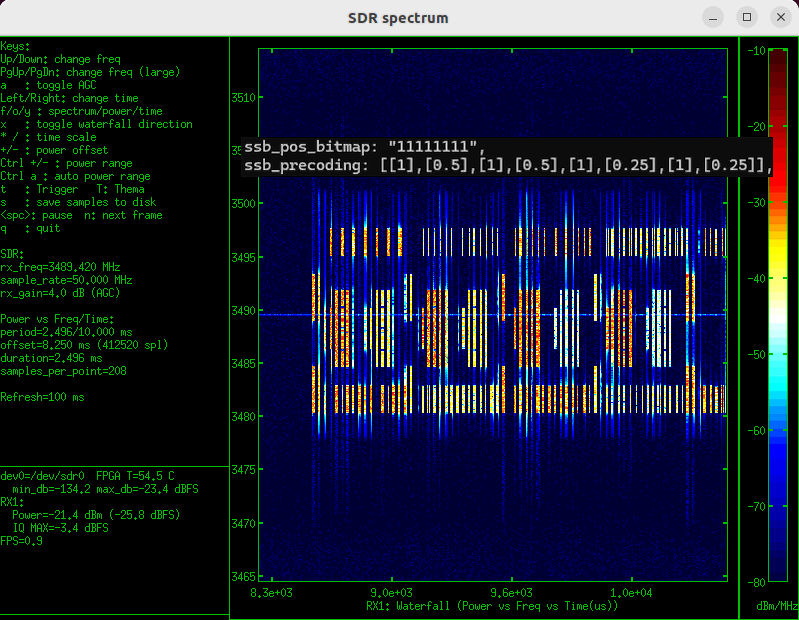
In this example, ssb_pos_bitmap is set to "11111111" which indicates 8 SSB index are enabled and ssb_precoding is set to [[1],[0.5],[1],[0.5],[1],[0.25],[1],[0.25]] which indicates the ssb power/phase of all the transmitted ssb index are alternating between high power and low power. As a result, in spectrogram (waterfall) you see the alternating pattern of color code .
The weights here are amplitudes, not on and off flags. Index 0, 2, 4 and 6 are at 1. Index 1 and 3 are at 0.5, and index 5 and 7 are at 0.25. Half the amplitude is about 6 dB down in power, and a quarter is about 12 dB down.
That gives three distinct colour levels in the burst set rather than two. The measured RX1 power is -21.4 dBm. The rx_gain reads 4.0 dB with AGC active in this run, so read the colour pattern here rather than comparing the absolute power against the earlier examples.
This is the setting to use when you want to simulate beams of different strength. Any value between 0 and 1 works, so you are not limited to the three levels used here.
Test 2 : SSB Precoding for 2 TX Antenna
This test is to show how to ssb precoding for 2 TX antenna (2 Downlink Antenna) and verify it.
Configuration
I am using gnb-sa-2x2-ssb-precoding.cfg which is copied and modified from gnb-sa.cfg
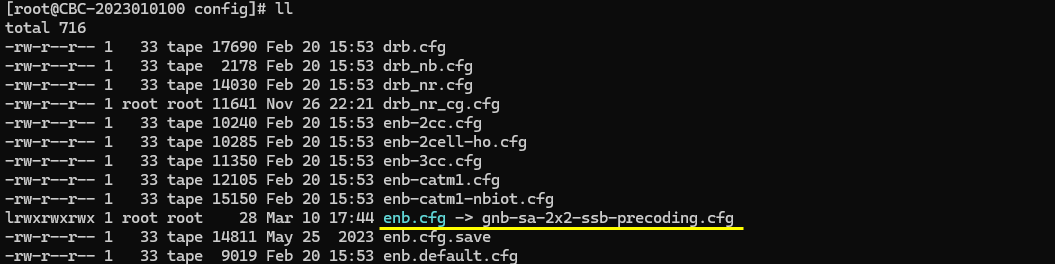
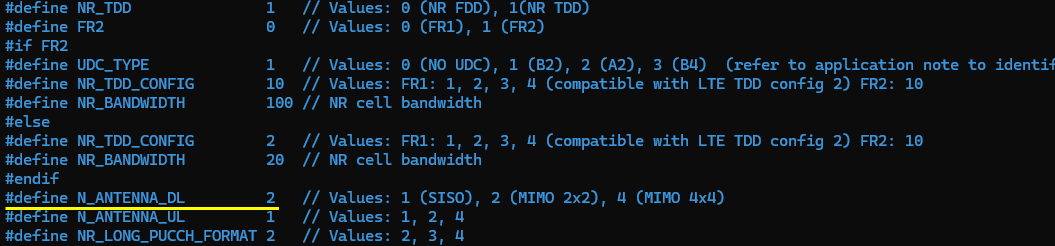
I added a new TDD flag option as shown below. I added an option for custom frequency to TDD option. Since this test is for single TX case, I set N_ANTENNA_DL to 2.
N_ANTENNA_DL is set to 2, which the comment on the same line calls MIMO 2x2. N_ANTENNA_UL stays at 1, since only the downlink matters for SSB. Everything else in this block is the same as Test 1. NR_TDD is 1 and FR2 is 0, so the FR1 branch is the one in use, with NR_TDD_CONFIG 2 and NR_BANDWIDTH 20.
This one value is what changes the shape of ssb_precoding. Each vector now needs two elements instead of one, one per downlink antenna. If you set N_ANTENNA_DL to 2 and leave the vectors with a single element, the vector length no longer matches the antenna count.
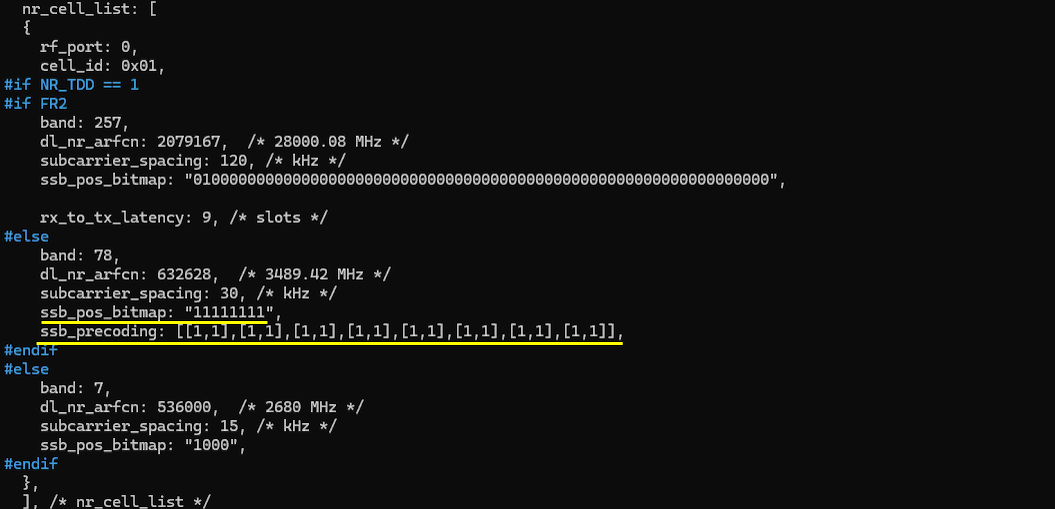
Then specify the value of ssb_pos_bitmap and ssb_precoding. You wouldn't need any explanation of ssb_pos_bitmap. In this test, ssb_pos_bitmap indicates 8 SSB burst is enabled. Then take a look at the structure of ssb_precoding. It has an array that is consists of 8 vectors and each of the vector has 1 elements. Each of the vector corresponds to the bit position of the value '1' in ssb_pos_bitmap. The number of element vector in ssb_precoding should be same as the number of '1's in ssb_pos_bitmap. Here you see each of the vector in the precoding matrix has two elements like [1,1]. Each elements of the vector is mapped to each TX antenna. The first one is mapped to the first TX antenna and the second one is mapped to the second TX antenna.
For example, for ssb_pos_bitmap = "11111111", the number of element vector of ssb_precoding should be 8. For ssb_pos_bitmap = "10101010", the number of element vector of ssb_precoding should be 4 (e.g, ssb_precoding=[[1,1],[1,1],[1,1],[1,1],])
The cell settings are the same as Test 1. The active branch is NR_TDD == 1 with FR2 at 0, so band 78 with dl_nr_arfcn 632628, 3489.42 MHz, and subcarrier_spacing 30 kHz. The FR2 branch on band 257 and the FDD branch on band 7 are not used.
The difference from Test 1 is inside ssb_precoding. It is [[1,1],[1,1],[1,1],[1,1],[1,1],[1,1],[1,1],[1,1]]. There are still eight vectors because ssb_pos_bitmap is still "11111111", but each vector now carries two elements. The first element drives the first TX antenna and the second drives the second.
Both antennas are at weight 1 for every SSB here, so this configuration is the two antenna equivalent of the all ones case. It is the baseline the three examples in the Analysis section are compared against.
Run and Check
In this test, I would not use any UE for verification. I will use a spectrum analyzer(sdr_spectrum) to verify the power of each SSB bursts.
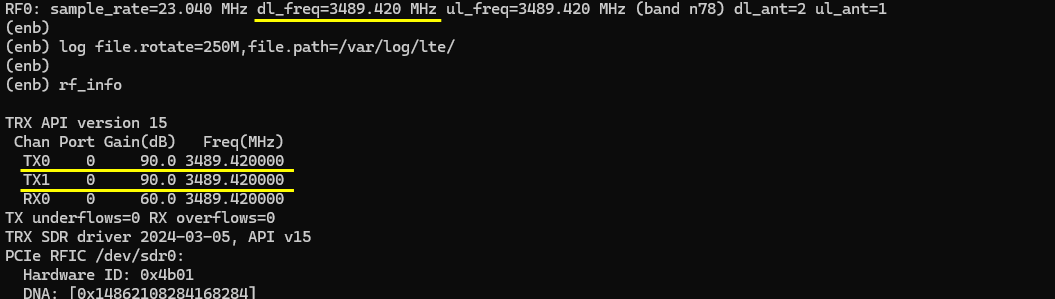
In order to configure, sdr_spectrum the only important information is frequency (the absolute frequency, not arfcn). You can figure out the absolute frequency from the initial print of (enb) command line or you can get the frequency by running the command rf_info as shown below.
The RF0 line now reads dl_ant=2 while ul_ant stays at 1. That is the N_ANTENNA_DL change showing up at run time. dl_freq is still 3489.420 MHz on band n78, so the frequency you give the analyzer does not change between the two tests.
rf_info lists one more channel than in Test 1. TX0 and TX1 are both at 3489.420000 MHz with 90.0 dB of gain, and RX0 is at the same frequency with 60.0 dB. Two transmit channels at equal gain means any power difference you see between the two antennas later comes from ssb_precoding and not from the card.
Once you figure out the frequency, you can run the following command for the sdr card that is connected to the callbox TX port that is transmitting the SSB (
The device, the frequency and the rate are the same as in Test 1. The one addition is channels 2, which tells sdr_spectrum to receive on two channels instead of one. That is what gives you the two waterfall tracks in the Analysis section, one per antenna. Without it you would only see the first antenna.
|
./sdr_spectrum -args "dev0=/dev/sdr0" -rx_freq 3489.420e6 -rate 50.0e6 –channels 2 |
Analysis
For verification of this configuration, trace log would not help much. Spectrum Analyzer would be the better solution for verification. If you have vector signal analyzer with NR analysis capability, it would be the best. I used Amarisoft sdr_spectrum for the verification. (
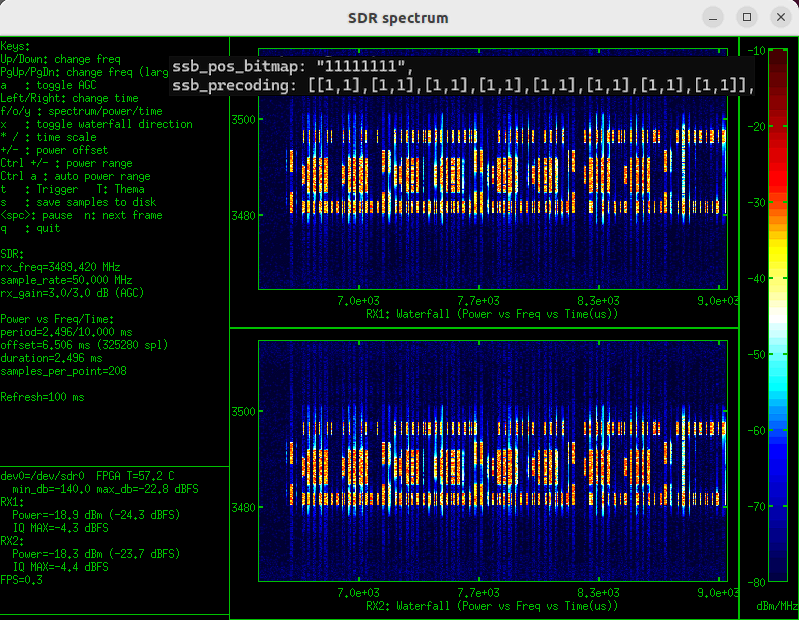
This is an example configuration and the resulting spectrum. In this example, ssb_pos_bitmap is set to "11111111" which indicates 8 contiguous SSB index are enabled and ssb_precoding is set to [[1,1],[1,1],[1,1],[1,1],[1,1],[1,1],[1,1],[1,1]] which indicates the ssb power/phase are all set to 1. As a result, in spectrogram (waterfall) you see all 8 SSBs with almost same color code. Here you see two tracks of spectrogram(waterfall plot). The upper track plots the signal captured from the first antenna and the lower track plots the signal captured from the second antenna.
The two tracks carry almost the same power. RX1 measures -18.9 dBm and RX2 measures -18.3 dBm, and the burst pattern is the same on both. That is what [1,1] on every SSB is supposed to give you.
Take this run as the reference. Both antennas are driven at full weight for every SSB, so any difference between the upper and the lower track in the examples that follow comes from the precoding vectors.
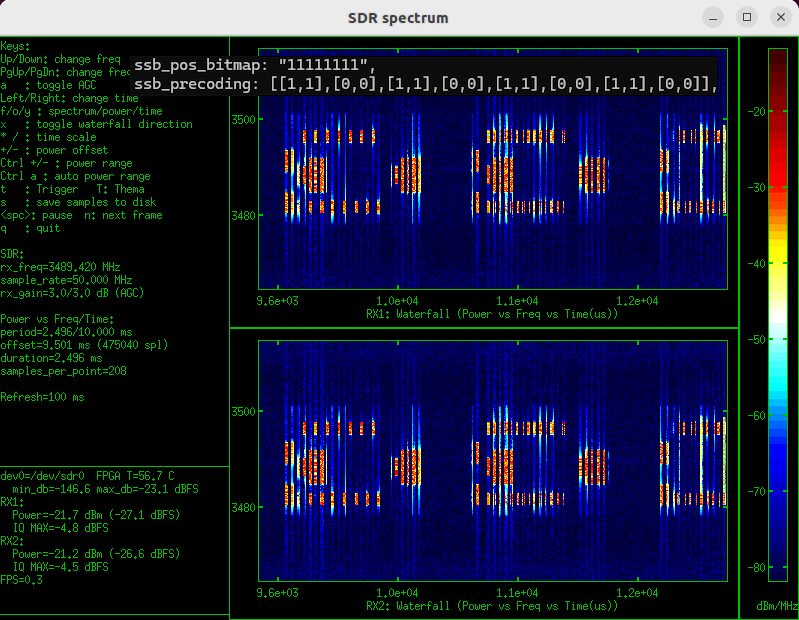
In this example, ssb_pos_bitmap is set to "11111111" which indicates 8 contiguous SSB index are enabled and ssb_precoding is set to [[1,1],[0,0],[1,1],[0,0],[1,1],[0,0],[1,1],[0,0]] which indicates the ssb power/phase of index 1,3,5,7 are all set to 0 for both antenna. As a result, in spectrogram (waterfall) you see no detection for SSB index 1,3,5 and 7 (NOTE : ssb index start from 0) .
The zeros are applied to both elements of the vector at once. [0,0] mutes that SSB on the first and the second antenna together, so the two tracks stay identical to each other. Only every other burst survives.
RX1 measures -21.7 dBm and RX2 measures -21.2 dBm. Both dropped by about 3 dB from the reference run, which follows from half of the eight bursts carrying no power.
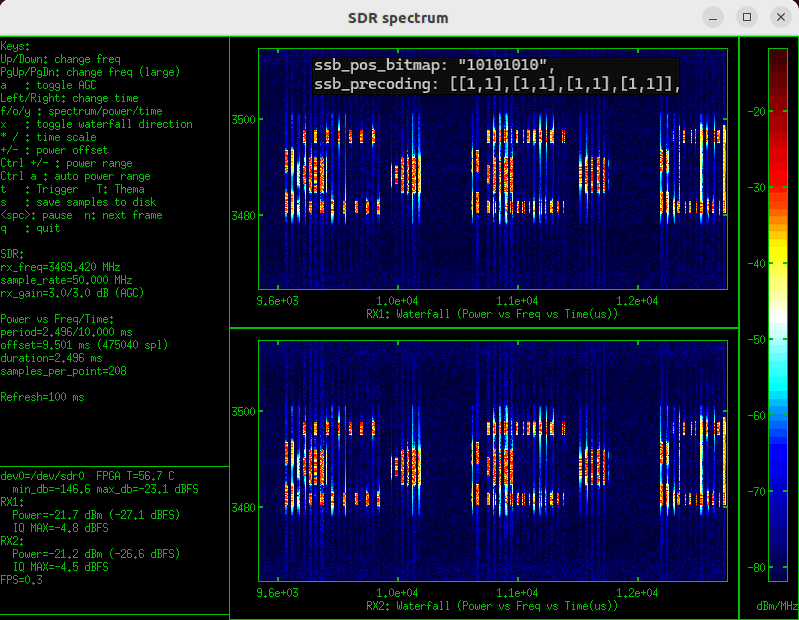
In this example, ssb_pos_bitmap is set to "10101010" which indicates 4 SSB index are enabled and ssb_precoding is set to [[1,1],[1,1],[1,1],[1,1]] which indicates the ssb power/phase of all the transmitted ssb index are all set to 1. As a result, in spectrogram (waterfall) you see no detection for SSB index 1,3, 5 and 7 (NOTE : ssb index start from 0) .
This is the same pairing as in Test 1. Clearing the bits in ssb_pos_bitmap and zeroing the weights in ssb_precoding reach the same result. With "10101010" only four bits are set, so ssb_precoding needs four vectors of two elements and not eight.
The measured powers are -21.7 dBm on RX1 and -21.2 dBm on RX2, the same pair of readings as the previous example. Which of the two methods you use is a matter of what you are testing. The bitmap removes the SSB from the burst set that the UE is told about, while a zero weight leaves the burst set as it is.
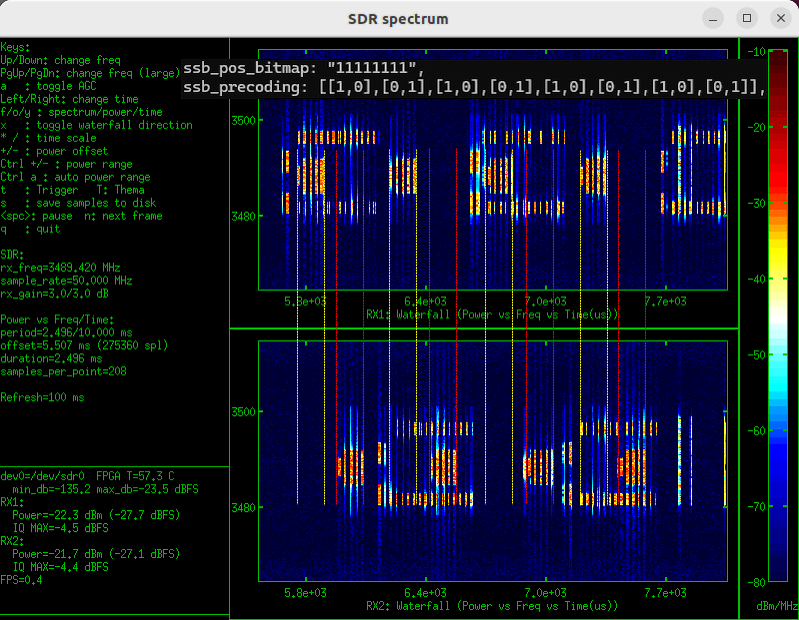
In this example, ssb_pos_bitmap is set to "11111111" which indicates 8 SSB index are enabled and ssb_precoding is set to [[1,0],[0,1],[1,0],[0,1],[1,0],[0,1],[1,0],[0,1]]. Here, for ssb0 TX0 is set to 1 and TX1 is set to 0. For ssb1 TX0 is set to 0 and TX1 is set to 1, and this kind of alternation repeats . As a result, in spectrogram (waterfall) you see the alternating pattern of color code .
This is the first example where the two tracks differ from each other. A burst that is present on the upper track is missing at the same time position on the lower track, and the next one swaps over. The bursts from the two antennas interleave in time rather than overlapping.
RX1 measures -22.3 dBm and RX2 measures -21.7 dBm. Each antenna is now carrying only four of the eight bursts, so both readings are lower than the reference run where every SSB was sent on both antennas.
Use this pattern when you want each SSB to come out of one antenna only. With two antennas pointing in different directions, this is the closest you can get to a per SSB beam direction on this hardware.
Tips
The two tests above verify the transmitted side only, with a spectrum analyzer and no UE. This section covers the two questions that come next. The first is how to tell from the gNB log which SSB the UE actually picked. The second is what this configuration is good for in a UE test.
Confirmation on the Selected SSB
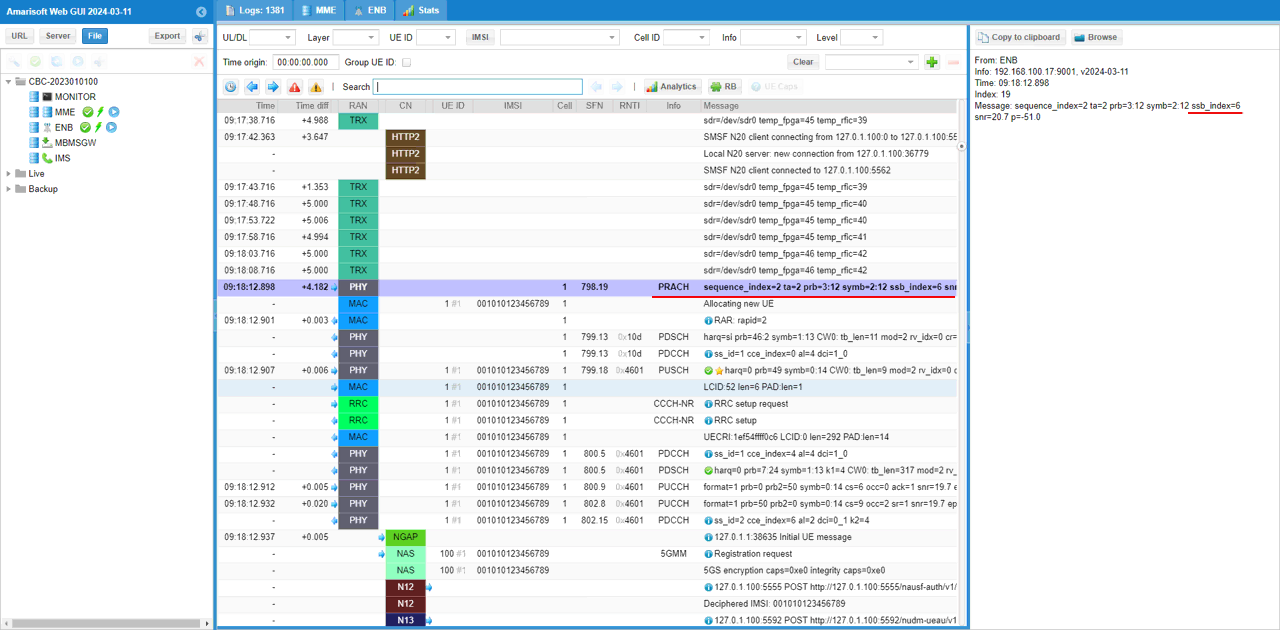
When gNB is transmitting multiple SSB burst(index), UE is expected to detect the best one and send PRACH mapped to the selected SSB. This association between the selected SSB and corresponding PRACH plays the fundamental role of the beam management process named Initial Beam Selection. In gNB log, you can confirm which SSB index is selected by the UE by checking out the ssb_index
value in PRACH log print as shown below. (
The PRACH row is the one to look for, and the ssb_index field on it is the answer. In this log it reads ssb_index=6, so the UE measured all the enabled SSBs and chose index 6. The same row carries snr=20.7 and p=-51.0, which tell you how strong that reception was.
The rows after the PRACH are the normal attach. RAR comes back, then RRC setup on CCCH-NR, then the Registration request on the 5GS NAS. That confirms the UE went on to attach using the SSB it selected. If you change the weights in ssb_precoding and restart, the ssb_index value on the next PRACH is what tells you the change had the effect you wanted.
How to Apply it to UE test ?
One simplest approach to apply this configuration for UE test would be to use it for initial beam selection test. When a UE is powered on, it is expected that UE detect and measure the power of SSB within a certain period and pick the SSB with highest percieved power and trigger PRACH using the physical resources mapped to the selected SSB. In live gNB antenna module which has a huge number of antenna elements (e.g, 64TX64RX), gNB can create different beam(i.e, beam in different directions) for each SSB and transmit them at same power. Even though the transmitted power from the live gNB antenna are same, the percieved/measured power on UE would be different depending on the angle of the beam.
In most case, test equipment does not have such a large number of antenna to create such a fine tuned beams. A typical approach for the lab test with test equipment is to place multiple external horn antenna pointing to UE in different direction as shown here. If you want to point the each SSB beam different direction with external horn antenna, the test equipment should provide such a functionality to switch TX port with interval of only a few OFDM symbol. For now, this kind of TX port switching is not suppored in Amarisoft callbox.
An alternative approach that we can take would be to transmit all the beam with the same direction but different TX power for each SSB. With this approach, it can create a situation which can roughly simulate the multiple beams with same power and different direction and test criteria for initial beam selection. (
The example weights for this approach are ssb_pos_bitmap "11111111" with ssb_precoding [[0.8],[0.9],[1.0],[0.9],[0.8],[0.7],[0.6],[0.5]]. All eight beams leave the antenna in the same direction. Only the amplitude of each one differs, and the sizes of the transmitted beams follow those weights.
The measured power on the UE then takes the shape of the weight list. SSB2 is the strongest because it is the only one at 1.0, and the level falls away towards SSB7 at 0.5. A UE that follows initial beam selection should pick SSB2 and send its PRACH on the resources mapped to it. You confirm that with the ssb_index field described just above.
Moving the peak is a matter of moving the 1.0 to a different position in the list. Keep the weights between 0 and 1, and keep the number of vectors equal to the number of 1 bits in ssb_pos_bitmap.