LTE VoLTE - PJSIP
This tutorial shows how to perform a VoLTE with Amarisoft UEsim and Open source SIP UA PJSIP.
Table of Contents
- LTE VoLTE - PJSIP
Introduction
Voice over LTE (VoLTE) represents a significant technological advancement in mobile communication by enabling high-quality voice services over LTE networks, leveraging the all-IP packet-switched architecture of 4G. Traditionally, voice calls in mobile networks were carried over circuit-switched domains; however, LTE networks rely exclusively on packet-switched data, necessitating the integration of IP Multimedia Subsystem (IMS) architectures and Session Initiation Protocol (SIP) for signaling. Amarisoft UEsim is a highly flexible and programmable LTE/5G user equipment simulator, widely used for testing and validating LTE network components and services, including VoLTE. PJSIP, on the other hand, is an open-source multimedia communication library implementing standard-based protocols such as SIP, SDP, RTP, and others, enabling robust and interoperable SIP-based applications. This tutorial demonstrates the interoperability between Amarisoft UEsim and the open-source SIP user agent PJSIP, showcasing how to establish VoLTE calls using a third-party SIP client in conjunction with a simulated LTE UE. The integration highlights the modularity and standards-compliance of modern telecom systems, allowing for proof-of-concept scenarios and comprehensive end-to-end testing. By connecting PJSIP to the Amarisoft UEsim environment, users can emulate real-world VoLTE workflows, validate SIP signaling, and analyze media path establishment, gaining hands-on experience with the technological foundations of contemporary mobile voice solutions.
-
Context and Background
- VoLTE is a key feature of LTE networks, providing native voice capabilities over an all-IP infrastructure.
- Amarisoft UEsim facilitates simulation and testing of LTE/5G UEs, supporting advanced scenarios such as VoLTE call flows.
- PJSIP serves as a versatile open-source SIP client library, enabling SIP-based audio and video communications, and is used here as a third-party SIP user agent.
- Interoperability testing between different vendor solutions and open-source components is critical in validating standards compliance and deployment readiness in modern telecom ecosystems.
-
Relevance and Importance
- Understanding integration between LTE UE simulators and SIP clients is essential for network engineers, testers, and researchers developing or verifying VoLTE solutions.
- This tutorial showcases a practical approach to validating VoLTE call flows using open-source tools, reducing dependency on proprietary implementations.
- Demonstrates the feasibility of using third-party SIP user agents in conjunction with advanced network simulators, underlining the significance of standards-based interoperability.
-
Learning Outcomes
- Gain practical experience configuring and operating Amarisoft UEsim for VoLTE scenarios.
- Learn how to set up, configure, and utilize PJSIP as a SIP user agent within an LTE/IMS testbed.
- Understand end-to-end VoLTE call establishment, SIP signaling, and media negotiation processes.
- Develop troubleshooting and diagnostic skills for resolving interoperability or configuration issues.
-
Prerequisite Knowledge and Skills
- Familiarity with LTE and IMS architectures, including basic concepts of VoLTE and SIP signaling.
- Prior experience with Amarisoft UEsim and its configuration procedures.
- Understanding of SIP protocol fundamentals and experience with SIP user agents, preferably PJSIP.
- Basic proficiency with Linux command-line operations and network configuration.
- Completion of the separate PJSIP installation tutorial is strongly recommended, as this tutorial assumes a functional PJSIP environment.
Summary of the Tutorial
This tutorial covers the setup and execution of VoLTE testing using Amarisoft Callbox and UEsim, focusing on two main test scenarios: VoLTE with No Precondition and VoLTE with Silent Precondition. Each test includes detailed configuration steps and test execution procedures, including both loopback and end-to-end call scenarios using PJSIP User Agents (UAs).
-
Test Setup and Configuration:
- The SIM card provided with the system is used as-is.
- Configuration of core network (eNB, MME, IMS, UE DB, UEsim) and PJSIP UAs is described, with references to specific configuration files.
- Key configuration parameters such as echo, impu, impi, precondition, 100rel, ipsec_aalg_list, and ipsec_ealg_list are highlighted.
- FDD mode (TDD 0), 20MHz bandwidth, 2x2 MIMO on LTE Band 7 are typical, but customizable.
- IMS is set to use loopback number 666 by default.
- Multi-UE support is enabled in UEsim, and APN for IMS is explicitly set.
- PJSIP UA configuration matches UE DB identities and the IMS registrar settings.
Test 1: VoLTE with No Precondition
-
SubTest 1: VoLTE Loopback
- Start eNB and verify cell configuration.
- Power on UEs using UEsim ('power_on *' or a single UE as needed).
- Wait for UEs to complete initial attach and IMS registration (verify in MME and IMS screens).
- On UEsim, launch PJSIP UA for UE1 using proper namespace and configuration file.
- Prioritize AMR/8000/1 codec using the 'Cp' command in PJSIP.
- Initiate a loopback call ('m' command, dial 'sip:666@192.168.4.1').
- Observe SIP registration, call setup, and voice path establishment; analyze signaling and media paths using provided logs and WebGUI tools.
-
SubTest 2: End-to-End Call
- Repeat the steps above, but configure and launch two PJSIP UAs in separate namespaces (UE1 and UE2).
- Both UAs register to IMS; verify in the IMS users screen.
- Set AMR/8000/1 codec priority on both UAs.
- Initiate a call from UA1 to UA2 ('m' command, dial 'sip:602@192.168.4.1').
- Answer the call from UA2 ('a' command, specify codec priority).
- End the call using 'h' command as needed; analyze call flow using logs and WebGUI.
Test 2: VoLTE with Silent Precondition
-
Configuration Differences
- Silent precondition is enabled by setting "precondition:silent" in UE DB and IMS configuration.
- Dedicated configuration files for silent precondition are used for MME, IMS, and UE DB.
- QoS settings in the MME configuration's RX interface are adjusted to assign QCI for dedicated bearers.
-
SubTest 1: VoLTE Loopback with Silent Precondition
- Follow the same overall procedure as in Test 1 Loopback: start eNB, power on UEs, ensure IMS registration, and launch PJSIP UA.
- Initiate loopback call as before.
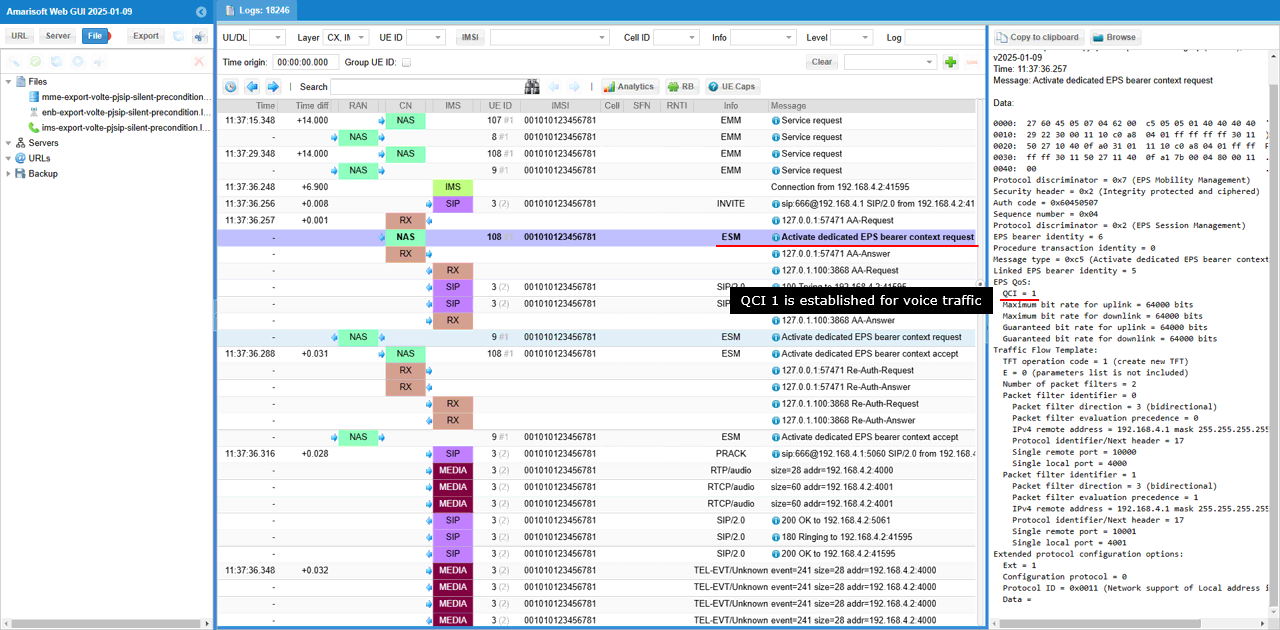
- Observe that after SIP INVITE, the system establishes a dedicated bearer with QCI 1 for media traffic, while SIP signaling continues over the default bearer with QCI 5.
- Use log files and WebGUI to verify signaling, bearer setup, and media path.
General Methodology:
- All tests involve stepwise configuration of network elements and UEs, registration of PJSIP UAs, codec prioritization, call initiation, and analysis of call flow and media path.
- Verification at each stage is done via CLI outputs, IMS/MME user screens, and network interface checks.
- Sample logs and WebGUI are referenced for in-depth analysis of signaling and media flows.
Test Setup
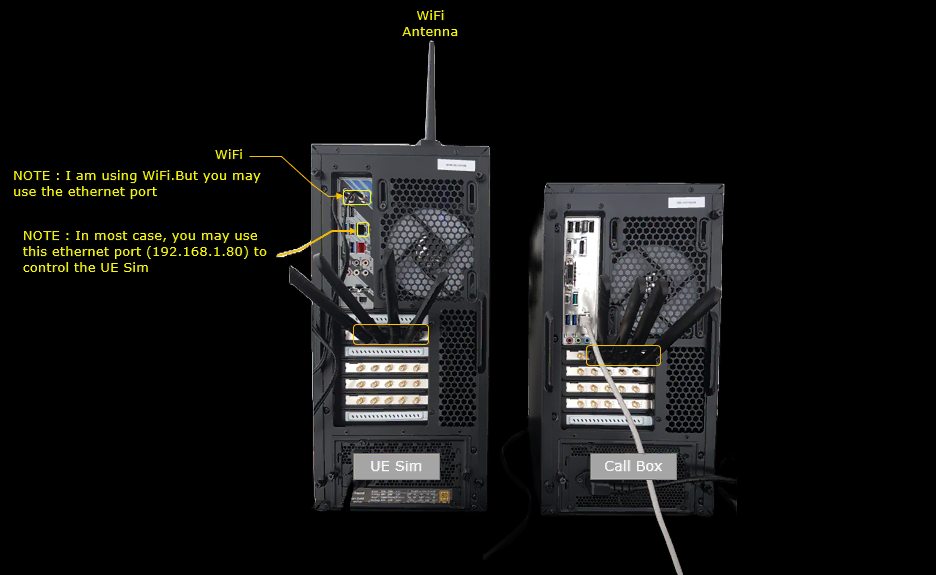
Test setup for this tutorial is as shown below.
- SIM Card used in this tutorial is the one delivered with the system as it is.
- If you want to change the configuration, The tutorial Configuration Guide would help
Key Configuration Parameters
Followings are important configuration parameters for this tutorial. You may click on the items for the descriptions from Amarisoft documents.
- echo
- tel
- impu
- impi
- precondition
- 100rel
- ipsec_aalg_list
- ipsec_ealg_list
Test 1 : VoLTE with No Precondition
Configuration
I used the enb-lte-pjsua.cfg which is copied from enb.default.cfg.
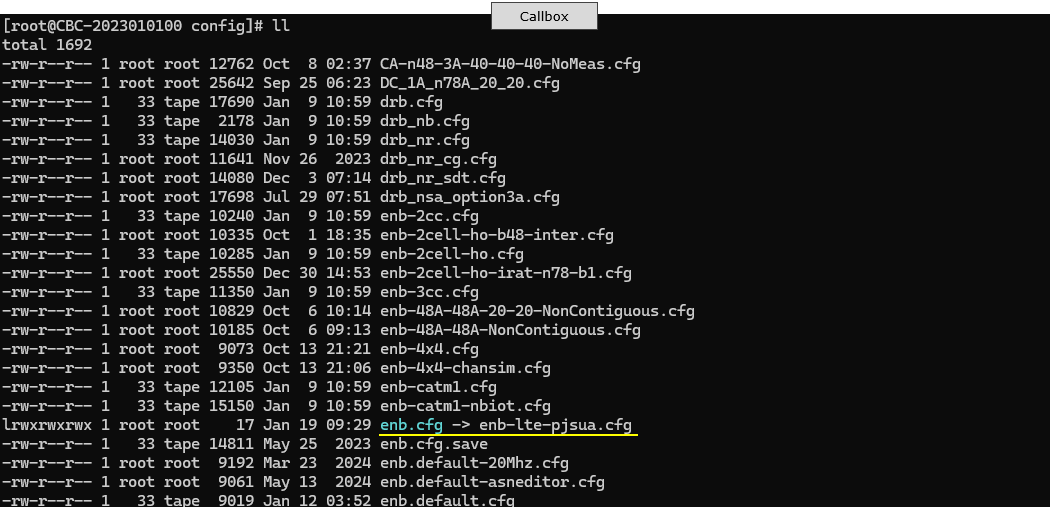
I used mme-pjsua.cfg which is copied and modified from mme-ims.cfg and used ims-pjsua.cfg which is copied and modified from ims.default.cfg. Along with this, ue_db-ims-pjsua.cfg is used.

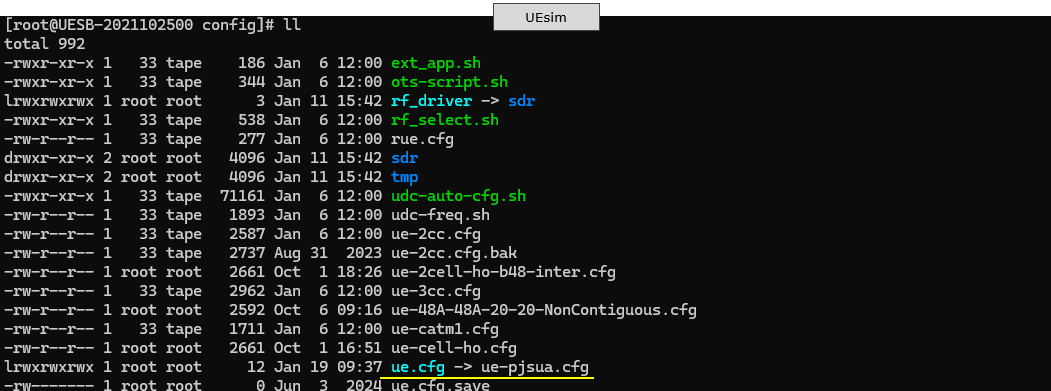
On UEsim side, ue-pjsua.cfg is used. It is copied and modified from ue.default.cfg
For the configurations for pjsip UAs, pjsua-amarisoft-1.cfg and pjsua-amarisoft-2.cfg are used.

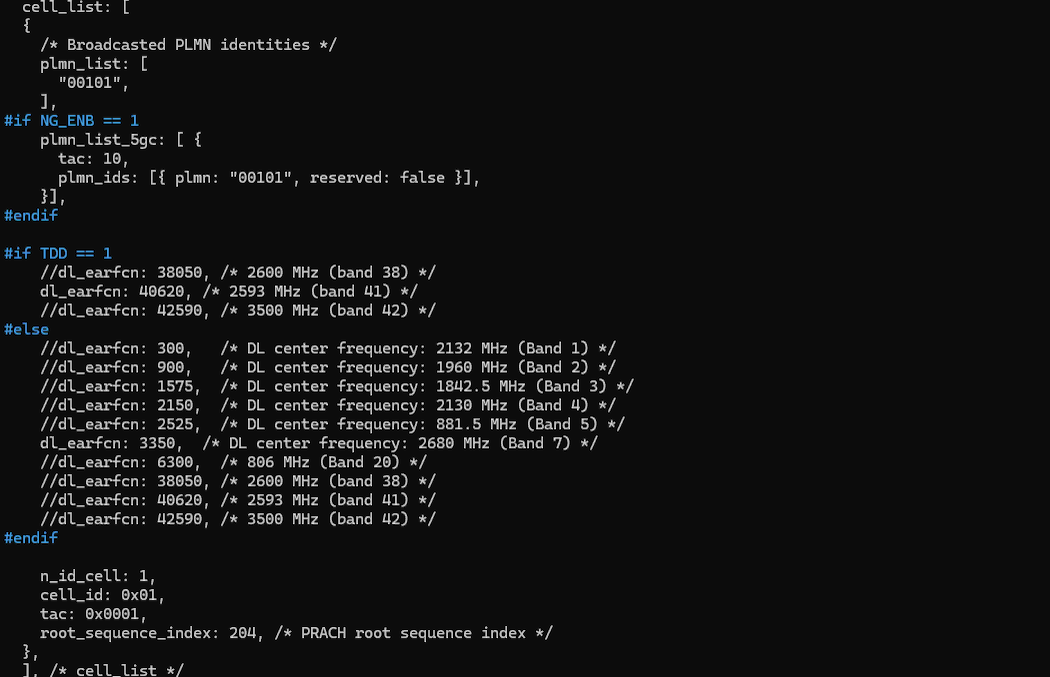
eNB Configuration
The eNB configuration enb-lte-pjsua.cfg has no special configuration. It is almost same as the default LTE configuration.
In this tutorial, FDD(TDD 0), 20Mhz BW(N_RB_DL 100) and 2x2 MIMO (N_ANTENNA_DL 2) are configured, but you can configure it in anyway as long as your DUT works with the configuration.

In cell parameter, LTE band 7 is configured but you can configure in any way as long as your DUT support it
 \
\
MME Configuration
In mme-pjsua.cfg file, you would notice that ue_db-ims-pjsua.cfg is used as ue db.
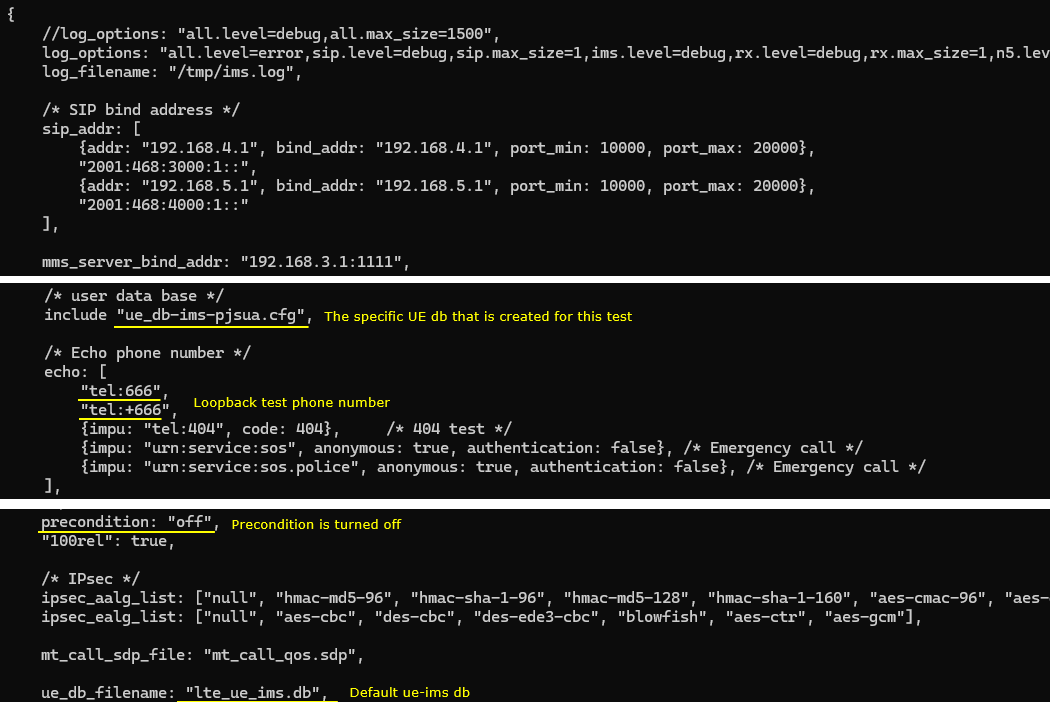
pdn setup is important in this configuration. In this tutorial, we will force UE to use ims pdn. so make it sure that configuration for ims is configured as you intended. I just used the default ims configuration. In addition, be aware that ue_db-ims-pjsua.cfg is used for this tutorial.

UE DB Configuration
In ue_db-ims-pjsua.cfg , we configured two sets of USIM/ISIM profile for the two UEs as follows. Pay attention to imsi, impi,impu,tel parameters for each UE.

IMS Configuration
In ims-pjsua.cfg, be aware that ue_db-ims-pjsua.cfg is used as ue db and precondition is set to off. The loopback phone number is set to 666 which is the default setting.
UEsim Configuration
In ue-pjsua.cfg , set multi_ue since we will use more than one UE in this tutorial and you can configure other parameters in cells [ ] block in anyway you like as long as it matches the eNB configuration.
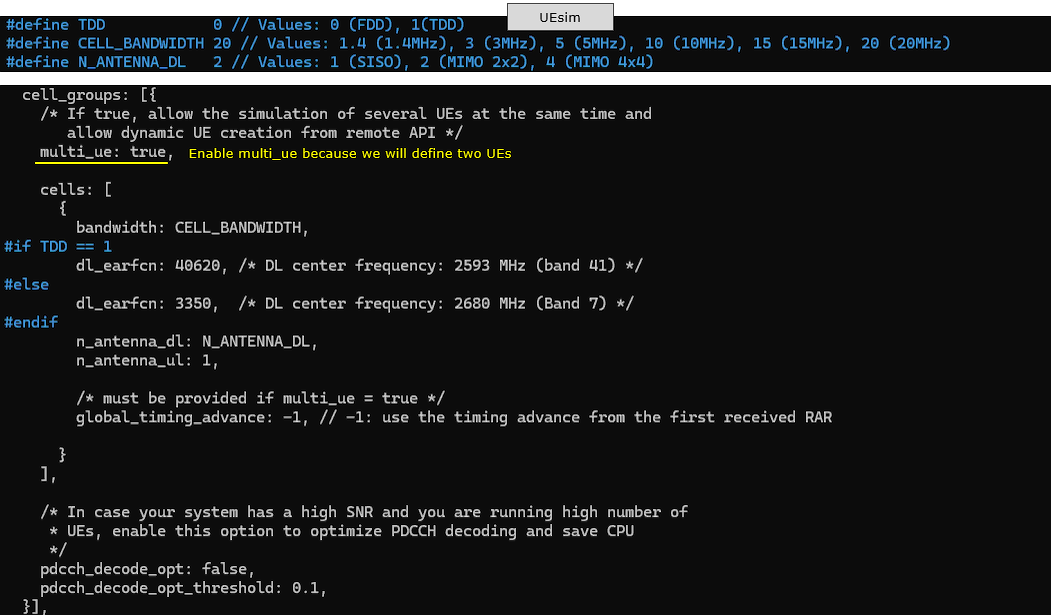
In ue_list, configure two UEs that will be associated with the two PJSIP UAs. Note that apn is explcitly set to "ims" (apn: "ims") and tun interface is enabled(tune_setup_script: "ue-ifup")

PJSIP Configuration
In pjsua-amarisoft-1.cfg , set authentication center to Amarisoft authentication center on callbox (realm ims.mnc001.mcc001.3gppnetwork.org) , set registrar to Amarisoft callbox IMS center (sip:192.168.4.1 in this case) and specify UA id for UA1. Keep in mind that the id should match the configuration in ue-db.

In pjsua-amarisoft-2.cfg , set authentication center to Amarisoft authentication center on callbox (realm ims.mnc001.mcc001.3gppnetwork.org) , set registrar to Amarisoft callbox IMS center (sip:192.168.4.1 in this case) and specify UA id for UA1. Keep in mind that the id should match the configuration in ue-db.

Perform the test
In this test, I will show you how to do VoLTE loopback call and end-to-end call between two different UAs.
SubTest 1 : VoLTE Loopback
In this test, I will use only one PJSIP UA and make a looback call.
First run eNB and check if the cell configuration is configured as intended.

Now power on UEs on UEsim. I powered on all UEs using 'power_on *' command, but you can power on only one UE with 'power_on' if you want.

Wait until UE complete the initial attach.
After the initial attach, switch to (mme) screen and make it sure the connected UEs are properly registered and assigned with 'ims/ip'.

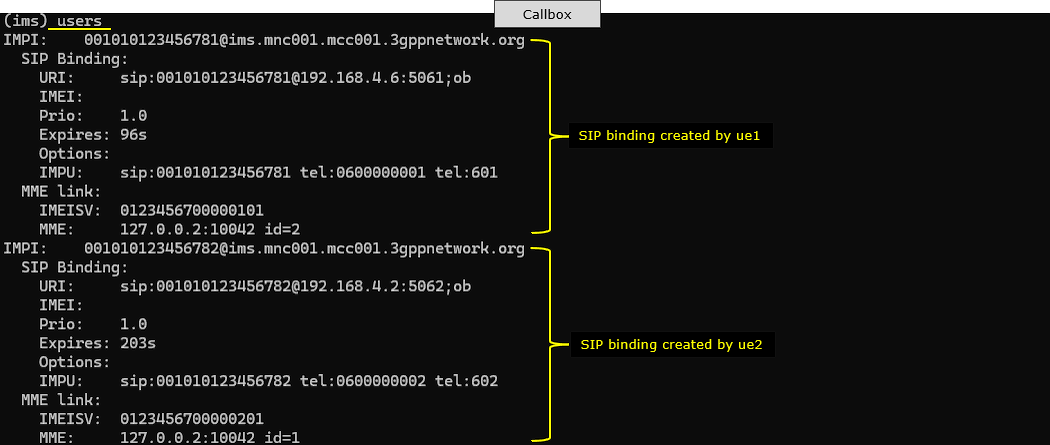
Now switch to (ims) screen and check out the result of 'users' command. Here you see the impi for the attached UEs as configured in ue-db file.

Now switch to UEsim. Open up a new command terminal or ssh session in addition to the ue software screen.
Move the the directory where pjsip executable is located (/root/siptrunk/pjproject-2.14.1/pjsip-apps/bin) and ensure that you need configuration file ready for the UA that you will use.

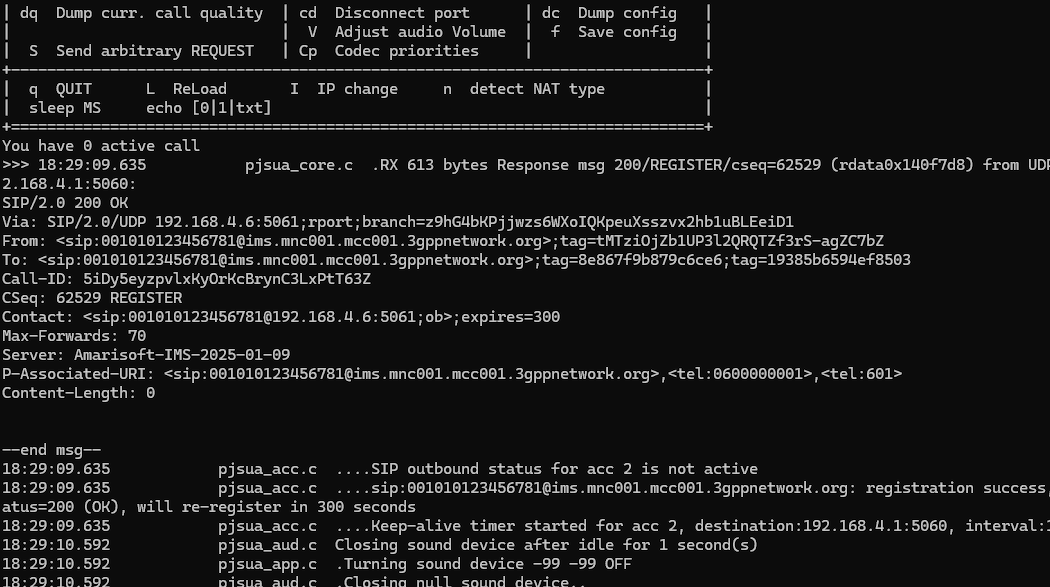
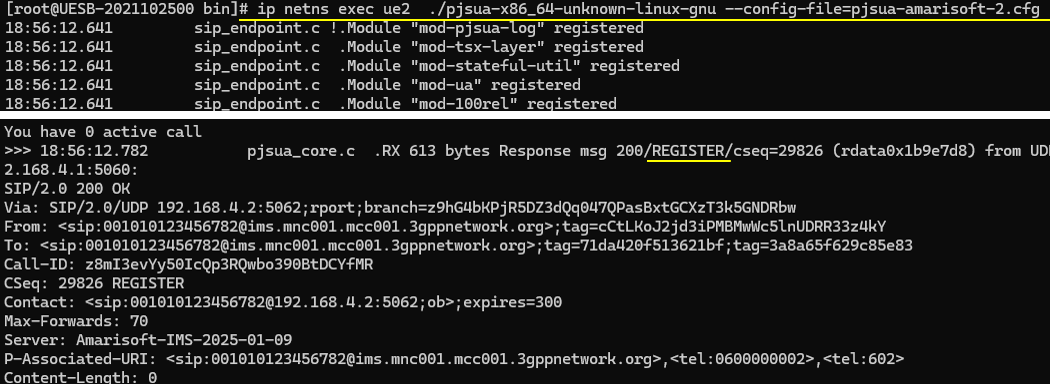
Run a pjsip ua within a ue1 name space(ip netns exec ue1 ./pjsua-x86_64-unknown-linux-gnu --config-file=pjsua-amarisoft-1.cfg)
![]()
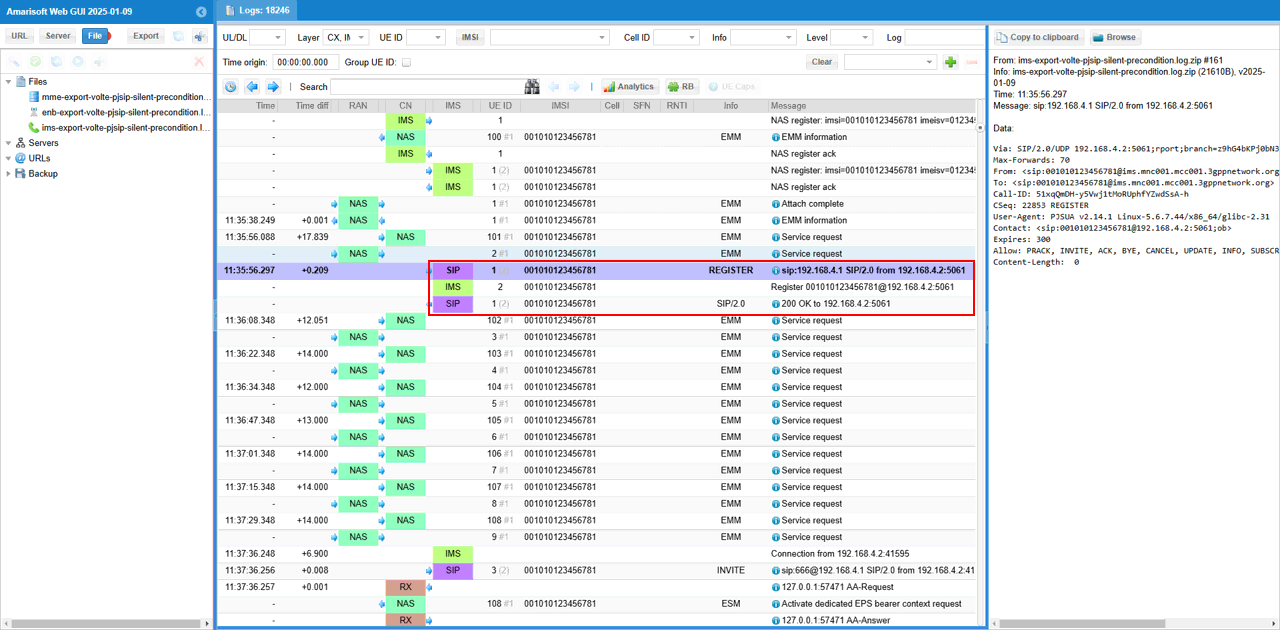
then you will get long and scrolling text as below. You would see SIP 'REGISTER' message is sent out from PJSIP UA.
After the registration is completed, go to (ims) screen on Callbox (eNB) and check 'users' there. Now you see the UE1 is bound with PJSIP UA.
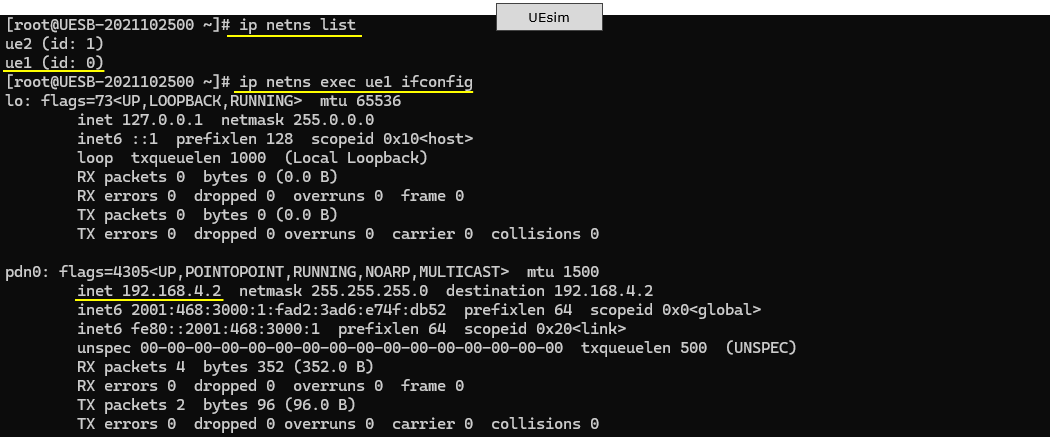
At this point, open up another terminal or ssh session on UEsim and can check out the details of pdn (tun interface) that is associated with the UE with the command 'ip netns list' and 'ip netns exec ue1 ifconfig'
Now you are ready to make a call.
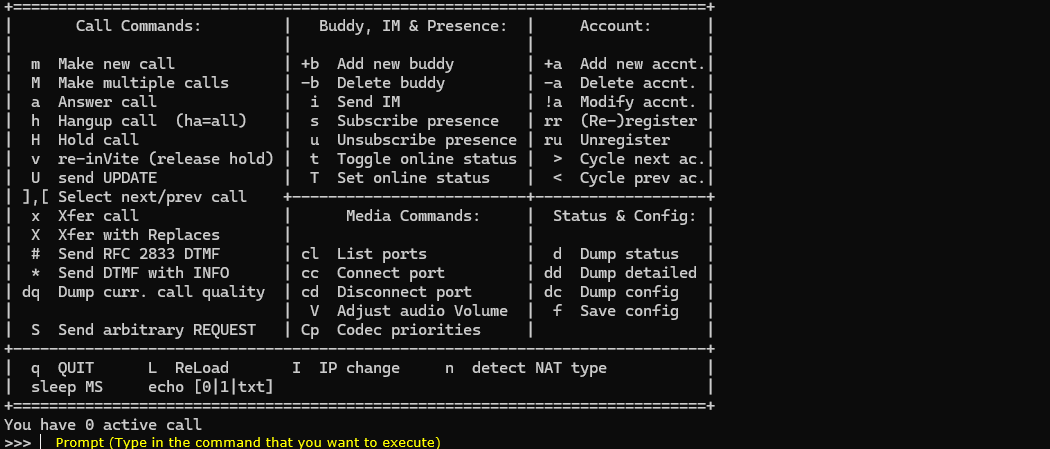
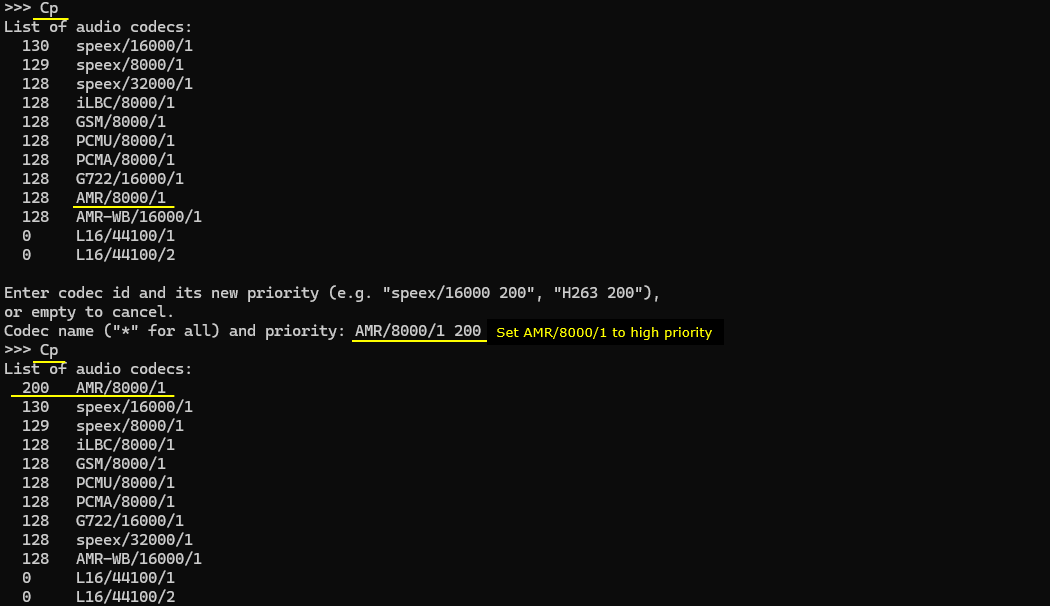
Before making a call, you may want to give high priority for the specific codec that you want to use (In this tutorial, I decided to put AMR/8000/1 at the highest priority so that the UA use that codec by default).
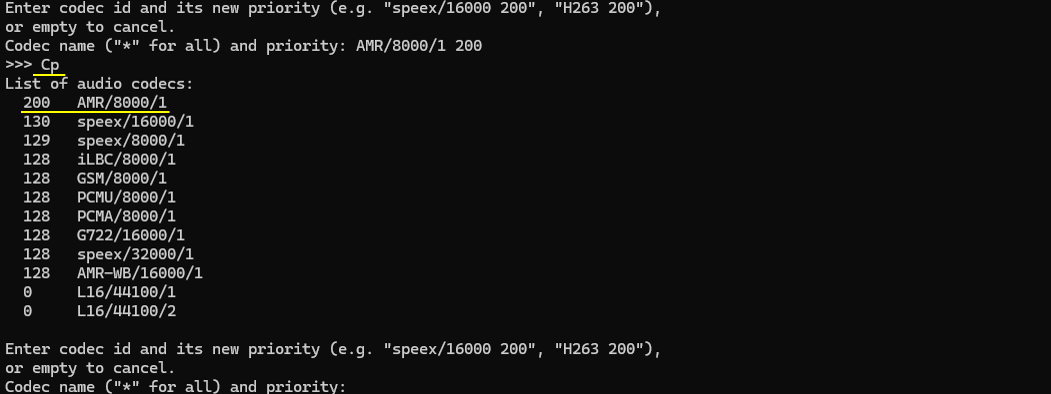
For this, switch to pjsip command screen and run 'Cp' command and set the priority 200 to AMR/8000/1 200 by typing in 'AMR/8000/1 200' at the command prompt : Codec name("*" for all) and priority.
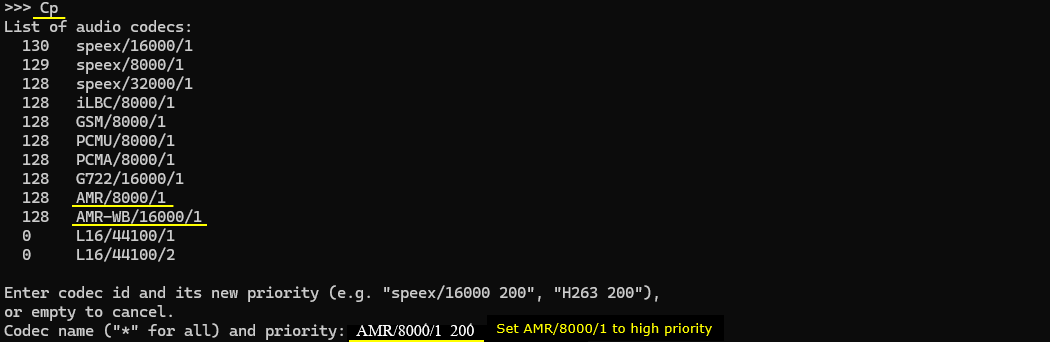
Now you can confirm that 'AMR/8000/1' is at the top of the codec list
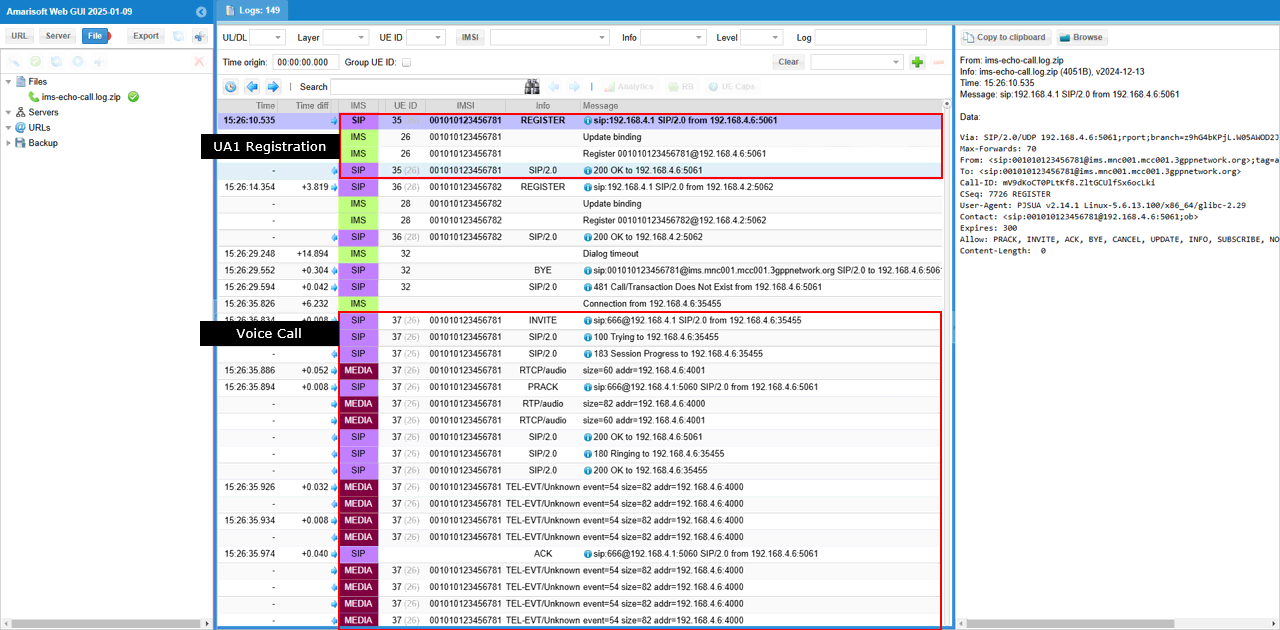
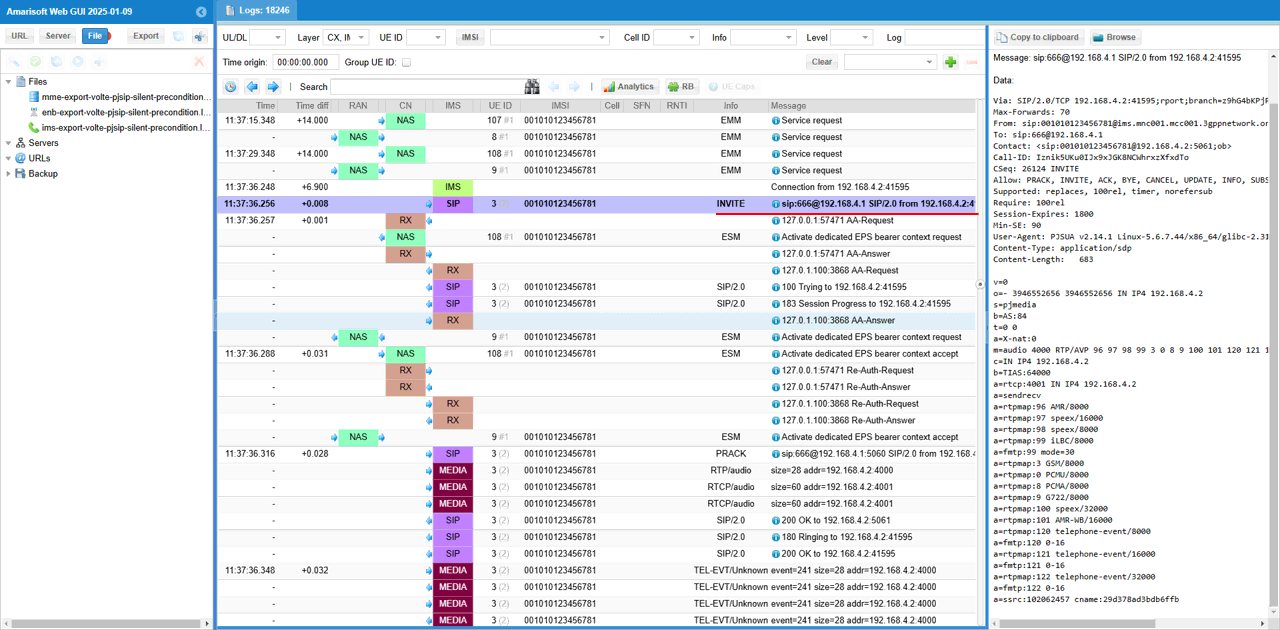
Now you can initiate a call with 'm' command. Type in 'm' and enter, and then type in 'sip:666@192.168.4.1' at the prompt 'Make call'.

Then you see the sequence of call setup SIP message sequences starting from INVITE message.
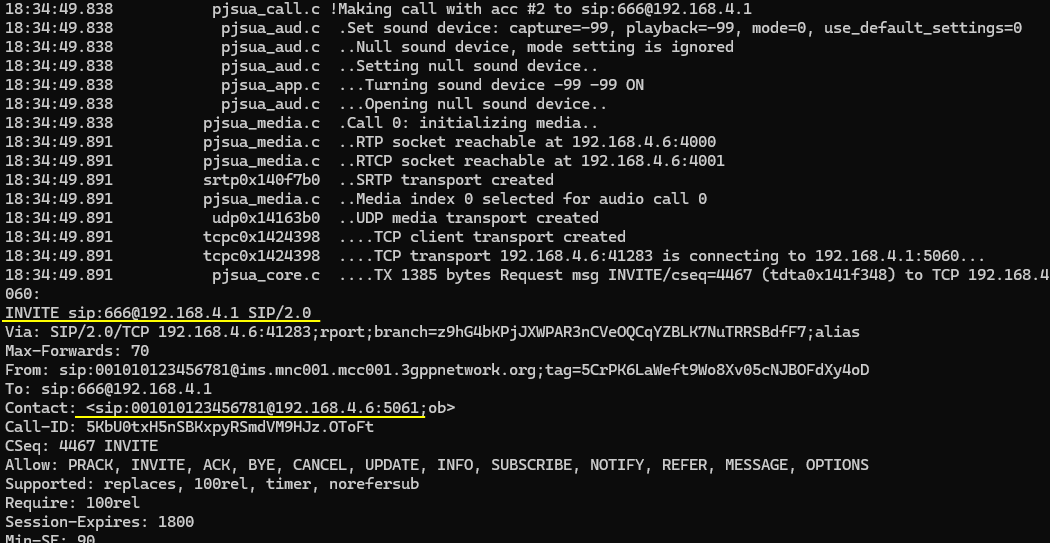
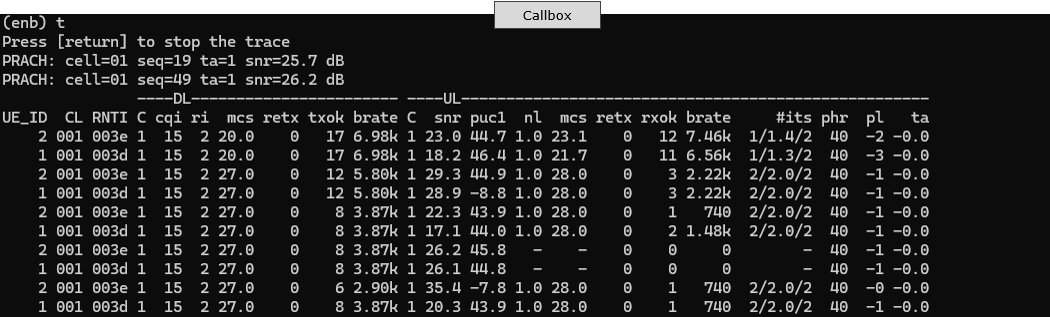
You can check and analyze full details of SIP message transactions RTP/RTCP traffics in WebGUI.
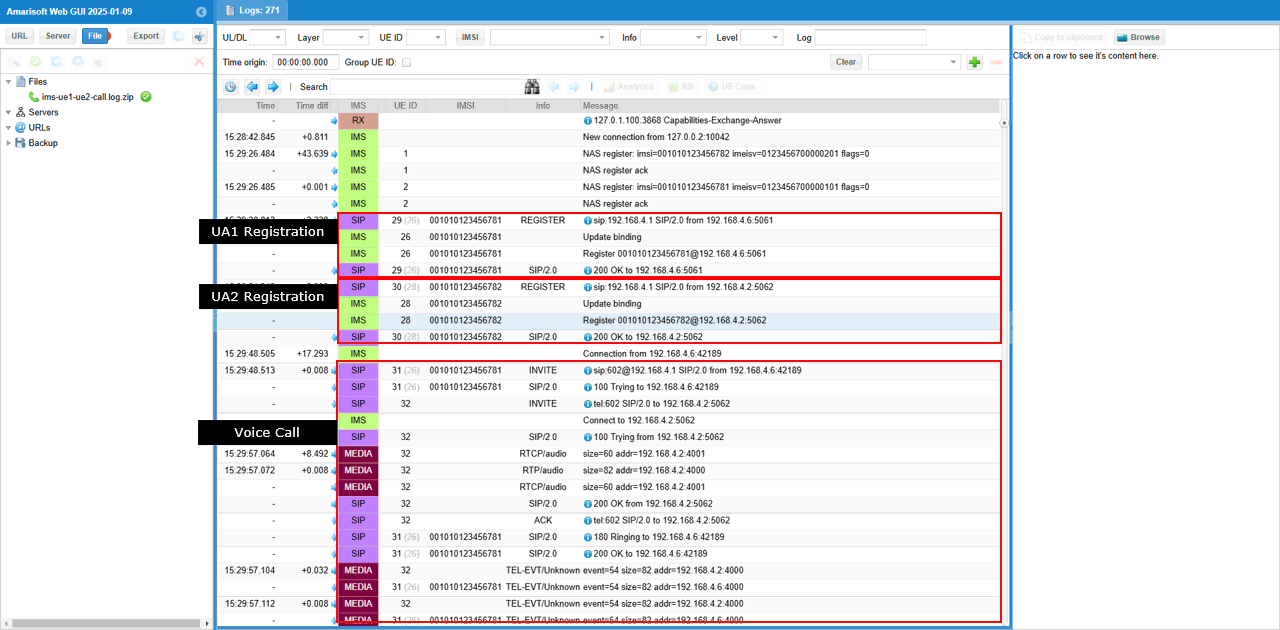
SubTest 2 : End to End Call
In this test, I will use only one PJSIP UA and make an end to end call (Call From UA1 to UA2 in this tutorial).
First run eNB and check if the cell configuration is configured as intended.
Now power on UEs on UEsim. I powered on all UEs using 'power_on *' command
Wait until UE complete the initial attach.
After the initial attach, switch to (mme) screen and make it sure the connected UEs are properly registered and assigned with 'ims/ip'.
Now switch to (ims) screen and check out the result of 'users' command. Here you see the impi for the attached UEs as configured in ue-db file.
Now switch to UEsim. Open up a new command terminal or a new ssh session in addition to the ue software screen.
Move the the directory where pjsip executable is located (/root/siptrunk/pjproject-2.14.1/pjsip-apps/bin) and ensure that you need configuration file ready for the UA that you will use.
Run a pjsip ua within a ue1 name space(ip netns exec ue1 ./pjsua-x86_64-unknown-linux-gnu --config-file=pjsua-amarisoft-1.cfg)

Run a pjsip ua within a ue2 name space(ip netns exec ue1 ./pjsua-x86_64-unknown-linux-gnu --config-file=pjsua-amarisoft-2.cfg)
After the registration is completed, go to (ims) screen on Callbox (eNB) and check 'users' there. Now you see both UE1 and UE2 are bound with PJSIP UAs.
At this point, open up another terminal or ssh session on UEsim and can check out the details of pdn (tun interface) that is associated with the UE with the command 'ip netns list' and 'ip netns exec ue1 ifconfig' and do the same thing with ue2.
Now you are ready to make a call.
Before making a call, you may want to give high priority for the specific codec that you want to use (In this tutorial, I decided to put AMR/8000/1 at the highest priority so that the UA use that codec by default).
For UA1, switch to pjsip command screen and run 'Cp' command and set the priority 200 to AMR/8000/1 200 by typing in 'AMR/8000/1 200' at the command prompt : Codec name("*" for all) and priority.
For UA2, switch to pjsip command screen and run 'Cp' command and set the priority 200 to AMR/8000/1 200 by typing in 'AMR/8000/1 200' at the command prompt : Codec name("*" for all) and priority.

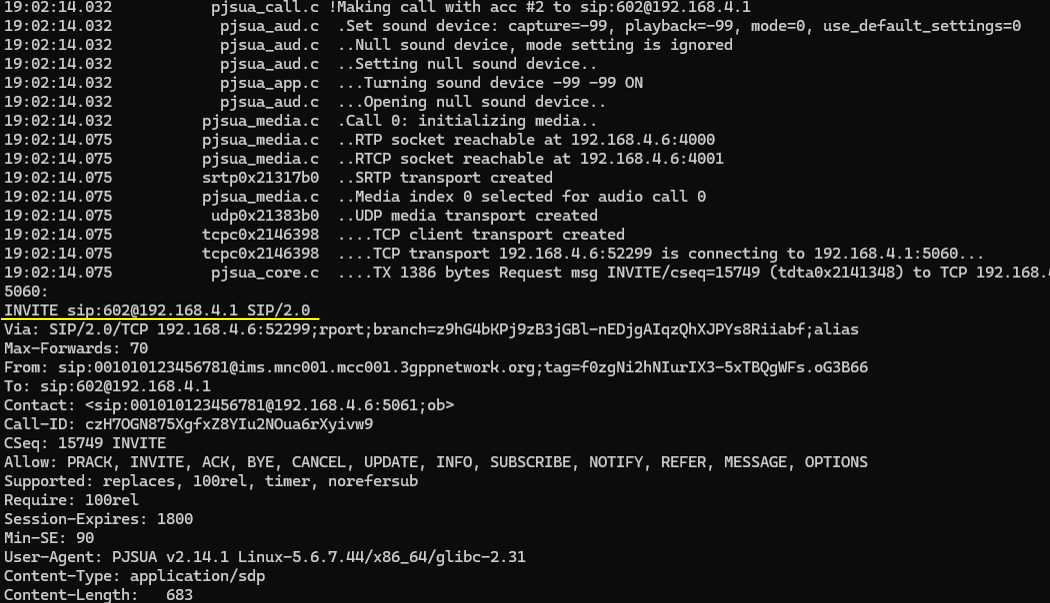
Now you can initiate a call from UA1 with 'm' command. Type in 'm' and enter, and then type in 'sip:602@192.168.4.1' at the prompt 'Make call'.

Then you see the sequence of call setup SIP message sequences starting from INVITE message.
Answer from UA2 with the command 'a' and codec '200'
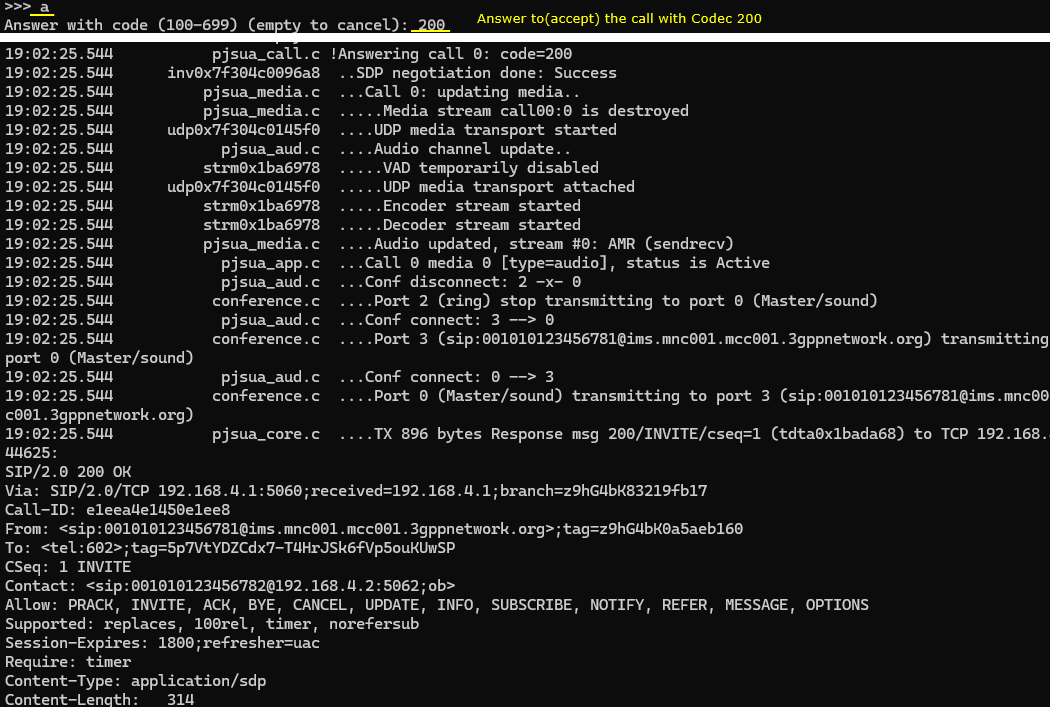
If you want to stop (hang up) the call, run the command 'h' in any UA.
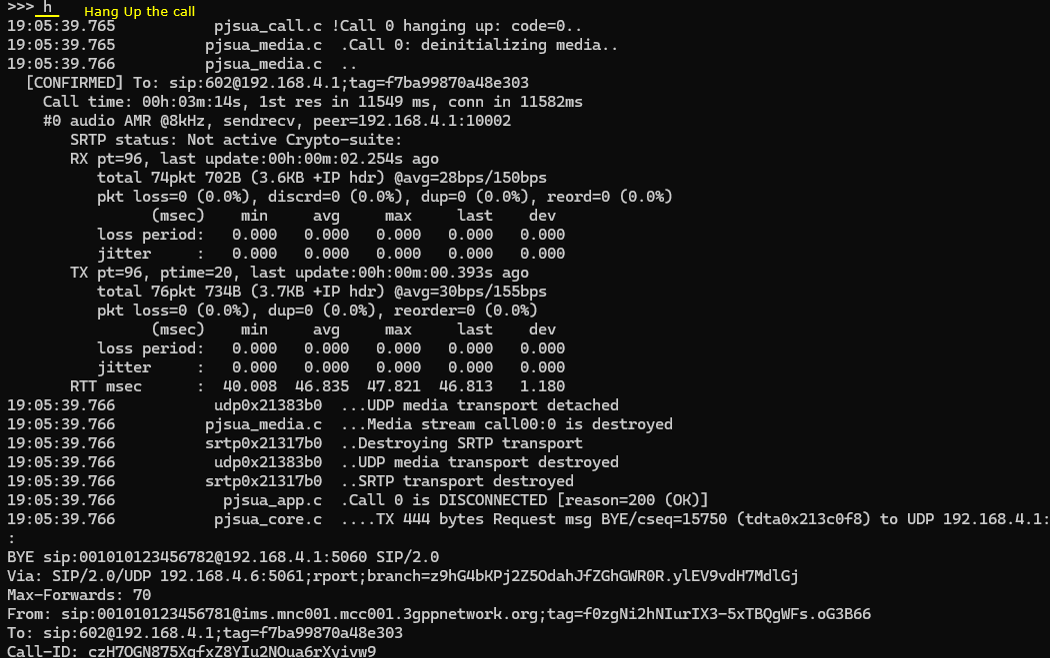
You can check and analyze full details of SIP message transactions RTP/RTCP traffics in WebGUI.
Test 2 : VoLTE with Silent Precondition
Configuration
I used the enb-lte-pjsua.cfg which is copied from enb.default.cfg.
I used mme-pjsua.cfg which is copied and modified from mme-ims.cfg and used ims-pjsua.cfg which is copied and modified from ims.default.cfg. Along with this, ue_db-ims-pjsua.cfg is used.

On UEsim side, ue-pjsua.cfg is used. It is copied and modified from ue.default.cfg
For the configurations for pjsip UAs, pjsua-amarisoft-1.cfg and pjsua-amarisoft-2.cfg are used.
eNB Configuration
The eNB configuration enb-lte-pjsua.cfg has no special configuration. It is almost same as the default LTE configuration.
In this tutorial, FDD(TDD 0), 20Mhz BW(N_RB_DL 100) and 2x2 MIMO (N_ANTENNA_DL 2) are configured, but you can configure it in anyway as long as your DUT works with the configuration.
In cell parameter, LTE band 7 is configured but you can configure in any way as long as your DUT support it
\
MME Configuration
In mme-pjsua-silent-precondition.cfg file, you would notice that ue_db-ims-pjsua-silent-precondition.cfg is used as ue db.
pdn setup is important in this configuration. In this tutorial, we will force UE to use ims pdn. so make it sure that configuration for ims is configured as you intended. I just used the default ims configuration. In addition, be aware that ue_db-ims-pjsua-silent-precondition.cfg is used for this tutorial.
In addition, not the qos settings in rx interface parameter. In case of precondition off, this parameter is not important. But in precondition or silent precondition, this setting is used to assign QCI for the dedicated bearer.


UE DB Configuration
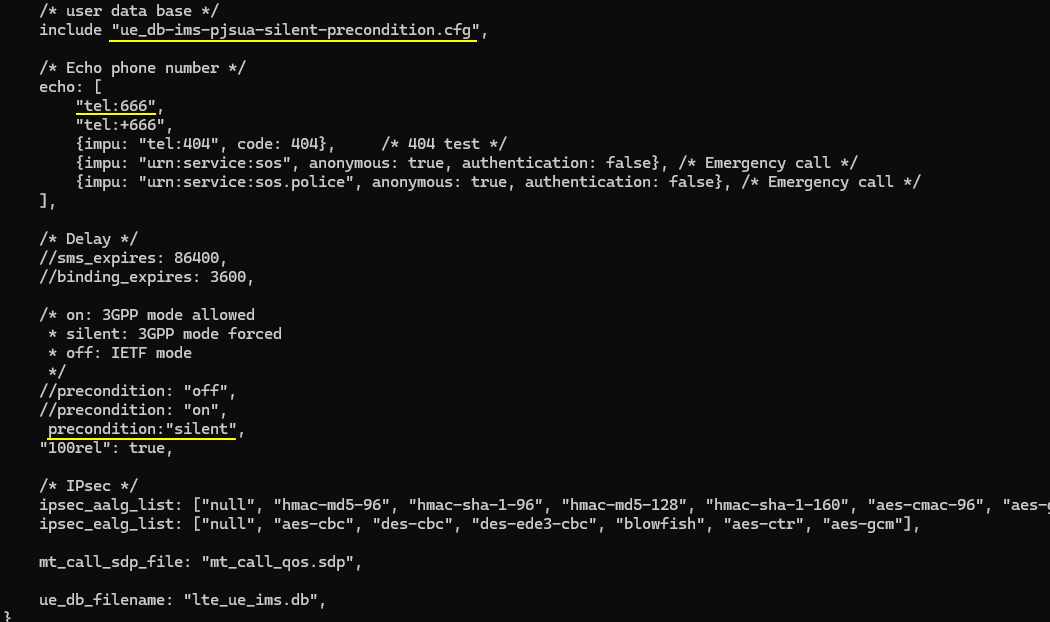
In ue_db-ims-pjsua-silent-precondition.cfg , we configured two sets of USIM/ISIM profile for the two UEs as follows. Pay attention to imsi, impi,impu,tel parameters for each UE. To apply the silent precondition, "precondition:silent" is added to impu parameter of each UE.

IMS Configuration
In ims-pjsua-silent-precondition.cfg, be aware that ue_db-ims-pjsua-silent-precondition.cfg is used as ue db and precondition is set to off. and precondition parameter is set to 'silent' (precondition:"silent") The loopback phone number is set to 666 which is the default setting.
UEsim Configuration
In ue-pjsua.cfg , set multi_ue since we will use more than one UE in this tutorial and you can configure other parameters in cells [ ] block in anyway you like as long as it matches the eNB configuration.
In ue_list, configure two UEs that will be associated with the two PJSIP UAs. Note that apn is explcitly set to "ims" (apn: "ims") and tun interface is enabled(tune_setup_script: "ue-ifup")
PJSIP Configuration
In pjsua-amarisoft-1.cfg , set authentication center to Amarisoft authentication center on callbox (realm ims.mnc001.mcc001.3gppnetwork.org) , set registrar to Amarisoft callbox IMS center (sip:192.168.4.1 in this case) and specify UA id for UA1. Keep in mind that the id should match the configuration in ue-db.
In pjsua-amarisoft-2.cfg , set authentication center to Amarisoft authentication center on callbox (realm ims.mnc001.mcc001.3gppnetwork.org) , set registrar to Amarisoft callbox IMS center (sip:192.168.4.1 in this case) and specify UA id for UA1. Keep in mind that the id should match the configuration in ue-db.
Perform the test
In this test, I will show you how to do VoLTE loopback call and end-to-end call between two different UAs.
SubTest 1 : VoLTE Loopback
In this test, I will use only one PJSIP UA and make a looback call.
First run eNB and check if the cell configuration is configured as intended.
Now power on UEs on UEsim. I powered on all UEs using 'power_on *' command, but you can power on only one UE with 'power_on' if you want.
Wait until UE complete the initial attach.
After the initial attach, switch to (mme) screen and make it sure the connected UEs are properly registered and assigned with 'ims/ip'.
Now switch to (ims) screen and check out the result of 'users' command. Here you see the impi for the attached UEs as configured in ue-db file.
Now switch to UEsim. Open up a new command terminal or ssh session in addition to the ue software screen.
Move the the directory where pjsip executable is located (/root/siptrunk/pjproject-2.14.1/pjsip-apps/bin) and ensure that you need configuration file ready for the UA that you will use.
Run a pjsip ua within a ue1 name space(ip netns exec ue1 ./pjsua-x86_64-unknown-linux-gnu --config-file=pjsua-amarisoft-1.cfg)
![]()
then you will get long and scrolling text as below. You would see SIP 'REGISTER' message is sent out from PJSIP UA.
After the registration is completed, go to (ims) screen on Callbox (eNB) and check 'users' there. Now you see the UE1 is bound with PJSIP UA.
At this point, open up another terminal or ssh session on UEsim and can check out the details of pdn (tun interface) that is associated with the UE with the command 'ip netns list' and 'ip netns exec ue1 ifconfig'
Now you are ready to make a call.
Before making a call, you may want to give high priority for the specific codec that you want to use (In this tutorial, I decided to put AMR/8000/1 at the highest priority so that the UA use that codec by default).
For this, switch to pjsip command screen and run 'Cp' command and set the priority 200 to AMR/8000/1 200 by typing in 'AMR/8000/1 200' at the command prompt : Codec name("*" for all) and priority.
Now you can confirm that 'AMR/8000/1' is at the top of the codec list
Now you can initiate a call with 'm' command. Type in 'm' and enter, and then type in 'sip:666@192.168.4.1' at the prompt 'Make call'.
Then you see the sequence of call setup SIP message sequences starting from INVITE message.
You can check and analyze full details of SIP message transactions RTP/RTCP traffics in WebGUI.
As shown below, at the time of Attach Accept ACI=5 is assigned and this will apply to the default bearer.
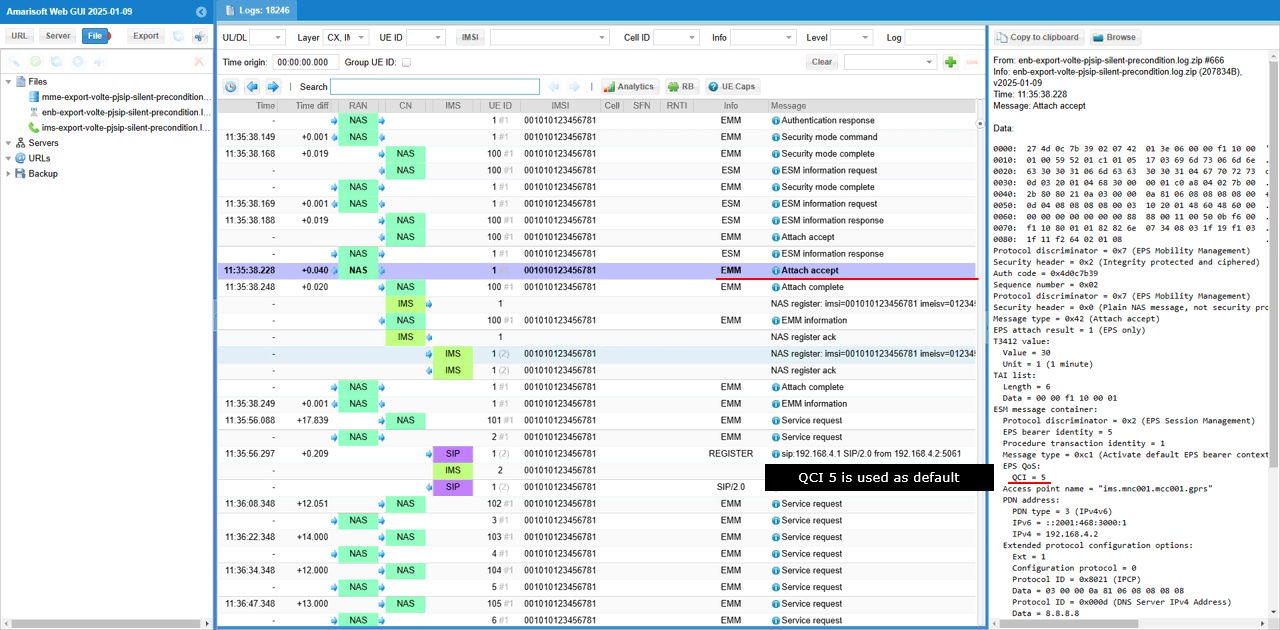
Here UE perform IMS registeration. The SIP signaling goes through the default bearer with QCI 5.
Now UE is establishing Voice call by sending SIP INVITE.
With the trigger of INVITE, the gNB/MME establish a dedicated bearer with QCI 1. From this on, SIP signaling will go through the default bearer with QCI 5 and MEDIA traffic will go through the dedicated bearer with QCI 5.