
CPRI-RRH
This tutorial shows how to connect an RRH (Remote Radio Head) to Amarisoft Callbox over CPRI interface. Amarisoft Callbox provide/support a dedicated CPRI Card (just as dedicated SDR card is supported) via PCI slots. This would have a few different use cases
- Live Network Deployment : With this setup and Amarisoft software stack (live network statemachine, multi UE support etc), you can deploy a livenetwork (e.g, as a macro cell or a private network)
- Testing a Development Board over Baseband : If the DUT support CPRI interface, you can test the DUT over baseband without RF.
Table of Contents
Introduction
The integration of Remote Radio Heads (RRHs) with the Amarisoft Callbox platform over the Common Public Radio Interface (CPRI) represents a significant advancement in flexible, software-defined radio access network (RAN) deployments. The Amarisoft Callbox, a comprehensive software suite designed for LTE, NB-IoT, and 5G NR testing and deployment, supports direct connectivity to RRHs via a dedicated CPRI card, which is installed in the host system's PCI slots. This architecture decouples the radio and baseband processing elements, allowing for centralized, scalable, and efficient network deployment. By leveraging the CPRI protocol—a high-speed, standardized interface for communication between radio equipment control (REC, typically implemented in the Callbox) and the remote radio equipment (RRE, i.e., the RRH)—this solution enables both live network operations (as in macro cell or private network scenarios) and advanced baseband testing without the need for RF transmission. Amarisoft’s flexible software stack, featuring live network state machines, multi-UE (User Equipment) support, and dynamic configuration capabilities, extends the utility of this setup to a wide range of use cases, from development board validation to full-scale RAN deployment. This tutorial provides a detailed, step-by-step guide to connecting an RRH to the Amarisoft Callbox via CPRI, highlighting the required hardware, configuration steps, and practical applications in both test and deployment environments.
-
Technology Background and Architecture
- Amarisoft Callbox: A versatile software platform for 4G/5G RAN and core network emulation, supporting radio access and core network protocols, end-to-end testing, and live deployments.
- Remote Radio Head (RRH): A modular radio transceiver unit typically installed close to the antenna, interfacing with the central baseband unit (BBU) via high-speed digital connections.
- CPRI Interface: An industry-standard protocol for transporting digitized radio signals between the baseband and radio units, supporting high throughput and low latency over fiber or high-speed copper links.
- Dedicated CPRI Card: A hardware PCI card supported by Amarisoft, enabling direct, low-latency CPRI connectivity to RRHs, analogous to the use of SDR cards for RF interfacing.
-
Relevance and Importance of the Tutorial Topic
- Enables deployment of live, production-grade LTE/5G networks with a scalable, centralized architecture.
- Facilitates comprehensive testing and validation of development boards and devices under test (DUTs) that support CPRI, without the need for RF environments.
- Supports advanced use cases, such as private cellular networks, macro cell deployments, and rapid prototyping for telecom research and development.
- Demonstrates the practical use of Amarisoft’s CPRI card integration for both laboratory and field scenarios.
-
What Learners Will Gain
- Understanding of the CPRI protocol and its role in distributed RAN architectures.
- Step-by-step knowledge on configuring the Amarisoft Callbox and RRH for seamless CPRI connectivity.
- Insights into real-world deployment and testing scenarios, including setup, troubleshooting, and best practices.
- Ability to leverage Amarisoft’s flexible software stack for both live network operation and device development/testing.
-
Prerequisite Knowledge and Skills
- Familiarity with LTE/5G RAN concepts and network architecture.
- Basic understanding of the CPRI standard and digital radio interfaces.
- Experience with Amarisoft Callbox software, hardware installation (PCI cards), and network configuration.
- Access to compatible RRH hardware and the Amarisoft CPRI card for hands-on practice.
Summary of the Tutorial
This tutorial outlines the setup and testing procedure for configuring and validating a CPRI-based connection between an Amarisoft callbox and a Remote Radio Head (RRH). The methodology covers initial configuration, verification steps, and an explanation of CPRI frame mapping as implemented in Amarisoft systems.
-
Test Setup:
- A SIM card supplied with the system is utilized without modification.
- Configuration settings are required for both the Amarisoft callbox/CPRI interface and the connected RRH.
-
Key Configuration Parameters:
- Critical parameters include cpri_mult, cpri_option, cpri_mapping, cpri_rx_delay, cpri_tx_delay, cpri_tx_dbm, fast_cm_pointer, ifname, syncclock.
-
Callbox Configuration:
- The configuration file used is gnb-sa-cpri.cfg, modified from gnb-sa.cfg.
- Duplex method, channel bandwidth, and MIMO scheme must align with the RRH's capabilities.
- rf_driver is set to "sdr", but CPRI-specific parameters are used.
- cpri_mult (or cpri_option) specifies the CPRI bit rate (as multiples of 614.4 Mbps), defining the interface bandwidth.
- ifname (e.g., "cpri0") assigns the TUN interface mapped to the CPRI port.
- cpri_mapping configures the mapping method for IQ data, as per CPRI specifications.
- tx_gain and rx_gain are not applicable—RF power is managed by the RRH.
-
RRH Configuration:
- Configured and controlled via vendor-provided software, not directly by Amarisoft.
- Set center frequency and power, and enable UL/DL for each required carrier (values must match those in the gNB configuration).
- Align SSB Type and TDD UL/DL slot configurations with the gNB TDD pattern.
-
Test Execution Steps:
- Start LTE service and verify basic cell configuration.
- Check rf_info output to confirm RF is mapped to the CPRI card (look for PCIe CPRI and bit rate option details).
- Validate cell configuration using the cell and cell phy commands.
- Perform interface checks with ifconfig -all:
- Ensure 'cpri0' and TUN interfaces (tun0, tun1, tun2, tun3) are present and properly configured.
- Power on the UE and allow it to attach to the cell.
- For performance optimization, monitor parameters such as CQI, RI, retransmissions, and SNR. Adjust RRH settings as necessary for optimal results.
-
Log Analysis and Visualization:
- No CPRI-specific information is collected; logs serve as evidence of successful UE attachment via RRH + CPRI.
- Use WebGUI visualization tools for SNR, EPRE plots, physical resource utilization, and CRC distributions for further analysis and optimization.
-
CPRI Frame Structure and IQ Mapping:
- Describes the use of cpri_mapping parameter to define IQ data mapping as per CPRI specification (standard, spread, hardware-accelerated, or proprietary BF1 format).
- Frame construction involves:
- IQ mapping: Forming AxC (Antenna Carrier) samples from each antenna.
- Basic Frame: 16 words of 64 bits, with the first word as control data and remaining for AxC samples.
- Hyper Frame: Aggregation of 256 basic frames, with all control words concatenated at the start, followed by AxC groups.
- Standard mapping uses 30-bit IQ samples (15 bits I, 15 bits Q) and follows CPRI Method 1 for data organization.
Conclusion: The test procedure ensures correct configuration and operation of the CPRI interface between an Amarisoft callbox and RRH, verification of interface setup, and provides methodologies for performance monitoring and optimization. The tutorial also explains the underlying frame structure and mapping methodology to ensure compliance and interoperability.
Test Setup
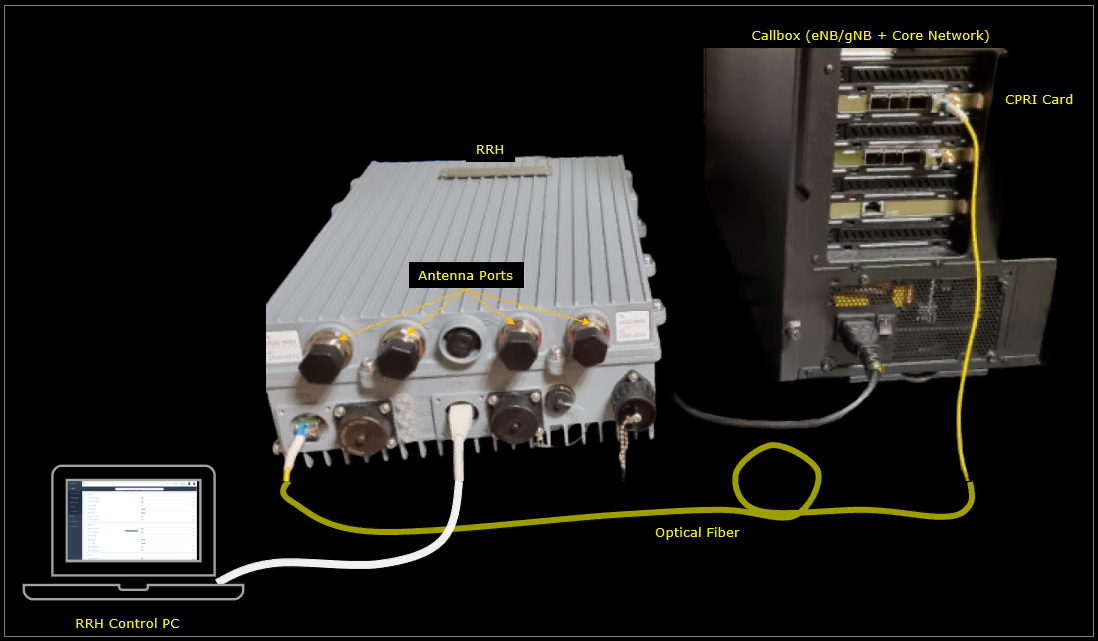
Test setup for this tutorial is as shown below.
- SIM Card used in this tutorial is the one delivered with the system as it is.
- If you want to change the configuration, The tutorial Configuration Guide would help
There are three boxes in this setup and only two of them are cabled together for traffic. The Callbox holds the CPRI card in one of its PCI slots and a single optical fiber runs from that card to the CPRI port of the RRH, so the fiber carries the whole baseband link and there is no RF between the two.
The third box is a separate PC connected to the RRH over its own ethernet link. That is the RRH control path and it has nothing to do with the Callbox. The four antenna ports on the front face of the RRH are where the RF comes out, and in this test they are what the 4x4 downlink is driven through.
Key Configuration Parameters
Followings are important configuration parameters for this tutorial. You may click on the items for the descriptions from Amarisoft documents.
Configuration
In this application, you need to do configuration settings not only for Amarisoft callbox/CPRI but also RRH(Remote Radio Head) connected to the CPRI interface.
Callbox
I used the gnb-sa-cpri.cfg which is modified from gnb-sa.cfg
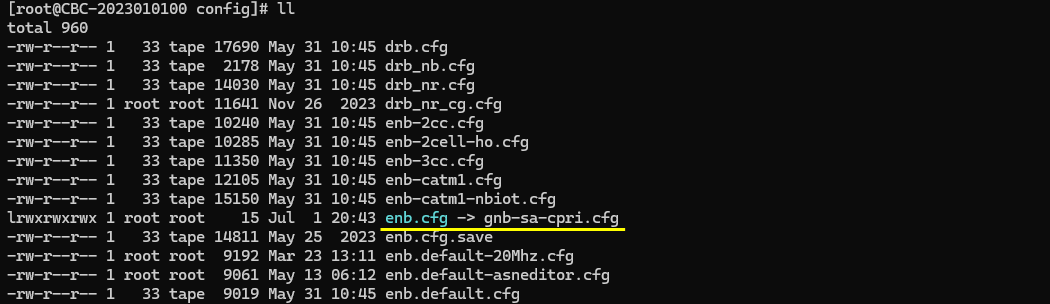
Configure gnb-sa-cpri.cfg as follows.
Specify Duplex method (NR_TDD), Channel Bandwidth (NR_BANDWIDTH) and MIMO Scheme(N_ANTENNA_DL) to match the capability of RRH(Remote Radio Head) which is connected to CPRI card. (
In this file NR_TDD is 1 for TDD with NR_TDD_CONFIG 2, NR_BANDWIDTH is 100 and N_ANTENNA_DL is 4, so the cell runs 100 MHz with 4x4 in the downlink. N_ANTENNA_UL stays at 1, and USE_SRS is 0 so periodic SRS with the uplink ports is left off. NR_LONG_PUCCH_FORMAT is 2.
Two more defines below them are the ones that do not exist in gnb-sa.cfg. CPRI is set to 1, which is what switches on the CPRI branch inside rf_driver, and CPRI_BANDWIDTH is 100, which selects which of the two CPRI branches in that block applies. Keep CPRI_BANDWIDTH and NR_BANDWIDTH consistent, because the first picks the CPRI line rate and the second sizes the cell, and a mismatch leaves the link carrying the wrong amount of IQ data.
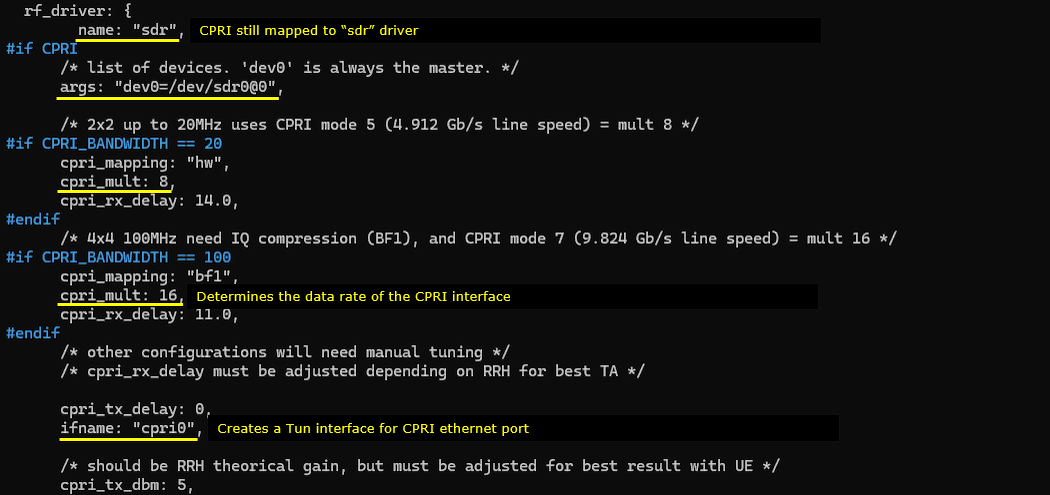
The most important part (the configuration that is unique to CPRI) is rf_driver:{ }. rf_driver name for CPRI is still set to "sdr" but most of other parameters are cpri specific configuration. cpri_mult specifies the bit rate of the CPRI interface. ifname ("cpri0" in this case) is the TUN interface that will be created and mapped to a specific CPRI port. cpri_mapping is related to 4.2.7.2. Mapping of IQ data of CPRI specification.
The whole block sits behind #if CPRI, and args is "dev0=/dev/sdr0@0" with dev0 always being the master device. Two branches follow it. The CPRI_BANDWIDTH == 20 branch is for 2x2 up to 20 MHz and sets cpri_mapping "hw" with cpri_mult 8, which is CPRI mode 5 at 4.912 Gb/s line speed. That branch is not used in this test.
The branch that applies here is CPRI_BANDWIDTH == 100. It sets cpri_mapping to "bf1" and cpri_mult to 16, which is CPRI mode 7 at 9.824 Gb/s, and cpri_rx_delay to 11.0. 4x4 at 100 MHz does not fit on the link without IQ compression, which is why this branch uses bf1 rather than the standard mapping. cpri_rx_delay is the one value here that depends on the RRH you plug in, and it has to be adjusted per RRH to get the timing advance right.
Below the branches, cpri_tx_delay is 0, ifname is "cpri0" and cpri_tx_dbm is 5. cpri_tx_dbm should start from the theoretical gain of the RRH, but it is a value you end up tuning against what the UE actually reports rather than one you can take from the datasheet and leave alone.
|
Option |
Bit Rate (Mbits/sec) |
Line Coding |
Bit Rate Calculation (Mbits/sec) |
Electrical |
Optical |
|
|
Short Range |
Long Range |
|||||
|
Option 1 |
614.4 |
|
E.6 |
OS.6 |
OL.6 |
|
|
Option 2 |
1,228.8 |
|
E.12 |
OS.12 |
OL.12 |
|
|
Option 3 |
2,457.6 |
|
E.24 |
OS.24 |
OL.24 |
|
|
Option 4 |
3,072.0 |
|
E.30 |
OS.30 |
OL.30 |
|
|
Option 5 |
4,915.2 |
|
E.48 |
OS.48 |
OL.48 |
|
|
Option 6 |
6,144.0 |
|
E.60 |
OS.60 |
OL.60 |
|
|
Option 7 |
9,830.4 |
|
E.79 |
N/A |
N/A |
|
|
Option 7A |
8,110.08 |
|
E.96 |
OS.96 |
OL.96 |
|
|
Option 8 |
10,137.6 |
|
E.99 |
OS.99 |
OL.99 |
|
|
Option 9 |
12,165.12 |
|
E.119 |
OS.119 |
OL.119 |
|
|
Option 10 |
24,330.24 |
|
E.238 |
OS.238 |
OL.238 |
|
One thing to notice is that tx_gain and rx_gain are not applicable for this setup since the RF power is controlled by RRH.
They are still left in the file at tx_gain 90.0 and rx_gain 60.0, which are the values gnb-sa.cfg came with, and I did not bother removing them. Changing either one has no effect on the transmitted power in this setup, so if the level coming out of the RRH is wrong, that is a cpri_tx_dbm and RRH matter and not something you fix here.

RRH
In this setup, RRH is not directly controlled by Amarisoft Callbox. The RRH should be configured and controlled by a separate software provided by RRH manufacturer.
The RRH used in this tutorial provide a configuration setting program as shown below.
It is a browser based tool and the settings are grouped down the left side, Carrier Configuration, TDD Configuration, Band Configuration, System Info and LAN Connectivity under Settings, with Alarms, Maintenance and Module DL Test below them. Only the first two matter for getting this link up. The row of buttons across the top is Query, Query All, Set, Clear, Show ID and Show Range, and the two I use are Query All to read back what the RRH is currently holding and Set to push a change, so nothing you type into a field takes effect until you press Set.
Carrier Configuration is the page open here, and it lists the carriers one block at a time, Carrier 0 Info, Carrier 1 Info, Carrier 2 Info and so on. Each block carries the same set of rows, so once you know what to do with carrier 0 the rest are the same work repeated.
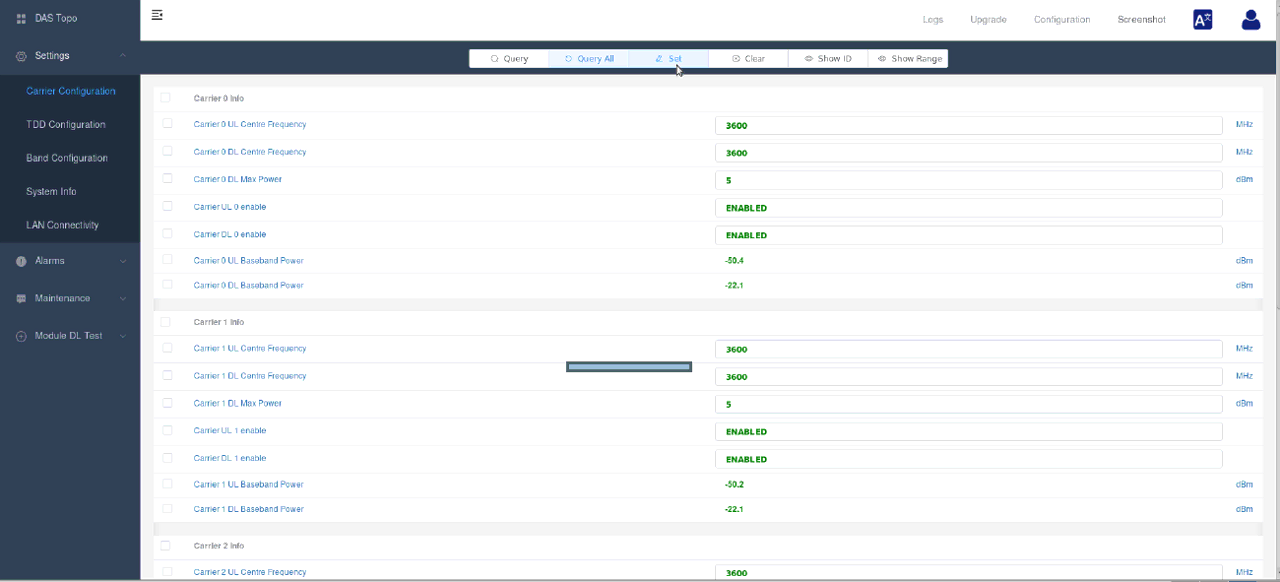
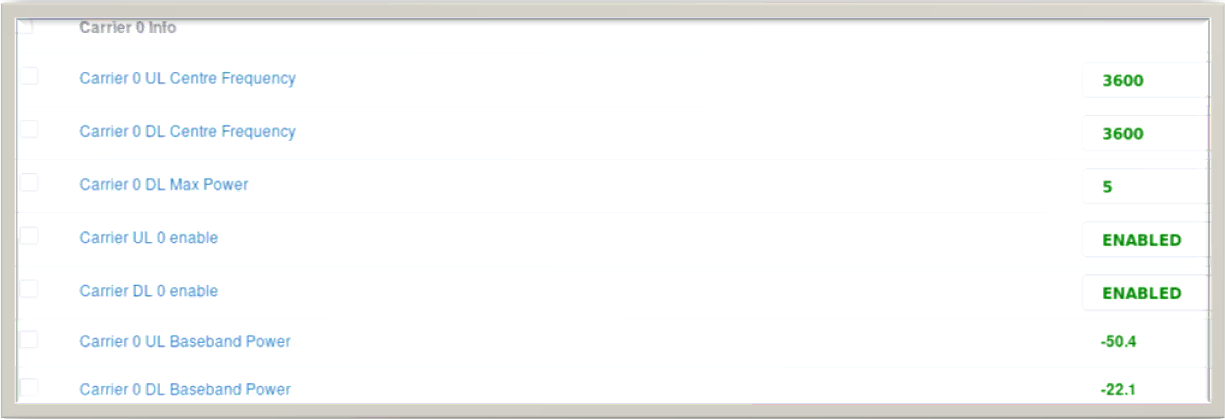
Specify the Center Frequency and Power as you like and Enable UL/DL for every carrier that you need. The Center Frequency you set here should match the frequency settings in gNB configuration file.
On carrier 0 I set both UL Centre Frequency and DL Centre Frequency to 3600 MHz, which is the 3600 MHz that dl_nr_arfcn 640000 lands on in the gNB configuration. DL Max Power is 5 dBm, and Carrier UL 0 enable and Carrier DL 0 enable are both ENABLED. Leaving either of those two disabled is an easy way to end up with a cell that comes up on the Callbox but never reaches a UE.
The last two rows, UL Baseband Power at -50.4 dBm and DL Baseband Power at -22.1 dBm, are readings and not things you type in. They are worth a look after Set, because they tell you whether the RRH is actually receiving IQ data over the CPRI link on that carrier.
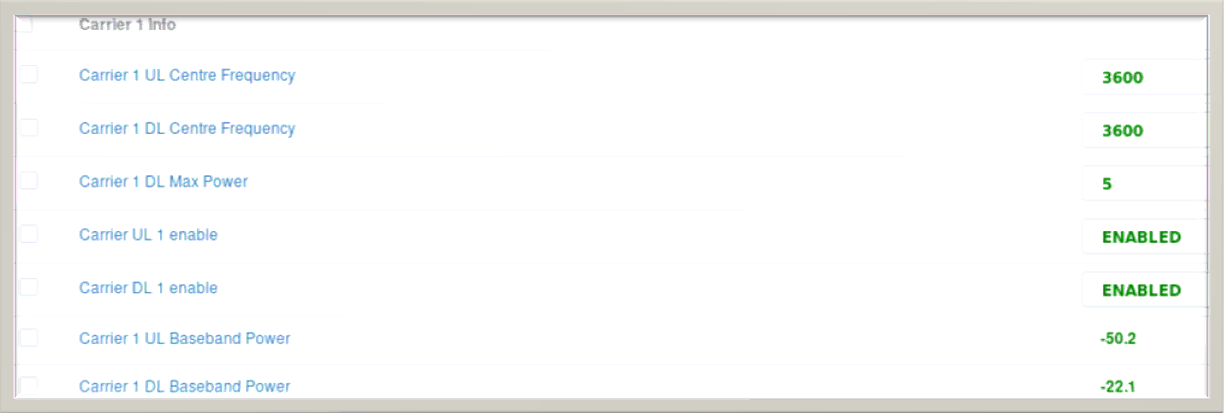
Carrier 1 gets exactly the same treatment, 3600 MHz on both UL and DL Centre Frequency, DL Max Power 5 dBm and both enables set to ENABLED. I did the same on the remaining carriers, because all of them belong to the one 100 MHz cell in this test and none of them may be left behind on a different frequency. Its UL Baseband Power reads -50.2 dBm against the -50.4 dBm on carrier 0, which is the kind of small spread between paths that you expect.
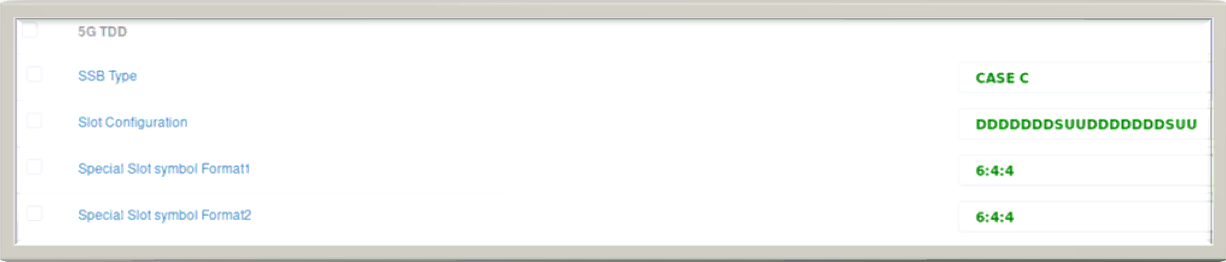
Set the SSB Type and TDD UL/DL configuration(Slot configuration and Special Slot symbols) to match tdd pattern you set in gNB configuration.
These four rows sit under 5G TDD. SSB Type is CASE C, and Slot Configuration is DDDDDDDSUUDDDDDDDSUU, twenty slots written out in full, which is seven downlink slots, one special slot and two uplink slots repeated twice. Special Slot symbol Format1 and Format2 are both 6:4:4, that is 6 downlink symbols, 4 guard symbols and 4 uplink symbols inside the special slot.
Every one of these has to say the same thing as the tdd_ul_dl_config in the gNB file. The RRH switches its own transmit and receive chains on this pattern, so if it disagrees with the gNB by even one slot the RRH will be receiving while the gNB transmits and nothing will get through. Change the pattern on the gNB side and you have to come back here and change it again.
Perform the test
Start LTE service and check basic cell configuration.
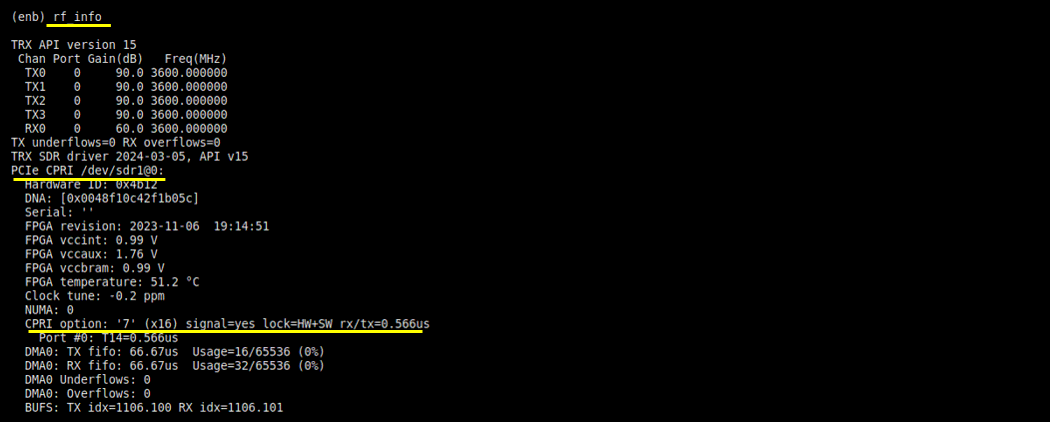
It would be good to check rf_info. You can see some of the output details that indicates the RF is mapped to CPRI card rather than regular sdr card as highlighed below.
PCIe CPRI indicates that CPRI card is plugged in PCI card and CPRI option indicates CPRI bit rate (option: '7' (x16) in this case.
On the same CPRI option line, signal=yes and lock=HW+SW are the two words to look for. They say the fiber is carrying a signal and that the link is locked in both hardware and software, and without them nothing else on the page is worth reading. rx/tx=0.566us and Port #0: T14=0.566us are the measured round trip on that port, which is what cpri_rx_delay is tuned against.
The channel table at the top shows TX0 through TX3 and RX0, all on port 0 at 3600.000000 MHz, so the four downlink chains and the single uplink chain agree with N_ANTENNA_DL 4 and N_ANTENNA_UL 1, and the frequency agrees with what I set on the RRH. Further down, FPGA temperature is 51.2 C and Clock tune is -0.2 ppm, and DMA0 Underflows and Overflows both read 0 along with TX underflows=0 and RX overflows=0 at the top. Those counters climbing is the first sign that the link cannot keep up with the IQ rate you asked for.
Now try out 'cell' and 'cell phy' to check if the cell is configured as intended.
cell gives one line, cell 0x001 on n78 with TAC 0x000064, dl_arfcn 640000, pci 500, prach_seq 1, dl_gain 0.0 and plmn 00101. cell phy fills in the rest, BW 100 on port 0 with DL ARFCN 640000 at ANT 4, NL 4, SCS 30 and QAM 256, UL ARFCN 640000 at ANT 1, NL 1, and the SSB on ARFCN 637344 at SCS 30.
Nothing in either output says CPRI. The cell looks exactly as it would on an SDR card, which is the point, and the only place the CPRI card shows up is rf_info. What is worth cross checking here is the ANT 4 and ANT 1 against the carriers you enabled on the RRH, and dl_arfcn 640000 against the 3600 MHz centre frequency you typed into the RRH tool.

Another thing to check (at least once when you try the CPRI for the first time) is the output of 'ifconfig -all'. Make sure that you see 'cpri0' TUN interface (the ifname you set in the configuration file) and tun0,1,2,3 are created properly.
|
cpri0: flags=4098<BROADCAST,MULTICAST> mtu 1500 ether d6:45:94:92:4c:e8 txqueuelen 1000 (Ethernet) RX packets 0 bytes 0 (0.0 B) RX errors 0 dropped 251448 overruns 0 frame 0 TX packets 0 bytes 0 (0.0 B) TX errors 0 dropped 0 overruns 0 carrier 0 collisions 0
tun0: flags=4305<UP,POINTOPOINT,RUNNING,NOARP,MULTICAST> mtu 1500 inet 192.168.2.1 netmask 255.255.255.0 destination 192.168.2.1 unspec 00-00-00-00-00-00-00-00-00-00-00-00-00-00-00-00 txqueuelen 500 (UNSPEC) RX packets 0 bytes 0 (0.0 B) RX errors 0 dropped 0 overruns 0 frame 0 TX packets 4 bytes 204 (204.0 B) TX errors 0 dropped 0 overruns 0 carrier 0 collisions 0
tun1: flags=4305<UP,POINTOPOINT,RUNNING,NOARP,MULTICAST> mtu 1500 inet 192.168.3.1 netmask 255.255.255.0 destination 192.168.3.1 unspec 00-00-00-00-00-00-00-00-00-00-00-00-00-00-00-00 txqueuelen 500 (UNSPEC) RX packets 58 bytes 9081 (8.8 KiB) RX errors 0 dropped 0 overruns 0 frame 0 TX packets 74 bytes 20085 (19.6 KiB) TX errors 0 dropped 0 overruns 0 carrier 0 collisions 0
tun2: flags=4305<UP,POINTOPOINT,RUNNING,NOARP,MULTICAST> mtu 1500 inet 192.168.4.1 netmask 255.255.255.0 destination 192.168.4.1 inet6 fe80::cead:dd2a:f2d1:9ce4 prefixlen 64 scopeid 0x20<link> inet6 2001:468:3000:1:: prefixlen 48 scopeid 0x0<global> unspec 00-00-00-00-00-00-00-00-00-00-00-00-00-00-00-00 txqueuelen 500 (UNSPEC) RX packets 48 bytes 21046 (20.5 KiB) RX errors 0 dropped 0 overruns 0 frame 0 TX packets 3490252 bytes 5228152173 (4.8 GiB) TX errors 0 dropped 0 overruns 0 carrier 0 collisions 0
tun3: flags=4305<UP,POINTOPOINT,RUNNING,NOARP,MULTICAST> mtu 1500 inet 192.168.5.1 netmask 255.255.255.0 destination 192.168.5.1 inet6 fe80::6755:cf48:fc02:ba1f prefixlen 64 scopeid 0x20<link> inet6 2001:468:4000:1:: prefixlen 48 scopeid 0x0<global> unspec 00-00-00-00-00-00-00-00-00-00-00-00-00-00-00-00 txqueuelen 500 (UNSPEC) RX packets 0 bytes 0 (0.0 B) RX errors 0 dropped 0 overruns 0 frame 0 TX packets 132 bytes 6432 (6.2 KiB) TX errors 0 dropped 0 overruns 0 carrier 0 collisions 0 |
Power on UE and let UE attach to the cell. (
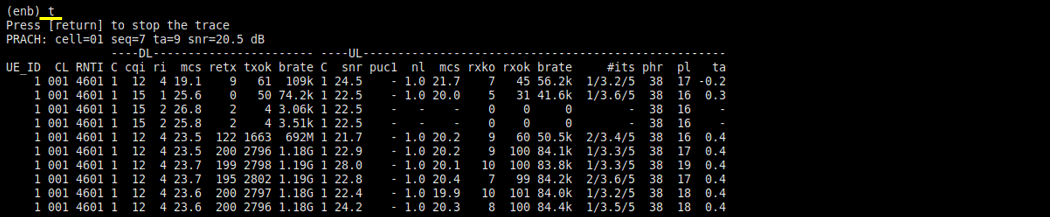
The trace opens with PRACH: cell=01 seq=7 ta=9 snr=20.5 dB, so the preamble came back through the RRH and the fiber at a healthy level, and the periodic line follows from there. In this run cqi settles at 12 to 15 and ri reaches 4, which is the 4x4 downlink being used for all four layers rather than falling back to fewer. DL mcs runs between 19.1 and 26.8 and DL brate climbs to about 1.19G once the four layers are in use.
On the uplink side snr is between 21.7 and 28.0 dB, mcs sits near 20 and brate is around 84k, with retx in the low hundreds against txok figures of 2796 to 2802, so a small but not zero retransmission rate. phr reads 38 and ta hovers around 0.3 to 0.4. These are the numbers to write down before you start changing anything on the RRH, because the only way to tell whether a tweak helped is to compare against a run you already have.
Log Analysis
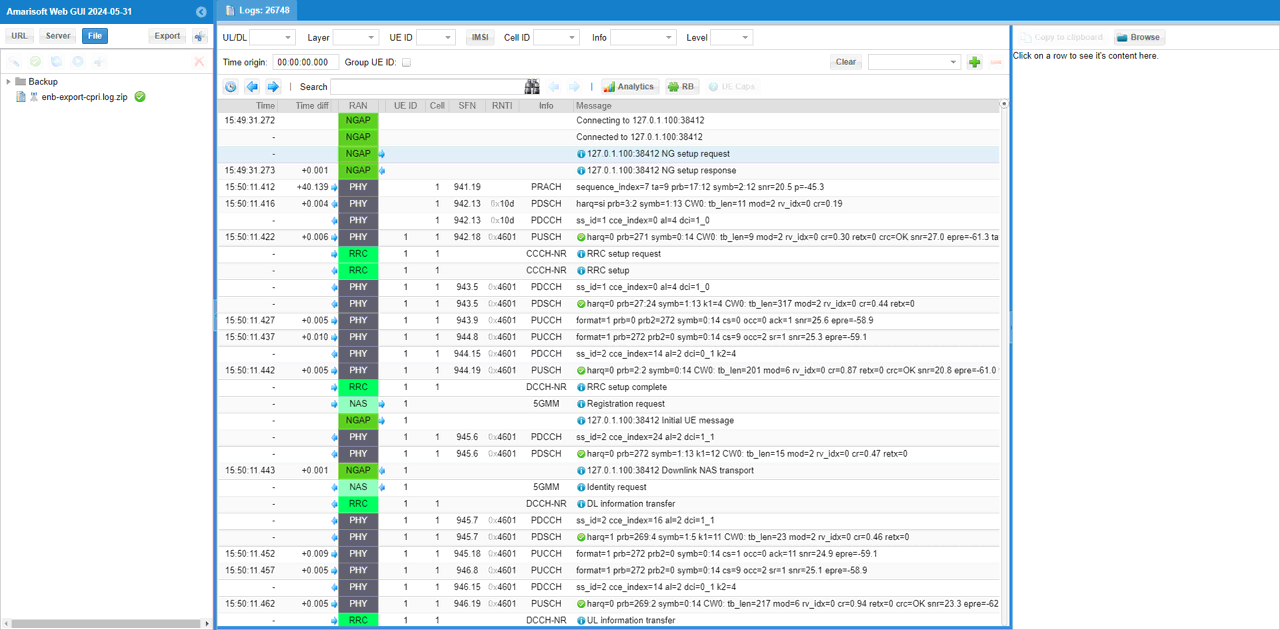
There is nothing specific for log analysis for CPRI since we are not collecting any CPRI specific information. I attached the log mainly as a evidence that the setup in this tutorial works properly to the point where UE camp on the network over RRH + CPRI.
What the log holds is an ordinary NR SA attach. It opens with the NGAP connection to 127.0.1.100:38412 and the NG setup request and response, then the PRACH at 15:50:11.412 with sequence_index=7 ta=9 prb=17:12 snr=20.5 p=-45.3, RRC setup request and RRC setup on CCCH-NR, RRC setup complete on DCCH-NR, and the 5GMM registration request going up as an Initial UE message.
Read against Run 03, the PRACH here is the same sequence_index=7 ta=9 snr=20.5 event, so this is the attach from that same session. Everything after it is PDCCH, PDSCH, PUCCH and PUSCH exactly as it would look on an SDR card, which is the useful part, since a CPRI link that is misconfigured never gets this far.
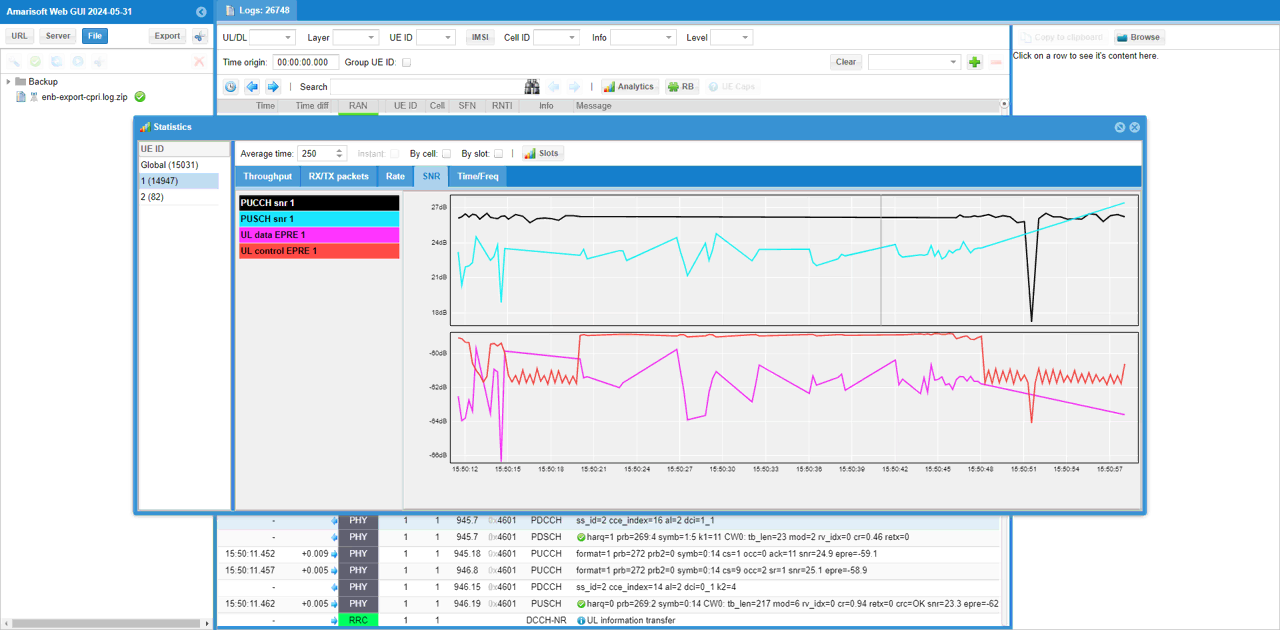
For this kind of application, one important step especially at early deployment would be to perform various tuning (optimization) in terms of power/radio link quality and performance. For this purpose, you can use various visualization features on WebGUI such as SNR, EPRE plots as shown below.
The Statistics window is opened from Analytics and the SNR tab draws four traces for the UE, PUCCH snr, PUSCH snr, UL data EPRE and UL control EPRE. The two SNR traces go in the upper plot and the two EPRE traces in the lower one, and the Average time box at the top is set to 250, which is what smooths the curves. Drop that number and you get a noisier trace that shows short events the averaged one hides.
Over the 45 seconds drawn here PUCCH snr holds fairly flat between about 24 and 27 dB while PUSCH snr wanders from roughly 19 dB up to 24 dB, and the EPRE traces run between about -66 and -60 dB. This is the pair of plots to watch while you change DL Max Power or cpri_tx_dbm, because a change that improves one and ruins the other is easy to make and hard to notice from throughput alone.
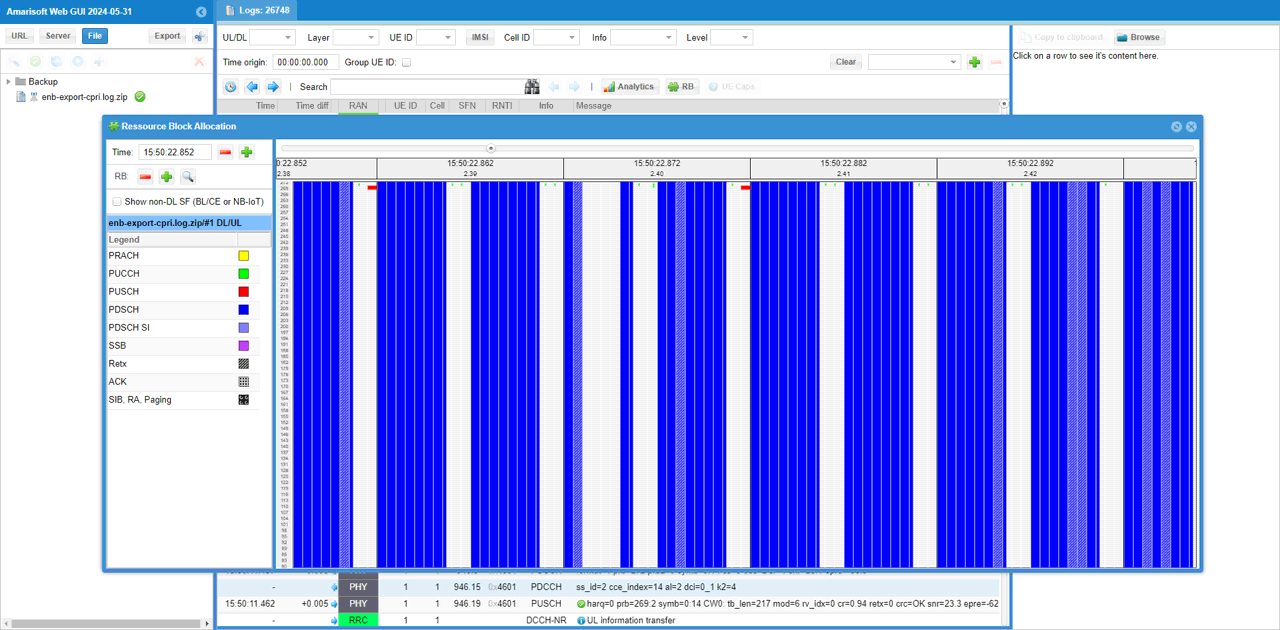
You can also visualize physical resource utilization and CRC distributions using RB map as shown below.
The window is opened at 15:50:22.852 and spans about 40 ms of the DL/UL view for cell #1. The legend down the left gives the colours, PRACH yellow, PUCCH green, PUSCH red, PDSCH dark blue, PDSCH SI and SSB in their own shades, plus hatched fills for Retx and ACK. What fills the view here is PDSCH across the full resource block range, which is the downlink traffic that produced the gigabit rate in the trace, with a few red PUSCH marks at the top of the band.
The regular white gaps between the blue columns are the slots the TDD pattern gives to the uplink, so this view is also a quick way to confirm that the pattern reaching the air is the DDDDDDDSUU one you set at both ends. If the RRH were following a different pattern you would see downlink allocations landing in slots that never make it out.
CPRI Frame Structure
In this section I will explain the CPRI frame structure and IQ mapping implemented in Amarisoft CPRI link. Of course, it complies to CPRI specification as outlined here. But CPRI specification allows subtle degree of variations in the implementation, it would be worth clearly describing the details of Amarisoft implementation here.
cpri_mapping
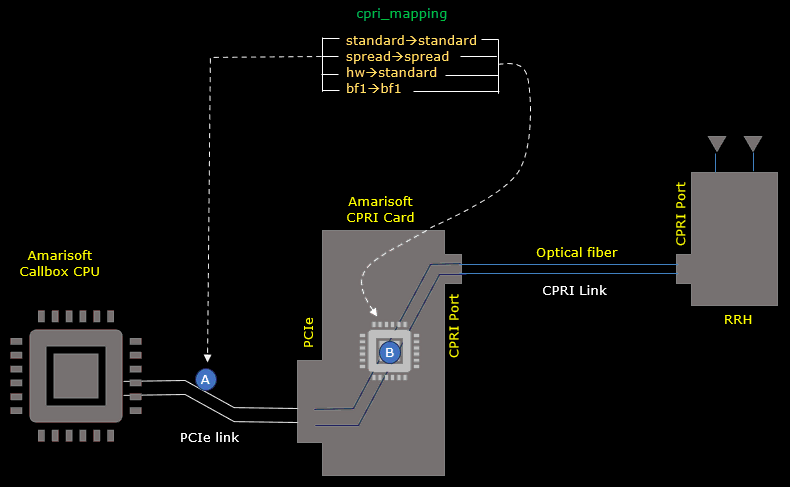
The configuration parameter that varies the structure of CPRI frame structure is cpri_mapping. In Amarisoft The I/Q data are transformed into final cpri frame at two major places. The first step is to form the frame between CPU and PCIe and the second step is to finalize the frame between PCIe and CPRI port. The cpri_mapping parameter affects these two steps.
The two steps are marked (A) and (B) here. (A) sits on the PCIe link where the Callbox CPU hands the data to the CPRI card, and (B) sits inside the card itself, between the PCIe side and the CPRI port. Past that port there is only the optical fiber and the RRH, and none of this applies there.
Each of the four values gives a pair, the format at (A) and the format at (B). standard stays standard at both, spread stays spread and bf1 stays bf1, so for those three the CPU already produces the format that leaves the card. hw is the one that differs, hw at (A) becoming standard at (B), which is how the card ends up doing the mapping work instead of the CPU while the RRH still receives the standard method 1 format.
Followings are short descriptions of each of the configuration parameter
- standard : same as I/Q mapping method1 of CPRI specification
- spread : same as I/Q mapping method3 of CPRI specification
- hw : same as standard in terms of I/Q mapping but the procedure of the mapping is mostly done by the hardware on CPRI card rather than being done by Callbox CPU
- bf1 : Amarisoft proprietary format based on Block Floating Point Compression (BF1).
Frame Structure
The frame structure of CPRI happen at a few levels of hierarchies as below.
- IQ mapping : This is the process of I/Q samples from each antenna into a basic frame. The bit structure of the I/Q samples are called AxC(Antenna Carrier).
- Constructing Basic Frame : This is the process of arranging (packing) control data and I/Q data (AxC) into a sequence of words
- Constructing Hyper Frame : This is the process of arranging (packing) the multiples of Basic Frames into a hyperframe.
The configuration parameter cpri_mapping is applied to IQ mapping step and it does not affect the process / structure of Hyperframe. We use the same Hyperframe structure as specified by CPRI specification regardless of cpri_mapping value.
standard(method 1)
This mapping mehod (i.e, cpri_mapping=standard) is based on 4.2.7.2.5. Mapping method 1: IQ sample based of CPRI specification. The structure and process of constructing the frame is illustrated as below.
Above the hyperframe there are two more levels worth knowing. A 10 ms radio frame carries 150 hyperframes, numbered #0 to #149, and the BFN at the top is the counter that runs over those frames. So the basic frame at the bottom of this hierarchy is the small unit and the 10 ms frame is 150 x 256 of them.
Inside one hyperframe, the reorganisation splits it into a Control Area and an IQ Area. The Control Area is the 256 control words, one taken from word 0 of each of the 256 basic frames, and since a basic frame is 16 words those 256 words take up the space of the first 16 basic frames. The IQ Area starts right after it, at the point marked Sample Offset, and holds the AxC groups from words 1 to 15 of every basic frame in order, so the AxC I/Q of basic frame #0 lands first, then #16, and so on out to #255.
Down at the bit level, one word is 64 bits wide, bit position 0 through 63. Two AxC samples of 30 bits each fill bits 0 to 59 of it, so the last 4 bits of every word carrying I/Q are left over and unused. In the word drawn here those two samples are the 0th and the 1st sample of AxC Ant 0, and the word above it holds the 0th and 1st sample of AxC Ant 1 in the same arrangement.
Within one 30 bit sample the I bits and the Q bits alternate, I bit 0 then Q bit 0 then I bit 1 and so on out to bit 14 of each, which is what the interleaving amounts to in practice. The control word is the exception, it uses all 64 bits and carries no I/Q at all.
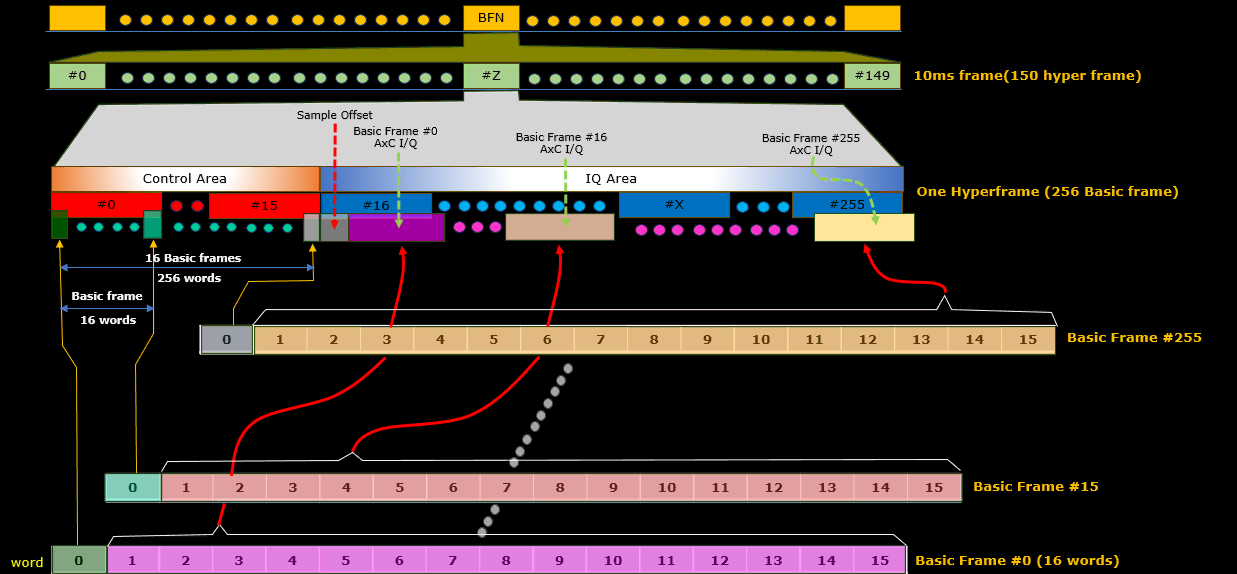
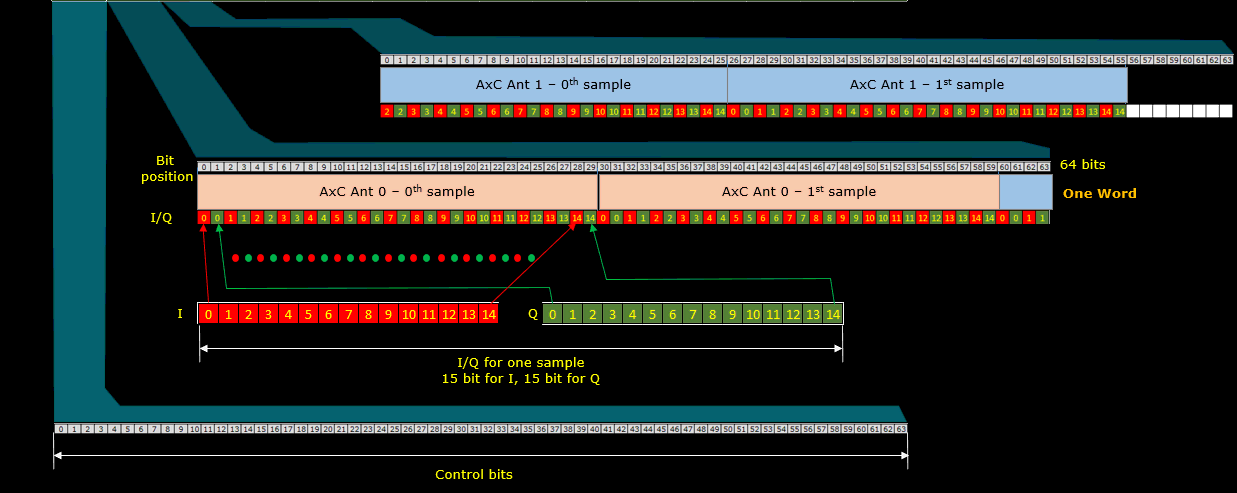
The high level procedure of the framing the data in this method can be summarized as below. (
- Each I/Q data sample is comprised of 30bits (15 bits for I, 15 bits for Q)
- I and Q bits are interleaved to construct an AxC sample (i.e, one AxC sample has the width of 30 bits)
- Prepare a basic frame which is made up of 16 words. Each word has the width of 64 bits
- The first word in a basic frame is allocated (reserved) for Control Data (Control bits) and the rest of the words are allocated with AxC samples.
- Determine the AxC group size (i.e, how many AxC samples are packed into one AxC group). In case of the example shown in the illustration, the AxC group size is 2 (i.e, there are two AxC samples within a group).
- In this case, each antenna group has two consecutive AxC from a same antenna and same carrier. For example, the first AxC group carries 'AxC Ant 0 - 0th sample' and 'AxC Ant 0 - 1st sample' and the second AxC group carries 'AxC Ant 1 - 0th sample' and 'AxC Ant 1 - 1st sample'
- Pack each AxC group into basic frame starting from word 1 of the basic frame.
- In this way, contruct 256 basic frames
- Construct a hyper frame out of the 256 basic frames. At this step, data reorganization happens. First, slice out the control word from all of the basic frame and concatenate them at the beginning of the hyperframe. And then starting from the end of the control word, concatenate all the AxC groups.