ASN.1 Editor
ASN.1 editor is a new software tool supported from 2023-08-22 release. It is a tool by which you can create a signaling message in ASN.1 format in GUI (Graphical User Interface). Once the creation is done, it can be saved in the format of JER (JSON representation) and the tool can import the ready made jer (JSON text file) as well.
RUN ASN.1 Editor from tech-academy
Table of Contents
Introduction
ASN.1 Editor is a sophisticated software tool introduced in the 2023-08-22 release, designed to streamline the creation and manipulation of signaling messages using the Abstract Syntax Notation One (ASN.1) standard. ASN.1 is a widely adopted, platform-independent notation that specifies data structures for cross-system communication, particularly in telecommunications, networking, and secure communications protocols. The ASN.1 Editor provides an intuitive Graphical User Interface (GUI), enabling users to visually construct complex ASN.1 messages without the need for manual coding. The editor supports seamless conversion between ASN.1 and JER (JSON Encoding Rules), empowering users to save messages in a standardized JSON representation or import pre-existing JER files for further editing. This tool enhances productivity, reduces errors in message definition, and bridges the gap between binary ASN.1 encoding and human-readable JSON formats. By integrating ASN.1 Editor into system development workflows, engineers and testers can accelerate the design, verification, and troubleshooting of protocol messages, ensuring interoperability and compliance across diverse platforms and applications.
-
Context and Background
- ASN.1 (Abstract Syntax Notation One) is a formal language for describing data structures used in communication protocols and data serialization.
- The editor leverages ASN.1s universality to support applications in telecom, networking, security, and data interchange standards.
- JER (JSON Encoding Rules) is a standardized method to represent ASN.1 data in JSON format, facilitating integration with web technologies and modern software stacks.
- The tool is developed and maintained by tech-academy, reflecting ongoing innovation in protocol engineering tooling.
-
Relevance and Importance
- Automates and simplifies the construction of ASN.1 messages, significantly reducing manual workload and potential for syntax errors.
- Bridges the gap between traditional ASN.1 encoding and modern JSON-based workflows, enhancing interoperability and ease of debugging.
- Essential for developers, testers, and protocol engineers working in environments where ASN.1 is the data interchange standard.
-
What You Will Gain from This Tutorial
- Comprehensive understanding of how to create, edit, and manage ASN.1 messages using the ASN.1 Editor.
- Ability to import existing JER files and export constructed messages in JER format for use in broader system integration or testing.
- Insight into best practices for ASN.1 message definition and practical experience with GUI-based ASN.1 tooling.
- Enhanced skills in managing protocol messages for telecommunications, networking, and security applications.
-
Prerequisite Knowledge and Skills
- Familiarity with ASN.1 syntax and data modeling concepts is recommended for maximum benefit.
- Basic understanding of JSON and its role in data interchange will aid in leveraging JER features.
- Experience in protocol development or testing is helpful but not mandatory; this tutorial is also accessible to beginners seeking to learn ASN.1 tooling.
Summary of the Tutorial
This tutorial describes procedures related to using the ASN.1 editor tool for LTE message creation and configuration. The following test and operational procedures are outlined:
-
Running the ASN.1 Editor Tool:
- Access the tool via a web browser at http://<ip>/lte/asn1.html from a callbox or UEsim, or launch the editor from the Tech Academy platform.
- Alternatively, use the provided shortcut link for direct access from Tech Academy.
-
Understanding Icons and Editor Navigation:
- The editor displays various icons indicating actions or item types; users should refer to these icons and the [Info] field for guidance at each step.
-
Manual ASN.1 Message Creation:
- ASN.1 messages use a tree structure, allowing multiple creation paths.
- Users should follow the [Info] field prompts and perform the indicated actions until the field is cleared, indicating completion.
- Manual creation is recommended initially to familiarize users with the editor before utilizing automated features.
-
Automatic Mandatory IE Creation:
- The editor provides a feature to automate the insertion of mandatory Information Elements (IEs) with a single button click, streamlining routine message construction.
-
Using Ready-Made Templates:
- Users can load example ASN.1 files (such as SIB1, SIB2, MeasConfig-A3, etc.) provided in the tutorial, modify them as necessary, and use them as templates for new messages.
-
Compatibility Testing between *.jer and *.asn Files:
- Open a *.asn configuration file in the ASN Editor GUI and verify error-free loading.
- Save the file as *.jer format using the editor.
- Reference the *.jer file in an LTE configuration file and specify content type as "application/json." Set parameters such as si_periodicity as needed.
- Restart the LTE service and confirm there are no errors during service initialization.
-
File Format Conversion Test:
- Convert between *.asn (gser format) and *.jer (jer format) using the lte_toolbox command-line utility:
-
- To convert *.asn to *.jer: ./lte_toolbox asn1-convert /tmp/sib1_orig.asn sib gser jer > /tmp/sib1_orig.jer
- To convert *.jer to *.asn: ./lte_toolbox asn1-convert /tmp/sib1.jer sib jer gser > /tmp/sib1.asn
Overall, the tutorial provides a comprehensive workflow for operating the ASN.1 editor, creating and modifying ASN.1 messages, ensuring compatibility between file formats, and performing format conversion for integration into LTE configurations.
How to Run
You can run the tool directly from your callbox or UEsim, or run it from tech-academy
If you want to run it from callbox/UEsim, go to http://<ip>/lte/asn1.html in a browser

You can run the ASN.1 editor from tech academy as shown below or simply click on this.

Icons
The ASN.1 editor shows several different types and input fields that shows up depending on different context. These icons can be a good guide on what to do next or what you can do with a current item. Some of the icons you would see frequently and short descriptions are listed below :
![]()
Creating a New ASN.1
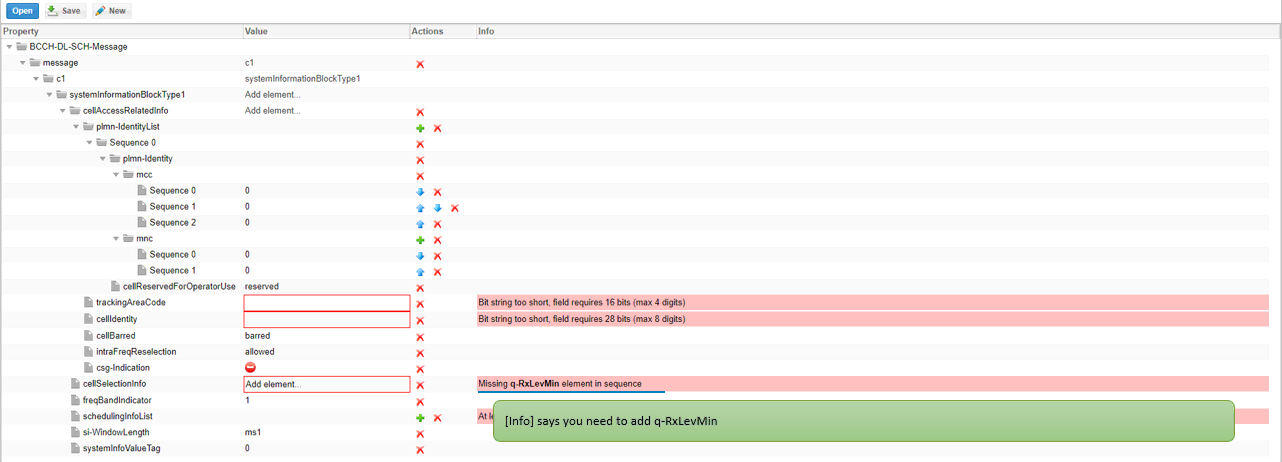
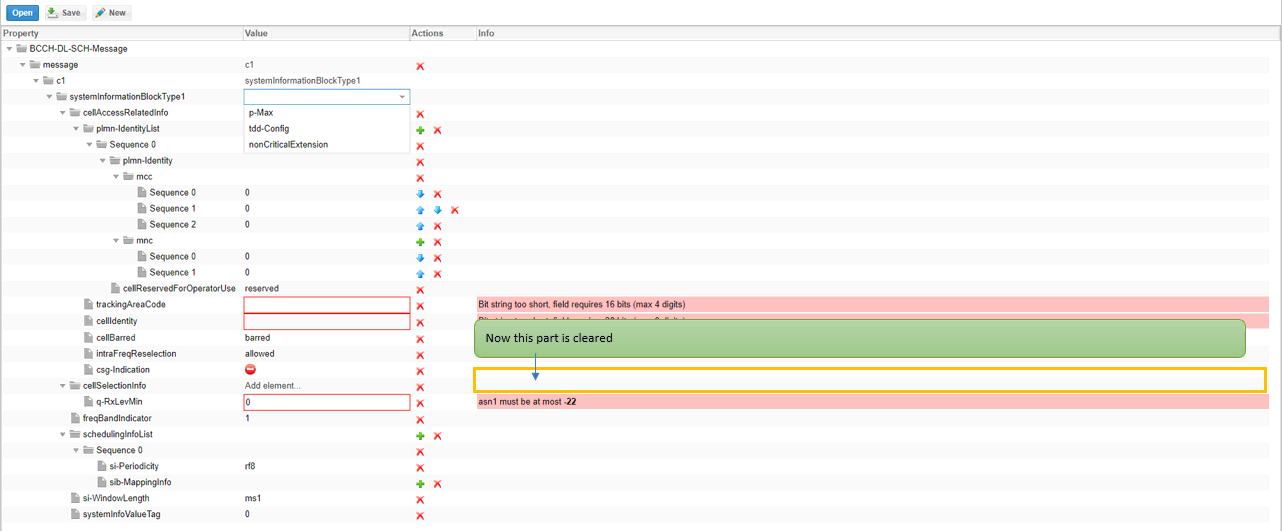
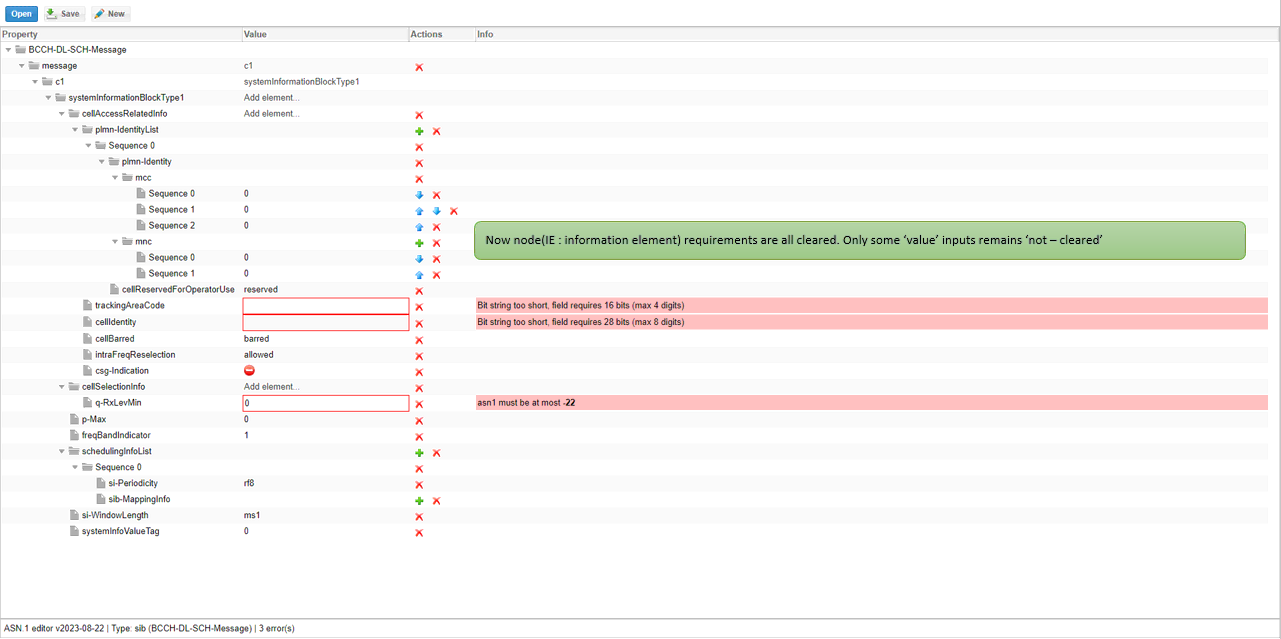
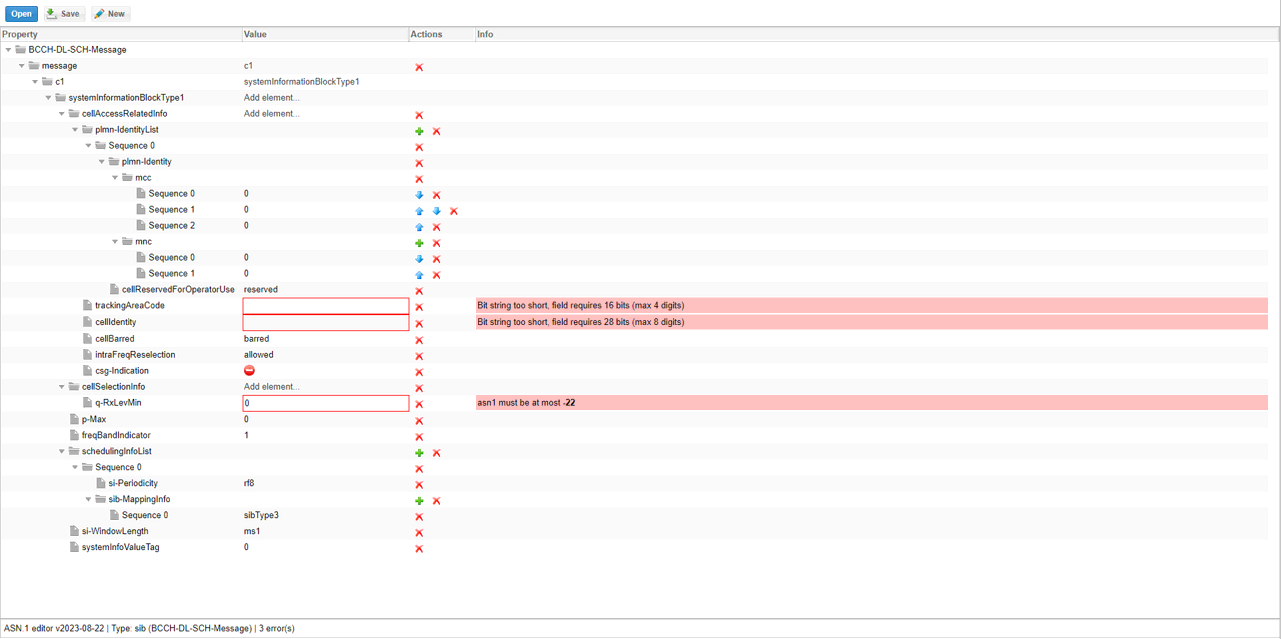
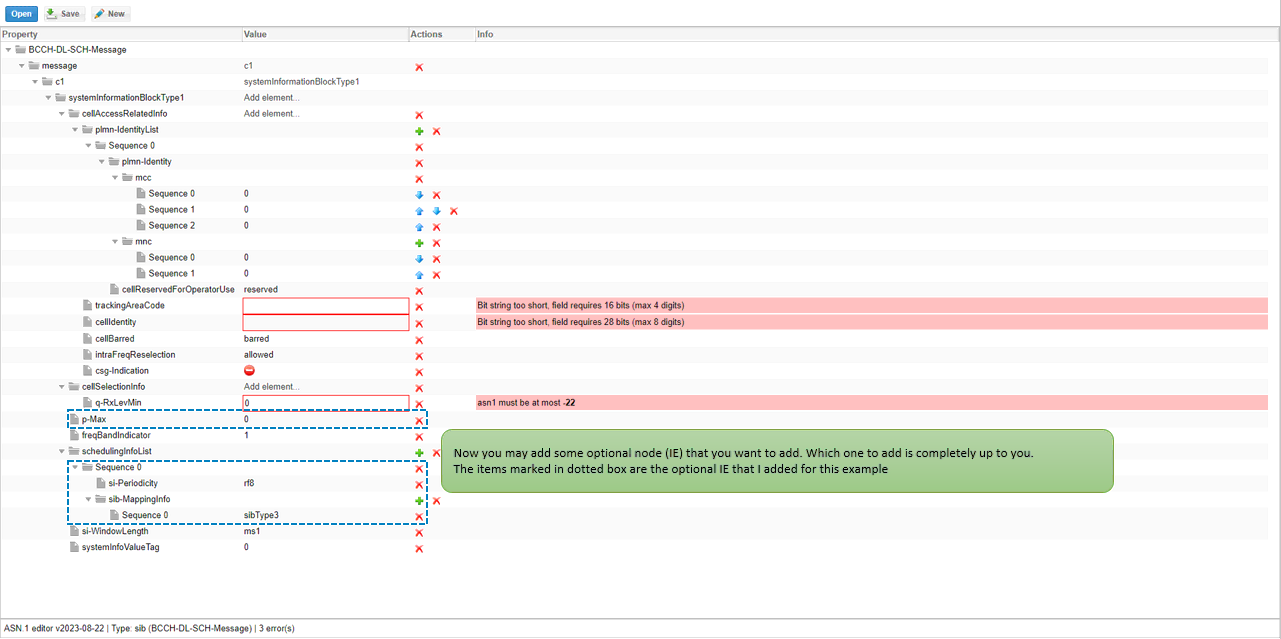
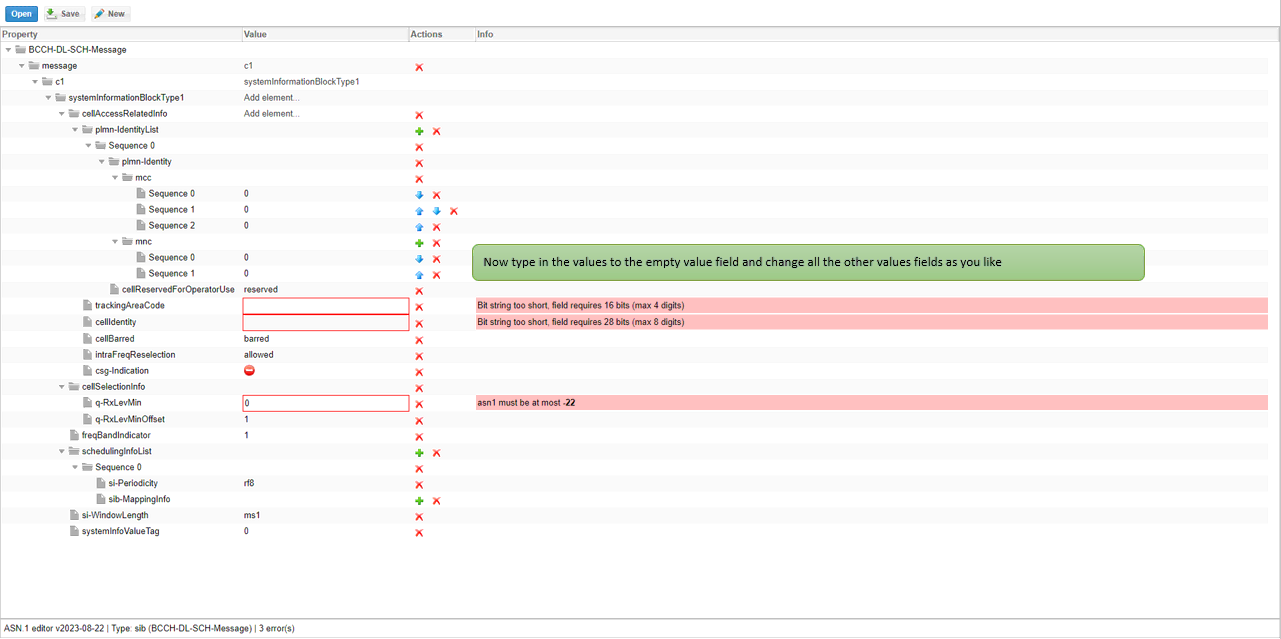
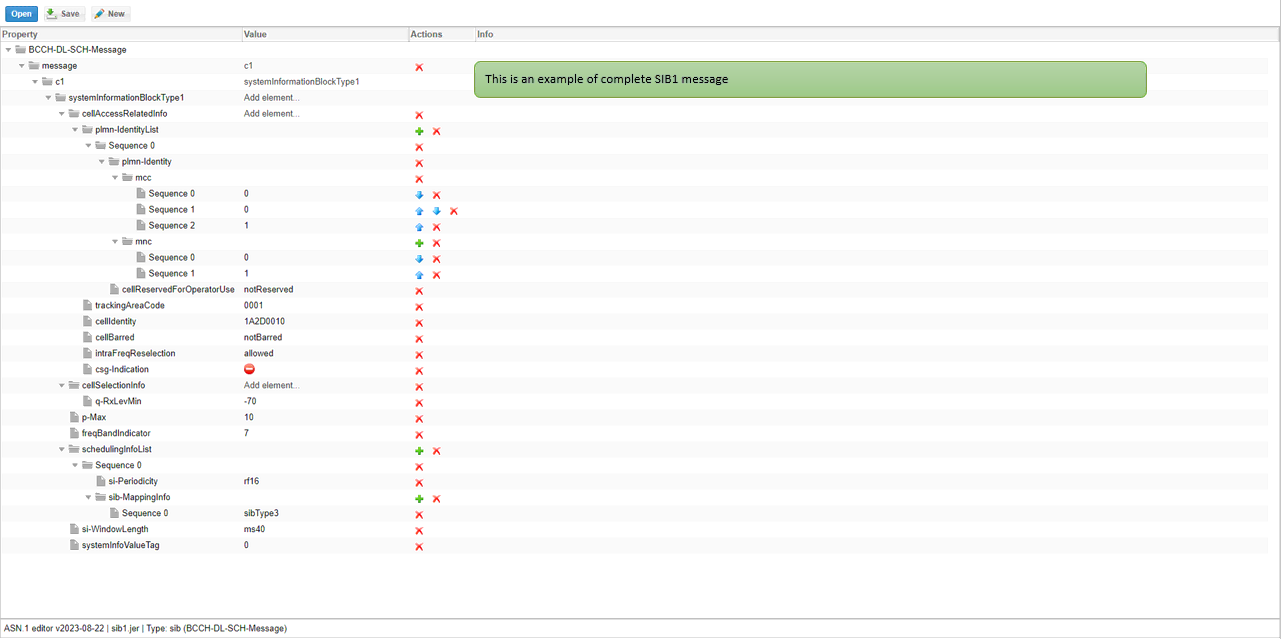
ASN.1 is a tree format and there would be almost a infinite number of different path to create a same tree. The example shown here is just one way and you may go through a little bit different path. This tool is very intuitive and just following the instruction in [Info] field and take actions until the [Info] field gets cleared as shown in this tutorial. You do not need to follow the exact steps shown here. Just take a look at the overall flow from start to the end and try yourself.

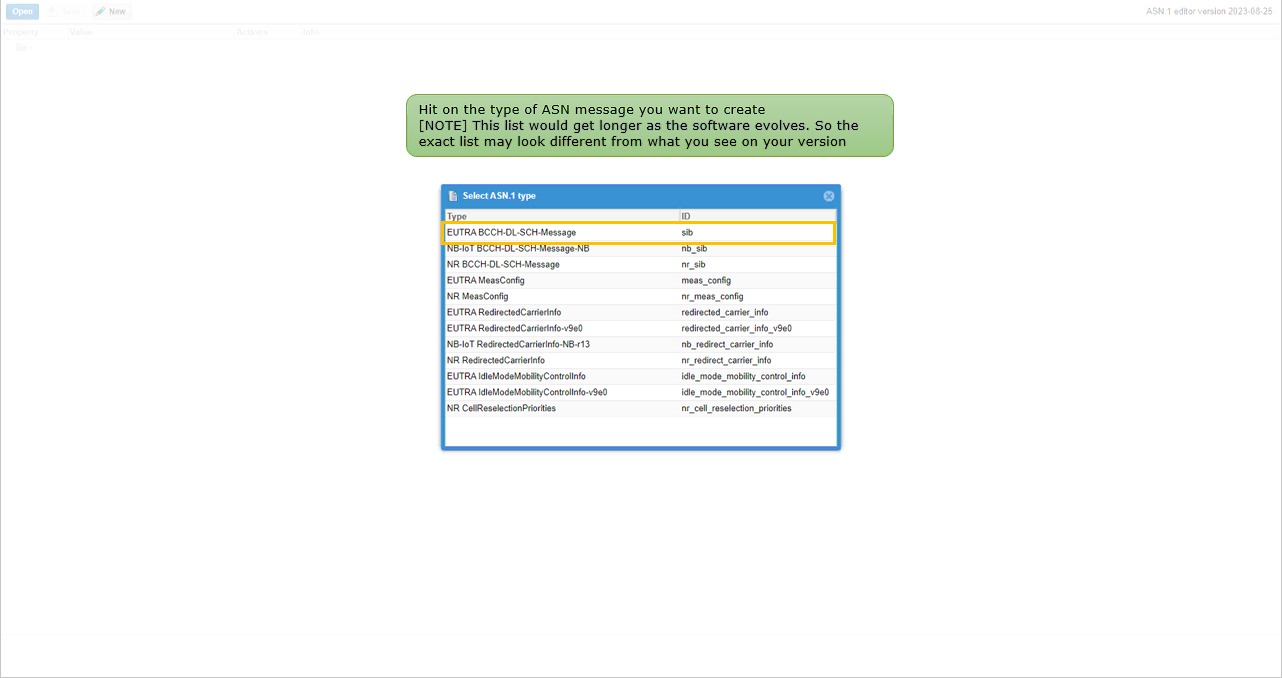


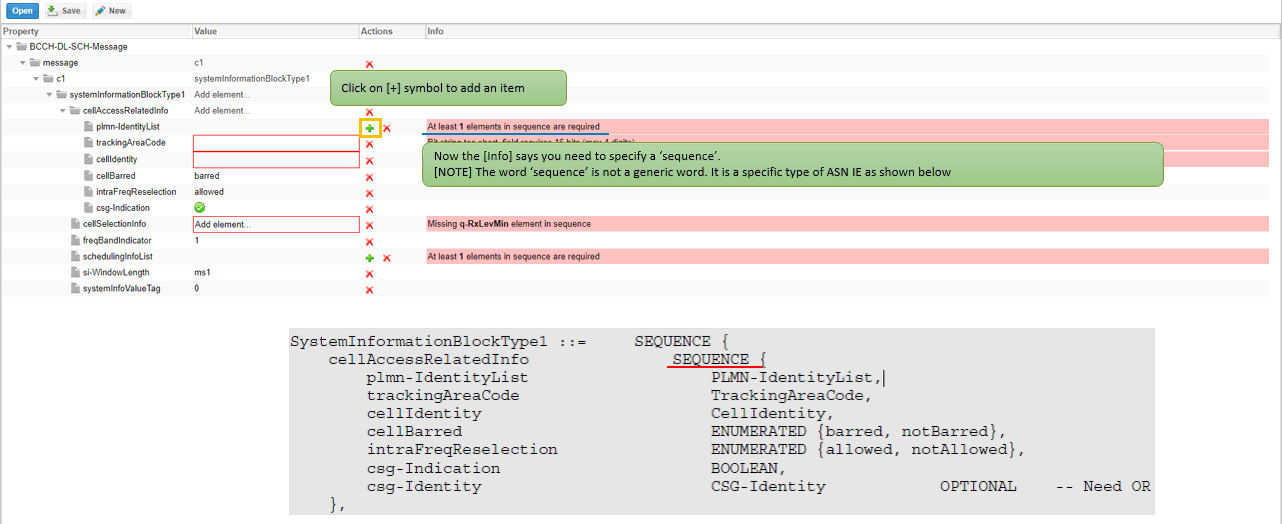


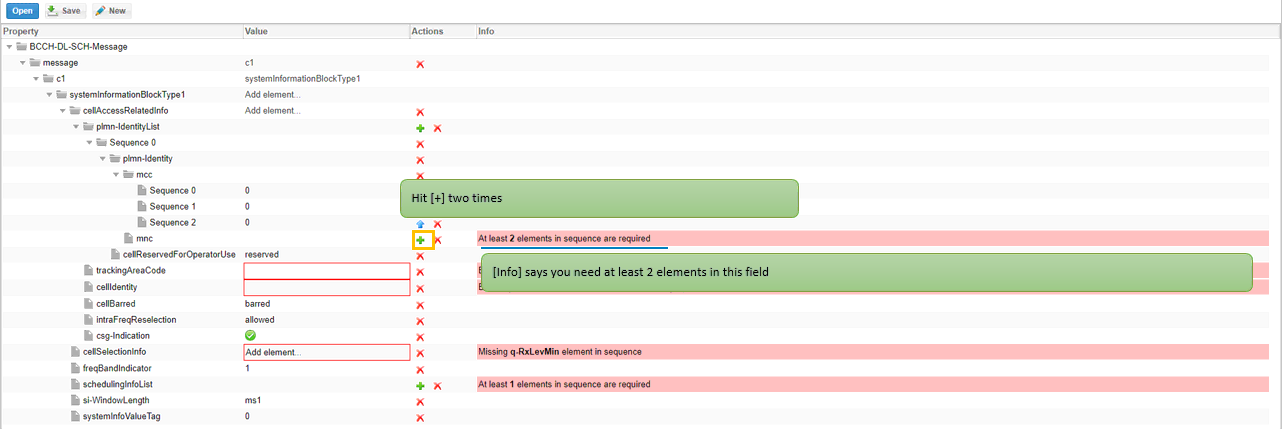
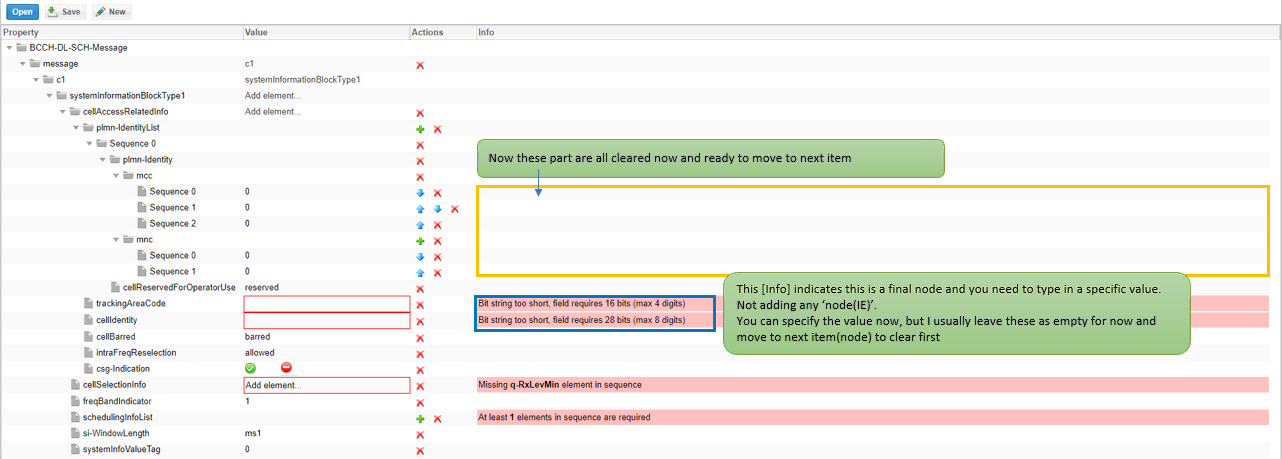
Automatic Mandatory IE Creation
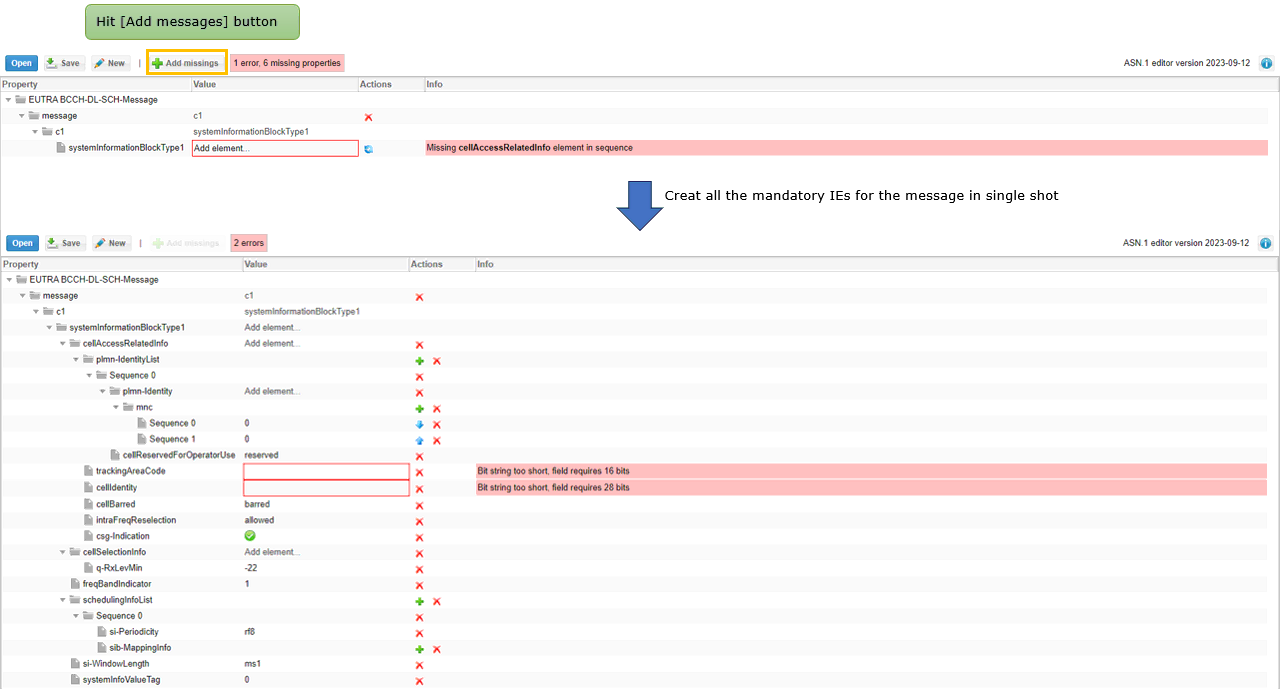
You might have noticed that a large portions of ASN.1 message creation is to add various mandatory IEs. Since they are mandatory IE, there is no other choices. You just have to create those IEs mechanically. This process can now be automated by single button click as shown below.
Ready-Made Templates
Here goes some example ASN.1 files that I created. Most of the examples are duplicated from some of working logs. You can take this as practically meaningful. You may take one of these example and modify as you like if you don't want to create everything from scratch.
LTE - SIB1 LTE - SIB2 LTE - SIB23 LTE - MeasConfig-A3 LTE - MeasConfig-CGI-LtoL NB IoT - SIB1 Cat M - SIB2,3 : 2CE Levels Redirection Carrier Info - NR
Tips
Compatibility between *.jer and *.asn file
Here *.jer indicates the file that is saved by ASN Editor(GUI) and *.asn indicates the asn file that are used in enb configuration files (e.g, *.asn files located in /root/enb/config directory). These two files are compatible without any specific format changes.
For example, you may try followings to confirm.
- i) Open sib2_3.asn (located in /root/enb/config) in ASN Editor GUI (You should see that the file is read without any error)
- ii) Save it to a file (e.g, sib2_3.jer) in ASN Editor GUI
- iii) Specify sib2_3.jer in any lte configuration file (e.g, enb.default.cfg) as follows.
|
sib_sched_list: [ { filename: "sib2_3.jer", /* the file created by ASN Editor GUI */ content_type: "application/json", /* Specify the contents type when you using *.jer file */ si_periodicity: 16, /* frames */ }, ], |
- iv) Run lte service ('service lte restart') and confirm there is no error in (enb) screen
Conversion between *.jer and *.asn file
If you want to convert between *.jer and *.asn, you can do it with the program lte_toolbox located in /root/ots. Following is an example.
|
./lte_toolbox asn1-convert /tmp/sib1_orig.asn sib gser jer > /tmp/sib1_orig.jer ==> Convert *.asn to *.jer (Convert gser format to jer format) ./lte_toolbox asn1-convert /tmp/sib1.jer sib jer gser > /tmp/sib1.asn ==> Convert *.jer to *.asn (Convert jer format to gser format) |