VoWiFi (Voice over WiFi) Setup
The purpose of this tutorial is to show how to setup a WiFi Access Point linked to Amarisoft Callbox to enable it to be act as WiFi components of ePDG and/or VoWiFi Test. To do this, you need an WiFi Access Point and a DNS server. There are roughly two options to set this environment.
- Option 1 : Use external WiFi AP(Access Point) and an external PC (for DNS Server).
- Option 2 : (If you have Amarisoft Callbox with embedded WiFi Module) Use the embedded WiFi Module (as an AP) and configure DNS server within the Callbox
Table of Contents
- VoWiFi (Voice over WiFi) Setup
Introduction
Integrating a WiFi Access Point with the Amarisoft Callbox is a fundamental step for simulating real-world mobile network deployments that require seamless interaction between cellular and WiFi domains, such as those involving evolved Packet Data Gateway (ePDG) and Voice over WiFi (VoWiFi) technologies. The Amarisoft Callbox serves as a comprehensive software-based test platform, capable of emulating both core and radio access components of LTE and 5G networks, making it ideal for end-to-end testing of device behavior, service continuity, and protocol compliance. By configuring a WiFi Access Point—either as an external device or via an embedded module within the Callbox—and deploying a DNS server, engineers can establish a controlled environment that mirrors the complex procedures involved in WiFi offload and VoWiFi operations. This setup requires careful architectural planning, including proper network segmentation, IP address management, DNS resolution, and the establishment of secure IPsec tunnels for user equipment (UE) authentication and data protection. Such a configuration enables validation of critical network functions, assessment of security protocols, and analysis of mobility management across heterogeneous access networks. As mobile operators and device vendors increasingly rely on multi-access technologies to deliver uninterrupted user experiences, mastering this integration becomes essential for ensuring network robustness, facilitating innovation, and meeting evolving industry standards.
-
Context of the Technology
- The tutorial centers around configuring a WiFi Access Point and DNS server to work in tandem with the Amarisoft Callbox, a platform for LTE and 5G network emulation.
- Interfacing WiFi and cellular network environments is critical for enabling services like ePDG and VoWiFi that require seamless handover and secure authentication across access technologies.
- This integration supports comprehensive testing of authentication processes, security associations, and session continuity as user equipment transitions between WiFi and cellular networks.
-
Relevance and Importance of the Tutorial Topic
- Proper configuration and validation of VoWiFi and ePDG scenarios are vital for ensuring service quality, security, and interoperability in production networks.
- The tutorial provides methodologies to build robust, repeatable test environments for advanced multi-access and mobility use cases.
- Expertise in these procedures accelerates troubleshooting efforts, streamlines development cycles, and supports adherence to regulatory and industry specifications.
-
Learning Outcomes
- Competence in configuring both standalone and embedded WiFi Access Points for integration with the Amarisoft Callbox.
- Understanding of the end-to-end architecture required for VoWiFi and ePDG testing, including DNS setup and network routing strategies.
- Ability to monitor, validate, and troubleshoot WiFi-to-cellular interoperability in a test lab environment.
- Knowledge of best practices for securing and optimizing connectivity and service performance in heterogeneous network deployments.
-
Prerequisite Knowledge and Skills
- Foundational understanding of IP networking, including subnetting, routing, and DNS configuration principles.
- Basic familiarity with LTE/5G network architecture, particularly in relation to ePDG and VoWiFi workflows.
- Experience with the Amarisoft Callbox or a similar network emulation platform is advantageous.
- Proficiency in configuring WiFi Access Points and performing Linux administration tasks for embedded system deployment.
Summary of the Tutorial
This tutorial demonstrates two options for setting up and testing a VoWiFi (Voice over WiFi) environment using either external or internal network components. Both options involve configuring a WiFi Access Point (AP) and a DNS server, and verifying connectivity and DNS resolution for VoWiFi operation.
Option 1: External Access Point and External DNS Server
-
Test Setup:
- External WiFi AP (e.g., Linksys) acts as both AP and DHCP server, providing LAN IP 192.168.10.1 and distributing IPs in the 192.168.10.xxx range.
- Mini PC configured as local DNS server at 192.168.10.10, connected to the same LAN as AP.
- eNB/MME/ePDG callbox PC at 192.168.10.101 (static IP).
- UE (e.g., Huawei P40) connects wirelessly, receives dynamic IP from AP.
-
WiFi AP Setup:
- Configure AP LAN interface as 192.168.10.1.
- Enable DHCP server to lease addresses from 192.168.10.100 upwards, avoiding static server conflict.
- Forward DNS information (192.168.10.10) to clients via DHCP.
- Disable dynamic routing (RIP) and keep static routing section empty for direct LAN-only traffic.
- Disable AP firewall to avoid interference with ePDG, SIP, or DNS flows.
-
DNS Server Setup:
- Install dnsmasq on Fedora-based PC using
sudo dnf install dnsmasq -y. - Edit /etc/dnsmasq.conf to:
- Specify interface to listen on (e.g.,
interface=enp23s0). - Set local domain (e.g.,
domain=lan). - Assign static hostnames and IP mappings.
- Define DHCP address range and options for default gateway and DNS server.
- Specify interface to listen on (e.g.,
- Enable and start the dnsmasq service:
- Test DNS functionality from the callbox by pinging domain names (e.g., router.lan, dns.lan, epdg.lan) and using
nslookupto verify resolution of telecom-specific domains to the correct IP.
- Install dnsmasq on Fedora-based PC using
Option 2: Internal Access Point and Internal DNS Server
-
Test Setup:
- Use the callbox's internal WiFi module (or a supported USB dongle) to create a WiFi AP.
- Set up DNS server software on the callbox or a second machine.
-
WiFi AP Setup:
- Create a WiFi hotspot named "voWifi hotspot" using the
nmclicommand on Fedora with the WiFi interface (e.g., wlp3s0): - List and verify the connection:
- Check network-scripts directory for the new configuration file.
- Change the WiFi connection mode to AP:
- Set WiFi AP password:
- Start the hotspot:
- Connect the test device to the WiFi hotspot.
- Create a WiFi hotspot named "voWifi hotspot" using the
-
DNS Proxy Configuration (on a second machine):
- Install bind-chroot:
- Create and edit DNS configuration files:
- /etc/named.conf: Set options to listen on AP and callbox IPs, enable recursion, set up logging, and include necessary zone files.
- /var/named/named.mydmn.org: Configure SOA, NS, and A records for relevant domains, using the WiFi AP IP address.
- /etc/named.rfc1912.zones: Define zone for telecom domain, referencing the zone file above.
- Enable and start the DNS service:
- Test DNS proxy functionality from the callbox using
nslookupto ensure correct IP resolution.
-
Start ePDG Component on Amarisoft Callbox:
- Modify ePDG configuration in the callbox software to bind to the AP IP address for tunnel setup.
- Configure PLMN parameters on both MME and eNB to match the test SIM and network settings.
- Add SIM card parameters to the MME UE database configuration.
-
VoWiFi Test and Logs:
- Start packet capture on the WiFi AP interface:
- Connect the phone to the WiFi AP and verify that the "WiFi Calls" icon appears, indicating VoWiFi activation.
- Observe DNS query traffic in network capture tools (e.g., Wireshark).
- Initiate an echo call (e.g., by dialing 666) to test end-to-end VoWiFi functionality.
Each option provides a systematic approach to setting up, configuring, and validating a VoWiFi solution, focusing on AP and DNS server setup, network configuration, and verification through connectivity and DNS resolution tests.
Option 1 : External Access Point and External DNS Server
In this option, we will use an external AP (e.g, Linksys AP) and an external PC (e.g, a mini PC). In this setup, WiFi AP is act as both AP and DHCP server and mini PC will work as a local DNS server.
Test Setup
Test setup for this tutorial is as shown below. In this setup, The WiFi Access Point works as the central hub. It has the LAN interface at 192.168.10.1 and hands out DNS information pointing to 192.168.10.10. The DNS server sits on the same LAN switch of the AP and uses its fixed IP 192.168.10.10. The eNB/MME/ePDG callbox PC is also wired to the AP, using a static IP of 192.168.10.101. The UE(e.g, Huawei P40) attaches wirelessly to the same AP and receives a dynamic IP in the range 192.168.10.xxx. for WiFi access and the IMS/SIP signaling and ePDG protocol is processed by Callbox.
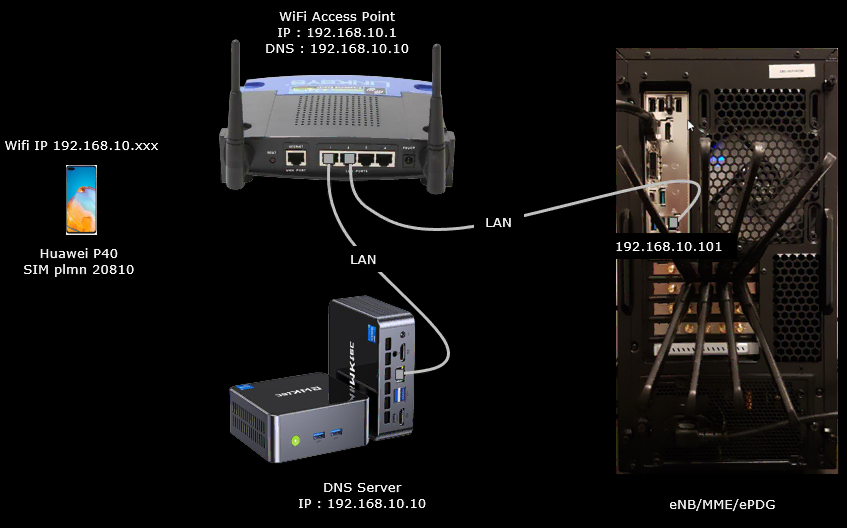
WiFi AP Setup
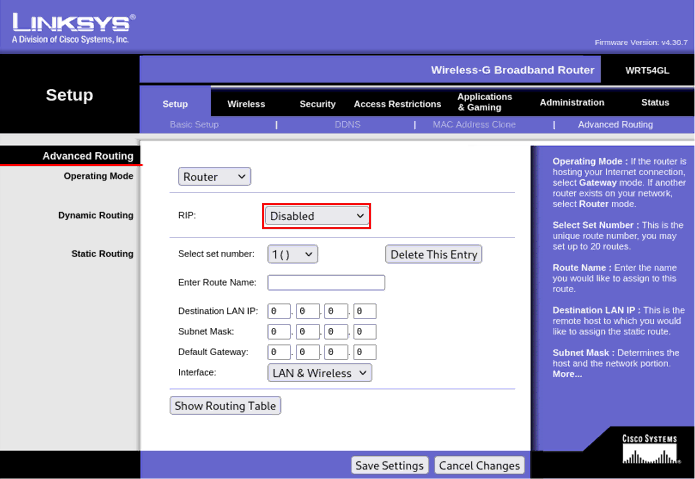
Configure Networt Setup section as shown below :
This WiFi Access Point works as the main gateway for the local test network. It uses the IP address 192.168.10.1 on the LAN side. It also distributes IP addresses to WiFi devices. The DHCP server in the AP hands out addresses starting from 192.168.10.100, so any phone or laptop joining the WiFi gets an address in the range 192.168.10.xxx. This keeps the address plan simple. It also avoids conflicts with the static servers on the network.
The AP also provides DNS information to WiFi clients. It forwards 192.168.10.10 as the DNS server. This makes all WiFi devices use the local dnsmasq system for hostname resolution. This is important because the ePDG and other core components use custom hostnames. The AP only passes the DNS info. It does not resolve anything by itself. This allows you to control naming from a single DNS machine.

In this test setu[, the AP operates in simple router mode. It does not run any dynamic routing protocol. So the RIP function is disabled. This means the AP does not exchange routing information with any other device.
The static routing section is empty. This means the AP will not add additional routes. It relies entirely on direct LAN connectivity. This keeps the testbed predictable. Every device on the 192.168.10.x network reaches the others through simple switching. No extra routing logic gets involved. So the callbox, DNS server, and WiFi clients all communicate naturally without any special configuration on the AP.
The firewall on this AP is disabled. This means the AP does not inspect or block packets at the WAN boundary. For this test environment this often makes things easier. It can avoid unexpected filtering that can block ePDG traffic, SIP flows, or DNS redirections. The AP simply passes everything between LAN and upstream.

DNS Server Setup
In this section I will show you how to setup a DNS server in the PC (DNS Server PC in the setup diagram). Basically you can install any DNS server as long as it can provide a static ip. In this tutorial, I use a dns server named dnsmasq and explain on how to install and configure dnsmasq and the server PC is running on Fedora.
dnsmasq is a small but very practical tool that combines DNS and DHCP into a single, easy-to-use service. It is designed to run with minimal configuration, so you can set up local name resolution and IP address assignment without going through complicated server setups.
Step 1 � Install dnsmasq
Run the following command. The command automatically installs the package on a Fedora-based distribution without asking for confirmation. This establishes the base service that will later be configured for DNS
|
sudo dnf install dnsmasq -y |
Step 2 � Configure dnsmasq
Now configure dnsmasq by editing the /etc/dnsmasq.conf file.
Open /etc/dnsmasq.conf and put the contents as follows.
|
# Interface to listen on interface=enp23s0 # replace with your working Ethernet interface bind-interfaces
# Local domain domain=lan
# Static hostnames address=/router.lan/192.168.10.1 address=/dns.lan/192.168.10.10 address=/epdg.epc.mnc010.mcc208.pub.3gppnetwork.org/192.168.10.101 address=/epdg.lan/192.168.10.101 # short hostname for convenience
# DHCP configuration dhcp-range=192.168.10.100,192.168.10.150,12h dhcp-option=3,192.168.10.1 # Default gateway dhcp-option=6,192.168.10.10 # DNS server |
In this step, you specify which network interface dnsmasq should listen on, define a local domain name, and assign static hostnames so specific devices always receive the same IP address. You also set up the DHCP service by defining the address range that dnsmasq will hand out and adding options such as the default gateway and DNS server. This step prepares dnsmasq to provide consistent local name resolution and controlled IP allocation within your LAN. Followings are description of each line item
- interface=enp23s0 specifies the network interface on which dnsmasq will listen; this must be replaced with the actual Ethernet interface of your system.
- bind-interfaces forces dnsmasq to bind only to the specified interface rather than all available interfaces, preventing conflicts with other services.
- domain=lan sets the local domain name so all hosts served by dnsmasq belong to the .lan domain.
- address=/router.lan/192.168.10.1 creates a static DNS mapping so the hostname router.lan always resolves to 192.168.10.1.
- address=/dns.lan/192.168.10.10 maps dns.lan to the local DNS server at 192.168.10.10.
- address=/epdg.epc.mnc010.mcc208.pub.3gppnetwork.org/192.168.10.101 provides a fixed DNS entry for a fully qualified telecom domain pointing to 192.168.10.101.
- address=/epdg.lan/192.168.10.101 assigns a shorter, convenient local alias epdg.lan to the same host at 192.168.10.101.
- dhcp-range=192.168.10.100,192.168.10.150,12h defines the pool of addresses that dnsmasq can lease, from .100 to .150, with a lease time of 12 hours.
- dhcp-option=3,192.168.10.1 sets DHCP option 3 (default gateway) so clients use 192.168.10.1 as their router.
- dhcp-option=6,192.168.10.10 sets DHCP option 6 (DNS server) so clients use 192.168.10.10 for DNS resolution.
Step 3 � Enable and start dnsmasq
Enable and start the dnsmasq service so it runs immediately and automatically after reboot.
|
sudo systemctl enable --now dnsmasq sudo systemctl restart dnsmasq sudo systemctl status dnsmasq |
Followings are the descriptions of each line item
- sudo systemctl enable --now dnsmasq :Enables the dnsmasq service to start automatically at boot and starts it immediately in the current session.
- sudo systemctl restart dnsmasq : Restarts the dnsmasq service so it reloads the latest configuration changes you made in dnsmasq.conf.
- sudo systemctl status dnsmasq : Shows the current status of the dnsmasq service, including whether it is active, any errors, and recent log output.
Step 4 - Test the DNS from the callbox
Now check out if DNS is working by pinging following domain name from Callbox.
|
> ping router.lan > ping dns.lan > ping epdg.lan |
Then try nslookup a epdg domain name and see if you get proper reply as shown below.
|
> nslookup epdg.epc.mnc010.mcc208.pub.3gppnetwork.org Server: 127.0.0.53 Address: 127.0.0.53#53 Non-authoritative answer: Name: epdg.epc.mnc010.mcc208.pub.3gppnetwork.org Address: 192.168.10.101 |
Option 2 : Internal Access Point and Internal DNS Server
In this option, we will use the wifi module embedded within the calbox as WiFi AP and setup a DNS server software within the callbox.
Test Setup
Test setup for this tutorial is as shown below.
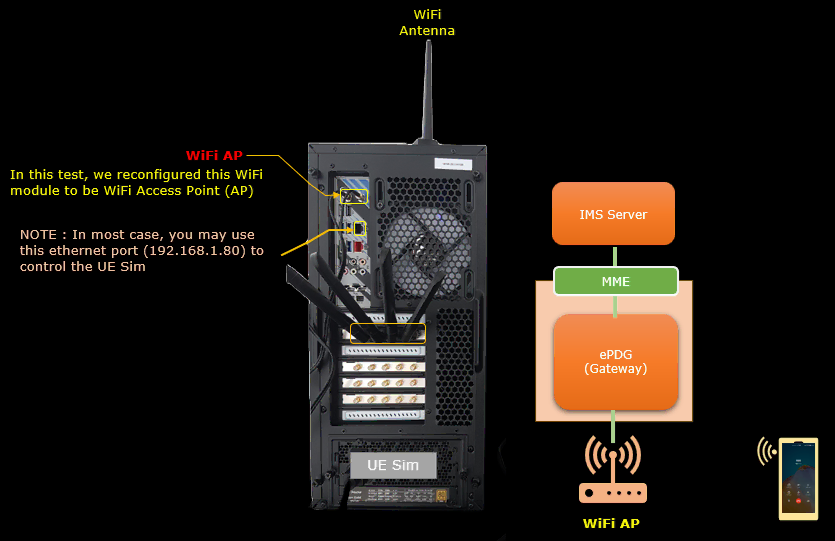
WiFi AP Setup
This session explains how to configure a Wifi Access Point on the callbox itself. If your callbox does not have an integrated Wifi mdoule (which is mostly the case for recent callboxes) you must add a Wifi USB dongle. Make sure that your dongle supports AP mode. Please note that you can also use an external WiFi router, in that case you do not need to enter the commands below, but you will have to add the DNS customization on the WiFi router or configure it to use the DNS server from the callbox. This kind of settings depends on the router that you use
Create a hotspot Wifi 'voWifi hotspot' on Fedora using Wifi interface wlp3s0
- use nmcli command to create the network connection:
- list the available connections:
- you can check if NetworkManager has added the config file to the network-scripts folder
- rw-r--r--. 1 root root 365 6 oct. 09:56 ifcfg-enp0s31f6
- rw-r--r-- 1 root root 362 5 nov. 09:56 ifcfg-voWifi_hotspot
- rwxr-xr-x. 1 root root 2162 29 janv. 2020 ifdown-ipsec
- rwxr-xr-x. 1 root root 8981 29 janv. 2020 ifup-ipsec
- change the wifi connection infrastructure mode to AP:
- set wifi AP password:
- manually start the hotspot
- finally connect your device to wifi hotspot
DNS Proxy Configuration on a second machine
- to create a dns proxy server, you need to install bind-chroot package
- then create the three files to /etc/named.conf /var/named/named.mydmn.org and /etc/named.rfc1912.zones as explained below:
- /etc/named.conf:
- /var/named/named.mydmn.org: set the mnc mcc of your "commercial" sim card. set also the wifi AP ip address
- /etc/named.rfc1912.zones: set the mnc mcc of your �����commercial����� sim card. set also the wifi AP ip address
- enable the service tuned (the service running the dns proxy):
- start tuned service:
- test the dns proxy: from callbox machine run the following command, it should return the wifi AP ip address:
Start ePDG component on amarisoft callbox
ePDG component is running on amarisoft EPC ltemme binary. To configure ePDG, we have to:
- add the AP ip address to setup the tunnel between ePDG and AP wifi.
- configure plmn on both mme and enb:
- then add the sim card parameter to mme ue db:
VoWifi test and logs
to start VoWifi testing, you can proceed as following:
- on callbox machine, start a tcpdump on WiFi AP port:
- then, attach the phone to wifi AP
Then an icon "calls WiFi" is displayed on the phone:

- bellow, the wireshark trace where we see the dns query to get epdg ip address
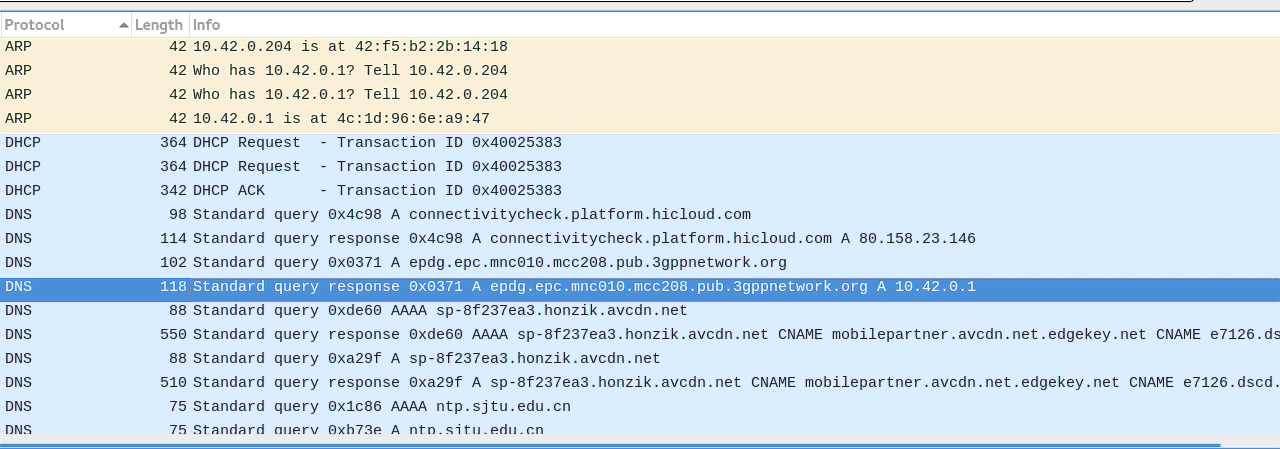
- finally, you can start an echo call by dialing 666