
NR NSA Split Bearer
The purpose of this tutorial is to show you how to test Uplink Splitbearer functionality in NSA. In this tutorial, it is assumed that you are faimiliar with basic operations of Amari Callbox operation. So in this tutorial, I will explain only about the configuration and analyzing the test result in the WebGUI log.
In NSA, user data goes through both LTE and NR. That is, a stream of user data may split between LTE chain and NR chain. This way of splitting user data into two different radio bearer (i.e, LTE bearer and NR bearer) is called Split bearer. In theory, we can think of the split bearer for both downlink and uplink, but in terms of 3GPP only uplink spit bearer is specified and downlink split is up to the implementation of network equipment manufacturer. In terms of Uplink Split Bearer, there are roughly three options as follows.
Option 1 : 100% going through LTE
Option 2 : 100% going through NR
Option 3 : data going through both NR and LTE (the ratio of split is configurable)
Table of Contents
Introduction
Uplink Split Bearer functionality in Non-Standalone (NSA) 5G networks represents a key advancement in the evolution of mobile communications, enabling simultaneous utilization of both LTE (Long-Term Evolution) and NR (New Radio, 5G) networks for user data transmission. This architecture, commonly referred to as Dual Connectivity (DC), allows a user device to maintain connections with both LTE and NR radio access technologies, facilitating enhanced throughput, reliability, and seamless mobility. In NSA deployments, the master eNB (LTE anchor) and secondary gNB (5G node) collaborate through the X2 interface to coordinate data paths and control signaling. The split bearer mechanism specifically addresses the uplink direction by enabling data packets originated by the user equipment (UE) to be distributed dynamically or statically between LTE and NR bearers, optimizing radio resource utilization and improving overall network performance. 3GPP specifications define uplink split bearer operation, while downlink splitting is left to vendor implementation, making uplink split bearer a standardized and critical feature for real-world NSA scenarios. Understanding and validating this functionality is essential for network engineers and testers, as it directly impacts end-user experience, network efficiency, and the ability to meet diverse service requirements in the 5G era. This tutorial focuses on guiding users through the configuration and evaluation of uplink split bearer behavior using the Amari Callbox platform, providing practical insights into test setup, WebGUI-based analysis, and interpretation of results within the NSA architecture.
-
Context and Background
- Non-Standalone (NSA) 5G leverages existing LTE infrastructure as an anchor while introducing 5G NR to achieve higher data rates and reduced latency.
- Dual Connectivity (DC) enables a single UE to connect to both LTE and NR, managed by distinct base stations (eNB for LTE, gNB for NR).
- Split Bearer Concept allows user-plane data to be split at the PDCP (Packet Data Convergence Protocol) layer, offering multiple routing options for uplink traffic.
- The Amari Callbox is a comprehensive testing platform widely used for simulating and validating 4G/5G network scenarios, including NSA configurations.
-
Relevance and Importance
- Uplink split bearer functionality is critical for maximizing spectral efficiency and ensuring seamless service continuity during the transition from LTE to 5G NR.
- Testing and analyzing split bearer behavior is essential for verifying network compliance with 3GPP standards and for troubleshooting interoperability issues.
- The tutorial addresses practical aspects of configuration and log analysis, empowering network professionals to validate and optimize real-world NSA deployments.
-
Learning Outcomes
- Understand the architectural principles behind uplink split bearer in NSA networks.
- Gain hands-on experience configuring split bearer scenarios using the Amari Callbox WebGUI.
- Learn to interpret test results and logs to assess split bearer performance and behavior.
- Develop troubleshooting skills relevant to multi-radio, multi-bearer 5G environments.
-
Prerequisite Knowledge and Skills
- Familiarity with basic Amari Callbox operations and user interface navigation.
- Understanding of LTE and 5G NR concepts, including radio bearers and protocol stack fundamentals.
- General knowledge of 3GPP NSA architecture and dual connectivity principles.
- Basic skills in interpreting network logs and analyzing test output.
Summary of the Tutorial
This tutorial guides through the procedures for testing split bearer configurations in an NR NSA (Non-Standalone) environment using Amarisoft Callbox, focusing on the configuration and verification of uplink (UL) traffic splitting between LTE and NR. The summary below outlines the test methodologies, key configuration steps, and verification procedures while maintaining the original content's structure and formatting.
-
Test Setup
- Use the SIM card provided with the system, unless reconfiguration is needed (see Configuration Guide).
- Internet access is configured to allow use of public services (e.g., Speedtest) for generating IP traffic.
- Several options are provided for connecting the CallBox to the internet; Case 4 is used here (direct wired, WiFi, or via another PC).
- For WiFi connectivity on a Linux (CLI) system, nmcli commands are provided to manage WiFi interfaces:
- # nmcli dev status
- # nmcli radio wifi
- # nmcli device wifi rescan
- # nmcli dev wifi list
- # nmcli dev wifi connect network-ssid password "network-password"
-
Key Configuration Parameters
- Critical parameter: en_dc_split in drb-splitbearer.cfg
- Elements: type, ul_data_threshold, secondary_path_dl_ratio
- Critical parameter: en_dc_split in drb-splitbearer.cfg
-
Configuration Steps
- Use gnb-nsa-splitbearer.cfg (modified from gnb-nsa.cfg).
- drb-splitbearer.cfg is set in the configuration to control split bearer behavior.
- Modify drb_config parameter to use drb-splitbearer.cfg instead of the default.
- Set en_dc_split in drb-splitbearer.cfg:
- Configure type and ul_data_threshold for each test scenario.
- Adapt configuration for device-specific requirements (e.g., TDD/FDD support).
-
Pre-Test Checks
- Ensure the network interface with internet connectivity and tun0,1,2,3 interfaces are up.
- Check the routing table for proper routing through tun interfaces.
- Verify internet connectivity from CallBox by pinging an external IP (e.g., 8.8.8.8) and a URL (to check DNS resolution).
- [Optional] Use nslookup or similar to resolve URLs and verify with a direct IP ping.
-
General Test Procedure
- Disable UE WiFi to ensure traffic is routed through cellular.
- Attach the UE and confirm successful connection to Callbox.
- Verify UE receives an IP address.
- Ping the UE from Callbox to confirm network reachability.
- Test internet browsing from UE.
- Generate high data rate traffic using an online speed test site (ensure both uplink and downlink are tested).
-
Test 1: Split Ratio Decided by UE Side Decision
- Objective: Demonstrate UL traffic split between LTE and NR based on UE's decision (typically 50-50).
- Configuration:
- Set split type to "scg".
- Set ul_data_threshold to 0 (b0), enabling UE-side split decision.
- Verification:
- Confirm configuration is reflected in the signaling messages (pdcp-Config).
- Observe equal UL throughput on both LTE and NR connections, indicating a 50-50 split.
- Check both downlink and uplink traffic are present on LTE and NR.
-
Test 2: All UL Traffic Goes Through NR (scg)
- Objective: Demonstrate all UL traffic is routed exclusively via NR (no split).
- Configuration:
- Set split type to "scg".
- Set ul_data_threshold to -1 (infinity), disabling splitting and forcing all UL through NR.
- Verification:
- Confirm configuration in signaling messages (cellGroup 1 and ul-DataSplitThreshold infinity).
- Observe downlink traffic on LTE, but no uplink traffic.
- See both uplink and downlink on NR, with 100% of UL traffic routed via NR.
This tutorial emphasizes configuration of split bearer parameters, connectivity verification, and observation of traffic distribution to validate split bearer and uplink routing behavior in an NR NSA environment. The procedures outlined support both flexible and exclusive routing of uplink data, with methodologies suitable for varied user equipment and test environments.
Test Setup
Test setup for this tutorial is as shown below. (
- SIM Card used in this tutorial is the one delivered with the system as it is.
- If you want to change the configuration, The tutorial Configuration Guide would help
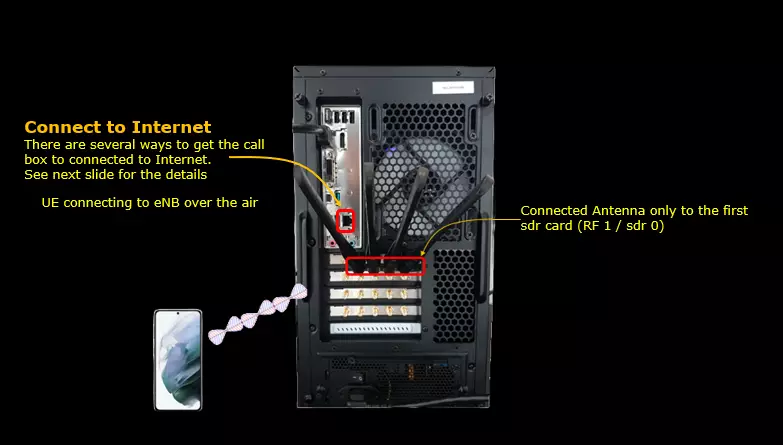
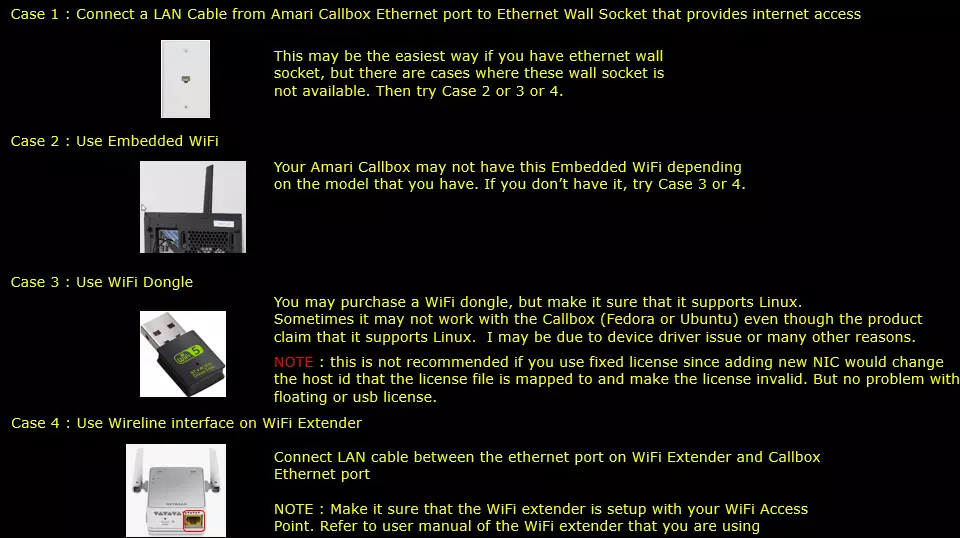
There are several ways to provide Internet access to the Amarisoft Callbox. The available method depends on the Callbox model and the network environment. In this tutorial, Case 4 is used.
Case 1: Connect a LAN cable from the Amarisoft Callbox Ethernet port directly to an Ethernet wall socket that provides Internet access. This is usually the simplest method when a wired Ethernet connection is available.
Case 2: Use the embedded WiFi interface of the Callbox. Some Amarisoft Callbox models may not include embedded WiFi. If embedded WiFi is not available, use another method such as Case 3 or Case 4.
Case 3: Use a USB WiFi dongle. Make sure that the WiFi dongle supports Linux and is compatible with the operating system running on the Callbox. Even if Linux support is specified by the manufacturer, compatibility may still depend on the device driver. This method is generally not recommended when the Callbox uses a fixed license, because adding a new network interface may change the host identification associated with the license. This is normally not an issue with floating or USB-based licenses.
Case 4: Use the wired Ethernet interface of a WiFi extender. Connect a LAN cable between the Ethernet port of the WiFi extender and the Ethernet port of the Callbox. Before making the connection, configure the WiFi extender to connect to the desired WiFi access point according to the extender manufacturer's instructions. This is the method used in this tutorial.
If you decide to use Case 2 or Case 3, the following commands may be helpful for configuring the WiFi connection.
Since the Amarisoft Callbox normally runs Linux such as Fedora or Ubuntu in command-line mode without a desktop GUI, WiFi configuration is typically performed from the terminal. The nmcli command can be used to detect the WiFi interface, enable WiFi, scan available networks, and connect to an access point.
- nmcli dev status : Displays the available network interfaces and their current connection status. Use this command first to verify that the embedded WiFi interface or USB WiFi dongle is detected by Linux.
- nmcli radio wifi : Displays the current WiFi radio status.
- nmcli device wifi rescan : Forces the WiFi interface to scan again for nearby wireless networks.
- nmcli dev wifi list : Displays the detected WiFi networks, including information such as SSID, signal strength, channel, and security type.
- nmcli dev wifi connect network-ssid password "network-password" : Connects the Callbox to the specified WiFi network. Replace network-ssid with the actual SSID and network-password with the WiFi password.
Key Configuration Parameters
Followings are important configuration parameters for this tutorial. You may click on the items for the descriptions from Amarisoft documents.
- en_dc_split : In this link, you will get the descriptions for all items listed below.
- type
- ul_data_threshold
- secondary_path_dl_ratio
Configuration
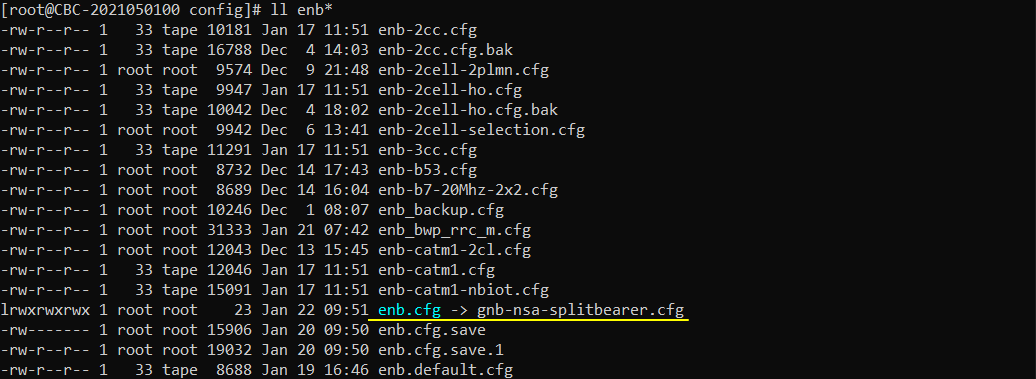
I have used gnb-nsa-splitbearer.cfg which is copied and modified from gnb-nsa.cfg.
I am using the default mme, ims config as shown below.

I used drb-splitbearer.cfg which is copied from drb.cfg

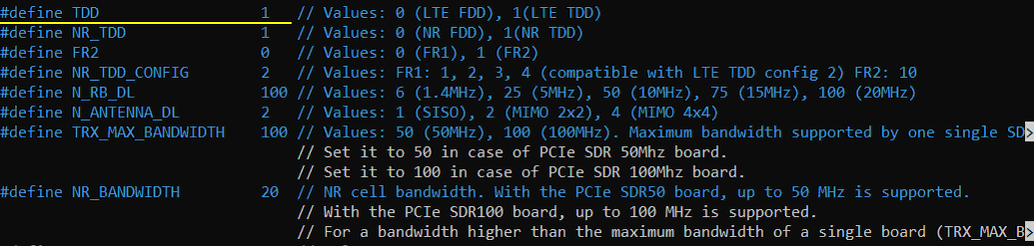
In gnb-nsa-splitbearer.cfg, the LTE and NR duplex modes are configured for TDD because the commercial UE used in this tutorial supports TDD operation. If your UE supports a different band or duplex mode, you may modify these parameters accordingly.
The TDD parameter is set to 1, which configures the LTE cell for TDD operation. The NR_TDD parameter is also set to 1, which configures the NR cell for TDD operation. The NR_TDD_CONFIG parameter is set to 2, selecting NR TDD configuration 2. This configuration is compatible with LTE TDD configuration 2, allowing the LTE and NR TDD timing patterns to operate consistently in this NSA setup.
Other parameters shown here, such as FR2, N_RB_DL, N_ANTENNA_DL, TRX_MAX_BANDWIDTH, and NR_BANDWIDTH, remain according to the requirements of the test setup and the capabilities of the UE and Callbox.
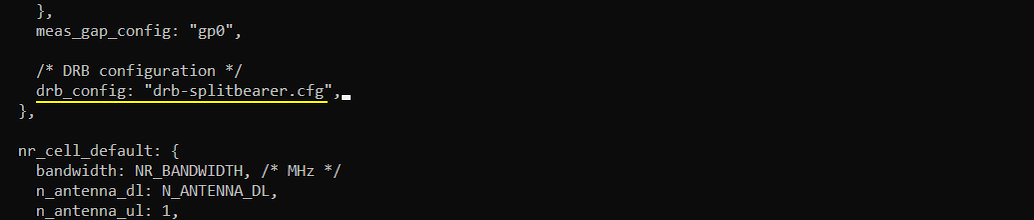
The drb_config parameter is changed to use drb-splitbearer.cfg instead of the default drb.cfg : drb_config: "drb-splitbearer.cfg"
With this configuration, the DRB settings defined in drb-splitbearer.cfg are applied when the UE establishes the data radio bearer. This file contains the DRB configuration required for the NSA split bearer test, allowing the bearer to use the split bearer configuration rather than the standard DRB configuration.
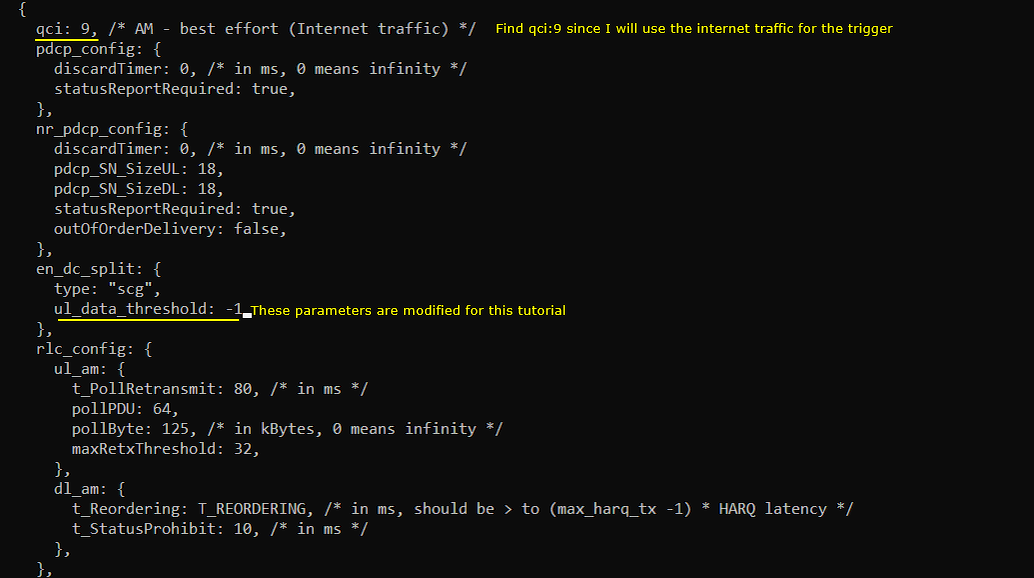
The main configuration parameter for this tutorial is en_dc_split in drb-splitbearer.cfg.. This parameter controls how the uplink traffic of the DRB is handled between the LTE and NR paths in NSA. In this tutorial, the en_dc_split configuration is changed for each test case to demonstrate different uplink split bearer behaviors.
The en_dc_split block contains two important parameters: type and ul_data_threshold.
The type parameter determines the preferred uplink path for the split bearer. In the configuration shown here, type is set to "scg", so the NR Secondary Cell Group path is used as the preferred uplink path.
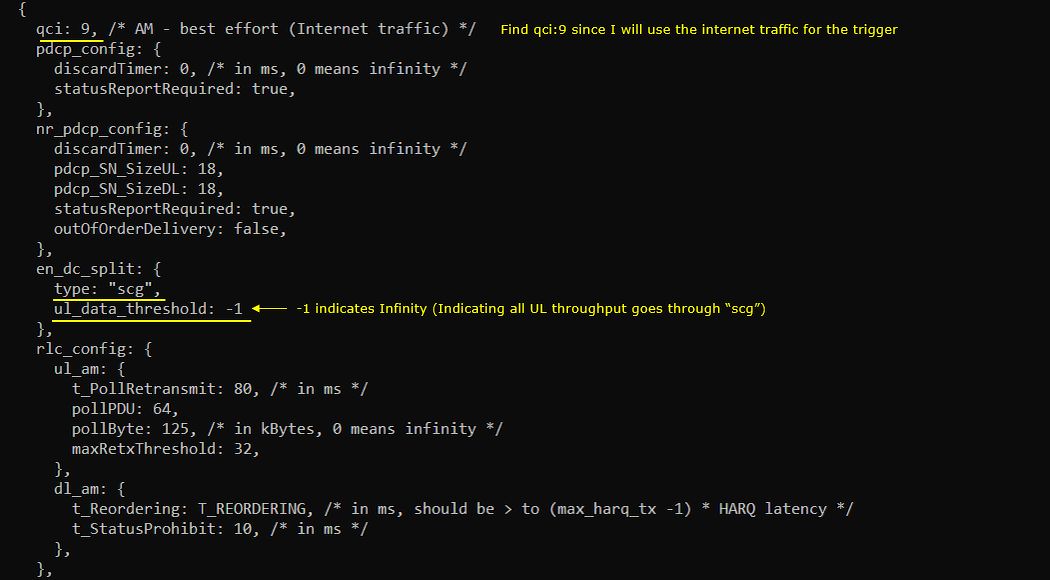
The ul_data_threshold parameter determines when uplink data transmission can start using the secondary path according to the configured split bearer behavior. In this example, ul_data_threshold is set to -1. The values of type and ul_data_threshold will be modified in the following test cases to demonstrate LTE-only, NR-only, and LTE/NR split uplink operation.
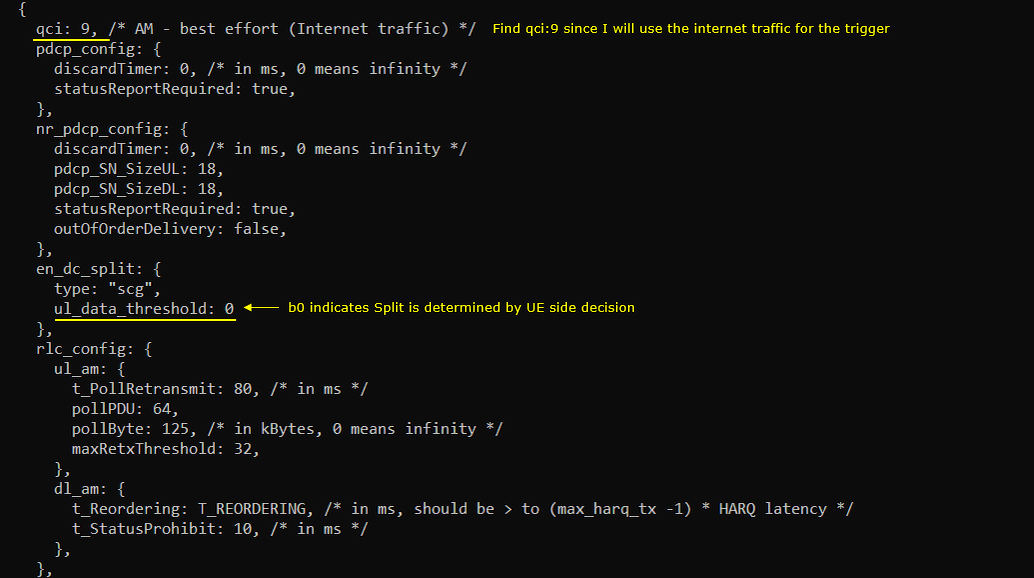
The qci parameter is set to 9 because this tutorial uses normal best-effort Internet traffic to generate the uplink data for the test.
Check Up before trying UE connection
Before trying Internet access from the UE, verify the basic network configuration of the Callbox. If the external Internet interface, tunnel interfaces, or routing configuration is not working correctly, the UE may attach successfully but still fail to access the Internet.
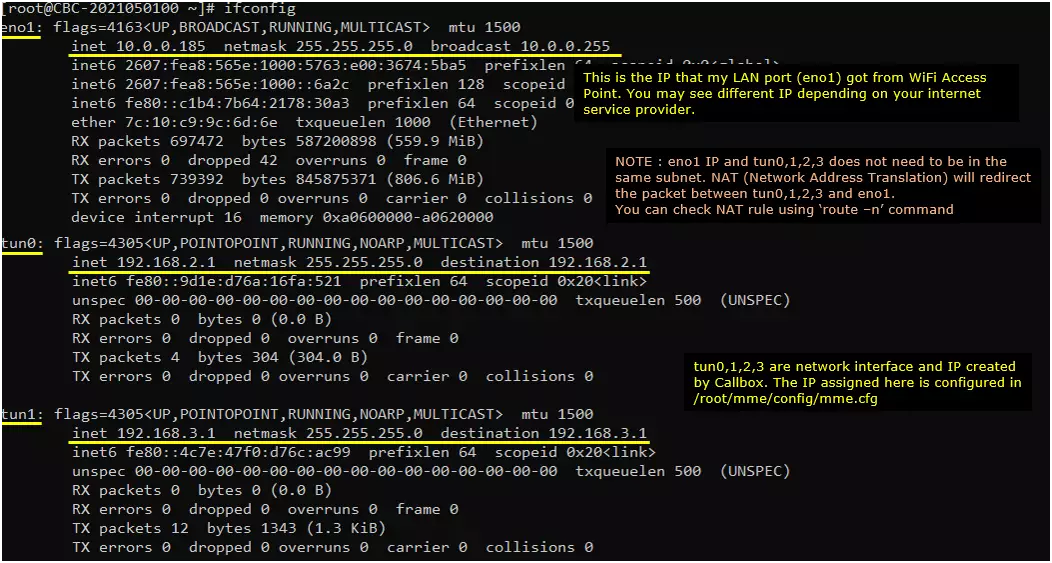
First, use ifconfig to verify that the network interface connected to the Internet is up. In this example, eno1 is the external interface and it has the IP address 10.0.0.185 assigned by the WiFi access point through the WiFi extender. The actual interface name and IP address may be different depending on your network environment and Internet service provider.
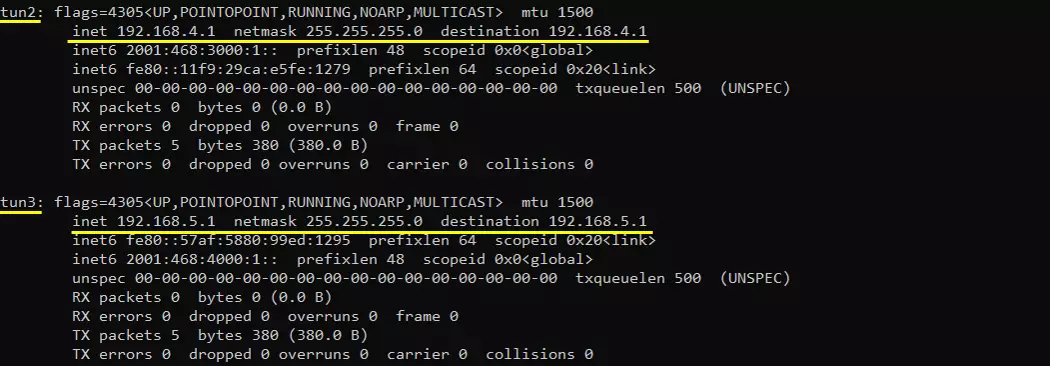
Also verify that tun0, tun1, tun2, and tun3 are up. These tunnel interfaces are created by the Callbox and are used to route UE user-plane traffic. In this example, tun0, tun1, tun2, and tun3 have the IP addresses 192.168.2.1, 192.168.3.1, 192.168.4.1, and 192.168.5.1 respectively. These IP addresses are configured in the Callbox configuration files such as /root/mme/config/mme.cfg.
The external interface eno1 and the tun interfaces do not need to belong to the same IP subnet. NAT and IP routing are used to forward packets between the UE-side tunnel interfaces and the external Internet interface. You can verify the routing configuration with the route -n command and confirm that packets from tun0, tun1, tun2, and tun3 can be forwarded toward eno1.
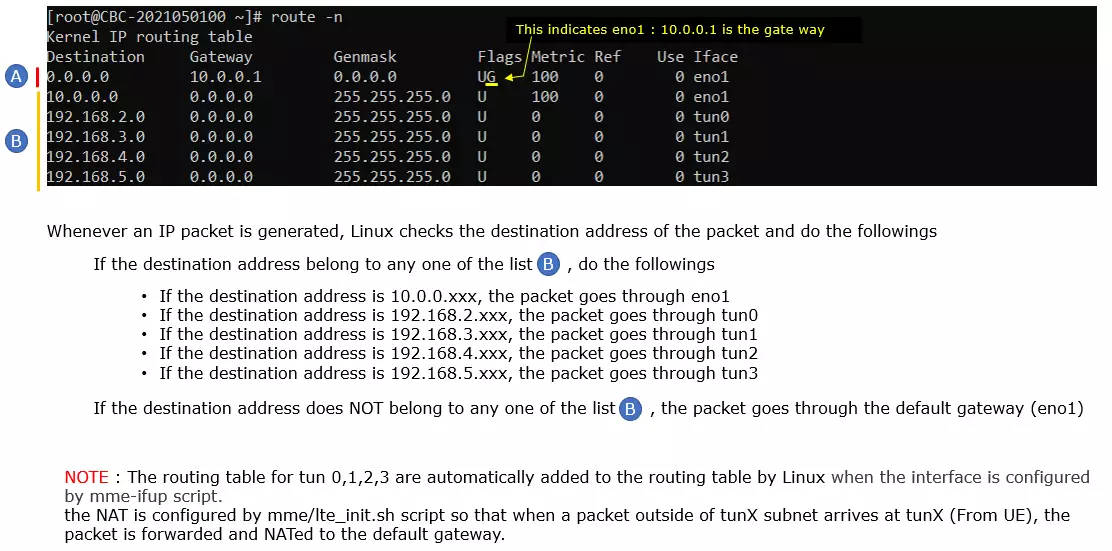
Check the routing table on the Callbox PC using the route -n command. The exact interface name and gateway address may be different depending on your network configuration, but the routes associated with tun0, tun1, tun2, and tun3 should be present as shown in this example.
The default route has destination 0.0.0.0/0 and gateway 10.0.0.1 through eno1. This means that packets whose destination does not match any more specific route are forwarded through eno1 toward the Internet gateway.
The routing table also contains directly connected routes for the Callbox tunnel interfaces. In this example, 192.168.2.0/24 is routed through tun0, 192.168.3.0/24 through tun1, 192.168.4.0/24 through tun2, and 192.168.5.0/24 through tun3. The 10.0.0.0/24 network is directly connected through eno1.
When Linux sends a packet, it checks the destination address against the routing table and selects the most specific matching route. Therefore, packets destined for the tunnel subnets are sent through the corresponding tun interface, while packets destined for other networks are sent through the default gateway via eno1.
The routes for tun0, tun1, tun2, and tun3 are automatically added when these interfaces are configured by the mme-ifup script. NAT is configured by the mme/lte_init.sh script so that uplink packets received from the UE through a tun interface can be forwarded toward the external interface and translated before being sent to the Internet.
Make sure that the Callbox itself can reach the Internet before testing Internet connectivity from the UE.
In this example, ping 8.8.8.8 is used to verify external IP connectivity. The address 8.8.8.8 is the Google Public DNS server and is also commonly configured as a DNS server in mme.cfg.
The successful ICMP replies confirm that the Callbox can reach the Internet through its external network interface. At this stage, the basic external network connection and default routing are working correctly.

Try pinging a domain name to verify that DNS resolution is working correctly.
In this example, ping www.google.com is used. The domain name is successfully resolved to an IP address, and ICMP replies are received from the resolved Google server.
This confirms that both DNS name resolution and external Internet connectivity from the Callbox are working correctly.

Optionally, you can use nslookup to find the IP address associated with a specific domain name.
In this example, nslookup [www.google.com](http://www.google.com) returns both an IPv4 address, 142.251.41.68, and an IPv6 address, 2607:f8b0:400b:807::2004.
You can then test connectivity using both the domain name and the resolved IP address. If ping to the IP address works but ping to the domain name does not, the basic Internet connection is working but there may be a DNS resolution problem. If both tests work, both IP connectivity and DNS resolution are operating correctly.

Perform the Test
The same test procedure is used for the different split bearer configurations described in the following sections. Only the split bearer configuration is changed between the test cases.
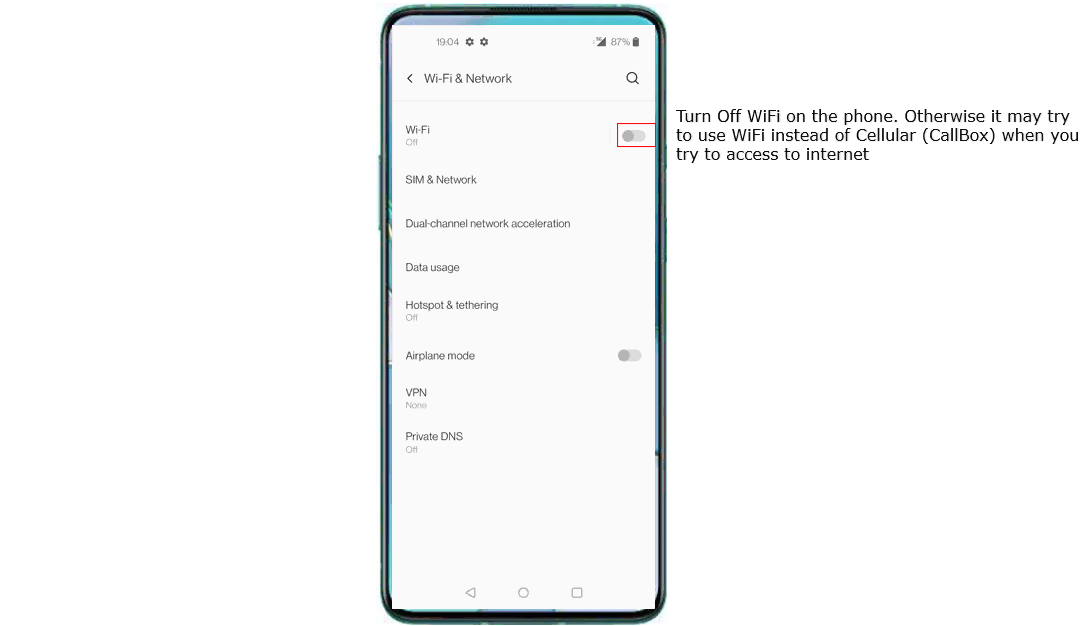
Before starting the test, turn off WiFi on the UE so that all Internet traffic is carried through the cellular connection provided by the Callbox. Commercial UEs normally prefer WiFi when both WiFi and cellular data are available, so leaving WiFi enabled may cause the test traffic to bypass the LTE/NR connection.
After WiFi is disabled, verify that the UE is connected to the NSA network and can access the Internet through cellular data. The following tests can then be performed while observing how the uplink traffic is carried through the LTE and NR paths.
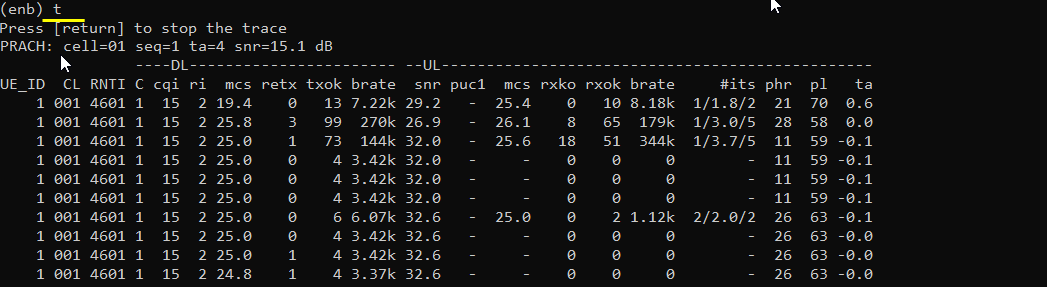
Perform the initial attach and confirm that the UE is successfully connected to the Callbox.
In the eNB console, enter the t command to display the real-time UE statistics. In this example, UE_ID 1 is connected to cell 1 with RNTI 4601. The presence of continuously updated DL and UL statistics confirms that the UE is attached and exchanging traffic with the LTE cell.
At this stage, verify that the UE remains stably connected before proceeding with the split bearer traffic test.
Confirm that the UE has been assigned an IP address by checking the UE information in the MME console.
In this example, the ue command shows that the UE has one bearer and has been assigned the IP address 192.168.3.2. This confirms that the UE has successfully established the packet data connection and received an IP address from the core network.
Once the IP address is assigned, the UE is ready to generate Internet traffic for the split bearer test.

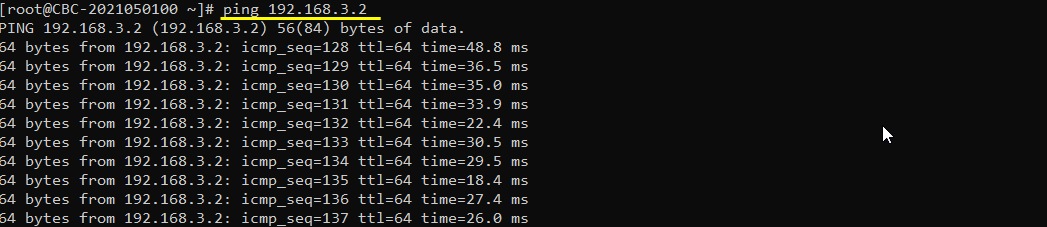
Ping the UE from the Callbox and confirm that the UE is reachable through its assigned IP address.
In this example, the UE has been assigned the IP address 192.168.3.2. The successful ICMP replies confirm that the Callbox can correctly route packets to the UE through the corresponding tunnel interface.
This verifies that the UE-side IP connection is established and working correctly before starting the split bearer traffic test.
Try browsing a website from the UE and confirm that Internet access works through the cellular connection.
In this example, the Google web page loads successfully while WiFi is disabled. This confirms that the UE can access the Internet through the Callbox and that the UE IP configuration, routing, NAT, DNS, and external Internet connection are working correctly.
Once Internet access is confirmed, the UE is ready for the uplink split bearer traffic tests.

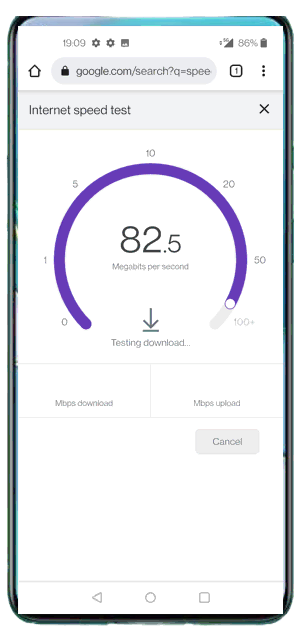
Go to a speed test website and generate a sufficiently high data rate so that the uplink split bearer behavior can be clearly observed.
You may use any speed test service, but make sure that it performs both downlink and uplink throughput tests. The uplink phase is particularly important for this tutorial because the en_dc_split configuration controls how uplink traffic is transmitted through the LTE and NR paths.
In this example, the speed test is started from the UE browser. While the test is running, monitor the LTE and NR traffic statistics in the Callbox WebGUI or console to determine which radio path is carrying the uplink traffic.
Test 1 : Split ratio decided by UE side decision
This test is to show the case where UL throughput gets splitted between LTE and NR based on UE side decision. In many case, UE split the UL traffic 50-50 in this configuration.
In this test, the en_dc_split configuration is set with type: "scg" and ul_data_threshold: 0.
The type parameter is set to "scg", which selects the SCG, or NR path, as the preferred uplink path for the split bearer.
The ul_data_threshold parameter is set to 0. In the corresponding RRC configuration, this is represented as b0. With b0, the network does not impose a non-zero uplink data threshold for switching or splitting, so the UE can determine how to distribute the uplink traffic between the LTE and NR paths.
With this setting, the actual UL split ratio is therefore mainly decided by the UE implementation. In many cases, the UE may distribute the traffic roughly evenly between LTE and NR, but the exact ratio can vary depending on UE behavior and radio conditions.
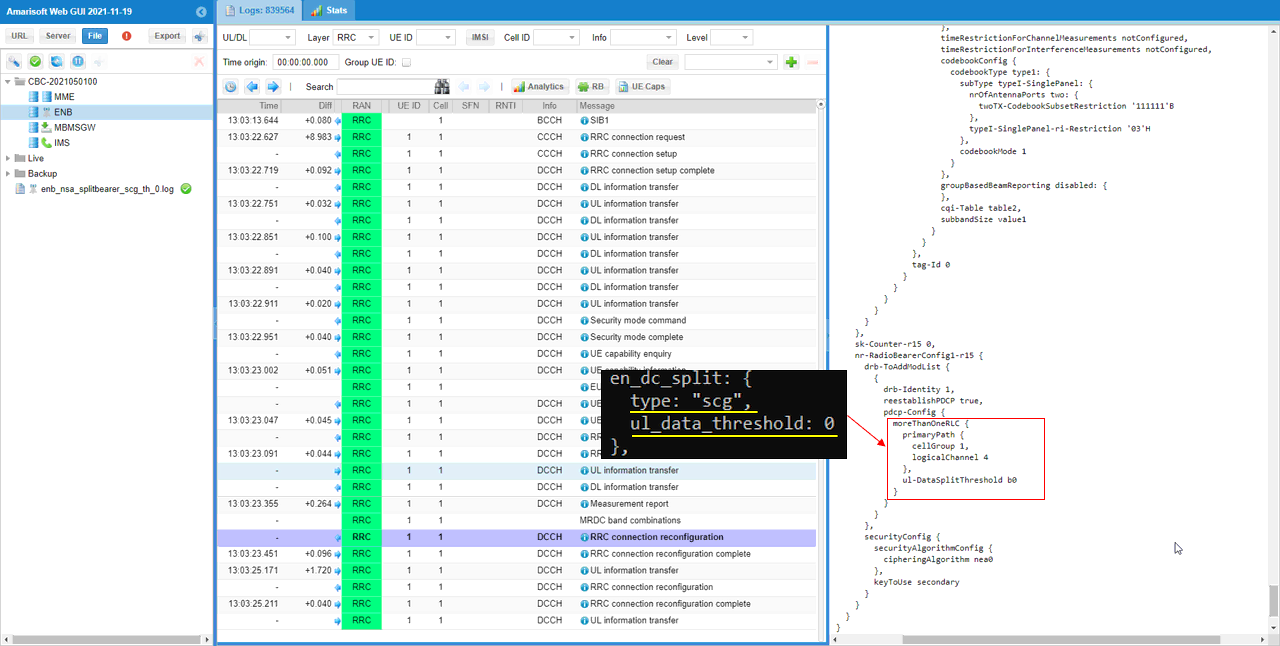
You can confirm that the en_dc_split configuration is correctly reflected in the RRC signaling.
In the RRCConnectionReconfiguration message, the split bearer configuration appears under nr-RadioBearerConfig-r15 and pdcp-Config. The cellGroup IE is derived from the type parameter in en_dc_split. A value of cellGroup 0 indicates the MCG path, while cellGroup 1 indicates the SCG path.
In this example, type is configured as "scg", and the RRC message therefore shows cellGroup 1.
The ul_DataSplitThreshold IE is derived from the ul_data_threshold parameter. Since ul_data_threshold is configured as 0, the RRC message shows ul-DataSplitThreshold b0.
This confirms that the configured en_dc_split settings have been correctly applied to the UE through RRC signaling.
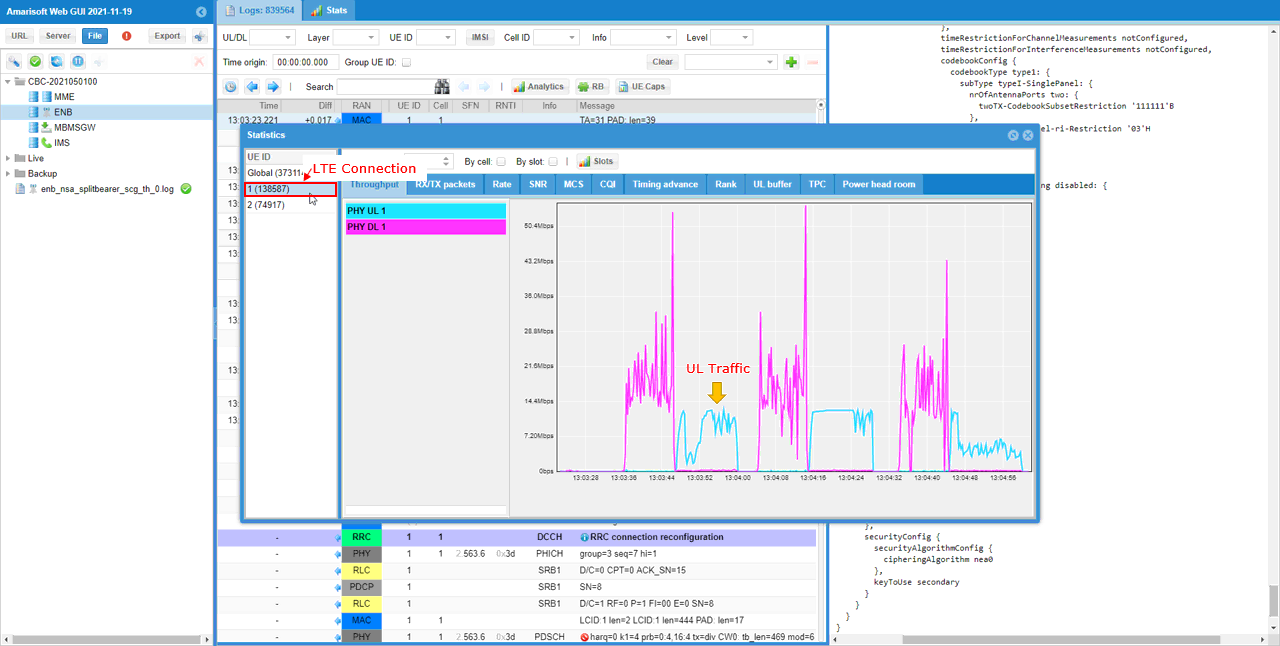
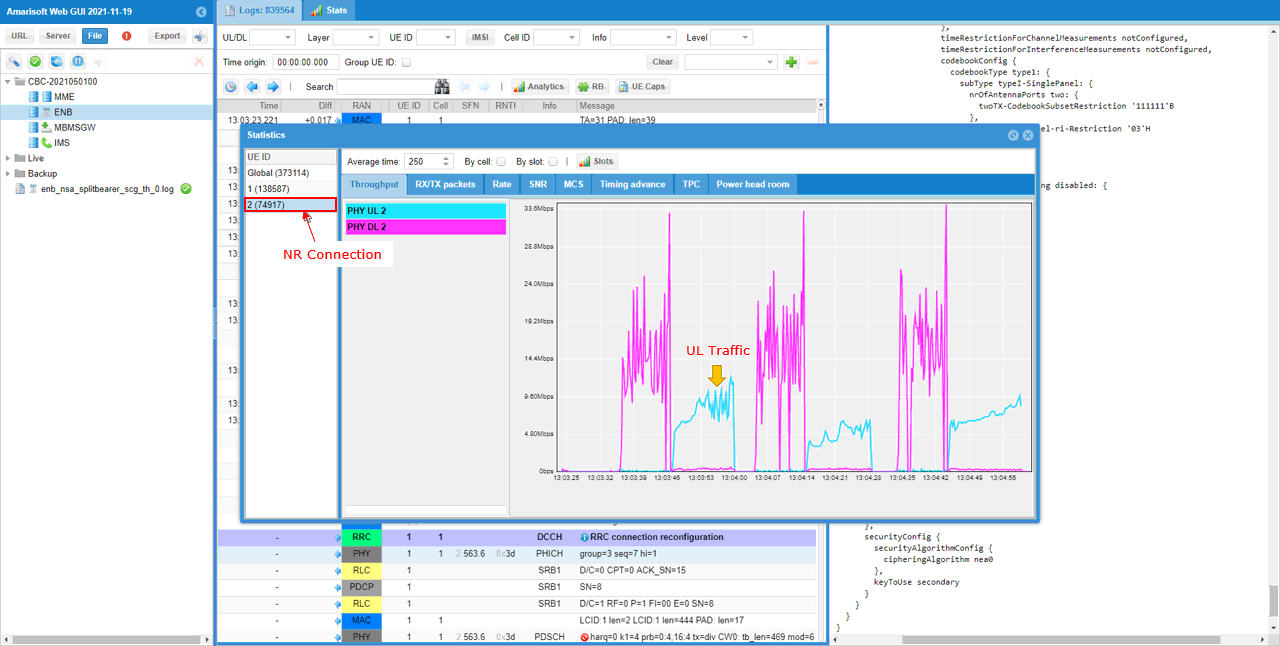
First, look at the LTE connection statistics in the WebGUI. In this example, both downlink and uplink traffic are visible on the LTE cell. The PHY UL 1 curve shows that a significant amount of uplink traffic is being transmitted through the LTE MCG path while the speed test is running.
This confirms that, with ul_data_threshold set to 0, the UE is using the LTE path for part of the uplink traffic rather than sending all uplink data through NR.
In the NR connection statistics, both downlink and uplink traffic are also observed. The PHY UL 2 throughput is approximately similar to the LTE uplink throughput observed in the previous step.
This indicates that the UE is transmitting uplink data through both the LTE MCG path and the NR SCG path. In this particular test, the uplink throughput is distributed roughly 50:50 between LTE and NR.
The exact split ratio is determined by the UE implementation, so the ratio may not always be exactly 50:50.
Test 2 : All UL traffic goes through NR (scg)
This test is to show the case where UL throughput does get splitted between LTE and NR, and goes through NR cell only.
In this test, the en_dc_split configuration is set with type: "scg" and ul_data_threshold: -1.
The type parameter is set to "scg", which selects the NR SCG path for uplink transmission. The ul_data_threshold parameter is set to -1. This corresponds to an infinite threshold, meaning that uplink traffic splitting is effectively disabled. As a result, the uplink traffic remains on the path selected by the type parameter. Since type is configured as "scg", all uplink user traffic is transmitted through the NR SCG path rather than being split between LTE and NR.
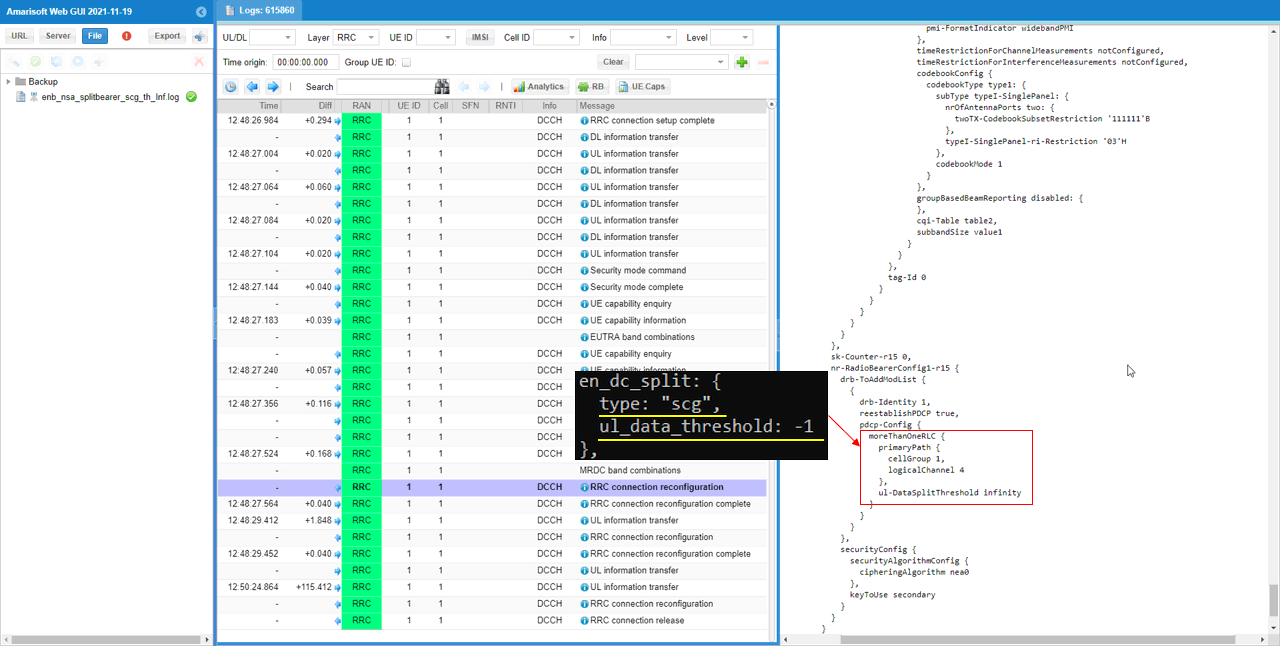
You can confirm that the en_dc_split configuration is correctly reflected in the RRC signaling.
In the RRCConnectionReconfiguration message, the split bearer configuration is included under nr-RadioBearerConfig-r15 and pdcp-Config. The cellGroup IE is determined by the type parameter, where cellGroup 0 indicates MCG and cellGroup 1 indicates SCG.
In this example, type is set to "scg", so the RRC message shows cellGroup 1. The ul_DataSplitThreshold IE is determined by the ul_data_threshold parameter. Since ul_data_threshold is set to -1, the RRC message shows ul-DataSplitThreshold infinity.
The combination of cellGroup 1 and ul-DataSplitThreshold infinity means that the SCG is selected as the uplink path and the split threshold is effectively infinite. As a result, uplink traffic is not split between MCG and SCG, and all uplink user traffic is transmitted through the NR SCG path.
Check how the uplink traffic is distributed between LTE (MCG) and NR (SCG).
First, check the LTE connection statistics in the WebGUI. In this example, the LTE cell shows downlink traffic, but essentially no uplink user traffic is observed during the speed test.
This confirms that the LTE MCG path is not being used for uplink user-plane traffic in this configuration. The uplink traffic is instead carried through the NR SCG path, as expected with type set to scg and ul_data_threshold set to -1.
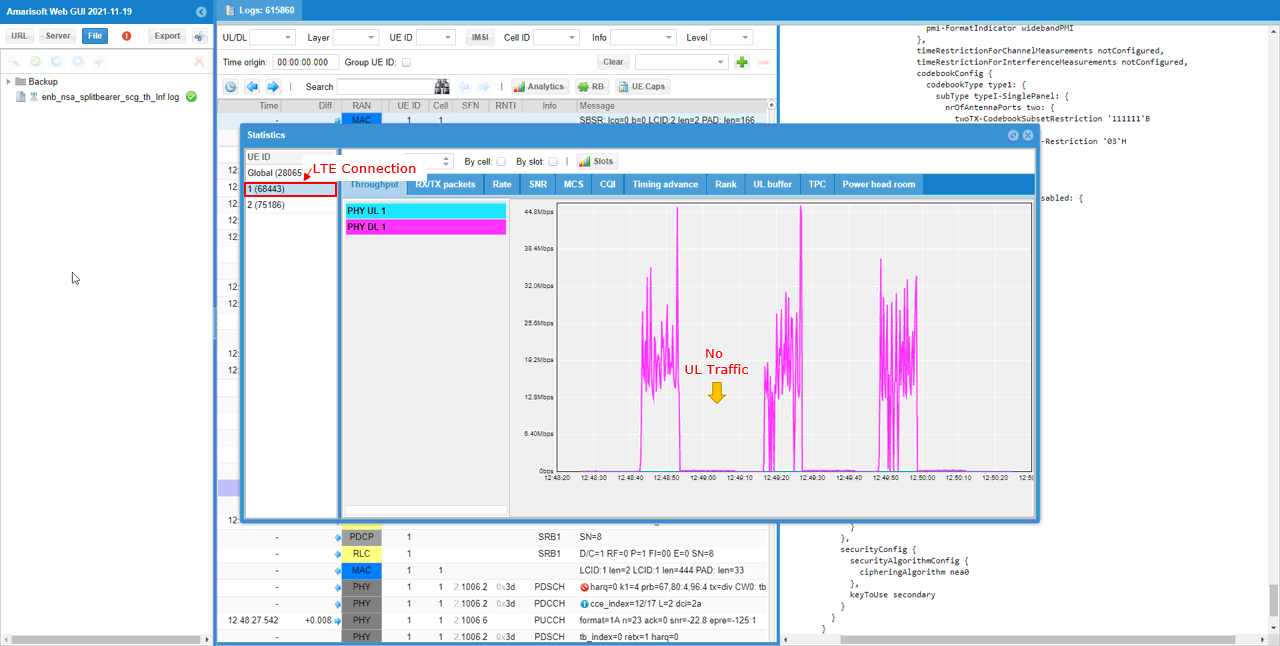
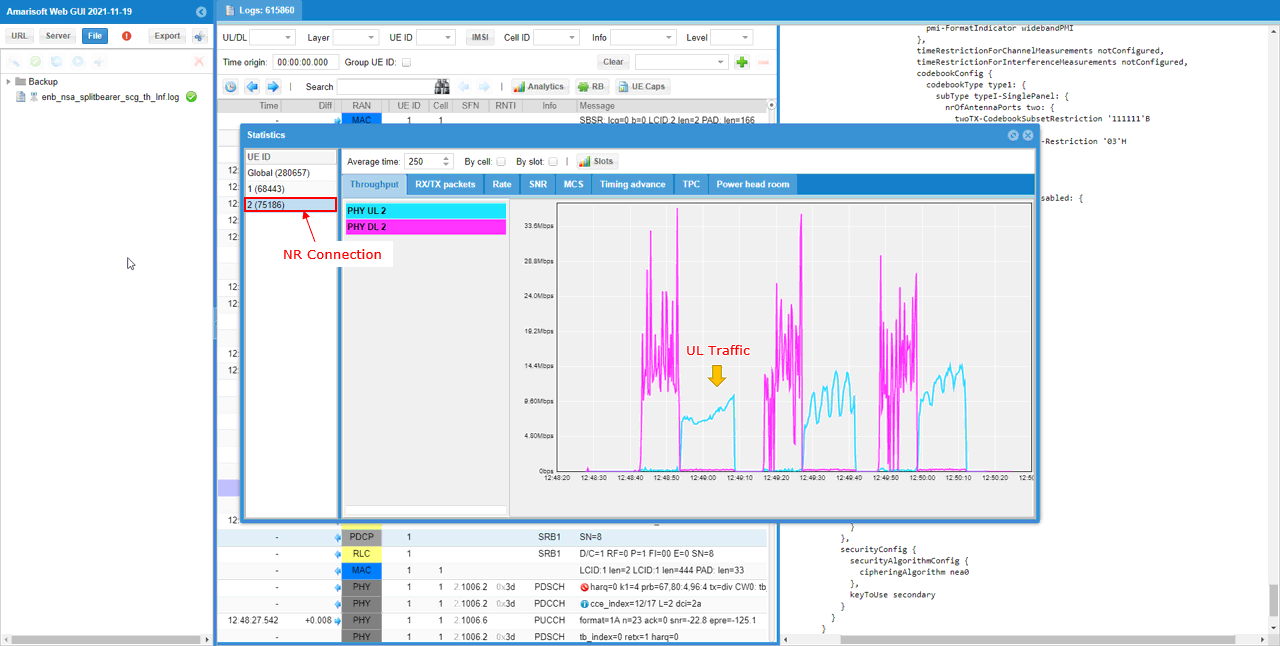
In the NR connection statistics, both downlink and uplink traffic are observed. Unlike the LTE connection, significant uplink traffic is present on the NR cell during the speed test.
Comparing the LTE and NR traffic patterns confirms that essentially 100% of the uplink user traffic is transmitted through the NR SCG path. This matches the configuration with type set to scg and ul_data_threshold set to -1, where uplink splitting is disabled and the NR path carries all uplink traffic.
RRC / NAS Signaling
: This section is to show you the overall structure of important Rrc messages and Information IE (IE) that are related to this tutorial. It is not intended to describe the details on every RRC/NAS Information elements. With the overall structure and key IEs shown here, it hope it would be easier / clearer to go through the sample log provided in this tutorial or any logs that you captured from your own test setup or live network.
rrcConnectionReconfiguration for NR Addition
: This is the RRC message sent by eNB (LTE) to add NR. (
message c1: rrcConnectionReconfiguration: {
rrc-TransactionIdentifier 0,
criticalExtensions c1: rrcConnectionReconfiguration-r8: {
....
nonCriticalExtension {
nonCriticalExtension {
nonCriticalExtension {
nonCriticalExtension {
nonCriticalExtension {
nonCriticalExtension {
nonCriticalExtension {
nonCriticalExtension {
nr-Config-r15 setup: {
endc-ReleaseAndAdd-r15 FALSE,
nr-SecondaryCellGroupConfig-r15 {
rrc-TransactionIdentifier 0,
criticalExtensions rrcReconfiguration: {
....
nr-RadioBearerConfig1-r15 {
drb-ToAddModList {
{
drb-Identity 1,
reestablishPDCP true,
pdcp-Config {
moreThanOneRLC {
primaryPath {
cellGroup 1,
logicalChannel 4
},
ul-DataSplitThreshold b0
}
}
}
},
securityConfig {
...
}