LteSat
This tutorial is to show you how to use/operate LteSat. LteSat. ltesat is a companion software of Amarisoft eNB/gNB for any NTN scenario. It can run in two different mode : Toobox mode and Mission Control mode.
- Toolbox mode is a kind of 'offline' mode(like a toolbox) to replay or plan any satellite orbit. It accepts various inputs for satellite description which are compatible with eNB/gNB NTN configuration and can output the satellite trajectory with several formats: azimuth/elevation from a given ground position, groundtrack or ECEF coordinates.
- Mission Control mode works as a 'misssion control' software to control several Amarisoft eNB/gNB working with a worldwide LEO constellation. The configuration file contains a mapping between ground cells and Amarisoft eNB/gNBs with an NTN configuration, along with the definition of a satellite constellation. ltesat will configure the eNB/gNBs in realtime to select the serving satellites for its NTN cells, in order to allow a continuous coverage in time. ltesat offers the same comprehensive logging mechanism as other Amarisoft products and smoothly interfaces with Amarisoft WebGUI.
Table of Contents
Introduction
LteSat is an advanced software solution designed to extend the capabilities of Amarisoft's eNB/gNB base station platforms into the realm of Non-Terrestrial Networks (NTN), addressing the unique challenges of satellite-based cellular connectivity. Developed as a specialized companion tool, LteSat facilitates seamless integration between terrestrial cellular infrastructure and satellite constellations, particularly those employing Low Earth Orbit (LEO) architectures. The software is architected to operate in two primary modes: Toolbox mode and Mission Control mode. In Toolbox mode, LteSat provides powerful offline capabilities for satellite scenario planning, orbit replay, and trajectory analysis using a variety of input formats compatible with Amarisoft's NTN configurations. This enables engineers and researchers to model, visualize, and prepare for complex satellite-ground interactions. Mission Control mode, on the other hand, elevates LteSat into a real-time orchestration platform, dynamically controlling multiple Amarisoft eNB/gNB instances deployed globally and synchronizing their operation with moving satellite constellations. This ensures continuous, reliable coverage by managing cell-satellite associations and automating handovers as satellites traverse their orbits. LteSat leverages robust logging systems and integrates tightly with the Amarisoft WebGUI for monitoring and management, making it a pivotal tool in the deployment of next-generation hybrid terrestrial-satellite networks. Its introduction reflects the growing importance of NTN in 5G and future wireless ecosystems, where ubiquitous, resilient connectivity is demanded across remote, maritime, and underserved regions.
-
Context and Background
- LteSat is purpose-built for use with Amarisoft's eNB/gNB platforms in Non-Terrestrial Network (NTN) scenarios, supporting satellite-based cellular communications.
- The software addresses the technical and operational complexities of integrating terrestrial base stations with LEO satellite constellations.
- It aligns with the ongoing evolution of 5G and upcoming 6G standards, where NTN is crucial for global connectivity and coverage extension.
-
Relevance and Importance
- LteSat enables mobile network operators, researchers, and system integrators to efficiently deploy, plan, and manage NTN infrastructures, crucial for reaching remote areas and ensuring service continuity.
- The Toolbox mode accelerates scenario planning and feasibility studies by providing detailed trajectory and coverage analysis tools.
- Mission Control mode automates the real-time configuration and management of distributed eNB/gNB sites, optimizing satellite resource allocation and ensuring seamless user experience.
-
Tutorial Objectives and Learning Outcomes
- Understand the architectural principles and operational modes of LteSat within the Amarisoft ecosystem.
- Gain practical skills in configuring and utilizing both Toolbox and Mission Control modes for satellite orbit planning and live network management.
- Learn how to interface LteSat with Amarisoft WebGUI for effective monitoring and troubleshooting.
- Acquire knowledge of best practices for supporting continuous coverage and dynamic handover in NTN deployments.
-
Prerequisite Knowledge and Skills
- Familiarity with Amarisoft eNB/gNB architecture and configuration files.
- Understanding of basic cellular network concepts, particularly related to NTN and satellite communications.
- General proficiency with Linux-based software environments and command-line tools.
- Access to a licensed version of LteSat (supported since the March 2024 release).
Summary of the Tutorial
This tutorial details the procedures for installing, configuring, and testing the ltesat tool in various operational modes. The summary below outlines the test methodologies and step-by-step procedures for each test described in the tutorial.
-
Test 1: Running in Toolbox Mode
- This is the simplest operational mode, requiring no special hardware setup.
- To execute, run the command:
./ltesat configuration_file -
Example usage:
./ltesat config/sat-mc-1ran.cfg - The tool outputs multiple columns of data directly to the terminal. The exact data displayed depends on the selected configuration file.
-
Advantage: Fast and simple to use.
Limitation: No visualization capability for results.
-
Test 2: Running in Mission Control Mode without RAN
- This mode enables visualization of output data using WebGUI, without involving a RAN (Radio Access Network) node.
-
To execute, run the command:
./ltesat -m configuration_file -
Example usage:
./ltesat -m config/sat-mc-1ran.cfg - The tool does not print textual output; instead, it sends data to WebGUI in the background.
- Set up the WebGUI by creating a Server component to connect to ltesat. Use 127.0.0.1 (or the callbox IP address) for the address and 9009 for the port (default).
- Once connected, specify log options in WebGUI and update the settings.
- Upon successful connection, the WebGUI will display logs and, when the [SAT] button is pressed, will render ltesat data on a world map visualization.
-
Test 3: Running in Mission Control Mode with RAN
- This test involves running ltesat in mission control mode, connected to both WebGUI and a RAN node. The RAN configuration must be set for NTN (Non-Terrestrial Network) operation and match the ltesat configuration, especially regarding the number of cells.
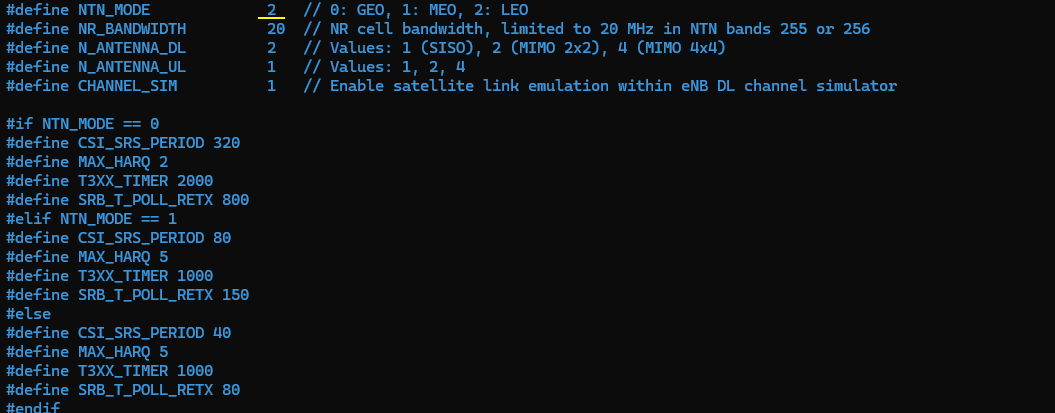
- Prepare and modify the RAN configuration (e.g., gnb-sa-ntn-leo.cfg) to ensure NTN_MODE is set appropriately (e.g., 2 for LEO).
-
Start the RAN service:
service lte restart -
Enter screen mode to verify that the RAN (eNB/gNB) is operational:
screen -r -
Run ltesat in mission control mode with the matching configuration:
./ltesat -m config/sat-mc-1ran.cfg - Open WebGUI and ensure both ENB and SAT server components are connected.
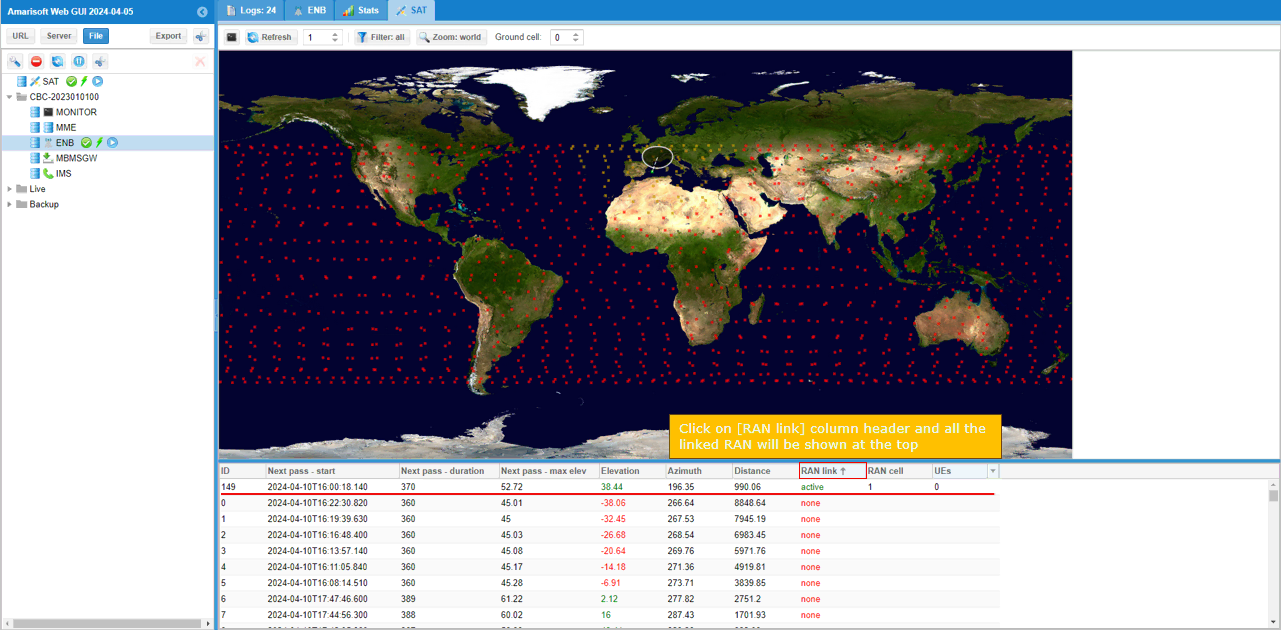
- After successful connection, press the [SAT] button in WebGUI to display the satellite constellation on the world map.
- Data in the RAN link can be sorted in WebGUI by clicking the [RAN link] column title, allowing linked RANs to be shown at the top.
General Configuration and Installation Notes:
- Installation: ltesat must be manually extracted from the installation package using tar xzf tarball_name and the files found in libs/linux folder must be copied in the newly created tarball_name folder.
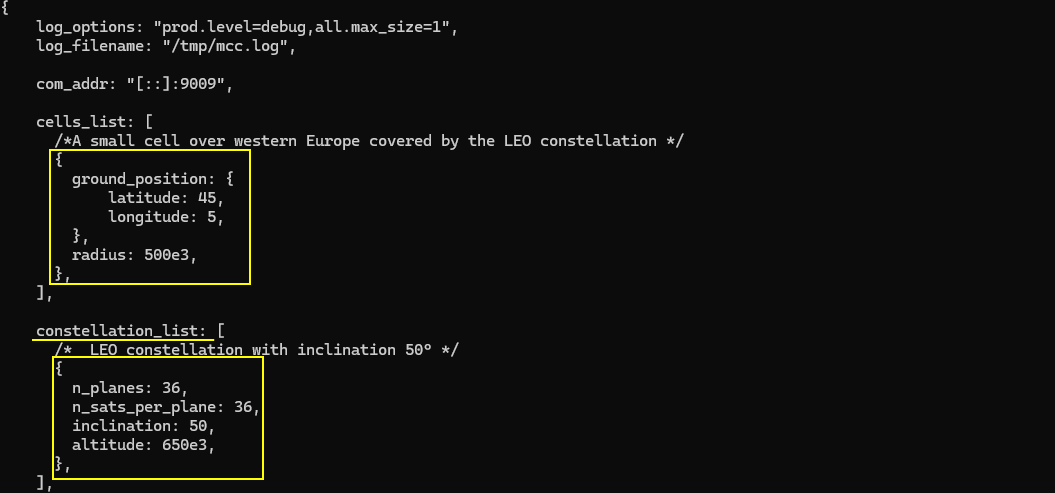
- Configuration: Sample configuration files are provided in the config directory. Key parameters include cells_list, constellation_list, and ran_node_list. Address and port settings are critical for connecting to WebGUI and the callbox.
- When connecting to WebGUI, use [::] for the com_addr field in the configuration file. When connecting to the callbox, use 127.0.0.1 for the addr field.
- Configuration files follow a structure similar to other Amarisoft products, beginning with logging options and communication addresses, followed by detailed configuration parameters.
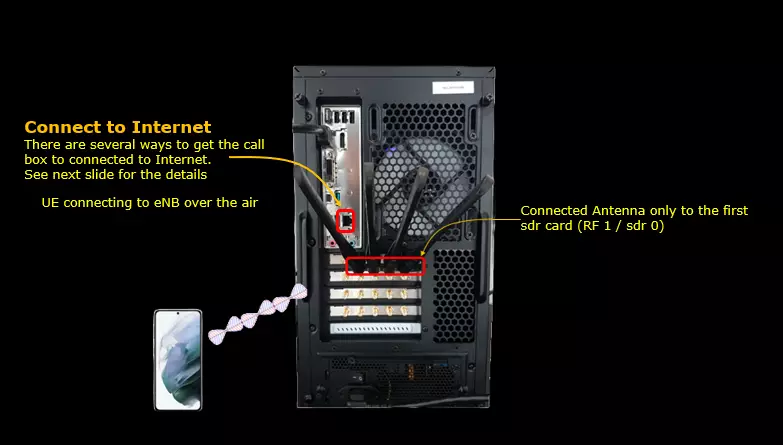
Test Setup
The toolbox mode operation does not require any specific hardware test setup. For mission control mode, any basic callbox hardware setup would work.
Key Configuration Parameters
Followings are important configuration parameters for this tutorial. You may click on the items for the descriptions from Amarisoft documents.
- cells_list
- constellation_list
- n_planes
- n_sats_per_plane
- inclination
- altitude
- multiple_tle_filename
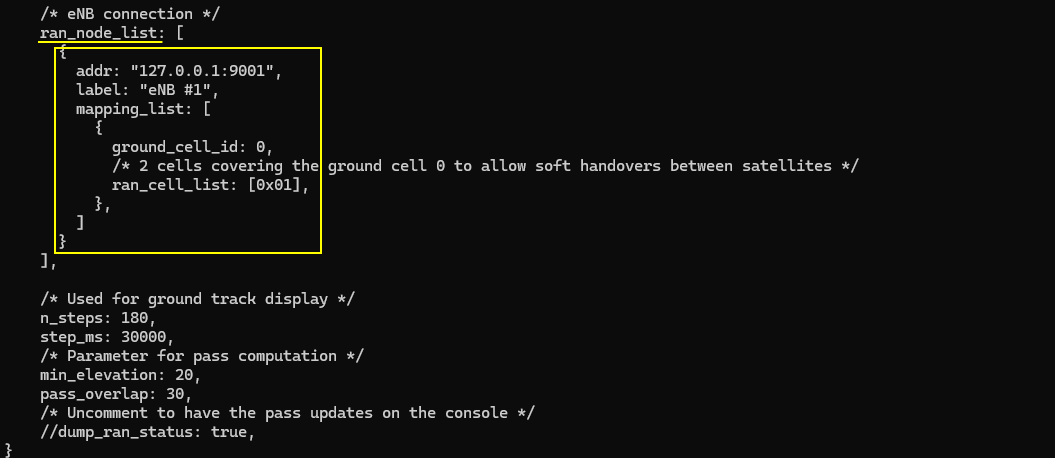
- ran_node_list
- addr
- label
- mapping_list
- ground_cell_id
- ran_cell_list
How to Install ?
ltesat is included in installation package (if you have license for it) but it does not get installed during the installation process. You need to manually untar it from the installation package.
If you untar the installation package and get into the untarred directory, you would find a tarball with name starting with ltesat as shown below.
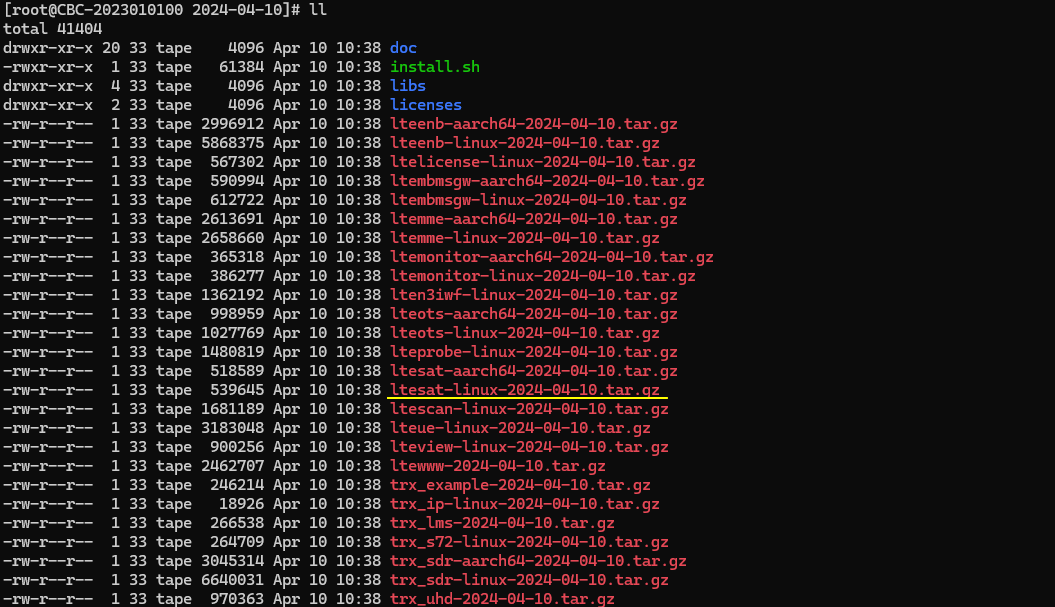
Untar the tarball with the command 'tar xzf tarball_name' as shown below.
![]()
Then you would get the uncompressed directory as ltesat-linux-yyyy-mm-dd as shown below.
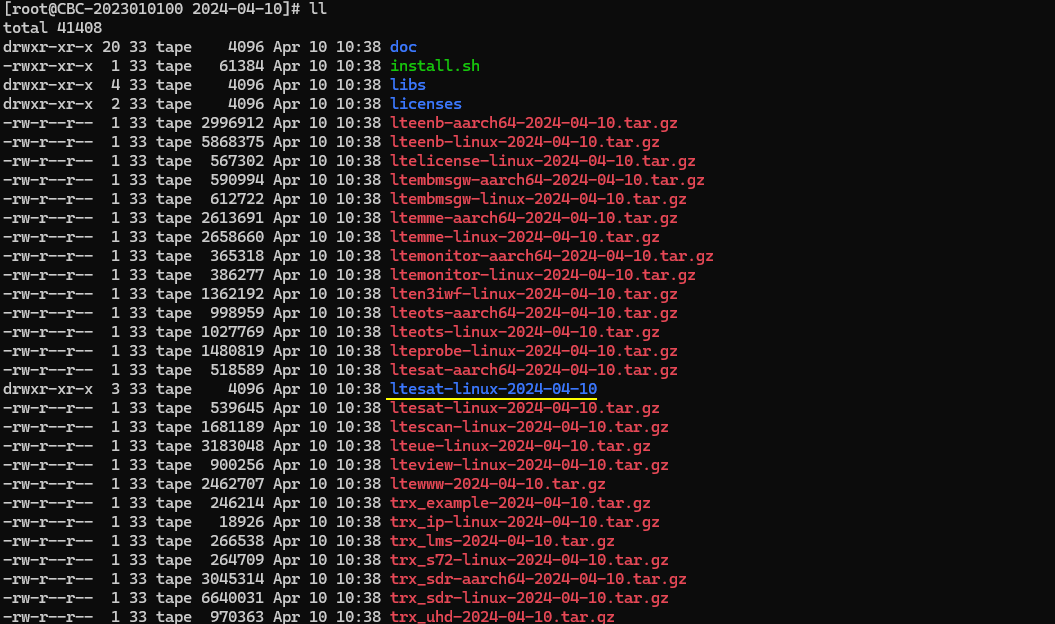
Then copy the files found in libs/linux folder to the newly created ltesat-linux-yyyy-mm-dd folder.
How to Configure ?
How to configure ltesat is similar to other Amarisoft software. If you go to ltesat directory, you would find a directory named 'config'.

In the config directory are some sample configuration files. You can use any of these sample configuration file or modify these files as per your test requirement.

Opening one of the configuration file shows a configuration as follows. Of course, the detailed configuration varies depending on test cases. This is just to show you about the file format and syntax, you would see overall file composition is similar to other amarisoft product starting with log_options, com_addr and then detailed configuration parameters come.
If you want to run the configuration in connection with WebGUI, com_addr is important. ltesat is using the port 9009 as a default unless you change this port here in the configuration.
If you want to run the configuration in connection with Amarisoft Callbox, addr in ran_node_list is important. ltesat is using the port 9001 as a default unless you change this port here in the configuration.
Test 1 : Running in Toolbox mode
This is the simplest way of using the tool. Just run it standalone without an association with any other tools (e.g, WebGUI, RAN). You can run ltesat with a configuration as follows.
./ltesat configuration_file
The example that I ran for this test is ./ltesat config/sat-mc-1ran.cfg. Then you will get the print of multiple columns of data. The contents of the column would vary with the configuration that you set. An advantage of this mode is that it is super fast and easy to run. A drawback is that there is no visualization for the result.

Test 2 : Running in Mission Control Mode without RAN
In this test, I will run the exactly same configuration used in previous test but run it in different mode called 'Mission Control' mode. Main purpose is just to visualize the output data. A perfect setup for the mission control mode is ltesat and WebGUI and RAN, but in this test I will just use ltesat and WebGUI without RAN.
To run a ltesat configuration in mission control mode is to run the command with -m option : ./ltesat -m configuration_file
In this test, I ran : ./ltesat -m config/sat-mc-1ran.cfg . When it runs, it does not print any result in text. It is transferring the output data to WebGUI in the background. Since I don't run any RAN (i.e, eNB or gNB), you see the message like "[eNB #1] Couldn't start connection" but you may ignore this for now.

Now launch WebGUI and create a Server component to ltesat. If you use the default setting for ltesat configuration (i.e, com_addr : [::]:9009), you may set 127.0.0.1 for address and 9009 as the port. If 127.0.0.1 does not work, type in the IP address of your callbox.
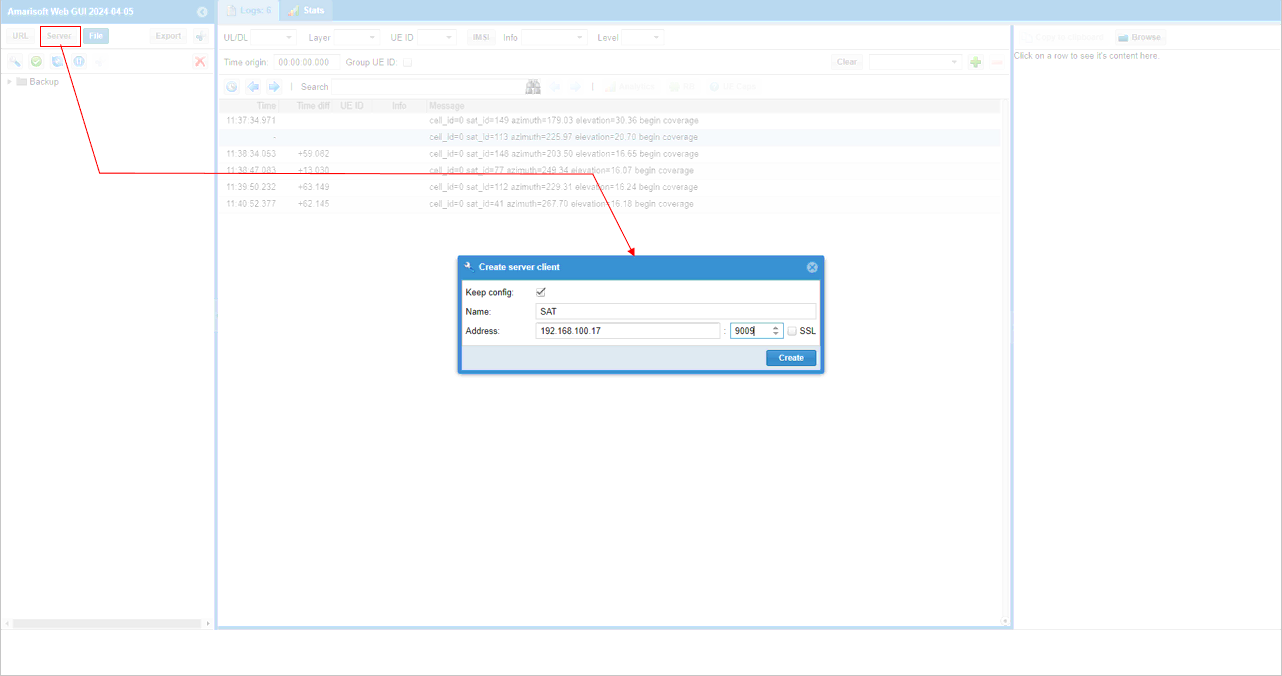
If WebGUI is get successfully connected ltesat, you would see log options showing up in the dialog box, specify log options as you like and hit [Update] button.

Then you would see the 'connected' indicator and log print.
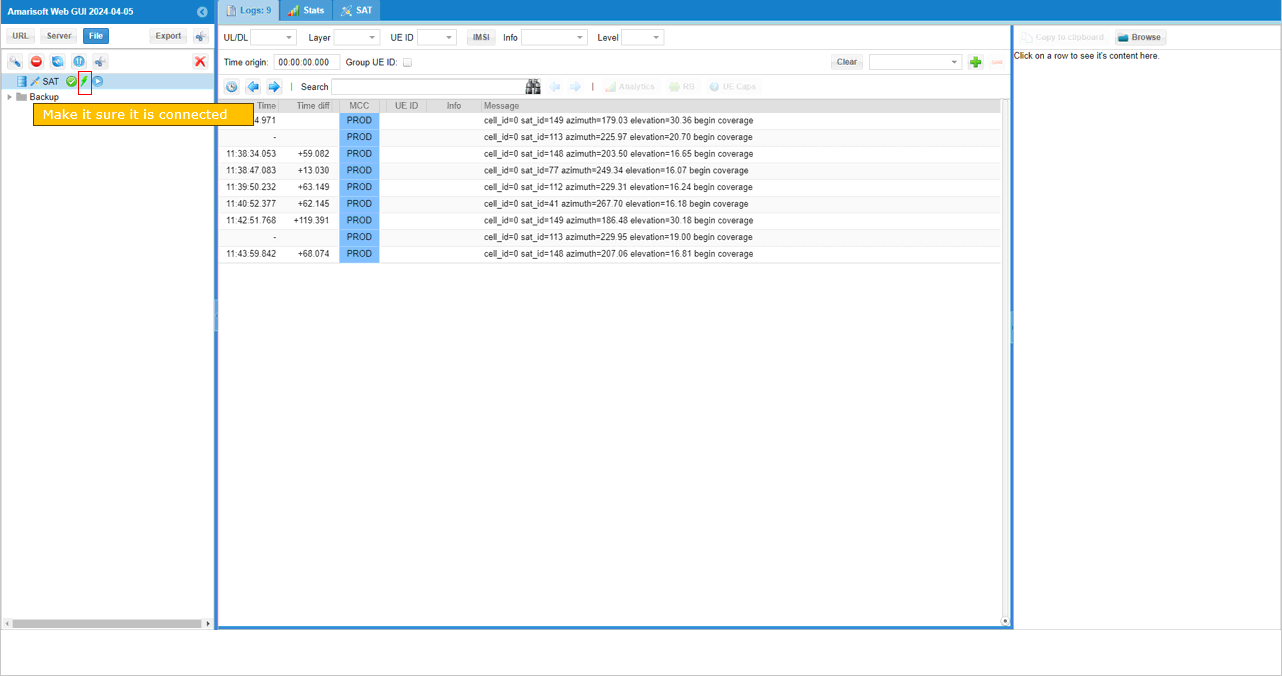
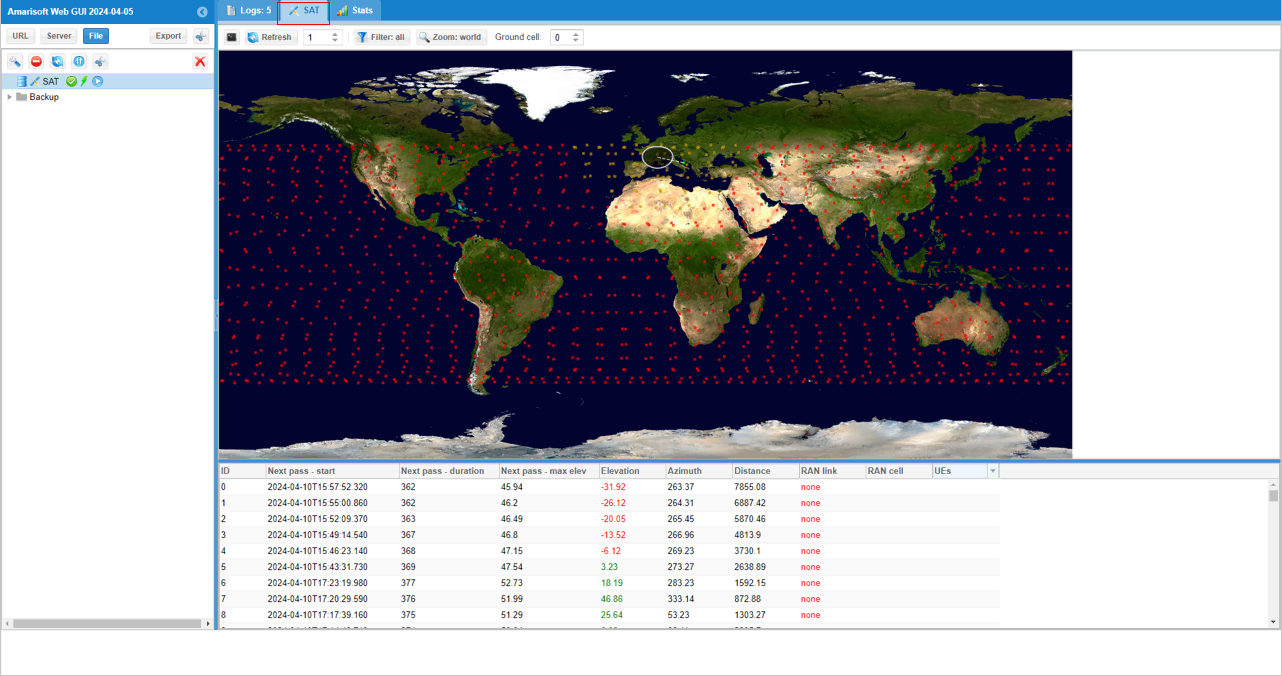
Now hit [SAT] button and you will get the ltesat data displayed on top of world map as shown below.
Test 3 : Running in Mission Control Mode with RAN
In this test, I will run the ltesat in connection with both WebGUI and RAN. In this case, the configuration for RAN should be NTN configuration and it should match the configuration of ltesat (especially in terms of the number cells).
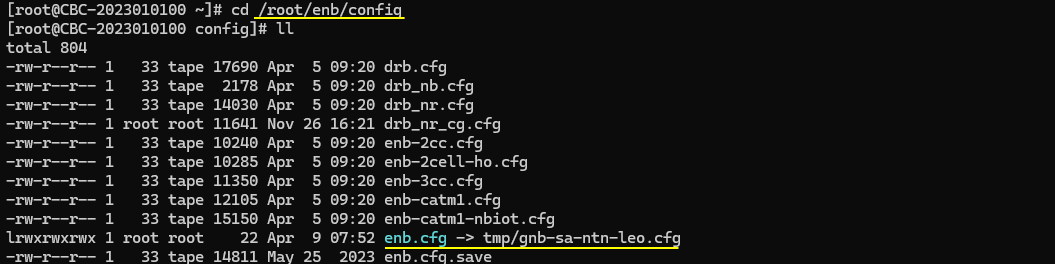
For this test, I used a NR SA NTN configuration gnb-sa-ntn-leo.cfg which is modified from the gnb-sa-ntn.cfg.
The configuration in gnb-sa-ntn-leo.cfg is exactly same as gnb-sa-ntn.cfg except only one parameter. I just changed NTN_MODE to 2 (LEO) and everything else same as the default setting.
Once the configuration is done, first run RAN part (i.e, 'service lte restart') and get into screen mode (i.e, 'screen -r') and make it sure the (enb) is running without any problem.
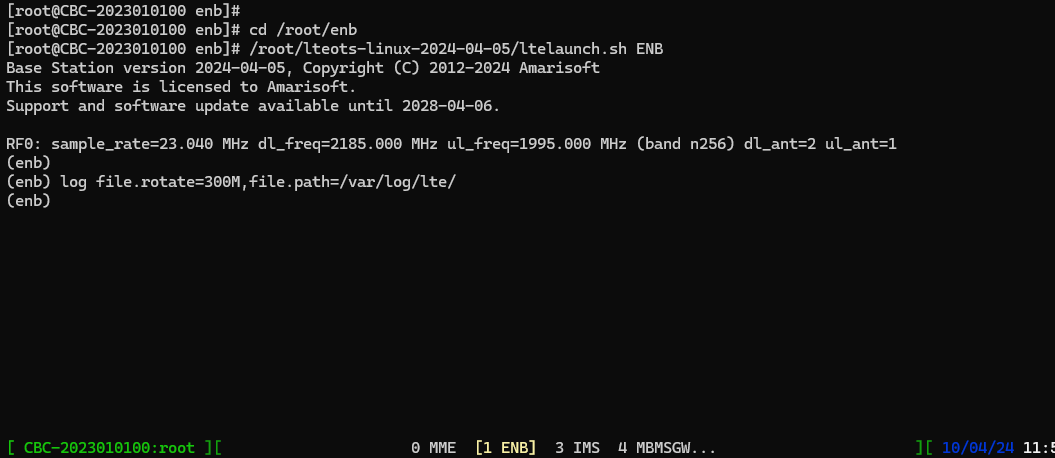
Then run ltesat in mission critical mode with configuration that matches RAN configuration. In this test, ltesat run as follows :
./ltesat -m config/sat-mc-1ran.cfg

Now open the WebGUI and ensure that both ENB and SAT server are properly connected (
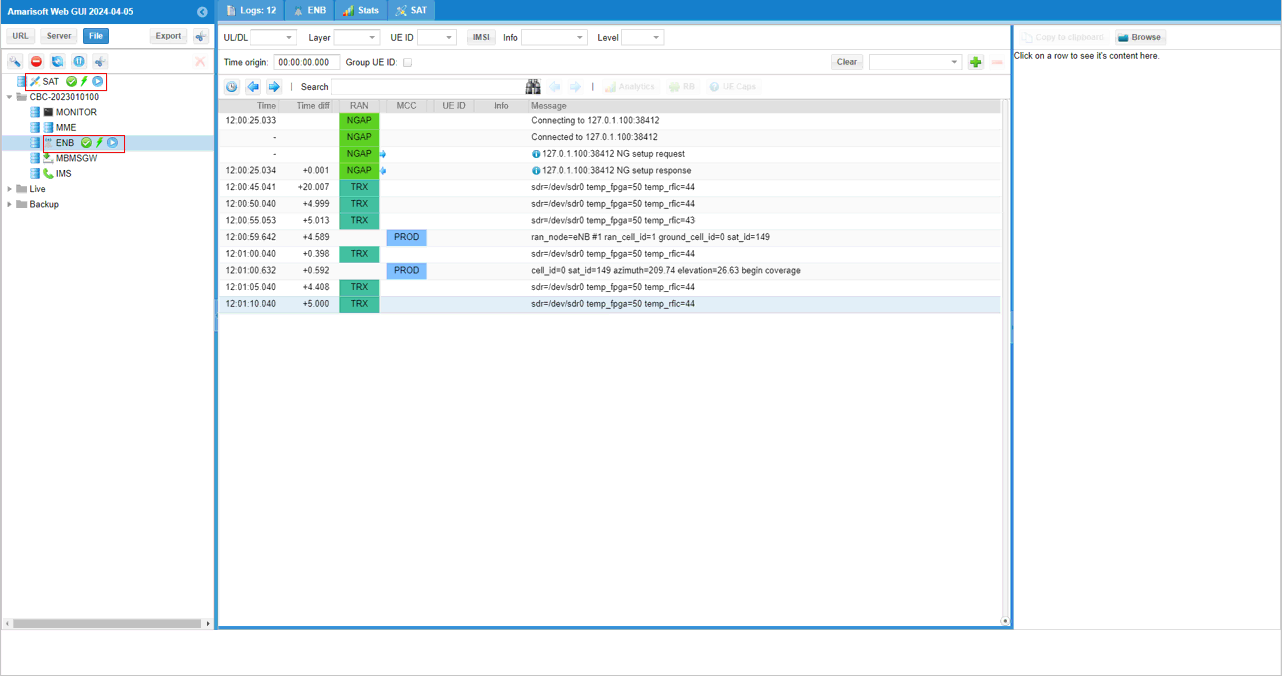
Once SAT server is properly connected, hit [SAT] button and you will see the satellite constellation displayed on world map.
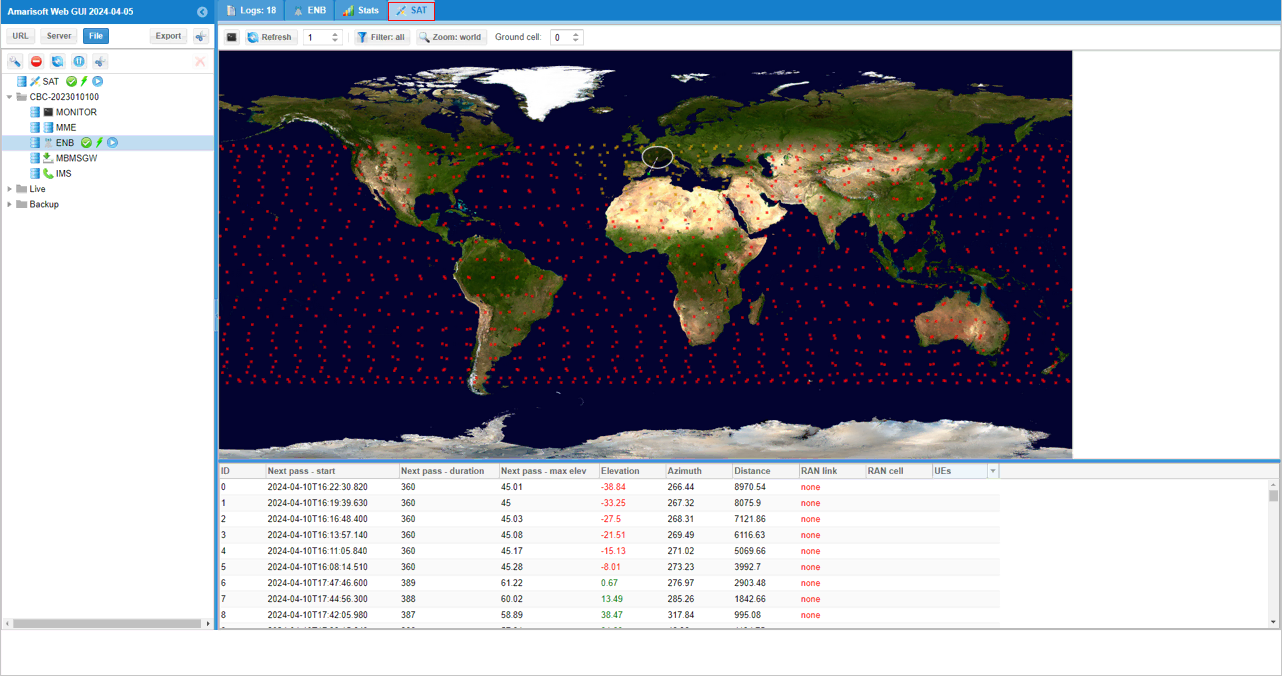
If you sort the data in RAN link (click on the [RAN link] column title), it will sort the linked RANs shown at the top.