LTE MMS
This tutorial shows how to test MMS(Multimedia Messaging Service) with a commercial UE on Amari Callbox. If you are using the USIM card from Amarisoft, you don't need to change any settings in the default configuration (You just need to understand about the settings on default configuration) The setting change for this test would be mainly with UE side configuration setting.
Unlike SMS, MMS is designed to send / receive multimedia contents (e.g, image, video, audio files etc). Therefore, there need to be some underline packet channel used. As SMS message is sent / received encapsulated by another signaling protocol (e.g, NAS signaling message or IMS signaling message), MMS is sent / received encapsulated by other protocol called WAP (Wireless Application Protocol).
One important thing in terms of MMS configuration is that you need to know of the ip address of MMSC (MMS Center) and configure the IP in your UE (DUT) properly, whereas SMS does not require this kind of configuration.
Table of Contents
Introduction
Multimedia Messaging Service (MMS) is a standardized communication protocol that enables the transmission and reception of multimedia content—including images, audio, video, and rich text—over mobile networks. Unlike traditional Short Message Service (SMS), which is limited to plain text and operates over signaling channels, MMS leverages underlying packet-switched data channels and is typically encapsulated within the Wireless Application Protocol (WAP) stack. This architectural distinction allows MMS to support richer content types and larger payload sizes. In a typical deployment, MMS messages traverse from the User Equipment (UE) through the mobile network to the Multimedia Messaging Service Center (MMSC), which acts as an intermediary for storing, forwarding, and delivering multimedia messages. Proper MMS functionality requires the UE to be correctly configured with network-specific parameters, such as the MMSC URL and associated IP address, to ensure seamless routing and content delivery. Testing MMS capabilities using a commercial UE on the Amari Callbox platform provides a controlled, versatile environment for validating end-to-end MMS workflows, interoperability, and network configuration, which is critical for both device manufacturers and network engineers. Understanding the protocol stack, addressing mechanisms, and configuration nuances is essential for diagnosing issues, optimizing performance, and ensuring compliance with industry standards. This tutorial is designed to guide learners through the process of MMS testing, emphasizing the architectural differences from SMS, the importance of WAP encapsulation, and the practical steps required to configure and verify MMS operations in a simulated network environment.
-
Context and Background
- MMS enables the exchange of multimedia content over mobile networks, leveraging packet-switched data bearers instead of traditional signaling channels.
- Unlike SMS, which uses NAS or IMS signaling, MMS relies on WAP for encapsulation and transmission of data between the UE and the MMSC.
- Proper configuration of network parameters—particularly the IP address or URL of the MMSC—is critical on the UE for successful MMS delivery and reception.
- The Amari Callbox provides a virtualized, configurable testbed for evaluating and troubleshooting MMS functionality using commercial UEs and standardized USIM cards.
-
Relevance and Importance of This Tutorial
- Demonstrates the practical steps required to validate MMS operation in a controlled test environment, which is crucial for device certification and network integration.
- Highlights key architectural and protocol distinctions between MMS and SMS, ensuring a foundational understanding of wireless messaging systems.
- Enables engineers, testers, and developers to identify configuration dependencies, troubleshoot communication issues, and optimize multimedia messaging workflows.
-
Learner Outcomes
- Understand the end-to-end MMS communication flow, including protocol encapsulation and network interactions.
- Gain hands-on experience configuring a commercial UE for MMS testing using the Amari Callbox platform.
- Identify and apply the necessary network settings (e.g., MMSC IP address) to ensure successful multimedia message exchange.
- Develop troubleshooting skills for diagnosing common MMS configuration and connectivity issues.
-
Prerequisite Knowledge and Skills
- Familiarity with basic mobile network concepts, including UE, USIM, and signaling protocols.
- Understanding of SMS and MMS service differences in terms of architecture and protocol stack.
- Basic experience with network configuration and using test platforms such as the Amari Callbox.
- Awareness of IP networking fundamentals and the role of application-layer gateways like the MMSC.
Summary of the Tutorial
This tutorial outlines the setup, configuration, and execution of MMS testing over IMS in an LTE environment using Amarisoft Callbox and a UE (User Equipment). The focus is on test procedures, configuration, and log analysis for Mobile Originated (MO) MMS, including methodologies for capturing and analyzing traffic data.
-
Test Setup:
- Use the SIM card provided with the system or configure a new one as needed (refer to the Configuration Guide for details).
- Ensure the test network includes proper callbox, UE, and connectivity as displayed in the test setup diagram.
-
Key Configuration Parameters:
- Set values for impi, impu, domain, and mms_server_bind_addr in configuration files as per Amarisoft documentation.
-
Configuration Procedure:
- Use the default configuration files: enb.default.cfg for the eNB and mme-ims.cfg for the MME.
- Verify that ue_db-ims.cfg is referenced as the UE database within mme-ims.cfg.
- Record the telephone numbers associated with the test USIM/ISIM for use in MMS and SMS testing. Adjust parameters if using a different test SIM.
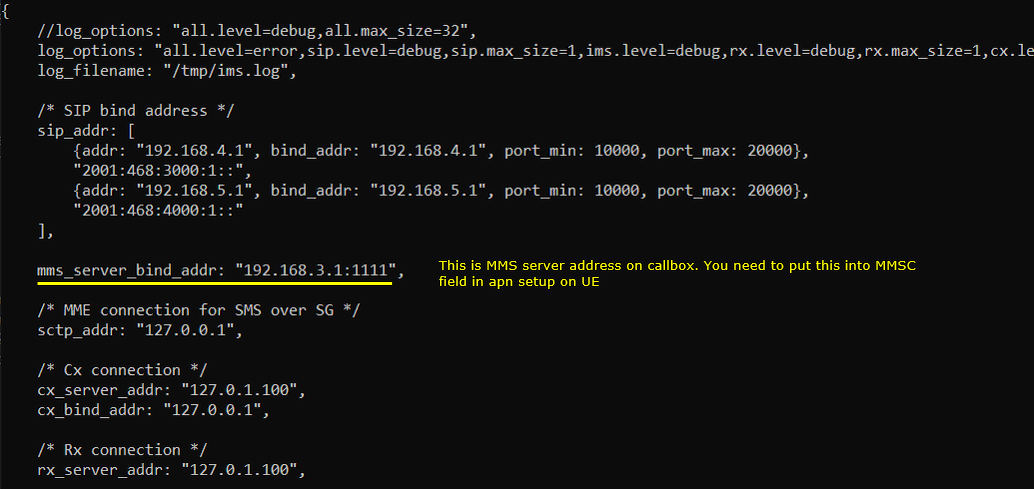
- Set the mms_server_bind_addr in ims.default.cfg and configure this IP in the UE’s MMSC settings.
- On the UE side:
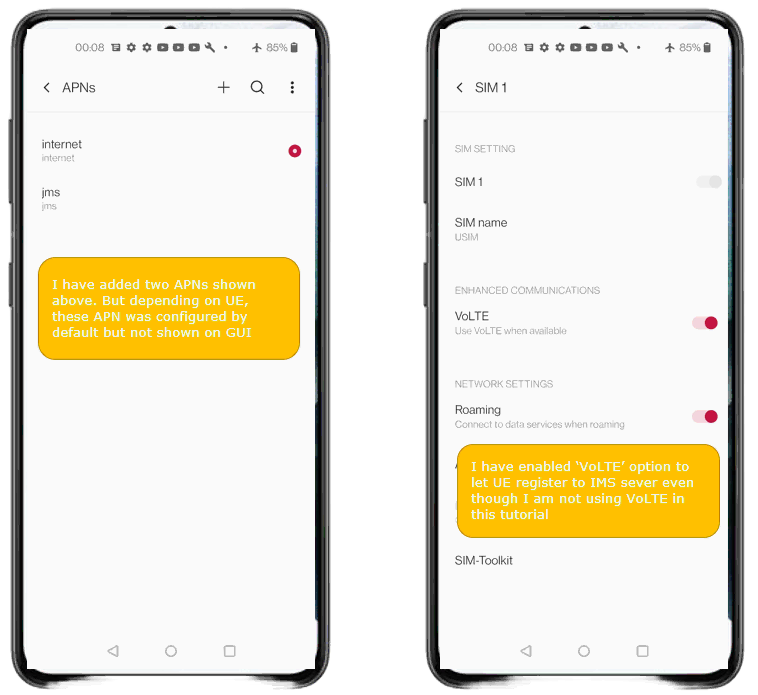
- Ensure the 'ims' APN is configured; add manually if not present.
- Enable 'VoLTE' option to facilitate IMS registration.
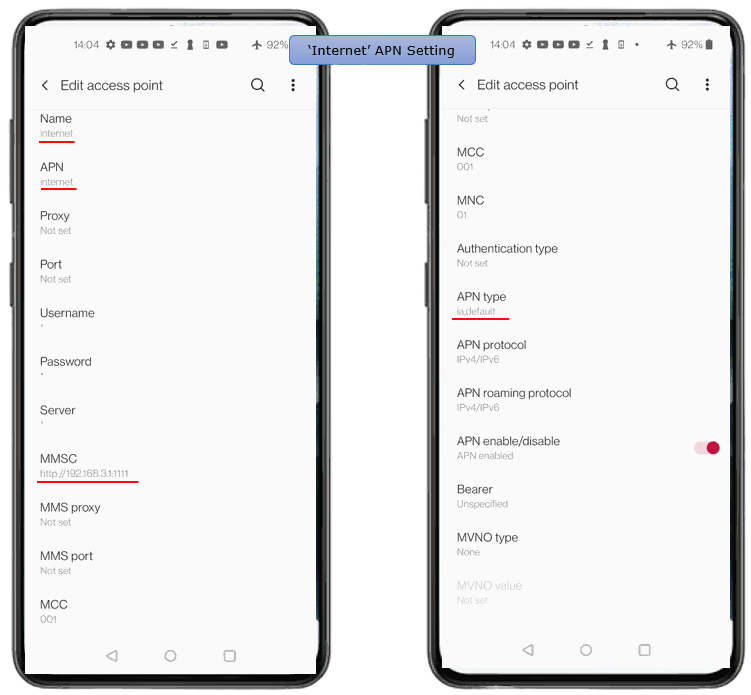
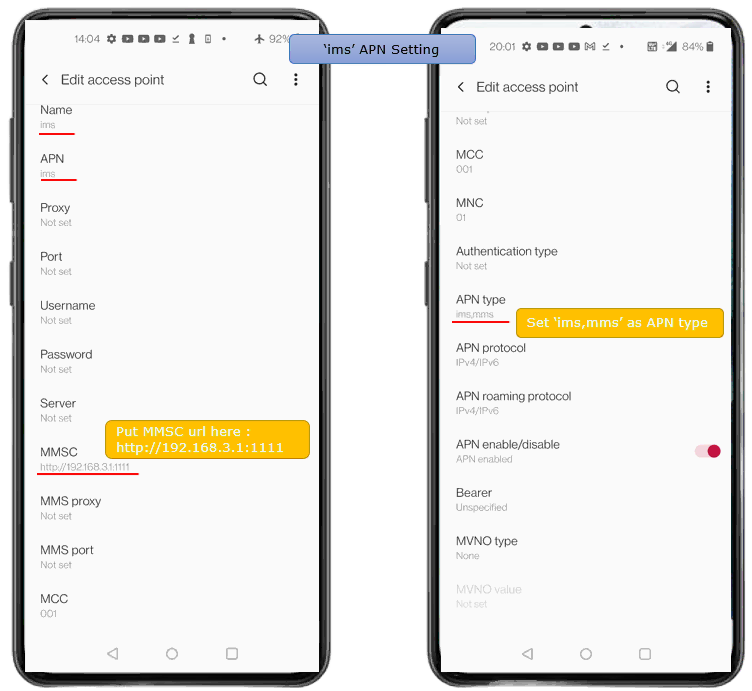
- Configure both 'internet' and 'ims' APNs with correct Name, APN, MMSC (e.g., http://192.168.3.1:1111/), and APN type. Adjust IP if PDN configuration changes.
-
Test Execution: MO MMS Procedure
- Start LTE service and validate basic cell configuration (any LTE cell is sufficient).
- Power on the UE and confirm successful network registration.
- Ensure that the UE is assigned to an IMS PDN.
- Verify that the UE is registered to the IMS server. This is a prerequisite for MMS testing; if registration fails, troubleshoot IMS registration first.
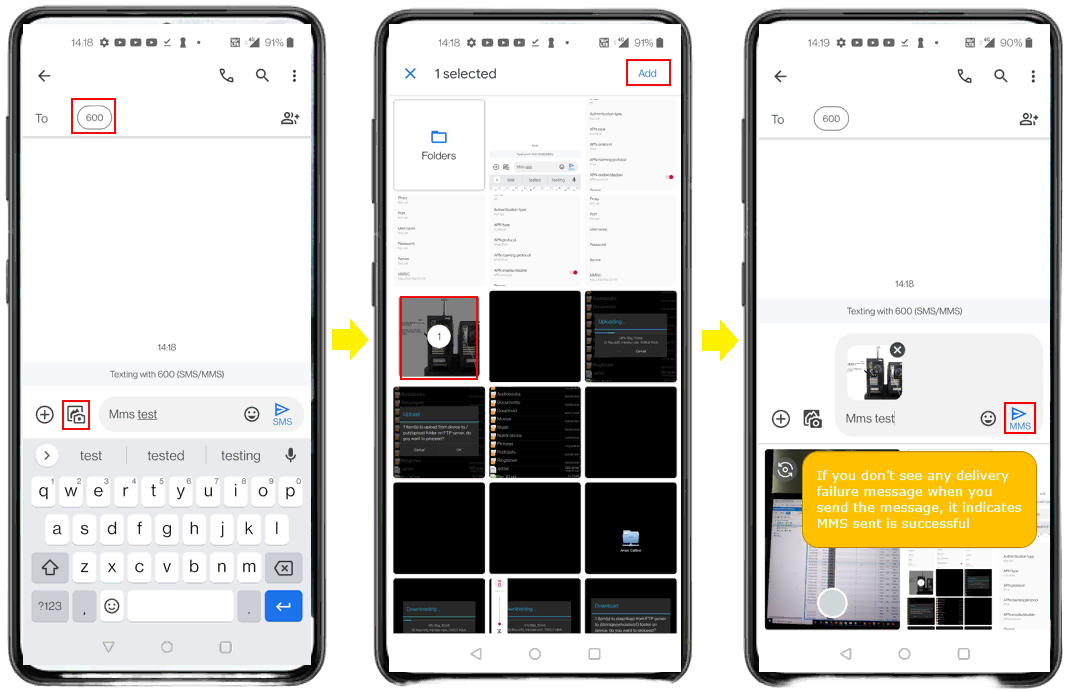
- Send an MMS (e.g., an SMS with a picture) from the UE. The UE will automatically use MMS protocol based on content type.
- Observe results, confirming successful MMS sending through the phone’s interface.
-
Log Analysis Procedure:
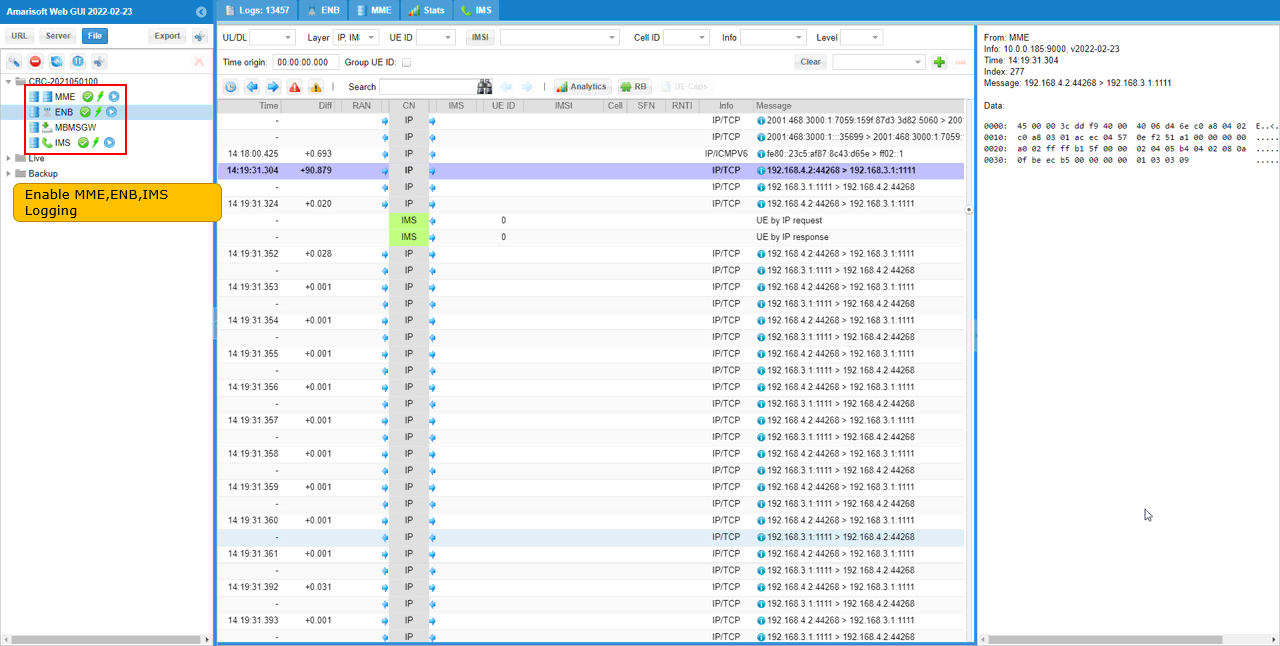
- Enable logging for eNB, MME, and IMS components prior to sending MMS.
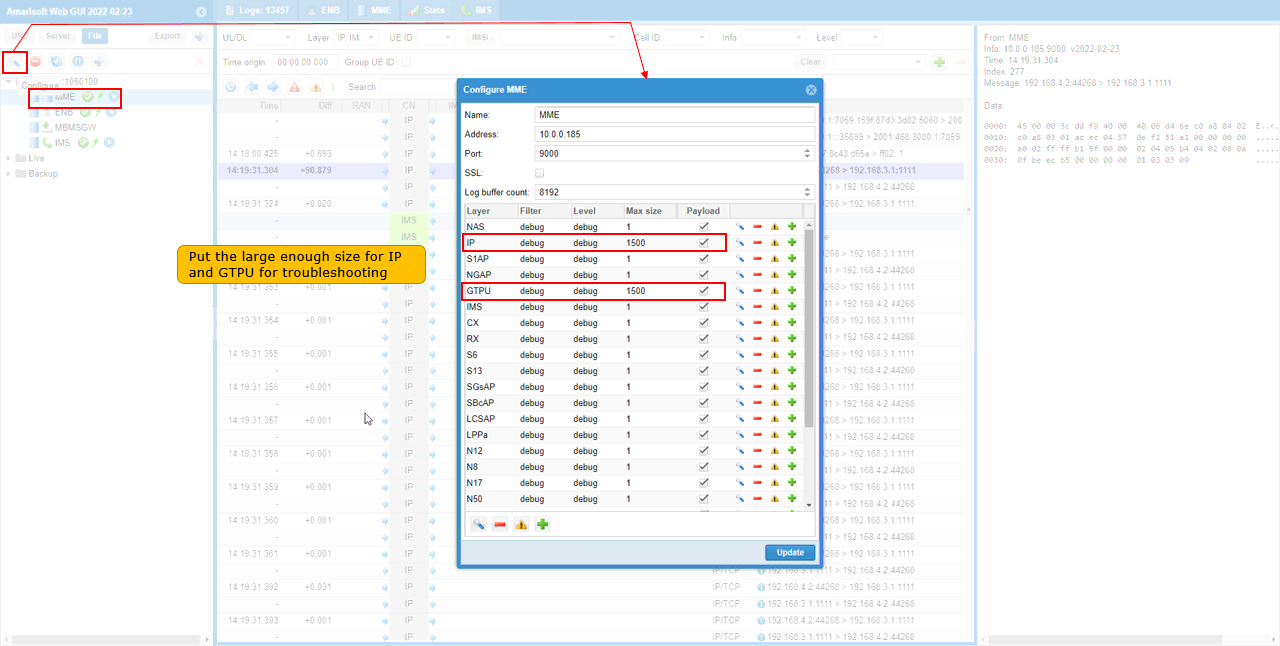
- Increase the maximum size for IP and GTPU logs in MME log properties to capture full IP packets.
- Similarly, increase the packet size in IMS log properties for MMS data.
- For convenience during analysis, select GTPU, IMS, IP, and RRC/NAS for display in the log viewer.
- For MO MMS:
- With the UE registered to IMS, send an MMS and monitor the log for TCP connection setup used to post MMS content over IP.
- Confirm the presence of HTTP POST in TCP packets carrying the MMS payload.
- Follow the TCP sequence in logs to inspect the content of the MMS, including any attached text or media.
-
Capturing MMS Traffic with pcap:
- Restart LTE services.
- In a separate terminal, run:
# tcpdump -i any /tmp/mms.pcap
- Perform the MMS test while tcpdump is running.
- Stop tcpdump after the test.
- Filter and analyze HTTP traffic in the captured pcap file using Wireshark for detailed MMS protocol inspection.
The tutorial emphasizes precise configuration of both network and UE, step-by-step execution of MMS sending over IMS, and detailed log/traffic capture for comprehensive analysis and troubleshooting.
Test Setup
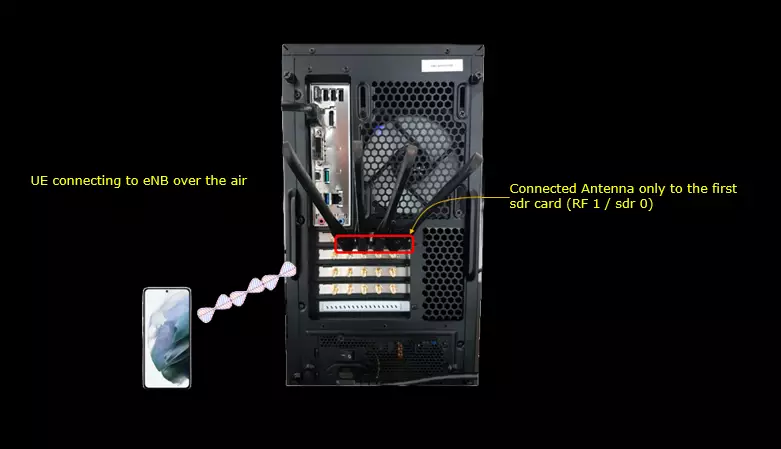
Test setup for this tutorial is as shown below.
- SIM Card used in this tutorial is the one delivered with the system as it is.
- If you want to change the configuration, The tutorial Configuration Guide would help
Key Configuration Parameters
Followings are important configuration parameters for this tutorial. You may click on the items for the descriptions from Amarisoft documents.
Configuration
I used the enb.default.cfg (LTE default configuration) as it is without changing any contents in it.

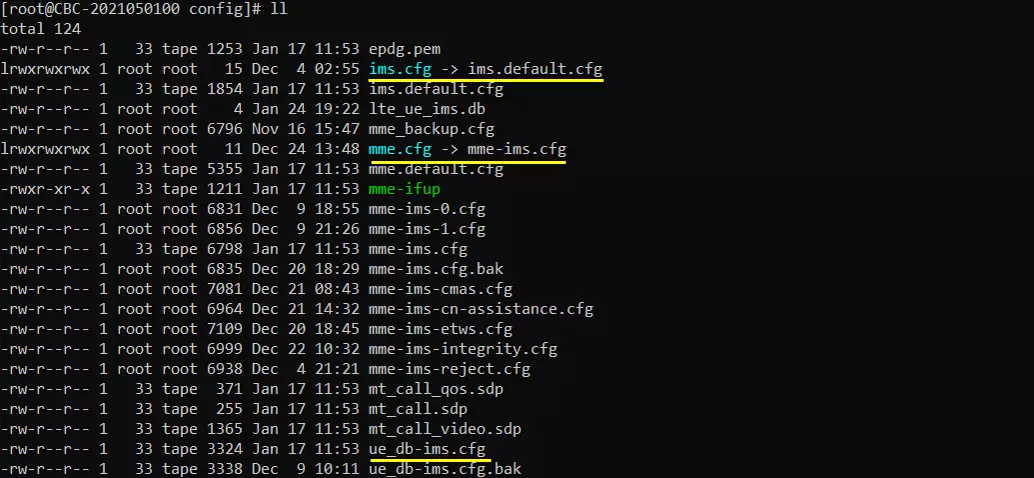
I also used the default configuration for mme (mme-ims.cfg) as shown below. Since this test is to send / receive MMS via IMS, ims.cfg and ue_db-ims.cfg is important configurations. Unless your DUT(UE) requires any specific configuration, the default configuration (i.e, ims.default.cfg and ue_db-ims.cfg) would work.
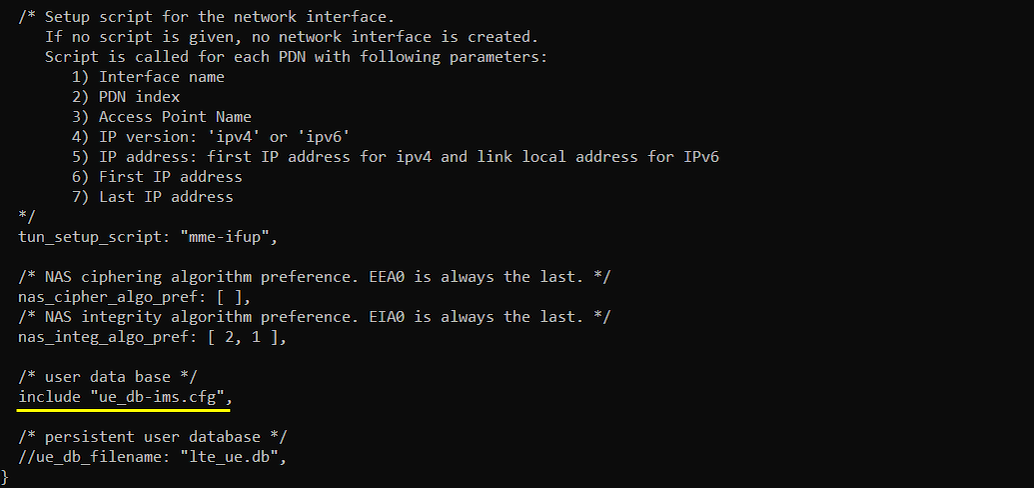
In mme-ims.cfg file, you would notice that ue_db-ims.cfg is used as ue db.
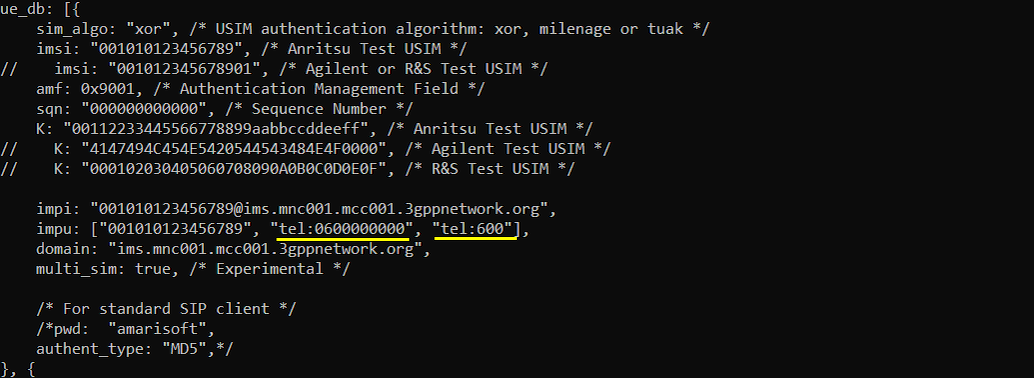
In this tutorial, I am using Anritsu Test USIM. Remember tel number since these will be used for MMS. Remember tel number since these will be used for SMS. If you are using any other test USIM/ISIM, change the parameters accordingly. For SMS test, remember 'tel' numbers specified here since the numbers will be used to send MMS in this test.
Check out mms_server_bind_addr setting in ims.default.cfg and remember this. you should put this ip into MMSC setting on UE side.
I did following configuration on UE side. First make sure that UE has 'ims' APN configured. In most of UE, the 'internet' and 'ims' APN would be configured by default. But for some UE, you may need to manually configure 'ims' APN. In addition, you may need to enable 'VoLTE' option because the UE may not initiate IMS registration if VoLTE is not turned on.
Since MME uses both IMS and Internet, you need to configure the details of both internet APN and ims APN as required for MMS testing.
Lst's look into internet APN first. You may pay attention to Name, APN, MMSC, APN type. Note that MMSC is set to http://192.168.3.1:1111/ (
Now look into ims APN. In this setting as well, You may pay attention to Name, APN, MMSC, APN type. Note that MMSC is set to http://192.168.3.1:1111/ and APN type is set to ims/mms.
Perform the test
You can do both MO(Mobile Originated) SMS and MT(Mobile Terminated) SMS with Amarisoft Callbox.
MO MMS
Start LTE service and check basic cell configuration. Any cell configuration is OK as long as it is LTE cell.

Power On UE and make it sure that UE get registerred.

Make it sure that UE is assigned with IMS pdn.

Following is indicating that UE is registered to IMS server. (

Send MMS from UE and you will get the result as follows. In terms of mobile phone user interface, sending MMS is same as sending SMS. UE internally switch between SMS and MMS based on the content type. In this test, I sent an SMS with a picture. Then UE is using MMS protocol due to the attached picture.
Log Analysis
Enable logging for ENB, MME, IMS to keep track of all the details while MMS is being sent.
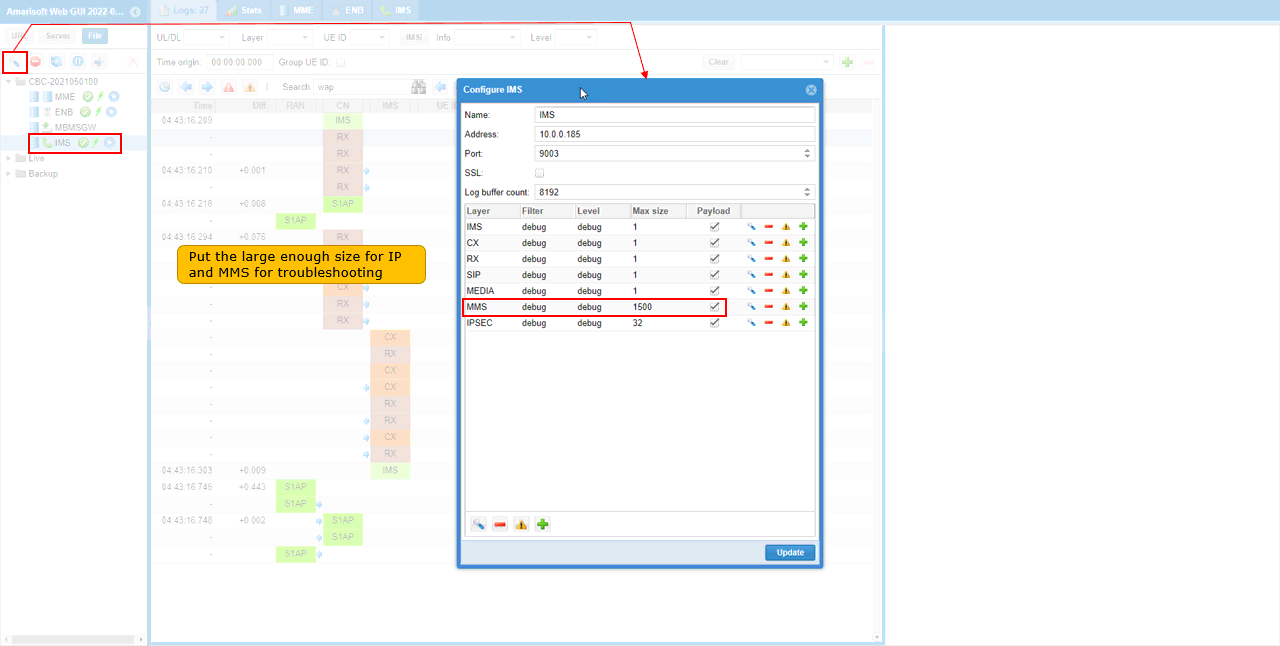
If you want to capture the entire IP packet, increase the Max size of IP and GTPU log in MME log property
In the same logic, increase the packet size of MMS in IMS log property.
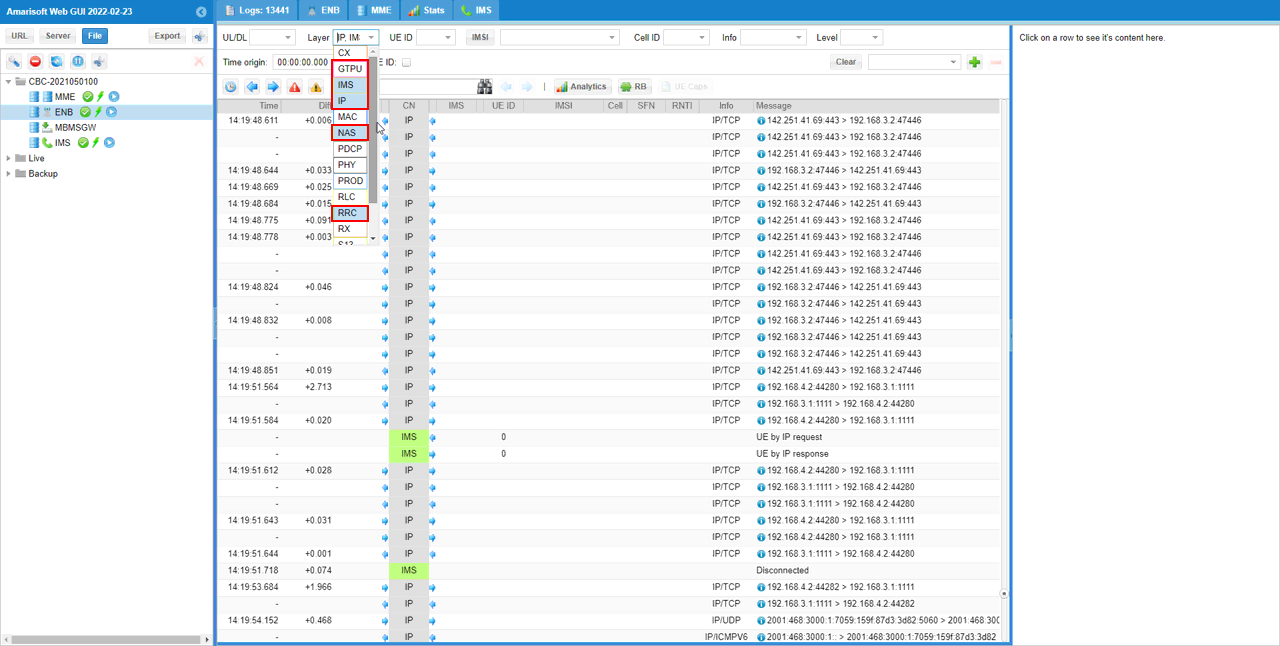
This is not mandatory, but for easy analysis select GTPU,IMS,IP and RRC/NAS for display.
MO MMS
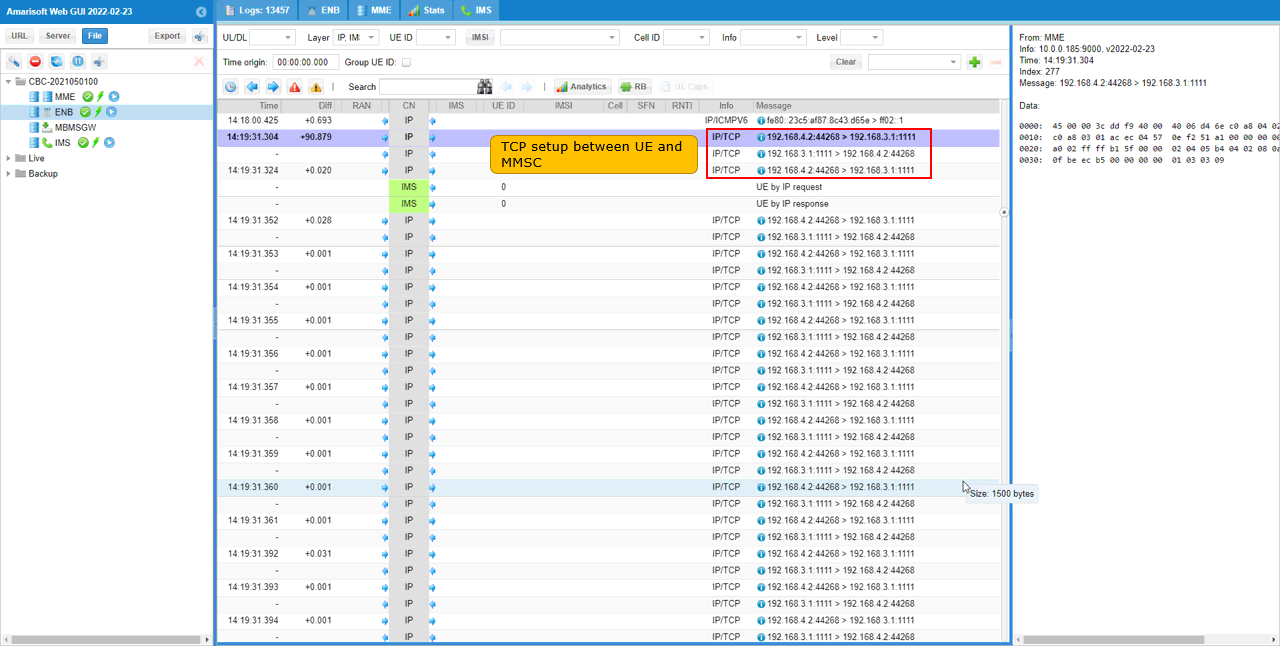
Assuming that UE is ready to send MMS over IMS (i.e, IMS registration is completed), send an MMS and check the log. You see a TCP is setup. This TCP is to post the contents of MMS over IP.
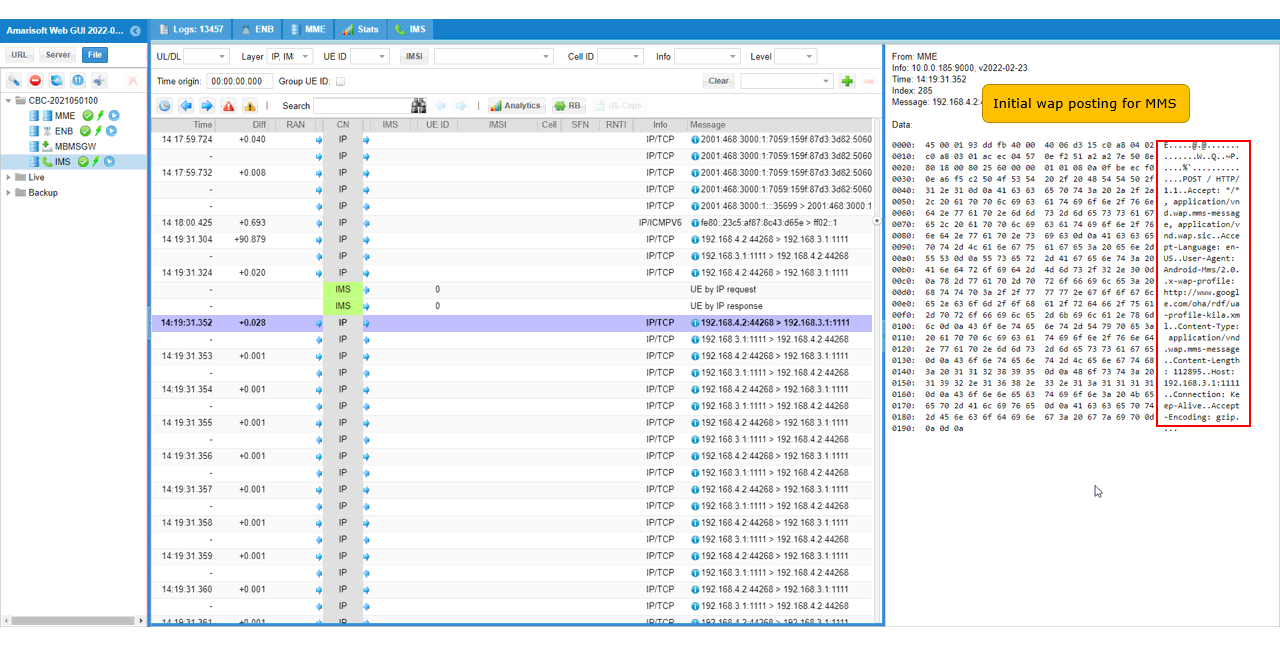
You can confirm the http POST in TCP packet.
Following down the TCP step by step, you can check on further details on MMS Data.
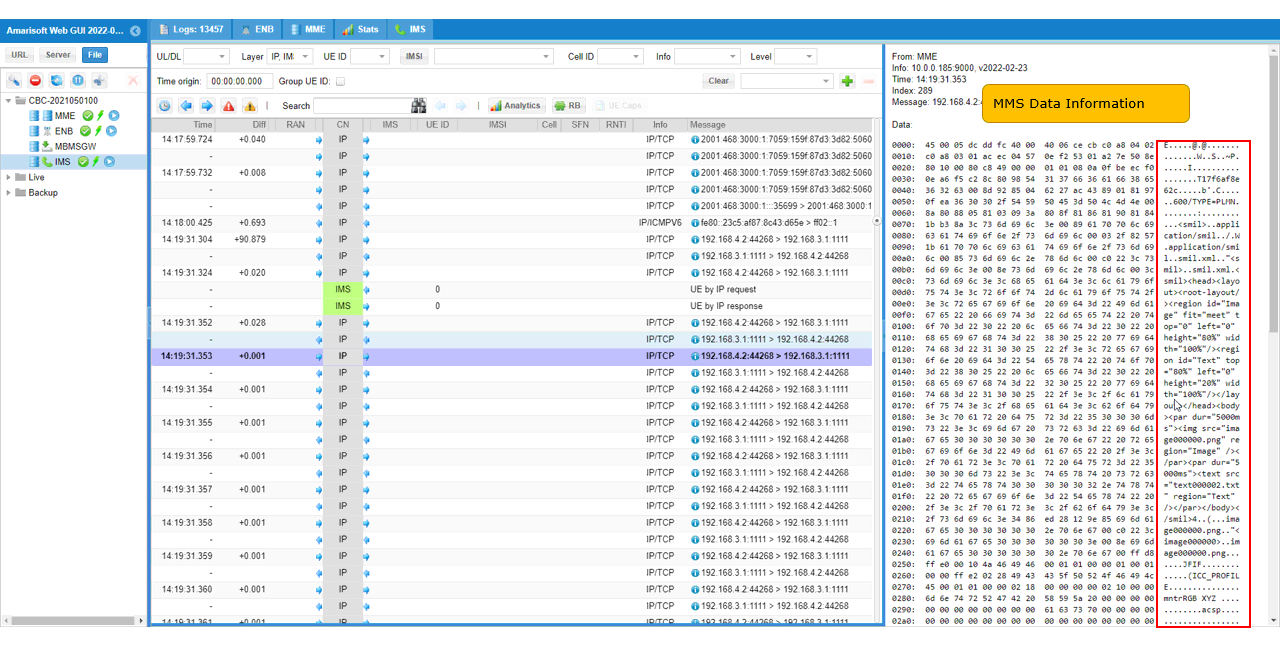
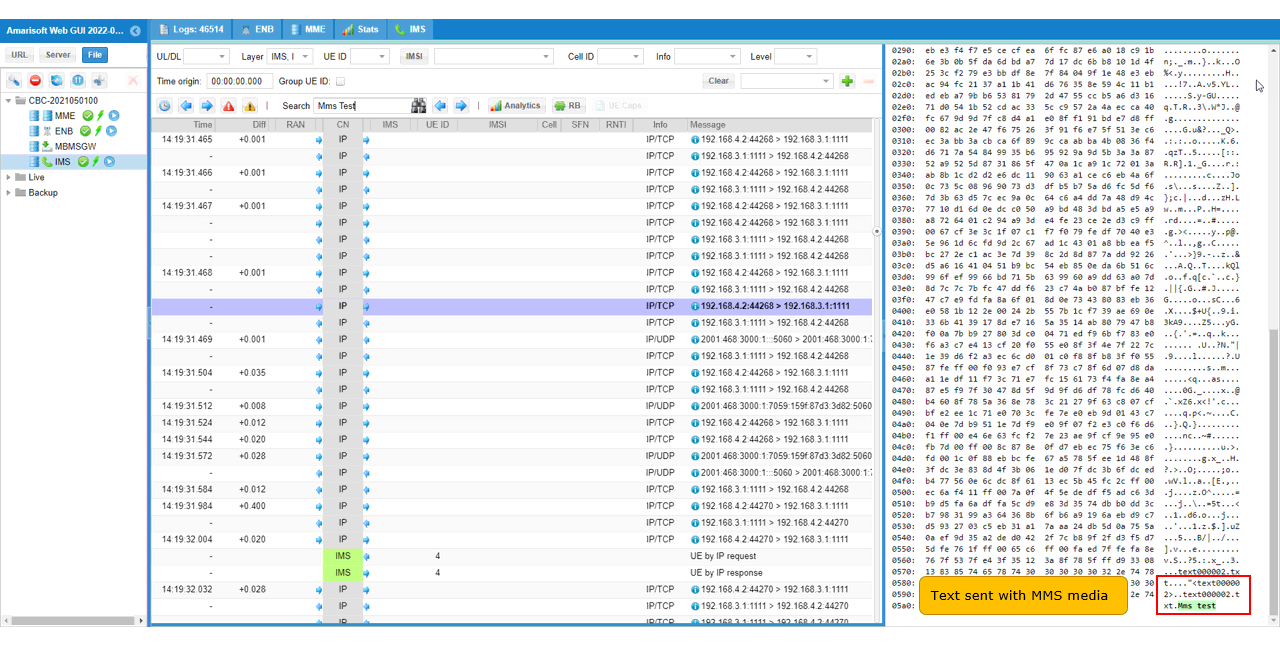
If you go down to the last part of the TCP sequence, you will see the text message that you typed in with the MMS contents.
Tips
Capturing pcap file for MMS
You can capture a pcap file for MMS as follows. (
i) service lte restart
ii) run the command : (you may open up another terminal to run this. You may use a specific interface name like '-i tun1', but this may not capture the MMS traffic if UE IP and MMSC IP is not in the same subnet. so I used '-i any')
# tcpdump -i any /tmp/mms.pcap
iii) perform mms test
iv) Stop tcpdump
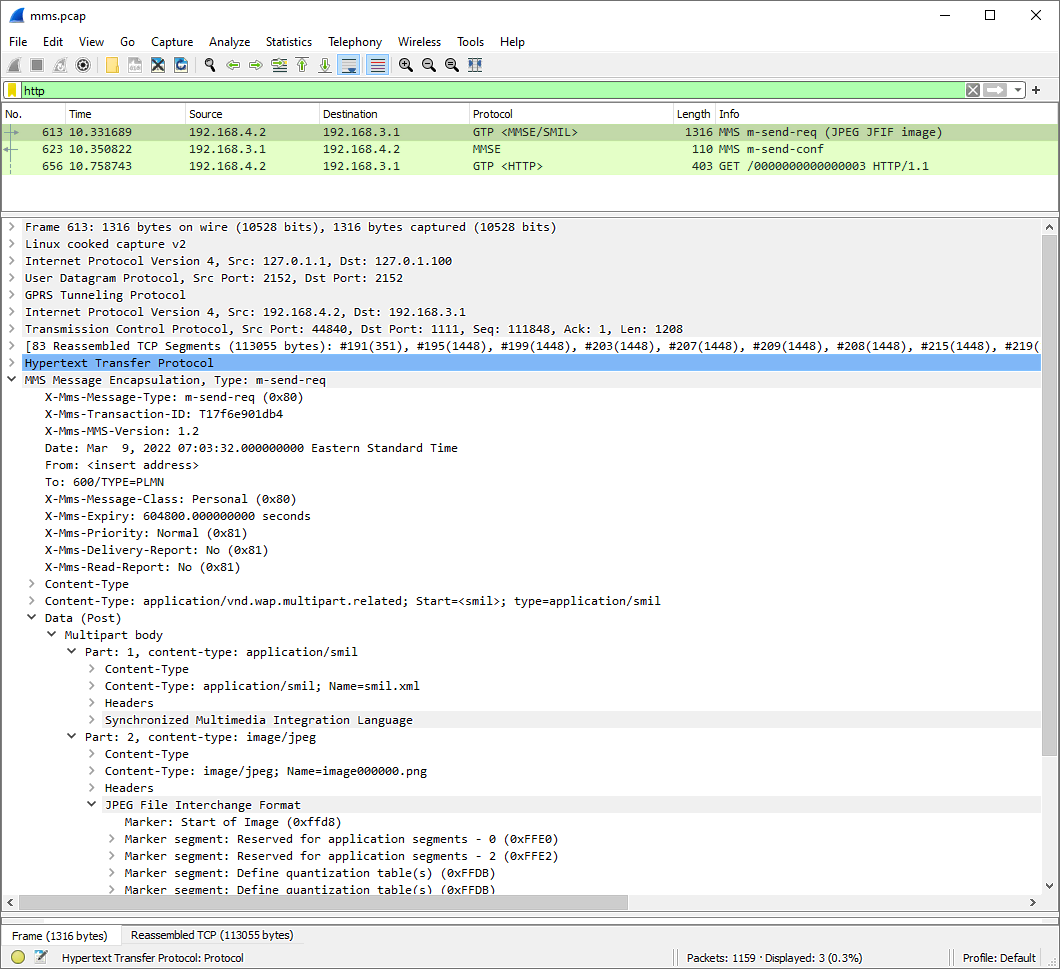
If you open the captured pcap file and filter http traffic only you would see the packets as follows.
